Chapter 24
Leveraging Java Libraries
Java has as many, if not more, third-party libraries than any other modern programming language. The third-party libraries I’m referring to here are the innumerable JAR files that you can include in a server or desktop Java application—the things that the Java SDKs themselves do not provide.
In the case of Android, the Dalvik virtual machine (VM) at its heart is not precisely Java, and what it provides in its SDK is not precisely the same as any traditional Java SDK. That being said, many Java third-party libraries still provide capabilities that Android lacks natively, and therefore may be of use to you in your project (if you can get them to work with Android’s flavor of Java).
This chapter explains what it will take for you to leverage such libraries and the limitations on Android’s support for arbitrary third-party code.
The Outer Limits
Not all available Java code will work well with Android. There are a number of factors to consider, including the following:
- Expected platform APIs: Does the code assume a newer Java Virtual Machine (JVM) than the one Android is based on? Or, does the code assume the existence of Java APIs that ship with Java SE but not with Android, such as Swing?
- Size: Existing Java code designed for use on desktops or servers does not need to be concerned much with on-disk size, or, to some extent, even in-RAM size. Android, of course, is short on both. Using third-party Java code, particularly when prepackaged as JARs, may balloon the size of your application.
- Performance: Does the Java code effectively assume a much more powerful CPU than what you may find on many Android devices? Just because a desktop can run it without issue doesn’t mean your average mobile phone will handle it well.
- Interface: Does the Java code assume a console interface? Or is it a pure API that you can wrap your own interface around?
One trick for addressing some of these concerns is to use open source Java code, and actually work with the code to make it more Android-friendly. For example, if you’re using just 10% of the third-party library, maybe it’s worthwhile to recompile the subset of the project to be only what you need, or at least to remove the unnecessary classes from the JAR. The former approach is safer, in that you get compiler help to make sure you’re not discarding some essential piece of code, although it may be quite tedious to do.
Ants and JARs
You have two choices for integrating third-party code into your project: use source code or use prepackaged JARs.
If you choose to use source code, all you need to do is copy it into your own source tree (under src/ in your project), so it can sit alongside your existing code, and then let the compiler perform its magic.
If you choose to use an existing JAR, perhaps one for which you do not have the source code, you will need to teach your build chain how to use the JAR. First, place the JAR in the libs/ directory in your Android project. Then, if you are using an IDE, you probably need to add the JAR to your build path. (Ant will automatically pick up all JARs found in libs/.)
Following the Script
Unlike other mobile device operating systems, Android has no restrictions on what you can run on it, so long as you can do it in Java using the Dalvik VM. This includes incorporating your own scripting language into your application, something that is expressly prohibited on some other devices.
One possible Java scripting language is BeanShell (http://beanshell.org). BeanShell gives you Java-compatible syntax with implicit typing and no compilation required.
To add BeanShell scripting, you need to put the BeanShell interpreter’s JAR file in your libs/ directory. Unfortunately, the 2.0b4 JAR available for download from the BeanShell site does not work out of the box with the Android 0.9 and newer SDKs (perhaps due to the compiler that was used to build it). Instead, you should probably check out the source code from Subversion and execute ant jarcore to build it, and then copy the resulting JAR (in BeanShell’s dist/ directory) to your own project’s libs/. Or, just use the BeanShell JAR that accompanies the source code for this book, up in the Java/AndShell project.
From there, using BeanShell on Android is no different than using BeanShell in any other Java environment:
- Create an instance of the BeanShell
Interpreterclass. - Set any globals for the script’s use via
Interpreter#set(). - Call
Interpreter#eval()to run the script and, optionally, get the result of the last statement of the script.
For example, here is the XML layout for the world’s smallest BeanShell IDE:
<?xml version="1.0" encoding="utf-8"?>

<LinearLayout xmlns:android="http://schemas.android.com/apk/res/android"

    android:orientation="vertical"

    android:layout_width="fill_parent"

    android:layout_height="fill_parent"

    >

<Button

    android:id="@+id/eval"

    android:layout_width="fill_parent"

    android:layout_height="wrap_content"

    android:text="Go!"

    />

<EditText

    android:id="@+id/script"

    android:layout_width="fill_parent"

    android:layout_height="fill_parent"

    android:singleLine="false"

    android:gravity="top"

    />

</LinearLayout>
Couple that with the following activity implementation:
package com.commonsware.android.andshell;


import android.app.Activity;

import android.app.AlertDialog;

import android.os.Bundle;

import android.view.View;

import android.widget.Button;

import android.widget.EditText;

import android.widget.Toast;

import bsh.Interpreter;


public class MainActivity extends Activity {

private Interpreter i=new Interpreter();
@Override
public void onCreate(Bundle icicle) {
super.onCreate(icicle);
setContentView(R.layout.main);
Button btn=(Button)findViewById(R.id.eval);
final EditText script=(EditText)findViewById(R.id.script);
btn.setOnClickListener(new View.OnClickListener() {
public void onClick(View view) {
String src=script.getText().toString();
try {
i.set("context", MainActivity.this);
i.eval(src);
}
catch (bsh.EvalError e) {
AlertDialog.Builder builder=
new AlertDialog.Builder(MainActivity.this);
builder
.setTitle("Exception!")
.setMessage(e.toString())
.setPositiveButton("OK", null)
.show();
}
}
});
}
}
Compile and run it (including incorporating the BeanShell JAR as mentioned earlier), and install it on the emulator. Fire it up, and you get a trivial IDE, with a large text area for your script and a big Go! button to execute it, as shown in Figure 24–1.
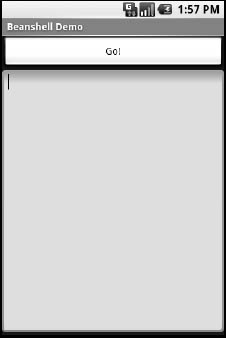
Figure 24–1. The AndShell BeanShell IDE
import android.widget.Toast;


Toast.makeText(context, "Hello, world!", 5000).show();
Note the use of context to refer to the activity when making the Toast. That is the global set by the activity to reference back to itself. You could call this global variable anything you want, as long as the set() call and the script code use the same name.
Click the Go! button, and you get the result shown in Figure 24–2.
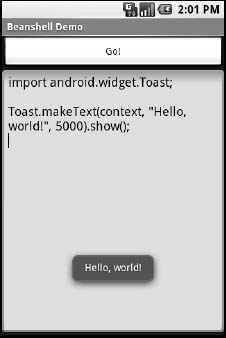
Figure 24–2. The AndShell BeanShell IDE, executing some code
And now, some caveats:
- Not all scripting languages will work. For example, those that implement their own form of just-in-time (JIT) compilation, generating Java bytecodes on the fly, would probably need to be augmented to generate Dalvik VM bytecodes instead of those for stock Java implementations. Simpler languages that execute from parsed scripts, calling Java reflection APIs to call back into compiled classes, will likely work better. Even there, though, not every feature of the language may work, if it relies on some facility in a traditional Java API that does not exist in Dalvik. For example, there could be stuff hidden inside BeanShell or the add-on JARs that does not work on today’s Android.
- Scripting languages without JIT will inevitably be slower than compiled Dalvik applications. Slower may mean users experience sluggishness. Slower definitely means more battery life is consumed for the same amount of work. So, building a whole Android application in BeanShell, simply because you feel it is easier to program in, may cause your users to be unhappy.
- Scripting languages that expose the whole Java API, like BeanShell, can pretty much do anything the underlying Android security model allows. So, if your application has the
READ_CONTACTSpermission, expect any BeanShell scripts your application runs to have the same permission. (Permissions are covered in Chapter 28.) - Last, but certainly not least, is that language interpreter JARs tend to be rather portly. The BeanShell JAR used in this example is 200KB. That is not ridiculous, considering what it does, but it will make applications that use BeanShell that much bigger to download, take up that much more space on the device, and so on.
...And Not a Drop to Drink
As noted earlier, not all Java code will work on Android and Dalvik. Here are some examples:
- If the Java code assumes it runs on Java SE, Java ME, or Java EE, it may be missing some APIs that Android does not provide. For example, some charting libraries assume the existence of Swing or AWT drawing primitives, which are generally unavailable on Android.
- The Java code might have a dependency on other Java code that, in turn, might have problems running on Android. For example, you might want to use a JAR that relies on an earlier (or newer) version of the Apache HttpComponents than the one that is bundled with Android.
- The Java code may use language capabilities beyond what the Dalvik engine is capable of using.
In all these cases, if you have a compiled JAR to work with, you may not encounter problems at compile time, but only when running the application. Hence, where possible, it is best to use open source code with Android, so you can build the third-party code alongside your own and find out about difficulties sooner.
Reviewing the Script
Since this chapter covers scripting in Android, you may be interested to know that you have options beyond embedding BeanShell directly in your project.
Some experiments have been conducted with other JVM-based programming languages, such as JRuby and Jython. At present, their support for Android is incomplete, but progress is being made.
Additionally, the Android Scripting Environment (ASE), available from the Android Market, allows you to write scripts in Python and Lua, to go along with BeanShell. These scripts are not full-fledged applications and, at the time of this writing, are not really distributable to others. Also note that ASE is not precisely designed to extend other applications, though it can be used that way. But if you want to do on-device programming, ASE is probably the best answer. For more information about ASE, see its project page at http://code.google.com/p/android-scripting/.