
Chapter 2
Projects and Targets
After you have downloaded and installed the latest Android Software Development Kit (SDK), and perhaps the Android Developer Tools (ADT) plugin for Eclipse (both available from the Android Developers web site), you're ready to get started. This chapter covers what is involved in building an Android application.
Pieces and Parts
To create an Android application, you will need to create a corresponding Android project. This could be an Eclipse project, if you are using Eclipse for Android development. The project will hold all of your source code, resources (e.g., internationalized strings), third-party JARs, and related materials. The Android build tools—whether Eclipse-integrated or stand-alone—will turn the contents of your project into an Android package (APK) file, which is the Android application. Those tools will also help you get your APK file onto an Android emulator or an actual Android device for testing purposes.
One key element of a project is the manifest (AndroidManifest.xml). This file contains the “table of contents” for your application, listing all of the major application components, permissions, and so on. The manifest is used by Android at runtime to tie your application into the operating system. The manifest contents are also used by the Android Market (and perhaps other independent “app stores”), so applications that need Android 2.0 will not be presented to people with Android 1.5 devices, for example.
To test your application with the emulator, you will need to create an Android Virtual Device, or AVD. Most likely, you will create several of these, as each AVD emulates an Android device with a particular set of hardware. You might have AVDs for different screen sizes, Android versions, and so on.
When creating projects and creating AVDs, you will need to indicate to Android the API level with which you are working. The API level is a simple integer that maps to an Android version; for example, API level 3 means Android 1.5. When creating a project, you will be able to tell Android the minimum and maximum API levels your application supports. When creating an AVD, you will tell Android which API level the AVD should emulate, so you can see how your application runs on various (fake) devices implementing different versions of Android.
All of these concepts are described in greater detail in this chapter.
Creating a Project
To create a project from the command line, for use with the command-line build tools (e.g., ant), you will need to run the android create project command. This command takes a number of switches to indicate the Java package in which the application's code will reside, the API level the application is targeting, and so on. The result of running this command will be a directory containing all of the files necessary to build a “Hello, World!” Android application.
Here is an example of running android create project:
android create project --target 2 --path ./FirstApp --activity FirstApp --package

apt.tutorial
If you intend to develop for Android using Eclipse, rather than android create project, you will use the Eclipse new-project wizard to create a new Android application.
NOTE: The source code that accompanies this book was set up to be built using the command-line build tools. If you prefer to use Eclipse, you can create empty Eclipse Android projects and import the code into those projects.
Project Structure
The Android build system is organized around a specific directory tree structure for your Android project, much like any other Java project. The specifics, though, are fairly unique to Android. Here's a quick primer on the project structure, to help you make sense of it all, particularly for the sample code referenced in this book.
Root Contents
When you create a new Android project (e.g., via android create project), you get several items in the project's root directory, including the following:
AndroidManifest.xml: An XML file describing the application being built and which components—activities, services, and so on—are being supplied by that application.build.xml: An Ant script for compiling the application and installing it on the device.default.propertiesandlocal.properties: Property files used by the Ant build script.assets/: A folder that holds other static files you wish packaged with the application for deployment onto the device.bin/: A folder that holds the application once it is compiled.gen/: Where Android's build tools will place source code that they generate.libs/: A folder that holds any third-party JARs your application requires.src/: A folder that holds the Java source code for the application.res/: A folder that holds resources—such as icons, graphic user interface (GUI) layouts, and the like—that are packaged with the compiled Java in the application.tests/: A folder that holds an entirely separate Android project used for testing the one you created.
The Sweat Off Your Brow
When you create an Android project (e.g., via android create project), you supply the fully qualified class name of the main activity for the application (e.g., com.commonsware.android.SomeDemo). You will then find that your project's src/ tree already has the namespace directory tree in place, plus a stub Activity subclass representing your main activity (e.g., src/com/commonsware/android/SomeDemo.java). You are welcome to modify this file and add others to the src/ tree as needed to implement your application.
The first time you compile the project (e.g., via ant), out in the main activity's namespace directory, the Android build chain will create R.java. This contains a number of constants tied to the various resources you placed in the res/ directory tree. Throughout this book, you will see that many of the examples reference things in R.java (e.g., referring to a layout's identifier via R.layout.main).
NOTE: You should not modify R.java yourself, but instead let the Android tools handle this for you.
And Now, the Rest of the Story
The res/ directory tree holds resources—static files that are packaged along with your application, either in their original form or, occasionally, in a preprocessed form. These are some of the subdirectories you will find or create under res/:
res/drawable/: For images (PNG, JPEG, etc.).res/layout/: For XML-based UI layout specifications.res/menu/: For XML-based menu specifications.res/raw/: For general-purpose files (e.g., a CSV file of account information).res/values/: For strings, dimensions, and the like.res/xml/: For other general-purpose XML files you wish to ship.
All of these, as well as other resources, are covered in this book.
What You Get Out of It
When you compile your project (via ant or the IDE), the results go into the bin/ directory under your project root, as follows:
bin/classes/: Holds the compiled Java classes.bin/classes.dex: Holds the executable created from those compiled Java classes.bin/yourapp.ap_: Holds your application's resources, packaged as a ZIP file (whereyourappis the name of your application).bin/yourapp-debug.apkorbin/yourapp-unsigned.apk: The actual Android application (whereyourappis the name of your application).
The .apk file is a ZIP archive containing the .dex file, the compiled edition of your resources (resources.arsc), any uncompiled resources (such as what you put in res/raw/), and the AndroidManifest.xml file. It is also digitally signed, with the -debug portion of the filename indicating it has been signed using a debug key that works with the emulator, or -unsigned indicating that you built your application for release (ant release), but the APK still needs to be signed using jarsigner and an official key.
Inside the Manifest
The foundation for any Android application is the manifest file, AndroidManifest.xml in the root of your project. Here is where you declare what is inside your application—the activities, the services, and so on. You also indicate how these pieces attach themselves to the overall Android system; for example, you indicate which activity (or activities) should appear on the device's main menu (a.k.a. the launcher).
When you create your application, a starter manifest will be generated for you automatically. For a simple application, offering a single activity and nothing else, the autogenerated manifest will probably work out fine, or perhaps require a few minor modifications. On the other end of the spectrum, the manifest file for the Android API demo suite is more than 1,000 lines long. Your production Android applications will probably fall somewhere in the middle.
Most of the interesting bits of the manifest will be described in greater detail in the chapters on their associated Android features. For example, the service element will be described in greater detail in Chapter 29, which covers creating services. For now, you just need to understand the role of the manifest and its general overall construction.
In the Beginning, There Was the Root, And It Was Good
The root of all manifest files is, not surprisingly, a manifest element:
<manifest xmlns:android="http://schemas.android.com/apk/res/android"

  package="com.commonsware.android.search">

...

</manifest>
Note the namespace declaration. Curiously, the generated manifests apply it only on the attributes, not the elements (e.g., it's manifest, not android:manifest). Since this pattern works, unless Android changes, you should stick with it.
The biggest piece of information you need to supply on the manifest element is the package attribute (also curiously not namespaced). Here, you can provide the name of the Java package that will be considered the “base” of your application. Then, everywhere else in the manifest file that needs a class name, you can just substitute a leading dot as shorthand for the package. For example, if you needed to refer to com.commonsware.android.search.Snicklefritz in this preceding manifest, you could just use .Snicklefritz, since com.commonsware.android.search is defined as the application's package.
Permissions, Instrumentations, and Applications (Oh My!)
Underneath the manifest element, you may find the following:
uses-permissionelements: Indicate the permissions your application will need in order to function properly.permissionelements: Declare permissions that activities or services might require other applications to hold in order to use your application's data or logic.instrumentationelements: Indicate code that should be invoked on key system events, such as starting up activities, for the purposes of logging or monitoring.uses-libraryelements: Hook in optional Android components, such as mapping services.uses-sdkelement: Indicates for which version of the Android SDK the application was built.applicationelement: Defines the guts of the application that the manifest describes.
Here's an example:
<manifest xmlns:android="http://schemas.android.com/apk/res/android"

  package="com.commonsware.android">

  <uses-permission

    android:name="android.permission.ACCESS_LOCATION" />

  <uses-permission

    android:name="android.permission.ACCESS_GPS" />

  <uses-permission

    android:name="android.permission.ACCESS_ASSISTED_GPS" />

  <uses-permission

    android:name="android.permission.ACCESS_CELL_ID" />

  <application>

...

  </application>

</manifest>
In this example, the manifest has uses-permission elements to indicate some device capabilities the application will need—in this case, permissions to allow the application to determine its current location. The contents of the application element will describe the activities, services, and whatnot that make up the bulk of the application itself.
Permissions will be covered in greater detail in Chapter 28.
Your Application Does Something, Right?
The children of the application element represent the core of the manifest file.
By default, when you create a new Android project, you get a single activity element:
<manifest xmlns:android="http://schemas.android.com/apk/res/android"

    package="com.commonsware.android.skeleton">

    <application>

        <activity android:name=".Now" android:label="Now">

            <intent-filter>

                <action android:name="android.intent.action.MAIN" />

                <category android:name="android.intent.category.LAUNCHER" />

            </intent-filter>

        </activity>

    </application>

</manifest>
This element supplies android:name for the class implementing the activity, android:label for the display name of the activity, and (frequently) an intent-filter child element describing under which conditions this activity will be displayed. The stock activity element sets up your activity to appear in the launcher, so users can choose to run it. As you'll see later in this book, you can have several activities in one project, if you so choose.
You may have one or more provider elements, indicating content providers, which are the components that supply data to your activities and, with your permission, other activities in other applications on the device. These wrap up databases or other data stores into a single API that any application can use. Later, you'll see how to create content providers and how to use content providers that you or others create.
Finally, you may have one or more service elements, describing services, which are long-running pieces of code that can operate independently of any activity. The quintessential example is the MP3 player, where you want the music to keep playing even if the user pops open other activities and the MP3 player's user interface is “misplaced.” Chapters 29 and 30 cover how to create and use services.
Achieving the Minimum
Android, like most operating systems, goes through various revisions, versions, and changes. Some of these affect the Android SDK, meaning there are new classes, methods, or parameters you can use that you could not in previous versions of the SDK.
If you want to ensure your application is run only on devices that have a certain version (or higher) of the Android environment, you will add a uses-sdk element, as a child of the root <manifest> element in your AndroidManifest.xml file. The <uses-sdk> element has one attribute, minSdkVersion, indicating which SDK version your application requires:
<manifest xmlns:android="http://schemas.android.com/apk/res/android"

  package="com.commonsware.android.search">

  <uses-sdk minSdkVersion="2" />

  ...

</manifest>
At the time of this writing, there are five possible minSdkVersion values:
1: Android 1.0 SDK2: Android 1.1 SDK3: Android 1.5 SDK4: Android 1.6 SDK5: Android 2.0 SDK
If you omit the <uses-sdk> element, your application will behave as though minSdkVersion is set to 1.
CAUTION: The Android Market seems to insist that you specifically state your minSdkVersion, so be certain to have a proper <uses-sdk> element if you are going to distribute via that channel.
If you set <uses-sdk>, the application will install only on compatible devices. You do not need to specify the latest SDK, but if you choose an older one, it is up to you to ensure your application works on every SDK version you claim is compatible. For example, if you leave out <uses-sdk>, in effect, you are stipulating that your application works on every Android SDK version ever released, and you will need to test your application to determine if this is indeed the case.
Also note that a bug in the Android Market means you should make the <uses-sdk> element be the first child of your <manifest> element.
Version=Control
Particularly if you are going to distribute your application, via the Android Market or other means, you probably should add a pair of other attributes to the root <manifest> element: android:versionCode and android:versionName. These assist in the process of upgrading applications.
The android:versionName attribute is some human-readable label for the version name or number of your application. So, you can use “3.0” or “System V” or “5000” or “3.1” as you see fit.
The android:versionCode attribute is a pure integer indication of the version of the application. This is used by the system to determine if one version of your application is newer than another. Newer is defined as “has a higher android:versionCode value.” Whether you attempt to convert your actual version (as found in android:versionName) to a number or simply increment this value by one for each release is up to you.
Emulators and Targets
Let's take a moment to discuss the notion of targets in Android, since they can be a bit confusing. Targets are important for your long-term application development, particularly when you use the Android emulator for testing your applications.
Virtually There
To use the emulator, you will need to create one or more AVDs. These virtual devices are designed to mimic real Android devices like the T-Mobile G1 or the HTC Magic. You tell the emulator which AVD to use, and the emulator will pretend it is the device described by that AVD.
When you create an AVD, you need to specify a target. The target indicates which class of device the AVD will pretend to be. At the time of this writing, there are five targets:
1: An Android 1.1 device, such as a nonupgraded T-Mobile G1.2: An Android 1.5 device that lacks Google Maps support. This is what you might get from a home-brew port of Android onto a device.3: An Android 1.5 device that has Google Maps support.4: An Android 1.6 device that has Google Maps support.5: An Android 2.0 device that has Google Maps support.
If you are building applications that may use Google Maps, you will want to use an AVD that has a target of 3 or higher.
You can create as many AVDs as you need and for which you have disk space. Each AVD behaves as a totally distinct device, so installing your app on one AVD does not affect any other AVDs that you have created.
AVDs can be created through the android create avd command, via Eclipse, or via the AVD Manager, a GUI added in Android 1.6. To use the AVD Manager, simply run the android command without any arguments. As shown in Figure 2-1, you will be presented with a list of prebuilt AVDs, New and Delete buttons to add and remove AVDs, a Start button to launch an emulator using a selected AVD, and so on.
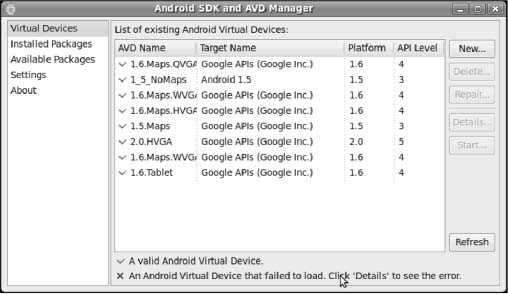
Figure 2-1. The AVD Manager GUI, showing a list of available AVDs
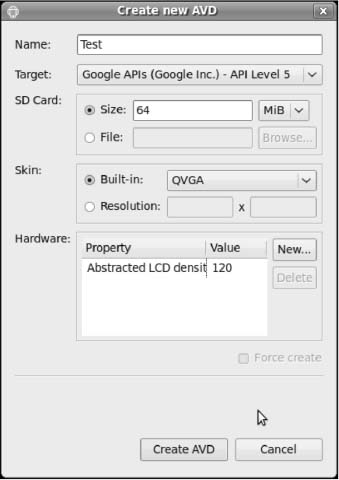
When you add an AVD through the GUI (via the New button in the main window), you will be prompted for a name, target API/Google Maps combination, details about an SD card image, and the size of screen you wish to emulate (called the skin). Figure 2-2 shows the Create New AVD dialog box.
Aiming at a Target
When you create a new project (via android create project or Eclipse), you will need to indicate which class of device this project targets. The same values shown in the previous section apply. For example, creating a project with a target of 3 indicates Android 1.5. Your resulting application will not install on devices that do not meet the specified target.
Here are some rules of thumb for dealing with targets:
- Ask for only what you really need. If you are sticking with Android 1.5 APIs, you may as well ask to build with Android 1.5 APIs and maximize the number of devices on which your program can run.
- Test on as many targets as you can and that are possible. For example, you may be tempted to target
1, to reach the maximum possible range of Android devices. That is fine, but you will need to test on a target1AVD, and a target2AVD, and so on. - Check out the new target levels with each Android release. There should be a new values with every Android point-release update (e.g., 2.0 or 1.6), and possibly even for SDK patch levels (e.g., 1.5r1 versus 1.5r2). Be sure to test your application on those new targets whenever you can, as some people may start getting devices with the new Android release soon.
- Testing on AVDs, regardless of target, is no substitute for testing on hardware. AVDs are designed to give you disposable environments that let you test a wide range of environments, even those that may not yet exist in hardware. However, you really need to test your application on at least one actual Android device. If nothing else, the speed of your emulator may not match the speed of the device; the emulator may be faster or slower depending on your system.