
Chapter 21
Using Preferences
Android has many different ways for you to store data for long-term use by your activity. The simplest to use is the preferences system, which is the topic of this chapter.
Android allows activities and applications to keep preferences, in the form of key/value pairs (akin to a Map), which will hang around between invocations of an activity. As the name suggests, the primary purpose is for you to store user-specified configuration details, such as the last feed the user looked at in your feed reader, the sort order to use by default on a list, or whatever. Of course, you can store in the preferences whatever you like, as long as it is keyed by a String and has a primitive value (boolean, String, etc.)
Preferences can be for a single activity or shared among all activities in an application. (Eventually, preferences might be shareable across applications, but that is not supported as of the time of this writing.)
Getting What You Want
To get access to the preferences, you can use the following APIs:
getPreferences()from within yourActivity, to access activity-specific preferencesgetSharedPreferences()from within yourActivity(or other applicationContext), to access application-level preferencesgetDefaultSharedPreferences(), onPreferencesManager, to get the shared preferences that work in concert with Android's overall preference framework
The first two take a security mode parameter; for now, pass in 0. The getSharedPreferences() method also takes a name of a set of preferences. getPreferences() effectively calls getSharedPreferences() with the activity's class name as the preference set name. The getDefaultSharedPreferences() method takes the Context for the preferences (e.g., your Activity).
All of these methods return an instance of SharedPreferences, which offers a series of getters to access named preferences, returning a suitably typed result (e.g., getBoolean() to return a Boolean preference). The getters also take a default value, which is returned if there is no preference set under the specified key.
Stating Your Preference
Given the appropriate SharedPreferences object, you can use edit() to get an editor for the preferences. This object has a set of setters that mirror the getters on the parent SharedPreferences object. It also has the following methods:
remove():Deletes a single named preference.clear(): Deletes all preferences.commit(): Persists your changes made via the editor.
The commit() method is important. If you modify preferences via the editor and fail to commit() the changes, those changes will evaporate once the editor goes out of scope.
Conversely, since the preferences object supports live changes, if one part of your application (say, an activity) modifies shared preferences, another part of your application (say, a service) will have access to the changed value immediately.
And Now, a Word from Our Framework
Beginning with the 0.9 SDK, Android has introduced a framework for managing preferences. Ironically, this framework does not change anything shown so far. Instead, the framework is more for presenting a consistent set of preference-setting options for users, so different applications do not need to reinvent the wheel.
The linchpin to the preferences framework is yet another XML data structure. You can describe your application's preferences in an XML file stored in your project's res/xml/ directory. Given that, Android can present a pleasant UI for manipulating those preferences, which are then stored in the SharedPreferences you get back from getDefaultSharedPreferences().
The following is the preference XML for the Prefs/Simple preferences sample project:
<PreferenceScreen

  xmlns:android="http://schemas.android.com/apk/res/android">

  <CheckBoxPreference

    android:key="checkbox"

    android:title="Checkbox Preference"

    android:summary="Check it on, check it off" />

  <RingtonePreference

    android:key="ringtone"

    android:title="Ringtone Preference"

    android:showDefault="true"

    android:showSilent="true"
    android:summary="Pick a tone, any tone" />

</PreferenceScreen>
The root of the preference XML is a PreferenceScreen element. You will see why it is named that later in this chapter. For now, take it on faith that it is a sensible name.
Some of the things you can have inside a PreferenceScreen element, not surprisingly, are preference definitions. These are subclasses of Preference, such as CheckBoxPreference or RingtonePreference, as shown in the preceding XML. As you might expect, these allow you to check a check box or choose a ringtone, respectively. In the case of RingtonePreference, you have the option of allowing users to choose the system default ringtone or to choose “silence” as a ringtone.
Letting Users Have Their Say
Given that you have set up the preference XML, you can use a nearly built-in activity for allowing your users to set their preferences. The activity is “nearly built-in” because you merely need to subclass it and point it to your preference XML, plus hook the activity into the rest of your application.
For example, here is the EditPreferences activity of the Prefs/Simple project:
package com.commonsware.android.simple;


import android.app.Activity;

import android.os.Bundle;

import android.preference.PreferenceActivity;


public class EditPreferences extends PreferenceActivity {

  @Override

  public void onCreate(Bundle savedInstanceState) {

    super.onCreate(savedInstanceState);


    addPreferencesFromResource(R.xml.preferences);

  }

}
As you can see, there is not much to see. All you need to do is call addPreferencesFromResource() and specify the XML resource containing your preferences.
You will also need to add this as an activity to your AndroidManifest.xml file:
<?xml version="1.0" encoding="utf-8"?>

<manifest xmlns:android="http://schemas.android.com/apk/res/android"

    package="com.commonsware.android.simple">

    <application android:label="@string/app_name"

        android:icon="@drawable/cw">

        <activity

            android:name=".SimplePrefsDemo"

            android:label="@string/app_name">

            <intent-filter>

                <action android:name="android.intent.action.MAIN" />
                <category android:name="android.intent.category.LAUNCHER" />

            </intent-filter>

        </activity>

        <activity

            android:name=".EditPreferences"

            android:label="@string/app_name">

        </activity>

    </application>

</manifest>
And you will need to arrange to invoke the activity, such as from a menu option, here pulled from SimplePrefsDemo:
public boolean onCreateOptionsMenu(Menu menu) {

    menu.add(Menu.NONE, EDIT_ID, Menu.NONE, "Edit Prefs")

        .setIcon(R.drawable.misc)

        .setAlphabeticShortcut('e'),


    return(super.onCreateOptionsMenu(menu));

  }


  @Override

  public boolean onOptionsItemSelected(MenuItem item) {

    switch (item.getItemId()) {

      case EDIT_ID:

        startActivity(new Intent(this, EditPreferences.class));

        return(true);

    }


    return(super.onOptionsItemSelected(item));

  }

}
That is all that is required, and it really is not that much code outside the preferences XML. What you get for your effort is an Android-supplied preference UI, as shown in Figure 21–1.
The check box can be directly checked or unchecked. To change the ringtone preference, just select the entry in the preference list to bring up a selection dialog, as shown in Figure 21–2.
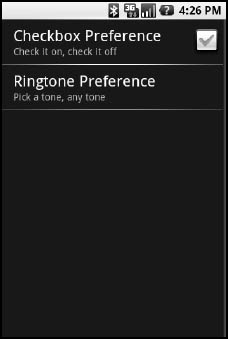
Figure 21–1. The Simple project's preference UI
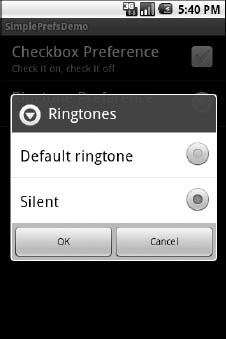
Figure 21–2. Choosing a ringtone preference
Notice that there is no explicit save or commit button or menu. Any changes are persisted as soon as they are made.
The SimplePrefsDemo activity, beyond having the aforementioned menu, also displays the current preferences via a TableLayout:
<?xml version="1.0" encoding="utf-8"?>

<TableLayout

  xmlns:android="http://schemas.android.com/apk/res/android"

  android:layout_width="fill_parent"

  android:layout_height="fill_parent"

>

  <TableRow>

    <TextView

        android:text="Checkbox:"

        android:paddingRight="5px"

    />

    <TextView android:id="@+id/checkbox"

    />

  </TableRow>

  <TableRow>

    <TextView

        android:text="Ringtone:"

        android:paddingRight="5px"

    />

    <TextView android:id="@+id/ringtone"

    />

  </TableRow>

</TableLayout>
The fields for the table are found in onCreate():
public void onCreate(Bundle savedInstanceState) {

  super.onCreate(savedInstanceState);

  setContentView(R.layout.main);


  checkbox=(TextView)findViewById(R.id.checkbox);

  ringtone=(TextView)findViewById(R.id.ringtone);

}
The fields are updated on each onResume():
public void onResume() {

  super.onResume();


  SharedPreferences prefs=PreferenceManager

                           .getDefaultSharedPreferences(this);


  checkbox.setText(new Boolean(prefs

                               .getBoolean("checkbox", false))

                     .toString());

  ringtone.setText(prefs.getString("ringtone", "<unset>"));

}
This means that the fields will be updated when the activity is opened and after the preferences activity is left (e.g., via the back button), as shown in Figure 21–3.
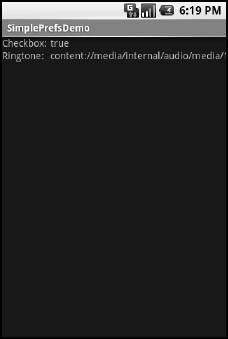
Figure 21–3. The Simple project's list of saved preferences
Adding a Wee Bit o' Structure
If you have a lot of preferences for users to set, putting them all in one big list may not be the best idea. Android's preference framework gives you a few ways to impose a bit of structure on your bag of preferences, including categories and screens.
Categories are added via a PreferenceCategory element in your preference XML and are used to group together related preferences. Rather than have your preferences all as children of the root PreferenceScreen, you can place a few PreferenceCategory elements in the PreferenceScreen, and then put your preferences in their appropriate categories. Visually, this adds a divider with the category title between groups of preferences.
If you have a whole lot of preferences—more than are convenient for users to scroll through—you can also put them on separate “screens” by introducing the PreferenceScreen element. Yes, that PreferenceScreen element.
Any children of PreferenceScreen go on their own screen. If you nest PreferenceScreens, the parent screen displays the screen as a placeholder entry, and tapping that entry brings up the child screen.
For example, from the Prefs/Structured sample project, here is a preference XML file that contains both PreferenceCategory and nested PreferenceScreen elements:
<PreferenceScreen

  xmlns:android="http://schemas.android.com/apk/res/android">

  <PreferenceCategory android:title="Simple Preferences">

    <CheckBoxPreference

      android:key="checkbox"
      android:title="Checkbox Preference"

      android:summary="Check it on, check it off"

    />

    <RingtonePreference

      android:key="ringtone"

      android:title="Ringtone Preference"

      android:showDefault="true"

      android:showSilent="true"

      android:summary="Pick a tone, any tone"

    />

  </PreferenceCategory>

  <PreferenceCategory android:title="Detail Screens">

    <PreferenceScreen

      android:key="detail"

      android:title="Detail Screen"

      android:summary="Additional preferences held in another page">

      <CheckBoxPreference

        android:key="checkbox2"

        android:title="Another Checkbox"

        android:summary="On. Off. It really doesn't matter."

      />

    </PreferenceScreen>

  </PreferenceCategory>

</PreferenceScreen>
The result, when you use this preference XML with your PreferenceActivity implementation, is a categorized list of elements, as shown in Figure 21–4.
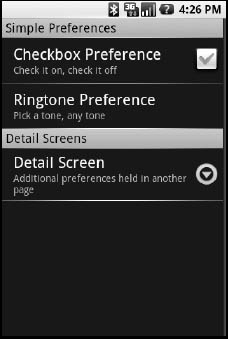
Figure 21–4. The Structured project's preference UI, showing categories and a screen placeholder
If you tap the Detail Screen entry, you are taken to the child preference screen, as shown in Figure 21–5.
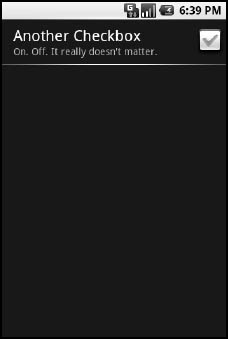
Figure 21–5. The child preference screen of the Structured project's preference UI
The Kind of Pop-Ups You Like
Of course, not all preferences are check boxes and ringtones. For others, like entry fields and lists, Android uses pop-up dialogs. Users do not enter their preference directly in the preference UI activity, but rather tap a preference, fill in a value, and click OK to commit the change.
Structurally, in the preference XML, fields and lists are not significantly different from other preference types, as seen in this preference XML from the Prefs/Dialogs sample project:
<PreferenceScreen

  xmlns:android="http://schemas.android.com/apk/res/android">

  <PreferenceCategory android:title="Simple Preferences">

    <CheckBoxPreference

      android:key="checkbox"

      android:title="Checkbox Preference"

      android:summary="Check it on, check it off"

    />

    <RingtonePreference

      android:key="ringtone"

      android:title="Ringtone Preference"

      android:showDefault="true"

      android:showSilent="true"

      android:summary="Pick a tone, any tone"

    />

  </PreferenceCategory>

  <PreferenceCategory android:title="Detail Screens">

    <PreferenceScreen

      android:key="detail"

      android:title="Detail Screen"
      android:summary="Additional preferences held in another page">

      <CheckBoxPreference

        android:key="checkbox2"

        android:title="Another Checkbox"

        android:summary="On. Off. It really doesn't matter."

      />

    </PreferenceScreen>

  </PreferenceCategory>

  <PreferenceCategory android:title="Simple Preferences">

    <EditTextPreference

      android:key="text"

      android:title="Text Entry Dialog"

      android:summary="Click to pop up a field for entry"

      android:dialogTitle="Enter something useful"

    />

    <ListPreference

      android:key="list"

      android:title="Selection Dialog"

      android:summary="Click to pop up a list to choose from"

      android:entries="@array/cities"

      android:entryValues="@array/airport_codes"

      android:dialogTitle="Choose a Pennsylvania city" />

  </PreferenceCategory>

</PreferenceScreen>
With the field (EditTextPreference), in addition to the title and summary you put on the preference itself, you can also supply the title to use for the dialog.
With the list (ListPreference), you supply both a dialog title and two string-array resources: one for the display names and one for the values. These need to be in the same order, because the index of the chosen display name determines which value is stored as the preference in the SharedPreferences. For example, here are the arrays for use by the ListPreference shown in the preceding example:
<?xml version="1.0" encoding="utf-8"?>

<resources>

  <string-array name="cities">

    <item>Philadelphia</item>

    <item>Pittsburgh</item>

    <item>Allentown/Bethlehem</item>

    <item>Erie</item>

    <item>Reading</item>

    <item>Scranton</item>

    <item>Lancaster</item>

    <item>Altoona</item>

    <item>Harrisburg</item>

  </string-array>

  <string-array name="airport_codes">

    <item>PHL</item>

    <item>PIT</item>

    <item>ABE</item>

    <item>ERI</item>

    <item>RDG</item>

    <item>AVP</item>

    <item>LNS</item>

    <item>AOO</item>
    <item>MDT</item>

  </string-array>

</resources>
When you bring up the preference UI, you start with another category with another pair of preference entries, as shown in Figure 21–6.

Figure 21–6. The preference screen of the Dialogs project's preference UI
Tapping the Text Entry Dialog entry brings up a text-entry dialog with the prior preference entry already filled in, as shown in Figure 21–7.
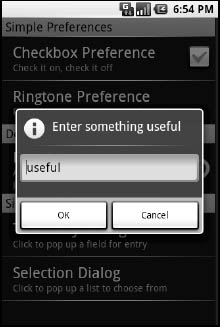
Figure 21–7. Editing a text preference
Tapping Selection Dialog brings up a selection dialog showing the display names from the one array, as shown in Figure 21–8.

Figure 21–8. Editing a list preference