
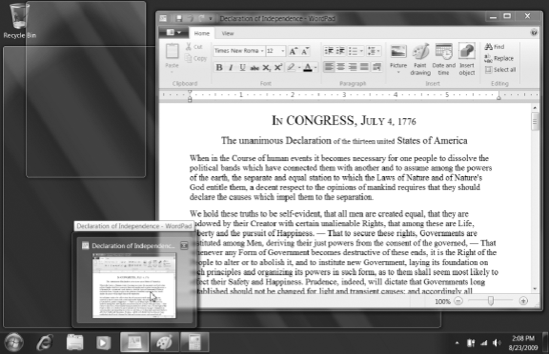
In this chapter, you'll explore the basics of the Windows 7 interface, which is often referred to as the desktop (Figure 1-1). You'll learn how to use the Start menu to run programs, how the taskbar helps you organize and keep track of multiple running programs (and launch new ones), how the notification area provides access to system information and settings, and how to manage open windows.
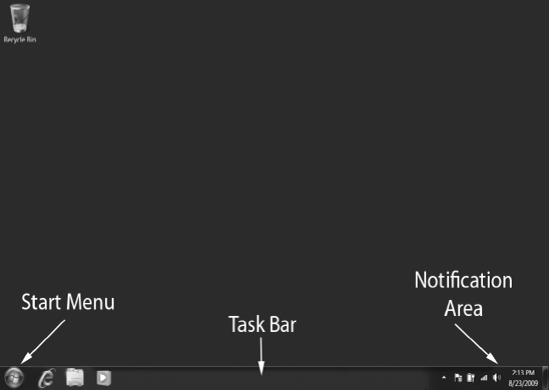
The Start menu will often be the first place you visit when you begin using the computer and the last place you visit when you're done, because from here you can perform tasks such as run programs, search for and open files and folders, change system settings, shut down the system, and so on. Click the Start button, the round Windows logo in the lower-left corner of the screen, to display the Start menu (Figure 1-2).

Figure 1.2. The Start menu is your jumping-off point for accessing programs, system settings, and more. (Note: The items displayed on the left side of your Start menu won't necessarily be the same as the ones shown here.)
You can find and run programs from the Start menu's left pane, where you'll see a group of default programs as well as some you've recently used. Just click a program to run it. If the program you want isn't in the list, click All Programs to browse through a menu listing all the programs installed on your system (Figure 1-3).

When you want to run a particular program but aren't sure where to find it, you don't need to wade through a series of menus looking for it because the Start menu's search box can help you locate it quickly. Just type in the name of the program—or even the first few letters of the name—to display a menu containing a list of full or partial matches (Figure 1-4).
You can start typing a search term as soon as you open the Start menu; you don't need to click the search box first. Also, the search results will update automatically as you type; click the X to clear what you've typed and start over.
ExplainED
We'll be using the Start menu's search box extensively throughout this book, because it can be a quick and efficient alternative to navigating through menus when you need to locate not just a program but settings, files, and folders as well. To follow along with the examples in the book, you'll want to use our suggested keywords, but we encourage you to experiment with your own as you get familiar with Windows 7.
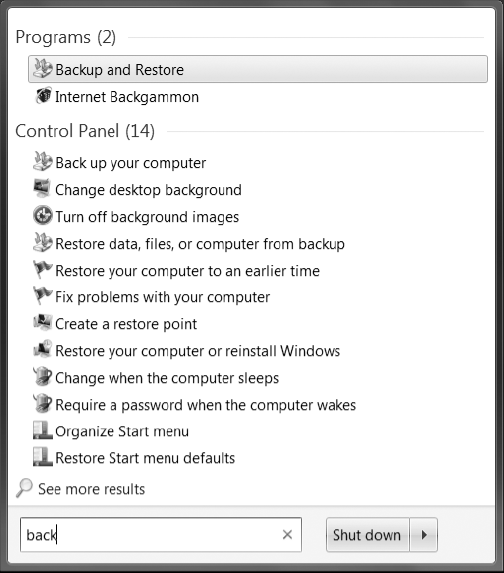
Figure 1.4. Type all or part of a program (or setting or filename) into the Start menu's search box to get a list of matches.
In Figure 1-4, for example, you'll notice that typing back produces program matches for both Backup and Restore and Internet Backgammon, along with a variety of setting matches. If there were any files or folders with back in the name, they'd appear in the list of search results as well.
LinkED
For more on searching for files and folders, see Chapter 3.
One way to ensure your favorite programs are easily accessible is to make them immediately visible when the Start menu appears by pinning them to the Start menu. To pin a program to the Start menu, pick the program you want—it can be in the recently used list, it can be in the All Programs menu, or you can find it with the search box. Then right-click the program and choose Pin to Start Menu (Figure 1-5).
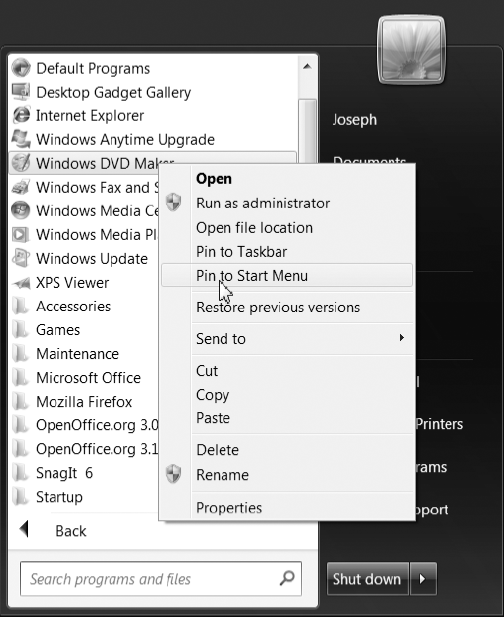
Figure 1.5. Right-click a program's icon and choose Pin to Start Menu to permanently add it to the top of the menu.
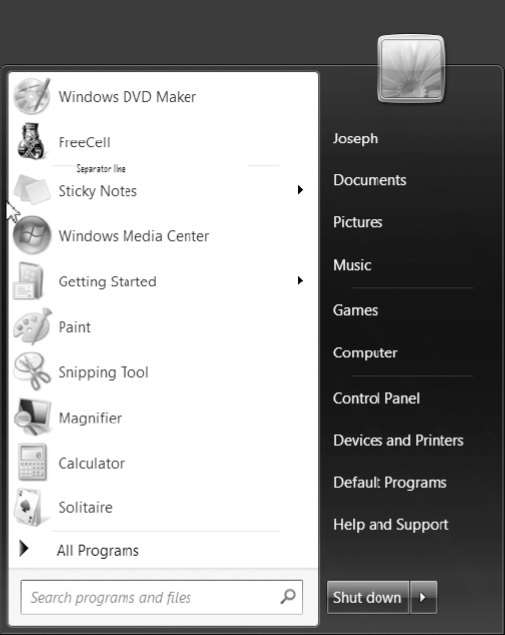
Programs that are pinned to the Start menu will appear at the top of the program list and be separated from other programs by a thin line, as shown in Figure 1-6.
You can also pin a default or recently used program to the Start menu by dragging its icon toward the top-left corner of the Start menu until the icon displays a Pin to Start menu label, as shown in Figure 1-7.

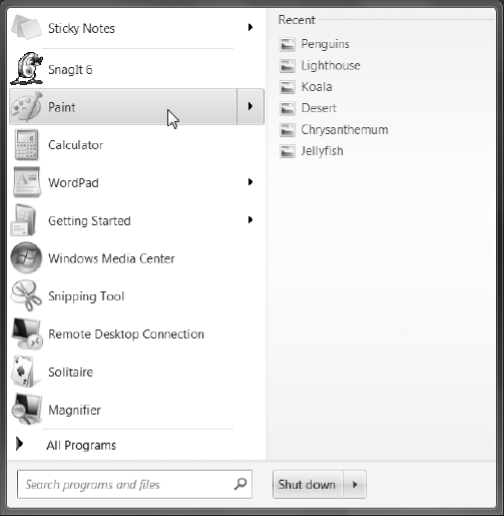
Sometimes a program listed in your Start menu will include a small right arrow. This arrow means the program has a Jump List—a special menu that offers convenient access to recently used files (and, in some cases, common tasks that are related to the program).
To view a Jump List, just leave the mouse pointer over the program listing for a moment. The Jump List in Figure 1-8, for example, lists images recently opened with the Paint program.
Jump Lists don't appear when you use the Start menu to search for programs.
The Start menu's right pane provides numerous shortcuts to commonly used areas of Windows 7. The top section (the portion above the first horizontal line) contains a shortcut to a user's personal account folders—click the account name in the upper right to view them (Figure 1-9). You can also click the three individual shortcuts for direct access to Documents, Pictures, or Music.
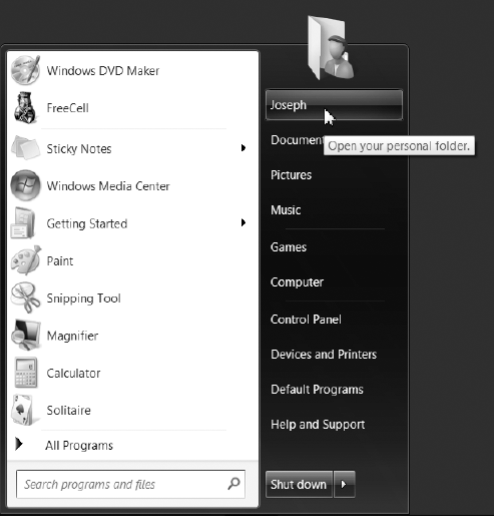
Figure 1.9. Click the name in the upper right of the Start menu to view the account's personal folders.
After you click the account name, a window will open displaying a group of account folders (Figure 1-10). Double-click a folder to view its contents.

LinkED
For more information about Windows 7 account folders, see Chapter 3.
Beneath the account-specific links in the Start menu are several more that you can use to perform tasks such as browse storage devices (Computer), find system settings (Control Panel), get help, and more. Figure 1-11 shows the Control Panel window that opens when you click the Control Panel link.

Clicking the Shut down button (Figure 1-12) will begin the process of shutting down Windows 7 and turning off your computer. By clicking the arrow to the right of the Shut down button, you can choose to log off your account, lock the system, restart the computer, or put it into a power-saving mode.
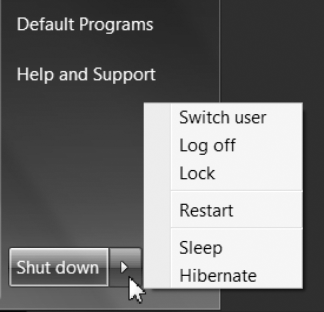
Figure 1.12. Click Shut down to immediately turn off the computer, or click the adjacent arrow to choose other related options.
LinkED
For more on the Log off and Lock options, see Chapter 2.
AdvancED
If you try to shut down the system while a program has an unsaved file open, the program will interrupt the shutdown and display a window asking if you want to save the file. You should avoid shutting down the system while someone else is already logged into it. If you try, Windows 7 will display a warning message telling you that shutting down might cause other users to lose data and asking you to confirm that you really want to shut down.
The taskbar is the narrow horizontal bar that runs across the bottom of the screen (Figure 1-13). The taskbar allows you to easily switch between open programs or windows and, like the Start menu, can provide convenient access to frequently used programs. Three programs are already included on the taskbar by default—they are Internet Explorer, Windows Explorer, and Windows Media Player.
Whenever you run a program or open a file or folder, a button representing that item's window will appear on the taskbar, and clicking an item's taskbar button will make its window active and bring it to the forefront.
AdvancED
Another way to activate taskbar buttons is by holding down the Windows button and pressing the number key that corresponds to a button's position on the taskbar (going from left to right and not counting the Start button). For the taskbar shown in Figure 1-13, pressing Windows+2 will open Windows Explorer.
There are three different kinds of taskbar buttons (as shown in Figure 1-14).
A button representing an open window is framed to appear "pressed" (in Figure 1-14, the three buttons on the far right)
A button representing an active window (the one in front of all the others) appears highlighted (in Figure 1-14, the button containing the document with the large letter A).
AdvancED
If you click an empty part of the taskbar while there are windows open, the button for the active window will no longer be highlighted, though it will still be in front.
Buttons that are neither framed nor highlighted represent program shortcuts (in Figure 1-14, the three buttons directly to the right of the Start button). We'll discuss these a little later in this chapter.

Figure 1.14. Taskbar buttons that look "pressed" represent open windows, while a highlighted button (the one with the letter A in this shot) shows which window is active.
You don't necessarily need to click a program's taskbar button to see what the window contains. If you simply place the mouse pointer over a taskbar button, a preview window will pop up displaying the program's name (as well of that of an open file, if applicable) and a thumbnail image of the window (Figure 1-15).
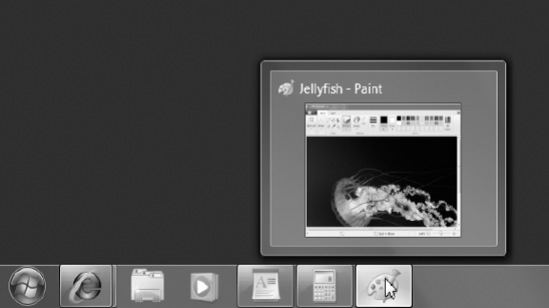
Figure 1.15. Place the mouse pointer over an open window's taskbar button to get a glimpse at the program it represents.
Sometimes a taskbar thumbnail image provides only limited information about the program. For example, most people would be hard-pressed to read the tiny letters in the thumbnail image of a text document. In this case, moving the mouse pointer over the thumbnail image will reveal the corresponding program window while reducing all other open windows to transparent outlines (Figure 1-16).
AdvancED
Windows 7 Starter Edition, which is common on netbooks, doesn't include the ability to preview windows via taskbar buttons.
LinkED
For more on netbooks, see Getting StartED with Netbooks by Nancy Nicolaisen and Karen Offermann (friends of ED, 2009).
When a program has more than one window open (for example, if you've opened two websites with Internet Explorer), all windows are grouped together under a single taskbar button. You can tell when a button has more than one window because it will look like several buttons stacked on top of each other, as shown in Figure 1-17.

Figure 1.17. The extra line to the right of the Internet Explorer button means the program has two windows open. In the case of the Windows Explorer button to its right, there are three open.
When you click or place the mouse pointer over a taskbar button with multiple windows attached, you'll see thumbnail previews of each window, as shown in Figure 1-18. Click a particular thumbnail to switch to that window. You can also place the mouse pointer over a thumbnail to bring that window to the forefront and temporarily hide all others, as shown in Figure 1-19.


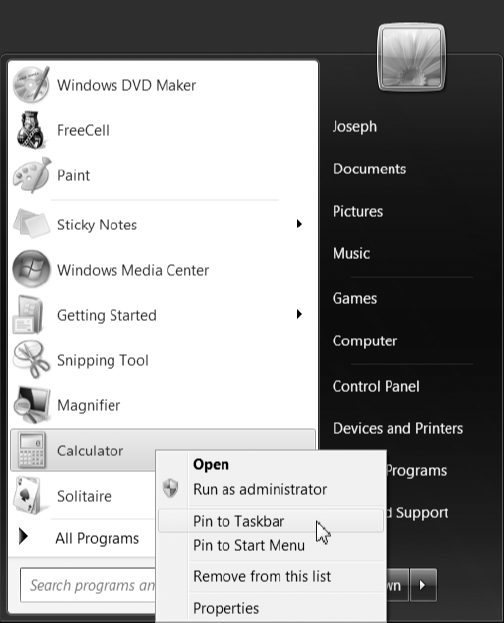
The taskbar isn't only for switching between programs that are already running. Just as you can make favorite programs easier to access by pinning them to the Start menu, you can also create taskbar buttons for them by pinning them to the taskbar. As mentioned earlier, Windows 7 pins a few programs—Internet Explorer, Windows Explorer, and Windows Media Player—to the Start menu in advance.
To create a taskbar button for a program, find the program (in the Start menu, for example) and then right-click it and choose Pin to Taskbar (Figure 1-20). (Note: If you pin a Start menu item to the taskbar, it will be removed from the Start menu.)
After you pin a program to the taskbar, you'll see a new button for it (Figure 1-21).

AdvancED
The order of taskbar buttons remains the same whether they represent open windows or pinned programs. You can click and drag buttons around the taskbar to rearrange them into whatever order you choose, and you'll always be able to tell which buttons represent open windows, because those buttons will be framed or highlighted as described earlier.
To unpin a program from the taskbar, right-click the button and choose Unpin this program from taskbar.
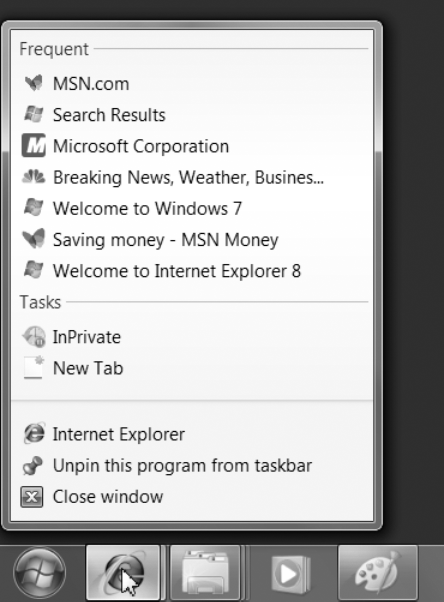
Jump Lists aren't just limited to the Start menu—you can use them from the taskbar too.
ExplainED
You may recall from earlier in this chapter that Jump Lists are shortcuts to recently used files or commonly used tasks for a program.
Right-click a taskbar button—it doesn't matter whether it's for a program that's running or not—and a Jump List will appear giving you access to recently opened files and common tasks (and, in the case of Internet Explorer, recent websites, as shown in Figure 1-22).
On the right side of the taskbar you'll find the notification area, which includes a time and date display along with a group of small icons that provide information about and access to various system or program settings (Figure 1-23).

Figure 1.23. The notification area provides system information and quick access to important settings.
On desktop systems, the notification area consists of three icons. The first two (viewed from right to left) let you view and change audio volume and network settings, respectively, while the third icon—the one that looks like a pennant—opens the Action Center, where you can view messages regarding potential system problems. On laptop systems, there's a extra icon for managing power settings, as you can see in Figure 1-23.
LinkED
We cover the Action Center in more detail in Chapter 9.
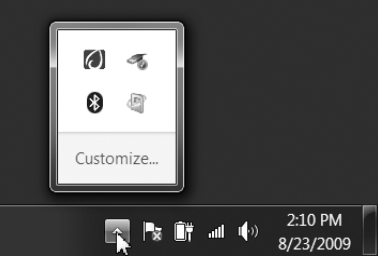
Programs you install on your system will often include their own notification area icons, but Windows 7 automatically hides these to reduce clutter and minimize use of taskbar space. If you see an arrow to the left of the notification area, it means at least one icon is hidden from view. Click the arrow to see the hidden icons (Figure 1-24); to see a hidden icon at all times, click and drag it to the notification area.
To change the setting for several notification area icons at once, click Customize to display the Notification Area Icons window (Figure 1-25).

Every window includes a trio of buttons in the upper-right corner that you can use to minimize, maximize, and close the window (Figure 1-26). When the window is maximized, you can resize it by placing the mouse pointer anywhere along a window's edge (or in the corners) until the pointer changes to a double-headed arrow and then clicking and dragging to make the window larger or smaller.
Windows 7 also offers several handy shortcuts you can use to change the size or position of windows.
Stretching a window vertically to make it as tall as possible can make viewing certain types of information easier, such as a long text document or a web page.
To maximize a window to the full height of the screen without making it any wider (as shown in Figure 1-27), position the mouse pointer at the upper or lower edge of the window until the pointer becomes a double vertical arrow; then double-click. Repeat the process or drag the window downward slightly to return it to its original size and orientation.
There may be times when you need to work with two large windows side-by-side (such as when copying or moving files between locations or viewing two programs simultaneously). Manually moving and sizing windows into this orientation can be cumbersome, but Windows 7 allows you to do it relatively easily with a feature called Snap.
To arrange two windows in an adjacent and nonoverlapping position, hold the left mouse button down while the mouse pointer is over a window's top bar, and then drag it over to the left or right edge of the screen. When you see the outline appear filling half the screen, let go of the window (Figure 1-28).
To minimize how far you need to move the mouse while dragging a window, grab it on the side in which you're going to move (that is, don't grab the left side of a window and drag to the right).

Figure 1.28. Drag a window to the edge of the screen, and it will resize to take up that half of the desktop.
Repeat the process on the opposite side of the screen with another window, and when you're finished, the two will be arranged exactly side-by-side, as shown in Figure 1-29.

AdvancED
You can also snap windows to the edges of the screen with the keyboard. Click the window, hold the Windows key, and press either the left or right arrow to move it to that edge. Hold the Windows key and press the opposite arrow to undo it.
To return a window to normal size, double-click its top bar, or drag the window away from the edge of the screen.
You can take advantage of Windows 7's Aero Shake feature to focus on a single window without being distracted by others in the background. Just click and hold the top bar of a window you want to focus on, and then quickly shake the mouse pointer back and forth (either left/right, up/down, or diagonal) to quickly minimize all but the window you've selected. Repeat the process, and the minimized windows will reappear.
When multiple overlapping windows are open, they often block your view of items on the Windows 7 desktop. To see what's beneath them, put the mouse pointer over the small vertical rectangle at the extreme right edge of the taskbar. All open windows will temporarily become transparent outlines, allowing you to view the items below (Figure 1-30). Click this rectangle to immediately minimize all open windows, and then click it again to restore them to their original positions.

Figure 1.30. Take a peek behind open windows by moving the mouse pointer to the rectangle in the lower-right corner of the screen.
AdvancED
Windows 7's Aero Peek feature lets you see behind open windows without using the mouse. Just hold down the Windows key and tap the spacebar—the windows will turn to outlines and reappear when you let go of the Windows key. To minimize all windows, hold down the Windows key and press D; then do it again to reopen them.
LinkED
The ability to see through open windows comes in handy when you use desktop gadgets, which we'll discuss in Chapter 8.
Windows 7 gives you three ways to browse and select from among all the open windows on your desktop using the keyboard:
Alt+Tab
Windows+Tab
Alt+Esc
Hold down the Alt key while pressing Tab, and a box will pop up displaying thumbnail images of every open window, beginning with the active one (Figure 1-31). Continue holding down Alt and press Tab repeatedly to cycle through the thumbnail images, and release the keys when you find the one you want. As you select each thumbnail, the window it represents will be brought to the forefront of the desktop, while the remaining open windows are replaced with outlines.

The thumbnail images displayed by Alt+Tab aren't large enough to let you see window details, but by holding down the Windows key while pressing Tab repeatedly, you can cycle through a series of larger, three-dimensional thumbnails, which will provide a closer look at each window's content (Figure 1-32).

Here's a review of what you've learned in this chapter:
How to use the
Startmenu to find and run programs, view account folders, access other Windows 7 features, and shut down your systemHow to use Jump Lists to open files and run programs
How to use the taskbar to manage open windows and run programs
How to pin programs to the
Startmenu and taskbarWhat the notification area does and how to customize it
How to manipulate Windows with the mouse and how to browse open windows with the keyboard