
User accounts in Windows 7 serve two main purposes. The first is to allow different people to customize the operating system to their own personal preferences, and the second is to make sure that people can't gain access to each other's files.
For example, imagine if you sat down at the computer and found that characteristics such as the background wallpaper, colors, and menu options were different from the last time you were there because someone else had come along and changed all the settings. Similarly, you probably wouldn't want other members of your household to be able to read, change, move, or delete your important personal files.
User accounts can make sure this kind of thing doesn't happen. Through user accounts, each person who uses the computer gets to customize the "look and feel" of Windows 7 the way they want, and everyone's personal files are kept separate and private.
The other purpose of user accounts is to control what somewhat can do in Windows 7 and what kinds of settings they can change. You might not want a child or a houseguest to be able to install their own software or change critical settings that could damage the system. Making sure each user has the right type of account can prevent this.
In a nutshell, user accounts make it easier and safer for multiple people to share access to the same computer.
Windows 7 provides three types of user accounts: standard, administrator, and guest. Each offers a different level of access to the computer:
Standard: The standard account provides you with a lot of control over how you use the computer, but not enough to affect other users. For example, a standard account lets you access personal files and customize many operating system settings, but it doesn't allow you to use other people's files, change security-related settings, or install new hardware or software.
Administrator: The administrator account provides complete and unrestricted access to all Windows 7 settings (including those of other users) and all of a computer's files and folders. You can also use an administrator account to create, delete, or change accounts that belong to other users.
Guest: The guest account is a special type of limited-access account that's primarily designed for infrequent or temporary users.
Windows 7 requires the computer to have at least one administrator account, but the standard account is appropriate for most users because it limits the amount of control they have over the operating system while still allowing them to get things done.
Even if you're the person in charge of controlling and maintaining the computer (that is, the administrator), you should still use a standard account for day-to-day computing because it can keep you from accidentally making potentially undesirable changes to Windows and can help prevent similarly harmful modifications from being made without your knowledge by malicious programs or websites.
If you use a standard account and try to make a change that requires an administrator account, such as creating a new account, as described next, you'll still be able to do it, but Windows 7 will pop up a window confirming the action and requiring you to type an administrator account password to proceed.
LinkED
For more information on which account options require administrator access, see the "Changing account options as an administrator" section later in this chapter.
To create a new user account, perform the following steps:
Click the
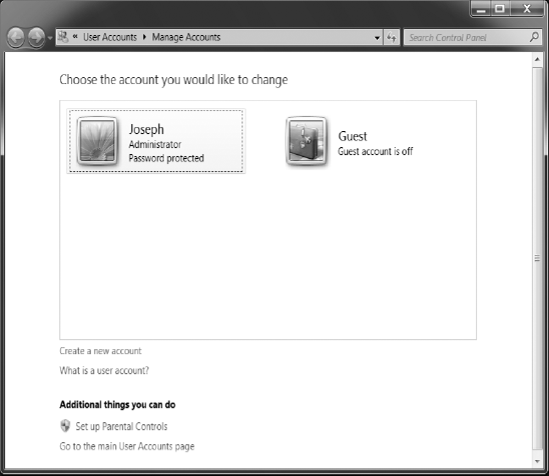
Startbutton, and then typeadd usersinto the search box. ChooseAdd or Remove useraccounts from the list of search results, and you'll open theManage Accountswindow (Figure 2-1).Click
Create a new account, type a name in theNew account namebox (such asAndreain this example), and choose whether you want the account to be a standard user or an administrator (Figure 2-2).Click the
Create Accountbutton to set up the new account. You'll return to theManage Accountswindow, where you can see the account you just created (Figure 2-3). Use theCreate a new accountlink again if you need to create additional accounts.


Windows 7's guest account lets you give someone access to the computer without having to set up a personal account for them or let them use someone else's account. For example, if visiting friends or family want to use your computer to check e-mail or browse the Web, they can do so with the guest account. The guest account is extremely limited; it can't change most settings, install software or hardware, or even have a password assigned to it (more on passwords in a moment).
ExplainED
No matter how much you trust a visitor, friend, or relative, it is not a good idea to give them access to your user account. If you want them to have fuller access to the computer than what a guest account allows, add a standard account for them. When they no longer need access to the computer, you can delete the account.
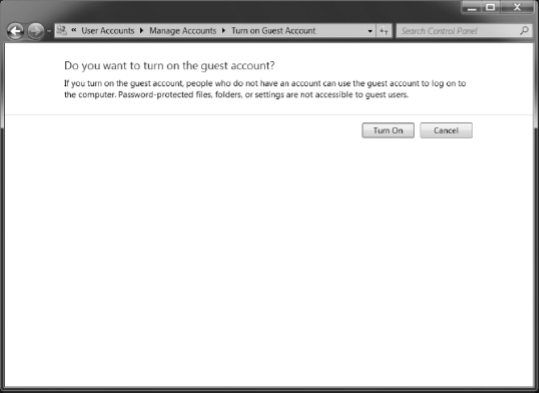
Before you can use the guest account, you need to turn it on. To do so, start from the Manage Accounts window shown in Figure 2-3, and click the guest account's suitcase icon. Then click the Turn On button (Figure 2-4).
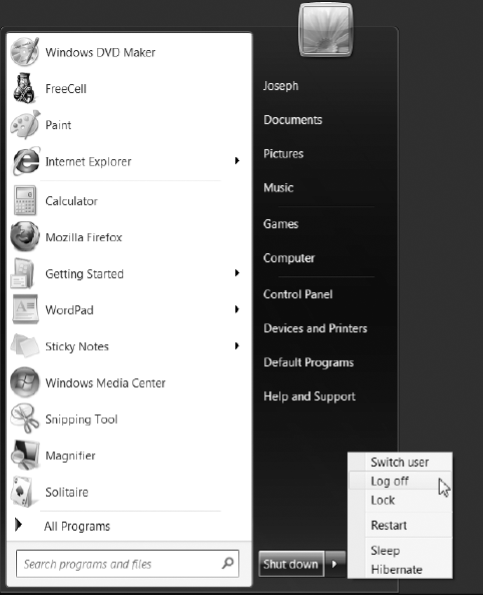
When you no longer need to use the computer, you can log off your account, which will close all your programs but not turn off the computer. To log off, click the Start button, click the arrow next to the Shut down button (not the button itself), and select Log off (Figure 2-5). If you have any programs with unsaved files open, you'll be prompted to save them before your account is logged off.
You don't need to log off your account every time you walk away from the computer. Many users find it more convenient to stay logged in unless they expect to be away from the computer for an extended period of time. As you're about to see, keeping an account logged in doesn't prevent other people from using their own accounts.
Although only one person can sit in front of the computer to use their account at a time, Windows 7 does allow multiple accounts to be logged in simultaneously, which is handy because it lets others use the computer while you're away from it, even if you didn't log off your account. To make the computer available for someone else to use in your absence without logging off your account, go to the Shut down menu shown in Figure 2-5, and click Switch user.
This will keep your account running but will return the computer to the Windows 7 welcome screen so another user can log in (Figure 2-6).
LinkED
For information about shutting down the computer, including what happens if you try to shut down while someone else is logged in, see Chapter 3.

Figure 2.6. Even when someone else is already logged into Windows 7, you can also log in from the welcome screen by clicking your account icon.
Another option is to press the Windows+L, which will "lock" your account and allow someone else to log in from the welcome screen after clicking the Switch User button (Figure 2-7).


Windows 7 will allow two, three, four, or even more accounts to remain logged in at the same time. However, depending how much memory is installed in your computer (and how many programs each of the logged-in accounts has running), having too many accounts logged in at the same time may noticeably slow down the computer's performance and cause it to take a long time to switch between accounts. In addition, some programs may not work properly when multiple accounts are using them simultaneously, so you may need to close certain programs in one account before you can use them in another. (Apple iTunes is a good example.)
Windows 7 doesn't require you to set passwords on user accounts, but it's a good idea to have one to protect each user account. This is especially true for administrator accounts because of the unrestricted access they provide, but ideally you should make sure a password is assigned to each account to prevent the wrong person from using it—either intentionally or by accident.
The first time you start Windows on a new computer or after Windows 7 has been installed, you're prompted to create a password for the first account you add. If you didn't specify a password or your account was added later after installation, you should set a password for it.
To create a password for your own account, make sure you're logged into the account, and then perform the following steps:
Type
account passwordin theStartmenu's search box, and then selectCreate or remove your account passwordto display theUser Accountswindow shown in Figure 2-8.Click
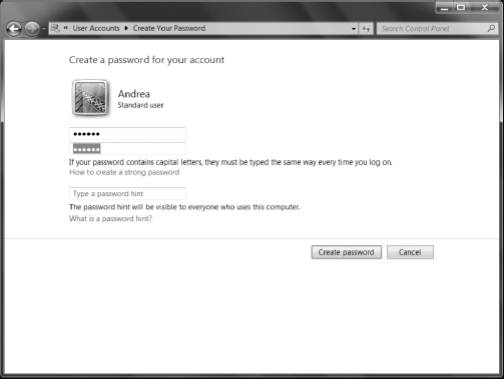
Create a password for your account;in theCreate Your Passwordwindow, type your chosen password in theNew passwordbox. Then type it again in theConfirm new passwordbox. This ensures you typed it the same way twice—you'll see dots in place of the letters and numbers you type (Figure 2-9).Type in a password hint that will be displayed in the event you ever forget your password (the hint will appear only after you've typed in an incorrect password). This step is optional but highly recommended.
Click the
Create passwordbutton to return to theUser Accountswindow.
Once your user account has a password, you can change it in a couple of ways. One is to type change password in the Start menu's search box and choose Change your Windows password. This will display the same User Accounts window that's shown in Figure 2-8, except the Create a password option will be replaced with one labeled Change your password (Figure 2-10).

Figure 2.10. When you already have a password on your account, the User Accounts window User Accounts window will give you the option to change it.
The second way to change a password is to press Ctrl+Alt+Delete while logged into your account and then click Change a password (Figure 2-11).

ExplainED
Regardless of which of these two methods you choose, you'll need to type in your old password in order to select a new one.
LinkED
As you can see in Figure 2-11, Ctrl+Alt+Delete will also let you lock the computer, switch users, or log off the computer.
If you ever forget the password for your account and you didn't create a password hint as a reminder (or you did but the hint fails to jog your memory), you can still access your account as long as you have a password reset disk. A password reset disk will let you bypass your old password and create a new one in its place, but in order to get around a forgotten password with a password reset disk, you have to create the disk in advance. If you wait until you need the password reset disk to make it, it will be too late.
You can create a password reset disk on a removable storage device like a floppy disk or USB flash drive. Since very few systems come with floppy disk drives these days, the flash drive option will be the best bet for most systems. The amount of data stored on a password reset disk is tiny, so you don't need a high-capacity flash drive to make one. In fact, the smaller, the better—you'll want to put the drive away for safekeeping, so you won't be able to use it for other things.
To create a password reset disk, follow these steps:
Log into the account you want to create the disk for, and plug your flash drive into a free USB port.
Then type
password resetinto theStartmenu's search box, and selectCreate a password reset diskto start the Forgotten Password Wizard (Figure 2-12).The wizard will ask you to confirm the storage device you want to use and ask you to type in your current password before creating a password reset disk for your account. It will usually select the correct storage device for you automatically, but if you have any other removable storage devices connected to your computer, you may need to choose your flash drive from the drop-down list.

After making your password reset disk, be sure to clearly label it as such and put it away in a safe place. It's important to protect your password reset disk from loss or theft, because anyone who finds it can use it to gain access to your account. A password reset disk can store information for only a single account; if you want to create one for more than one account, you'll need a separate storage device for each.
Once you've created the password reset disk for a particular account, you won't need to do it again. You can use it as many times as you need to, even if you change your password after making the disk.
If you ever need to take advantage of your password reset disk, you'll be able to after you've typed in an incorrect password. When you return to the account login screen, you'll see a new link called Reset password beneath the password box (Figure 2-13).

Insert your password reset disk, click the link to start the Password Reset Wizard (see Figure 2-14), and then follow the prompts to choose the storage device and create a new password for your account.

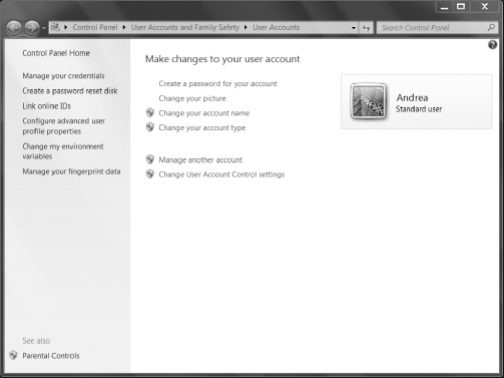
In the User Accounts window (shown earlier in Figure 2-10), you'll see several options, such as Change your account name and Change your account type, thathave a shield icon next to them. This icon indicates that an administrator account is required to access the setting, so if you try to change it with a standard account, you'll be prompted to type in the password for an administrator account before you can do so.
LinkED
The feature that prompts you for an administrator password is called User Account Control, which you'll learn more about in Chapter 9.
If you want to change settings for an account that's not currently logged in, follow these steps:
Type
change accountsinto theStartmenu's search box, and selectMake changes to accounts. (You'll be prompted for an administrator password at this point if you're not already logged into an administrator account.)Click the account you want to change, and the Change an Account window will appear listing all the settings you can change (Figure 2-15). These include changing the account name, the account type (from standard to administrator, or vice versa), setting up Parental Controls, and even deleting an account.

If any children will be using the computer, you may want to turn on Windows 7's Parental Controls, which give you a way to limit when and how the computer can be used. By turning on Parental Controls for a particular account, you'll be able to decide when that person can use the computer, whether they can play games (and if so, what kind), and designate certain programs as off-limits.
Note that you must use an administrator account to turn on Parental Controls, and you can apply Parental Controls only to users with standard accounts.
To set up Parental Controls, follow these steps:
Type
user parentalinto theStartmenu's search box, and chooseSet up parental controls for any userto display the window shown in Figure 2-16.After you've selected the account you want to set up Parental Controls for, click the
On, enforce current settings option. Now you can customize each of the items listed underWindows Settings(Figure 2-17).Click
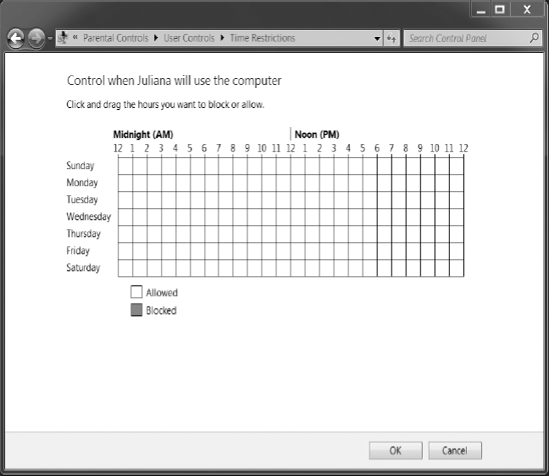
Time Limits. A grid is displayed with the hours that are allowed and blocked.By default, all hours are allowed (Figure 2-18). Use the mouse to click and drag over the grid to indicate the specific hours and days of the week you want to block. Note that you can configure the grid with noncontiguous blocks—such as to permit computer use between 3 and 5 p.m. and then again between 7 and 9 p.m. Clicking a box in the grid toggles the setting between block and allow.
Click
OKwhen you're done with these settings to return to the Parental Controls settings for this account.Click
Games.In addition to blocking access to games entirely, you can use the
Set game ratingsoption to block games that have a particular Entertainment Software Rating Board (ESRB) rating, games that lack a rating, or those that contain certain kinds of undesirable content such as violence or drug references. You can also use theBlock or Allow specific gamesoption to disable access to any of the games installed on the computer.Click
OKwhen you're done (Figure 2-19).If you want to have control over not just games but other kinds of software as well (such as instant messaging or file-sharing programs), click the
Allow and block specific programsoption, and then click<account name> can only use the programs I allow.Within a few moments, a list of all the programs available on the computer will appear. Select the box next to any program you want the account holder to be able to use. Then select the check box for each program you want to allow access to, and then click
OKwhen you're done. (Figure 2-20).


When using the Block or Allow specific games option, the list of programs can be pretty extensive, so finding a specific program you want to allow may take some digging. Also, remember that when this option is selected, only the programs you selected will work.
Here's a review of what you've learned in this chapter:
About Windows 7 account types
How to create an account
How to activate the guest account
How to log off and switch between accounts
How to create and change passwords
How to create a password reset disk
How to change account options as an administrator
How to set up parental controls