
Over time, your system will become home to all types of very important—even irreplaceable—personal data. Documents are just the beginning; consider years worth of digital family photos and home videos you never want to lose. Despite their reputation, computers generally provide reliable and trouble-free operation, but they do suffer from problems from time to time. In some cases, those problems can result in losing data and thus fond memories.
What could go wrong with your PC? It could be an equipment problem like the failure of a hard drive. Or, your system could become infected with a virus or other type of malicious software, or a routine software installation could go wrong, damaging Windows and perhaps even leaving your system unusable. You might even inadvertently delete or overwrite files or folders by mistake.
The bottom line is that it's absolutely crucial that you make regular backup copies of your data so you can get it back if something happens to the original data.
Fortunately, Windows 7 includes backup software that can ensure your important stuff isn't lost as the result of an unexpected system problem. Let's look at how it works and how to use it.
Windows 7 provides two different but complementary waysto protect your data, called file backup and system image backup.
File backup is designed to protect personal data files, such as documents, photos, videos, music, and so forth. With file backup you can store as much or as little data as you like. You get to choose specific folders, drives, or libraries to make copies of, or you can let Windows decide for you. Similarly, if you ever need to restore data from a file backup, you can choose specific folders to restore—even individual files.
File backups don't make copies of Windows operating system files or program files, and restores must be done from within Windows. In the event of a complete system failure, if all you've done is a file backup, you must reinstall Windows and all your software before you restore that data.
System image backup is designed to protect not just data files but the entire contents of a computer's hard drive. A system image backup consists of an exact replica of everything from the Windows operating system to its configuration settings to any programs you've installed, plus all personal data files.
You can use a system image backup to restore a computer to the precise condition it was in when the image was made, even if the Windows isn't working properly—or, in the event of a major problem, isn't working at all.
But system images are all-or-nothing backups. You can't pick and choose what to restore, and when you restore from a system image, anything already on the hard drive gets erased.
The most comprehensive way to protect your system and the data it contains is to do both file and system image backups, because this gives you the flexibility to restore anything from a single file to the entire hard drive in the event of a problem. You can have Windows 7 run both types of backup for you automatically according to a schedule, or you can run them manually whenever you want.
AdvancED
In addition to Windows 7's built-in backup feature, you can also buy (and sometimes even download for free) third-party backup programs that may provide more capabilities, such as the ability to password protect backups or greater control and flexibility over how and when backups are run. Such programs are often preinstalled on new computers or included with external hard drives.
LinkED
Some services let you back up your important data to another location via the Internet. This is a good added level of protection in case your at-home backups are damaged or destroyed (such as by a fire or natural disaster). Two popular online backup services are Mozy (www.mozy.com) and Carbonite (www.carbonite.com).
You can store Windows 7 backups to a variety of types of storage, including a system's internal hard drive, removable storage devices such as an external hard drive or flash memory drive, or writable DVDs.
Each type of storage has its own pros and cons, but for most people an external hard drive will be the best option. External hard drives can hold far more information than either flash drives or DVDs, so they usually have enough room to store large backups and multiple backups. Plus, unlike internal hard drives, the external kind can be easily disconnected from the system and stored for safekeeping if necessary (like in a safe or a fireproof box).
AdvancED
Whenever possible, it's a good idea to save your backups to an external hard drive with a storage capacity greater than your system's. For example, if your system came with a 500GB hard drive, your external hard drive should be 500GB or more. This will ensure that you always have as much backup space as you'll possibly need and can keep the backups for as long as possible.
AdvancED
If you're using the Professional or Ultimate version of Windows 7, you can also store backups on a network drive such as a network-attached storage (NAS) device.
The type of backup you do may dictate the kind of storage you need to use. For example, Windows 7 won't let you save a system image on a USB flash drive because they're generally much too small to store an entire image. As a result, you'd likely need quite a few of them to store a single image, which gets extremely expensive compared to DVDs. (Plus, you can't easily label them the way you can DVDs.) In addition, although you can save an image to a DVD (or, more likely, a set of them), the image can't be updated later like it can be when you save it on an external hard drive.
To have Windows make file and system image backups on a regular basis, perform the following steps. Note that you must use an administrator account to create backups, change their configuration settings, or restore files from them:
Type
backupin theStartmenu's search box, and then chooseBackup and Restoreto display the window shown in Figure 6-1. If you've never done a backup before, you'll see a message sayingWindows Backup has not been set up.Click
Set up backup. Windows Backup will start up and ask you to choose a backup destination (Figure 6-2). Click a destination once to see what backup limitations it has, if any (such as not enough space, can't store a system image, and so on), or double-click a destination to select it and go to the next screen. If you want to use an external hard drive that you haven't connected yet, plug it in, wait a few minutes for Windows 7 to recognize and identify it, and then clickRefreshto make it appear in the list.To do the most comprehensive backup possible, select the
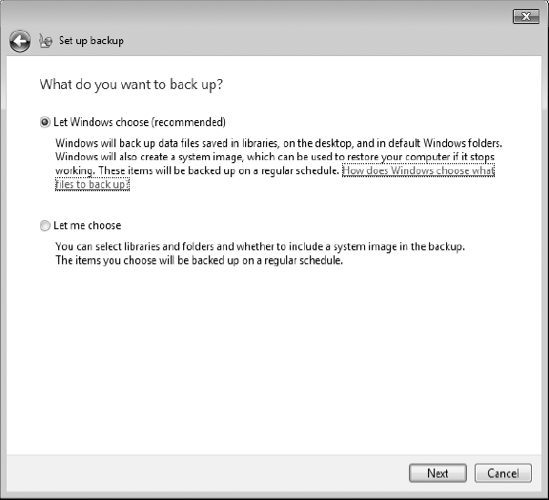
Let Windows chooseoption (Figure 6-3), and go to the next screen.AdvancED
When you let Windows choose what to back up, it automatically backs up files stored on the desktop and all the default folders—such as Desktop, Downloads, Favorites, Documents, Pictures, and so on—for every person with a user account on the system. Windows will also back up files saved in libraries and create a system image backup for you.
The
Let me chooseoption will allow you to modify Windows 7's standard backup settings by dispensing with the system image backup and/or backing up additional locations besides the default ones. It's the option to use if you save important files in places other than standard user account folders or if you just want to back up a handful of specific folders.Review your backup settings to make sure they're correct (Figure 6-4). Note that Windows automatically runs weekly backups on Sunday at 7 p.m. If you'd rather do them on a different day or time or do them more or less frequently (such as daily or monthly), click
Change schedule. Once your choices have been made, clickSave settings and run backup.


AdvancED
Any files that have been added or changed in the backed-up locations since the last backup will automatically be included in the next scheduled backup. Scheduling backups more frequently—daily rather than weekly, for example—will minimize the chance of losing files that were added or changed in between backups. When doing daily backups, however, it's a good idea to schedule backups at times a system is unlikely to be used because your system may run slowly while a backup is in progress. (If you don't shut your system off at night, scheduling backups around midnight is a good option.)
Regardless of the backup schedule, Windows will run an initial backup immediately and display a green Backup in Progress bar (to see what percentage of the backup is complete or stop a backup in progress, click View Details). After the first backup is finished (it can take as long as several hours depending on how much is being backed up), the Backup and Restore window (Figure 6-5) will indicate the details of the backup, when the last backup was done, and when the next one is due.
You can click Back up now to run a backup manually any time in between scheduled backups. To change what is backed up, where the backup is saved, or when it occurs, click Change settings.

Figure 6.5. After your first backup completes, the Backup and Restore window will let you view or change backup settings.
AdvancED
Windows automatically manages the amount of disk space it uses for both file and system image backups, saving older backups until they must be deleted to make room for newer ones. Clicking Manage space will let you view or adjust how backup disk space is used or delete individual file backups to free up space for other uses.
The term system image is something of a misnomer, because it doesn't necessarily back up the entire contents of a system. The system images that Windows 7 creates automatically only saves the contents of a hard drive or hard drive partition (portions of a hard drive that function independently and have their own drive letters) that Windows needs in order to run.
If a system has multiple hard drives or one drive divided into multiple partitions, those extra drives or partitions aren't included in the system image when you configure Windows 7 to automatically create backups as outlined earlier.
If you want a system image that includes extra hard drives or partitions—let's say you have Windows on the C: drive but also save files onto a D: or E: drive—you must create the image manually by performing the following steps:
In the
Backup and Restorewindow shown in Figure 6-5 (typebackupinto theStartmenu's search box, and then chooseBackup and Restore), clickCreate a system image, choose where you want to save the system image (Figure 6-6), and then go to the next screen.Select the check boxes for the extra drives you want the system image to include (Figure 6-7), and then go to the next screen.
Confirm the drives that will be part of the system image, and click
Start backup(Figure 6-8).


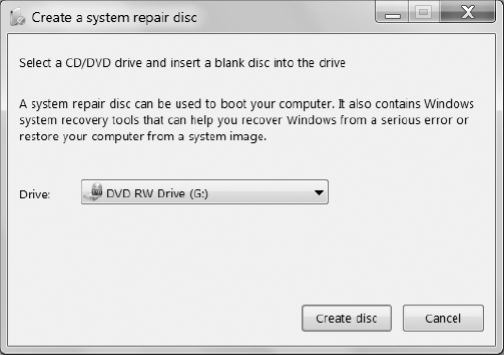
Sometimes—ideally rarely—a system suffers a hard drive crash or a similar catastrophic problem that's so severe it keeps Windows from loading correctly. If this happens, a system repair disc will not only allow you to let you start your systemand access repair options but will also let you restore your system to proper working order using a system image backup. (In Figure 6-4 you may have noticed a message warning that a system repair disc might be required to restore a system image.)
To create a system repair disc, perform the following steps:
Insert a blank CD or DVD into the CD/DVD drive, type
repairin theStartmenu's search box, and selectCreate a system repair disc.Make sure the correct drive is listed, and then click
Create disc(Figure 6-9).
Once your system and its personal data are safely backed up, Windows gives you the option to restore individual files or folders, groups of files or folders, or your entire hard drive.
To restore personal data files, make sure the drive that contains your backup is connected, and perform the following steps:
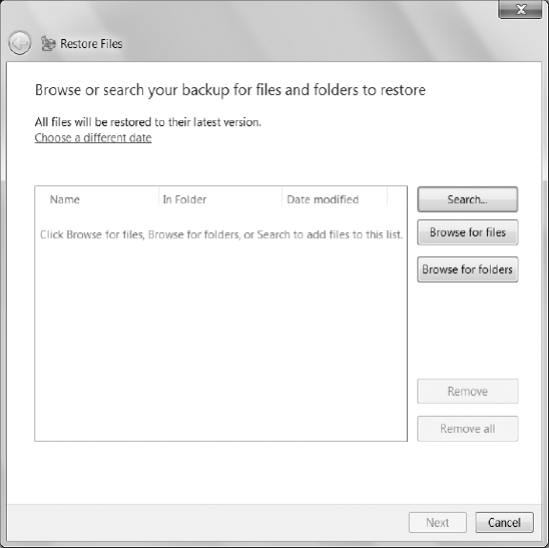
In the
Backup and Restorewindow, clickRestore my files. If you want to restore only specific files, clickBrowse for files; to restore entire folders, clickBrowse for folders(Figure 6-10).AdvancED
If you're administrator and want to restore another user's files rather than your own, in the
Backup and Restorewindow clickRestore all user's filesinstead ofRestore my files. The process of selecting what to restore will be the same as outlined in the following steps.AdvancED
If you're restoring data to a different computer than the one you backed up from, select
Select another backup to restore files from. Windows 7 will display any available backups you can restore from.AdvancED
Windows automatically restores files from the most recent backup, so click
Choose a different dateif you want to restore from an older one. If you're looking for a particular file or folder to restore, you can find it quickly by clicking theSearchbutton and then typing all or some of the file/folder name.Click a backup name (
Joseph's backupin this example) in the left pane to browse the contents of the backup in the right pane. When you find the file or folder you want to restore, highlight it and click either theAdd filesorAdd folderbutton (Figure 6-11).The button that appears will depend on whether you're browsing for files or folders.
Figure 6.11. When you find an item you want to restore, click
Add folder (Add folder (orAdd files).AdvancED
After you select a file or folder to restore, you'll return to the window shown in Figure 6-10. From there, browse again to select additional items to restore (you can restore files and folders at the same time). While browsing, you can select multiple files in the same folder (by holding down Ctrl while clicking to select), but you can select only one folder at a time.
Once you've selected all the items you want to restore, go to the next screen (Figure 6-12). Files are restored to their original location by default, but if you want to restore them somewhere else, click
In the following location, and use theBrowsebutton to choose one.AdvancED
Selecting a new location can be useful if you want to restore files to portable storage such as a USB flash drive so that you can transfer them to another computer, or if you still have the original version of the files on your system and want to restore from a backup without disturbing them.
Click
Restoreto begin the restore process. If any restored files will overwrite existing versions, a window will appear giving you the option to keep one version or the other (or save a copy of both by giving the file you're restoring a new name).

Normally you restore a file or folder from a backup because the original has been damaged or erased. But there may be times when you want to restore an intact file from backup. For example, if you edit a document or a photo and inadvertently save a change or if you do it intentionally but later decide that it was a mistake, then your file is still there, but it's not the version you want.
When this happens, you can restore the file from a backup using the procedure described earlier, but there's also another method that may be more convenient. When you right-click a file or folder anywhere in Windows, you'll see an option labeled Restore previous versions. Select it, and Windows will display a list of older versions of the file that were saved as a result of recent backups or system restore points (Figure 6-13).
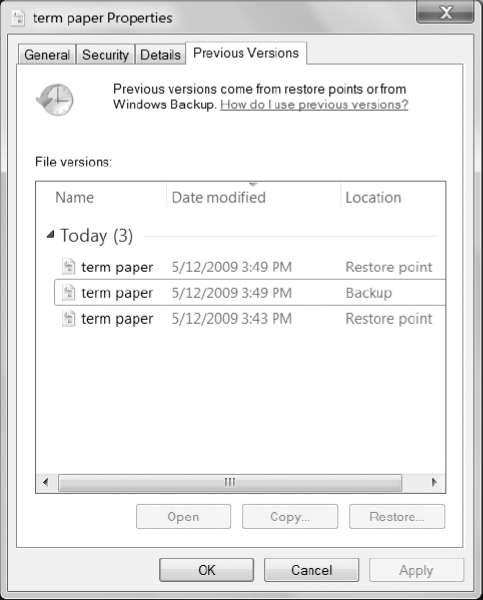
Highlight a previous version of a file, and click Restore to replace the current version of the file with the previous one. (A confirmation window will warn you that this action can't be undone.) If a file's previous version is the result of a restore point rather than a backup, then in addition to restoring the file, you can also click Open to view the file or Copy to save a copy to another folder.
When your Windows 7 system starts having problems—especially after installing a piece of hardware or software—you can use the system restore feature to load a previously saved system configuration (restore point), which will often be enough to fix the problem.
LinkED
For more on the system restore feature and restore points, see Chapter 5.
However, should your system suffer from a catastrophic problem that prevents Windows from running—the hard drive fails, for example—you can restore your system to its previously working condition by restoring a system image (once you've replaced the hard drive, of course).
Restoring a system image when Windows isn't installed on the system requires a system repair disc. Before attempting to restore a system image, make sure system repair disc is in the drive and that the storage device containing the image is powered up and connected to the system (or if your system image is saved on DVDs, check that you have them handy).
ExplainED
Remember that restoring from a system image returns a system to the condition it was in when the image was made, not when the problem occurred. Therefore, you'll lose any programs that were installed or data files that were added or changed between the time the image was created and the problem occurred.
AdvancED
Can't find your system repair disc or forgot to make one? System repair discs aren't computer-specific, so if you have another Windows 7 system—or know someone who does—you can use it to make one belatedly.
Turn the system on and immediately watch the screen for a message telling you which specific key to press (Esc and F12 are commonly used) to start the system from the CD/DVD drive or display a "boot menu" that will let you choose the CD/DVD drive from a list of storage devices.
This message will be visible only for a few seconds, so timing is important. If you don't press the appropriate key fast enough, the system will try to boot Windows normally and eventually freeze up (assuming that was the problem). If that happens, just turn the system off and try step 1 again.
After pressing the key necessary to start the system from the CD/DVD drive, watch the screen closely, because many systems may prompt you to
press any keyto confirm you actually want to load the disc in the drive.If the system repair disc loads successfully, within a minute or two you'll see the screen shown in Figure 6-14.
Confirm the keyboard type shown is correct (the right one is usually chosen for you), and then go to the next screen.
Choose the
Restore your computer using a system image you created earlieroption, and then go to the next screen.Windows will now look for available system images and automatically select the most recent one it can find (Figure 6-15). This is almost always the best one to use, but if you'd rather use a different one, choose
Select a system image, and pick the image you want from the menu.After selecting your system image, you can choose additional restore options. If you let Windows create your system image automatically, you'll see an option labeled
Format and repartition discs, which is turned off by default. This option will delete anything already on the disc, so you should choose it only when you're restoring to a completely empty hard drive.If you created your system image manually, you'll see an additional option labeled
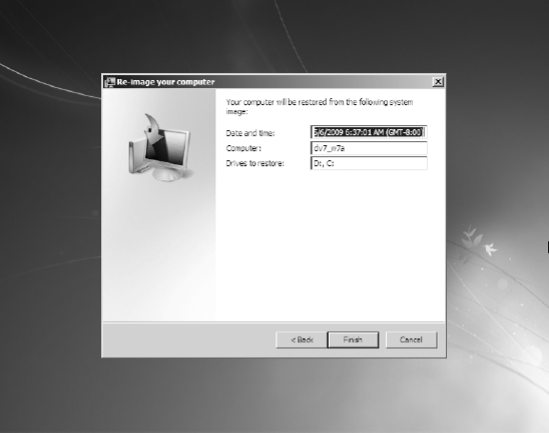
Only restore system drives, also turned off by default(Figure 6-16). Selecting this option will only restore the drive that contains Windows and skip any others that are part of the image. Unless there are separate hard drives that you don't want to restore, you'll want to keep this option turned off.Verify that you've chosen the right system image to restore, and click
Finish(Figure 6-17). A final confirmation window will appear, and when you clickYes, the restore process will begin.


Depending on the size of your system image, it may take a while for the restore process to complete—perhaps an hour or longer. (If you're restoring an image from DVDs, you'll need to stick around to feed them into the PC.) When it's finished, the system will restart automatically and should be working properly.
ExplainED
Remember that restoring from a system image returns your system to the condition it was in when the image was made, so at this point you may need to reinstall some programs.
If your system came with Windows 7 installed, it may have included a set of recovery, or restore, discs. (If you didn't receive such discs, there's probably a program installed that will make them for you.) It's important to note that these manufacturer-provided discs are designed to return your system to its original condition—that is, the way it came out of the box. Unlike a Windows 7 system image, these discs can't restore the software and data you've added to your PC, and they'll actually erase everything already on your system, so don't use them without backing up your system first.
Here's a review of what you've learned in this chapter:
The type of data backups Windows 7 can do
The kinds of storage devices you can back up to
How to configure automatic backups
How to create a system image manually
How to restore files and folders
How to recover previous versions of files
How to restore a system from an image