Every Linux system includes at least one command-line interpreter that enables you to interact with the operating system. This interpreter is known as a shell. This is an appropriate moniker because the shell's purpose is to act as a layer that shields you from having to know the internal workings of the operating system. The shell allows you to perform complex tasks using simple commands.
If you're a DBA, you should become familiar with running shell commands from the command line (operating system prompt). Yes, you can perform many DBA tasks through various graphical user interfaces (GUIs) or browser user interfaces (BUIs). However, regardless of the robustness of the GUI or BUI, you will still be required to use the command line to perform tasks that the graphical user interface can't handle. For example, you may find yourself in a stressful database restore and recovery situation in which you have access only to a terminal to run the appropriate commands. In this scenario, your job depends on you being able to work from the command line to diagnose possible media failures and then perform the appropriate database restore and recovery operations.
Many command-line interpreters ship with your Linux server, such as the Bourne Again (Bash) shell, Korn shell, C shell, and so on. The Bash shell is usually the default command-line interpreter on Linux systems. Therefore, the focus of this chapter (and book, for that matter) centers on how to perform DBA tasks using the Bash shell. We strongly encourage you to use the Bash shell for your default command-line interpreter. This is because the Bash shell incorporates most of the useful features of other available shells and provides additional functionality.
Where appropriate, we'll also juxtapose key features of the Bash shell with both the Korn shell and the C shell. DBAs in Unix environments tend to use the Korn shell, so it's important to understand how various Korn shell features compare with the equivalent Bash shell commands. The C shell is also worthy to note because it is always installed, regardless of the Linux or Unix operating system version, whereas the Bash shell and Korn shell may not be universally available (especially on older systems).
When you log on to your Linux database server, you are "in" a shell. This means you can enter commands that the shell will interpret and run for you. The most common default shell prompt in Linux is the $ character (the dollar sign). For this reason, most of examples in this book denote the shell command line with the $ character. The # character (the hash) will be used for the prompt to denote operations that need to be performed as the root user. Figure 2-1 shows a typical screen where you type commands.

In this chapter, we cover Linux topics such as obtaining information about your shell environment and customizing it. The solutions will enable you to work efficiently at the command line on database servers. The command line is where you will perform most of your database administrator activities.
A typical DBA spends several hours per day furiously typing commands at the shell prompt. Therefore, the shell is a tool that all DBAs must thoroughly understand. The solutions in this chapter will form the building blocks for the more complex DBA tasks covered in the rest of this book.
You find yourself spending a lot of time retyping commands you've previously entered. You want to view, edit, and rerun shell commands that were recently executed.
One timesaving feature of the Bash shell is that it has several methods for editing and rerunning previously executed commands. This bulleted list highlights several options available for manipulating previously typed commands:
Scrolling with the up and down arrow keys
Using Ctrl+P and Ctrl+N
Listing command history
Searching in reverse
Setting the command editor
Each of these techniques is described briefly in the following sections.
Use the up arrow to scroll up through your recent command history. As you scroll through previously run commands, you can rerun a desired command by pressing the Enter or Return key.
If you want to edit a command, use the Backspace key to erase characters, or use the left arrow to navigate to the desired location in the command text. After you have scrolled up through the command stack, use the down arrow to scroll back down through previously viewed commands.
Note
If you're familiar with Windows, scrolling through the command stack is similar to the DOSKEY utility.
The Ctrl+P keystroke (pressing the Ctrl and P keys at the same time) will display your previously entered command. If you have pressed Ctrl+P several times, you can scroll back down the command stack by pressing Ctrl+N (pressing the Ctrl and N keys at the same time).
Use the history command to display commands that have been previously entered by the user:
$ history
Depending on how many commands have previously been executed, you may see a lengthy stack. You can limit the output to the last n number of commands by providing a number with the command. For example, the following lists the last five commands that have been run:
$ history 5
Here is some sample output:
273  cd -
274  grep -i ora alert.log
275  ssh -Y -l oracle 65.217.177.98
276  pwd
277  history 5
To run a previously listed command in the output, use an exclamation point (!, sometimes called the bang) followed by the history number. In this example, to run the pwd command on line 276, use ! as follows:
$ ! 276
To run the last command you ran, use !!, as shown here:
$ !!
Press Ctrl+R (press the Ctrl and R keys at the same time), and you'll be presented with the Bash shell reverse search utility:
$ (reverse-i-search)`':
From the reverse-i-search prompt, as you type each letter, the tool automatically searches through previously run commands that have similar text to the string you entered. As soon as you're presented with the desired command match, you can rerun the command by pressing the Enter or Return key. To view all commands that match a string, press Ctrl+R repeatedly. To exit from the reverse search, press Ctrl+C.
You can use the set -o command to make your command-line editor be either vi or emacs. This example sets the command-line editor to be vi:
$ set -o vi
Now when you press Esc+K (press the Esc key and K key at the same time), you are placed in a mode where you can use vi commands to search through the stack of previously entered commands.
For example, if you want to scroll up the command stack, you can use the K key, and similarly, you can scroll down using the J key. When in this mode, you can use the slash (/) key and then type a string to be searched for in the entire command stack.
Tip
Before you attempt to use the command editor feature, ensure that you are thoroughly familiar with either the vi or emacs editor (see Chapter 4 for details on using vi).
A short example will illustrate the power of this feature. In this example, say you know you ran the ls -altr command about an hour ago. You want to run it again but this time without the r (reverse sort) option. To enter the command stack, press Esc+K:
$ Esc+K
You should now see the last command you executed. To search the command stack for the ls command, type /ls and then hit Enter or Return:
$ /ls
The most recently executed ls command should appear at the prompt:
$ ls -altr
To remove the r option, use the right arrow key to place the prompt over the r on the screen, and press X to remove the r from the end of the command. After you've edited the command, press the Enter or Return key to have it executed.
Your command history is a stored sequential list of all the commands you have previously entered. You can use any of the techniques described in the "Solution" section of this recipe to view and manipulate previously entered commands.
The Bash shell command history is stored in your home directory in a file named .bash_history. If your current working directory is your home directory, then you can view the contents of this file with a utility such as cat. The following example uses the cd command to navigate to the home directory and then displays the contents of the .bash_history file with the cat command:
$ cd
$ cat .bash_history
The number of entries stored in the .bash_history file is determined by the HISTSIZE operating system variable. You can verify the history size using the echo utility. On this system, the command history size is 1000:
$ echo $HISTSIZE
10000
Usually system administrators will set the HISTSIZE variable in the /etc/profile file (which is automatically executed whenever a user logs on to a server). You can override the system's default value for command history by setting the HISTSIZE variable in a special startup file (see recipe 2-5 for details).
The easiest way to view the Bash shell command history is to use the up and down arrows to find the command of interest and the left and right arrows and/or the Backspace key to modify the command. Other shells typically do not allow the use of the up and down arrows. Table 2-1 lists common shells and what types of command history manipulation each tool supports.
You get tired of typing long commands. You wonder whether there is some way the Bash shell can automatically fill in the text for long command strings.
The Tab key can be used for command completion. For example, say there are two files in the current directory named initRMOUGDB.ora and initBRDSTN.ora:
$ ls
initBRDSTN.ora initRMOUGDB.ora
In this example, you want to edit the initRMOUGDB.ora file with the vi utility. All you have to type is enough to make the file name unique within a directory and then press the Tab key (ensure that there is no space between the text and the Tab key):
$ vi initR<Tab>
Since there are no other files in the current directory that begin with the string initR, the Bash shell will automatically fill in the text initRMOUGDB.ora:
$ vi initRMOUGDB.ora
Now you can press the Enter or Return key to edit this file. One thing to note is that you can use this technique on any program, directory, command, or file. For example, if you need to change directories to a subdirectory named products and there are no other directories beneath your current working directory that start with the letter p, you can type cd p and then hit the Tab key. Your prompt will then show the following:
$ cd products/
You can now press the Enter or Return key to execute the cd products command.
A timesaving feature of the Bash shell is command completion. This feature allows you to only partially type a program, command, file, or directory and then hit the Tab key, and the shell will attempt to complete the rest of the text.
If the Bash shell can't uniquely identify a program, command, file, or directory, then it will beep after you press Tab. In this situation, if you press Tab again, the shell will display all the possible programs, commands, files, or directories that match what string was partially typed.
For example, command completion can be used to show all executable files that start with a certain string. If you want to view all commands that start with the string di, then type di and hit the Tab key twice:
$ di<Tab><Tab>
diff       diff-jars  dir        dirname    disable    disown
diff3      dig        dircolors  dirs       disol
You should hear a bell (sometimes called a beep) sound after you enter the first Tab. The Bash shell will search for commands that start with the string di that are located in any directories contained within the PATH variable.
You can use any of the following Linux commands to display operating system variables:
printenvenvsetexportecho
To display all variables set in your environment, then use any of the following commands (without any options): printenv, env, set, or export. The next bit of code uses the printenv command to show all environment variables:
$ printenv
Here's a partial listing of the output:
HOSTNAME=rmg.rmg.org
TERM=cygwin
SHELL=/bin/bash
HISTSIZE=1000
SSH_TTY=/dev/pts/0
USER=oracle
If you know the name of the variable you want to display, you can display it directly with the echo command. To display the contents of an operating system variable, you must preface it with a $ (dollar sign) character. This example uses the echo command to display the contents of the USER variable:
$ echo $USER
oracle
You can also use the printenv command to display environment variables. The following example uses printenv to show the current setting of the USER variable:
$ printenv USER
oracle
Most DBAs work with multiple database servers. Every time you log on to a server, certain operating system variables are automatically set for you. Table 2-2 lists several environment variables you should know. Use any of the commands described in the "Solution" section of this recipe to view variables in your environment.
Table 2.2. Commonly Used Environment Variables
Variable | Description |
|---|---|
| Contains a list of directories in which the shell will look to find the executable commands. This variable is usually set by a shell startup script. |
| Contains the user account you used to log in to the server. This is automatically set for you when you log on. |
| Holds the home directory for a user. This is set for you when you log on. |
| Holds the home directory for a user. The tilde character is a shorthand way to reference your home directory. This is set for you when you log on. |
| Contains the location of the current working directory. This is set whenever you use |
| Contains the name of your login shell. |
| Holds the name of the default editor used with some utilities (such as |
| Contains the values used for displaying the command prompt. |
| Keeps track of how many subshell levels deep your current shell is. |
| Is used by X applications to determine the display server used for input and output. |
Sometimes you may not know the exact name of the variable. In situations like this, use the grep command to filter the output. This next example uses the set command and sends the output to the grep command for filtering any variables related to secure shell (SSH):
$ set | grep ORA
Here's some typical output from the previous command:
ORACLE_BASE=/oracle
ORACLE_HOME=/oracle/product/10.2
ORACLE_SID=RMDB1
PS1='[h:u:${ORACLE_SID}]$ '
Tip
For details on all variables set by the Bash shell in your environment, inspect the output of the man bash command. Search the man page for shell variables.
One quick way to display your shell is to echo the SHELL variable. You must specify a $ in front of the variable to display its contents:
$ echo $SHELL
In this example, the Bash shell is in use:
/bin/bash
You may occasionally find yourself logged on to a box and wonder why certain Bash shell commands aren't working. In shops that have a large number of Linux and Unix servers, there may not be a consistent shell standard. In environments like this, first verify the current setting of your shell.
You can also use the $0 variable to show your current working shell. The $0 variable holds the name of the shell or script that is currently running. In this example, the Bash shell is the current shell:
$ echo $0
-bash
Another method for viewing the current shell is by running the ps command without any options:
$ ps
The first line of the output will show which shell you are currently using. You should see output similar to this:
PID TTY          TIME CMD
9088 pts/1    00:00:00 bash
9137 pts/1    00:00:00 ps
You want to automatically set various database variables whenever you log on to your database server.
Place shell variables that you want automatically set (when you log on) in the .bash_profile file in your home directory. In the next example, the ORACLE_SID variable is set to BRDSTN. The following text is placed in the .bash_profile file:
export ORACLE_SID=BRDSTN
Now if you log off and log back on, you can verify that this variable has been set by echoing it:
$ echo $ORACLE_SID
BRDSTN
If you don't want to log off and back on, then run the file manually using the . (dot) command. This command executes the lines contained within a file. The following example runs the .bash_profile file:
$ . $HOME/.bash_profile
The . instructs the shell to source the script. Sourcing tells the shell process that you are currently logged on to inherit any variables set with an export command in an executed script. If you don't use the . notation, then the variables set within the script are visible only within the context of the subshell that is spawned when the script is executed.
Note
In the Bash shell, the source command is equivalent to the . (dot ) command.
When using the Bash shell, several special startup files can potentially be executed for you when first logging on to your database server:
/etc/profile˜/.bash_profile˜/.bash_login˜/.profile
Note
Depending on the version of the Linux operating system, there may be different startup files in use. Run the ls -altr in command in your home directory to view all files available.
The /etc/profile file is maintained by your system administrator, and you need root privileges to modify it. This file sets systemwide variables common to all users logging on to the system. Here is a snippet of some typical entries in the /etc/profile file:
# No core files by default
ulimit -S -c 0 > /dev/null 2>&1
# Set OS variables
USER="`id -un`"
LOGNAME=$USER
MAIL="/var/spool/mail/$USER"
HOSTNAME=`/bin/hostname`
HISTSIZE=1000
After running the /etc/profile file, the Bash shell will next search for the following files and run only the first file it locates (in the following order): ˜/.bash_profile, ˜/.bash_login, ˜/.profile.
Here are some typical entries in the oracle user's ˜/.bash_profile file:
# User specific environment and startup programs
PATH=$PATH:$HOME/bin
# Source the oracle OS variables for BRDSTN database
. /var/opt/oracle/oraset BRDSTN
You should be aware of two additional important startup type files:
˜/.bashrc˜/.bash_logout
If you start a nonlogin Bash shell by typing bash at the command line, then the ˜/.bashrc file will automatically be executed for you. DBAs will place commands in ˜/.bashrc to ensure that database-related operating system commands are consistently set regardless of whether they are using a login shell or a nonlogin shell. A common technique to address this is to place the following code in the ˜/.bash_profile file:
# Run .bashrc if it exists
if [ -f ˜/.bashrc ]; then
        . ˜/.bashrc
fi
When first logging on to a Linux server, the previous bit of code checks to see whether the ˜/.bashrc file exists and, if so, then runs it. This method ensures that aliases and functions are defined in a consistent manner regardless of whether it's a login or nonlogin shell.
The ˜/.bash_logout file is appropriately named and is executed when you issue the exit command. Typically you might see the clear command executed in the ˜/.bash_logout file to clear text off the terminal when logging out.
You work with several database servers. You typically have several terminal screens open simultaneously on your screen. To avoid confusion, you would like the hostname and username to be displayed in the command prompt.
The special operating system variable PS1 holds the text string of what appears in the command prompt. This example changes the PS1 variable to hold the hostname and username:
$ PS1='[h:u]$ '
The h and u are special Bash variables that hold the hostname and username, respectively. After setting PS1 in this example, the prompt now shows the following:
[rmougprd1:oracle] $
The string rmougprd1 is the hostname, and oracle is the current operating system user.
Setting your command prompt to something informational can be invaluable for DBAs who work with multiple servers and operating system accounts. Table 2-3 lists many of the Bash shell backslash-escaped special variables that you can use to customize your command prompt.
Tip
You can also view all variables available in your environment by issuing a man bash command. Search for PROMPTING in the man page.
You will most likely want to have your command prompt automatically set for you when you log on to a database server. To do this, place the command that sets the PS1 prompt in a special startup file (see recipe 2-5 for more details on how to do this).
Table 2.3. Bash Shell Backslash-Escaped Variables Used for Customizing Command Prompt
Variable | Description |
|---|---|
| ASCII bell character. |
| Date in "weekday month date" format (for example, Thu Aug 21). |
| ASCII escape character. |
| Hostname. |
| Number of jobs managed by shell. |
| Base name of shell's terminal device. |
| Newline. |
| Carriage return. |
| Name of shell. |
| Time in 24-hour HH:MM:SS format. |
| Time in 12-hour HH:MM:SS format. |
| Time in 12-hour a.m./p.m. format. |
| Time in 24-hour HH:MM format. |
| Current username. |
| Version of Bash shell. |
| Release of Bash shell. |
| Current working directory. |
| Base name of current working directory. |
| History number of command. |
| If effective UID is 0, then display |
You can combine the characters in Table 2-3 with other regular characters or variables. For example, if you want your prompt to always display the current hostname and database SID, then place the following bit of code in your .bashrc file:
PS1='[h:${ORACLE_SID}]$ 'The previous line of code ensures that every time you log on to the server or start a new Bash shell, your prompt will automatically be set to contain the current value of ORACLE_SID. Additionally, if you change the value of ORACLE_SID, your prompt will automatically reflect the new setting. This can be an invaluable tool to eliminate confusion for DBAs who operate on Linux servers that run multiple databases on one physical server.
You find yourself frequently retyping long sets of commands and want to somehow create a shortcut to the lengthy commands.
There are two very common methods for creating shortcuts to other commands: aliases and functions. These two techniques are described in the following sections.
Suppose you find yourself often navigating to a database background process logging destination to view log files. You would have to type something similar to this:
$ cd /oracle/BRDSTN/admin/bdump
You can use the alias command to create a shortcut to accomplish the same task. This example creates an alias named bd that will change directories to a background location that is dependent on the value of the ORACLE_SID variable:
$ alias bd='cd /oracle/$ORACLE_SID/admin/bdump'
Now you can type bd, which will do the same thing as changing your current working directory to the Oracle background dump directory.
You can also use a function to create command shortcuts. We provide only a brief example of how to use a function in this recipe; for full details on using functions, see Chapter 7.
The following line of code creates a simple function named bd:
$ function bd { cd /oracle/${ORACLE_SID}/admin/bdump; }You can now type bd at the command line to change your working directory to the Oracle background dump directory.
An alias is a simple mechanism for creating a short piece of text that will execute other shell commands. To show all aliases that have been defined, use the alias command with no arguments:
$ alias
Listed next are some common examples of alias definitions that DBAs use:
alias l.='ls -d .*'
alias ll='ls -l'
alias lsd='ls -altr | grep ^d'
alias bd='cd $ORACLE_BASE/$ORACLE_SID/admin/bdump'
alias ud='cd $ORACLE_BASE/$ORACLE_SID/admin/udump'
alias sqlp='sqlplus "/ as sysdba"'
alias shutdb='echo "shutdown immediate;" | sqlp'
alias startdb='echo "startup;" | sqlp'
alias valert='view $ORACLE_BASE/admin/$ORACLE_SID/bdump/alert_$ORACLE_SID.log'
You may have to modify some of the previous alias definitions depending on your implementation of Oracle's Optimal Flexible Architecture (OFA) standard. This is especially true if you're using Oracle Database 11g, because the OFA standards changed in regard to the location of the alert.log file.
If you want to remove an alias definition from your current environment, then use the unalias command. The following example removes the alias for lsd:
$ unalias lsd
Using aliases is a common way to create command shortcuts. However, we recommend using functions over aliases. Functions are more powerful because of features such as the ability to operate on parameters passed in on the command line. Functions are described in much more detail in Chapter 7.
DBAs commonly establish aliases and functions by setting them in the $HOME/.bashrc file. For example, here we create a file named dba_fncs and place in it the following lines of code:
#------------------------------------------
# cd to bdump
  function bd {
    cd /oracle/${ORACLE_SID}/admin/bdump
  } # bd
#------------------------------------------
# View Oracle Database 11g alert.log file
function valert2 {
view $ORACLE_BASE/diag/rdbms/$(echo $ORACLE_SID|
tr A-Z a-z)/$ORACLE_SID/trace/alert_$ORACLE_SID.log
} # valert2
#------------------------------------------
A common practice is to create a bin directory beneath the oracle account's home directory and place the dba_fncs file in HOME/bin. The dba_fncs file is sourced as follows:
. $HOME/bin/dba_fcns
Now every time you log on, the functions in the dba_fncs file are sourced and available for you to use as command shortcuts.
If you ever wonder whether a shortcut is an alias or a function, use the type command to verify a command's origin. This example verifies that bd is a function:
$ type bd
bdump is a function
bdump ()
{
    cd /oracle/${ORACLE_SID}/admin/bdump
}You want a shell command to receive its input from a file or another process instead of commands typed from the keyboard.
In Linux you can instruct a command to receive its input from a file with the < character. This technique is known as redirection. In this example, we use the mail command to send a log file named output.log to an e-mail account of [email protected]:
$ mail [email protected] <output.log
You can also use the output of one command as the input to another command. This technique is known as pipelining. The pipe (|) character instructs a process to receive its input from the output of another process. In this example, we use the output of the cat command as the input to the mail command:
$ cat output.log | mail [email protected]
This technique of piping the output from one command to another is an extremely powerful tool. DBAs use this method to chain commands together to perform complex tasks. We provide many examples of this approach throughout the book.
In Linux there are three data streams associated with a process:
Standard input (also called standard in or stdin)
Standard output (also called standard out or stdout)
Standard error (also called stderr)
Figure 2-2 displays the three data streams associated with each Linux process. Starting on the left side of the figure, standard input is the data provided to the Linux process. This is usually data entered by you from the keyboard. As demonstrated in the "Solution" section of this recipe, standard input can also come from a file or as the output of another process.
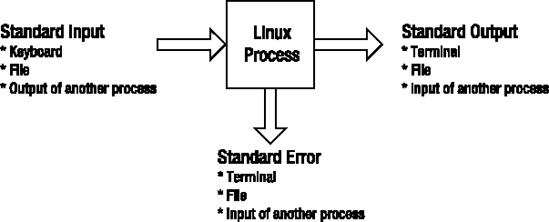
Shell programs often generate output data. By default, standard output data is directed to the terminal. Standard output can also be redirected to a file or another Linux process. Recipe 2-9 demonstrates how to redirect standard output to a file or another process.
Sometimes shell programs generate error messages. By default, standard error messages are displayed to your terminal. Like standard output, standard error messages can be redirected to a file or another process.
The Linux process doesn't care where its input comes from or where the output is delivered. This means you can string together combinations of commands that feed output from one command to be used as the input to another command. This piping of command output to another command's input is a very powerful and flexible feature of the shell. Table 2-4 summarizes the ways in which standard input, output, and errors can be redirected using the Bash shell.
Table 2.4. Command Input and Output Redirection Operators
Operation | Bash Shell Redirection Syntax |
|---|---|
Read standard input from a file. |
|
Read standard input until end of marker. |
|
Write standard output to a file. |
|
Append standard output to end of file. |
|
Write standard output and standard error to separate files. |
|
Write standard output and standard error to the same file. |
|
Write standard output and standard error to the same file. |
|
Append standard output and standard error to the end of a file. |
|
Send (pipe) standard output of first command to input of second command. |
|
Send (pipe) standard output and standard error to input of second command. |
|
Some additional explanation is required for interpreting the second column of Table 2-4. Notice that the < and << characters are used to redirect standard input. The > and >> characters are used to redirect standard output. Also notice that the characters > and >> are shorthand for 1> and 1>>. Likewise, < and << are shorthand for 1< and 1<<.
The 2> and 2>> characters are used to redirect standard error. Also note that the syntax 2>&1 means to redirect the standard error stream to the same location as standard output. In the Bash shell, you can also use the syntax &> to send both standard error and standard output to the same file.
The &0, &1, and &2 characters are used to represent the files used for standard input, standard output, and standard error, respectively. Put another way, the &0, &1, and &2 characters are synonyms for the /dev/stdin, /dev/stdout, and /dev/stderr files, respectively. To illustrate this point, this example uses the file /dev/stdout to redirect standard error to the same location as standard output:
$ cat initBRDSTN.ora 1>myfile.txt 2>/dev/stdout
The previous command is equivalent to the following:
$ cat initBRDSTN.ora 1>myfile.txt 2>&1
The previous command directs the standard output 1> to be sent to myfile.txt. If any errors are encountered when issuing the command (for example, if file initBRDSTN.ora doesn't exist), the standard error stream >2 is sent to the same location as standard out (which is myfile.txt).
By default, the output from a command will be displayed on your terminal. The > character is used to redirect the output of a command to a specified file. The > character is synonymous with 1>. For example, the following command will take the output of the cat command and place it in a file named output.txt:
$ cat init.ora >output.txt
If the init.ora file doesn't exist, then you'll receive an error message such as this:
cat: init.ora: No such file or directory
You should know about some other interesting features of redirecting command output. For example, you can also instruct the shell command to redirect any errors that are encountered when running a script to a separate file. The 2> characters specify where errors should be written. Just as > means redirect output to a file, 2> means redirect error messages to a file. This example redirects standard output to the file output.txt and sends any error messages encountered to errors.txt:
$ cat init.ora >output.txt 2>errors.txt
You can also use a shorthand notation to send both standard output and error messages to the same file:
$ cat init.ora >output.txt 2>&1
The 2>&1 notation instructs the shell to send output stream number 2 (error output) to the same place as output stream number 1 (standard output). You'll find it useful to use this notation when running scripts such as database-monitoring jobs.
If for any reason you don't want to overwrite the output file, then use the >> syntax. The >> syntax instructs the shell to append any messages to the end of an existing file:
$ cat init.ora >>output.txt 2>&1
If you do not want text to appear on your screen or to be saved in a physical file, then you can send it to the proverbial "bit bucket" (the /dev/null device). The following example uses the dd command to read a file one block at a time without writing the output to a file:
$ time dd if=/ora01/BRDSTN/user_data01.dbf of=/dev/null
The previous command is useful for troubleshooting disk I/O issues without the overhead of physically creating a file. If you divide the datafile size by the total time the command took to run, this will give you the disk I/O rate. You can compare that value with V$BACKUP_ASYNC_IO.EFFECTIVE_BYTES_PER_SECOND to help you determine whether RMAN has a potential I/O problem.
The /dev/null file is a special file known as the null device. It also called slash dev slash null or the bit bucket. It contains nothing, and any output you send to this special file will never be seen again.
The null device is useful in situations where you don't want to see all the error messages generated by a command. For example, the following find command will generate error messages for directories that it can't read.
$ cd /
$ find . -name "alert*.log"
Here is a partial snippet of the output:
find: cannot read dir ./var/fm/fmd/xprt: Permission denied
find: cannot read dir ./var/fm/fmd/rsrc: Permission denied
find: cannot read dir ./var/fm/fmd/ckpt: Permission denied
To eliminate those error messages, send the error output to the null device:
$ find . -name "alert*.log" 2>/dev/null
If you know you're going to be running a program or command that generates output you don't need, then you can redirect the output to the /dev/null file. This file can also be used to quickly reduce a large file to 0 bytes without deleting the original file (see recipe 5-31 for details).
You want to see the output of a command on your screen, and additionally you want to store the output in a file.
If you want to capture only the output associated with the execution of a specific operating system command, then you can use the tee command. The tee command enables the writing of any output generated by a command to both the screen and a designated file.
The following example runs the ls command to list all files in a directory. It also saves that output to a file that can later be viewed to determine the names and sizes of files on a particular date:
$ ls -altr /ora01/BRDSTN | tee /home/oracle/log/oct15_df.log
Here is some sample output of what is displayed to the screen and recorded in the log file:
-rw-r-----  1 oracle oinstall  52429312 Oct 15 08:00 redo03a.log
-rw-r-----  1 oracle oinstall 838868992 Oct 15 08:25 undotbs01.dbf
-rw-r-----  1 oracle oinstall 524296192 Oct 15 08:30 system01.dbf
-rw-r-----  1 oracle oinstall  15056896 Oct 15 08:37 control01.ctl
The tee command is useful when you want to interactively see the output of a command displayed on the screen and also require that the display be logged to a file that can be inspected later for debugging or troubleshooting activities.
Tip
The tee command is similar to a plumbing t-splitter pipe in that it allows one input stream to be bifurcated into two output pipes.
You're performing a database upgrade, and you need to run several SQL scripts. You want to record the output of everything printed to your screen to a log file.
The script command enables the recording of all output printed to your screen to also be written to an operating system file. This example writes all output to a file named upgrade.log:
$ script upgrade.log
Script started, file is upgrade.log
From this point on, all output printed to your terminal is also recorded in the script upgrade.log. To end the script logging session, press Ctrl+D or type exit. You should see this message similar to this:
Script done, file is upgrade.log
The script command is invaluable when you need to capture all output being printed to the terminal. This command will store all output in an operating system file that can later be used to verify what tasks were performed and whether the operations succeeded or failed.
If you don't specify a file name when using script, a default file with the name of typescript will be created. If you need to append to an already existing file, use script with the -a option, as shown here:
$ script -a upgrade.log
This enables the capturing of all output from all scripts that are being run. This can be extremely useful when you have a mix of operating system commands and database commands and want to capture the output of every operation.
DBAs use the script command in situations where the person who developed upgrade scripts (DBA #1) is passing the scripts to a different team member (DBA #2) to have those scripts executed in another database environment. In this scenario, DBA #2 will start a script job, run the upgrade scripts, end the script logging, and send the generated log file to DBA #1 for verification purposes.
Your system administrator has set your operating system account to use the Bash shell, and you want to change it to the Korn shell.
Use the chsh (change shell) command to change the default login shell. You can specify the desired login shell directly with the -s option. In this example, I'll change the default shell for the oracle user to the Korn shell:
$ chsh -s /usr/bin/ksh
Changing shell for oracle.
Password:
After successfully entering the password, a message "shell changed" will be displayed. If you don't specify a shell with the -s option, then you will be prompted for a password and then a shell:
$ chsh
Changing shell for oracle.
Password:
Enter the password for your operating system account. You should now see the following text:
New shell [/usr/bash]:
To change your shell to the Korn shell, enter the following text:
/usr/bin/ksh
And you should see a message confirming that your shell has been changed:
Shell changed.
Most Linux operating system accounts are created with the Bash shell as the default. In most circumstances, the Bash shell is the preferred shell. However, if you're migrating to Linux from another Unix operating system, you may have a preexisting affinity to a non-Bash shell.
The valid shells available on your server are stored in the /etc/shells file. You can use the chsh -l command or use the cat command to view the contents of the /etc/shells file. This next example uses the cat command to display the available shells:
$ cat /etc/shells
/bin/sh
/bin/bash
/sbin/nologin
/bin/ash
/bin/bsh
/bin/ksh
/usr/bin/ksh
/usr/bin/pdksh
/bin/tcsh
/bin/csh
We recommend that you use the Bash shell on Linux systems. The Bash shell is very robust and incorporates most of the useful features from the Bourne shell, Korn shell, and C shell. Table 2-5 describes the various shells available in Linux environments.
Table 2.5. Descriptions of Some of the More Popular Linux Shells Available
You can verify what your default login shell has been set to by viewing the contents of the /etc/passwd file. For example, to view the default shell for the oracle user, use the cat and grep commands:
$ cat /etc/passwd | grep -i oracle
oracle:x:500:500::/home/oracle:/usr/bin/ksh
Note
You do not need any special privileges or the assistance of your system administrator to use the chsh command.
You need your shell to automatically find executable programs that are not currently in a directory that is included in your PATH variable. You want to add directories to your PATH variable.
You can manually add a directory to your PATH variable by using the export command. The following example appends the /oracle/product/11.0 directory to the current contents of the PATH variable:
$ export PATH=$PATH:/oracle/product/11.0
In the previous line of code, the PATH variable is defined to be the current contents of PATH plus the directory of /oracle/product/11.0. You separate directories in the PATH variable with a colon (:).
If you want to have a directory added to your PATH variable every time you log on to your database server, then place the export command in a special startup file (see recipe 2-5 for details).
The export command allows you to define variables that will be available to subsequently executed commands. You can add directories to the PATH variable by exporting it. To verify the contents of your PATH variable, you can use the echo command:
$ echo $PATH
Occasionally you might encounter an Oracle RMAN issue when the directory /usr/X11R6/bin appears in the PATH variable before the ORACLE_HOME/bin directory. Here, attempt to start rman:
$ rman target /
rman: can't open target
You received this error because there is an rman executable in the /usr/X11R6/bin directory that has nothing to do with the Oracle rman backup and recovery utility. In this scenario, you'll have to modify your PATH variable to ensure that ORACLE_HOME/bin comes before /usr/X11R6/bin:
$ export PATH=$ORACLE_HOME/bin:$PATH
The other alternative is to rename the rman executable in /usr/X11R6/bin to something like rman.X11.
Tip
See Oracle's MetaLink Note 101050.1 for issues regarding your PATH variable and the rman executable.
You wonder whether you're running a built-in version of a shell command or whether you're using the binary program located in the /bin directory.
Use the help command to view all built-in commands. For example, if you type help with no arguments, then all built-in commands will be displayed:
$ help
Here is a partial listing of the output:
alias [-p] [name[=value] ... ]
bind [-lpvsPVS] [-m keymap] [-f fi
builtin [shell-builtin [arg Figure
.]]
case WORD in [PATTERN [| PATTERN].
command [-pVv] command [arg ...]
complete [-abcdefgjksuv] [-pr] [-o
declare [-afFirtx] [-p] [name[=val
disown [-h] [-ar] [jobspec ...]
You can also use the type command to determine whether a program is built in. Use the -a option of type to print all locations in the PATH variable that include a command (including all aliases and functions). The following example shows that there is a built-in pwd command and also a pwd program in the /bin directory:
$ type -a pwd
pwd is a shell builtin
pwd is /bin/pwd
Note
You might wonder why Linux provides both a built-in command and a program for pwd. This is because some shells may not have a built-in command for pwd, so a Linux program is explicitly provided in the /bin or /usr/bin directory.
Some commands are built in to the Bash shell. Built-in simply means that the shell contains its own version of the command. Therefore, if you run a built-in command such as pwd, the Bash shell will run its version of the pwd command rather than the executable program located in the /bin or /usr/bin directory. If you want to explicitly run the pwd command in the /bin directory, then specify the complete path and file name. This example shows how to run the pwd program located in the /bin directory:
$ /bin/pwd
In some situations, it's important to know whether a command is built in to the shell or not. Built-in commands execute faster than their counterparts in the /bin or /usr/bin directory. This is because there is no overhead of looking in directories for the command and then loading the command into memory for execution.
Additionally, there are code portability issues to consider. Built-in commands typically have the same behavior from one Linux vendor to another, whereas the commands in the /bin and /usr/bin directories may behave differently between different ports of Linux (especially older versions).
Built-in commands do not start a separate process (sometimes called forked, child, or spawned) when they are executed. This is a requirement of some commands such as cd. This is because a child process cannot modify its parent process. If cd were executed as a child process, it would not be able to modify the current working directory of the parent process and therefore wouldn't be of much use. For this reason, the Bash shell contains its own executable code for the cd command. Table 2-6 describes some of the more commonly used Bash built-in commands.
Table 2.6. Commonly Used Bash Built-in Commands
Bash Built-in Command | Description |
|---|---|
| Changes directories |
| Displays strings and the contents of variables |
| Displays help on Bash built-in commands |
| Shows recently run commands |
| Prints the current working directory |
| Sets and displays various system resource limits imposed on the shell |
You can instruct the Bash shell to explicitly run a built-in command with the builtin command. Sometimes this is useful when porting scripts between different versions of Linux. The builtin command will run the built-in version of the command even if there is an alias declared for it. This example runs the pwd built-in command:
$ builtin pwd
Likewise, you can explicitly instruct Bash to run the Linux program version of a command, even if there is a built-in command or alias defined with the same name. This example runs the program version of the pwd command that is located in the /bin directory:
$ command pwd
You can also use the enable command to enable or disable the use of a built-in command. This example uses enable -n to disable the pwd built-in command:
$ enable -n pwd
$ type pwd
pwd is /bin/pwd
This example reenables the pwd command:
$ enable pwd
$ type pwd
pwd is a shell builtin
Tip
You can also use the man bash command to view all built-in commands. When viewing the bash man page, search for shell built-in commands.
You've entered in a command incorrectly, and you want to backspace over previously entered characters so that you can correct them. When you attempt to use the Backspace key, instead of it deleting previously entered characters, it shows the ^?characters.
Use the stty command to set your Backspace key to delete characters properly. The following bit of code sets the Backspace key to delete characters:
$ stty erase Ctrl+Backspace
In the previous command, ensure that you press the Ctrl key and Backspace key at the same time. This may vary depending on your Linux system; for example, the following is an alternative way of setting the Backspace key:
$ stty erase <Backspace>
In the previous line of code, don't type the word Backspace; rather, you need to press the Backspace key.
When working with older versions of Linux or Unix, you may find yourself logged on to a server and the Backspace key doesn't work. In situations like these, you'll have to manually set the Backspace key to function correctly. If you want the Backspace key to be automatically set every time you log on to the server, then place the stty command in a special startup file (see recipe 2-5 for details).
Note
On some older Linux or Unix systems, you may need to use the stty erase ^H command or the stty erase ^? command to set the Backspace key.
Use the backslash () character followed by pressing the Enter or Return key to extend a line of code to the next line. The following example shows how to break a long rman connection command over several lines:
$ /usr/oracle/product/10.2.0/db_1/bin/rman
>  target /
>  catalog rman/rman@db11g_bllnx1
>  cmdfile=/home/oracle/scripts/rmancheck.rmn
>  msglog=/home/oracle/rmanlog/rmancheck01.log append
You could have typed the previous command on one line. In situations where you have a limited terminal width, though, you may want to consider breaking a command up into multiple lines.
Sometimes it's desirable to extend a command across multiple lines for readability reasons. When you type followed by the Enter or Return key, the next line will be preceded by the > character. This indicates the command has been extended to the next line. Both the backslash and the new line marker will be ignored when using this technique.
It doesn't matter at what position within the command you use the backslash. You can break a command over as many lines as necessary.