The techniques and disciplines that directors use should fit their own personalities, the capabilities of the on-air talent, and the needs of the show they are directing. Some directors are by nature more authoritative than others and give concrete direction. Others rely more on psychology and obtain disciplined performances by letting the talent and technicians feel they are the ones in charge of their own actions. Professional actors, such as those participating in a drama, require different handling than nonprofessionals who might be making a first-time appearance on an interview program. A children’s program with many young kids requires a more patient approach than a fast-paced newscast with seasoned professionals.
Equipment also affects methods and duties related to directing. For example, if robotic cameras (see Chapters 2 and 5) are being used, the director gives commands to one person operating all cameras rather than to individual camera operators. Directors should be familiar with the equipment in the studio. They don’t need to know the intricacies of each piece, but they should know the underlying principles so that they can communicate effectively with the crew members who operate it.
Also, what the director does is sometimes affected by what the producer has done. Many series TV programs have been cast by the producer and others before the director sets foot in the studio or on location. For other types of programs, such as a movie of the week, the director might have an important influence on which actors are chosen for the parts.
The Directors Guild of America is the professional organization for directors of theatrical, industrial, educational, and documentary films and television, as well as videos and commercials. As with all the guilds, membership eligibility requires a certain amount of work, along with annual dues. In exchange, the guild provides various benefits, such as insurance. The work of directors is frequently honored at film festivals and at awards ceremonies such as the Directors Guild of America Awards, Academy Awards, Emmys, Golden Globes, and so on.
The “Manager” Role
A director is part manager, part artist, and part psychologist. Directors give instructions to cast and crew, make sure the production is aesthetically pleasing, and handle the reasonable (and unreasonable) demands or quirks of those involved with the production.1 As the overall “boss,” the director oversees all activity in the studio and on the set.
In addition, the director has many specific tasks that are primarily his or her domain and that are part of managing the program. These include blocking the production, marking the script, other preparation, conducting rehearsals, and calling shots. The associate director, working with the director, plans and executes the timing procedures for the show.
Blocking
Once you and your producer have determined the purpose of the script and are sure it is the approximate length you want (see Chapter 2), you should start thinking about blocking: the placement of talent and cameras and figuring out how and where they are going to move during the program. This process (also referred to as staging) is more complex for dramas and comedies than it is for news and public affairs programs, but all programs need some form of blocking. Staging involves the relationships of the talent with each other and with the cameras.
Think through how the actors or performers will best relate to each other. Should the talk-show host sit in the middle of two guests or to the right of both of them? Can the weathercaster interact with the anchors while standing on the weather set, or will you need to allow time for him or her to walk to the anchor area? Should the husband lean against the back of the wife’s chair or sit down in the chair next to her? Consider the actors’ comfort. An actress who has to turn her head unnaturally to see the man playing her brother is going to be too uncomfortable to deliver her lines well.
Also think through the relationship of the actors to the cameras. Where should the daughter be positioned so that camera 2 can capture a good close-up of her reaction to her father’s chastisement? On which burner of the stove should the chef stir the pudding so that camera 3 can obtain an effective shot?
Directors often draw blocking diagrams to help them visualize the shots ahead of time. (See Figure 4.1.) Using these plots, they can plan moves and think through how the people and the equipment will interact. One useful blocking technique is to start planning shots in the center of the program. Pick the most crucial or difficult part of the production and figure out your camera pattern for that segment first. Then you can figure backward to see how you will work your way up to that position and how you will proceed to the end of the program.
In planning multi-camera blocking, keep in mind that the action is continuous, and you will not be able to stop to readjust the prop in someone’s hand. Also keep in mind the position of all the cameras so that they are not visible in shots. You must consider the position of actors and cameras so that shots can flow appropriately from one camera to another. With single-camera shooting you can stop, but actors must perform in the same fashion over and over again so that all takes are consistent (see Chapter 12).
Marking the Script
Once you have thought through the blocking, you can mark your copy of the script so that you can call commands effectively during the program. Indicate which cameras you are going to use for which shots, what instructions the technical director and camera operators will need, where the audio cues will be, what cues the talent will need, and so forth. Most directors develop their own shorthand for marking their scripts, but some commonly used script-marking symbols are shown in Figure 4.2.
Depending on the program and the director’s experience, scripts are marked in varying degrees. A major studio comedy special might involve hundreds of abbreviated cues, instructions, and notes. With a fairly routine ongoing program, script preparation might require no more than a few penciled reminders of unusual cues.
As a beginning director, you will probably feel more comfortable with a heavily marked script. (See Figure 4.3.) The process of noting all the commands you will need to give helps you when you are in the director’s chair. As you gain more experience, you can cut down on the number of markings. For example, you may initially mark a “T” for each take (quick cut from one shot to another). As you become more experienced, you can assume that changes from one camera to another will be takes unless they are indicated otherwise and drop the “T” from your markings. Also, once you become more experienced, rather than writing in many markings, you can simply underline elements that are already in the script to remind you of needed instructions.

Other Preparation
The amount of additional preparation depends on your level of experience and the type of program material you are directing. You want to be well-prepared when you enter the studio. You might, for example, wish to storyboard (see Chapter 3) certain complicated parts of the script so that you can see in your mind’s eye exactly how each shot will look. Or you might make a floor plan of the entire studio setup. This can help you with blocking and also enable you to keep the overall environment in mind as you think through the show.
Some directors prepare shot sheets for their camera operators. (See Figure 4.4.) These are abbreviated descriptions of every shot that each camera has to get. A shot sheet is compact enough to be attached to the rear of the camera, where the operator can quickly refer to it. Shot sheets are not particularly useful for interview shows, where the director calls shots on the fly depending on who happens to be talking. But they are very valuable for complex, fully scripted programs, where every shot has been carefully worked out and the cameras have to move quite a bit to get the shots.

Conducting Rehearsals
The number and kinds of rehearsals depend on the program type. They can range from essentially none for live news coverage to several days for a sitcom. You want everything to be rehearsed enough so the program runs smoothly, but at the same time you do not want to over-rehearse so the material becomes stale to both talent and crew. Sometimes, outside factors, such as the amount of money budgeted to pay the actors or the amount of time the studio is available, affect your rehearsal schedule. You might wish to think in terms of three different kinds of rehearsals: pre-studio, floor, and control room.
Pre-studio Rehearsals
For many extensive productions, especially dramas and comedies, you want some rehearsals prior to coming into the studio. Studio time is too precious to start from scratch with basic blocking. Using a rehearsal hall, an empty studio, or a living room, you can begin working with actors. Specific areas can be measured off and marked with masking tape or furniture to represent major staging areas. Much of your blocking can be rehearsed, as well as quite a bit of the dramatic interpretation and line readings.
For non-dramatic productions, there are also many good reasons for pre-studio rehearsals. Demonstration shows, educational programs, and the like can benefit from having an early dry-run session, where the director and talent can work together on the basic staging of the program. For both dramatic and non-dramatic shows, it is a good idea to rehearse business prior to going into the studio. Business is what people do while they are talking, such as cutting up tomatoes or mopping the floor, and often it is the most complicated part of the show.
Production meetings are also a form of pre-studio rehearsal. Whenever possible, the director should gather together all the significant people involved in the studio and go over the entire show. In this way, each person knows his or her role in relation to the overall production.
Studio Floor Rehearsals
When the director and the production crew start to work in the studio, the director usually spends time on the studio floor before assuming the director’s chair in the control room.2 If the talent is particularly insecure or if the technical coordination of a production is really complicated, you might spend quite a bit of your time on the floor. However, if the talent is in control and the technical elements are no special problem, you will benefit from getting into the control room as early as you can.
The main rehearsal you conduct from the studio floor is a walk-through. This might be either a talent walk-through, if they are not certain of their positions and movements, or a technical walk-through (also called a technical rehearsal) to explain major camera moves, audio placement, and scene changes. In many instances, the walk-through is a combination, taking both the talent and the crew through an abbreviated version of the production. During this time, it is beneficial to have a monitor in the studio that simultaneously displays all camera outputs (e.g., with a quad split). This helps the actors and crew visualize how the different shots interrelate.
Control Room Rehearsals
More complete rehearsals are usually conducted with the director calling shots from the control room. The first rehearsal may be a start-and-stop rehearsal. In this approach, you interrupt the rehearsal every time there is a major problem, correct it, and then continue the rehearsal. It is quite a time-consuming process, but it can be effective if you have the luxury of enough studio time.


Another approach is the uninterrupted run-through. Here, the director attempts to get through the entire production (or the segment of the production that is about to be shot) with a minimum of interruptions. Unless problems are major, you keep plowing through the rehearsal regardless of what happens. After the rehearsal is complete, you point out all the mistakes and correct them.
Finally, there is the dress rehearsal. In theory, this is the final rehearsal: a complete, uninterrupted, full-scale run-through after all the problems have been straightened out. In practice, this stage is rarely reached. Realities of the medium are such that there simply is never enough studio time to do as polished a job as you want. In many instances, the director winds up with a combination start-and-stop and dress rehearsal.
When time is short, you must economize and try to make the most efficient use of the time available. Do not stand around waiting for others to finish their jobs before starting your rehearsal; you can rehearse even while the lighting crew is still trimming the lights and while the audio technician is establishing music levels. In an abbreviated rehearsal, at least make certain you get through all the rough spots in the production; rehearse the open and the close and the crucial transitions that call for coordination of several kinds of movement. Pick your priorities; do not get hung up on small details (e.g., worrying about the possibility of a boom shadow) when you have only a few minutes to work out major problems (e.g., talent not knowing where to move next).
Using Communication Devices
When you are in the control room and need to talk to people in the studio, you obviously cannot holler through the soundproof walls or windows. Several communication devices can facilitate talking with the cast and crew. The main way the director communicates is through an intercom system, sometimes referred to as the PL for private line (some use the term Clear-Com—a very common brand that has come to be used generically for any intercom). The intercom is a closed-circuit audio network that connects all primary production personnel by headsets with microphones. In theory, any crew member with a headset can talk to anyone else. In practice, the director does most of the talking during a production.
During Setup
When directors (or others) need to talk to talent or crew during setup, they often use the studio address (SA) or public address (PA) system. This is a loudspeaker in the studio with a talkback microphone in the control room, which enables the director or others to be heard by everyone, whether or not they are wearing headsets. Because the director’s voice can suddenly boom out of the studio speaker, the microphone is sometimes jokingly called the “God mic.” Most studios also have a talkback feature with a mic hanging in the studio so that cast and crew on the floor can be heard in the control room (even if faintly).
You can also use the studio speaker when talent needs to hear program audio. For example, dancers need to hear their dance music. Sound should not be piped into the studio when mics are live, however, because the sound feeding back into the equipment through the mics will create the nasty squeal of feedback. Most studio monitors automatically cut off microphones when those mics are activated. The problem of feedback gets a bit more tricky, though, with singers who have to hear the music. The most common solution is for the singers to wear headphones. The music is confined to the headsets and does not get picked up by the singers’ microphones.
However, when headphones are not an option, such as a fictional scene from a musical production when two lovers break into a Broadway-style duet, the music needs to come through a studio speaker to accompany the singing. In this case, the speaker should be as far away from the talent as possible, and point away from the talent if possible, to reduce the sound waves reaching the microphones. Also, the talent should sing into microphones that have a very short pick-up range (see Chapter 7), meaning they reproduce only sound waves very close to them (the singers’ mouths) and not other sound waves bouncing around the studio (the music from the loudspeaker).
During the Production
If the director needs to talk to talent during the production, the talent can be wired with an interruptible foldback or feedback (IFB) system. This is a small earpiece that fits in the talent’s ear and is connected to a box hidden on the talent’s costume or somewhere out of frame. The box is then connected to the IFB audio system. An IFB is often used for news when the director (or producer or AD) must tell an anchor about a story change while the anchor is reading another story. Field reporters use them, too, so they know when to begin a live stand-up. You have probably seen reporters in live shots touch their ear to hear the monitor better when listening to a question from an in-studio anchor.
Sometimes crew and talent need to hear program audio in addition to commands from the director. For example, boom operators need to hear program audio so they know if they are picking up sound properly, but they also need to be able to hear the director. PL, SA (or PA), and IFB systems can all be wired so that they can transmit program audio as well as comments from the crew.
Timing
As director, you want to make sure that your AD is effectively handling the program’s timing. One way for the AD to do this is through the use of timing sheets. Additionally, the AD should be familiar with talent timing cues and the difference between program and body time.
Timing Sheets
Timing sheets can take different forms and be used in various ways, but they all share the purpose of making sure the program is the right length. Computer programs and mobile apps make it easy to calculate times because they can quickly do the math from any point to determine how long a particular segment has taken, how much time remains to the end of the program both with and without commercial breaks, how much time has elapsed since the beginning of the program, and so forth. A whole raft of calculations can be displayed continuously while the program is in progress, including how long a segment is taking compared to how long it should be taking.
If you do not have access to computer timing programs, you can design your own timing sheet, similar to the one in Figure 4.5. This example has five columns. The first column contains a brief description of each segment in the program. The next four columns display different timing notations. Unit refers to the actual length of the individual segment. Cume stands for the cumulative time of the program up to that point.
The Ideal column is the estimated time that each segment should run, and the AD should figure this out prior to setting foot in the studio. The Rehearsal column is for jotting down the unit times as various segments are worked through in a start-and-stop rehearsal. It is difficult to get an accurate picture of the actual cumulative times at this point, but the total of the unit times should give the AD a rough idea of how long or how short the program is likely to be. The Dress column should give the AD a clear picture of how the actual cumulative times compare to the ideal times. The Air column is filled in as the program progresses. It lets the AD know how much to tell the talent to stretch or how much to cut to come out on time. In the sample program in Figure 4.5, we can see that several segments ran long, so the interview segment had to be cut short, from an ideal of five and a half minutes to an actual five minutes.

Talent Timing Cues
In many programs, such as the one illustrated in Figure 4.5, the talent needs time-remaining cues in specific segments. Thus, working from the ideal times, the host would get, for example, a “30 seconds remaining” cue at 3:25 into the program (as a reminder that there are 30 seconds left in the chart talk) and at 7:25 (30 seconds left in the demonstration). The talent might want time cues to get out of the interview segment on time (i.e., a 30-second cue at 12:55) or simply time cues to get through with the wrap-up summary on time (i.e., a 30-second cue at 13:25). Care must be taken that the talent clearly understands what these intermediate segment cues are so they will not be confused with time remaining in the body of the program.
Program Time and Body Time
This brings up one other point of potential confusion. The AD must be concerned both with getting the talent wrapped up on time and with getting the program off the air on time. In Figure 4.5, the talent needs a 30-second cue at 13:25 because he or she has to be completely wrapped up and finished at 13:55 (leaving the director 35 seconds for the closing credits). Also, the director has to have a 30-second cue at 14:00 in order to get the program off the air and into black at precisely 14:30. Thus, the AD has to work with both body time (the actual length of the program content including the host’s closing summary but not the show’s closing credits) and with program time (the total length of the show from fade-in to fade-out).
Calling Commands
Once rehearsals are finished and you (the director) and your AD have solved any potential timing problems, you are ready to record the show (or send it out live). You are the one who makes sure all the audio and video material is ready when you need it, and you make the decisions as to what happens when. You may delegate some tasks to your AD, such as making sure the proper camera shots are set up, but you have the overriding authority and responsibility for the production.
Most successful television directors work to develop a calm, articulate manner when giving commands. Whenever possible, they speak in a very casual style and even use a bit of humor. Those not used to being on the intercom should not be misled by this apparent easygoing banter. Good directors know that showing too much anxiety risks losing the confidence of the crew, but being too relaxed risks having the crew not take the production seriously. Inexperienced directors who speak in loud and commanding voices are hard to work with. Finding the right balance that conveys both serious and calm is key. All directorial commands must be delivered in a precise, decisive manner so that crew members know exactly what they are supposed to do. The director must understand the practical realities of the production. To request that any crew member do too many things in too short a time is to invite a series of problems. Once an operator falls behind in a sequence, there can be a domino effect, which can put a whole series of production elements at risk.
Crew Commands
Each production varies in terms of the exact commands you need to give, but in general a director might give different crew members the following kinds of commands.
Technical Director. Various transitions, such as cuts and dissolves (see Chapter 9 for more about commands to the TD). The technical director also sets up special effects, but those are usually planned ahead of time because the director does not have time during production to give elaborate instructions as to what type of effect he or she desires. When an effect is needed, the director calls for “effect 1,” “effect 2,” etc.
Associate Director. Quick comments regarding things such as pickup shots that need editing. Actually, the associate director is more likely to be giving information to the director (such as time remaining in the program) than the other way around.
Audio Operator. Fade music or other audio elements in and out; open and close mics.
Graphics Operator. Change graphics and get them positioned for airing.
Recordist and Playback Operator. Start and stop the recording device and any roll-in material. In many studios, the AD gives the commands to record and play back.
Lighting Director. Bring up or fade out lights if lighting changes are part of the show.
Prompter Operator. Roll the script without instruction from the director, keeping pace with the talent. Commands are needed only if there are problems.
Stage Manager. Cues and timing information to relay to the talent.
Camera Operators. Shot designations such as close-up, medium shot, zoom, or pan.
Boom Operator. Follow the talent with the boom mic, keeping it overhead and slightly in front, pointing at the talent’s mouth for optimal pickup, as close to the talent as possible while also keeping the mic just out of the camera frame, working independently, though the director or AD might need to say something if it appears the boom or its shadow might appear in a shot.
Figures 4.6a and 4.6b give examples of commands a director might give to get into and out of a talk show. It also indicates the actions these commands should bring. You might want to review this figure after you have read the rest of the book, because then you will understand the technical terms more thoroughly.
The hardest part of directing is usually getting the program started, because many things need to happen at once. You need to make sure everyone is ready to start, and then make sure the recording device starts recording. Once you are recording, you need to place color bars, tone, a slate, and a countdown as a “leader” on the program. Note that in many studios the AD calls for the recording to start and for bars, tone, slate, and countdown. This allows the director to concentrate on the opening shot and sound of the program itself.


Color bars, also called a test pattern, are the red, green, blue, cyan, magenta, yellow, white, and black bars that an engineer uses to make sure the color recorded on one machine plays back appropriately on another machine. Tone is a sound used to calibrate volume, usually a 1,000 Hz (1 kHz) signal. It records along with the color bars. By making sure the sound registers at the same reference level on all meters (0 dB analog; either -12 or -18 or -20 dB digital, depending on the device), technicians can ensure that the volume is the same on all pieces of equipment. A slate gives identifying information, including the name of the program, the date it is recorded, the name of the director, and the take number if multiple takes are recorded. The countdown is the numbers from 10 to 2 progressing 1 second apart. It is used to cue the video file or tape so it will play back at the appropriate time. The numbers stop at 2 and are followed by black to allow the TD to cut or dissolve to the recording up to 1 second early without the countdown accidentally appearing on air or on the recording.
Once you (or your AD) are through with bars-tone-slate-countdown, you need to direct the program opening, which is often a complicated arrangement of music, voice, video, and graphics effects. Usually, the middle of the program (especially in a nonfiction show) is the easiest part because it takes on a regular rhythm. The ending, again, can be complicated by effects and the need to end at a precise time. If you are a novice director, it is a good idea to practice the beginning and ending of the show by going off to a separate room with a stopwatch and saying the commands you need to give until they feel smooth and natural.
Command Principles
There is no absolute right or wrong way to give commands, but certain principles have developed over time that enable you to give directions as clearly as possible.
- When talking to the stage manager, refer to talent by name. For example, say “Cue Dr. Morgan,” not “Cue him,” to avoid misunderstandings.
- In contrast, refer to camera operators by number. You are less likely to slip up and get confused. That noted, this author has observed experienced directors who place a piece of masking tape under each camera monitor in the control room with the corresponding camera operator’s name, and then they talk to the camera operators by name rather than by camera numbers for greater intimacy: “Nicole, zoom in to a close-up.” Of course, when the directors give switching commands to the TD, they use the camera numbers for clarity because the switcher buttons are labeled with numbers and not names: “Take camera 3” is clearer than “Take Nicole’s camera.”
- Make sure you use correct and precise commands of preparation as well as commands of execution. Commands of preparation are the “ready” commands you give prior to executing a command. Ready commands are necessary so that each person involved with that command knows what is coming and has at least a second or two to prepare: The camera operator has to hold the shot steady; the TD has to set up the switcher to make a cut; the engineer has to make sure the brightness levels and color are correct; and so on. Ready commands use the exact same wording as the execute commands that follow, but they are preceded by the word “ready” to signal to everyone that you are about to call for something new. Examples are: “Ready to fade in music,” “Ready to dissolve to one,” “Ready to key CG,” and the like.
Commands of execution follow ready commands. They are the exact same commands but without the word ready. They are the cues for the command to happen now. Using the examples above, execution commands might be: “Fade in music,” “Dissolve to one,” and “Key CG.” These commands determine what actually goes out over the airwaves or is recorded.
Experienced directors often do not use the verb take or the word camera in their command sequences, though beginning directors often use these words. This is because the straight take is the most-used transition and is therefore assumed in the absence of a call for a different transition, namely a fade (to or from black), a dissolve (between two sources other than black), a wipe (geometric pattern used to replace one image with the next), or a key (an image—usually text—cuts into existing image like a stencil or cookie cutter). That is, the director calls for a fade, dissolve, wipe, or key when he or she wants one of those transitions, but does not use the word take when calling for a straight cut because that is the assumed transition. Likewise, the most used video sources are the cameras, so the director need not use the word camera. That is assumed when the director calls for “one,” “two,” “three,” on up to the number of cameras in the production. If the director wants a source other than a camera, then he or she calls for that, such as the graphics generator, satellite feed, video clip played back from a computer, and so on.
Consider that the following two command sequences mean exactly the same thing: “Ready to take camera 1; take camera 1”; and “ready one; one.” Because the take is the assumed transition and the camera is the assumed video source, those words are not necessary. Both commands execute a straight cut to camera number 1, but the second command sequence uses fewer words. In contrast, if the director wants a different transition and a different source, the command sequence might be, “Ready to dissolve to CG; dissolve to CG.” Abbreviating commands of preparation and execution like this, including not using the assumed “take” and “camera,” cuts down on headphone chatter, which makes directing commands clearer and more precise and can reduce communication errors. - Keep the lag time of various equipment and personnel in mind and give your cues in a sequence designed to get things happening when you want them to. In opening your program, say “Fade in music” followed by “Fade in two.” It usually takes a second or so before the music is heard, but the camera is there with the push of a button or pull of a lever. Similarly, always cue talent before putting his or her camera on. “Open-mic-cue-talent-dissolve-to-two” is often given as one command of execution. By the time the stage manager reacts and throws the cue and the talent takes a breath and starts to talk, the camera will be selected.
- Watch and listen to your monitors. Always be aware of exactly what is recording or going out. If a picture is not what you want, then change it. The viewer watching at home could not care less about your sinus headache or the camera cable with the bad connection. All he or she knows is what is broadcast or streaming, and, if it is bad, it is bad. Also, always check your camera and preview monitors before calling a shot. Make sure the camera you want to take or the special effects you want next are ready. You cannot afford to get buried in your marked script while ignoring the realities of the picture and sound you are sending out. Memorize your script to the extent possible and direct with your head up, eyes on the monitors.
The “Artist” Role
Many of the director’s tasks affect aesthetics. For example, the director must think of the framing and composition of each picture while planning, blocking, or marking the script. Beyond that, the director must think of artistic concepts that make a program pleasant to watch. Many of these involve continuity: a broad term that refers to a smooth, uninterrupted flow from one image and sound to the next throughout an entire program.
The principles, or guidelines, of continuity have developed over the years as part of the language of film and television. People viewing a movie or TV program expect certain conventions, and violating them confuses the audience. However, these principles are not laws of the land. In fact, they are made to be violated, because sometimes you want to disorient (or frighten or shock) your audience. For example, music videos often breach every camera and cutting continuity principle, and do so effectively.3 If a program is straightforward information or entertainment, though, a director is well advised to abide by the medium’s conventional language. In addition, understanding these principles better enables you to know how and when to violate them.
The following discussion of production conventions focuses on multi-camera production, but these conventions also hold true for single-camera shooting. Additionally, some of these principles are important for camera operation and editing and are discussed in those contexts in Chapters 5 and 11.
Shot Juxtaposition
Early filmmakers4 quickly came to realize that when one picture is immediately replaced by another, this communicates something to the viewer that is different than if each picture were viewed separately. This concept has direct bearing on the process of shot selection for any television program. Each shot can be thought of as being part of a flow of images, with a relationship to the one that precedes it and the one that follows it.
LS, MS, CU Pattern
The succession of pictures should be motivated by this basic tenet: “Give the viewers what they need to see when they need to see it.” To a great extent, this “rule” of cutting images together results in a juxtaposition of collective shots showing the whole picture followed by more intimate, particularized shots that give viewers the closer details that they want. Said another way, this pattern establishes the scene with wider shots and brings viewers into the scene with tighter shots. (See Figures 4.7a and 4.7b.)
The generalities of a scene or program are established by the long shot (LS), also referred to as a wide shot (WS) or establishing shot (ES). A medium shot (MS) or a series of medium shots gives the audience particularized details, such as the talent’s look. When something small or intimate needs to be seen, or a strong emotion needs to be conveyed, the director uses the close-up (CU).


The terms long shot, medium shot, and close-up are relative and vary from one type of program to another. The picture in Figure 4.7a is considered a long shot for a talk program. However, if this were a children’s program with toys to be demonstrated flanking the four people, this shot would be considered a medium shot. Likewise, the shot in Figure 4.7b would be considered a close-up for a talk show, but, for a drama in which the man’s eyebrow played a major role, this might be the medium shot and the eyebrow would be the close-up.
A directing pattern of LS to MS to CU allows the audience to comprehend the total environment and then relate to particular areas of that environment. It is worth noting again, however, that this “rule” is often violated for perfectly good reasons. Starting with a close-up of a dagger builds suspense and draws the audience into the scene. Where is this dagger, and why is it there? After the audience’s curiosity has been aroused, the director uses a wide shot to reveal its location. (See Chapter 5 for more on types of shots that are used in productions.)
Principles of shot juxtaposition have changed slightly with the introduction of high-definition television, or HDTV, and its 16:9 aspect ratio and high resolution of 1,920×1,080 pixels (older, standard definition TV had an aspect ratio of 4:3 and lower resolution of 640×480 pixels). For example, a wide shot of a basketball game in HDTV can cover the whole court with enough clarity for the audience to discern what is happening. There might be less need for medium shots with HDTV than with standard definition TV. Then again, a wider screen presents more space for people to stand side-by-side or face-to-face, perhaps allowing for more medium shots that are also two-shots. As with any artist, a director needs to work with the image by framing and composing shots that best tell the story on the “canvas”—the screen.
Camera Selection
Even with the opportunity to plan and block the camera work in multi-camera television programs such as soap operas, the live or live-recorded production approach forces the director to make some quick, on-the-air editing decisions, because the exact moment of the take is crucial. Even though these decisions are instantaneous, the principles underlying them are similar to the decisions made in postproduction editing discussed in Chapter 11. With talk and game shows, the camera changes every time someone new starts to talk. A challenge with live programming is to have the proper camera ready for a shot at the exact moment the situation calls for it. On the part of the director, this requires an ability to think simultaneously on at least two levels—what is on the air right now and what is going to be on the air next.
Thought Process
With a three-camera structure, the thinking process might go something like this: Camera 1 is on the air. You, as director, have the choice of using camera 2 or 3 for the next shot. Camera 3, however, has just been used on the previous shot. Camera 2, therefore, has more time to make a framing adjustment or even change position. (See Figure 4.8.)
It is accepted studio procedure in a three-camera setup to place camera 1 on the left, camera 2 in the middle, and camera 3 on the right. This setup allows the director to keep track easily of the relative positions of cameras on the floor and the angle of shots available to them. Obviously, cameras usually are not employed in a repeated 1-2-3-1-2-3 rotation. To observe the long shot, medium shot, and close-up pattern of a program, at least one of the three cameras at any given time is usually designated as a wide-angle cover-shot camera. This is especially important in shooting unrehearsed programs, such as talk shows, where the person speaking often changes suddenly. The technique on such a program is to cut to a wide shot on the change of voice if a close-up of the new person is not immediately available. The director then has a chance to ascertain who is talking and call for the close-up. A glaring error on any kind of program is for an unprepared director to be caught with a speaker or performer still on camera when that person is no longer speaking or performing. In a rehearsed program, when the camera blocking has been worked out in advance, the director can temporarily commit all cameras to close-up shots, having planned to return to a cover shot at a specific later time.

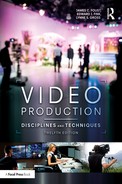
Crossing Camera Angles
An important principle of camera placement is to cross-shoot camera angles (see Chapter 11 for the editing corollary to this). In many staging setups, the natural pattern has two people facing each other. To frame the best headshots, cameras should shoot across each other’s angles; that is, each camera should be shooting the person or object farthest away from it. (See Figure 4.9.) The camera on the right (camera 2) should be getting the shot of the person on the left, and vice versa. In this way, each camera gets a view of most of the talent’s face. If camera 1 shoots the talent on the left, it gets only a profile of him or her. The same holds true for camera 2 if it shoots the person on the right.

Shot Relationships
When changing from one shot to another, the two pictures should relate to each other in both an informational and an aesthetic sense. The subject in two successive shots should maintain continuity in that it should be readily recognizable. You would be ill-advised to cut to such a different angle that the viewer would not immediately recognize the subject from the previous shot.
Cutting Ratio
One of the most common errors of shot relationship involves long shots and close-ups. If you were to cut from the shot in Figure 4.7a to a close-up of the man’s eyebrow, most of your viewers would be lost, because they would not have noticed the eyebrow in the long shot. A good rule is always to keep your camera cuts within a three-to-one cutting ratio; that is, take to a shot that is different enough to show the viewers something new or refocus their attention, but the shot should generally be no more than three times larger or three times smaller than the preceding shot.
Shot Similarity
For aesthetic reasons, you should avoid cutting between cameras that have nearly matching shots of the same person or subject. This will prevent the undesirable result of a scene that remains essentially the same but exhibits a slight jump within the frame. On unrehearsed shows, the camera operators might inadvertently come up with almost identical shots, such as a two-shot; therefore, it is up to the director to watch carefully for this similarity on the control room monitors and to talk to one camera operator or the other to change the shot to something either tighter or wider.
Position Jumps
Another problem to avoid is the position jump, in which a primary subject moves from one spot on the screen to another position on the screen in the next shot. This violates the continuity principle that people or objects should remain in the same relative screen position across shots: A person in the left part of the screen in one shot should still be in the left in the next shot. A break in this continuity, or a position jump, can occur, for example, if three people are lined up facing two cameras and each camera is getting a two-shot of two adjacent persons. The center person is on the right in one camera’s picture and on the left in the other’s image. (See Figure 4.10.) This position jump can be avoided by having one camera go to a three-shot before cutting or, conversely, by cutting to a close-up single shot before going back to a two-shot.
Axis of Action/Conversation
Another principle involves screen direction. In successive shots, make certain that all action is flowing in the same direction and that each screen character is facing in one consistent direction. If an imaginary line is drawn extending the path in which a character is moving or looking, we can call this the axis of action. As long as all cameras are placed on the same side of this axis, the action continues to flow in the same direction. If cameras are placed on different sides of this action axis, however, the apparent screen direction is reversed when you cut between them. (See Figure 4.11.) Directors, therefore, usually try to avoid having cameras cross the line. This rule about axis of action is sometimes called the 180-degree rule because as long as the cameras stay within the 180-degree arc of the line, the screen direction remains the same from camera to camera.

Closely related to the axis of action is the axis of conversation. If the imaginary axis is drawn through two persons facing each other, all cameras should be kept on the same side of this line. Otherwise, the screen direction (the direction in which a person is looking) is reversed when you cut to the other side of the line. Figure 4.12 shows two common errors in crossing the axis of conversation. It is important to understand that this imaginary line—the axis of conversation—changes as performers move. Therefore, cameras also have to move during production to remain on the same side of the changing axis.
Cutting ratio, shot similarity, position jumps, and crossing-the-line problems are all examples of mistakes that are easier to spot in a multi-camera production than in a field production. This is because multi-camera productions allow the director to see the shots in relation to each other as they are selected; whereas, a field production is done one shot or setup at a time, and a live comparison between shots is not possible. It is much more likely for a director to cross the line accidentally when a long shot is recorded in the morning and its accompanying close-up is shot in the afternoon than it is for a studio director who is watching all the monitors. However, as with other aesthetic principles, there are times when it is perfectly acceptable to break the traditional shot relationship principles for effect.

Transitions
Many of the mechanics of continuity are carried out in the actual transitions: the manner in which the director changes from one picture to another. Over the years, the various types of transitions have adopted meanings that audience members readily understand. The director must be aware of the psychological and visual impact of each. These transitions can be accomplished in postproduction editing (see Chapter 11) or with the switcher (see Chapter 9) during a multi-camera studio production.
Cuts
The instantaneous cut, or straight take, replaces one picture immediately with another. It implies that there is no change in time or location. It happens right now. The audience is not moved anywhere, except to a different perspective of the same scene. Audiences have understood this device since the beginning of motion pictures as representing a change in point of view that indicates no other major dramatic change. In terms of grammar, it is the end of a sentence—a period—and the beginning of a new sentence.
Dissolves
The dissolve, simultaneously fading out one picture and fading into another, creates a temporary overlapping of images called a superimposition. Dramatically, this implies a change of place or a change in time(usually a lapse of time). It demonstrates a relationship between the two shots but indicates a change; the action has moved somewhere else or somewhere later in time. Grammatically, the dissolve corresponds to the end of a paragraph or possibly even to the end of a major section of a chapter.
In some programs, particularly music shows, the dissolve is often used purely for aesthetic reasons: a slow dissolve of a singer from a medium to a tight close-up profile, or a close-up of the dancer’s feet dissolving to a long shot of the dancer. No change in time or locale is implied in this case—just a pleasant visual effect.
Most dissolves are slow and therefore help establish the pace of a program. For example, an effective series of fast camera cuts can lose its intensity if a dissolve is suddenly used. If the director does not want to lose intensity, the dissolve should not be used. However, dissolves can also be quick, creating an aesthetic that is slightly slower than a cut but faster than a traditional dissolve. If the dissolve stops for a while in the middle, creating a superimposition, this serves to intensify whatever is being expressed by the individual images.
Fades
A fade works like a dissolve, but it is a dissolve specifically to or from black. A fade from a camera to black or a fade in from black implies a strong separation. It is used in going from one segment of a program to another—from the talk-show interview to the used-car commercial, for example. Dramatically, the fade is the curtain falling—the end of a scene or an act. Grammatically, it represents the end of a chapter or story.
Defocus
One specialized transition that can be used with no fancy electronic effects is the defocus; the camera on the air defocuses and is dissolved to a similarly defocused shot on another camera, which then comes back into focus. This usually implies either a dream, a deranged state of mind, or a transition backward in time. It tends to call attention to itself so is used sparingly.
Wipes
The wipe uses a geometric pattern to replace one image with another, such as a horizontal, vertical, or diagonal push across the screen, or a shape that emerges from the center, such as a heart or diamond, or a breaking up of one image into cubes or other shapes. A wipe is the most noticeable of the transition types and, therefore, calls the most attention to itself. It is used to make a major change from one scene to another. In sports, for example, it is customary to wipe from the center to the sides to indicate an instant replay and then reverse this when going back to the live action. Grammatically, the wipe is most like an exclamation mark.
Digital Effects
Digital technology offers many dimensions to transitions (see Chapter 9). Graphics programs and digital manipulators allow for an array of bursts, flips, tumbles, and spins, both 2D and 3D. These are frequently used as attention getters and are often employed during opening credits to grab the audience or between segments to keep the audience. Digital effects are so commonplace that sometimes one digital effect (e.g., a squeeze of a newsmaker at the top of the screen) shares the screen with another digital effect (e.g., a tumble of sports scores at the bottom of the screen).
Timing of the Transition
Understanding the different types of transitions helps to explain the how and why of changing cameras, but a word needs to be said about the when. Generally, camera changes must be adequately motivated: There has to be some reason for cutting at a particular point. The audience should want to see something else. (“Give the viewers what they need to see when they need to see it.”) Without proper motivation, you should avoid the temptation to change the picture just for the sake of change. The following discussion on the timing of camera transitions applies equally to the timing of live shots or shots edited together in postproduction for a single-camera production.
One of the strongest motivations for cutting is to capture action. When the action starts, you need a wider view. When the talent walks to a new area, you need an establishing shot. Also, it is easier to follow a moving person or an object in a wide shot than in a close-up. When cutting to a shot with action, you should always try to cut on the action or the movement itself—not too long before it begins or too late after it is in progress. Ideally, the moment the action starts, the audience needs to see the wider shot.
In a similar vein, you should not cut to a camera that is in the middle of movement—panning, tilting, or zooming. Occasionally, it is acceptable to cut (or preferably dissolve) from one moving camera to another that is moving in the same way. For example, if a camera is panning right, a cut can be made to another camera that is also panning right at the same pace. Cutting to a camera panning left or zooming in or to a stationary camera would be jarring. But of course, as with all artistic decisions, there are situations where this abrupt effect is desired.
During a talk show, the strongest motivation for cutting is when a speaker starts to talk. The ideal timing of the take is precisely between the two speakers’ words. As a practical matter, cutting during an ad-lib program usually involves a delay of one second or so. To avoid a long delay, the director has to be sensitive to the body language and facial expressions of all participants (watching the camera monitors in the control room). Who has his or her mouth open? Who just leaned forward? Anticipate who the next speaker is going to be. Include appropriate, judiciously spaced reaction shots, particularly when someone is reacting in an animated fashion. In timing reaction shots, do not cut at the end of an obvious statement or during a break in the speaking: It looks too much like a cut to the wrong participant. Reaction shots are most effective in the middle of the other person’s speech.
The “Psychologist” Role
Any video production involves the work of a team of people. You, as the director, are the team captain and must motivate people to do their best work. Sometimes, this involves listening to problems that have nothing to do with the production: the stage manager’s woes with child care, the camera operator’s brother’s illness, or the audio operator’s love of flying (all true stories these authors have heard). Other problems the director faces are very much related to the production in that they involve interactions among members of the cast and crew.
Familiarity
Cast and crew members (and college classmates) who work with each other over and over for a continuing series often become like family. This has the same advantages and disadvantages as other family situations. They come to know each other well and can anticipate each other’s moves and thoughts. In fact, people who freelance often choose to work with each other because they have developed a well-oiled working pattern.
However, like brothers and sisters, people who work together regularly can get on each other’s nerves and develop rivalries and incompatibilities. Realize this happens occasionally, and try to make sure the outcome is positive instead of negative. A disagreement on microphone placement between the audio person and the lighting director can be healthy, because it can lead to better lighting and better sound. However, if the antipathy between the two grows to the point where the audio person purposely places a boom microphone where he or she knows it will give the lighting director problems, the feud has gone too far. It is time for the director to intervene and point out that they are both in their jobs to meet the needs of the production.
New Relationships
When the people involved with the shoot have not worked with each other before, the director’s job can be even more complicated. You must mold these individuals into a workable whole, taking advantage of the skills and personality traits each brings to the production. If you have the opportunity to hire crew members, check their references and interview them thoroughly to make sure they are right for the project and for each other.
Initial rehearsals usually take longer when crew members are strangers (or when students first start working together), because all of them are trying to find their specific roles. Which of the camera operators should be given the complicated zooming shot? Should the audio operator use his or her own initiative in deciding how slowly to fade in the music or wait for specific instructions from the director? How much background information should the stage manager give the talent?
The best way to handle a new cast and crew is to start the rehearsal session by holding a meeting and talking through the entire program, specifying each person’s role at various points. As the rehearsal proceeds, changes and discrepancies will alter these roles, but at least everyone has had the same starting point. All share an understanding about their own specific roles and the roles of the others.
A variation on a new situation is one in which the crew and some of the performers (e.g., the game-show host, the soap-opera regulars) are the same for each production, but others of the talent are new (e.g., the game-show contestants, an “uncle” visiting a soap-opera regular). These people must be made to feel at home so they can perform at their best. As the director, you should welcome them and spend a little time orienting them.
Directorial Style
Your style as a director can affect the psychological makeup of interpersonal relationships on your production. Some directors give precise instructions, such as specifying how much headroom (the distance between the top of a person’s head and the top of the frame) a camera operator should allow or telling an actress exactly when she should wrinkle her nose. Others let cast and crew members make more decisions: The camera operator frames the shots himself, and the actress works out her own facial expressions. The director intervenes only if something is incorrect. Either method can work: The former ensures quality control, but it can antagonize creative people who like to exercise their own judgment; the latter can lead to extra creative input that enhances what the director wants, but it can lead to chaos if cast and crew members’ choices run counter to each other.
Your best bet is to be yourself, but be consistent. If you feel most comfortable letting cast and crew members make many of their own decisions, then do so. Conversely, if you have a specific vision for a scene or program and have the training and experience to articulate that in detail and with confidence, then do so. Either way, don’t expect initiative from others one moment and then clamp down on it the next.
Working with Talent
As discussed in Chapter 2, there is a difference between working with trained actors and working with performers who have never been on television before. It is more difficult to make performers feel comfortable and to make sure they know where to look and how to move. You can expect actors to understand the medium, but you must work with them on the development of the characters they portray.
If you have the opportunity to audition actors and decide who will be selected for various roles, you can begin building a relationship with them at the audition stage. In addition to listening to them perform as the characters they might portray, interview them and discuss how they interpret the characters and what they think they can bring to the parts that would be special. Give some of your ideas about the characters’ traits and see how they react.
Nervousness can be a problem for all talent, both actors and performers. There is no cure for nervousness, but it can be mitigated if the person has confidence. Self-confidence is an internal trait, but confidence can also be gained through knowledge of the situation, which in turn leads to comfort. If a guest on a talk show knows ahead of time that she is to enter from the left after the host says, “Our next guest,” and if she can practice her entrance once or twice, she will build confidence that will show in the final product. Actors are more relaxed if they know what your expectations are. Understand they will need time to get away from the set and to “get into character” when they have a particularly dramatic scene to perform.
If it is necessary to talk to an actor or performer about a shortcoming in his or her performance, do this in private, not in front of the crew. Small corrections, such as turning the head to a slightly different angle, can be handled publicly. Always tell the person why the change is needed, phrasing it in terms of how this adjustment will help the overall production.
Like all professions, acting has its own concepts, techniques, and language. If you have no training or experience as a director or actor, it is advisable to take some courses in directing and acting or read some books on these subjects. Some directors have trained themselves to avoid the instinct to say to actors, “I want you to …” While beginning directors naturally use this common phrase, it does not convey “actable” direction. Actors respond best to action verbs and metaphors. Avoid instructions like, “I want you to be mad when you say this line.” Replace this instead with, “You are a lion trapped in a cage, waiting to pounce the moment the door opens.” This is much more “actable” than, “I want you to …”
Working with Crew
A director should be able to assume that the crew members working on a production have both the discipline and the technique to do the job. If someone is not exhibiting one or both of these characteristics, you should have a talk with him or her, outlining your expectations. If this does not work, you should try to remove the person from the crew. However, in union (and student) situations, this might not be possible.
The director must then use persuasion to motivate the person to improve. One tactic is to compliment the person when he or she does something well. A compliment can often motivate a person to continue the good work. Another is to involve the person in solving problems. If someone can see the difficulty he or she is causing by some form of behavior and has a say in how the situation should be remedied, the bad behavior often disappears. A third is good old honesty. Take the person aside and explain what you are trying to achieve and how his or her behavior is interfering with the goal. Convey your honesty in positive, encouraging, and specific comments rather than using negative, belittling, and overly general words. For example, let’s say a crew member is always trying to make funny comments, and this is annoying the crew and interfering with your instructions. If you say, “Hey you, shut up, you’re screwing up the shoot,” then you are negating the person and not clarifying what specific action is causing the problem. Instead, consider taking the person aside and saying, “Trevor, I appreciate your unique sense of humor, but I’m sure you can understand how difficult it is for me to communicate with the crew when I have to talk over the top of your jokes.” This acknowledges his humor while indicating that he needs to stop joking all the time. This will result in a less annoyed crew and help you direct better. However you approach the situation, be yourself with your crew and cast, demonstrate genuine concern for everyone, and exude passion for the project you are directing. Your attitude will be infectious in creating a positive environment.
When you see a minor problem developing between crew members, address it before it becomes major. The best tactic is to sit down with those involved and have a frank, open discussion. Doing nothing and hoping the problem will go away rarely works. That noted, most production situations work very well. Cast, crew, and director develop a sense of unity and exhilaration, and the production as a whole is greater than the sum of its parts.
Focus Points
After reading this chapter, you should know . . .
- How the director blocks talent and cameras, marks a script, and handles other preparation.
- The nature of pre-studio, floor, and control room rehearsals.
- How the AD uses a timing sheet and handles talent timing cues.
- The difference between program time and body time.
- Principles related to calling commands appropriately.
- The long shot, medium shot, close-up pattern.
- Placement of cameras.
- Aesthetic principles related to cutting ratio, shot similarity, position jumps, and the axis of action.
- The use of transitions such as cuts, dissolves, fades, defocusing, wipes, and digital effects.
- The proper timing of transitions.
- How the director interacts with cast and crew.
Review
- What are several reasons why marking a script is important?
- As a director, what jobs would you most likely give your AD?
- Give some specific examples of when you might use a defocus effect, a wipe, a fade, and a digital spin.
- As a director, do you think you would lean toward giving precise instructions or toward letting the cast and crew members make many of their own decisions? Based on your answer, what might you have to watch for as danger signs that your directing is becoming ineffective?
On Set
- Mark a script as a director might, using the marks provided in Figure 4.2. You can use one of the scripts from Chapter 3 or from a website such as www.simplyscripts.com. Share your marked script with several classmates. Compare how you each marked the scripts and analyze which script seems to be marked most clearly.
- Record a television program that has segments, such as Today or Good Morning America. Then prepare a timing sheet similar to the one in Figure 4.5, except that yours will have only two columns—one that describes the segment and one for the Air timings. If you do this for several days, you should start to see similarities in the timing sheets and should develop a good idea of how this type of program is built.
Notes
1Several books that offer good advice for directors are Peter W. Rea and David K. Irving, Producing and Directing the Short Film and Video, 5th ed. (Focal Press, Waltham, MA, 2015); Myrl A. Schreibman, The Film Director Prepares: A Practical Guide to Directing for Film and TV (Lone Eagle Publishing, Los Angeles, 2006); Nicholas T. Proferes, Film Directing Fundamentals: See Your Film before Shooting, 3rd ed. (Focal Press, Waltham, MA, 2008); Mark Travis, Directing Feature Films: The Creative Collaboration between Directors, Writers, and Actors (Michael Wiese Productions, Studio City, CA, 2004); and Michael Rabiger and Mick Hurbis-Cherrier, Directing: Film Techniques and Aesthetics, 5th ed. (Focal Press, Waltham, MA, 2013).
2A note on multi-camera sitcoms. While the director is in the control room calling the shots for nearly all types of multi-cam shoots, on professional sitcoms the director usually remains on the floor during recording while the AD takes the helm in the control room and calls the shots for the technical director to switch the cameras. This live switching is fed to monitors in front of the studio audience members so they can see what the show might look like and their laughter can be recorded. The live switching is also recorded as a reference for the editors who put the show together in postproduction. The director then sits with the editors for the final assembly of the program. The point is that the director is in charge of the final project, so he or she goes wherever placement is most effective. When a program is truly live or there is little or no postproduction editing, the director is usually in the control room. In professional sitcoms, the director is usually on the floor directing actors and crew from there, akin to a film shoot, because the sitcom is like a short film that is shot with multiple cameras for editing later.
3For example, when a band member is shown doing the same movements over and over with constantly changing scenery, this is an example of total lack of continuity. In “real life” one cannot repeat the movement that quickly, especially in front of different backgrounds. But the audience expects music videos to have a different style, so such effects are easily accepted and appreciated.
4Two of the main theorists were Russian filmmakers Vladimir Pudovkin and Sergei Eisenstein. Pudovkin’s ideas can be found in Vladimir I. Pudovkin, Film Technique and Film Acting (New York: Grove, 1970). Eisenstein’s Film Form (New York: Harcourt, Brace & World, 1949) and Film Sense (New York: Harcourt, Brace & World, 1947) are seminal sources for learning about his ideas.