
Appendix
Intro to Nikon SnapBridge
Your Z fc can connect wirelessly to a smartphone or tablet that’s running Nikon’s SnapBridge app. After connecting, you can use the app to
- Transfer photos and videos from the camera to your smart device. You can transfer full-resolution images or lower-resolution (2 megapixel) versions. In either case, the camera transfers copies of your files; originals remain on the memory card. You can view the transferred files on your smart device and use the device’s Internet connection to share them online.
- Use your smart device as a wireless remote control. This is a handy option if you don’t do enough remote control shooting to justify buying a stand-alone remote control unit.
- Upload files to Nikon Image Space. Your Z fc purchase entitles you to a free account at Nikon Image Space, an online photo storage and sharing site. After creating your account, you can use SnapBridge to upload files to your gallery. Visit
www.nikonimagespace.comfor details on this feature.
SnapBridge is free and available for devices that run the Android OS (operating system) or Apple iOS. Visit Google Play for Android apps; go to the App Store for iOS apps. Device requirements for the app appear on the download page.
I can’t provide detailed instructions for using SnapBridge because things vary depending on your device and its operating system. In addition, when Nikon issues SnapBridge updates — which it often does as it introduces new cameras — some aspects of the app change. (As I write this appendix, the current version of the app is 2.82.) So the pages to come provide just some general guidance to get you started. Complete instructions are available at snapbridge.nikon.com; you can also access the instructions from within the app itself, as described a little later.
Note: Although figures here show the iOS version of SnapBridge, the Android version is exactly the same unless otherwise noted.
Making the Connection
Your Z fc offers two types of wireless connection, and the one you choose affects what you can do with SnapBridge:
- Bluetooth: You can automatically upload JPEG photos to your device as you shoot or select photos for later transfer. Bluetooth connections also let you synchronize your camera to the current time of your smart device and embed the device’s location into your files.
- Wi-Fi: Whereas Bluetooth permits JPEG file transfer only, Wi-Fi lets you transfer Raw files and video files as well as JPEG. The trade-off is that you can’t use the upload-as-you shoot feature that Bluetooth provides. Instead, you use the app to select and transfer files that already exist on your camera.
Either connection enables you to use your device as a camera remote, but Wi-Fi allows you to access more remote control features than Bluetooth.
Later parts of this appendix provide information about these and other SnapBridge features. Before you can use any of them, though, you have to connect your camera to your smart device. The next two sections show you how.
Connecting via Bluetooth
Connecting via Bluetooth for the first time involves pairing the camera and smart device — a fancy term for introducing them to each other so that they know it’s safe to link up. After you pair the devices once, you can skip that step when connecting them in the future. Take these steps to make the initial connection:
- On your smart device, enable Bluetooth but don’t open SnapBridge.
On the camera’s Setup menu, turn off Airplane mode.
When on, Airplane mode disables wireless transmission from the camera, something you may be asked to do when, say, flying in an airplane. (Airlines typically allow you to use Bluetooth during flight but ask you to disable Wi-Fi.)
- Also on the Setup menu, choose Connect to Smart Device and then choose Pairing (Bluetooth), as illustrated in Figure A-1.
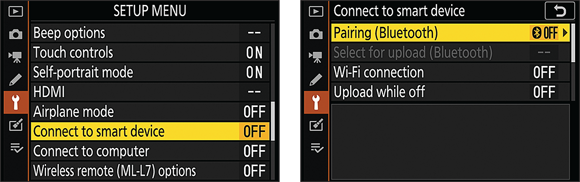
FIGURE A-1: Choose Connect to Smart Device and then choose Pairing (Bluetooth).
Choose Start Pairing and press OK.
The camera displays the screen shown on the left in Figure A-2, which includes the name assigned to your camera. (I changed my camera name to protect the innocent.)
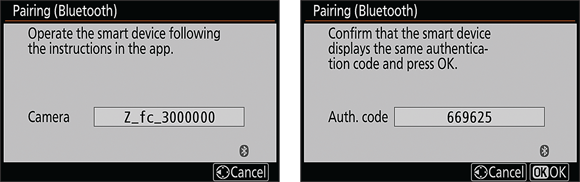
FIGURE A-2: The camera displays its name (left) and a Bluetooth authorization code (right).
- On your smart device, open SnapBridge and tap Connect to Camera.
Follow the instructions displayed on your smart device.
You’re asked to provide some input along the way, such as tapping the camera name on the device. It may take several seconds for the device and camera to communicate after each tap, so be patient.
Wait for a pairing request to appear.
When the app is ready to connect your camera and smart device, you see a pairing request on the device. On the camera, you see the screen shown on the right in Figure A-2. It displays an authorization code, which should match the one shown on your device.
- If the pairing codes match, press the OK button on the camera and then tap Pair on the device.
If all went well, the camera displays the menu screen shown in Figure A-1. I explain the various menu options in upcoming sections. On your smart device, the SnapBridge screen shows a picture of a Z fc, along with the camera serial number and firmware version, as shown in the upcoming Figure A-4.
 After you go through these steps once, you don’t have to repeat all of them to reconnect the devices. Just check the camera menu screen shown in Figure A-3 to make sure that Bluetooth is turned on, enable Bluetooth on your smart device, and then launch SnapBridge. You should get the same results as when wrapping up the initial connection steps. I say should because SnapBridge sometimes insists that it can’t find the camera and refuses to reconnect. Two troubleshooting steps:
- If you paired the camera with two devices — perhaps connecting it to a phone on one occasion and a tablet on another — the camera tries to pair with the device you used last. To switch devices, Choose Pairing (Bluetooth) on the camera (refer to Figure A-3), choose Paired Devices, and select the device you want to connect.
- If all else fails, open the Settings menu in SnapBridge, labeled in Figure A-4, choose Forget Camera, and select Z fc from the list of cameras. You’re instructed to visit your device’s Bluetooth settings, locate the camera name, and choose Forget This Device (the name of the option may differ depending on your device’s operating system). Then follow the initial connection steps again.
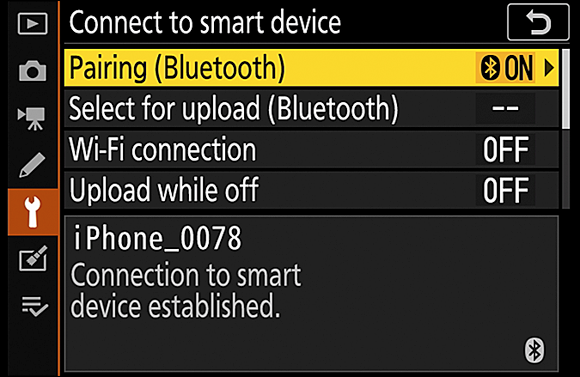
FIGURE A-3: When you see this screen, the Bluetooth connection was successful.

FIGURE A-4: The SnapBridge display looks like this when your camera is connected via Bluetooth.
One final note: In the upper right corner of the screen in Figure A-4, you see the standard signal that represents a Wi-Fi connection on most smart devices. That symbol references the device’s Wi-Fi connection, not the one available via the camera. The symbol representing the device-to-camera connection appears to the right of the camera name, in the area labeled Bluetooth connection symbol in the figure. If you change to Wi-Fi, the Bluetooth symbol is replaced by the Wi-Fi symbol.
Connecting via Wi-Fi
To implement certain SnapBridge features, the camera establishes a peer-to-peer Wi-Fi connection between the devices. That means the two devices talk to each other via a private Wi-Fi network that is provided by the camera. You can’t access the Internet or any other Wi-Fi-dependent services via the camera’s Wi-Fi; it’s solely a means of communication with SnapBridge.
If you’re already connected via Bluetooth and choose a SnapBridge feature that requires Wi-Fi, the app offers to make the switch for you. If it’s not successful or the camera isn’t connected via Bluetooth, take these steps:
- On the camera’s Setup menu, turn off Airplane mode and choose Connect to Smart Device.
Choose Wi-Fi Connection, as shown on the left in Figure A-5, and then choose Establish Wi-Fi Connection, as shown on the right.
The camera displays the screen shown on the left in Figure A-6.
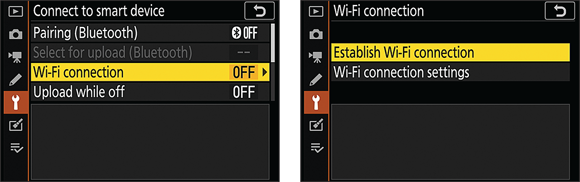
FIGURE A-5: Choose these Connect to Smart Device options to connect via Wi-Fi.
On your smart device, find the Wi-Fi network settings and select the network name shown on the camera screen.
The network name is in the box labeled SSID. After selecting the network, enter the password shown on the camera screen. (Again, I altered the name and password in the figure; yours may be the same as your camera’s serial number.) When the devices are joined, the camera screen displays the information shown on the right in Figure A-6. You can then switch from your device’s network settings screen back to the SnapBridge app.
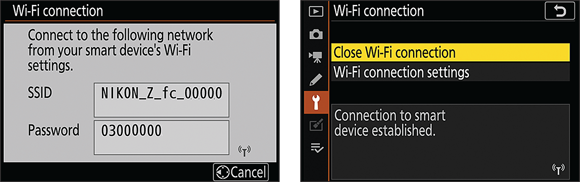
FIGURE A-6: The camera displays its network name and password (left) and then lets you know when the connection is active (right).
If you’re a networking guru and want to alter the password or otherwise change how the Wi-Fi connection is established, choose Wi-Fi Connection Settings from the camera menu screen shown on the right in Figure A-6. To turn off the Wi-Fi connection, choose Close Wi-Fi Connection.
Using SnapBridge
SnapBridge has three main tabs, marked by the symbols labeled in Figure A-4. The first two tabs, Camera and Device, are the most important, so I provide an overview of both in the next few sections. The Nikon Image Space tab is of interest only if you take advantage of the Nikon Image Space photo storage and sharing site mentioned at the start of this appendix.
Setting app preferences
On any SnapBridge tab, you can access the App menu and Settings menu labeled in Figure A-4. On the App menu, the following items are especially useful:
- Help: While your smart device is connected to the Internet, tap Help to access the app’s instruction manual.
App Options: Tap this item to access several settings, the most useful of which is Show Credits, which enables you to add a bit of text to a photo, such as a copyright notice. The notice appears on the photo, as opposed to the copyright data that you can embed invisibly into a file, as outlined in Chapter 12.
On an Android device, the App Options menu also enables you to specify where you want to store files that you transfer from the camera. On an iOS device, files are automatically added to the folder used by the Photos app.
The Settings menu enables you to modify the camera connection and to remove a connected camera from the app’s memory — a step that sometimes is needed if you have trouble connecting via Bluetooth and want to start all over.
When the camera is connected via Bluetooth, you can further customize how the app interacts with your camera, by tapping Auto Link on the Camera tab. On the next screen, enable Auto Link to access the following options:
- Link Mode: Choose Foreground to link to the camera only while the app is running in the foreground on your device. At the default setting, Background, the connection takes place and remains active even if the smart device enters Sleep mode.
- Auto Download: Enable this feature if you want the app to automatically transfer JPEG photos after you connect via Bluetooth. You can select specific photos before making the connection by using the in-camera option I describe in the next section. You can also tell the camera to send all photos immediately after you shoot them — again, though, only for JPEG files.
- Clocks: You can tell the app to synchronize the camera’s clock with your smart device, but this feature is available only if you disable the Location Data option, described next.
- Location Data: Turn on this option to embed the location data (GPS coordinates) of the smart device into your camera files. This setting is affected by the Link Mode option: When that option is set to Foreground, the data is added to files after you transfer them to your smart device. When you choose Background, the location data is sent to the camera and is added to files as they’re uploaded to your smart device.
Auto Link options don’t apply when you connect to the camera via Wi-Fi; again, all are related to Bluetooth connection only. See the next section to find out how to download pictures via Wi-Fi without using the Auto Download feature.
Downloading files to your device
You can transfer files from the camera to your device in two ways:
Wi-Fi file transfer: Wi-Fi is the easiest way to go and the only way to go if you want to transfer Raw files and videos as well as JPEG photos. After making the Wi-Fi connection, tap Download Pictures on the Camera tab to display thumbnails of files on your memory card.
Next, specify which type of files you want to view and transfer. The current file type(s) appear in the area labeled in Figure A-7 (JPEG photos and videos, in the figure). Only files that match that criteria are shown on the thumbnails screen. To change the file type, click Display Options, which reveals the settings shown on the right in the figure. Choose File to specify your preference on that issue. (Unfortunately, you can’t select both Raw and JPEG as the file type for photos; you have to select and download each separately.) The Display Options screen also has settings that enable you to set the sort order used to display thumbnails and to limit the display to files that were assigned a certain rating or were protected by using the Rating and Protect features covered in Chapter 9.
After setting file preferences, tap Done to return to the initial thumbnails screen. Tap Select, tap thumbnails of files you want to transfer, and then tap Download. You’re given the option to create a 2MP JPEG copy of the image for downloading or to download a copy of the file in its original format and at its full resolution. After you make your choice, file transfer begins. The Device tab then shows thumbnails of the files you transferred. Raw files are labeled RAW; files uploaded at the original resolution carry the label ORG. Files with no labels are 2 megapixel JPEG images.
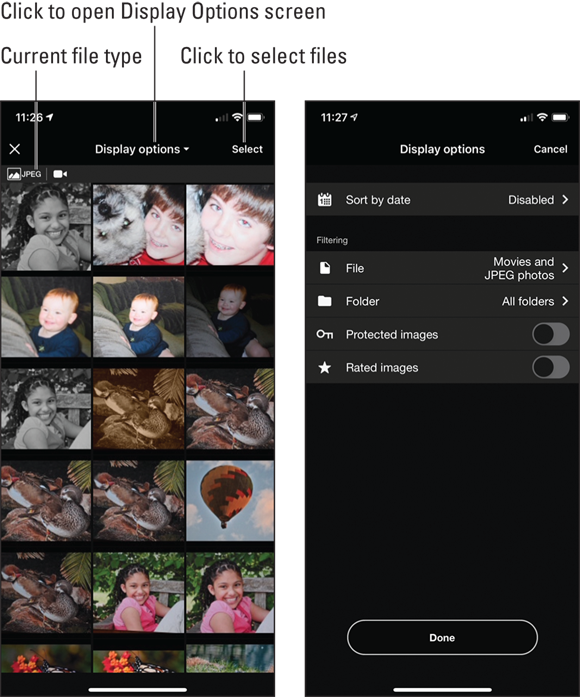
FIGURE A-7: For Wi-Fi transfer, open the Display Options menu to specify the types of files you want to view and upload.
Bluetooth transfer: When the camera is connected via Bluetooth, you use in-camera tools to select photos you want to transfer. On the menu screen shown on the left in Figure A-8, which appears after you initiate the Bluetooth connection, choose Select for Upload (Bluetooth). You then get three choices:
- Auto Select for Upload: All JPEG files are selected for upload as you shoot them.
 Manually Select for Upload: Use this option to select just certain files. After you choose Manually Select for Upload, you see the screen shown on the right in Figure A-8. Select the thumbnail of an image you want to transfer and press the Zoom Out button or tap the Select box on the screen to mark the file with the Selected for Upload symbol, labeled in the figure. To remove the tag, press Zoom Out or tap Select again.
- Deselect All: Choose this menu option to remove the upload tag from all photos.
You also can select photos during playback — again, only after establishing a Bluetooth connection to your smart device. Display the JPEG photo you want to select, press the i button, and choose Select for Upload to Smart Device. The menu disappears and you see the transfer symbol on the image.
Regardless of which route you take, the actual file transfer doesn’t begin until you enable Auto Link on the SnapBridge camera tab and then turn on Auto Download. Tapping Download on the SnapBridge Camera tab — which seems like the logical way to go — displays a prompt to switch the Wi-Fi connection to transfer photos. Yeah, it’s mighty confusing and, because of that quirk and other problems associated with Bluetooth connections, I suggest sticking with Wi-Fi for file transfer.
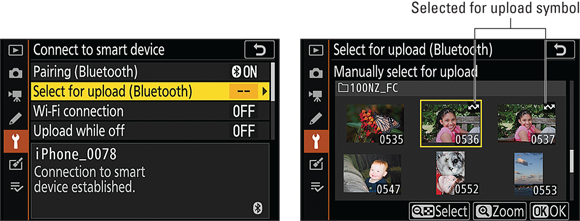
FIGURE A-8: When you connect devices via Bluetooth, select JPEG photos for upload via this camera menu option.
 For Wi-Fi or Bluetooth connections, you can opt to have the camera send files even after you turn off the camera. Open the camera Setup menu, choose Connect to Camera, and set Upload While Off to Enable. This option saves camera battery power, but if you’re connected via Wi-Fi, you can’t access the Internet on your device, because you can’t connect to another Wi-Fi network. (You can always connect to the Internet via your device’s cellular connection, if it has one, of course.)
Viewing downloaded files in SnapBridge
Display the Device tab, shown on the left in Figure A-9, to view thumbnails of images already transferred from the camera. You don’t have to be connected to the camera to view transferred files.
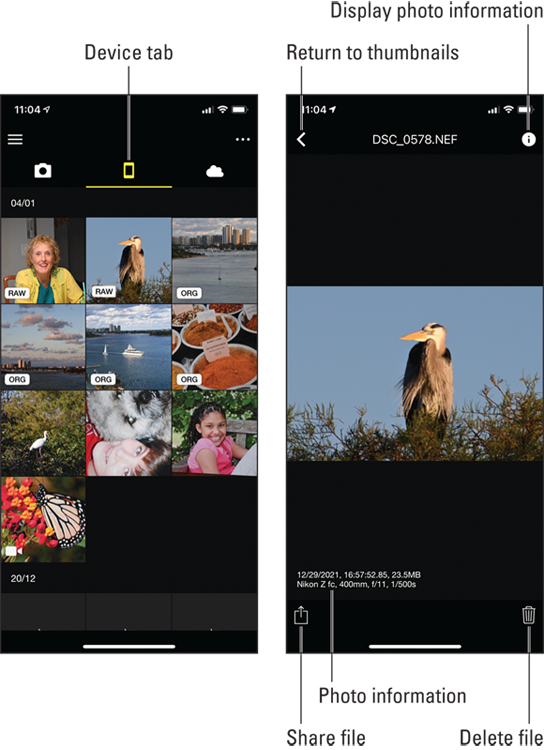
FIGURE A-9: You can view files on the Device tab after uploading them from the camera.
Use standard smartphone picture-viewing gestures — swipe to scroll through your photos and tap a thumbnail to display it by itself. After you display a photo by itself, as shown on the right in the figure, tap the i symbol, labeled Display photo information in Figure A-9, to display limited shooting data, such as the lens focal length, shutter speed, and aperture setting beneath the image preview. To share a photo online, tap the symbol labeled Share file in the figure. (On some devices, the symbol is different, sometimes looking like an arrow with three dots). Tap the symbol labeled Delete file in the figure to erase the file from your device.
In single-image view, you can swipe right or left to view the next or previous image. To return to the thumbnails view, tap the left-pointing arrow labeled Return to thumbnails in the figure.
Using your device as a remote control
You can use your smart device as a camera remote control with either a Bluetooth or Wi-Fi connection. Wi-Fi is the best option because you can see a live preview on the device screen and even adjust some camera settings from the app. With Bluetooth, the app doesn’t offer a live preview, and you’re limited to initiating autofocus and triggering the shutter button or starting and stopping video recording.
Take advantage of the remote control feature as follows:
Wi-Fi remote control: On the Camera tab, tap Remote Photography. At the top of the screen, tap the icon labeled Photography mode symbol on the left in Figure A-10, to display options for shooting photos. Tap the icon labeled Video mode symbol on the right in Figure A-10 to display video recording features. At the bottom of the screen, you see symbols representing various camera settings; if the symbol appears white, you can tap it to change the setting. (Any other settings must be established on the camera before you enter Remote Photography mode.) A focus box appears on the preview; tap your subject to place the focus box over it and set focus. The focus box turns green when focus is achieved.
Tap the Settings menu symbol, labeled on the left in the figure, to display the Camera Settings screen. There, you can specify whether you want photos to be automatically downloaded after you take them using the remote-control feature and, if so, whether you prefer a 2 megapixel copy or a copy at the original resolution. (The full-size original is always stored on the camera memory card regardless of this setting.) On the same screen, you can enable self-timer shooting and specify the delay time between when you press the shutter button on the remote and the camera takes the picture. Keep the final option, Live View, enabled; otherwise, you can’t see the preview on the device.
For still photography, the current Shooting mode and number of shots that can fit in the remaining memory-card space appear in the areas labeled on the left in Figure A-10. You also see a symbol showing the current camera battery status (don’t confuse that symbol with the one that represents the device battery status, usually shown at the top of the screen). To take a picture, tap the shutter-button symbol, labeled on the left in Figure A-10. A thumbnail of the photo appears under the live preview. Tap the thumbnail to see the image at a larger size and to access options that enable you to share or delete the image.
For video recording, the app automatically uses the camera’s P (programmed autoexposure) Shooting mode, regardless of the setting you select via the camera’s Shooting mode switch. Tap the red Record button, labeled on the right in Figure A-10, to start recording; tap again to stop. The available recording time appears in the upper right corner of the screen, as does the camera’s battery-status symbol.
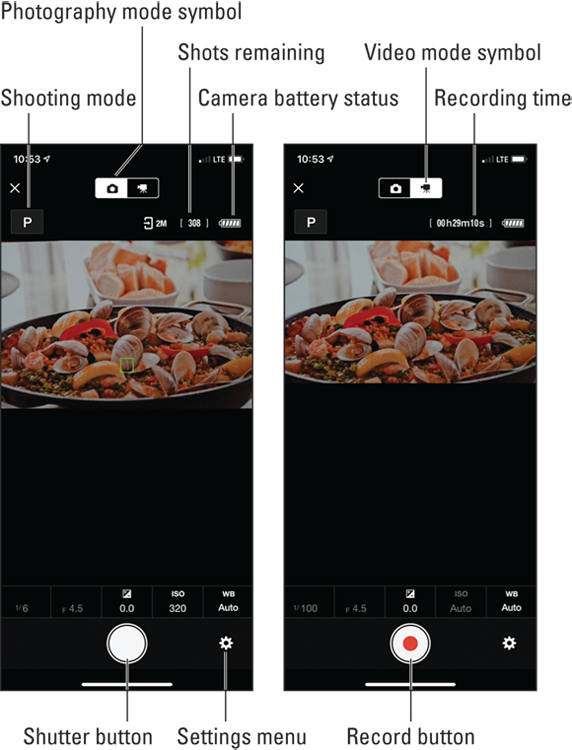
FIGURE A-10: The remote control screens as they appear for photography (left) and video recording (right) when you use a Wi-Fi connection.
Bluetooth remote control: If you connect via Bluetooth, set the camera’s Photo/Video switch to take still photos or record videos before you start the rest of the process for using your device as a remote control. You can’t switch between still photography and video recording from inside the SnapBridge app as you can with a Wi-Fi connection. Also remember that with Bluetooth, you have to compose your shot using the camera displays; the live preview doesn’t appear on the device as it does with Wi-Fi.
If the camera is connected to your device via Bluetooth and you tap Remote Photography in SnapBridge, the app prompts you to switch to Wi-Fi so that you can access the more powerful Wi-Fi remote. If you want to stick with Bluetooth, cancel out of the prompt and then tap the swap arrows next to the Remote Photography option on the Camera tab. The name of that option then changes to Bluetooth Remote Control. Tap that option to display the screen shown on the left in Figure A-11. Tap the camera symbol at the top of the screen if it’s not already highlighted as it is in the figure. Then tap the Press Halfway symbol to start autofocusing. The symbol name changes to End Half Press. A focus box appears on the app screen; when the box turns green, focus is set. If you check the camera monitor and focus isn’t in the right spot, tap End Half Press in the app and try again. When the proper focus point is locked in, tap the shutter button symbol, labeled on the left in Figure A-11. If the camera is in Video mode, the app screen displays a red record symbol rather than the shutter button. Tap the record symbol to start and stop recording.
Bluetooth does offer one feature you can’t get with the Wi-Fi remote: After you press the Playback button on the camera, playback controls appear on the app screen, as shown on the right in Figure A-11. You may want to use this feature when your camera is connected to a TV or another large monitor via HDMI. Using the device as a playback remote means that you don’t have to stay by the camera to advance through your photos or start video playback. Chapter 10 has information on camera options related to HDMI connections.
The circular control labeled Multi-Selector playback controls on the right in Figure A-11 mimics the playback functions of the camera’s Multi Selector, with the center circle serving as the OK button. You can use the controls to scroll through your photos and videos. Tap the magnifying glass symbols to zoom in and out on the displayed photo.
 With either type of connection, don’t turn off the camera or choose another tab in the app between shots or during video recording. Either action disconnects the devices.
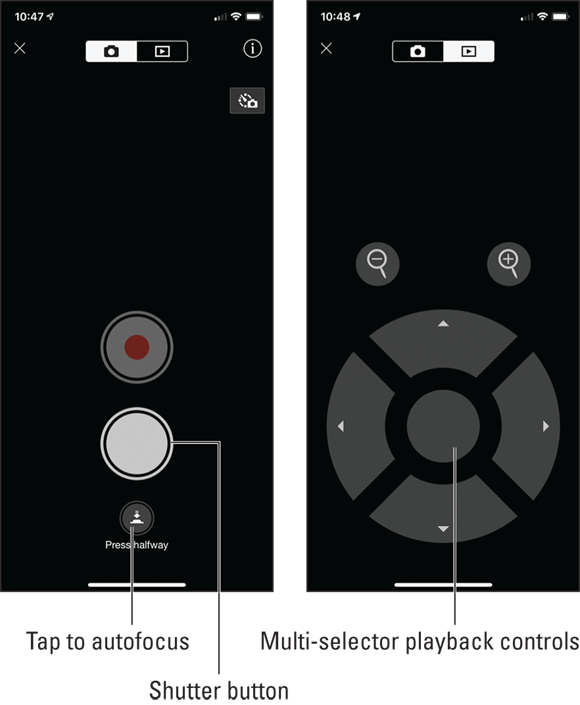
FIGURE A-11: Bluetooth offers only basic shooting and playback remote controls.