
CHAPTER 45
Creating Custom Excel Add-Ins
For developers, one of the most useful features in Excel is the capability to create add-ins. This chapter discusses this concept and provides a practical example of creating an add-in.
Understanding Add-Ins
An add-in provides software with additional functionality. Excel includes several add-ins, including the Analysis ToolPak and Solver. Ideally, the new features blend in well with the original interface so that they appear to be part of the program.
Excel's approach to add-ins is quite powerful: any knowledgeable Excel user can create add-ins from workbooks. The type of add-in covered in this chapter is basically a different form of a workbook file. Any Excel workbook can be converted into an add-in, but not every workbook is a good candidate for an add-in.
What distinguishes an add-in from a normal workbook? Add-ins, by default, have an .xlam extension. In addition, add-ins are always hidden, so you can't display worksheets or chart sheets that are contained in an add-in. However, you can access its VBA procedures and display dialog boxes that are contained on UserForms.
The following are some typical uses for Excel add-ins:
- Store one or more custom worksheet functions When the add-in is loaded, you can use the functions as you would any built-in worksheet function.
- Store Excel utilities VBA is ideal for creating general-purpose utilities that extend the power of Excel.
- Store proprietary macros If you don't want end users to see (or modify) your macros, store the macros in an add-in and protect the VBA project with a password. Users can use the macros, but they can't view or change them unless they know the password. An additional benefit is that the add-in doesn't display a workbook window, which can be distracting.
As previously noted, Excel ships with several useful add-ins, and you can acquire other add-ins from third-party vendors or online. In addition, Excel includes the tools that enable you to create your own add-ins. We explain this process later in this chapter (see “Creating Add-Ins”).
Working with Add-Ins
The best way to work with add-ins is to use the Excel Add-In Manager. To display the Add-In Manager, follow these steps:
- Choose File ➪ Options. The Excel Options dialog box appears.
- Select the Add-Ins category.
- At the bottom of the dialog box, select Excel Add-Ins from the Manage list and then click Go.
The Add-Ins dialog box appears, as shown in Figure 45.1. The dialog box contains all the add-ins that Excel knows about, which varies from computer to computer. The add-ins that are checked are open. You can open and close add-ins from this dialog box by selecting or deselecting the check boxes.

FIGURE 45.1 The Add-Ins dialog box
The user interface for some add-ins (including those included with Excel) may be integrated into the Ribbon. For example, when you open the Analysis ToolPak add-in, you access these tools by choosing Data ➪ Analysis ➪ Data Analysis.
Understanding When to Create Add-Ins
Most Excel users have no need to create add-ins. However, if you develop spreadsheets for others—or if you simply want to get the most out of Excel—you may be interested in pursuing this topic further.
Here are some reasons why you may want to convert your Excel workbook application to an add-in:
- To avoid confusion If an end user loads your application as an add-in, the file isn't visible in a window and, therefore, is less likely to confuse novice users or get in the way. Unlike a hidden workbook window, an add-in can't be unhidden.
- To simplify access to worksheet functions Custom worksheet functions stored in an add-in don't require the workbook name qualifier. For example, if you have a custom function named MOVAVG stored in a workbook named
Newfuncs.xlsm, you must use syntax such as the following to use this function in a different workbook:=NEWFUNCS.XLSM!MOVAVG(A1:A50)If this function is stored in an add-in file that's open, however, the syntax is much simpler because you don't need to include the file reference:
=MOVAVG(A1:A50) - To provide easier access After you identify the location of your add-in, it appears in the Add-Ins dialog box and can display a friendly name and a description of what it does.
- To permit better loading control You can automatically open add-ins when Excel starts, regardless of the directory in which they're stored.
- To omit prompts when unloading When an add-in is closed, the user never sees the Save Change In prompt because changes to add-ins aren't saved unless you specifically do so from the VB Editor window.
Creating Add-Ins
Technically, you can convert any workbook to an add-in. Not all workbooks benefit from this conversion, though. In fact, workbooks that consist only of worksheets (that is, no macros or custom dialog boxes) become unusable because add-ins are hidden.
Workbooks that benefit from conversion to an add-in are those with macros. For example, you may have a workbook that consists of general-purpose macros and functions. This type of workbook makes an ideal add-in.
The following steps describe how to create an add-in from a workbook:
- Develop your application, and make sure that everything works properly.
- (Optional) Add a title and description for your add-in. Choose File ➪ Info and click Show All Properties at the bottom of the right panel. Enter a brief descriptive title in the Title field and then enter a longer description in the Comments field. Although this step isn't required, it makes installing and identifying the add-in easier.
- (Optional) Lock the VBA project. This step protects the VBA code and UserForms from being viewed. You do this in the Visual Basic Editor (VBE) by choosing Tools ➪ <Project Name> Properties (where <Project Name> corresponds to your VB project name). In the dialog box, click the Protection tab and select Lock Project for Viewing. If you like, you can specify a password to prevent others from viewing your code.
- Save the workbook as an add-in file by choosing File ➪ Save As and selecting Excel Add-In (*.xlam) from the Save As Type drop-down list. By default, Excel saves your add-in to your AddIns directory. You can override this location and choose any directory that you like.
After you create the add-in, you need to install it:
- Choose File ➪ Options ➪ Add-Ins.
- Select Excel Add-Ins from the Manage drop-down list and then click Go. The Add-Ins dialog box appears.
- Click the Browse button to locate the XLAM file that you created, and click OK, which installs the add-in. The Add-Ins dialog box uses the descriptive title that you provided for the Title field in the Show All Properties panel.
Looking at an Add-In Example
The following sections discuss the steps required to create a useful add-in from the change case.xlsm workbook that we covered in Chapter 41, “Creating UserForms.” This workbook contains a UserForm that displays options that change the text case of selected cells (uppercase, lowercase, or proper case). Figure 45.2 shows the add-in in action.
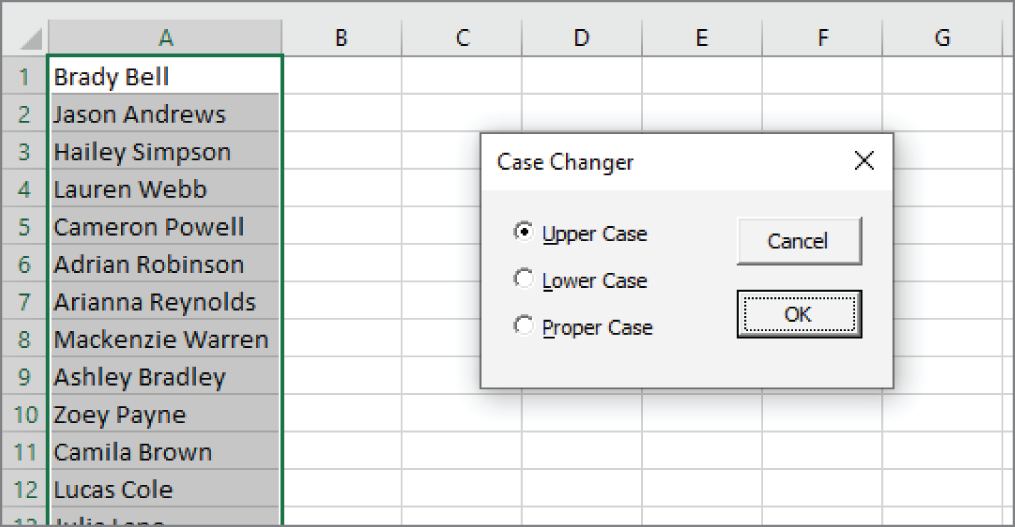
FIGURE 45.2 This dialog box enables the user to change the case of text in the selected cells.
This workbook contains one worksheet, which is empty. Although the worksheet is not used, it must be present because every workbook must have at least one sheet. It also contains one VBA module and one UserForm.
Learning about Module1
The Module1 code module contains one procedure that displays the UserForm. The ShowChangeCaseUserForm procedure checks the type of selection. If a range is selected, the dialog box in UserForm1 appears. If anything other than a range is selected, a message box is displayed:
Sub ShowChangeCaseUserForm ()If TypeName(Selection) = "Range" ThenUserForm1.ShowElseMsgBox "Select some cells."End IfEnd Sub
Learning about the UserForm
Figure 45.3 shows the UserForm1 form, which has five controls: three OptionButton controls and two CommandButton controls. The controls have descriptive names, and the Accelerator property is set so that the controls display an accelerator key (for keyboard users). The option button with the Upper-Case caption has its Value property set to TRUE, which makes it the default option.

FIGURE 45.3 The custom dialog box
Testing the workbook
Before you convert a workbook to an add-in, test it when a different workbook is active to simulate what happens when the workbook is an add-in. Remember that an add-in is never the active workbook, and it never displays any of its worksheets.
To test it, save the XLSM version of the workbook, close it, and then reopen it. With the workbook open, activate a different workbook, select some cells that contain text, and then press Alt+F8 to display the Macros dialog box. Execute the ShowChangeCaseUserForm macro and try all the options.
Adding descriptive information
Adding descriptive information is recommended but not necessary. Choose File ➪ Info and click Show All Properties at the bottom of the right panel (see Figure 45.4). Enter a title for the add-in in the Title field. This text appears in the Add-Ins dialog box. In the Comments field, enter a description. This information appears at the bottom of the Add-Ins dialog box when the add-in is selected.

FIGURE 45.4 Adding descriptive information about your add-in
Creating the user interface for your add-in macro
At this point, the future add-in is missing one key component: a way to execute the macro that displays the UserForm. The easiest solution is to provide a shortcut key that executes the macro. Ctrl+Shift+C is a good key combination. Here's how to do it:
- In Excel, choose Developer ➪ Code ➪ Macros (or press Alt+F8). The Macro dialog box appears.
- In the Macro Name list, select the macro named ShowChangeCaseUserForm.
- Click the Options button. The Macro Options dialog box appears.
- Specify Ctrl+Shift+C as the shortcut key and click OK.
- Click Cancel to close the Macro dialog box.
Make sure you save the workbook after making this change.
Protecting the project
In some situations (such as a commercial product), you may want to protect your project so that others can't see the source code. To protect the project, follow these steps:
- Activate the VBE.
- In the Project window, click the project.
- Choose Tools ➪ <Project Name> Properties. The VBE displays its Project Properties dialog box.
- Select the Protection tab (as shown in Figure 45.5).
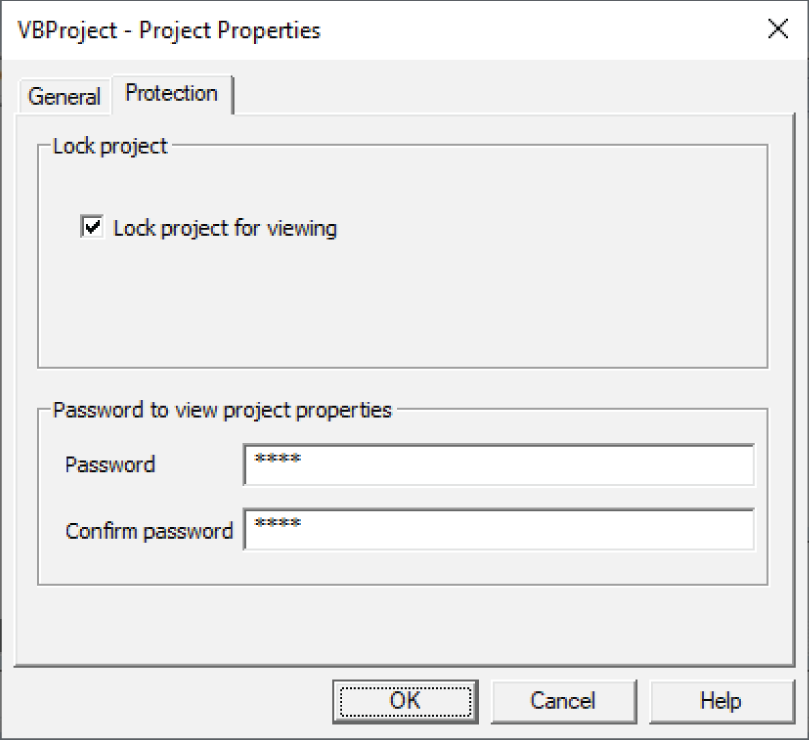
FIGURE 45.5 The Protection tab of the Project Properties dialog box
- Select the Lock Project for Viewing check box.
- Enter a password (twice) for the project.
- Click OK.
Creating the add-in
To save the workbook as an add-in, follow these steps:
- Switch to the Excel window and activate your workbook.
- Choose File ➪ Save As.
- Select Excel Add-In (
*.xlam) from the Save as Type drop-down list. - Enter a name for the add-in file and then click Save. By default, Excel saves the add-in in your AddIns directory, but you can choose a different directory if you like.
Installing the add-in
Now it's time to try the add-in. Make sure the XLSM version of the workbook is not open and then follow these steps:
- Choose File ➪ Options ➪ Add-Ins.
- Select Excel Add-Ins from the Manage drop-down list and click Go. The Add-Ins dialog box appears.
- Click the Browse button. Locate and select the
change case.xlamadd-in that you just created. Click OK. The Add-Ins dialog box displays the add-in in its list. Notice that the information that you provided in the Show All Properties panel appears here. - Click OK to close the dialog box and open the add-in.
When the add-in is installed, you can access it by pressing Ctrl+Shift+C. Another option is to add a new item to your Quick Access Toolbar or to the Ribbon.