CHAPTER 41
Creating UserForms
You can't use Excel very long without being exposed to dialog boxes. Excel, like most Windows programs, uses dialog boxes to obtain information, clarify commands, and display messages. If you develop VBA macros, you can create your own dialog boxes that work very much like those that are built into Excel. These dialog boxes are known as UserForms.
Understanding Why to Create UserForms
Some macros that you create behave the same every time that you execute them. For example, you may develop a macro that enters a list of your sales regions into a worksheet range. This macro always produces the same result and requires no additional user input. You may develop other macros, however, that perform differently under different circumstances or that offer options for the user. In such cases, the macro may benefit from a custom dialog box.
The following is an example of a simple macro that makes each cell in the selected range uppercase (but skips cells that have a formula). The procedure uses VBA's built-in StrConv function:
Sub ChangeCase()For Each cell In SelectionIf Not cell.HasFormula Thencell.Value = StrConv(cell.Value, vbUpperCase)End IfNext CellEnd Sub
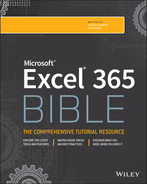
This macro is useful, but it can be improved. For example, the macro would be more helpful if it could also change the cells to lowercase or proper case (only the first letter of each word is uppercase). This modification is not difficult to make, but if you make this change to the macro, you need some method of asking the user what type of change to make to the cells. The solution is to present a dialog box like the one shown in Figure 41.1. This dialog box is a UserForm that was created by using the Visual Basic Editor (VBE), and it's displayed by a VBA macro.
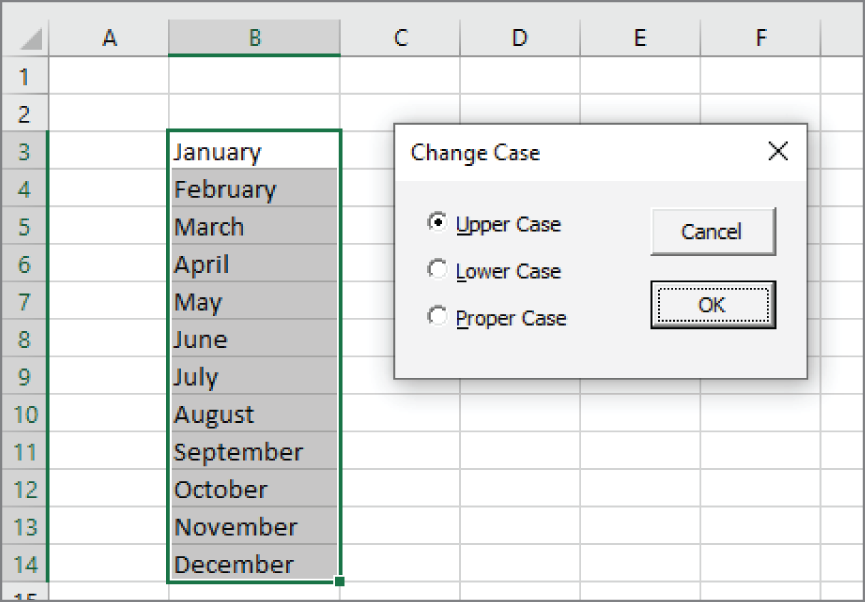
FIGURE 41.1 A UserForm that asks the user to select an option
Another solution is to develop three macros—one for each type of text case change. Combining these three operations into a single macro and using a UserForm is a more efficient approach, however. We discuss this example, including how to create the UserForm, in “Looking at Another UserForm Example” later in the chapter.
Exploring UserForm Alternatives
After you get the hang of it, developing UserForms isn't difficult. But sometimes using the tools that are built into VBA is easier. For example, VBA includes two functions (InputBox and MsgBox) that enable you to display simple dialog boxes without having to create a UserForm in the VBE. You can customize these dialog boxes in some ways, but they certainly don't offer the number of options that are available in a UserForm.
Using the InputBox function
The InputBox function is useful for obtaining a single input from the user. A simplified version of the function's syntax follows:
InputBox(prompt[,title][,default])The elements are defined as follows:
- prompt (Required): Text that is displayed in the input box
- title (Optional): Text that appears in the input box's title bar
- default (Optional): The value that appears in the input box's text area by default
The following is an example of how you can use the InputBox function:
CName = InputBox("Customer name?","Customer Data")When this VBA statement is executed, Excel displays the dialog box shown in Figure 41.2. Notice that this example uses only the first two arguments for the InputBox function and does not supply a default value. When the user enters a value and clicks OK, the value is assigned to the variable CName. Your VBA code can then use that variable.

FIGURE 41.2 This dialog box is displayed by the VBA InputBox function.
Using the MsgBox function
The VBA MsgBox function is a handy way to display information and to solicit simple input from users. We use the VBA MsgBox function in many of this book's examples to display a variable's value. A simplified version of the MsgBox syntax is as follows:
MsgBox(prompt[,buttons][,title])The elements are defined as follows:
- prompt (Required): Text that is displayed in the message box
- buttons (Optional): The code for the buttons that appear in the message box
- title (Optional): Text that appears in the message box's title bar
You can use the MsgBox function by itself or assign its result to a variable. If you use it by itself, don't include parentheses around the arguments. The following example displays a message and does not return a result:
Sub MsgBoxDemo()MsgBox "Click OK to continue"End Sub
Figure 41.3 shows how this message box appears.

FIGURE 41.3 A simple message box, displayed with the VBA MsgBox function
To get a response from a message box, you can assign the result of the MsgBox function to a variable. The following code uses some built-in constants (described in Table 41.1) to make it easier to work with the values that are returned by MsgBox:
Sub GetAnswer()Ans = MsgBox("Continue?", vbYesNo)Select Case AnsCase vbYes' ...[code if Ans is Yes]...Case vbNo' ...[code if Ans is No]...End SelectEnd Sub
When this procedure is executed, the Ans variable contains a value that corresponds to vbYes or vbNo. The Select Case statement determines the action to take based on the value of Ans.
You can easily customize your message boxes because of the flexibility of the buttons argument. Table 41.1 lists the most common built-in constants that you can use for the buttons argument. You can specify which buttons to display, whether an icon appears, and which button is the default.
TABLE 41.1 Constants Used in the MsgBox Function
| Constant | Value | Description |
|---|---|---|
| vbOKOnly | 0 | Displays OK button |
| vbOKCancel | 1 | Displays OK and Cancel buttons |
| vbAbortRetryIgnore | 2 | Displays Abort, Retry, and Ignore buttons |
| vbYesNoCancel | 3 | Displays Yes, No, and Cancel buttons |
| vbYesNo | 4 | Displays Yes and No buttons |
| vbRetryCancel | 5 | Displays Retry and Cancel buttons |
| vbCritical | 16 | Displays Critical Message icon |
| vbQuestion | 32 | Displays Query icon (a question mark) |
| VBExclamation | 48 | Displays Warning Message icon |
| vbInformation | 64 | Displays Information Message icon |
| vbDefaultButton1 | 0 | First button is default |
| vbDefaultButton2 | 256 | Second button is default |
| vbDefaultButton3 | 512 | Third button is default |
The following example uses a combination of constants to display a message box with a Yes button and a No button (vbYesNo) and a question mark icon (vbQuestion). The second button (the No button) is designated as the default button (vbDefaultButton2), which is the one that is executed if the user presses Enter. For simplicity, these constants are assigned to the Config variable, and Config is then used as the second argument in the MsgBox function.
Sub GetAnswer()Config = vbYesNo + vbQuestion + vbDefaultButton2Ans = MsgBox("Process the monthly report?", Config)If Ans = vbYes Then RunReportIf Ans = vbNo Then Exit SubEnd Sub
Figure 41.4 shows how this message box appears when the GetAnswer procedure is executed. If the user clicks the Yes button, the routine executes the procedure named RunReport (which is not shown). If the user clicks the No button (or presses Enter), the procedure is ended with no action. Because the title argument was omitted in the MsgBox function, Excel uses the default title (Microsoft Excel).
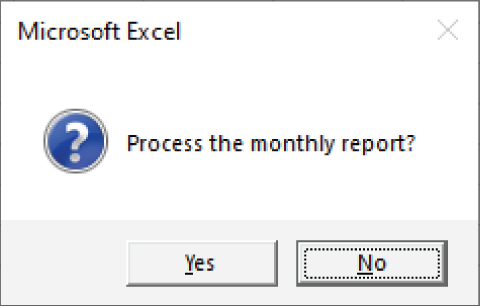
FIGURE 41.4 The second argument of the MsgBox function determines what appears in the message box.
The procedure that follows is another example of using the MsgBox function:
Sub GetAnswer2()Msg = "Do you want to process the monthly report?"Msg = Msg & vbNewLine & vbNewLineMsg = Msg & "Processing the monthly report will take approximately "Msg = Msg & "15 minutes. It will generate a 30-page report for all "Msg = Msg & "sales offices for the current month."Title = "XYZ Marketing Company"Config = vbYesNo + vbQuestionAns = MsgBox(Msg, Config, Title)If Ans = vbYes Then RunReportIf Ans = vbNo Then Exit SubEnd Sub
This example demonstrates an efficient way to specify a longer message in a message box. A variable (Msg) and the concatenation operator (&) are used to build the message in a series of statements. vbNewLine is a constant that represents a line break character. (Using two line breaks will insert a blank line.) The title argument is also used to display a different title in the message box. The Config variable stores the constants that generate Yes and No buttons and a question mark icon. Figure 41.5 shows how this message box appears when the procedure is executed.
FIGURE 41.5 A message box with a longer message and a title
Creating UserForms: An Overview
The InputBox and MsgBox functions are adequate for many situations, but if you need to obtain more information, you need to create a UserForm.
The following is a list of the general steps that you typically take to create a UserForm:
- Determine how the dialog box is going to be used and where it will fit into your VBA macro.
- Activate the VBE and insert a new UserForm.
- Add the appropriate controls to the UserForm.
- Create a VBA macro to display the UserForm. This macro goes in a normal VBA module.
- Create event handler VBA procedures that are executed when the user manipulates the controls (for example, when the user clicks the OK button). These procedures go in the code module for the UserForm.
The following sections offer more details on creating a UserForm.
Working with UserForms
To create a dialog box, you must first insert a new UserForm in the VBE. To activate the VBE, choose Developer ➪ Code ➪ Visual Basic (or press Alt+F11). Make sure that the correct workbook is selected in the Project window and then choose Insert ➪ UserForm. The VBE displays an empty UserForm, as shown in Figure 41.6. When you activate a UserForm, the VBE displays the Toolbox, which is used to add controls to the UserForm.

FIGURE 41.6 An empty UserForm
Adding controls
The Toolbox, also shown in Figure 41.6, contains ActiveX controls that you can add to your UserForm. If the Toolbox is not visible, choose View ➪ Toolbox.
When you move the mouse pointer over a control in the Toolbox, the control's name appears. To add a control, select the control in Toolbox and either click in the form to get the default size or drag the desired size onto the form. After adding a control, you can move it or change its size.
Table 41.2 lists the Toolbox controls.
TABLE 41.2 Toolbox Controls
| Control | Description |
|---|---|
| Select Objects | Lets you select other controls by dragging |
| Label | Adds a label (a container for text) |
| TextBox | Adds a text box, which allows the user to type text |
| ComboBox | Adds a combo box (a drop-down list) |
| ListBox | Adds a list box, which allows the user to select an item from a list |
| CheckBox | Adds a check box to control Boolean options |
| OptionButton | Adds an option button to allow the user to select from multiple options |
| ToggleButton | Adds a toggle button to control Boolean options |
| Frame | Adds a frame (a container for other objects) |
| CommandButton | Adds a command button (a clickable button) |
| TabStrip | Adds a tab strip (a container for other objects) |
| MultiPage | Adds a multipage control (a container for other objects) |
| ScrollBar | Adds a scrollbar, which allows the user to specify a value by dragging a bar |
| SpinButton | Adds a spin button, which allows the user to specify a value by clicking up or down arrows |
| Image | Adds a control that can contain an image |
Changing the properties of a control
Every control that you add to a UserForm has several properties that determine the way the control looks and behaves. You can change some of these properties (such as Height and Width) by clicking and dragging the control's border. To change other properties, use the Properties window.
To display the Properties window, choose View ➪ Properties Window (or press F4). The Properties window displays a list of properties for the selected control. (Each type of control has a different set of properties.) If you click the UserForm itself, the Properties window displays properties for the form. Figure 41.7 shows the Properties window for a CommandButton control.
To change a property, select the property in the Properties window and then enter a new value. Some properties (such as BackColor) let you select a value from a list. The top of the Properties window contains a drop-down list of all the controls on the form. You can also click a control to select it and display its properties.
When you set properties via the Properties window, you're setting properties at design time. You can also use VBA to change the properties of controls while the UserForm is displayed (that is, at runtime).

FIGURE 41.7 The Properties window for a CommandButton control
A complete discussion of all the properties is well beyond the scope of this book—and it would indeed be dull reading. To find out about a particular property, select it in the Properties window and press F1 for help.
Handling events
When you insert a UserForm, that form can also hold VBA Sub procedures to handle the events that are generated by the UserForm. An event is something that occurs when the user manipulates a control. For example, clicking a button causes a Click event. Selecting an item in a list box control also triggers a Click event, as well as a Change event. To make a UserForm useful, you must write VBA code to do something when an event occurs.
Event handler procedures have names that combine the control with the event. The general form is the control's name, followed by an underscore and then the event name. For example, the procedure that is executed when the user clicks a button named MyButton is MyButton_Click. You don't have to remember how they're named, however. Just right-click the control and choose View Code. The Private Sub and End Sub keywords will be inserted for you, and the correct name of one of the control's events will already be constructed. Use the drop-downs at the top of the code pane to change the event from the default.
Figure 41.8 shows the result of right-clicking on a CommandButton control named CommandButton1 and choosing View Code. The CommandButton's default event, the Click event, is inserted into the code module. The figure also shows some of the other events available using the code pane's drop-down.

FIGURE 41.8 The code pane showing the Click event of a CommandButton and the drop-down listing other available events
Displaying a UserForm
You also need to write a procedure to display the UserForm. You use the Show method of the UserForm object. The following procedure displays the UserForm named UserForm1:
Sub ShowDialog()UserForm1.ShowEnd Sub
This procedure should be stored in a regular VBA module (not the code module for the UserForm). If your VB project doesn't have a regular VBA module, choose Insert ➪ Module to add one.
When the ShowDialog procedure is executed, the UserForm is displayed. What happens next depends on the event handler procedures that you create.
Looking at a UserForm Example
The preceding sections are, admittedly, rudimentary. The following sections demonstrate, in detail, how to develop a UserForm. This example is rather simple. The UserForm displays a message to the user—something that can be accomplished more easily by using the MsgBox function. However, a UserForm gives you more flexibility in terms of formatting and layout of the message.
Creating the UserForm
If you're following along on your computer, start with a new workbook. Then follow these steps:
- Choose Developer ➪ Code ➪ Visual Basic (or press Alt+F11). The VBE appears.
- Click your workbook's name in the Project Explorer to activate it.
- Choose Insert ➪ UserForm. The VBE adds an empty form named UserForm1 and displays the Toolbox.
- Press F4 to display the Properties window, and then change the following properties of the UserForm object:
Property Change to Name AboutBox Caption About This Workbook - Use the Toolbox to add a Label object to the UserForm. If the Toolbox is not visible, choose View ➪ Toolbox.
- Select the Label object, and in the Properties window change the Name property to lblMessage and enter any text you want in the Caption property.
- In the Properties window, click the Font property and adjust the font. You can change the typeface, size, and so on. The changes then appear in the form. Figure 41.9 shows an example of a formatted Label control. In this example, the TextAlign property was set to the code that center aligns the text.
2 - fmTextAlignCenter
FIGURE 41.9 A Label control, after changing its Font properties
- Use the Toolbox and add a CommandButton object to the UserForm. Then use the Properties window to change the following properties for the CommandButton:
Property Change to Name OKButton Caption OK Default True - Make other adjustments so that the form looks good to you. You can change the size of the form or move or resize the controls.
Testing the UserForm
At this point, the UserForm has all the necessary controls. What's missing is a way to display the UserForm. While you're developing the UserForm, you can press F5 to display it and see how it looks. To close the UserForm, click the Close button (X) in the dialog box title bar.
This section explains how to write a VBA procedure to display the UserForm when Excel is active:
- Insert a VBA module by choosing Insert ➪ Module.
- In the empty module, enter the following code:
Sub ShowAboutBox()AboutBox.ShowEnd Sub - Press Alt+F11 to activate Excel.
- Choose Developer ➪ Code ➪ Macros (or press Alt+F8). The Macro dialog box appears.
- Select ShowAboutBox from the list of macros, and then click Run. The UserForm appears.
If you click the OK button, notice that it doesn't close the UserForm as you may expect. This button needs to have an event handler procedure for it to do anything when it's clicked. To dismiss the UserForm, click the Close button (X) in its title bar.
Creating an event handler procedure
An event handler procedure is executed when an event occurs. In this case, you need a procedure to handle the Click event that's generated when the user clicks the OK button.
- Press Alt+F11 to activate the VBE.
- Activate the AboutBox UserForm by double-clicking its name in the Project window.
- Double-click the CommandButton control. The VBE activates the code module for the UserForm and inserts the Sub and End Sub statements for the button's Click event, as shown in Figure 41.10.
- Insert the following statement before the End Sub statement:
Unload Me
This statement simply dismisses the UserForm by using the Unload statement. The complete event handler procedure is as follows:
Private Sub OKButton_Click()Unload MeEnd Sub

FIGURE 41.10 The code module for the UserForm
After you add the event procedure, clicking the OK button closes the form.
Looking at Another UserForm Example
This example is an enhanced version of the ChangeCase procedure presented at the beginning of the chapter. Recall that the original version of this macro changes the text in the selected cells to uppercase characters. This modified version asks the user what type of case change to make: uppercase, lowercase, or proper case (initial capitals).
Creating the UserForm
This UserForm needs one piece of information from the user: the type of change to make to the text. Because only one option can be selected, OptionButton controls are appropriate. Start with an empty workbook and follow these steps to create the UserForm:
- Press Alt+F11 to activate the VBE.
- In the VBE, choose Insert ➪ UserForm. The VB Editor adds an empty form named UserForm1 and displays the Toolbox.
- Press F4 to display the Properties window and then change the following properties of the UserForm object:
Property Change to NameUChangeCase CaptionChange Case - Add a CommandButton object to the UserForm and then change the following properties for the CommandButton:
Property Change to NameOKButton CaptionOK DefaultTrue - Add another CommandButton object and then change the following properties:
Property Change to NameCancelButton CaptionCancel CancelTrue - Add an OptionButton control and then change the following properties. (This option is the default, so its Value property should be set to True.)
Property Change to NameOptionUpper CaptionUpper Case ValueTrue - Add a second OptionButton control and then change the following properties:
Property Change to NameOptionLower CaptionLower Case - Add a third OptionButton control and then change the following properties:
Property Change to NameOptionProper CaptionProper Case - Adjust the size and position of the controls and the form until your UserForm resembles the one shown in Figure 41.11. Make sure that the controls do not overlap.
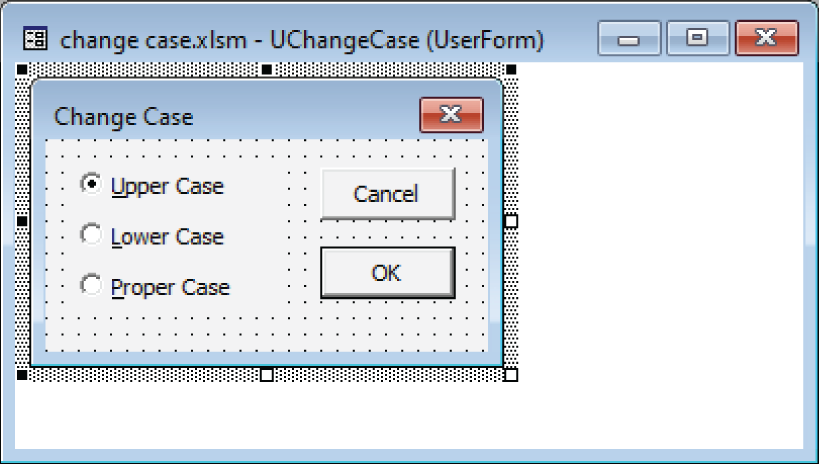
FIGURE 41.11 The UserForm after adding controls and adjusting some properties
Creating event handler procedures
The next step is to create two event handler procedures: one to handle the Click event for the CancelButton CommandButton and the other to handle the Click event for the OKButton CommandButton. Event handlers for the OptionButton controls are not necessary. The VBA code can determine which of the three OptionButton controls is selected, but it does not need to react when the choice is changed—only when OK or Cancel is clicked.
Event handler procedures are stored in the UserForm code module. To create the procedure to handle the Click event for the CancelButton, follow these steps:
- Activate the UChangeCase UserForm form by double-clicking its name in the Project window.
- Double-click the CancelButton control. The VBE activates the code module for the UserForm and inserts an empty procedure.
- Insert the following statement before the End Sub statement:
Unload Me
That's all there is to it. The following is a listing of the entire procedure that's attached to the Click event for the CancelButton:
Private Sub CancelButton_Click()Unload MeEnd Sub
This procedure is executed when the CancelButton is clicked. It consists of a single statement that unloads the form.
Next, add the code to handle the Click event for the OKButton control. Follow these steps:
- Select OKButton from the drop-down list at the top of the module or reactivate the UserForm and double-click the OKButton control. The VBE creates a new procedure called OKButton_Click.
- Enter the following code. The VBE has already entered the first and last statements for you:
Private Sub OKButton_Click()' Exit if a range is not selectedIf TypeName(Selection) <> "Range" Then Exit Sub' Upper caseIf Me.OptionUpper.Value ThenFor Each cell In SelectionIf Not cell.HasFormula Thencell.Value = StrConv(cell.Value, vbUpperCase)End IfNext cellEnd If' Lower caseIf Me.OptionLower.Value ThenFor Each cell In SelectionIf Not cell.HasFormula Thencell.Value = StrConv(cell.Value, vbLowerCase)End IfNext cellEnd If' Proper caseIf Me.OptionProper.Value ThenFor Each cell In SelectionIf Not cell.HasFormula Thencell.Value = StrConv(cell.Value, vbProperCase)End IfNext cellEnd IfUnload MeEnd Sub
The macro starts by checking the type of selection. If a range is not selected, the procedure ends. The remainder of the procedure consists of three separate blocks. Only one block is executed, determined by which OptionButton is selected. The selected OptionButton has a Value of True. Finally, the UserForm is unloaded (dismissed).
Showing the UserForm
At this point, the UserForm has all the necessary controls and event procedures. All that's left is a way to display the form. This section explains how to write a VBA procedure to display the UserForm:
- Make sure the VBE window is activated.
- Insert a module by choosing Insert ➪ Module.
- In the empty module, enter the following code:
Sub ShowUserForm()UChangeCase.ShowEnd Sub - Choose Run ➪ Run Sub/UserForm (or press F5). The Excel window is activated, and the new UserForm is displayed, as shown in Figure 41.12.
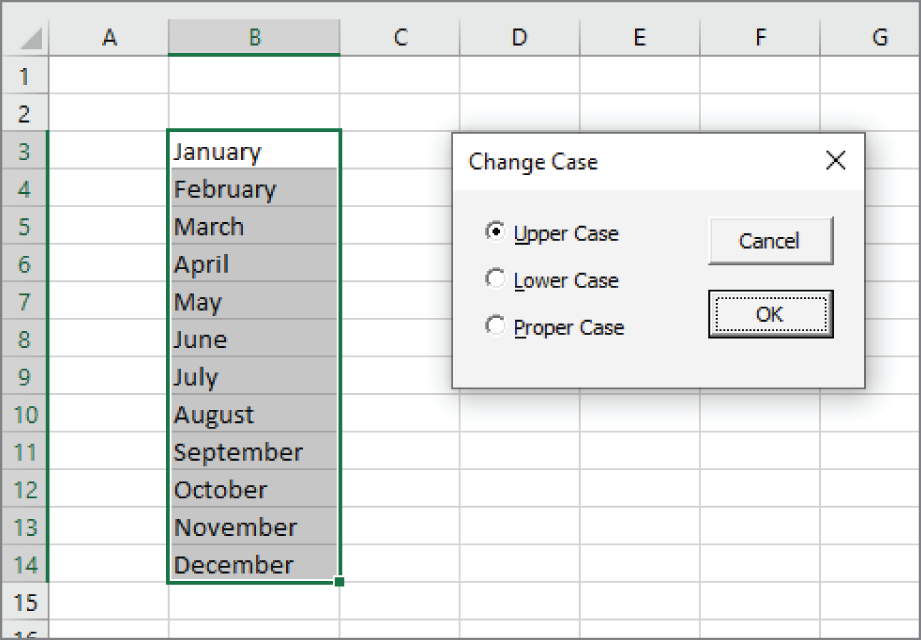
FIGURE 41.12 Displaying the UserForm
Testing the UserForm
To try the UserForm from Excel, follow these steps:
- Activate Excel.
- Enter some text into a range of cells.
- Select the range with the text.
- Choose Developer ➪ Code ➪ Macros (or press Alt+F8). The Macro dialog box appears.
- Select ShowUserForm from the list of macros and then click Run. The UserForm appears, as shown in Figure 41.12.
- Make your choice and click OK.
Try it with a few more selections, including noncontiguous cells. Notice that if you click Cancel, the UserForm is dismissed and no changes are made.
The code does have a problem, though: if you select one or more entire columns, the procedure processes every cell, which can take a long time. The version of the workbook on the website corrects this problem by working with a subset of the selection that intersects with the workbook's used range.
Making the macro available from a worksheet button
At this point, everything should be working properly. However, you have no quick and easy way to execute the macro. A good way to execute this macro would be from a button on the worksheet. You can use the following steps:
- Choose Developer ➪ Controls ➪ Insert and click the Button control in the Form Controls group.
- Click and drag in the worksheet to create the button. The Assign Macro dialog box appears.
- Select the ShowUserForm macro and then click OK.
- (Optional) At this point, the button is still selected, so you can change the text to make it more descriptive. You can also right-click the button and choose Edit Text at any time to change the text.
After you perform the preceding steps, clicking the button executes the macro and displays the UserForm.
Making the macro available on your Quick Access Toolbar
If you'd like to use this macro while other workbooks are active, you may want to add a button to your Quick Access Toolbar. Follow these steps:
- Make sure the workbook containing the macro is open.
- Right-click on the Quick Access Toolbar and choose Customize Quick Access Toolbar from the shortcut menu. The Excel Options dialog box appears, with the Quick Access Toolbar tab selected.
- Choose Macros from the Choose Commands From drop-down menu on the left. You'll see your macro listed.
- Select the macro's name and click Add to add the item to the list on the right.
- (Optional) To change the icon, click Modify and choose a new image; then click OK. You can also change the Display Name.
- Click OK to close the Excel Options dialog box. The icon appears on your Quick Access Toolbar.
Enhancing UserForms
Creating UserForms can make your macros much more versatile. You can create custom commands that display dialog boxes that look exactly like those that Excel uses. The following sections contain some additional information to help you develop custom dialog boxes that work like those that are built into Excel.
Adding accelerator keys
All Excel dialog boxes work well with a mouse and a keyboard because each control has an associated accelerator key. The user can press Alt plus the accelerator key to work with a specific dialog box control.
Your custom dialog boxes should also have accelerator keys for all controls. You add accelerator keys in the Properties window by entering a character for the Accelerator property.
Your accelerator key can be any letter, number, or punctuation, regardless of whether that character appears in the control's caption. It's a good practice to use a letter that is in the control's caption, though, because that letter will be underlined—a visual cue for the user. (See Figure 41.12 for an example of option buttons with accelerator keys.) Another common convention is to use the first letter of the control's caption. But don't duplicate accelerator keys. If the first letter is already taken, use a different letter, preferably one that is easy to associate with the word (like a hard consonant). If you have duplicate accelerator keys, the accelerator key acts on the next control in the tab order of the UserForm. Then, pressing the accelerator key again takes you to the second control with that accelerator.
Some controls (such as text boxes) don't have a Caption property and other controls (such as labels) can't have the focus. You can assign an accelerator key to a label that describes the control and put that label right before your target control in the tab order. Pressing the accelerator key for a control that can't take the focus activates the next control in the tab order.
Controlling tab order
The previous section refers to a UserForm's tab order. When you're working with a UserForm, pressing Tab and Shift+Tab cycles through the dialog box's controls. When you create a UserForm, you should make sure that the tab order is correct. Usually, it means that tabbing should move through the controls in a logical sequence.
To view or change the tab order in a UserForm, choose View ➪ Tab Order to display the Tab Order dialog box (see Figure 41.13). You can then select a control from the list; use the Move Up and Move Down buttons to change the tab order for the selected control.
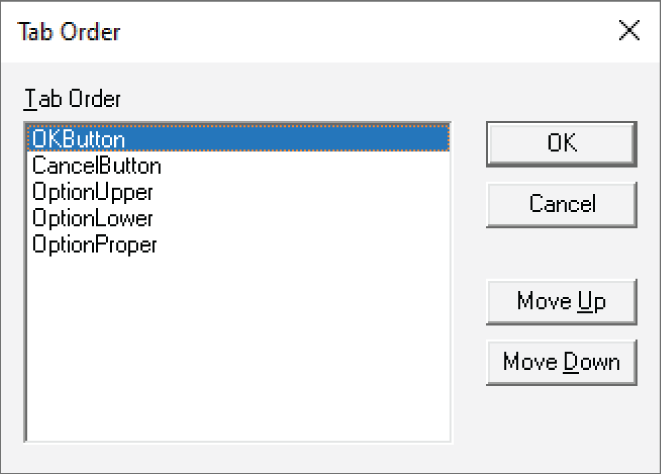
FIGURE 41.13 Adjusting the tab order in a UserForm
Learning More
Mastering UserForms takes practice. You should closely examine the dialog boxes that Excel uses to get a feel for the way dialog boxes are designed. You can duplicate many of the dialog boxes that Excel uses.
The best way to learn more about creating dialog boxes is by using the VBA Help system. Pressing F1 is the quickest way to display the Help window.