
Chapter 8
Selecting Data with Queries
IN THIS CHAPTER
- Understanding what queries are and what they can do for you
- Creating queries
- Specifying the fields in a query
- Displaying a query's results
- Adding and removing fields from a query's design
- Sorting a query's results
- Filtering records returned by a query
- Printing records returned by a query
- Saving a query
- Including more than one table in a query
- Adding, deleting, and moving tables in a query
- Joining tables in a query's design
- Understanding the options for joining tables in a query
Queries are an essential part of any database application. Queries are the tools that enable you and your users to extract data from multiple tables, combine it in useful ways, and present it to the user as a datasheet, on a form, or as a printed report.
You may have heard the old cliché, “Queries convert data to information.” To a certain extent, this statement is true—that's why it's a cliché. The data contained within tables is not particularly useful because, for the most part, the data in tables appears in no particular order. Also, in a properly normalized database, important information is spread out among a number of different tables. Queries are what draw these various data sources together and present the combined information in such a way that users can actually work with the data.
Introducing Queries
The word query comes from the Latin word quaerere, which means “to ask or inquire.” Over the years, the word query has become synonymous with quiz, challenge, inquire, or question.
An Access query is a question that you ask about the information stored in Access tables. You build queries with the Access query tools. Your query can be a simple question about data in a single table, or it can be a more complex question about information stored in several tables. For example, you might ask your database to show you only trucks that were sold in the year 2012. After you submit the question in the form of a query, Access returns only the information you requested.
What queries can do
Queries are flexible. They allow you to look at your data in virtually any way you can imagine. Most database systems are continually evolving and changing over time. Quite often, the original purpose of a database is very different from its current use.
Here's just a sampling of what you can do with Access queries:
- Choose tables. You can obtain information from a single table or from many tables that are related by some common data. Suppose you're interested in seeing the customer name along with the items purchased by each type of customer. When using several tables, Access combines the data as a single recordset (a set of records that meet given criterion).
- Choose fields. Specify which fields from each table you want to see in the recordset. For example, you can select the customer name, zip code, sales date, and invoice number from tblCustomers and tblSales.
- Provide criteria. Record selection is based on selection criteria. For example, you might want to see records for only a certain category of products.
- Sort records. You might want to sort records in a specific order. For example, you might need to see customer contacts sorted by last name and first name.
- Perform calculations. Use queries to perform calculations such as averages, totals, or counts of data in records.
- Create tables. Create a brand-new table based on data returned by a query.
- Display query data on forms and reports. The recordset you create from a query might have just the right fields and data needed for a report or form. Basing a report or form on a query means that, every time you print the report or open the form, you see the most current information contained in the tables.
- Use a query as a source of data for other queries (subquery). You can create queries that are based on records returned by another query. This is very useful for performing ad hoc queries, where you might repeatedly make small changes to the criteria. In this case, the second query filters the first query's results.
- Make changes to data in tables. Action queries can modify multiple rows in the underlying tables as a single operation. Action queries are frequently used to maintain data, such as updating values in specific fields, appending new data, or deleting obsolete information.
What queries return
Access combines a query's records and, when executed, displays them in Datasheet view by default. The set of records returned by a query is commonly called (oddly enough) a recordset. A recordset is a dynamic set of records. The recordset returned by a query is not stored within the database, unless you've directed Access to build a table from those records.
When you save a query, only the structure of the query is saved, not the returned records. That is to say, only the SQL syntax used to build the query is stored.
Consider these benefits of not saving the recordset to a physical table:
- A smaller amount of space on a storage device (usually a hard disk) is needed.
- The query uses updated versions of records.
Every time the query is executed, it reads the underlying tables and re-creates the recordset. Because recordsets themselves are not stored, a query automatically reflects any changes to the underlying tables made since the last time the query was executed—even in a real-time, multiuser environment. Depending on your needs, a query's recordset can be viewed as a datasheet, or in a form or report. When a form or report is based on a query, the query's recordset is re-created and bound to the form or report each time it's opened.
A query's recordset can also be used in macros and VBA procedures to help drive any number of automated tasks.
Creating a Query
After you create your tables and place data in them, you're ready to work with queries. To begin a query, select the Create tab on the Ribbon, and click the Query Design button in the Queries group. This opens the Query Designer shown in Figure 8.1.

Figure 8.1 The Show Table dialog box and the query design window.
Figure 8.1 shows two windows. The underlying window is the Query Designer. Floating on top of the Query Designer is the Show Table dialog box. The Show Table dialog box is modal, which means that you must do something in the dialog box before continuing with the query. Before you continue, you add the tables required for the query. In this case, tblProducts is highlighted and ready to be added.
The Show Table dialog box (refer to Figure 8.1) displays the tables and queries in your database. Double-click tblProducts to add it to the query design, or highlight tblProducts in the list and click the Add button. Close the Show Table dialog box after adding tblProducts. Figure 8.2 shows tblProducts added to the query.

Figure 8.2 The query design window with tblProducts added.
To add additional tables to the query, right-click anywhere in the upper portion of the Query Designer and select Show Table from the shortcut menu that appears. Alternatively, drag tables from the Navigation pane to the upper portion of the Query Designer. There is also a Show Table button on the Design tab of the Ribbon.
Removing a table from the Query Designer is easy. Simply right-click the table in the Query Designer and select Remove Table from the shortcut menu.
The query design window has three primary views:
- Design view: Where you create the query
- Datasheet view: Displays the records returned by the query
- SQL view: Displays the SQL statement behind a query
The Query Designer consists of two sections:
- The table/query pane (top): This is where tables or queries and their respective field lists are added to the query's design. You'll see a separate field list for each object to add. Each field list contains the names of all the fields in the respective table or query. You can resize a field list by clicking the edges and dragging it to a different size. You may want to resize a field list so that all of a table's fields are visible.
- The Query by Example (QBE) design grid (bottom): The QBE grid holds the field names involved in the query and any criteria used to select records. Each column in the QBE grid contains information about a single field from a table or query contained within the upper pane.
The two window panes are separated horizontally by a pane-resizing scroll bar (refer to Figure 8.2). You can use the scroll to shift the design grid left or right, or use the mouse to click and drag the bar up or down to change the relative sizes of the upper and lower panes.
Switch between the upper and lower panes by clicking the desired pane or by pressing F6. Each pane has horizontal and vertical scroll bars to help you move around.
You actually build the query by dragging fields from the upper pane to the QBE grid.
Figure 8.2 displays an empty QBE grid at the bottom of the Query Designer. The QBE grid has six labeled rows:
- Field: This is where field names are entered or added.
- Table: This row shows the table the field is from. This is useful in queries with multiple tables.
- Sort: This row enables sorting instructions for the query.
- Show: This row determines whether to display the field in the returned recordset.
- Criteria: This row consists of the criteria that filter the returned records.
- Or: This row is the first of a number of rows to which you can add multiple query criteria.
You learn more about these rows as you create queries in this chapter.
The Query Tools Design Ribbon (shown in Figure 8.3) contains many buttons specific to building and working with queries. Although each button is explained as it's used in the chapters of this book, here are the main buttons:

Figure 8.3 The Query Tools Design Ribbon.
- View: Switches between the Datasheet view and Design view in the query design window. The View drop-down control also enables you to display the underlying SQL statement behind the query.
- Run: Runs the query. Displays a select query's datasheet, serving the same function as selecting Datasheet View from the View button. However, when working with action queries, the Run button performs the operations (append, make-table, and so on) specified by the query.
- Select: Clicking the Select button transforms the opened query into a Select query.
- Make Table, Append, Update, Crosstab, and Delete: Each of these buttons specifies the type of query you're building. In most cases, you transform a select query into an action query by clicking one of these buttons.
- Show Table: Opens the Show Table dialog box.
The remaining buttons are used for creating more-advanced queries and displaying a query's Property Sheet.
Adding fields to your queries
There are several ways to add fields to a query. You can add fields one at a time, select and add multiple fields, or select all the fields in a field list.
Adding a single field
You add a single field in several ways. One method is to double-click the field name in the table in the top pane of the Query Designer. The field name immediately appears in the first available column in the QBE pane. Alternatively, drag a field from a table in the top pane of the Query Designer, and drop it on a column in the QBE grid. Dropping a field between two fields in the QBE grid pushes other fields to the right.
In Figure 8.4 you can see that the Cost field was brought into the QBE grid. Once a field is added, you can simply add the next field you need to see in the query.

Figure 8.4 To add fields from your table to the QBE grid, simply double-click or drag the field.
Each cell in the Table row of the QBE grid contains a drop-down list of the tables contained in the upper pane of the Query Designer.
Adding multiple fields
You can add multiple fields in a single action by selecting the fields from the field list window and dragging them to the QBE grid. The selected fields don't have to be contiguous (one after the other). Hold down the Ctrl key while selecting multiple fields. Figure 8.5 illustrates the process of adding multiple fields.

Figure 8.5 Selecting multiple fields to add to the QBE grid.
The fields are added to the QBE grid in the order in which they occur in the table.
You can also add all the fields in the table by double-clicking the field list's header (where it says tblProducts in Figure 8.6) to highlight all the fields in the table. Then drag the highlighted fields to the QBE grid.

Figure 8.6 Adding the asterisk to the QBE grid selects all fields in the table.
Alternatively, you can click and drag the asterisk (*) from the field list to the QBE grid (or double-click the asterisk to add it to the QBE grid). Although this action doesn't add all the fields to the QBE grid, the asterisk directs Access to include all fields in the table in the query.
Running your query
After selecting the fields, run the query by clicking the Run button on the Query Tools Design Ribbon (see Figure 8.7).

Figure 8.7 Click the Run button to display the results of your query.
To return to the QBE grid, you can go up to the Home tab and choose View ![]() Design View. Alternatively, you can right-click the tab header for the query (as shown in Figure 8.8) and select Design View.
Design View. Alternatively, you can right-click the tab header for the query (as shown in Figure 8.8) and select Design View.

Figure 8.8 Right-click on the queries tab header and select Design View to return to the QBE grid.
Working with Query Fields
Sometimes you'll want to work with the fields you've already selected—rearranging their order, inserting a new field, or deleting an existing field. You may even want to add a field to the QBE grid without showing it in the datasheet. Adding a field without showing it enables you to sort on the hidden field or to use the hidden field as criteria.
Selecting a field in the QBE grid
Before you can move a field's position, you must first select it. To select it, you will work with the field selector row.
The field selector is the thin gray area at the top of each column in the QBE grid at the bottom of the Query Designer. Each column represents a field. To select the Category field, move the mouse pointer until a small selection arrow (in this case, a dark downward arrow) is visible in the selector row and then click and drag the column. Figure 8.9 shows the selection arrow above the Category column just before it's selected.

Figure 8.9 Selecting a column in the QBE grid. The pointer changes to a downward-pointing arrow when you move over the selection row.
Changing field order
The left-to-right order in which fields appear in the QBE grid determines the order in which they appear in Datasheet view. You might want to move the fields in the QBE grid to achieve a new sequence of fields in the query's results. With the fields selected, you can move the fields on the QBE design by simply dragging them to a new position.
Left-click a field's selector bar and, while holding down the left mouse button, drag the field into a new position in the QBE grid.
Figure 8.10 shows the Category field highlighted. As you move the selector field to the left, the column separator between the fields ProductID and Description changes (gets wider) to show you where Category will go.
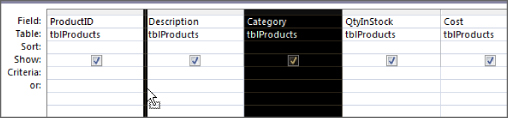
Figure 8.10 Moving the Category field to between ProductID and Description. Notice the QBE field icon below the arrow near the Description column.
Resizing columns in the QBE grid
The QBE grid generally shows five or six fields in the viewable area of your screen. The remaining fields are viewed by moving the horizontal scroll bar at the bottom of the window.
You might want to shrink some fields to be able to see more columns in the QBE grid. You adjust the column width to make them smaller (or larger) by moving the mouse pointer to the margin between two fields, and dragging the column resizer left or right (see Figure 8.11).

Figure 8.11 Resizing columns in the QBE grid.
The width of a column in the QBE grid has no effect on how the field's data is displayed in a datasheet, form, or report. The column width in the QBE grid is just a convenience to you, the developer. Also, QBE column width is not preserved when you save and close the query.
Removing a field
Remove a field from the QBE grid by selecting the field and pressing the Delete key. You can also right-click on a field's selector bar and choose Cut from the shortcut menu.
Inserting a field
Insert new fields in the QBE grid by dragging a field from a field list window in the tables pane above the QBE grid and dropping it onto a column in the QBE grid. The new column is inserted to the left of the column on which you dropped the field. Double-clicking a field in a field list adds the new column at the far-right position in the QBE grid.
Hiding a field
While you're performing queries, you might want to show only some of the fields in the QBE grid. For example, suppose you've chosen FirstName, LastName, Address, City, and State. Then you decide that you want to temporarily look at the same data, without the State field. Instead of completely removing the State field, you can simply hide it by unchecking the Show check box in the State column (see Figure 8.12).

Figure 8.12 The Show check box is unchecked for the State field so that field will not show in the results.
A common reason to hide a field in the query is because the field is used for sorting or as criteria, but its value is not needed in the query. For example, consider a query involving invoices. For a number of reasons, the users might want to see the invoices sorted by the order date, even though the actual order date is irrelevant for this particular purpose. You could simply include the OrderDate field in the QBE grid, set the sort order for the OrderDate field, and uncheck its Show box. Access sorts the data by the OrderDate field even though the field is not shown in the query's results.
Changing the sort order of a field
When viewing a recordset, you often want to display the data in a sorted order to make it easier to analyze the data. For example, you may want to review the results from the tblProducts table sorted by category.
Sorting places the records in alphabetical or numeric order. The sort order can be ascending or descending. You can sort on a single field or multiple fields.
You input sorting directions in the Sort row in the QBE grid. To specify a sort order on a particular field (such as LastName), perform these steps:
- Position the cursor in the Sort cell in the LastName column.
- Click the drop-down list that appears in the cell, and select the sort order (Ascending or Descending) you want to apply. Figure 8.13 shows the QBE grid with ascending sorts specified for the LastName and FirstName fields. Notice the word Ascending is being shown in the fields' Sort cells.

Figure 8.13 An ascending sort has been specified for the LastName and FirstName fields.
The left-to-right order in which fields appear in the QBE grid is important when sorting on more than one field. Not only do the fields appear in the datasheet in left-to-right order, but they're sorted in the same order; this is known as sort order precedence. The leftmost field containing sort criteria is sorted first, the first field to the right containing sort criteria is sorted next, and so on. In the example shown in Figure 8.13, the LastName field is sorted first, followed by the FirstName field.
Figure 8.14 shows the results of the query shown in Figure 8.13. Notice that the data is sorted by LastName and then by FirstName. This is why Ann Bond appears before John Bond, and John Jones appears before Kevin Jones in the query's data.

Figure 8.14 The order of the fields in the QBE grid is critical when sorting on multiple fields.
Adding Criteria to Your Queries
Most often users want to work only with records conforming to some criteria. Otherwise, too many records may be returned by a query, causing serious performance issues. For example, you might want to look only at customers who haven't bought any products within the last six months. Access makes it easy for you to specify a query's criteria.
Understanding selection criteria
Selection criteria are filtering rules applied to data as they're extracted from the database. Selection criteria tell Access which records you want to look at in the recordset. A typical criterion might be “all sellers,” or “only those vehicles that are not trucks,” or “products with retail prices greater than $75.”
Selection criteria limit the records returned by a query. Selection criteria aid the user by selecting only the records a user wants to see, and ignoring all the others.
You specify criteria in the Criteria row of the QBE grid. You designate criteria as an expression. The expression can be simple (like “trucks” or “not trucks”), or it can take the form of complex expressions using built-in Access functions.
Proper use of query criteria is critical to an Access database's success. In most cases, the users have no idea what data is stored in a database's tables and accept whatever they see on a form or report as truthfully representing the database's status. Poorly chosen criteria might hide important information from the application's users, leading to bad business decisions or serious business issues later on.
Entering simple string criteria
Character-type criteria are applied to Text-type fields. Most often, you'll enter an example of the text you want to retrieve. Here is a small example that returns only product records where the product type is “Cars”:
- Add tblProducts and choose the Description, Cost, QtyInStock, and Category fields.
- Type CARS into the Criteria cell under the Category column (see Figure 8.15). Notice that Access adds double quotes around the value. Unlike many other database systems, Access automatically makes assumptions about what you want.

Figure 8.15 Specifying Cars as the query's criteria.
- Run the query. Note that only cars are displayed in the query's results.
When looking at the results of the query, you may argue that there is no point in displaying Cars in every row. In fact, because this query only returns information about cars, the user can assume that every record references a car, and there's no need to display a product category in the query. Unchecking the Category field's Show box in the query's design removes Category from the datasheet, making the data easier to understand.
You could enter the criteria expression in any of these other ways:
- CARS
- = CARS
- “CARS”
- = “Cars”
By default, Access is not case sensitive, so any form of the word cars works just as well as this query's criteria.
Figure 8.15 is an excellent example for demonstrating the options for various types of simple character criteria. You could just as well enter Not Cars in the criteria column, to return all products that are not cars (trucks, vans, and so on).
Generally, when dealing with character data, you enter equalities, inequalities, or a list of acceptable values.
This capability is a powerful tool. Consider that you only have to supply an example, and Access not only interprets it but also uses it to create the query recordset. This is exactly what Query by Example means: You enter an example and let the database build a query based on the example.
To erase the criteria in the cell, select the contents and press Delete, or select the contents and right-click Cut from the shortcut menu that appears.
Entering other simple criteria
You can also specify criteria for Numeric, Date, and Yes/No fields. Simply enter the example data in the criteria field just as you did for text fields. In almost every case, Access understands the criteria you enter and adjusts to correctly apply the criteria to the query's fields.
It's also possible to add more than one criteria to a query. For example, suppose that you want to look only at contacts who live in Connecticut and have been customers since January 1, 2010 (where OrigCustDate is greater than or equal to January 1, 2010). This query requires criteria in both the State and OrigCustDate fields. To do this, it's critical that you place both examples on the same criteria row. Follow these steps to create this query:
- Create a new query starting with tblContacts.
- Add OrigCustDate, FirstName, LastName, and State to the QBE grid.
- Enter ct or CT in the Criteria cell in the State column.
- Enter >= 01/01/2010 in the Criteria cell in the OrigCustDate column. Access adds pound sign characters (#) around the date in the criteria box. Figure 8.16 shows how the query should look.

Figure 8.16 Specifying text and date criteria in the same query.
- Run the query.
Access displays records of customers who live in Connecticut and who became customers after January 1, 2010.
Access uses comparison operators to compare Date fields to a value. These operators include less than (<), greater than (>), equal to (=), or a combination of these operators.
Notice that Access automatically adds pound sign (#) delimiters around the date value. Access uses these delimiters to distinguish between date and text data. The pound signs are just like the quote marks Access added to the “Cars” criteria. Because OrigCustDate is a DateTime field, Access understands what you want and inserts the proper delimiters for you.
Be aware that Access interprets dates according to the region and language settings in the Control Panel. For example, in most of Europe and Asia, #5/6/2010# is interpreted as June 5, 2010, while in the United States this date is May 6, 2010. It's very easy to construct a query that works perfectly but returns the wrong data because of subtle differences in regional settings.
Printing a Query's Recordset
After you create your query, you can easily print all the records in the recordset. Although you can't specify a type of report, you can print a simple matrix-type report (rows and columns) of the recordset created by your query.
You do have some flexibility when printing a recordset. If you know that the datasheet is set up just as you want, you can specify some options as you follow these steps:
- Run the query you just created for Connecticut customers who've been active since January 1, 2010.
- Choose File
 Print from the Query Datasheet window's Ribbon.
 - Specify the print options that you want in the Print dialog box and click OK.
The printout reflects all layout options in effect when you print the recordset. Hidden columns don't print, and gridlines print only if the Gridlines option is on. The printout reflects the specified row height and column width.
Saving a Query
To save your query, click the Save button on the Quick Access toolbar at the top of the Access screen. Access asks you for the name of the query if this is the first time the query has been saved.
After saving the query, Access returns you to the mode you were working in. Occasionally, you'll want to save and exit the query in a single operation. To do this, click the Close Window button in the upper-right corner of the Query Designer. Access always asks you to confirm saving the changes before it actually saves the query.
Creating Multi-Table Queries
Using a query to get information from a single table is common; often, however, you need information from several related tables. For example, you might want to obtain a buyer's name and product purchased by the customer. This query requires four tables: tblCustomers, tblSales, tblSalesLineItems, and tblProducts.
After you create the tables for your database and decide how the tables are related to one another, you're ready to build multi-table queries to obtain information from several related tables. A multi-table query presents data as if it existed in one large table.
The first step in creating a multi-table query is to add the tables to the query design window:
- Create a new query by clicking the Query Design button on the Create tab of the Ribbon.
- Add tblCustomers, tblSales, tblSalesLineItems, and tblProducts by double-clicking each table's name in the Show Table dialog box.
- Click the Close button.
Figure 8.17 shows the top pane of the query design window (the section in gray) with the four tables you just added. Because the relationships were set at table level, the join lines are automatically added to the query.

Figure 8.17 The query design window with four tables added. Notice that the join lines are already present.
You add fields from more than one table to the query in exactly the same way as you do when you're working with a single table. You can add fields one at a time, multiple fields as a group, or all the fields from a table.
When you select a field that has a common name in multiple tables, Access adds the table's name, followed by a period and the field name. For example, if ProductID is a field found in more than one table used in the query design window (let's say tblProducts and tblSalesLineItems), adding the ProductID field from tblSalesLineItems will display that field in the design grid as tblSalesLineItems.ProductID. This helps you select the correct field name. Using this method, you can select a common field name from a specific table.
Viewing table names
When you're working with multiple tables in a query, the field names in the QBE grid can become confusing. You might find yourself asking, for example, just which table the Description field is from.
Access automatically maintains the table name that is associated with each field displayed in the QBE grid. Figure 8.18 shows the Query Designer with the name of each table displayed under the field name in the QBE grid.

Figure 8.18 The QBE grid with table names displayed. Notice that it shows all four table names.
Adding multiple fields
The process of adding multiple fields in a multi-table query is identical to adding multiple fields in a single-table query. When you're adding fields from several tables, you must add them from one table at a time. The easiest way to do this is to select multiple fields and drag them together down to the QBE grid.
Select multiple contiguous fields by clicking the first field of the list and then clicking the last field while holding down the Shift key. You can also select noncontiguous fields in the list by holding down the Ctrl key while clicking individual fields.
Recognizing the limitations of multi-table queries
When you create a query with multiple tables, there are limits to which fields can be edited. Generally, you can change data in a query's recordset, and your changes are saved in the underlying tables. The main exception is a table's primary key—a primary key value can't be edited if referential integrity is in effect and the field is part of a relationship.
There may be instances when you will want to make manual edits to the resulting recordset of a query. In Access, the records in your tables might not always be updateable. Table 8.1 shows when a field in a table is updateable. As Table 8.1 shows, queries based on one-to-many relationships are updateable in both tables (depending on how the query was designed).
Table 8.1 Rules for Updating Queries
| Type of Query or Field | Updateable | Comments |
| One table | Yes | |
| One-to-one relationship | Yes | |
| Results contain Long Text field | Yes | Long Text field updateable if the underlying query is not based on a many-to-many relationship |
| Results contain a hyperlink | Yes | Hyperlink updateable if the underlying query is not based on a many-to-many relationship |
| Results contain an OLE object | Yes | OLE object updateable if the underlying query is not based on a many-to-many relationship |
| One-to-many relationship | Usually | Restrictions based on design methodology (see text) |
| Many-to-one-to-many relationship | No | Can update data in a form or data access page if Record Type = Recordset |
| Two or more tables with no join line | No | Must have a join to determine updateability |
| Crosstab | No | Creates a snapshot of the data |
| Totals query (Sum, Avg, and so on) | No | Works with grouped data creating a snapshot |
| Unique Value property is Yes | No | Shows unique records only in a snapshot |
| SQL-specific queries | No | Union and pass-through work with ODBC data |
| Calculated fields | No | Will recalculate automatically |
| Read-only fields | No | If opened read-only or on read-only drive (CD-ROM) |
| Permissions denied | No | Insert, replace, or delete not granted in older MDB databases that use user-level security. |
| ODBC tables with no unique identifier | No | Unique identifier must exist |
| Paradox table with no primary key | No | Primary key file must exist |
| Locked by another user | No | Can't be updated while a field is locked by another |
Overcoming query limitations
Table 8.1 shows that there are times when queries and fields in tables are not updateable. As a general rule, any query that performs aggregate operations or uses an ODBC data source is not updateable; most other queries can be updated. When your query has more than one table and some of the tables have a one-to-many relationship, some fields might not be updateable (depending on the design of the query).
Updating a unique index (primary key)
If a query uses two tables involved in a one-to-many relationship, the query must include the primary key from the “one” table. Access must have the primary key value so that they can find the related records in the two tables.
Replacing existing data in a query with a one-to-many relationship
Normally, all the fields in the “many” table (such as the tblSales table) are updateable in a one-to-many query. All the fields (except the primary key) in the “one” table (tblCustomers) can be updated. This is sufficient for most database application purposes. Also, the primary key field is rarely changed in the “one” table because it's the link to the records in the joined tables.
Updating fields in queries
If you want to add records to both tables of a one-to-many relationship, include the foreign key from the “many” table and show the field in the datasheet. After doing this, records can be added starting with either the “one” or “many” table. The “one” table's primary key field is automatically copied to the “many” table's join field.
If you want to add records to multiple tables in a form (covered in Chapters 17 and 18), remember to include all (or most) of the fields from both tables; otherwise, you won't have a complete set of the record's data on your form.
Working with the Table Pane
The upper (table) pane of the Query Designer contains information that's important to your query. Understanding the table pane and how to work with field lists is critically important to building complex queries.
Looking at the join line
A join line connects tables in the Query Designer (refer to Figure 8.17). The join line connects the primary key in one table to the foreign key in another table. The join line represents the relationship between two tables in the Access database. In this example, a join line goes from tblSales to tblCustomers, connecting CustomerID in tblCustomers to the CustomerID field in tblSales. The join line is added by Access because relationships were set in the Relationship Builder.
If referential integrity is set on the relationship, Access uses a somewhat thicker line for the join connecting to the table in the Query Designer. A one-to-many relationship is indicated by an infinity symbol (∞) on the “many” table end of the join line.
Access auto-joins two tables if the following conditions are met:
- Both tables have fields with the same name.
- The same-named fields are the same data type (text, numeric, and so on). Note that the AutoNumber data type is the same as Numeric (Long Integer).
- One of the fields is a primary key in its table.
When you're working with many tables, these join lines can become confusing as they cross or overlap. As you scroll through the table, the line eventually becomes visible, and the field it's linked to becomes obvious.
Moving a table
You can move the field lists around the query editor by grabbing the title bar of a field list window (where the name of the table is) with the mouse and dragging the field list. You can also resize a field list by clicking its borders and adjusting the height and width.
Access makes some attempts to save the arrangement when you save and close the query. Generally speaking, the field lists will appear in the same configuration the next time you open the query.
Removing a table
You might need to remove tables from a query. Use the mouse to select the table you want to remove in the top pane of the query design window and press the Delete key. Or right-click the field list window and choose Remove Table from the shortcut menu.
Removing a table from a query's design does not remove the table from the database, of course.
Adding more tables
You might decide to add more tables to a query or you might accidentally delete a table and need to add it back. You accomplish this task by clicking the Show Table button on the Query Setup group in the Design Ribbon. The Show Table dialog box appears in response to this action.
Creating and Working with Query Joins
You'll often need to build queries that require two or more related tables to be joined to achieve the desired results. For example, you may want to join an employee table to a transaction table in order create a report that contains both transaction details and information on the employees who logged those transactions. The type of join used will determine the records that will be output.
Understanding joins
There are three basic types of joins: inner joins, left outer joins, and right outer joins:
- Inner joins: An inner join operation tells Access to select only those records from both tables that have matching values. Records with values in the joined field that do not appear in both tables are omitted from the query results. Figure 8.19 represents the inner join operation visually.

Figure 8.19 An inner join operation will select only the records that have matching values in both tables. The arrows point to the records that will be included in the results.
- Left outer joins: A left outer join operation (sometimes called a “left join”) tells Access to select all the records from the first table regardless of matching and only those records from the second table that have matching values in the joined field. Figure 8.20 represents the left join operation visually.

Figure 8.20 A left outer join operation will select all records from the first table and only those records from the second table that have matching values in both tables. The arrows point to the records that will be included in the results.
- Right outer joins: A right outer join operation (sometimes called a “right join”) tells Access to select all the records from the second table regardless of matching and only those records from the first table that have matching values in the joined field (see Figure 8.21).

Figure 8.21 A right outer join operation will select all records from the second table and only those records from the first table that have matching values in both tables. The arrows point to the records that will be included in the results.
By default, an Access query returns only records where data exists on both sides of a relationship (inner join). For example, a query that extracts data from the Contacts table and the Sales table only returns records where contacts have actually placed sales and will not show contacts who haven't yet placed a sale. If a contact record isn't matched by at least one sales record, the contact data isn't returned by the query. This means that, sometimes, the query might not return all the records you expect.
Although this is the most common join type between tables in a query, users sometimes want to see all the data in a table regardless of whether those records are matched in another table. In fact, users often want to specifically see records that are not matched on the other side of the join. Consider a sales department that wants to know all the contacts that have not made a sale in the last year. You must modify the default query join characteristics in order to process this type of query.
You can create joins between tables in these three ways:
- By creating relationships between the tables when you design the database.
- By selecting two tables for the query that have a field in common that has the same name and data type in both tables. The field is a primary key field in one of the tables.
- By modifying the default join behavior.
The first two methods occur automatically in the query design window. Relationships between tables are displayed in the Query Designer when you add the related tables to a query. It also creates an automatic join between two tables that have a common field, as long as that field is a primary key in one of the tables and the Enable Auto Join choice is selected (by default) in the Options dialog box.
If relationships are set in the Relationship Builder, you might not see the auto-join line if:
- The two tables have a common field, but it isn't the same name.
- A table isn't related and can't be logically related to the other table (for example, tblCustomers can't directly join the tblSalesLineItems table).
If you have two tables that aren't related and you need to join them in a query, use the query design window. Joining tables in the query design window does not create a permanent relationship between the tables; instead, the join (relationship) applies only to the tables while the query operates.
Leveraging ad hoc table joins
Figure 8.22 shows a simple query containing tblSales, tblSalesLineItems, tblProducts, and tblCategories. This is an ad hoc join, formed when the Categories table was added to the query.

Figure 8.22 An ad hoc join between tblProducts and tblCategories.
No direct relationship yet exists between tblProducts and tblCategories. However, Access found the Category field in both the tables, determined that the Category data type is the same in both tables, and determined that the Category field in tblCategories is the primary key. Therefore, Access added an ad hoc join between the tables.
If Access hasn't auto-joined tblProducts and tblCategories (perhaps because the Category field was named differently in the tables), you can easily add an ad hoc join by dragging the Category field from one table and dropping it on the corresponding field in the other table.
Specifying the type of join
The problem with most joins is that, by default, they exhibit inner join behavior as the query executes. In the case of the query in Figure 8.22, if a product record exists that doesn't have an assigned category (for example, a car that was never assigned to a category), the query doesn't return any records where a product record isn't matched by a category.
The problem is that you can't even tell records are missing. The only way you'd ever determine that there should be more records returned by this query is by carefully examining the sales records, by composing another query that counts all sales, or by performing some other audit operation.
You must modify the join characteristics between tblProducts and tblCategories to get an accurate picture of sales. Carefully right-click on the thin join line between tblProducts and tblCategories, and select the Join Properties command from the shortcut menu. This action opens the Join Properties dialog box (see Figure 8.23), enabling you to specify an alternate join between the tables.
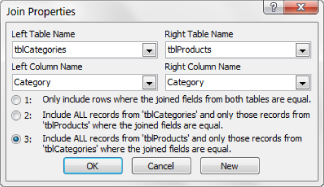
Figure 8.23 Selecting an outer join for the query.
In Figure 8.23, the third option (Include All Records from ‘tblProducts’…) has been selected (the first option is the default). Options 2 and 3 are left outer join and right outer join, respectively. These options direct Access to retrieve all records from the left (or right) table involved in the join, regardless of whether those records are matched on the other side of the join.
Figure 8.24 shows the result of the new join. In the lower-right corner of this figure you see how an outer join appears in the Access Query Designer, while the rest of the figure shows the recordset returned by the query.

Figure 8.24 A right outer join corrects the “missing products” problem in Figure 8.22.
Of course, you can easily create joins that make no sense, but when you view the data, it'll be pretty obvious that you got the join wrong. If two joined fields have no values in common, you'll have a datasheet in which no records are selected.
You would never want to create a meaningless join. For example, you wouldn't want to join the City field from tblCustomer to the SalesDate field of tblSales. Although Access enables you to create this join, the resulting recordset will have no records in it.
Deleting joins
To delete a join line between two tables, select the join line and press the Delete key. Select the join line by placing the mouse pointer on any part of the line and clicking once.