
Chapter 3
Running a Timeline Contest
In This Chapter
![]() Deciding on the parameters of your Timeline contest
Deciding on the parameters of your Timeline contest
![]() Administering your Timeline contest
Administering your Timeline contest
![]() Choosing a winner at random
Choosing a winner at random
The easiest way to run a Facebook contest is to run one on your Page Timeline. But don’t let the quick setup fool you! Planning is required for your contest to get the results you want. You also have to know the rules of Timeline contests so that you set it up correctly.
A Timeline contest is basically a post that you put on your Page that can be as simple as “Like this post to be entered to win” or as involved as “Upload a photo to our Timeline, get your friends to vote for you by liking your photo, and the photo with the most Likes wins.” A Timeline contest takes place on your Timeline, and people do things such as liking a post, commenting on a post, or posting on your Timeline in order to enter.
Timeline contests are great way to get your community participating on your Facebook Page — and they’re free to run — but you also want to have a goal in mind, such as bringing awareness to a product or service. Think about the follow up to the contest as well so you can make the most out of your time and effort.
In this chapter, we look at how to structure and set up a Timeline contest and best practices to running them.
Preparing for Your Timeline Contest
After you decide that a Timeline contest is the type of contest for you, spend a little time to think about the following:
- When will contest start?
- Where will I post the rules of my contest?
- How will I monitor my contest?
- How will I choose a winner?
- What if a tie occurs?
- How will I get in touch with the winner?
- How long will your contest be?
In this chapter, you learn how to make these decisions for your Timeline contest.
 Most important of all: Do you understand Facebook’s contest rules?
Understanding the rules
In Chapter 2 of this minibook, we cover some of the Promotion Terms set up by Facebook, but we want to break these down further so that you understand what you can and cannot do with Facebook Timeline Contests.
Businesses can
- Require people to like a post and/or comment on a post to be entered
- Require that someone post something directly on your Timeline to enter (could be a text post or a photo)
- Use Like as a voting method (either liking a post or photo on your Timeline)
- Require that someone message your page to enter
- Announce the winner of the contest on your page
- Require that to win the prize, entrants come back to your page to see who has won the contest
- Use a Like button plug-in on a website as a voting mechanism
- Use an app plug-in to post an entry to your contest directly on your page
Businesses can’t
- Require that people share a post or photo to be entered
- Require someone to post something on their own Timeline or a friend’s Timeline to enter
- Require people to tag themselves in a photo to either vote or enter
- Have anyone who likes your page be entered to win (contest does not take place on the Timeline)
 The biggest mistake currently being made with Facebook Timeline contests by businesses is telling people, “Share this post to be entered.” That is a big no-no, and your entire Page is in danger of being shut down without warning if you violate Facebook’s terms. But other than that, there are a myriad options available to you with a Timeline contest.
Keep current with Promotions rules because they do change. Before you get started with your contest, check the link for Facebook Page Terms at www.facebook.com/page_guidelines.php.
Assembling the parts
After you review the rules, get a few items in place. You need these basic components:
- A photo to post to your Timeline that promotes the contest
- A location for your contest rules
- Text to announce the contest
- Your Facebook Page settings optimized
Photo to post
The ideal photo has text and is eye-catching. Whenever someone shares your contest (and you hope they do), the photo and text travel.
You can create an image that announces the prize in the text, as shown in Figure 3-1.

Figure 22-1: Create a photo that announces your contest.
 If you’re doing a “Caption this photo” contest, make sure the photo is fun and inspires a lot of different possible captions, like the one in Figure 3-2. Make sure you are following copyright rules around sharing photos and that you have the appropriate permissions to use that photo if it is submitted by someone in your community.

Figure 3-2: This fun image is perfect for a caption contest.
Don’t create an image with a lot of text, or you won’t be able to promote the post or boost the post with a Facebook ad. Facebook ads are restricted to a maximum of 20 percent text overlay on the photo.
If you want to test out how much text is in your image according to Facebook’s advertising guidelines, they have a Grid Tool where you can upload your photo. Facebook uses a grid system where any image is marked with five columns and five rows and you are allowed a maximum amount of text showing in any five of the squares. To test your image, go to https://www.facebook.com/ads/tools/text_overlay and follow these steps:
- Click the Choose File button.
A popup box appears with your files.
- Navigate to the image you want to use for the Timeline contest.
- Select Open.
Your photo appears with the 5 x 5 grid system as shown in Figure 3-3.
- Click on any box that has text in it.
A box that is clicked appears in red. If you are able to click more than five boxes that have text (as shown in Figure 3-3), your image has too much text and can’t be advertised with a Boost Post or Promoted Post on Facebook. You may need to consider changing the size and position of your text on your image or not use Facebook Ads for this contest.

Figure 3-3: You can test how much text your image has with the Grid Tool.
Once you have determined how much text is in your image, you can just close the window or navigate to another website if needed.
Learn more about Facebook advertising in Book VII.
Location for contest rules
Because you don’t want to bog down your post with all your contest rules, put them where you can easily reference them. You have some options:
- Put the rules on a separate page on your website and then link to that page, as shown in the first comment on Figure 3-2.
- Create a Facebook Note whose URL you can post. See Book III to learn how to create a Facebook Note. You can then post the URL to the Facebook Note in the comments of the announcement of the Facebook contest so that people can reference the official rules.
State these important points in the rules:
- “This contest is, in no way, sponsored, endorsed, administered by, or associated with Facebook.”
- “By entering the contest, the entrant agrees to a complete release of Facebook by each entrant or participant.”
This is also known as Indemnification and Limitation of Liability. It basically means that people can’t sue Facebook because of this contest.
- “Winner must claim prize within (a limited time) of notification.”
You select how long you want to give the winner to claim the prize. This allows you the ability to safely choose another winner. If one week is too long, three days is sufficient.
Make sure you review Facebook’s Promotion terms found under III E to understand Facebook’s requirements for contests: https://www.facebook.com/page_guidelines.php.
One of the advantages of using an application to run a contest is that the apps typically have a built-in location within the app itself for your rules.
Text to post
Spend some time carefully crafting the text you will use to announce the contest.
Consider these points:
- Should you add hashtags? Adding hashtags, such as #Contest or #Win, can help your contest gain visibility, but you may attract the type of people who just enter contests because they constantly monitor these hashtags. If you have a local business, these hashtags may not attract your ideal customer to your business. If you’re a larger brand with a wider audience, these types of hashtags could be a good thing. You may also consider adding a keyword from your niche as a hashtag. Spend some time researching the hashtags you may consider before adding them to the proposed text.
- How readable is it? Ask someone else to take a look at what you’ve written. If they can’t understand it easily, rewrite it.
- How clear is it? Make sure your instructions are clear. In steps, spell out exactly what people need to do, as shown in Figure 3-1.
The clearer you can make your instructions, the easier it will be for people to enter. Don’t make them follow too many steps to enter.
Optimal page settings
Before you start your contest, make sure you have the correct settings selected on your Facebook Page.
- Posting Ability: This setting depends on your contest.
- If people must upload photos or videos to your page, choose Anyone Can Add Photos and Videos to My Page Timeline.
- If people must make a text post, choose Anyone Can Post to My Page Timeline.
- Post Visibility: Set to “Allow posts by other people on my Page Timeline” as shown in Figure 3-4 if you’re doing a Timeline contest where people post to your Timeline. If you aren’t requiring that people post directly to your Timeline, this setting can be set however you want it.
- Messages: Set it as people can Contact my Page privately. While you’re running the contest, we recommend allowing people to contact your Page privately if they have a question or concern or if they have been notified as the winner.

Figure 3-4: Make sure your page settings are optimized.
Do not set the Country Restrictions or Age Restrictions settings, even if you’re limiting your contest to a certain age or country. Restricting access to your Page in this way makes it unable to be seen unless you’re logged into Facebook, which can hurt your promotional efforts.
Administering Your Timeline Contest
With all the pieces in place, it’s time to post your contest. Posting the information itself doesn’t take much time, obviously, but you should be aware of a few things when you are continuing your promotion.
Editing your post
If you post your contest and see an error early on, edit your post by clicking the down arrow in the upper-right corner of the post.
Even if you edit the text, anyone can access the previous text (even after you edit). Don’t change the rules of the contest. Make sure you’re just correcting a mistake or clarifying if someone has a question about the contest and you want to edit the text to clarify.
Consider pinning your post to the top of your Timeline to make it more visible and accessible to new visitors. Click the down arrow in the upper-right corner of the post and choose Pin to Top, as shown in Figure 3-5.

Figure 3-5: If you have errors, edit your post.
Sharing your contest
Sharing your Timeline contest again with your community can be a little tricky. If you share the photo to promote the contest again, you will most likely get people entering on that new post by commenting on the shared post. Figure 3-6 shows how this can happen in their shared post where they received 62 new entries on the new post.
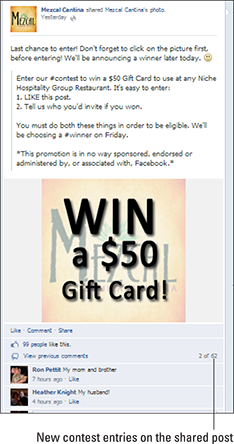
Figure 3-6: Sharing the contest can result in new entries on the new post.
Now you have to decide how you will handle those entries. Will you count those as well? If so, how will you process them all?
Contest Capture has an Export system where you can export the Likes and comments of the individual posts. Learn more in the “Selecting a Winner” section of this chapter. If you have multiple shared posts, you can export all of the Likes and comments from each of them to help choose the winner from one big list. You can find Contest Capture at http://contestcapture.com/.
A better way to share your post could be to share the specific link to the original post without a preview of the details of the contest.
We discuss posting to your Page in Book III, but if you want to only share the link to your contest, use the following steps:
- On your Timeline, click the date stamp on the post that has the contest announcement, as shown in Figure 3-7.
Your post opens in a window with the URL of the individual post in the browser window.

Figure 3-7: Click the post’s date stamp (shown here as Yesterday).
- Copy the URL of the post from the browser window. Close the post by clicking the X in the upper-right corner.
- Paste the URL into the publisher area on your Facebook Page.
The image and text are pulled in to the post in a preview window.
- Add text at the beginning of the post to remind people to enter, as shown in Figure 3-8.
The text might say something like, “Don’t forget to enter the special Caption this Photo contest for your chance to win a seat in my Facebook Advertising Secrets course! Go here to see the photo and submit your caption: insert URL of original Timeline contest photo.”
- Click the X in the upper-right corner of the preview.
The photo preview and previous contest are removed.
- Click the blue Post button.
Now people won’t be tempted to enter a new comment as an entry. They can’t see the photo, and the previous post will have told them that they have to click the link to enter.

Figure 3-8: Add your text to tell people to enter at the previous post.
Promoting Your Timeline Contest
In Chapter 5 of this minibook, we talk more about the promotion of contests, but we want to highlight the main way you may be promoting your Timeline contest: with a Facebook Ad. You can also learn more about Facebook Advertising in Book VII.
One of the easiest ways to use Facebook advertising for your Timeline contest is by boosting the post. We suggest boosting the post only to the people who like your Page and their friends, as shown in Figure 3-9. The typical goal of a Timeline contest is to re-engage your current fans, so you want the post to be shown to them.
You can find out more about all the nuances of options in Book VII.
After you post the contest:
- Click Boost Post (in the lower-right corner of the post), as shown in Figure 3-9.
- Set your budget for the boost post.
- Click the blue Boost Post button to complete your order.
Your post will most likely be boosted for a couple days. If you want to stop the advertisement, you can come back to the post and discontinue the ad by selecting the same button.

Figure 3-9: Boost your post to push it into the News Feed of your fans.
If you have too much text (more than 20 percent) in the photo of your post, your ad won’t be approved, and you cannot boost it. Keep this in mind when creating your contest photo. Review the steps to determine how much text is in your photo earlier in this chapter and use Facebook’s Grid Tool found here: https://www.facebook.com/ads/tools/text_overlay.
Selecting a Lucky Winner
If your contest involves voting, selecting the winner is most likely easy. The only challenge is when you have a tie vote, and hopefully you added provisions for what to do in that case. But what if your contest is supposed to have a random winner (a sweepstakes)? A few tools can help.
Exporting data with Contest Capture
Contest Capture is a free tool that exports the Likes and comments from any post on your Timeline into a CSV file. From there, you can use a random number generator to pick a line number on your CSV file. That would be the winner.
This tool is good if you have multiple posts where people have entered. You can merge the CSV files to create one single list to choose the winner from.
To download to Contest Capture, follow these steps:
- Go to www.contestcapture.com.
- Click the blue Connect Now button.
If you’re not logged in to Facebook, you’re prompted to log in and you also have to allow them permission to access your Facebook account.
- Select the Page of your contest from the drop-down menu.
The Pages for which you’re admin are listed in the menu.
- Select the contest post from the drop-down menu.
All your posts from the last month are listed.
- Click the blue Download CSV button, as shown in Figure 3-10.
Your CSV file downloads to where files you download are sent (often a folder labeled Downloads).
- Open the file that you downloaded from Contest Capture, and it will typically open in an Excel spreadsheet.
Take note of how many entries you have by how many rows of names there are in the spreadsheet.
- Visit a random number generator tool, and use it to select a number between 1 and the maximum number of entries you have.
Here are some suggestions:
- Select the winner of the contest by using the number generated from the random number generator tool.
The winner is located in the row of the random number.

Figure 3-10: Use Contest Capture to download people who have liked or commented on your post.
Using Woobox to pick a winner
Woobox also has an easy-to-use Timeline contest winner picker. The application is free and all you need to do is to create an account.
Woobox also has a lot of other great Facebook applications that can enhance your Page, including one that runs contests that require an e-mail address to enter (as we mention in Chapter 4 of this minibook).
To use the Woobox Timeline contest winner picker, follow these steps:
- Go to http://www.woobox.com.
- Click the green Try it Free button.
If you’ve never connected with Woobox, you’re taken to Facebook where you are prompted to log in if you aren’t already. Then you’re prompted to allow the Woobox app to connect to your Facebook profile.
- Click Okay.
You return to the Woobox site.
You need to connect apps to your profile to access your Pages. - Click Posts on the upper menu to get to the recent posts from your Page.
You may need to select the correct Page from the drop-down menu on the upper left.
- Click the green Pick Winner button next to the appropriate post; see Figure 3-11.
You are taken to a page where you can choose whether people can enter by liking or by commenting on the post.

Figure 3-11: Pick a winner for your Timeline contest.
- Select the criteria for the winner: Liking the post, commenting on the post, or either.
If you select commenting on the post, you can restrict people from only being eligible for one comment that they have made rather than counting each separate comment as one entry thus giving them extra chances to win.
- Click the green Pick a Winner button.
Your winner is displayed in the Winners area.