
Chapter 5
Building Visibility for Your Timeline
In This Chapter
![]() Getting people to follow to your posts
Getting people to follow to your posts
![]() Directing the offline world to your Timeline
Directing the offline world to your Timeline
![]() Using a Timeline Cover image that supports your business
Using a Timeline Cover image that supports your business
![]() Using Public photo albums and milestones to spread the word about your business
Using Public photo albums and milestones to spread the word about your business
![]() Supporting your business by posting life events on your Timeline
Supporting your business by posting life events on your Timeline
![]() Highlighting your business by rearranging apps
Highlighting your business by rearranging apps
Can you count how many things have changed with Facebook in the past two – three years? Some of the most important changes happened with personal Timelines.
The biggest change for Facebook users was the introduction to Timeline, a completely redesigned Timeline that allows users to share stories and organize them by time (birth all the way to present).
Beside the transition to Timeline, Facebook opened the door for public figures to be able to post to followers with their public updates. This is big. We introduce this topic in Book II.
In this chapter, we look at a few specific things you can do with building, engaging, retaining, and selling to your community by using your Timeline.
If you made the decision to turn on your Follow button (see Book II, Chapter 5), you can do specific things to encourage people to follow your Timeline instead of asking them to be your Friend. All those things we discuss in Book II — about connecting your offline world to your business Page — come into play when you focus on your Timeline.
 The most important thing to remember when using your Timeline to support your business is to make sure the public posts and public images reflect your personality. Facebook is a friend network where people interact with people first, brands second. Posting content that reflects your personality will be much more interesting to followers than promotional messages about your business.
Because Timelines have Cover photos too, you can develop a way to support your business with some specific shots woven between your more personal photos. We discuss how to make a photo album Public and how the visitors will see your Timeline. Make sure that to read Book II, Chapter 4 for basic setup information.
Inviting People to Follow Instead of Friend
In Book II, Chapter 4, we discuss how to modify your settings so that only Friends of Friends can ask to be your Friend; everyone else will see only the Follow button. Having a Follow button on your Timeline is a passive way to get people to follow to your public posts instead of requesting to be your Friend. What about some active ways? Here are a few ideas to try:
- Change your wording. When you’re at events, instead of saying “Friend me on Facebook,” say “Follow me on Facebook.”
- Educate your audience. Explain why being a Follower is a good thing — your public posts are what people want to read anyway.
- Ignore Friend requests. People who ask to be Friends are automatically Followers. Ignore their Friend requests, and they’ll still see your Public posts.
At some point, you may find a lot of people following your Timeline. This may mean that you’re being “suggested” by Facebook. You can see the whole list of people who have their Follow button turned on here
www.facebook.com/subscriptions/suggestions
Occasionally, you see suggested people in the right column of your own News Feed.
Connecting Your Timeline to Your Offline World
Chapter 1 of this minibook includes a section on connecting your business Page to your offline world. That content can be applied to your personal Timeline. Reread that section, but replace business Page with Timeline. Also consider these highlights:
- Change your phone hold message. Say, “Follow me on Facebook.”
- Add your personal URL to your e-mail signature. All the how-to’s are in Chapter 1 of this minibook. Just change the URL you use to the your Timeline URL, and you’re good to go.
- Include your Timeline URL on hard copy mailings. If you have fliers, posters, hard copy newsletters, and the like, include your Timeline URL, and include the sentence “Follow me on Facebook.”
- Update your letterhead and stationery. As in the preceding item, use your Timeline URL.
- Modify your website’s Facebook icon. On your website, use your Timeline URL as the link to the Facebook icon. If you have text with your icon, use Follow instead of Friend.
The most important point is this: If you’re using your Timeline to support your business, make sure that you let people know about the Follow button located on your Timeline! Don’t assume that they understand it or know how it works; just make it easy for them to click it and see your public updates.
Creating a Cover Photo Strategy
In Chapter 1 of this minibook, we talk about creating a strategy using the Cover photo on your business Page. The same strategy can be applied here, except that the nature of the images can be a little more personal. Here’s a link to some fine examples to help you design your own: www.amyporterfield.com/2012/06/facebook-timeline-covers
To create a Timeline Cover photo that will support your business, remember these points:
- Include your face in the image. Faces are much more interesting than the best logos, and authentic action shots are very interesting to people on Facebook. Images work better than almost any other type of posts, so use this knowledge to rock the Cover photo.
- Reference your business in the image. You can have your storefront on the image, a shot of the inside of your store, or an image of you holding one of your products. All these images are perfectly okay to use as a Cover photo.
- Happy customer faces need model releases (so have them handy). Not many people realize this, but if you’re taking pictures of someone else, it would be prudent to have a model release, which is a form that the person being photographed signs, saying that he knows his image will appear on Facebook.
- Don’t include any calls to action. Think artistically about your image. Make it charming, attractive, and informative. You can’t have text on the image that says Try our hot dogs! 10% off your next order!
You can see a nice way of presenting your life in Figure 5-1. For example, Mari Smith is dressed professionally as she does when she speaks at various conferences.

Figure 5-1: Create a Timeline cover to span your personal and public lives.
What are some strategies you can use to have your personal Timeline support your business?
- Do you have business events? Or does your business sponsor events? Both types of event provide opportunities to take photos that you can use as a Cover photo strategy. You can change out the image as the event progresses, or take a shot that shows your happy face and the event sponsors’ logos in the background.
- Do you have new products? Are you intimately involved with the development of new products? An image of you working on a product would be a perfect Cover photo for a Timeline.
- Do you travel with your business? A shot of you at an event or on the beach after the event are good ways to promote without promoting. Great airplane shots of the clouds or the food you’re eating in a restaurant in Singapore, with a description of where you are and what you’re doing, are excellent uses of the Cover photo. Most people put these types of photos in an album, but consider them for the Cover photo, too.
Making Photo Albums Public
Think about the images you have that show you doing something in your business, such as holding a product or shaking someone’s hand. You also may have images of the outside of your store, the inside of your store, one of your products, or a crowd of people at your last event. We could go on and on.
When you have a collection of these types of photos, you can create an album and upload the photos to it. Then you have a URL you can share that will take people right to the album. Because you’re making this folder Public, anyone, whether or not he or she has a Facebook account, will be able to view the photos.
Making a new Public album
Here’s how to create a Public album from scratch. Go to your Timeline and follow these steps:
- In the Update Status box, click the Add Photos/Video option.
- Click the Create Photo Album option.
A window opens to select photos on your computer.
- Select the images on your computer that you want to upload.
- Click Open to start the upload process.
- Type a name for the album. Enter a location and date, if appropriate.
See Figure 5-2.

Figure 5-2: Give the new Public album a name and description.
- Fill in the description for each photo as fully as you can.
Always include an http:// link to direct people to your website, product page, or your Facebook business Page, if it’s relevant to the image.
A drop-down menu appears in the bottom-right corner of the page; see Figure 5-3.
- At the very bottom of your album, select Public for the privacy setting (as shown in Figure 5-2).
- Click Post Photos (as shown in Figure 5-2).
This step publishes the whole album at one time as a Public post. Every Public Follow and personal Friend will be able to see this album.
Making an existing album Public
If you already have an album that you’re using for these types of public photos, follow these steps:
- Go to your Timeline, and click the Photos tab.
See Figure 5-3.
- Click the Album tab and then click the photo album you want to make public.
See Figure 5-4.
- Just under the name of the album, you will see a privacy drop-down menu represented by an icon (as shown in Figure 5-3).
The privacy setting for your album with automatically be saved.

Figure 5-3: You can make any existing album public.
Figure 5-4: You can share any photo album with your friends or on a Page you manage.
Using Life Events to Support Your Business
We discuss how to use milestones for your business Page in Books II and III. You can use life events (which are the same things as milestones, only with a different name) in your Timeline to support your business, too.
 Think about all the milestones you have for your business and then put a personal spin on them for life events in your Timeline. You need to use a few little tweaks to use this business-supporting process in your personal Timeline. Regardless of whether you have a business Page, you can add these types of life events to support your business.
On a business Page, when you select a milestone, you can immediately name the event. In a Timeline, though, you have several categories to choose from to create a life event: Work & Education, Family & Relationships, Home & Living, Health & Wellness, and Travel & Experiences. Each category has several options, always including Other. Choosing Other enables you to name your life event whatever you want.
Using life events to support your business is actually pretty simple:
- Take a business event.
- Make it personal by choosing the Work & Education category.
- Select Other Life Event.
- Type a name in the Event text box.
Table 5-1 shows a couple examples. These life events can support your business in a completely appropriate way in your Timeline.

Adjusting and Adding Apps
Timeline apps don’t have the functionality of business Page apps, but you can still use apps to support your business. On a personal Timeline, apps appear below the About section in the left-hand column. You can’t move Friends and Photos.
Moving apps
To change the order of app placements, follow these steps:
- Click the pencil icon to the right of the apps.
- Click Manage Sections.
A pop-up window appears where you can rearrange the order of apps (as shown in Figure 5-5).
- Once you've rearranged your apps, click Save.
Choosing apps
Think about the types of apps that would support your business. You can peruse the available ones here: www.facebook.com/about/timeline/apps.
Here are a few that we recommend:
- Pinterest: To create an app for Pinterest, you have to start on Pinterest itself. Go to your Pinterest settings and connect your Pinterest account to your Timeline.
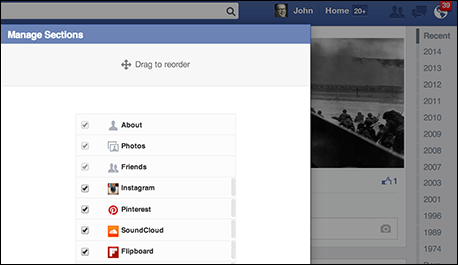
Figure 5-5: Rearranging the order of apps.
- Spotify and/or SoundCloud: If your business is in the music field, consider using Spotify to showcase your likes and SoundCloud to showcase your own music. Again, start with a personal account with Spotify or SoundCloud, and connect it to your Timeline.
- RunKeeper or Map My Fitness: If your business is in the fitness field, consider using one of these popular apps to showcase your own workouts.
- TripAdvisor: Do you travel for your business? Add this app to let people know where you are and what you’re doing or where you want to go.
In all cases, make sure that you set the Posts on Your Behalf option (see Figure 5-6) to Everyone for widest impact.
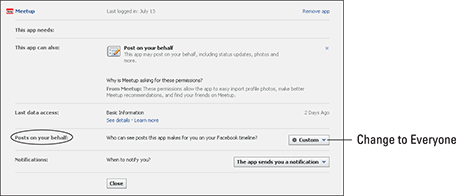
Figure 5-6: Set the Posts on Your Behalf option to Everyone.