
Chapter 2
Creating Your Account
In This Chapter
![]() Creating your Facebook account
Creating your Facebook account
![]() Finding friends on Facebook
Finding friends on Facebook
![]() Understanding your account settings
Understanding your account settings
![]() Setting up your cellphone to receive Facebook updates
Setting up your cellphone to receive Facebook updates
![]() Deactivating or deleting your account
Deactivating or deleting your account
Creating your Facebook account is easy: Fill out a short form, and you’re on your way. And when customizing your account, Facebook walks you through the three most important steps: finding friends, filling out your profile information, and uploading a profile picture. But you'll want to know about a few other features, such as where to find your account settings so you can manage your password, username, and security options. This chapter discusses all these tasks, as well as how to connect your cellphone to your account and how to deactivate or delete your Facebook account.
Signing Up
It’s easy to create a new Facebook account! Just point your browser to www.facebook.com to get started. You begin by completing the form on the front page. You need to provide your first and last names, your e-mail address, the password you want to use, your sex, and your date of birth. Facebook then sends you an e-mail with a confirmation link. When you receive the e-mail, click the link to complete your Facebook signup. Facebook has this step to ensure that the e-mail account you’re using is real.
 You can have only one Facebook account, and you should be at least 13 years old to create an account. Be sure to use real information (including your birth date, which you can hide from the public later).
When you’ve completed the form, click the Sign Up button. At this point, Facebook wants to walk you through some steps to get you started.
Completing step 1: Finding friends
In step 1, you find friends who are already on Facebook by using your e-mail account's contacts list. Facebook offers options for Outlook (Hotmail), Gmail, Yahoo!, and other e-mail services. Click the Find Friends link next to the type of e-mail account you have, type your e-mail address in the text box, and click the Find Friends button. A dialog box may appear, asking you to allow Facebook to access your e-mail account and contacts list. You need to grant this access for Facebook to cross-check the e-mail addresses in your contacts list with the addresses registered on Facebook.
 You can find friends associated with multiple e-mail accounts. For instance, if you have three Gmail accounts, you can type any of those addresses to find friends who are already on Facebook. Or if you have a Gmail account and a Yahoo! account, find your Gmail friends and then repeat the process for your Yahoo! account.
After you allow Facebook to access your e-mail account, you’re presented with a list of friends who are currently on Facebook. Or, if you’re a Gmail user, you see instructions for uploading your contacts.
If you see a list of friends, select the check box next to each friend you’d like to connect with on Facebook. If you want to connect with all your contacts, select the Select All Friends check box. When you’ve selected your friends, click the Add Friends button to continue.
If Facebook finds e-mail addresses for people who are not on Facebook yet, you’re asked if you’d like to invite those people to connect on Facebook. If you choose to do that, Facebook sends a message to those people on your behalf, asking them to join Facebook. You can instead click Skip This Step if you don't want to add contacts right now.
Completing step 2: Filling in profile information
In step 2, you start filling out personal profile information, beginning with the name of your high school, your college or university, your current place of employment, and your current city and hometown. When you’re done, click Save & Continue.
You don’t have to complete this information right now or ever if you so choose. You can click the Skip link to move directly to step 3.
Based on the information you’ve shared so far, Facebook pulls a list of recommended friends for you. In general, these people may be in your address book or may have attended the same high school, college, or university while you were there. You can choose to add any of these people as a friend on Facebook simply by clicking the Add Friend link under the person’s name. When you do, Facebook sends a friend request to that user and alerts you if he or she accepts your friend request.
Completing step 3: Choosing interests
In step 3, Facebook wants to know as much about you as you’ll allow so that it can determine what ads are best to show you and to figure out additional pages that might interest you, such as pages for musicians, news sources, public figures, and actors. You'll be able to immediately Like these pages.
When you Like these pages, you'll see updates from them in your news feed. You may find that some pages update too often or the content is offensive, so choose wisely when Liking a page. (To Unlike a Page, see Book II, Chapter 11.)
Completing step 4: Uploading a profile picture
Your profile picture is one of the most important aspects of your Facebook account because people associate it with your updates. In step 4, Facebook offers you the option of uploading an existing image from your computer or taking a new photo with your computer’s webcam. (See Book II, Chapter 3 for tips on taking pictures with your webcam.) After you choose your photo, click Save & Continue. Your personal timeline appears, and you can start using Facebook.
It’s best to choose a picture that clearly shows your face so friends and family will recognize you immediately. (This is Facebook, after all!) We suggest using a picture of yourself, not a picture of your child, pet, favorite team, and so on. Because so many people scan their Facebook news feed quickly, it’s easier for them to spot your updates if they can clearly see your picture. In addition, using logos or other found pictures you don’t own yourself may be in violation of copyright. Contrary to what you may have heard, just because you find something interesting on the Internet doesn’t mean it’s free to use.
Finding Friends
Because Facebook is all about being social, it makes sense that you’ll want to connect with your friends, family, and colleagues. In fact, as you become more comfortable with Facebook, you may interact with friends of friends, see that they’re good fits, and send friend requests to them. Facebook says the average number of friends is 130, but just about everyone we know has many, many more. The following sections aim to help you understand what it means to be friends on Facebook and how to find people you want to connect with.
Understanding what it means to be friends on Facebook
In the real world, the term friend has different meanings to different people. If you ask an extrovert how many friends she has, she may say hundreds, because to her, everyone she meets is a friend. If you ask an introvert how many she has, she may say three, because her definition of a friend is much different from her extrovert counterpart’s. Neither answer is wrong, but you can see how perspective can change what it means to be friends.
Along those same lines, the term friend is a little different in the world of social media than in the real world. Online, you may find that you’re friends with people you’ve never even met in person but have interacted with online through the comments on a mutual friend’s status updates or through other social media (such as Twitter or blogs). Or maybe someone you met at a party sends you a friend request on Facebook, and you accept. Your circle is widening in a way it may not in the real world.
Consider how you want to connect with others and your criteria for requesting and accepting Facebook friend requests. And respect how others deal with online friends. Understand that some people like to keep their Facebook timelines private and limited to real-life friends and family. Other people are an open book and accept requests from just about anyone. The key is not to take it personally if someone doesn’t accept your friend request. (Sometimes easier said than done.)
Social media is interesting because, on one hand, it’s a public forum where you can be heard by thousands. On the other hand, it’s a private place where you can establish your own space and determine who you interact with. We suspect that your idea of how to relate with others will change as you become more comfortable interacting on Facebook and other social media platforms.
We suggest starting slowly and building a group of Facebook friends you know and are comfortable with, and then expanding your community as you become more familiar with Facebook (and possibly other social media). In particular, pay attention to your privacy settings (see Chapter 3 of this minibook) and how and what you share in your status updates (see Book II, Chapter 2).
Searching for people you know
When you first set up your account with Facebook, it walks you through finding friends who may already be on Facebook. The platform allows you to use your existing e-mail contacts to see whether any of those e-mail addresses are registered with accounts on Facebook and then lets you send a friend request to people you know. (See the previous section “Completing step 1: Finding friends.”) If you skipped that step or decided to wait to find friends later, that’s not a problem. You can find friends in several ways:
- Check out Facebook’s suggestions. When you visit your personal timeline (by clicking your name or profile image anywhere in Facebook), click the Friends link. To the right of the profile picture, click the +Find Friends button to see a list of people Facebook thinks you may know. (When you first sign up for Facebook, a Find Friends link appears in the Facebook navigation but will eventually disappear.) Facebook draws this list from accounts that have shared information similar to your own (for example, hometown, education, or mutual friends). When you click the +Find Friends button, the People You May Know page appears, as shown in Figure 2-1. If you see someone you’d like to connect with, click the 1+ Add Friend button. (If you have pending friend requests, you can confirm or delete the request.)

Figure 2-1: Facebook suggests friends you can connect with.
You may also see friend suggestions from Facebook on the right side of your news feed page. - Use Facebook’s list features. Lists are a handy way to keep groups of friends together so you can see their updates any time you like. Facebook has a few lists it creates for you based on information you shared when you created your account (such as where you live or where you went to school). Facebook takes that information, tries to find other Facebook accounts that have similar information, and adds them to your lists (you can remove anyone from those lists if you like). See Chapter 3 of this minibook for further information on creating and managing friends lists.
- Use the Graph Search box. At the top of every Facebook page is a blue toolbar containing a text box for searching called the Graph Search box. Start typing a name in the text box, and check the list that appears. The name may not appear in the initial list, so be sure to click the See More Results option to view a longer list of possible matches. You can also search previous companies you worked for, your hometown, alma maters, and so on.
- Look at friends of friends. As you build your friends list, you can click over to someone’s timeline and view his or her friends. If you spot someone you know, you can click over to that person's timeline and send a friend request.
- Search for topic pages. Do a search for your high school, college or university, favorite sports team or hobby, and more. If you see someone you know, send that person a friend request or follow the person if he or she has enabled others to follow public updates. (See Book II, Chapter 2 for information on the Follow feature.)
- Look on the sidebar of a website or blog. Many businesses and bloggers would love to have you connect with them on Facebook. See if your favorite websites have a Facebook logo that links to their business page.
Sending, receiving, and responding to friend requests
To connect with someone on Facebook, you need to send him a friend request. When you visit his personal timeline, you can click the 1+ Add Friend button to send him a request.
If you don’t see the 1+ Add Friend button or any option to send a friend request, that person may have his privacy set in a way that doesn’t allow people he doesn’t know to send a request. For example, Scott’s personal privacy settings allow everyone to request a connection with him. His wife, however, allows only friends of friends to make requests. If you don’t know her or her friends, you can’t send her a friend request.
If you don’t know someone but would like to follow his public updates, you can click the Follow button on his personal timeline (if he’s enabled it). When you follow someone, you aren’t Facebook friends with that person, but you can see any public updates he shares. Following is a good way to follow leaders in your line of work or someone you’re interested in. For example, Scott isn’t Facebook friends with Mark Zuckerberg (the founder of Facebook), but he follows Mark’s public updates. Likewise, Scott has over 24,000 people following him on Facebook, but he’s not friends with them all.
When you receive a friend request, Facebook alerts you by highlighting a number next to the friend requests icon, which appears to the right of the search box at the top of the page. If you aren’t sure whether you have pending friend requests, click the friend requests icon to see a list similar to the one in Figure 2-2.
You can see from Figure 2-2 that you have two choices: Confirm or Not Now. When you confirm a friend, Facebook adds that person to your friends list. In Figure 2-3, you can see the Friends button, which indicates that the person was added to the list. (Facebook also asks you whether you know this person away from Facebook; we don't know what Facebook does with this feedback.)
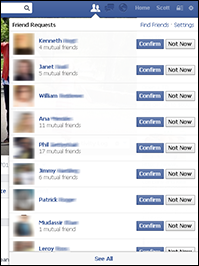
Figure 2-2: Check your pending friend requests.
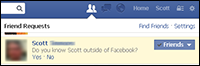
Figure 2-3: When you confirm a Facebook friend, the person goes into your friends list.
If you click the Friends button, you see the options shown in Figure 2-4. You can add that person to any of your lists, get notifications when that person makes a post, and display or hide the person's posts in your news feed.
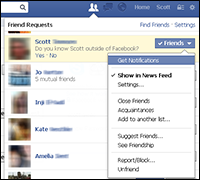
Figure 2-4: You can add your new Facebook friend to any list for easier access.
If you choose to ignore a friend request or click the Not Now button, Facebook wants to know whether you know the person, as shown in Figure 2-5.

Figure 2-5: Do you know the person who tried to friend you?
Facebook asks if you know the person to help cut down on spam and unwanted requests. If you click Yes, Facebook thanks you for your feedback, and that person can send another friend request. If you click No, Facebook won’t allow that person to send you another friend request.
If you don’t accept a friend request, Facebook doesn’t tell the person who sent the request. However, the person can figure it out. For instance, if she looks at her own list of friends and you aren’t there, or if she looks at your personal timeline and sees the +1 Add Friend button instead of the Friend Request Pending button, she’ll realize you didn’t accept her request.
If you ignore a friend request or click the Not Now button, that person can still see any public updates you post. If you’re the one who initiated the friend request, you can see public posts by the person to whom you sent the request. As mentioned, the Follow feature is a great alternative if you aren’t ready to be Facebook friends with someone.
Finding and Customizing Your Account Settings
You can control the information you share on Facebook in three areas: General Account Settings, Privacy Settings, and Timeline. The last two are described in Chapters 3 and 4, respectively, of this minibook. You can find your General Account Settings page by clicking the down arrow or the gear (depending on the version of Facebook you have), at the far-right end of the blue toolbar at the top of any Facebook page, and choosing Account Settings from the menu. The General Account Settings page appears, as shown in Figure 2-6.
The options appear on the left. The next sections describe each option and show you how to control the option to suit your Facebook needs.

Figure 2-6: The General Account Settings page displaying general account settings.
General Account Settings
Your General Account Settings page (refer to Figure 2-6) lists the basics of your account and allows you to edit that information. You see options for editing your name, username, e-mail, password, networks, and language. You also have the option to download a copy of your Facebook data. We explain each of these options in the following sections.
For details about the Privacy and Blocking settings, see Chapter 4 of this minibook.
Name setting
The Name row shows the name you registered when you created your Facebook account. This name is what others see when you share content. If you click the Edit link, you can change your first and last names and add your middle name if you like. You can also use the drop-down list to choose how your name appears on your timeline.
Most people display their name as First, Last. The alternative-name option lets you include a nickname or maiden name to help others find you. If you make any changes here, you need to confirm them by typing your Facebook password in the Password text box and then clicking the Save Changes button. You can change your name only three times.
Username setting
A username is a customized URL for your Facebook account and is sometimes referred to as a vanity URL. Facebook assigns a unique number to all new accounts and uses that number in the address for your personal timeline. For example, click over to your personal timeline and look in the address bar of your browser. You probably see something like this:
http://www.facebook.com/profile.php?id=1018974455
The long string of numbers following id= is your account ID. That ID is pretty hard to remember and more than a little inconvenient to include on a business card. When you choose a username, the numbers in the URL for your timeline are replaced. For example:
https://www.facebook.com/scottwayres
To set your username, follow these steps:
- Navigate to your General Account Settings page and click the Edit link next to Username.
- Verify your account via your mobile phone (if it’s not already verified).
If you’ve just established your Facebook account, it may not be verified yet (even if you clicked the link in the e-mail that Facebook sent you when you signed up). If that’s the case, you can wait a little longer until Facebook confirms your verification, or you can click the Verify via Mobile Phone option. To verify via your phone, do this:
- Click the Verify via Mobile Phone link.
- Use the drop-down list to choose the correct country code for your cellphone’s number.
- In the Phone Number text box, type your cellphone number.
- Some users will be given the option to select whether they prefer to receive a text or an automated phone call. Most users will not have a choice and will be sent a text message.
- Click Continue.
The Enter Your Confirmation Code dialog box appears. If, after five minutes, you haven't received the code, click the Resend Code link to try again.
- After you receive your verification code via text, type the code in the text box, and click Confirm.
A dialog box appears.
- Select whether you want text notifications turned on and your phone number to be Public, Only Seen by Friends, or Only Me. Then click Save Settings.
 If you activate text messages, Facebook texts your notifications to you. Normal text messaging charges apply, so be sure you know what your phone’s data plan is — you could be receiving a lot of texts.
When your account is verified, the Username option changes as shown in Figure 2-7.
If the Username option doesn’t change right away, click another option (for example, Name) and then click back to Username.

Figure 2-7: The Username option looks like this if you’ve verified your account.
- In the text box, type your desired username.
If your username isn’t available, Facebook suggests a username for you.
You can change your username only one time. It’s best to use your real name if you can. (You may have to include your middle name or at least your initial if you have a fairly common name.) Choosing something like PartyBill may be fun now but probably won’t be quite as impressive when work colleagues look you up. - In the Password text box, type your Facebook password and then click Save Changes.
Email setting
The Email row displays the e-mail address you used when you created your Facebook account. When you click the Edit link, you have these options:
- Add another e-mail address to your account. If you have multiple addresses associated with your account, you must choose one to be your primary address. Facebook uses your primary e-mail to send notifications to you. You can remove an address from your account by clicking the Remove link.
- Activate your Facebook e-mail. You need to have a username associated with your account to activate your Facebook e-mail. Your username is your Facebook e-mail address (for example, [email protected]). Any messages sent to that address appear in your Facebook messages. You can check for new messages by clicking the messages icon (labeled in Figure 2-6) in the blue toolbar at the top of all Facebook pages.
If your account is new, you may have to wait a few days before e-mail is available.
- Allow friends to include your e-mail in the information that’s downloaded when they back up their accounts. When Facebook users download a copy of their Facebook data (explained in a moment), all sorts of information is included: status updates, comments, pictures, video, and even contact information for their Facebook friends. If you don’t want your e-mail address to be included in that download, deselect the check box next to this option.
If you make any changes to your e-mail settings, be sure to type your Facebook password in the text box and click the Save Changes button for those changes to take effect.
Password setting
It’s a good idea to periodically change your account password. You can do that by first clicking Password in the General Account Settings screen. Then in the text boxes that appear, type your current password in the Current text box, type your new password in the New box, and retype your new password in the final box. Click the Save Changes button, and your password is updated. You’ll need to use the new password the next time you log in to Facebook.
We provide tips on choosing a password and protecting your privacy in Chapter 4 of this minibook.
Networks setting
Facebook has networks associated with high school, college, and some supported companies. To join a specific network, you need to have an official e-mail address associated with the college or work network you’re trying to join so you can confirm your affiliation. If you're trying to join a high school network, a classmate in the network must approve you.
You can join up to five networks. If you join more than one, you’re prompted to choose your primary network. Your primary network appears next to your name and is public. Your primary network also affects your search results in Facebook. If you do a search, results associated with your network appear at the top of the results.
To join a network, click Networks in the General Account Settings screen, and then click Join a Network. Type the name of the network in the Network Name text box and type your associated e-mail address in the Network Email text box. Click Save Changes. You need to check that e-mail account for your confirmation message and follow the instructions to join the network.
To remove a network from your account, click the Remove link beside the network you want to leave. Then click Save Changes.
Facebook no longer accepts requests for new networks, so if your work doesn’t have an approved network, you can create a group and invite people to join that way.
Language setting
Because Facebook is an international social media platform, it’s available in myriad languages. To change your primary language, click Language in the General Account Settings screen, and then use the drop-down list to make your selection. Click Save Changes.
Download a copy of your Facebook data
Always remember that you don’t own your space at Facebook. If you violate Facebook's terms of service, you may find yourself locked out of your account. If that were to happen, you’d lose access to all the content you’ve added to Facebook: status updates, pictures, video, comments, friends and their contact information, and so on.
Facebook makes it so easy to use your smartphone to upload pictures and updates that many people use their phones to record and share important life events directly to Facebook. We suggest making a habit of backing up your data on a regular basis if you’re consistently keeping important content (for example, vacation photos) on Facebook rather than somewhere else. Your download will include everything you’ve uploaded to Facebook, including status updates, pictures, video, private messages, chats, and a list of Facebook friends and their contact information (if they’ve enabled that on their account).
To back up your data, follow these steps:
- On the General Account Settings page, click the Download a Copy of your Facebook Data link.
The Download Your Information page appears.
- Click the green Start My Archive button.
- Enter your password (if requested to do so) and click Submit.
The Request My Download dialog box appears and explains that it will take some time to create the backup file.
- Click the Start My Archive button.
Facebook tells you that it will send a message to the primary e-mail associated with your account when your archive is ready.
- Click Okay.
- When you receive the e-mail stating that your archive is ready, click the link to download the file to your computer.
When you open the archive file, you find the following information:
- Your biographical timeline information (your contact information, interests, work history, and so on)
- All your status updates and comments by you and your friends
- All photos and video you uploaded to your account (and the comments associated with them)
- Your friends list
- All the notes you wrote and shared
- All your sent and received private messages
It’s great that you’ve backed up your Facebook information, but we encourage you to go a step further and save the file to your computer as well as another source (for example, Dropbox or an external hard drive). That way, if something happens to your computer, you’ll still have your content.
Security Settings
Facebook states that it takes your personal privacy and security seriously. To that end, Facebook provides many options so you can control how and what you share (see Book I, Chapter 4 for more information on privacy). The Security tab on your Account Settings page, shown in Figure 2-8, is where you find many of the options for securing your account, as you discover in this section.
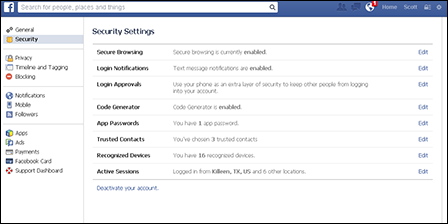
Figure 2-8: The Security Settings screen.
Secure Browsing setting
By default, Facebook uses secure browsing on laptops, desktop computers, and most mobile devices while you’re logged into Facebook. We highly recommend leaving this feature turned on. Secure browsing encrypts your Facebook activity so it’s harder for others to access it without your permission (you grant permission through your share setting, tags, and so on).
If you want to turn off secure browsing, click the Edit link on the far right of the Secure Browsing row, and then deselect the check box labeled Browse Facebook on a Secure Connection (https) When Possible. Then click the Save Changes button.
To make sure secure browsing is enabled, see whether the address bar of your browser begins with https:// (for example, https://www.facebook.com). If you see http:// instead of https://, revisit your settings to be sure you still have this option enabled. You may have turned off secure browsing to access a noncompliant app but then forgot to turn it back on.
Secure browsing is available on most mobile devices.
Login Notifications setting
If you’re concerned that someone may access your account without your consent, we suggest enabling the login notifications option. This option notifies you via e-mail or text message when your account is accessed from a device that you haven’t used before. So if you usually use your desktop computer to access your account, but one afternoon you use your laptop, Facebook sends you a note (either an e-mail or a text message) to let you know that your account was accessed from a new device. If you were the one logging in from the new device, no problem. If you weren’t, you can investigate.
To turn on login notifications, click the Edit link in the Login Notifications row. Then select the E-mail check box or the Text Message/Push Notification check box, or both. Keep in mind that charges for text messages apply here. Click Save Changes to complete the process.
Login Approvals setting
The Login Approvals entry adds another layer of protection to login notifications. Each time you (or someone else) logs into your account from a device that you haven’t used before, Facebook sends you a text message with a code that you have to use to complete your Facebook login. For example, if you usually log into your Facebook account with your desktop computer but decide to log in with your laptop, Facebook texts you a code that you must type when prompted to access your account.
Obviously, to use this option, you need to be sure you have a cellphone number associated with your account. You can associate a cellphone number with your account via the Mobile tab on your Account Setting page or when you verify your account by using your phone (see the “Username” section, earlier in this chapter).
To turn on login approvals:
- Click the Edit link in the Login Approvals row.
- Select the check box that appears.
The check box is labeled Require Me to Enter a Security Code Each Time an Unrecognized Computer or Device Tries to Access My Account.
The Set Up Login Approvals dialog box appears, with an explanation of how login approvals work.
- Read the overview of login approvals, grab your cellphone, and then click Get Started.
- Select the device you are using and then click Continue.
- When the Security Codes box appears, click Continue.
- Activate Code Generator as follows:
- On your phone, open the Facebook app.
- Tap the menu button.
- Scroll down the screen and tap Code Generator.
- Tap Activate.
You need to activate Code Generator so you can receive security codes on your phone.
- Back at the Account Settings screen, click Continue.
- Type the code in the text box and click Confirm.
If the code doesn’t work, you are given the option of having Facebook simply text you a code.
- In the text box, type a name for the device you’re using (for example, home computer) and click Next.
The Success dialog box appears, with information about what to do if you get a new phone, lose your phone, or use Facebook apps.
- Click the Close button to complete the process.
Now that login approvals are set up, every time you log in from a new device, Facebook texts a login code to your phone. You see the message shown in Figure 2-9.

Figure 2-9: Use the security code Facebook texts you to log in to your account.
Type the login code in the text box and click Submit Code to start using Facebook.
Code Generator setting
You can use Code Generator in your Facebook mobile app to reset your password or to generate login approval security codes.
To enable Code Generator, follow these instructions:
- In the Code Generator row, click Edit.
- Click Enable.
- Activate Code Generator as follows:
- On your phone, open the Facebook app.
- Tap the menu button.
- Scroll down and tap Code Generator.
- Tap Activate.
- Back at the Account Settings screen, click Continue.
If the code doesn’t work, click Continue to have Facebook text you a code.
App Passwords setting
Some Facebook applications don’t work with Facebook login approval codes, so if you have that option enabled, you may not be able to use all your apps. Facebook has fixed it so you can use app passwords instead of your account password to log in to certain apps (for example, Skype). According to Facebook’s Help section, “when you use an app password you won’t have to wait to receive a [login approval] code. Instead, you can skip login approvals and log in immediately.” You can read more about app passwords at http://on.fb.me/FBAppPasswords.
To generate an app password, follow these instructions:
- In the App Passwords row, click Edit.
- Click the Generate App Passwords link.
The Generate App Passwords dialog box appears and explains that some apps don’t work with login approvals.
- Click the Generate App Passwords button.
- In the text box, type the name of the app you want to approve and then click Generate Password.
A window appears, with the choice of creating another password (click Next Password) or finishing (click Finish).
- To complete the process, click Finish.
If you want to create another password instead, click Next Password and repeat Step 4.
You can remove a password by clicking App Passwords and then clicking the Remove link next to the password you want to delete.
Trusted Contacts setting
Trusted contacts are friends who can securely help you if you have trouble accessing your account.
To set up a trusted contact, follow these steps:
- In the Trusted Contacts row, click Edit.
- Click Choose Trusted Contacts.
A window appears, explaining more about trusted contacts.
- Click the Choose Trusted Contacts button.
- Type the names of at least three friends that you can call for help if you have a problem with your account.
- Click Confirm.
- Enter your password, and then click Submit.
Recognized Devices setting
Recognized devices are those you’ve used to log into your Facebook account. For instance, if you activated the Login Notifications option discussed earlier, you named your primary device. That device is listed under Recognized Devices. As you use other devices to log in, and they are confirmed as belonging to you, you can name those devices as well, and they appear in Recognized Devices too.
Any device listed under Recognized Devices doesn’t require secure login confirmation. You can remove a device from this section simply by clicking the Edit link in the Recognized Devices row and then clicking the Remove link next to the name of the device. Be sure to click Save Changes to complete the removal process.
Active Sessions setting
Click the Edit link to the right of the Active Sessions row to display a list of your recent active sessions on Facebook. You see the name and type of device used to log in and where the login occurred. If you see a location that doesn’t look familiar, be sure to check to see whether the session is linked to your smartphone, because those sessions don’t always reflect an accurate location.
If you see an active session and you think someone may be accessing your account without permission, click the End Activity link next to the questionable active session. Facebook suggests you also change your account password, as well as your e-mail password, as an added measure to ensure no one can access your account at this point.
Deactivate Your Account setting
Deactivating your account is not the same as deleting your account. When you deactivate your account, it’s still around but it’s not in use. People can’t find your timeline or view previous content you’ve shared, but friends can still tag you and invite you to events and groups. You also lose your admin status in groups, events, and business pages. You can choose to reinstate your account at any time, and Facebook will restore your timeline to the way it looked before you deactivated your account.
Deleting your account will erase your information and content from Facebook. At the end of this chapter, we explain how you can delete your Facebook account.
To deactivate your Facebook account, follow these steps:
- Click the Deactivate Your Account link at the bottom of the Security Settings screen.
A new page appears, asking if you’re sure you want to deactivate your account.
- Select a reason for leaving.
- (Optional) In the text box, type an extended explanation of why you’re deactivating your account.
This optional step helps Facebook pinpoint areas that may need work.
- Select the Opt Out of Receiving Future Emails from Facebook check box.
When you deactivate your account, your friends can still tag you in updates, photos, and videos, and invite you to Events and groups. If you choose to opt out of future e-mails from Facebook, you won’t receive notifications about those tags and invitations.
If you’ve created any apps and you’re the only developer, Facebook gives you the option to edit or delete those apps before you deactivate your account. - Click Confirm.
A password confirmation window appears.
- Type your password in the text box, and then click the Deactivate Now button.
Another security check window appears. (Facebook really wants you to think about your decision!)
- Type the CAPTCHA in the text box and click the Submit button.
Your account is deactivated.
To reinstate your account, go to www.facebook.com and log in with your e-mail and password. Facebook sends you a confirmation e-mail (so be sure you can access the e-mail address you originally used to set up your Facebook account). After you confirm that you own your account, Facebook reinstates your timeline as it was before you left. However, you still won’t have any admin privileges for groups, events, or business pages that you had before you left. You need to have someone add you as an admin if that’s something you’re interested in.
If you’re the only administrator for a business page, we urge you to add another administrator to the page before you deactivate your account. If you don’t, you lose all administrative rights to your page timeline. You won’t be able to access the Admin panel of your business page, and you won’t be able to regain your administrative status. When you add another person as an admin and later decide to reinstate your business page, the other admin can grant you admin capabilities again.
Timeline and Tagging Settings
Facebook has added several settings to give you more control over your timeline and who can tag you around the site. Click the Timeline and Tagging entry in the Account Settings pane, and you see the three options shown in Figure 2-10.
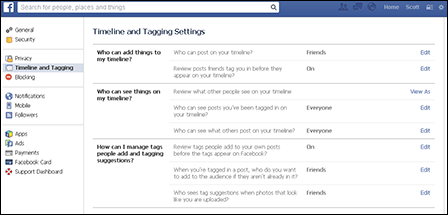
Figure 2-10: The Timeline and Tagging Settings screen.
“Who can add things to my timeline?” setting
In the first section, you decide whether friends can add posts to your timeline. To change the setting, click the Edit link to and make a selection from the drop-down list. If you do allow friends to add items to your timeline, you can also enable a feature that lets you review the post before it goes live.
“Who can see things on my timeline?” setting
In the second section, you can view your timeline as other people see it by clicking View As. On the screen that appears, you can also enter a person's name in the text box and view the timeline as that person sees it.
The next setting, Who Can See Posts You've Been Tagged In, lets you control who can see posts you’ve been tagged in on your timeline. For example, you might not want your public following seeing the naked baby picture of you that your mother tagged. Click the Edit link and make a selection in the drop-down list.
The final setting in this section enables you to choose who can see what others post on your timeline. As with the previous option, click the Edit link and make a selection in the drop-down list.
“How can I manage tags people add and tagging suggestions?” setting
In the final section, you can turn on tag review to review tags that friends add to your content before the tags appear on Facebook. When someone you’re not friends with adds a tag to one of your posts, by default you’ll always be asked to review it. When you approve a tag, the person tagged and his or her friends will likely see it.
Next choose if you want your friends, only yourself, or people on a custom list to be added as the audience of the post you’re tagged in if they aren’t already in it.
Finally, when a photo that looks like you is uploaded, Facebook will suggest adding a tag of you to the photo. This feature saves time when people add tags to photos, especially from events. You can allow Facebook to show tag suggestions to your friends or to no one.
Notifications Settings
Notifications are messages that alert you when someone tags you in an update, a photo, or a video or comments on one your posts (or comments on someone else’s post that you commented on). Some people like to enable notifications because they remind them to visit Facebook and respond to what’s happening. On the other hand, if you’re on Facebook quite a bit, notifications may be overkill. The Facebook team understands that everyone uses the platform a little differently, so you can determine how you receive notifications.
When you first create your account, your Notifications Settings page looks similar to the one shown in Figure 2-11.
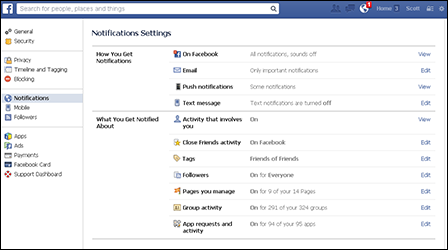
Figure 2-11: Your Notifications Settings page allows you to choose how you receive updates.
The Notifications Settings page lists all the different types of notifications you can set. To determine which notifications you receive, click the Edit link or the View link next to each option. That option expands to show a list of further options. You can select or deselect the items about which you want to be notified. Remember to click Save Changes for each category so your changes will take effect.
As you use Facebook regularly, you’ll receive more notifications because people will be interacting with you regularly. If you find that you receive too many e-mail notifications from Facebook regarding updates and comments, return to the Notifications Settings screen and choose Email. A screen similar to Figure 2-12 appears.

Figure 2-12: The Email option has these settings.
You can choose to receive all notifications, except ones you have unsubscribed from (in Figure 2-12, you can see that Scott has unsubscribed from 78 items). You can choose to receive important notifications about you or an activity you’ve missed. Or you can choose to receive notifications only about your account, security, and privacy.
Consider setting up an e-mail address that you use solely for Facebook. That way, all your Facebook correspondence is in one place, and you can check as you like without cluttering your primary e-mail inbox. As a bonus, if your Facebook account is ever hacked or you click a bad link, you have a single e-mail address to deal with (and it doesn’t affect your other accounts).
Mobile Settings
Enabling your mobile settings allows Facebook to text you when you have friend requests or other notifications. Additionally, you can text updates (including photos and video) from your phone directly to your Facebook Timeline.
However, if you have a smartphone, you can do all these things directly from the Facebook app for your phone. We explain mobile Facebook options more thoroughly in Book II, Chapter 6; you can also point your browser to www.facebook.com/mobile to find out more.
To set up your Facebook mobile settings, follow these instructions:
- On the Account Settings page, click Mobile in the left navigation pane.
The Mobile Settings page appears, as shown in Figure 2-13.

Figure 2-13: The Mobile Settings screen.
- Click the green +Add a Phone button.
The Add Mobile Phone dialog box appears.
- Type your password in the text box and click Confirm.
The Activate Facebook Texts (Step 1 of 2) dialog box appears.
- Select your country and mobile carrier from the drop-down lists and click Next.
The Activate Facebook Texts (Step 2 or 2) dialog box appears.
- Text the letter F to the number 32665.
You receive a text from Facebook with a confirmation code.
- In the text box, type the confirmation code.
- Select whether you want to share your phone number with your friends and whether you want to allow friends to text you from Facebook.
If you activate text messages, Facebook texts your notifications to your mobile phone.
Normal text messaging charges apply, so be sure you know the details of your phone’s data plan — you could be receiving a lot of texts if you’re active on Facebook. - Click Next to complete the process.
The Facebook for Mobile page appears, and you can read more about your mobile options. You'll receive a text message from Facebook to let you know that the number has been confirmed.
To remove a phone number from your account, simply click the Remove link beside the number on the Mobile Settings page.
After you confirm a phone number, the Mobile Settings page displays additional options:
- Text Messaging: If more than one mobile phone is associated with your profile, you can click Edit and choose which phone receives text messages. Although Facebook doesn’t charge you for texting, your mobile carrier may. Be sure you understand the details of your data plan.
- Facebook Messages: Control when Facebook can text you. Click Edit and use the drop-down list to choose the option that works for you.
- Daily Text Limit: Control how many texts you receive from Facebook each day. You can choose 1, 5, 100, all the way to Unlimited. Remember that your mobile carrier’s texting rates apply.
- Post-by-Email Address: Facebook gives you a unique e-mail address to which you can use to post updates. You could, for example, e-mail a video or photo from your phone and it will automatically be posted to Facebook. Note that posting by using the Facebook mobile app is easier.
Followers Settings
The Followers option (previously called Subscribe) on the Account Settings page has changed how many use Facebook. You can now allow people to follow your public posts, just like in Twitter or Google+, without having to become their friend. For many, especially journalists, celebrities, athletes, artists, and bloggers, this feature has also eliminated the need to run a Facebook business page.
Click the Followers entry in the left sidebar to turn on and off the Follow feature. When you turn on the feature, a new set of options appears, as shown in Figure 2-14.
A description of each option follows:
- Follower Comments: Determine who can comment on posts (everybody, friends of friends, or friends). If you have a large number of followers, you may not want to deal with the amount of spam you’d get by leaving comments open, but you will also miss out on the connections made.
- Follower Notifications: Determine whether you want to get notifications when people who aren’t your friends start following you and share, Like, or comment on your public posts.
- Username: You might want to change your username so that people can find and follow you more easily.
- Twitter: If you have a Twitter account, you can connect it to your profile. Then each time you make an update, your Facebook account will send a Tweet.
- Follow Plugin: Make it easy for people visiting your website to follow you on Facebook. Add a Follow button on your website by copying and pasting the supplied code.
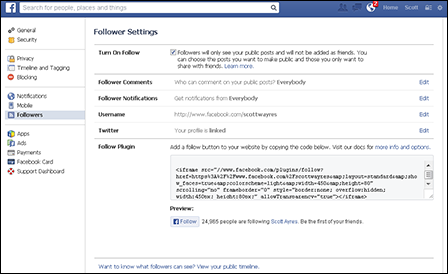
Figure 2-14: The Follower Settings screen.
Apps Settings
As you interact on Facebook, you’ll find that it’s nearly impossible to avoid Facebook applications. (We explain applications and how they work in Book VI.) Apps allow you to interact more fully on Facebook. When you play a game, share photos via Instagram (http://instagram.com), update your status via apps such as Post Planner (www.postplanner.com) or HootSuite (https://hootsuite.com), or even enter a giveaway, you utilize a Facebook application. With the release of timeline for personal profiles in late 2011, Facebook applications are becoming even more prevalent because they’re a primary way people choose to share an activity (for example, listening to music via Spotify or watching a movie via Netflix).
Each time you click an activity related to an application, Facebook checks to see if your account is already associated with that app. If it is, you move forward and complete the action. If your account isn’t associated with the app, you get an alert asking if you’d like to allow the app to have access to your account. And that’s where people new to Facebook start to get concerned (rightfully so; your privacy and protecting your account are important).
By their nature, apps must have access to your account in order to function properly. For instance, when you play Words with Friends (it’s like mobile Scrabble), you probably want to find out if any of your other Facebook friends are playing so you can start a game with them. By allowing Words with Friends to access your account, the app can look at your list of Facebook friends, compare it with the people who have Words with Friends accounts, and let you know who is already playing. Then, after you play Words with Friends, you can choose to post your wins to your timeline and let people know you are the king or queen of word strategy (or not).
If you don’t want to use applications or are uncomfortable allowing them to access your account information, you don’t have to install or allow the application on your account. The trade-off is that you’ll miss out on some functionality of Facebook and interacting with your friends on a different level. If you decide to allow an app, you can always remove it later.
To see which apps you currently have associated with your account, click Apps on the Account Settings page. A list similar to the one in Figure 2-15 shows you the name of the application, when you last accessed or used the application, the option to edit the application, and the option to remove the application.
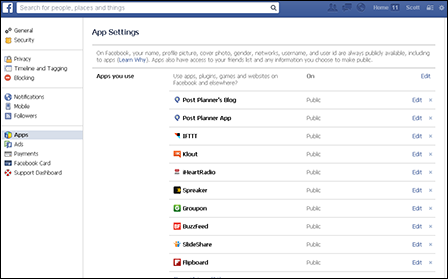
Figure 2-15: Your App Settings page lists the apps associated with your Facebook account.
We recommend that you check your App Settings page periodically just to clean out apps you no longer use. There’s no use having extra apps hanging around.
If you want to see what permissions a particular app has for your account, click the Edit button next to the application name. The app window expands, as shown in Figure 2-16.

Figure 2-16: Check to see what permissions an app has for your account (and customize as necessary).
Figure 2-16 shows several options for working with this app:
- Remove the app by clicking the Remove App link, at the bottom of the page.
- Remove nonessential functions such as Manage Your Pages and Post on Your Behalf.
- Check to see when the app last accessed you data.
- Customize which of your friends or lists can see when and how you use the application.
If you choose to remove an application, you can always add it back to your account later.
Applications will become much more integral to Facebook than they already are. In general, people don’t like to leave Facebook to complete other actions. That’s why you can watch videos in your news feed instead of clicking over to YouTube, and why you can click a photo and see a lightbox with a larger version of the image. Facebook offers secure browsing and applications that allow payments inside the application. As product sales on Facebook grow, so will the use of applications that can connect third-party websites to Facebook and share inventory.
Ads Setting
The Facebook Ads option on your Account Settings page, shown in Figure 2-17, isn’t referring to how to create Facebook ads (which we discuss in Book V, Chapter 4). Instead, this option explains how Facebook ads work with your personal timeline account, what the ads can and can’t do, and how your information and your friends’ information is (or isn’t) used with ads.
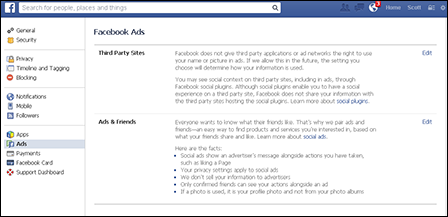
Figure 2-17: The Facebook Ads screen.
Take a moment to read Facebook’s explanation and familiarize yourself with how ads work. In a nutshell, Facebook is reminding you that third-party apps and networks don’t have the legal right to use your information (including your picture) in their advertisements. You can control third-party ad settings by clicking the Edit link and using the drop-down list to choose who can see your information if Facebook makes changes to its ad policies in the future. Be sure to click the Save Changes button to ensure that your preference is saved.
Payments Settings
The Payment Settings page, shown in Figure 2-18, enables you to view and manage purchases you’ve made in Facebook. These purchases are conducted in games, apps, when purchasing a gift for someone, or when using promoted posts.
Account Balance setting
If you've previously purchased credits, you’ll see an account balance. As of September 2013, the credits system has been dissolved and you can now simply make app purchases in your country’s currency.

Figure 2-18: The Payments Settings screen.
Subscriptions setting
You can set up monthly recurring payments to subscribe to your favorite games and apps. Subscriptions are available only on select apps and the offer will vary depending on the app. If you've subscribed to a recurring payment, you'll see that information in the Subscriptions setting.
Purchase History setting
If you’ve ever made a purchase in Facebook, you can see your purchase history by clicking the View link in the Purchase History row. You might want to use this handy resource to keep track of how much you’re spending.
The following details are listed: order date, item purchased, purchase location, and amount. Click the dollar amount to display a new window with the time of the purchase, the payment ID, and the purchase method. You can also dispute the purchase if you don’t recognize it.
Payment Methods setting
Facebook offers many payment methods. You can use your credit card, PayPal, or even a Facebook gift card. If you use PayPal to pay for Facebook ads (see Book V), your PayPal information is saved, and you can edit it in the Payment Methods row.
To add a credit card to your payment methods, follow these steps:
- In the Payment Methods row, click the Manage link.
A new page appears, asking for your Facebook account password.
- Type your password in the text box, and then click Continue.
The Payment Methods box expands and lists payment options, as shown in Figure 2-19.
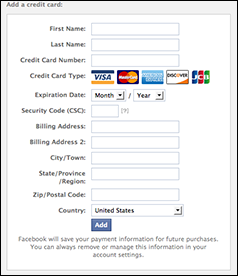
Figure 2-19: Choose your payment method.
- Complete the form, and then click the Add button.
Facebook saves your information so you don’t have to resubmit the same information each time you want to buy credits.
You can remove credit card or payment information any time by clicking the Manage link next to Payment Methods and then clicking Remove for the information you want to delete.
Preferred Currency setting
The Preferred Currency option is pretty much what it sounds like. You can choose the currency that you use the most from the drop-down list. The currency you choose determines how Facebook displays pricing to you (for example, either in American dollars or euros). If you make changes to your preferred currency, remember to click Save Changes for those to take effect.
Shipping Addresses setting
With the addition of Facebook Gifts (for details, see Book II, Chapter 9), you’ll want to add a shipping address to Facebook should someone purchase you a gift card or other item for your birthday.
To add an address, follow these steps:
- In the Shipping Addresses row, click the Manage link.
A new page appears, asking for your Facebook account password.
- Type your password and click Continue.
(Any addresses you have entered previously will appear.)
- Click the Add an Address link.
- Fill out your address information, and then click Add.
- When you're finished, click Close.
Note that you can't edit an existing address. To remove an address, click Remove next to the address you’d like to remove. A warning box appears, asking you to confirm. Click Remove and the address is removed.
Facebook Card Setting
The Facebook card is a way for anyone to buy you a gift card and have the balance automatically added to your card. The first time someone sends you a Facebook card, you’ll be sent a reusable Facebook-branded card in the mail that looks like any other gift card. When you receive your card, you can use it to make purchases at the store or restaurant with which you have a balance. Then the next time you receive a Facebook card gift, the amount is simply added to your existing card.
You will see the Facebook Card setting only if someone has sent you a Facebook card.
The Facebook Card settings screen is shown in Figure 2-20. If your card is lost or stolen, click the Report Lost or Stolen Card link and follow the onscreen instructions.
The Current Balances row displays any gift cards you have at specific stores, as well as the current balance. Click View in this row to see who sent money to your card and when you spent the money.
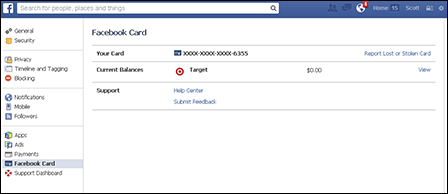
Figure 2-20: The Facebook Card Settings screen.
Support Dashboard Setting
The Support Dashboard screen, which is shown in Figure 2-21, enables you to see the status of your reports and inquiries. The following options are available:
- Notifications: Use the Notifications drop-down list on the right to turn notifications off and on.
- Pending: When you report a photo, comment, video, or post from another user or page, the report is placed in Pending. You’ll be able to see what you reported as well as be given the opportunity to cancel the report.
- History: When Facebook has reviewed your report, you’ll see a list of recent items and Facebook’s decision.

Figure 2-21: The Support Dashboard screen.
The Support Dashboard screen looks different for every user.
Deleting Your Facebook Account
If you decide to delete your Facebook account, your information becomes irretrievable. Unless you’ve made a copy of your Facebook data and saved that file somewhere other than Facebook, you’ll lose your photos, videos, status updates, comments, friends lists, and private messages.
We give step-by-step instructions for archiving your Facebook data earlier in this chapter, in the “Download a copy of your Facebook data” section. We firmly suggest that you archive your Facebook data before you delete your account so you don’t lose anything of value.
When you delete your account, there’s no going back. You can’t reinstate your account. If you choose to return to Facebook, you have to create a new account and start from scratch.
To delete your account, follow these instructions:
- Log in to your Facebook account, and then visit www.facebook.com/help/contact.php?show_form=delete_account.
The Delete My Account page appears, with a strict warning that you will not be able to retrieve any data after your Facebook account is deleted.
- If you’re sure you’d like to delete your Facebook account, click Delete My Account.
The Permanently Delete Account dialog box appears.
- Provide your Facebook account password and type the CAPTCHA phrase.
- Click Okay.
One more warning appears, explaining that your account has been deactivated but not deleted. If you log in to Facebook within 14 days, you have the option to cancel your deletion request.
- To confirm you want to delete your account, click Okay again.
You still have 14 days to change your mind. If you don’t log in to your account within 14 days, your Facebook account is permanently deleted.