
Chapter 4
Ads, Promotions, and Offers
In This Chapter
![]() Setting up a Facebook ad
Setting up a Facebook ad
![]() Using Ads Manager
Using Ads Manager
![]() Creating a report
Creating a report
![]() Sharing administrative privileges
Sharing administrative privileges
![]() Marketing your business through a promotion
Marketing your business through a promotion
![]() Finding the best apps to run your giveaway or contest
Finding the best apps to run your giveaway or contest
![]() Setting up best practices for a successful promotion
Setting up best practices for a successful promotion
![]() Using offers to expand your business
Using offers to expand your business
One of the things Facebook does well is collecting demographic information about users. Facebook members share their likes and dislikes, brand loyalties, where they live, and so many other personal interests just by filling out their timelines, Liking business pages, and updating their status. Facebook doesn’t sell this information, and each user controls what he or she shares or doesn’t share with others. (Admittedly, though, it can be hard to not share on a platform such as Facebook.) What Facebook does do with that information is use it to allow advertisers to target users with their marketing. Because Facebook is and always will be a free platform, it makes money from advertisements.
If you run a business and are looking to get the biggest bang for your buck, Facebook ads aren’t a bad way to go because you can reach a targeted audience. This chapter explains the considerations of setting up a Facebook ad and how to track your ad’s success rate. We give you a pretty broad overview; if you really want to get into the nitty-gritty of Facebook advertising, we suggest getting a copy of Facebook Marketing All-In-One For Dummies, 3rd Edition, by Andrea Vahl (John Wiley & Sons, Inc.).
Finding Facebook Ads
Facebook ads appear in your news feed or in the right sidebar under your ticker, as shown in Figure 4-1. The ads you see are usually not too invasive and may have some interest for you. That’s because Facebook and advertisers are trying to target the most useful ads for you based on the information you’ve shared in your personal timeline, your interactions with other pages in Facebook, or even who your friends are (and how they’ve interacted on Facebook).
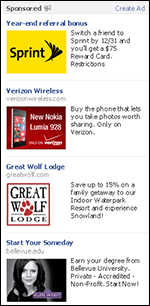
Figure 4-1: Facebook ads in the right sidebar.
You may see ads for external websites or Facebook pages such as business pages, events, and apps. Ads for Facebook-related items may also show which of your friends have Liked a business page or RSVP’d to an event. Seeing those connections with people you know provides social proof — reinforcement that your friends endorse something — and you may be more likely to complete an action (for example, Liking a business page).
 Sometimes ads miss their mark. If you’re seeing an ad you don’t like or if an ad keeps coming up in your sidebar and you’re tired of seeing it, you can remove it. Just move your mouse over the ad and click the X that appears. You have the option to hide the ad itself or hide all ads from the same advertiser. When you hide the ad, you can have a say in what kinds of ads you receive in the future. Unfortunately, you can’t opt out of all advertisements.
If you’re interested in seeing the types of ads Facebook thinks you would be interested in, go to www.facebook.com/ads/adboard.
Deciding Whether Facebook Ads Are Right for You
If you’re looking to get the most bang for your advertising buck, Facebook ads may be just what you’re looking for. We know at least some of your audience is using Facebook because it has more than 1.19 billion active users. And with that many users, just think of the new customers you can find!
Why is Facebook such a great place to advertise? Well, Facebook is in a unique position. It has access to specific demographic information for each user. Facebook allows advertisers to target ads to specifications regarding location (down to the ZIP code), gender, age, interests, education, and even employment. And, of course, you can use keywords as well. Heck, you can even target people whose birthdays are today! That kind of precise audience targeting means you should enjoy a healthy return on your investment.
Other benefits of using Facebook advertising include the ability to
- Target your audience in the following areas: post engagement, page Likes, clicks to website, website conversions, app installs, app engagement, event responses, and offer claims.
- Buy your ads based on cost per click (CPC) or cost per impression (CPM).
- See whether people completed an action within 24 hours of seeing your ad.
- Set your own daily or lifetime budget and pay only for what you use.
- Change any aspect of your ad (image, content, link, budget, and so on) during the ad’s run.
- Stop the ad — even if the time isn’t up yet.
If you’ve ever used other methods of advertising (online or offline), you know you don’t always have this kind of flexibility.
Although you can advertise just about anything — business pages, groups, events, apps, and external websites — Facebook gives you two choices of ads: Facebook ads or sponsored stories.
Choosing an ad: Facebook ads
You can use a Facebook ad to attract interest for any page in Facebook (for example, a business page, a group, an event, or an app), or you can promote an external website. Any time you promote something in Facebook, it’s called an engagement ad, and it includes two important parts:
- An opportunity to complete an action in the ad (instead of interrupting the user’s flow by having to click over to your business page)
- Relevant actions by users connected to the viewer to help build awareness through social proof
For example, if a user sees your ad for your business page, the ad will include a Like button so that the person can Like the business page right from the ad and can see whether any of his or her Facebook friends Liked your business page as well. Figure 4-2 shows an example of an engagement ad.

Figure 4-2: An engagement ad provides social proof and an opportunity to complete an action.
 If you are using cost per click (CPC) for your ad, you’re charged each time someone clicks Like or clicks through to your destination page.
Choosing an ad: sponsored stories
Sponsored stories (also called featured stories) are stories about a business page, a place, or an app that are already available in your news feed. A sponsored story may show a friend who Likes a business page, checks into a place, or Likes or shares a status update from a business page.
The interactions you see in a sponsored story (for example, Likes or shares) are interactions that already show up in your news feed or ticker. The difference is that a business or individual is paying for the sponsored story to be more prominent and less likely to be lost in the constant flow of information.
Figure 4-3 shows an example of a sponsored story ad that would appear in the right column. If the sponsored story ad were to appear in the news feed, it would look similar to the example in Figure 4-2. You decide in which position you want the ad to appear, as described later in the chapter, in “Text and Links section.”

Figure 4-3: A sponsored story ad.
You can enable sponsored stories by selecting the box on the left side of the Text and Links section if applicable. Not all ads offer this choice.
Knowing what you can’t do with ads
Facebook has guidelines for everything. It has terms of service for your personal timeline and your business page, guidelines for giveaways and contests, and yes, guidelines for advertisements. Facebook must approve each ad you create, so it makes sense to know what you can and can’t do with your ads. If you don’t comply, Facebook rejects your ad.
You can read the guidelines in their entirety at www.facebook.com/ad_guidelines.php. Here are a few examples of what you are not allowed to advertise (again, read the guidelines for a full list):
- Pornography
- Alcohol, drugs, or tobacco
- Gambling or lotteries
- Pharmaceuticals and supplements
- Any site that uses domain forwarding (that is, you think you’re going to one website and end up on another)
- Any site that contains spyware or malware
- Weapons and explosives
Facebook won’t double-check your ad to be sure it’s legal — that’s completely up to you. If your ad doesn’t comply with the law, you, not Facebook, are liable.
Creating Your Facebook Ad
You can start the ad-creation process in about eleventy billion ways. Okay, we’re exaggerating. But Facebook does give you several opportunities to click and create an ad on just about every page you browse. We show you one of the ways. However, realize that whenever you see a Create Ad link, you can click it and the steps to create the ad will be largely the same.
To get started with a Facebook ad, go to www.facebook.com/ads/create. You see the Advertise on Facebook page, which offers all the options you need to create a Facebook advertisement. The page has the following sections:
- What Kind of Results Do You Want for Your Ads?
- Select Images
- Text and Links
- Audience
- Account and Campaign
- Bidding and Pricing
We explain each section more thoroughly in the next few pages.
What Kind of Results Do You Want for Your Ads? section
The main section of the Advertise on Facebook page is shown in Figure 4-4.
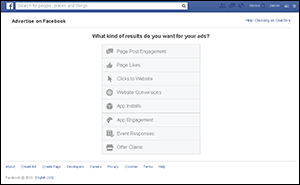
Figure 4-4: Options for creating your Facebook ad.
You have eight choices to help you focus your goals and results, as detailed next.
Page Post Engagement option
Select the Page Post Engagement option to expand the reach of your page posts to attract more comments, shares, Likes, and photo and video views. Then enter your business page or URL, and a menu appears listing the posts that you can promote. Select one and click Continue. If you do not want to select a current post, you can click the + button and create a new page post.
Page Likes option
If you want to promote your page to get more Likes, select the Page Likes option. On the right, enter the business page or URL, and you see the main advertising page.
Clicks to Website option
To drive traffic to your website, select the Clicks to Website option. In the box on the right, type the URL of the website, and the main advertising page appears.
Website Conversions option
A conversion-tracking pixel is code that will track desired conversions such as downloads, sign-ups, and sales on your website.
Select the Website Conversions option when you want to promote individual conversions on your website. On the right side of the screen, enter the URL that you want to promote. A drop-down menu appears with the types of conversions you can track: Checkouts, Registrations, Leads, Key Web Page Views, Adds to Cart, and Other Web Conversions.
Select the type of conversion you want to measure, and if desired, give it a custom name. Then select the Terms of Service box.
App Installs option
When you want to promote your desktop or mobile app so that users will install it, select App Installs. On the right, browse and select the app or enter its URL. Then click Continue.
App Engagement option
To create an ad that encourages people to use your desktop app, select App Engagement. On the right, browse and select the app or enter its URL. Then click Continue.
Event Responses option
Have an event that you want to promote? Select Event Responses, and then browse and select the event or enter its URL. Then click Continue.
Offer Claims option
Have you created an offer and want to promote it? Select the last option on the page, Offer Claims. On the right side, select the business page or URL that has the offer you want to promote. Then make a selection from the menu of posts that appears. If you want to create a new offer instead, click the + button.
Select Images section
After you select an option in the preceding section (you may or may not have to click Continue), your selection appears at the top of the Advertise on Facebook page. The next section on the page is the Select Images section, which is shown in Figure 4-5.
You can upload up to six images to create additional ads that Facebook will rotate at no extra charge. Whichever ad performs better will be shown, so it's to your advantage to use six images. Each image should be 600 x 225 pixels.
You have the option to upload new images, select images from your library, or choose a stock image courtesy of Shutterstock. After you upload the images, you can reposition them to your liking.
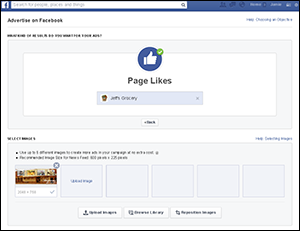
Figure 4-5: The Select Images section of the Advertise on Facebook page.
Text and Links section
Your ad appears to the right of the Text and Links section, as shown in Figure 4-6, and the options appear on the left.
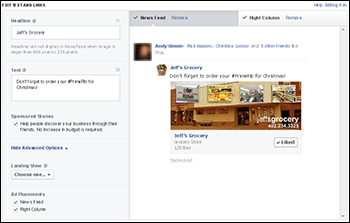
Figure 4-6: Choosing where your ad will appear.
Depending on the ad type you chose, you'll see some or all of the following options:
- Headline: Your main text goes here.
- Text: Type supporting text here.
- Sponsored Stories: Reach the friends of your friends.
- Connect Facebook Page: If you're promoting your website, this option will link to your site in the news feed, but it will be seen as one of your business pages. You can disable this feature.
- Advanced Options: This drop-down list displays some or all of the following, depending on which ad type you selected:
- URL Tags: Append or replace URL tags.
- Ad Placements: Determine where your ad will appear.
- Landing View: Choose a view or app on your page where you want people to land when they click on your link.
- News Feed Link Description: Explain why people should go to your site.
- Ad Placements: Select News Feed, Right Column, or both.
Audience section
One of the biggest draws for using Facebook ads is the capability to fine-tune who sees your ads. You can customize your audience right down to the ZIP code you want to reach, if you like.
Move down the screen until you see the next section, Audience, as shown in Figure 4-7.

Figure 4-7: The targeting information you choose determines your ad's potential audience.
Pay close attention to the Audience Definition section in the upper-right corner. As you customize your targeted audience by making selections on the left, the number for your potential reach changes.
If you haven’t looked at your Insights data yet, now is a good time to check them out. (See Chapter 3 of this minibook for details on how to use your data.) Insights, Facebook’s analytics program, provides important demographic and engagement information about your current audience. You can use that data to determine the target audience for your ad.
You can start targeting your audience based on location, age, gender, interests, and who they’re connected to. You can go even further by including specific relationship status, language, education, and employment information. Each Facebook user has shared a certain amount of data pertaining to his or her life, and Facebook uses that information to help you reach the best audience for your business or product ads.
Account and Campaign section
The next step in setting up your Facebook ad or sponsored story campaign is determining how much you want to spend, when you want to run your campaign, and whether you want to pay for clicks or impressions (and how much you’re willing to pay for each). These items are shown in Figure 4-8.
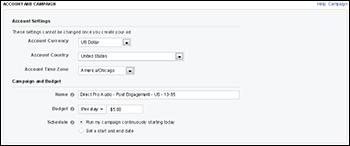
Figure 4-8: Determining the budget for your campaign.
First, under Account Settings, you need to set up the currency, country, and time zone for your account. After you create your ad, these selections cannot be changed, so make sure you choose correctly.
The second subsection is titled Campaign and Budget. Facebook allows you to group similar ads into campaigns. Each campaign can have multiple similar ads. This feature is useful when you want to see which ad works best. Each time you create an ad, you can put it in an existing campaign or you can create a new campaign. When choosing a name, you might want something that indicates your goals or distinguishes your different ads.
When setting your budget, you can choose to spend a specific amount per day or to set a lifetime budget. When you set a daily budget, Facebook will promote your ad until the ad has met its budget for the day. The next day, the process starts over. So if you have a budget of $50 per day, Facebook shows your ad until it meets that $50 parameter. Then tomorrow, Facebook shows the ad again until it reaches its $50 limit. Facebook continues to show the ad until the end date you set.
 Be careful! If you want to spend $50 total, but want your ad to run for five days, you need to set your daily budget to $10 and set the dates accordingly. Otherwise, you may end up paying quite a bit more than you intended for a campaign. Pay special attention to your end date. Facebook automatically sets the end date a month from the start date, so you may have to change it.
By default, your campaign is set to run continuously. If you want to set specific dates for your campaign, click the Set a Start and End Date option. Start and end dates appear for you to set. Enter a starting and ending date and a time, adjusted for your own time zone.
Suppose you have a campaign that is set to run for five days. If you’ve limited your daily budget, Facebook will stop displaying your ad when you’ve reached that daily budget. Facebook won’t continue to display your ad and then charge you more.
Bidding and Pricing section
One of the important reasons to select the type of ad you want is that Facebook automatically optimizes your ad. You don’t have to understand how bidding works. However, you can control this feature in the Bidding and Pricing section, which is shown in Figure 4-9. (Your screen might look different, depending on the results you chose at the beginning.)

Figure 4-9: The Bidding and Pricing section.
If you want to optimize for something other than what Facebook suggests, you can select either Bid for Clicks or Bid for Impressions. The screen changes as shown in Figure 4-10.
Ad pricing is based on either cost per impression (CPM) or cost per click (CPC). CPM stands for cost per mille (which is French for 1,000; M is the Roman numeral for one thousand — CPM seems to make sense in every language except English). When you choose the CPM model, you’re choosing to pay for every thousand times the ad is seen. Choose this option if it’s more important for your ad to be seen than for people to click it. CPM works well when you’re trying to build brand awareness.
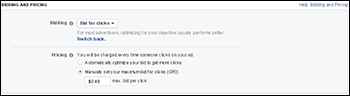
Figure 4-10: Customized pricing options.
CPC stands for cost per click. You pay only when someone clicks your ad — this action can include clicking the Like button, submitting an RSVP to an event, clicking through the ad and landing on the destination page, and so on. Choose this option if it’s more important for people to complete an action.
When you set your bid, you’re determining what you’re willing to pay for a click or an impression. The least amount you can pay for CPC is $0.01 and the least you can pay for CPM is $0.02. However, it’s unlikely that ads with those bids would ever be seen. Facebook uses an auction-type system to determine which ads are shown. Basically, all ads and sponsored stories are competing for the same ad space. When you place your bid, it’s wise to use the maximum amount you’re willing to pay for CPM or CPC. Facebook will calculate the least you would have to pay to “win” your ad space. That price may be lower than the maximum price you submitted. For instance, if you say you’ll pay $5 for each click, but the next lowest bid is $3, Facebook sees that you have a higher maximum and will sell the space to you for, say, $3 instead of the $5 you bid. On the other hand, if you’re in a competitive niche, you may end up paying that full $5 (but not more than your bid; if you want to raise your bid later, you can).
Facebook gives you a suggested range for your bid based on your target audience, your keywords (that is, interests), and so on. You don’t have to bid more than the minimum of a penny or two, but you’ll have more success if you make a reasonable bid based on Facebook’s suggestions.
Review
After you’ve designed your ad, targeted your audience, and determined your budget, click the Review Order button. A page appears, showing you what your ad will look like. You have the opportunity to edit the page as needed. When you're ready to go, click Place Order. If you don’t have a payment option set up in your account, you will be asked to select one. Otherwise, you see the Facebook Ads Manager page.
It can take up to 24 hours for Facebook to approve your ad.
Finding and Using the Facebook Ads Manager
The Facebook Ads Manager, which is shown in Figure 4-11, is the command center for the ads and sponsored stories you’re running on Facebook. From here, you can edit your ads and stories, as well as track how they’re performing. You can find your Ads Manager by navigating to www.facebook.com/ads/manage or by clicking the See Insights link at the top of the page and then clicking the Ads Manager button at the top right.
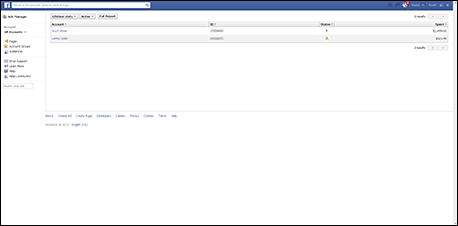
Figure 4-11: The Ads Manager page gives you an overview of your campaign's performance.
Understanding the left navigation options
Your main Ads Manager page has links in the left column that allow you to quickly move from one page to another to manage various aspects of your account:
- Campaign and Ads: If you click the Campaign & Ads link in the left sidebar, you see a page similar to Figure 4-12, with two sections: Notifications and Daily Spend. Notifications are updates on the status of ads (for example, whether they’ve been approved or whether Facebook charged your credit card on file). Daily spend is how much your ads cost you on a daily basis.
Under the Notifications and Daily Spend sections are your campaigns along with ten metrics: Your Campaign name, Status, Results, Cost, Reach, Start Date, End Date, Budget, Remaining Budget, and Total Spent.
If you’re not reaching enough of your target audience, tweak your campaign. You may need to raise your bid so that your ads appear more frequently.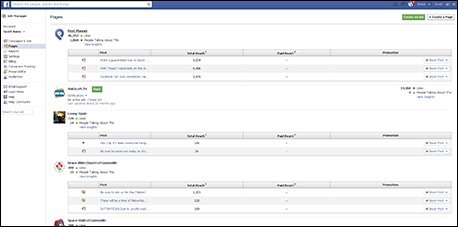
Figure 4-12: The Pages link in the left navigation allows you to see stats and promote your posts.
- Pages: Click the Pages link to see a list of business pages you own or are the administrator of. You can quickly see how your business pages are doing, and you can promote or boost a post right from here. You can see page notifications, when you last updated, total page Likes, and weekly activity.
If you click the name of a business page, you navigate to that page. If you click the gear icon in the upper-right corner and select a business page in the Use Facebook As section, you switch to using Facebook as that business page. (See Book IV, Chapter 2 for an explanation of how to use Facebook as a business page instead of as yourself.)
- Reports: You can run reports about how your ads, stories, and campaigns are performing so you can decide if they need to be tweaked or are fine as is. The reports include data such as impressions, clicks, connections, and spend. We explain more about reports in the next section.
- Settings: Click this link to see your Ad Account Settings page. On this page, you can find your account ID, close your ad account, and set your business name and address. If you’re located in the European Union, you can enter your EU VAT number here as well. This is also where you can set your permissions and e-mail notifications.
- Billing: Your Billing page provides an overview of any outstanding balances, your daily spend limit, and your account spend limit. Your daily and account spend limits are the maximum Facebook will allow you to spend — not necessarily the bid or limit you set when creating your ad or story.
Facebook won’t charge you more than the limit you set, but it lets you know what your limit is if you’d like to change your settings. For instance, if you set the daily spending limit at $25, your Facebook daily limit may be $250. Facebook knows that you set the limit at $25 and won’t allow you to spend more than that in a given day. However, you can up the limit as high as necessary up to $250.
In addition to monitoring your balance and spend limits, you can check your transactions by date and type (for example, Facebook coupons, PayPal, and credit card).
- Payment Method: This link is below Billing. This page shows you which credit cards you have on file. You can add a credit card or debit card, connect your PayPal account, or add a Facebook Ad coupon by clicking the Add New Payment Method button in the top-right corner. Follow the directions to add a credit card, add a PayPal account, or use a Facebook ad coupon.
- Conversion Tracking: Here is where you can keep track of actions that people take on your website after they view or click through your ads.
- Power Editor: This Facebook tool helps you create, edit, and manage ads, campaigns, and page posts in bulk from multiple business pages and ad accounts.
- Audiences: Manage groups of people that you want to view your ad. You can save these groups and use them for different campaigns in the future.
- Learn More: Facebook has an extensive library of help files for Facebook ads. Click the Learn More link to start finding the answers you need. Here are few additional resources you may want to check out:
- Facebook’s business section: www.facebook.com/business
- Facebook help files for advertising: www.facebook.com/help/ads-and-business-solutions
- Facebook advertising guidelines: www.facebook.com/ad_guidelines.php
Generating a Report
The data Facebook collects for your ads, stories, and campaigns can be an invaluable resource for you as you gauge whether your ads are working. To run a report, click the Full Report button below the Notifications section on the Ads Manager Campaigns page or click the Reports button in the left navigation. With either method, the Facebook Ads Reporting page appears, as shown in Figure 4-13.
This page has four buttons at the top of the page:
- Schedule: Run a weekly report and receive it through e-mail. To schedule reporting, click the Schedule button. In the Schedule Report window that appears, complete the form and then click Schedule.
- Save: Save the report in Facebook.
- Share: Create a link to the report so you can send it to others. You may shorten the link through Facebook’s link shortener.
- Export: Run a report and save it to your desktop as a .csv (comma separated value) or .xls file that you can open in Excel or Numbers.
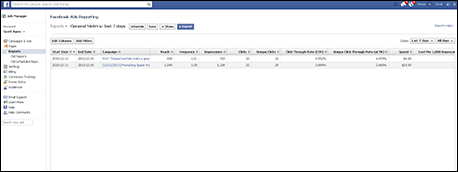
Figure 4-13: Run a report from the Facebook Ads Reporting page.
Adding or Deleting an Ads Account Administrator
It’s always a good idea to have a back-up plan. Jamie likes to have at least one other trusted person as an admin on his business page and his Facebook ads account. That way, if he’s locked out for some reason, he still has a spare key, so to speak.
When you add someone to your Facebook Ads account, the person may have access to your credit card information. It’s important to grant privileges only to someone you trust.
To add an administrator to your Facebook ads account, follow these steps:
- Navigate to www.facebook.com/ads/manage or select the Ads Manager button at the top of the Insights page.
- Select the account in the left sidebar.
- Click the Settings link in the left navigation and scroll down the page until you see Ad Account Roles, as shown in Figure 4-14.

Figure 4-14: The Ad Account Roles section on the Settings page.
- Click the +Add a User button.
The Add a New User to This Ads Account window appears.
- In the text box, type the name of the person to whom you want to grant administrative permissions.
You can type the name of a Facebook friend or an e-mail address.
- Use the drop-down list to determine the new user’s permissions.
You can grant the user access to the full account settings (General User) or only reports (Reports Only).
- Click the Submit button.
A window appears stating that the person has been added to your account.
- Click Okay.
The new administrator appears under Ad Account Roles on your Settings page.
Someday, you may need to delete an administrator. Follow these steps:
- Navigate to www.facebook.com/ads/manage or select the Ads Manager button at the top of the Insights page.
- Select the account in the left sidebar.
- Click the Settings link in the left navigation and scroll down the page until you see Ad Account Roles.
- Click the X next to the user’s permission status (for example, General User).
A window appears, asking if you want to remove this person from your account.
- Click Remove.
A window appears confirming that the person is removed from your account.
- Click Okay.
The person is removed from your account and no longer appears in your Ad Account Roles area.
Closing Your Facebook Ads Account
If you decide Facebook ads just aren’t for you, no problem. When you close your Facebook ads account, any active ads, stories, and campaigns will cease and you won’t be able to create new ones. Facebook will charge any leftover balance to your credit card on file and then delete the card from your account.
If you think you may want to return to Facebook ads later, pause your account instead of closing it. To pause your account, click the Campaign and Ads link. From there, change the status of each ad, story, and campaign to Paused.
To close your Facebook ads account, follow these steps:
- Navigate to www.facebook.com/ads/manage or select the Ads Manager button at the top of the Insights page.
- Select the account in the left sidebar.
- Click the Settings link in the left navigation pane.
- Click the Close Ads Account link at the bottom-right corner.
The Close Ads Account window appears.
- Select the reason(s) you’re closing your account (or type a reason in the text box labeled Other).
- Click the Close Ads Account button.
It may take up to two days for Facebook to completely close out your account.
Using Facebook Promotions to Market Your Business
As a business page admin, you’ll be interested in creating ways to encourage new visitors to become followers. One way to convert visitors is to offer them the chance to win something.
In this section, we explain why you may want to host a Facebook promotion and how to interpret the Facebook promotions guidelines (fb.com/promotions_guidelines.php) so you don’t run the risk of losing your business page and its community. We also explain the concept of Like-gating content and help you find some great tools to administer your promotions.
Running a Facebook promotion is an excellent way to promote your business page, bring attention to a specific product or service (especially a new launch), and possibly garner more Likes for your page. First, some Facebook definitions:
- A promotion is either a contest or a giveaway.
- A contest is a promotion in which users are asked to submit something that will be voted on, either by the public, the business page owner, or a panel of judges. The winner of a contest is whoever receives the most votes.
- A giveaway (also called sweepstakes) is a promotion of chance. Users are asked to complete an entry form, and a winner is chosen at random.
It’s okay to use the words giveaway and sweepstakes interchangeably, but you wouldn’t use giveaway and contest interchangeably because they are different beasts.
Giveaways and contests are fun and easy ways to drive traffic to your business page. They aren’t expensive to run (depending on what you’re giving away), and your fans love to win something! The benefits for you as a company could include
- Bringing more people to your business page
- Increasing your business page Likes by Like-gating the entry form (as discussed later in the chapter)
- Increasing your e-mail list by collecting e-mail addresses on the entry form (which are needed to contact the winner)
- Recording important demographic information or product feedback by incorporating a short survey as part of the entry form
- Inspiring followers and customers to share their own experiences related to your brand via a story, a photo, or a video contest
You must be clear about what information you’re gathering and how you’ll use the information. For example, if you’re collecting e-mail addresses, let followers know if you’re going to automatically subscribe them to your newsletter — and give them an opt-out option.
Getting the word out
When you create your Facebook promotion, remember that you need to get the word out. It stands to reason that you’ll tell your Facebook followers about your promotion, but you may be interested in reaching beyond your current followers. To reach a wider audience, you need to integrate your Facebook promotions with all your other outlets: Twitter, a blog or website, an e-mail newsletter, and even offline in your store.
People won’t know about the promotion unless you tell them. Write status updates on Facebook and Twitter that include a link directly to your Facebook promotion entry form, publish a blog post explaining the promotion and its purpose (and the prize, of course). Take advantage of your e-newsletter list and send out an alert that you’re having a promotion on Facebook, and then suggest that people forward your newsletter to their friends so they can enter as well. If you have a bricks-and-mortar venue, ask employees to remind your customers to find your Facebook page online and enter to win.
Using a strong call to action
When you’re hosting a Facebook promotion, you’ll probably be posting status updates telling people about it. Unfortunately, many people do this task half-heartedly, so they don’t see a great response. A strong call to action is important in all your marketing efforts — and most important on Facebook. Facebook visitors move fast. They skim their news feeds for video, pictures, and links. In other words, they’re looking for action. Consider this sample status update:
One day left to enter our giveaway! Win a full pass to our conference!
The previous status update looks interesting, but it has a weak call to action and doesn’t offer a way to complete the action. Instead, try a status update like this one:
Enter to win a full pass to the International Marketing Conference! Just complete the entry form at http://bitly./link! Good luck!
Note that this status update tells you exactly what you can win (a pass to the International Marketing Conference), has a clear call to action (complete the entry form), and tells you how to complete the task (with a link to the form).
When you include a link in your status update, don’t send your followers to your business page! If you do, they may not know how to find the entry form, and even if they can find the entry form, it’s an extra step. Every navigation tab on your business page has its own URL. Send followers directly to the entry form tab. This method is more efficient and will give you a higher rate of completion. To find the URL for any custom tab on your business page, follow these instructions:
- Use your browser to navigate to your business page.
Below your cover photo, you see your apps.
- Click the app to which you want to send followers (in this case, the app for your giveaway).
If you can’t see the app you want to use, click More next to the fourth application box to reveal the rest of your apps.
- Copy the new URL from your browser’s address bar.
- Click the (Your Page Name) link next to your profile picture at the top left of the page to return to your business page.
- Paste the URL in your status update box, and then type a status update with a strong call to action.
- Click the Share button to share your update with your followers.
If you want to track how many people click the link in your status update, use a link-shortening and -tracking tool such as bitly. Visit http://bitly.com and create an account, and then return to your Facebook business page and follow these instructions:
- Copy the URL of the destination tab.
To find the URL, see Step 3 in the preceding set of instructions.
- Navigate your browser to http://bitly.com and log in.
- Paste the URL in the text box.
- Click the Shorten button.
- Copy the resulting shortened link.
- Return to your business page and copy the bitly link into your new status update.
When you want to see how many people have clicked your link, return to bitly and check your dashboard. You may be surprised how many times followers clicked your link!
You can see how many people have clicked your links also via your business page Insights.
Understanding the promotions guidelines
Many businesses and bloggers running Facebook promotions don’t realize that Facebook has guidelines regarding how you can (and can’t) administer a promotion on Facebook. As a result, many businesses run the risk of losing their business pages because they run improper giveaways or contests. You can find the guidelines at http://facebook.com/promotions_guidelines.php.
The Facebook promotions guidelines are pretty self-explanatory. Be sure to follow them and you shouldn't have any problems.
Before you create a Facebook promotion, it’s important to understand the federal and state laws that govern sweepstakes, contests, and lotteries. It’s a good idea to talk to a lawyer before you start your promotion (and that goes for promotions on your website, blog, Facebook, or anywhere else you’re holding one) to ensure that you’re in compliance with the law. “Everyone else was doing it” won’t help you should someone bring a lawsuit against you.
Because you can’t install third-party apps on your personal timeline, you won’t be able to run a giveaway or contest on your personal timeline.
One of the applications we discuss later in this chapter is ShortStack. If you use ShortStack to create your promotion, it provides some nice verbiage you can include in your giveaway that adheres to the Facebook rules. The text is placed clearly on the promotion and ensures that you’re adhering to promotion guidelines. Figure 4-15 shows how your giveaway may look using ShortStack’s verbiage.

Figure 4-15: Be sure to include a notice releasing Facebook of liability related to your promotion.
ShortStack also enables you to create content that only followers can see. Figure 4-16 shows a promotion that has been Like-gated. Note that the gate page asks the user to Like the page to reveal the entry form. Figure 4-17 shows what users see after they click Like and reveal the entry form. From here, they can enter the promotion and hope for a win!

Figure 4-16: A Like-gated promotion page.
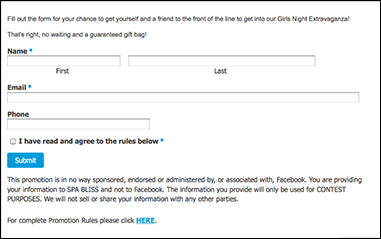
Figure 4-17: The entry form is revealed after the user clicks the Like button.
Using Apps to Create Customized Giveaways and Contests
The biggest complaint we hear about the Facebook promotions guidelines is “But it’s just so easy to do it on the business page. I don’t want the hassle of setting up an application! That sucks the fun out of it.”
We suspect what these complaints mean is that the page admins think setting up a promotion via a Facebook application will be hard and they’d rather just post a status update because that’s easy and they already know how to do it. We have good news for you: The companies who create Facebook promotions applications understand the need for an easy way to set up promotions. In the following sections, we list a few of the most popular apps so you have a starting place.
With most of these tools, you can be up and running with a promotion in less than 15 minutes. It’s true that setting up a promotion via an app is still not as fast as creating a simple status update, but this way, you don’t risk losing your business page!
ShortStack
ShortStack (http://shortstack.com) offers Facebook applications that allow you to create custom tabs for your business page. The one that concerns you in this chapter is the app that allows you to create a Facebook promotion (including Like-gating if you want; note that ShortStack calls it “fan only” content). You could also create a printable coupon or a contact form. Or you could share images and video from an external site or pull in PDF documents using www.scribd.com and a ShortStack app. ShortStack has five plans, ranging from free up to $300 a month, depending on the features you choose.
A few things to know about ShortStack:
- You can use ShortStack for free if your Business Page has fewer than 2,000 Likes.
- You can Like-gate content on a custom tab with the click of a button.
- You can schedule your promotion to auto-publish in the future, and ShortStack takes care of everything.
- You can include custom CSS or templates featuring your logo or design in ShortStack widgets to reinforce your brand.
- You can manage multiple client sites with a single account.
Wildfire
Wildfire (http://wildfireapp.com) has a robust cache of applications to help you create a contest or giveaway as well as to customize your business page. Wildfire is social marketing software for enterprise companies.
A few things to know about Wildfire:
- You can publish your campaign to multiple outlets at the same time.
- You can run several types of promotions, including sweepstakes; coupons; user-generated photo, essay, and video contests; and quizzes.
- Use the dashboard to publish campaigns and view analytics, leads, and results.
Strutta
Strutta (www.strutta.com) enables you to create promotions that can stand alone or live on Facebook. It’s a premium tool, and pricing starts at $399 for sweepstakes and $999 for contests. If you want to customize your promotion, you need to upgrade to the Pro version. The interface is very user friendly, which makes creating your promotion a breeze.
A few things to know about Strutta:
- You can optimize your promotion for mobile devices.
- You can use Strutta's analytics or your Google Analytics tracking code to track your promotion’s success.
- You can use Strutta’s promotions tools outside Facebook. Embed your contest or giveaway on your blog or website.
- The basic templates are clean and attractive.
Creating Best Practices for Your Facebook Promotion
Following Facebook's promotions guidelines is the first step to hosting your contest or giveaway. Beyond adhering to Facebook’s rules, though, you need to make sure your promotion is fulfilling your own goals. Do you want to increase your e-mail list? Do you want to draw attention to a specific product or service? Are you interested in expanding your base of followers? Do you want your Facebook community to participate more? Whatever your goals are, be sure you know how you’re going to reach them. To that end, it makes sense to create your own set of best practices. In this section we offer some ideas to get you started.
Know the goals of your promotion
How can you determine whether a promotion is a success if you don’t know what you want to achieve? Write down measureable goals (for example, “Our business page will garner 150 new Likes” is better than “increase the number of Likes”), and then decide two things:
- What do you need to offer your audience (the prize) to entice them to share information (via the entry form)?
- What information do you need to collect from your entrants to meet your goals?
The more valuable the prize, the more participants are willing to share their information. If you’re offering a $25 gift card, don’t expect your entrants to complete a lengthy survey. If you’re offering a vacation, though, people are more willing to answer some questions for you or jump through some hoops.
Keep hoops to a minimum
Our experience with running promotions is that people want free stuff, and they don’t want to put a lot of work into entering a promotion. On the other hand, as the business owner, you have certain goals you’re trying to reach. The key to balancing both is keeping the barrier to entry commiserate with what you’re offering for a prize. If you’re offering something small as a prize, your followers are less likely to do more than Like your business page. However, if you’re offering an iPad or a trip as a prize, your followers will be more forgiving of the hoops you make them jump through for entry.
In general, the barrier to entry as it relates to likelihood of entry is as follows:
- Completing an entry form is the easiest form of entry and will probably result in the most entries and traffic. People are most interested in promotions in which they don’t have to exert a lot of effort but have a reasonable expectation of payoff.
- Liking a business page to access an entry form (that is, like-gating your entry form) is the next highest barrier to entry and may or may not decrease the traffic to your promotion. However, be aware that you may see a drop in Likes after the promotion ends because those who didn’t win may Unlike your business page.
- User-generated content is the highest barrier to entry. Although you may have fewer entries in this type of promotion, those entering are usually brand enthusiasts or serious about sharing their own information to enhance their visibility to your audience. Examples of user-generated content for a promotion could be inviting entrants to share original recipes or a story about your product, or submitting photos or video based on specific criteria.
Provide the what, why, and how
Tell entrants what information you require, why you require it, and how you’ll use it in the future. If you need both an e-mail address and a street address, tell your entrants why. Are you going to add those addresses to your database and send them periodic notifications via e-mail and snail-mail? Or will you add their e-mail address to your newsletter or e-mail list, but only use their street address for shipping purposes and then delete it from your database?
Your audience needs to know these details when deciding whether to participate in your giveaway. The way you plan to keep and use their information may determine whether they choose to enter the giveaway.
Go beyond your current followers
If you’re running a Facebook promotion on your business page, it stands to reason you’ll tell your followers about it. But if the purpose of your promotion is to spread the word about a specific product or service, to create buzz around an idea, or even to increase your page Likes, you need to garner attention beyond your existing fan base. You can do that by
- Using a Facebook ad with your Facebook promotion. You can target Facebook ads to specific audiences based on interests, location, or even friends. Be sure to create your Facebook ad with a strong call to action and include a direct link to your Facebook promotion.
- Promoting your contest or giveaway on other social channels. Facebook shouldn’t be your only social media outlet. More likely than not, Facebook is just one of the ways you’re creating community. Use your Twitter, website, and blog outlets as well as QR codes or signs in your bricks-and-mortar store to spread the word.
Using Facebook Offers to Reach New Customers
You can post an offer on your business page for your targeted audience. When people claim your offer, they receive an e-mail message that they can bring to your store or business to redeem.
Your business page must have 50 or more Likes to create an offer.
To create an offer, follow these steps:
- In your business page's status update box, click the Offer, Event+ link, as shown in Figure 4-18, and then select Offer.
A pop-up box appears.
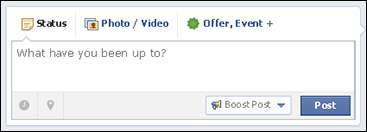
Figure 4-18: Creating a Facebook offer.
- Provide the following information about your offer: a headline, an image, an expiration date, the audience, the budget, and the reach.
- Click the Create Offer button.
Remember to follow Facebook’s guidelines concerning offers. For details, go to www.facebook.com/page_guidelines.php.