
THE OFFICE JAVASCRIPT OBJECT MODEL
The Office JavaScript Object Model provides the ability for your web application and the Office host application to interact, and that’s where the creativity and innovation of your web-based solution can intersect with the creativity and innovation of the Office user.
You can think of Apps for Office in two ways: those that will interact with documents (document based) and those that will interact with mail items (mailbox based). At the time of this writing, document-based apps include Word, Excel, PowerPoint, and Project. The xsi:type TaskPaneApp and ContentApp are document-based apps for Office. The mailbox-based app, xsi:type MailApp, is, of course, associated with the Outlook rich client and companion Outlook Web App (OWA). Therefore, although the Office JSOM is a unified object model, due to the differences between the sheer nature of a document and a mailbox item, you will use different parts of the Office API depending on which Office applications your app for Office will target.
Fortunately, you do not need to build the manifest file and all the constituent parts in a raw text editor for an app for Office as you did in the previous Try It Out, but you instead have the power of Visual Studio to make this job much less tedious. With the Apps for Office tools installed in Visual Studio, the File ⇒ New Project process is a guided experience that automatically generates an appropriate manifest file for a TaskPaneApp, ContentApp, or MailApp. You then have an immediate F5, debug runtime experience. Of course, you can go on to fine-tune and customize the manifest and build out your app, but Visual Studio provides for you a solid starting point.
Document-based Apps
The Office JSOM provides many capabilities for document-based apps for Office. With Office JSOM, your web application can programmatically interact with a selection the user has made, read or write to your document, react to events as the user enters a specific location or changes data in the document, save one or more settings in the document so that they are persisted for the next time the document is opened, and much more. However, the thing to keep in mind, especially for those who have written VBA or built add-ins in the past, is that the Office JSOM is not for automation of the Office client itself, but for enabling programmatic interaction between the document and your task pane or content app. Everything you do using the Office JSOM is focused around the user and the document, and should enable that experience to be a productivity gain for the user.
The Microsoft.Office.WebExtension namespace contains the JavaScript objects needed to programmatically interact with the Office client applications that support Apps for Office. In code, this namespace is referred to by the alias Office. The Visual Studio app for Office project template includes the Office.js library in the Scripts/Lib folder for the Web project. Figure 11-2 shows the core objects in the API.

The main objects you will use for document-based apps are Office, .context, and .document. When your App for Office is specific to Microsoft Outlook, then you will use the .mailbox object to access the APIs specific to programming against the mail client — but this object is covered in further detail later. If you are creating Apps for Office specifically for Microsoft Project, you will use the .project part of the Office API.
To keep this discussion straightforward, for Microsoft Word and Excel, the document object provides the functional capabilities needed for document interaction. With this you can read and write an active selection, bind to named locations in the document, and react to events at the document or bound-location level. Almost all methods in the Office JSOM are asynchronous to not tie up the UI as your method call executes. A typical line of code used to retrieve the data the user has selected in the document looks like this:
Office.context.document.getSelectedDataAsync(...)
Although not a lot of methods are in the API, they provide the fundamental building blocks for you to build your solution — it’s up to your imagination on how you stitch them together to meet a business need. Let’s now explore what Visual Studio provides for Apps for Office and explore the API.
    <button onclick="writeToDoc()"> Write to Document </button><br/>
    <button onclick="readFromSelection()"> Read from Document Selection
    </button><br/>
    <button onclick="bindToData()"> Bind to User-selected Data </button><br/>
    <button onclick="readFromBoundData()"> Read from Bound Data </button><br/>
    <button onclick="addAnEvent()"> Add an Event </button><br/>
    <span>Show: </span><div id="show"></div>
Office.initialize = function (reason) {
    $(document).ready(function () {
        showResult('Document Ready'),
    });
};

function writeToDoc() {
    Office.context.document.setSelectedDataAsync([["apples"],
["pears"], ["oranges"], ["cherries"]], function (asyncResult) {
        if (asyncResult.status === "failed") {
            showResult('Error: ' + asyncResult.error.message);
        }
    });
}

function readFromSelection() {
    Office.context.document.getSelectedDataAsync("matrix",
function (asyncResult) {
        if (asyncResult.status === "failed") {
            showResult('Error: ' + asyncResult.error.message);
        }
        else {
            showResult('Read from Selection: ' + asyncResult.value);
        }
    });
}

function bindToData() {
    Office.context.document.bindings.addFromSelectionAsync("matrix",
{ id: 'fruitBinding' },
        function (asyncResult) {
            if (asyncResult.status === "failed") {
                showResult('Error: ' + asyncResult.error.message);
            } else {
                showResult('A binding type of ' + asyncResult.value.type
                    + ' was added with an id of ' +
                    asyncResult.value.id);
            }
        });
}

function readFromBoundData() {
    Office.select("bindings#fruitBinding").getDataAsync({
coercionType: "matrix" },
        function (asyncResult) {
            if (asyncResult.status === "failed") {
                showResult('Error: ' + asyncResult.error.message);
            } else {
                showResult('Value of bound selection: ' + asyncResult.value);
            }
        });
}

function addAnEvent() {
    Office.select("bindings#fruitBinding").addHandlerAsync(
"bindingDataChanged", fruitHandler, function (asyncResult) {
        if (asyncResult.status === "failed") {
            showResult('Error: ' + asyncResult.error.message);
        } else {
            showResult('New event handler added for binding.'),
        }
    });
}
function fruitHandler(eventArgs) {
    eventArgs.binding.getDataAsync({ coerciontype: "matrix" },
function (asyncResult) {

        if (asyncResult.status === "failed") {
            showResult('Error: ' + asyncResult.error.message);
        } else {
            showResult('Show bound data change: ' + asyncResult.value);
        }
    });
}

function showResult(text) {
    document.getElementById('show').innerText = text;
}
Functional Capabilities by Office Client
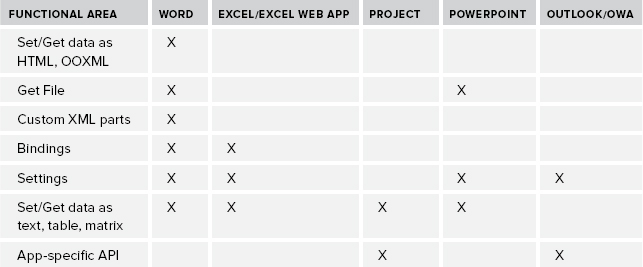
A number of other functional capabilities are available in the API but these are so numerous that they will need to be left to your own discovery. http://dev.office.com has the full documentation for the Apps for Office JSOM. Table 11-2 identifies some of the more popular additional functional capabilities and shows how they map to the Office client applications.
TABLE 11-2: Functional Areas vs. App Support Summary
Mailbox-based Apps
Certainly as widely used by business professionals as Excel is for number crunching and Word is for authoring documents, a vast number of people exist whose days are built around communicating, scheduling, managing contacts, and ordering their day’s tasks with Outlook. Therefore, historically, Outlook has been one of the most targeted Office clients for third-party add-ins. Outlook tends to be a hub application in the business person’s day and a primary point of reference. Plus, if for some reason during the day a person doesn’t have access to his or her desktop, a web companion called Outlook Web Access is available as long as he or she has access to a browser and an Internet connection. This tight bond between business people and their Outlook is what makes it such a key new opportunity for landing your app for Office.
The MailApp for Office differs from the TaskPaneApp and the ContentApp in a couple of ways. First, it is not associated with a document, and second, it does not render in a task pane in Outlook nor on the surface of a mail item like the ContentApp does in a workbook. Rather, MailApps are activated in the Outlook, OWA, or Outlook mobile UI based upon activation rules defined in your app for Office manifest file. This declarative set of rules evaluates contextual content within an e-mail message or appointment item when it is opened. If the contextual content within the item matches one or more of the activation rules then the MailApp will be automatically activated and show in the UI. This differs from the document-based apps for Office that must be manually selected and inserted via the ribbon by the user. Lastly, another significant difference is that the manifest file is deployed to an Exchange server, App Catalog, rather than to SharePoint or a network share. Microsoft has pre-installed at least four mailbox-based apps to the Office 365 Exchange App Catalog for each tenancy. These Apps for Office — Action Items, Bing Maps, Suggested Meetings, and Unsubscribe — are found in the Exchange admin center under Organization ⇒ Apps. Although the Office 365 Exchange administrator can globally disable these apps for their tenancy, they cannot be uninstalled. However, given that they are available to users, they will automatically activate for a user when the activation rules are met within a mail item.
For a mailbox-based app, the activation rules act on contextual information within the mail item and provide the unique opportunity to build genuine productivity solutions for those who live in their Outlook. You can use several built-in, well-known entity types to activate a MailApp. These include URL, contact, task suggestion, meeting suggestion, phone number, address, and e-mail address. In your app manifest, using the Rule element, you would include the evaluation of one or more of these in the form of <Rule xsi:type="ItemHasKnownEntity" EntityType="Contact" />, for instance. You can further scope the activation rule by adding an additional attribute of RegExFilter where the rule will only activate if, say, the RegExFilter="ID". With this rule the intent is that you are only interested in identifying contacts from the state of Idaho. Hence, your MailApp would activate only when contact information contains an uppercase ID value. Although the well-known entity types will save you a ton of code writing, you will sometimes, of course, want a fully customized rule. Suppose you want to provide a convenient way for an Outlook user to interact with a back-end Line of Business (LoB) application or your Software as a Service (SaaS) application when the system sends an autogenerated e-mail to a stakeholder. In these situations you build your own rule using the ItemHasRegularExpressionMatch type. With this type you provide your own RegExValue to pattern match against the contextual information in the item body (whether HTML or plain text), subject, or sender’s SMTP address. This fully customized rule, as with any other rule, can then stand alone or be combined with other rules in a rule collection. You can combine the RuleCollection type using a Mode of And or Or with other rule collections to create complex rules. This flexibility in rule and rule collection construction provides you the ability to control precisely what needs to be in the mail or appointment item for your MailApp to activate. When a rule is not met, the MailApp will not show in the UI.
From an app model perspective, you still have a manifest file and you write your mailbox-based app using your favorite web technologies and host the app on any server you like. From a JSOM perspective you still use the Office JSOM but you use the Office.context.mailbox object. From the mailbox object you can get information relating to the specific message or appointment item and access a limited set of profile information about the user. For more advanced scenarios you can call back into Exchange using Exchange Web Services (EWS) where you can create new e-mail messages and appointments to provide a more deeply integrated mailbox-based app for Office. For now, in the following Try It Out, you can explore well-known entities, rules and rule collections, and regular expressions for customized pattern matching.
<body>
    <div id="Content">
        <h4>Display some of what's available to developers:</h4>
        User Profile name: <span id="displayName"></span>
        <br />
        User Profile time zone: <span id="timeZone"></span>
        <br />
        Email item Subject: <span id="subject"></span>
        <br />
        Email item From: <span id="from"></span>
        <br />
        Email item To: <span id="to"></span>
       <table>
           <tr><td>Urls</td><td id="urls" /></tr>
           <tr><td>Contact Names and Addresses</td><td id="contactNames" /></tr>
           <tr><td>Invoices</td><td id="regexInvoices" /></tr>
       </table>
    </div>
</body>
  <Rule xsi:type="RuleCollection" Mode="And">
    <Rule xsi:type="RuleCollection" Mode="Or">
      <Rule xsi:type="ItemIs" ItemType="Message" />
      <Rule xsi:type="ItemIs" ItemType="Appointment" />
    </Rule>
    <Rule xsi:type="RuleCollection" Mode="Or">
      <Rule xsi:type="ItemHasKnownEntity" EntityType="Contact"
RegExFilter="ID" FilterName="state" IgnoreCase="false" />
      <Rule xsi:type="ItemHasKnownEntity" EntityType="Url" />
      <Rule xsi:type="ItemHasRegularExpressionMatch"
      PropertyName="BodyAsHTML" IgnoreCase="true"
      RegExName="Invoices"
      RegExValue="INVOICE#s*([0-9][0-9][0-9][0-9][0-9][0-9])+"/>
    </Rule>
  </Rule>
Office.initialize = function () {
    $(document).ready(function () {
        var userProfile = Office.context.mailbox.userProfile;
        $('#displayName').text(userProfile.displayName);
        $('#timeZone').text(userProfile.timeZone);

        var item = Office.context.mailbox.item;
        $('#subject').text(item.normalizedSubject);
        $('#from').text(item.from.displayName);
        $('#to').text(item.to[0].displayName);

        //Get all the well-known entities to show this pattern and use for URLs.
        var myEntities = item.getEntities();

        // Build an array of Urls using the Urls entity.
        var myUrls = myEntities.urls;
        // Loop over the myUrls array.
        var myString = "";
        for (i = 0; i < myUrls.length; i++) {
            myString += "<a href='" + myUrls[i] + "'>" + myUrls[i]
+ "</a>" + " <br />";
        }
        // Write the Contacts found to the web page
        $('#urls').html(myString);

        // Build an array of Contacts by directly accessing the filtered entity
        // by name.
        var myContacts = item.getFilteredEntitiesByName("state")
        // Loop over the myContacts array.
        myString = "";
        for (i = 0; i < myContacts.length; i++) {
            myString +=
                   myContacts[i].personName + ", " + myContacts[i].addresses
+ " <br />";
        }
        // Write the Contacts found to the web page
        $('#contactNames').html(myString);

        // Handle invoices from RegEx matches
        var myInvoices = item.getRegExMatches();
        //Loop over the myInvoices collection.
        myString = "";
        for (var i in myInvoices.Invoices) {
            myString += myInvoices.Invoices[i] + ", ";
        }
        // Write the invoices found to the web page
        $('#regexInvoices').text(myString);

    });
};
<Rule xsi:type="RuleCollection" Mode="And"> (this is the overarching AND)
 <Rule xsi:type="RuleCollection" Mode="Or"> (the OR for Message/Appointment)
...
 </Rule>
 <Rule xsi:type="RuleCollection" Mode="Or"> (the OR for well-known Entities/RegEx)
...
 </Rule>
</Rule>
This Try It Out is not at all exhaustive of the many different ways you can interact with mail and appointment items in a MailApp, but hopefully it pulls together enough of the concepts and code to get you rolling. Mailbox-based apps can provide a convenient vector for engaging a user for interaction with your back-end systems. These can be great companion apps for your SaaS or LoB systems because they render everywhere, whether within Outlook on the rich client, OWA, or Outlook mobile.
App Security
When delivering any technology solution you must give special attention to the types of security measures that have been taken to keep the user’s computer safe from malicious attacks. As a developer, you need to have a good sense for what the security framework is and the freedom and constraints with which you have to work.
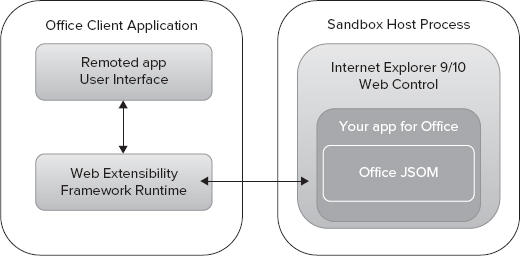
Figure 11-3 shows the security framework for Apps for Office. Your App for Office actually runs in an Internet Explorer 9 or 10 Web Control out of process from the Office client app itself, in a sandbox host process. This provides a security boundary between your app and the client application and also isolates your app if it should have performance issues. The Office client application hosts the Web Extensibility Framework Runtime, which is the broker that manages communication and monitoring between the two processes, translates the JavaScript calls to native ones, and remotely renders your App for Office in the client application’s UI as a TaskPaneApp, ContentApp, or MailApp.
This security framework cannot be altered. However, as the developer, you can declaratively request what level of security permissions your app for Office needs to carry out its business within the manifest file via the <Permissions> element. You should be familiar enough with the API to set the requested level of permission based on your API use. To use a part of the API that requires more permissions than you’ve requested in the manifest will result in the Office client blocking the use of that specific part of the API at runtime. This, of course, results in an error being thrown and most likely a frustrated user.
For document-based apps you can request the permission levels shown in Table 11-3. The table intentionally represents gradations from least-privileged permission to most-privileged permission as you move down the table, where Restricted has the least permission on the document and ReadWriteDocument has the most.
TABLE 11-3: Document-based Permissions
∗ Source: Office manifest’s schema reference for apps on MSDN
| PERMISSION | DESCRIPTION |
| Restricted | Permission that applies to all TaskPaneApps, enables activation, and allows use of the Settings object |
| ReadDocument | Includes the Restricted permission, and also enables the TaskPaneApp to use the API to read the document, manage bindings, and subscribe to events |
| ReadAllDocument | Includes the Restricted and ReadDocument permissions, and also enables the TaskPaneApp to use the API to obtain a binary copy of the document |
| WriteDocument | Includes the Restricted permission, and also enables the TaskPaneApp to use the setSelectedDataAsync API to write to the document |
| ReadWriteDocument | Includes the ReadAllDocument and WriteDocument permissions, and also enables the TaskPaneApp to use all write APIs |
Table 11-4 shows the MailApp permissions. Note that if your MailApp requires the ReadWriteMailbox permission, then an Exchange administrator must install the app. Apps that require this permission level cannot be installed by the user.
TABLE 11-4: Mailbox-based Permissions
| PERMISSION | DESCRIPTION |
| Restricted | Permission that applies to all MailApps, enables the ItemIs and ItemHasKnownEntity activation rules, enables use of the RoamingSettings object, and is a subset of the app JavaScript Object Model |
| ReadItem | Applies to the selected item, includes the Restricted permission, and enables the MailApp to use all the well-known entities and regular expression activation rules to read all properties and to write custom properties |
| ReadWriteMailbox | Includes all the ReadItem permission and also enables the MailApp to use the makeEWSRequestAsync method to read and write all properties of any item in the user’s mailbox |