
DEVELOPING WINDOWS AZURE APPLICATIONS
Windows Azure is not just about services. It is an ever-evolving cloud platform that has a set of tools and SDKs that enable you to get started quickly developing cloud applications.
Getting started with Windows Azure requires the following:
- Visual Studio (2010 or 2012)
- Windows Azure SDK and Tools for Visual Studio
- Windows Azure subscription
You can also integrate different SDKs and tools with Visual Studio 2010 or Visual Studio 2012. The Windows Azure tools and SDK are free downloads. After you download the tools and SDK, you must set up a Windows Azure account. You can sign up for a free 90-day account to get started.
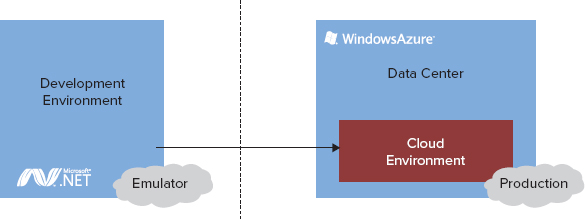
After you download the Windows Azure tools and SDK and create a Windows Azure account, you can use Visual Studio to build and deploy applications to your account. When you’re ready you will be able to test, stage, and ultimately deploy your applications to a production environment. While you’re developing (and especially while you’re developing offline), you can use the emulator — an emulated Windows Azure environment that is installed with the tools — to test your applications locally.
Figure 5-5 illustrates at a high level the process of developing cloud applications. In the diagram, you can see the left side represents a local development environment. Installed in this environment are the tools, SDK, and emulator as well as the .NET and Visual Studio development toolset. (Windows Azure also supports PHP, Java, Node.js, and other types of non-Microsoft technologies through SDKs and community tooling.) You can build and test your applications locally, but at some point you’ll need to deploy these apps to your production account, and which account you choose depends on what licensing structure your company has purchased (for example, basic subscription or pay-per-use account versus enterprise license account). In any case, you deploy into an account using a LiveID (or Microsoft account ID) username and password information. The Windows Azure account has a unique subscription ID and allows you to add co-admins so others can manage the services that are deployed to it. Note in the right side of Figure 5-5 how the cloud environment is hosted in a physical data center (as shown earlier in the chapter); thus your application, service, or data becomes available to others when you deploy into this production environment. You can lock down the applications (using Windows Azure Active Directory technology) and have an authenticated, single sign-on experience, or you can have a fully anonymous-access site or service that is leveraged by your application.
A number of elements must be in place to get started developing, so the following exercise walks you through where you can find the software to set up your development environment.
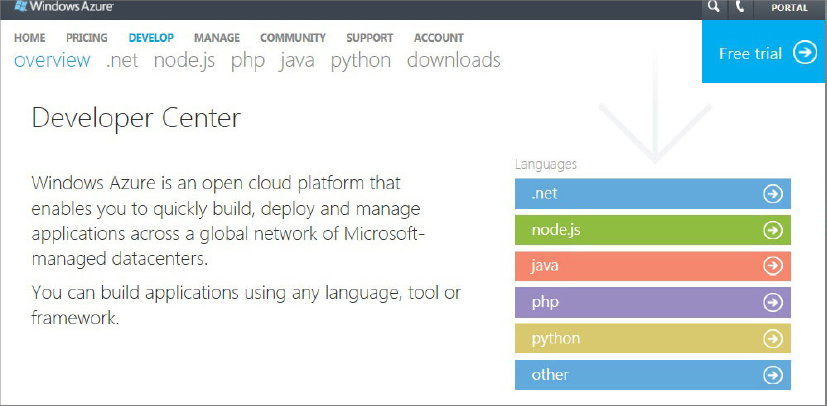

After you’ve installed Visual Studio and the Windows Azure tools/SDK for Visual Studio, you need to sign up for a Windows Azure account. To do this, click the Home link on the main Windows Azure site, click the Free Trial button, and then click the Try it Free∗ button (see Figure 5-8). You’ll be prompted for your LiveID and a wizard will walk you through a sign-up process. After you sign up, you’ll then be able to navigate to your portal and begin creating cloud services, websites, and so on.

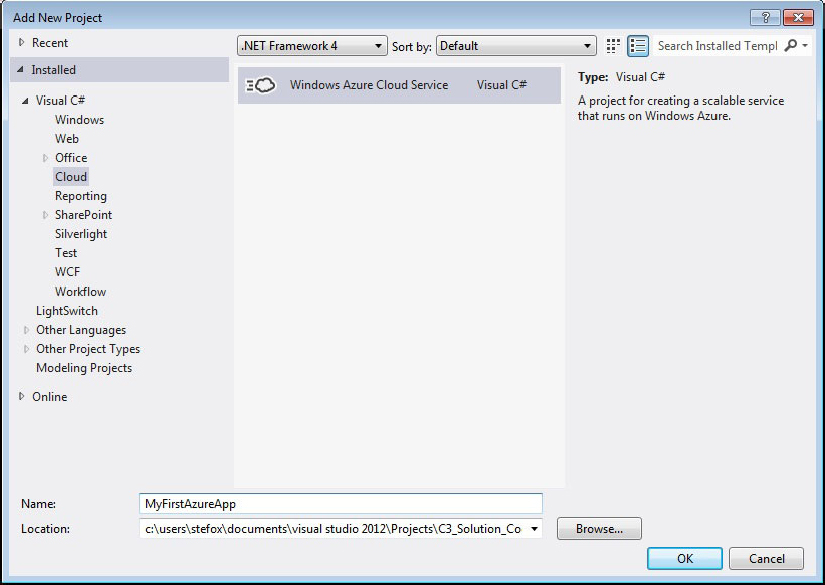
Now that you have your development environment up and running and a Windows Azure account ready to go, you’ll want to get hands on with developing for Windows Azure. To do this, the following Try It Out walks you through creating your first Windows Azure application. The application is a simple REST-based Web API project that will return some hard-coded sales data.


The next series of steps in the process of creating an application with Windows Azure entails creating a simple model to represent data. The following exercise walks you through this process.
using System;
using System.Collections.Generic;
using System.Linq;
using System.Web;

namespace MyFirstAzureWebAPI.Models
{
    public class Sales
    {
        public string Company { get; set; }
        public string FY09Sales { get; set; }
        public string FY10Sales { get; set; }
        public string FY11Sales { get; set; }
    }
}
using System;
using System.Collections.Generic;
using System.Linq;
using System.Net;
using System.Net.Http;
using System.Web.Http;
using MyFirstAzureWebAPI.Models;

namespace MyFirstAzureWebAPI.Controllers
{
    public class ValuesController : ApiController
    {
        // GET api/values
        public List<Sales> Get()
        {
            List<Sales> mySales = new List<Sales>();

              mySales.Add(new Sales
              {
                    Company="Contoso",
                    FY09Sales="$9,020,398,122,332.00",
                    FY10Sales="$10,111,309,312,998.00",
                    FY11Sales="$11,033,990,102,443.00"
              });

              mySales.Add(new Sales
              {
                    Company="Fabrikam",
                    FY09Sales="$7,332,444,552,112.00",
                    FY10Sales="$5,019,132,011,668.00",
                    FY11Sales="$3,889,940,589,901.00"
              });

              mySales.Add(new Sales
              {
                  Company = "Wingtip",
                  FY09Sales = "$9,032,522,000,129.00",
                  FY10Sales = "$9,115,339,990,899.00",
                  FY11Sales = "$9,001,439,321,666.00"
              });

              return mySales;

        }
...

    }
}

[
{
"Company":"Contoso",
"FY09Sales":"$9,020,398,122,332.00",
"FY10Sales":"$10,111,309,312,998.00",
"FY11Sales":"$11,033,990,102,443.00"
},
{
"Company":"Fabrikam",
"FY09Sales":"$7,332,444,552,112.00",
"FY10Sales":"$5,019,132,011,668.00",
"FY11Sales":"$3,889,940,589,901.00"
},
{
"Company":"Wingtip",
"FY09Sales":"$9,032,522,000,129.00",
"FY10Sales":"$9,115,339,990,899.00",
"FY11Sales":"$9,001,439,321,666.00"
}
]
Congratulations! You’ve created your first Windows Azure application; that is, a REST-based Web API that returns JSON data. When you deploy it to a production environment, you can use the REST service from a multitude of clients and process the JSON data within your applications — whether it is SharePoint, Windows Phone, Windows 8, or other device/tablet applications.
Even before you deploy your first application to your Windows Azure account, you can use this REST service locally within the cloud emulator environment with other applications. Although you won’t deploy this application to Windows Azure now (you’ll have the opportunity to deploy many different applications to Windows Azure throughout the book), you can right-click the cloud project (MyFirstAzureApp) and select Publish. This invokes the Publish Windows Azure Application dialog, which enables you to walk through a wizard and deploy your application directly to your Windows Azure subscription — which you can then manage within the Windows Azure portal. See Figure 5-13 for the Start page of the Publish Windows Azure Application wizard.

At this point, you should at least have a basic understanding of what Windows Azure is, how to set up the Windows Azure development environment, and the types of applications that you can build using Windows Azure. You might now be asking yourself, “Why all the Windows Azure hubbub?” When paired with SharePoint 2013, Windows Azure becomes important in two ways:
- It is natively integrated within the SharePoint application development and deployment experience — you use Windows Azure to build and deploy cloud-hosted applications.
- You can also use Windows Azure in the broader cloud application development experience — just like you could use an array of other Web technologies and standards.
The next section of this chapter covers how SharePoint and Windows Azure integrate both in general and through the two main app models: the Autohosted model and the Provider-hosted model, covered in Chapter 2, “Overview of the SharePoint 2013 App Model.”