APPLICATION INTEGRATION OPTIONS IN SHAREPOINT 2013
The new application model in SharePoint 2013 offers a number of options for your application to deeply integrate with SharePoint, other systems, and data. These options fall into the following categories:
- User interface integration
- Events and logic integration
- Data integration
When you think about building a solution, you must evaluate your options for how you want to surface your application inside SharePoint (UI), how you want to call code and process actions when a user uses your application (events and logic), and how and where you store and work with your application’s data and data that resides in other systems (data). Understanding what options are available and how they work is critical when designing your application.
The following sections cover some of the most common options you have for each of the layers (UI, events, and data) in the new SharePoint application model.
User Interface Integration
Three main integration points are available to you in the SharePoint user interface as part of the SharePoint application model:
- App Parts and Pages
- Ribbon and Action menus
- Navigation
App Parts and Pages offer you the ability to surface your applications’ user interface to your users. For people familiar with SharePoint 2010, App Parts are similar to Web Parts. Navigation lets users find your application, and integrating with the Ribbon and Action menus lets your users take actions in the same familiar location that they do elsewhere in SharePoint. Using one or more of these building blocks enables you to integrate your application’s user interface with that of SharePoint’s and expose your app to its users.
App Parts and Pages
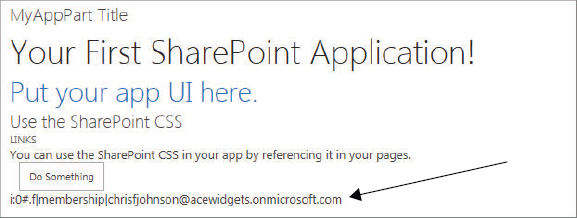
App Parts are reusable and configurable windows into your application. They are analogous to Web Parts in SharePoint 2010; however, the UI is generated and served remotely within your application as opposed to being generated from code running in the SharePoint process. Typically, the interface is rendered from another environment such as Windows Azure in the cloud or IIS on premises. Additionally, App Parts show in the Web Part gallery alongside all the other Web Parts in SharePoint, so they are easy to find and add to your SharePoint pages. Your solutions can consist of one or more App Parts, which should typically surface parts of your application that make sense to show alongside other Web Parts, such as a summary of data or a small set of controls. Figure 6-1 shows a weather App Part that has been added to the homepage of a site. It acts much like a Web Part would except that the UI of your application is embedded within the part via an iFrame. This means your application UI can be served from anywhere you choose, as long as it is accessible from the user’s browser. As you will see later in this section, part of an App Part’s configuration is the URL that the iFrame should be pointed at. Along with this URL you can feed additional parameters that your App’s logic can pick up from the query string. These can be properties set via the App Parts property panel, for example.

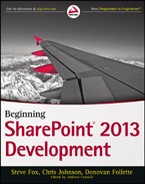
Pages are much like an App Part except that they are viewed in a larger, fuller window style. Unlike with an App Part though, when someone launches your app’s page via a navigation link or similar method, the whole browser is directed to your app’s page thus giving your app full control over what is displayed. This ability enables you to include and show much more of your application to the user. Using Pages is good for when you need a lot of room to do things such as have the user fill in a large form or show a lot of data. Additionally, parameters can be passed along on the URL much like with an App Part. SharePoint provides a number of controls to assist you in branding your application so that it fits well with the look and feel of SharePoint. This includes a top navigation bar, as shown in Figure 6-2.
To get a better feel for how App Parts and Pages work, try your hand at creating an app and adding these new elements to it. The following activity walks you through the process.
<Content Type="html" Src="~remoteAppUrl/Pages/Default.aspx?{StandardTokens}" />
<!DOCTYPE html PUBLIC "-//W3C//DTD XHTML 1.0
Transitional//EN" "http://www.w3.org/TR/xhtml1/DTD/xhtml1-transitional.dtd">
<html xmlns="http://www.w3.org/1999/xhtml">
<head runat="server">
    <title></title>
    <script src="https://ajax.aspnetcdn.com/ajax/4.0/1/MicrosoftAjax.js"
type="text/javascript"></script>
    <script type="text/javascript"
src="https://ajax.aspnetcdn.com/ajax/jQuery/jquery-1.7.2.min.js"></script>

    <script type="text/javascript">
        var hostweburl;

        $(document).ready(function () {
            hostweburl = decodeURIComponent(getQueryStringParameter("SPHostUrl"));
            var scriptbase = hostweburl + "/_layouts/15/";

            var dclink = document.createElement("link");
            dclink.setAttribute("rel", "stylesheet");
            dclink.setAttribute("href", scriptbase + "defaultcss.ashx");

            var head = document.getElementsByTagName("head");
            head[0].appendChild(dclink);
        });

        function getQueryStringParameter(paramToRetrieve) {
            var params = document.URL.split("?")[1].split("&");
            var strParams = "";
            for (var i = 0; i < params.length; i = i + 1) {
                var singleParam = params[i].split("=");
                if (singleParam[0] == paramToRetrieve)
                    return singleParam[1];
            }
        }
    </script>

</head>
<body>
    <form id="form1" runat="server">
    <h1 class="ms-core-pageTitle">Your First SharePoint Application!</h1>
    <h1 class="ms-accentText">Put your app UI here.</h1>
    <div>
        <h2 class="ms-webpart-titleText">Use the SharePoint CSS</h2>
        <a class="ms-commandLink" href="#">links</a>
        <br />
        You can use the SharePoint CSS in your app by referencing it in your pages.
    </div>
    </form>
</body>
</html>


As with traditional Web Parts, you may also configure App Parts with custom properties. You can do this in the Elements.xml file for the App Part. App Parts support the following types of custom properties:
- String: Gives a simple text box input field
- Int: Renders as an input field that only accepts integers
- Boolean: Renders as a check box field
- Enum: Renders as a drop-down field
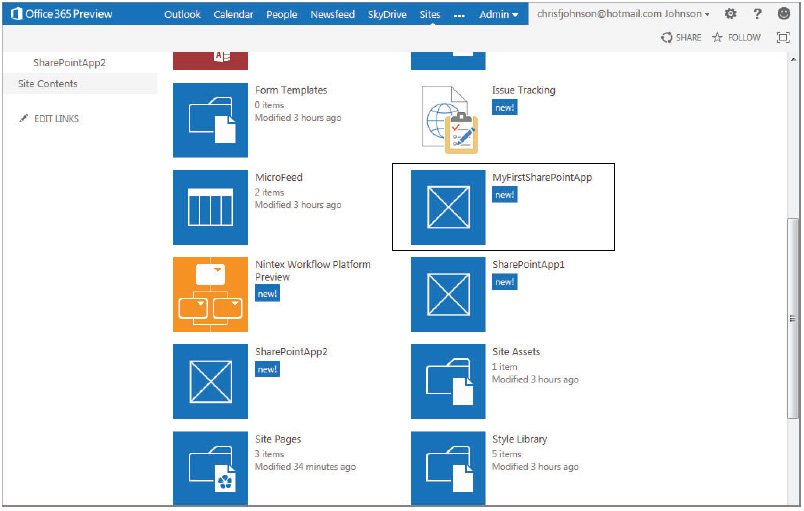
For example, if you wanted your App Part to accept a configuration property where the user could choose from one of three options, you could use the following XML:
<Property Name="colorProp" Type="enum" RequiresDesignerPermission="true"
DefaultValue="R" WebCategory="My App Part Settings" WebDisplayName="Fav Color">
  <EnumItems>
    <EnumItem WebDisplayName="Red" Value="R"/>
    <EnumItem WebDisplayName="Green" Value="G"/>
    <EnumItem WebDisplayName="Blue" Value="B"/>
  </EnumItems>
</Property>
This code would render as shown in Figure 6-7.
Additionally, you can choose to pass the value set for these properties to your App Part via the URL by setting them as tokens in the Src attribute on the Content node in the Elements.xml file:
<Content Type="html"
Src="~remoteAppUrl/Pages/Default.aspx?{StandardTokens}& Property1=_ colorProp _" />
Ribbon and Action Menus
The ribbon was first introduced in SharePoint 2010 and provides the central location for all actions that a user may want to take on documents and other data. In SharePoint 2010, developers could include custom actions for their applications in the ribbon; SharePoint applications also allow this customization. This enables you to include actions where users expect them, alongside all the other standard actions SharePoint provides (see Figure 6-8).

The Action menu is a context-aware menu on items in a SharePoint list or library. For example, in a SharePoint document library the Action menu exposes common functions such as Check In and Check Out (see Figure 6-9). Another term commonly used for this menu is ECB (Edit Control Block). SharePoint applications allow you to include additional actions on this menu. For example, it is a great location to expose your application’s functions that apply to a single list item. You should also consider including the action in the ribbon for consistency; however, the ECB offers quicker access for the user, so including it in both locations is advised.

To get a feel for how to develop with the Ribbon in a SharePoint application try the following exercise that walks you through the process.
<?xml version="1.0" encoding="utf-8"?>
<Elements xmlns="http://schemas.microsoft.com/sharepoint/">
<CustomAction Id="00ec7345-f310-4fb1-a836-5cef4d0ad2fa.MyAppAction"
RegistrationType="List"
RegistrationId="100"
Location="CommandUI.Ribbon"
Sequence="100"
Title="MyAppAction action">
<CommandUIExtension>
<CommandUIDefinitions>
<CommandUIDefinition Location="Ribbon.ListItem.Manage.Controls._children">
<Button
Id="Ribbon.Library.Connect.PropertyViewer"
Alt="MyAppAction action"
Sequence="115"
Command="Invoke_CustomAction"
LabelText="MyAppAction action"
TemplateAlias="o1"/>
</CommandUIDefinition>
</CommandUIDefinitions>
<CommandUIHandlers>
<CommandUIHandler
Command="Invoke_CustomAction"
CommandAction="~remoteAppUrl/Pages/Default.aspx?{StandardTokens}
&ListURLDir={ListUrlDir}&SelectedListID={SelectedListId}
&SelectedItemID={SelectedItemId}"/>
</CommandUIHandlers>
</CommandUIExtension>
</CustomAction>
</Elements>
protected void Page_Load(object sender, EventArgs e)
{
    var contextToken = TokenHelper.GetContextTokenFromRequest(Page.Request);
    var hostWeb = Page.Request["SPHostUrl"];

    using (var clientContext = TokenHelper.GetClientContextWithContextToken (hostWeb,contextToken, Request.Url.Authority))
    {
        clientContext.Load(clientContext.Web,
            web => web.Title);

        clientContext.ExecuteQuery();
        Response.Write(clientContext.Web.Title);
        clientContext.ToString();

        if (Page.Request["SelectedListID"] != null)
        {
            Guid listId = Guid.Parse(Page.Request["SelectedListID"]);

            Microsoft.SharePoint.Client.List list =
clientContext.Web.Lists.GetById(listId);

            clientContext.Load(list,
                l => l.Title);

            clientContext.ExecuteQuery();

            Response.Write("<p>Action taken on:" + list.Title + "</p>");
        }
    }
}

Navigation
To ensure a consistent way for users to find and interact with apps, SharePoint 2013 provides two standardized navigational elements:
- Quick Launch navigation (see Figure 6-11)

- All Site Content tiles (see Figure 6-12)

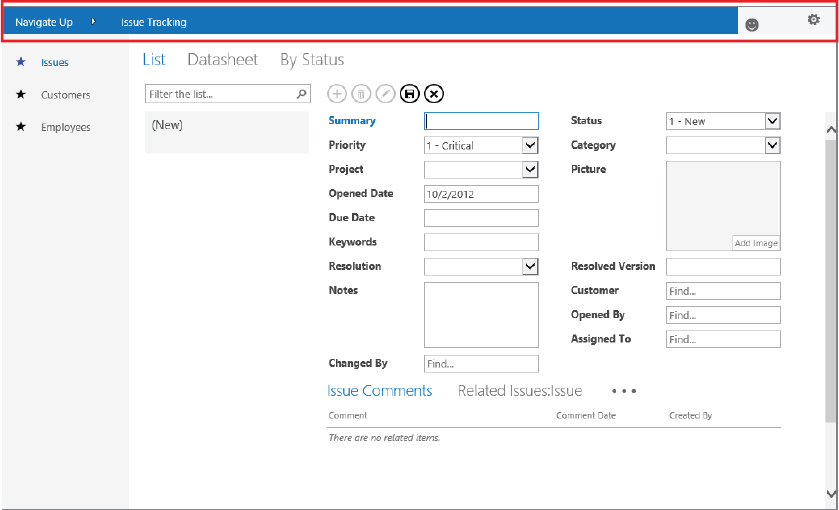
App developers have little control over the style and location of the Quick Launch navigation because it is provided by SharePoint and the inclusion of your app in this navigation is dictated by the user. However, app developers have more control over the appearance of their application’s tiles available in the Site Contents section of a SharePoint 2013 site. You are able to specify the name and tile icons shown.
As a developer you can specify the following properties via the AppManifest.xml file in your application:
- Name
- Title (shown in the SharePoint site UI)
- Tile icon (96 × 96 PNG)
Try out the following exercise to learn how to change the look of your application with a custom tile and name.

Events and Logic Integration
Providing a UI for users is usually the most prominent aspect of any application. However, responding to the actions users take either within an application, or to interact with an application, is also extremely important. SharePoint applications provide the ability to both respond to activities within your application (such as a button click) and respond to activities within SharePoint (such as a document being checked out).
Responding to activities within your application is very straightforward. Your application’s UI and code run remotely from SharePoint and are simply surfaced via App Parts and Pages. For that reason, responding to an event such as a button being clicked in your application is entirely tied to your application’s programming framework. For example, if your app is built with ASP.NET then you simply catch the OnClick event for an ASP.NET button. SharePoint does not get in your way for these types of events.
The following exercise shows you how to add code behind a button in your SharePoint application that responds when it is pressed.
<asp:Button ID="Button1" runat="server" Text="Do Something"
OnClick="Button1_Click" /><br />
<asp:Label ID="txtUser" runat="server" Text=""></asp:Label>
protected void Page_Load(object sender, EventArgs e)
{
    var contextToken = TokenHelper.GetContextTokenFromRequest(Page.Request);
    var hostWeb = Page.Request["SPHostUrl"];

    if (!IsPostBack)
    {
        Button1.CommandArgument = contextToken;


        using (var clientContext =
TokenHelper.GetClientContextWithContextToken(hostWeb, contextToken,
 Request.Url.Authority))
        {
            clientContext.Load(clientContext.Web, web => web.Title);
            clientContext.ExecuteQuery();
            Response.Write(clientContext.Web.Title);
            clientContext.ToString();
        }
    }
}
protected void Button1_Click(object sender, EventArgs e)
{
    var contextToken = ((Button)sender).CommandArgument;
    var hostWeb = Page.Request["SPHostUrl"];

    using (var clientContext =
TokenHelper.GetClientContextWithContextToken(hostWeb, contextToken,
 Request.Url.Authority))
    {
        clientContext.Load(clientContext.Web.CurrentUser);
        clientContext.ExecuteQuery();

        txtUser.Text = clientContext.Web.CurrentUser.LoginName;
    }
}
For responding to events that occur inside SharePoint, such as a document’s being saved or updated, SharePoint provides event receivers. In SharePoint 2010 developers could use event receivers to receive events from SharePoint when a user took certain actions such as checking in a document or saving a list item. SharePoint 2013 also provides event receivers that allow applications to respond to events occurring within a SharePoint site. The primary difference from SharePoint 2010 is that event receivers now trigger code that runs remotely outside the SharePoint process in your application’s code. They do this via a commonly defined Web service interface. This means the code that you want to respond to events could reside in almost any system you like, as long as it is callable over HTTP/HTTPS from the SharePoint Server or Office 365. An example might be your application code that runs in Windows Azure.
Data Integration
At the heart of every application is data, which is typically what users want to work with within your application. SharePoint provides a number of out-of-the-box options for storing and working with data. These options fall into two categories:
- Storing and manipulating data within SharePoint
- Working with data that lives external to SharePoint
From the very first version of SharePoint, the goal has been to make working with data simple and straightforward for users. The simplest example of this is the concept of list data. Users are able to store and work with tabular style data via a common Web interface. Many see using lists analogous to using a table of data in a database. SharePoint applications can also take advantage of these same data storage capabilities natively. By using lists SharePoint offers developers the ability to take advantage of many of the data storage capabilities that SharePoint provides without having to reinvent the wheel. If used properly, SharePoint can save time and effort and potentially reduce the management and support costs of your operation.
At the core of the data storage capabilities within SharePoint are the following:
- Lists: For storing structured data, much like in a table
- Libraries: For storing unstructured data, such as in a document or file
SharePoint provides a comprehensive set of APIs for developers to use within applications to interact with and manipulate data that resides in SharePoint. For SharePoint applications those APIs are exposed in the Client-Side Object Model (CSOM).
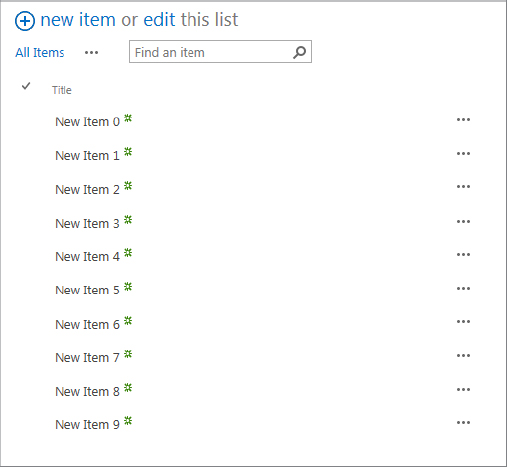
To get a better feel for the data storage capabilities SharePoint provides, try out storing data in lists within SharePoint in the following exercise.
protected void Button1_Click(object sender, EventArgs e)
{
    var contextToken = ((Button)sender).CommandArgument;
    var hostWeb = Page.Request["SPHostUrl"];

    using (var clientContext =
TokenHelper.GetClientContextWithContextToken(hostWeb, contextToken,
 Request.Url.Authority))
    {
        Microsoft.SharePoint.Client.List list =
clientContext.Web.Lists.GetByTitle("My Custom List");

        for (int i = 0; i < 10; i++)
        {
            ListItemCreationInformation itemCreateInfo =
new ListItemCreationInformation();
            Microsoft.SharePoint.Client.ListItem newListItem =
list.AddItem(itemCreateInfo);
            newListItem["Title"] = "New Item " + i.ToString();
            newListItem.Update();
        }

        clientContext.ExecuteQuery();
    }
}

- Scope: List
- Permission: Write
Additionally, SharePoint offers developers a range of mechanisms and APIs for integrating with data that lives outside of SharePoint. Although the data exists external to SharePoint, these APIs and features offer the ability to integrate with data much the same way you would with data stored inside SharePoint itself. The capability is called Business Connectivity Services and you can read more about these advanced data integration options in Chapter 13, “Building Line-of-Business Solutions Using Business Connectivity Services.”