
Lesson 3: Illustrator CC Essentials
Illustrator is used to create many types of artwork from simple icons to complicated illustrations and technical documentation. In this lesson, you’ll use the shape tools, work with basic selection techniques, and complete artwork. Along the way, you will learn some helpful tips for creating artwork on your own.
What you’ll learn in this lesson:
- • Creating shapes
- • Selecting objects using the selection tools
- • Transforming shapes
- • Using layers to organize artwork
Starting up
Before starting, make sure that your tools and panels are consistent by resetting your workspace. See “Resetting Adobe Illustrator CC Preferences” in the Starting up section of this book.
You will work with several files from the ai03lessons folder in this lesson. Make sure that you have loaded the ailessons folder onto your hard drive from www.digitalclassroombooks.com/epub/illustratorcc. See “Loading lesson files” in the Starting up section of this book.
Using the shape tools
Making shapes is an important part of using Adobe Illustrator. In Lesson 5, “Working with the Drawing Tools,” you learn how to make your own custom shapes and lines using the Pen tool, but many times you will work with shapes that are ready-to-go, right off the Tools panel.
Though it might seem simple if you have used Illust rator before, transferring a shape from the Tools panel to the artboard can be a little confusing for new users. To start this lesson, you’ll create a new blank document; think of it as a piece of scratch paper that you can use for practice. You will put a number of shapes on this new document throughout the exercise; feel free to delete or reposition them as you move on to make room for new ones. You won’t use this document in any other lessons.
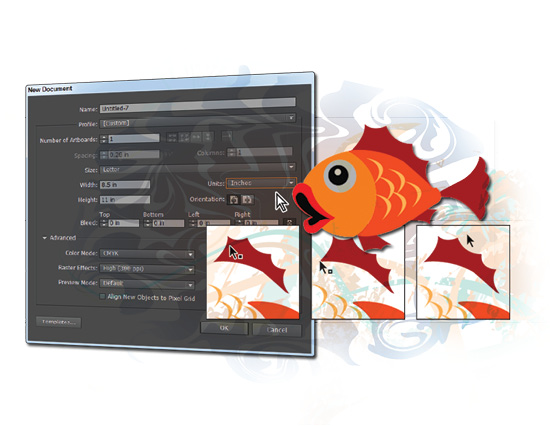
1 In Illustrator, choose File > New, or use the keyboard shortcut Ctrl+N (Windows) or Command+N (Mac OS). The New Document dialog box appears.
2 If they are not already selected, choose Print from the New Document Profile drop-down menu and Inches from the Units drop-down menu. When you change the units to inches, the New Document Profile setting changes to [Custom]. Keep in mind that the Document Profile can be changed after the file has been created, as can the units of measurements.
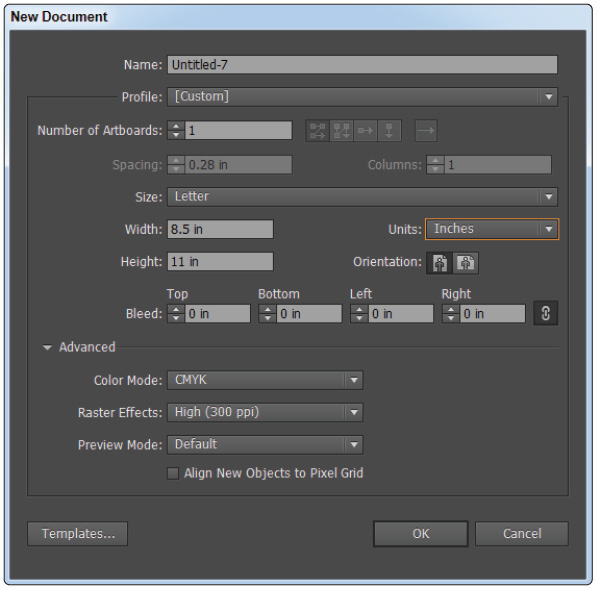
Specify the settings of your new Illustrator document.
3 Click OK. A new blank document appears.
4 Select the Rectangle tool (![]() ) from the Tools panel. Click and drag anywhere on the artboard. By clicking and dragging, you determine the placement and size of the rectangle. Typically, you would pull from the upper-left corner diagonally to the lower-right corner.
) from the Tools panel. Click and drag anywhere on the artboard. By clicking and dragging, you determine the placement and size of the rectangle. Typically, you would pull from the upper-left corner diagonally to the lower-right corner.
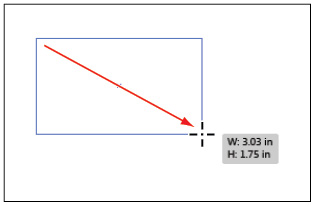
Click and drag from the upper-left corner to the lower-right corner.
5 It is wise to save your files often after you start working. Choose File > Save As to save this file. The Save As dialog box appears.
6 Type ai0301_work into the File name (Windows) or Save As (Mac OS) text field, leave the Save as type as Adobe Illustrator (AI), and then navigate to the ai03lessons folder. Click Save.
7 When the Illustrator Options dialog box appears, leave the version set to Illustrator CC and click OK. The file is saved.
 If you are not able to save in the ai03lessons folder, the folder might be locked. See the Starting up section at the beginning of this book for instructions on how to unlock your lessons folder.
Repositioning and visually resizing the rectangle
Now that you have your first shape on the page, perhaps you want to relocate it or alter its shape or size.
1 Choose the Selection tool (![]() ) from the Tools panel. A bounding box with eight handles appears around the rectangle you just drew. If you do not see the eight handles, make sure you have the rectangle selected by clicking it once. If the bounding box is still not visible, choose View > Show Bounding Box. The bounding box is a feature that can be toggled on or off, and that allows you to transform a shape without leaving the Selection tool.
) from the Tools panel. A bounding box with eight handles appears around the rectangle you just drew. If you do not see the eight handles, make sure you have the rectangle selected by clicking it once. If the bounding box is still not visible, choose View > Show Bounding Box. The bounding box is a feature that can be toggled on or off, and that allows you to transform a shape without leaving the Selection tool.

The bounding box provides handles to help transform shapes.
2 Using the Selection tool, click inside the rectangle and drag it to another location on the page (do not click the handles, since that resizes the shape).
 If you click inside a shape and it becomes unselected, it probably has no fill. Fill and stroke are discussed in Lesson 4, “Adding Color.” By pressing the letter D, you revert back to the default white fill and black stroke, then you can easily select the shape.
3 Hover over the bottom-middle handle until the cursor becomes a vertical arrow and the word path appears. Click and drag. When you click a middle handle and drag, you adjust the size of the selected handle’s side only.
4 Click a corner handle and drag. When you click a corner handle, you adjust both sides that are connected to the corner point.

Click and drag a middle point.
Click and drag a corner point.
5 Choose File > Save to save your work.
Finding or changing the shape’s dimensions using the Transform panel
What if you need to know a shape’s dimensions, or need it to be an exact size? This is when you should refer to the Transform panel.
1 Make sure the rectangle is still selected and open the Transform panel by choosing Window > Transform. The Transform panel appears. The values displayed are for the selected item, which in this case is the rectangle.
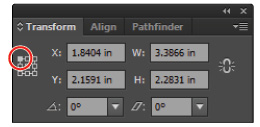
The Transform panel displays information about the rectangle’s location and size. Here is something to keep in mind: the values (except for the X and Y values, which refer to the selected reference point) displayed in the Transform panel refer to the rectangle’s bounding box. By default, the reference point is the center of the shape.
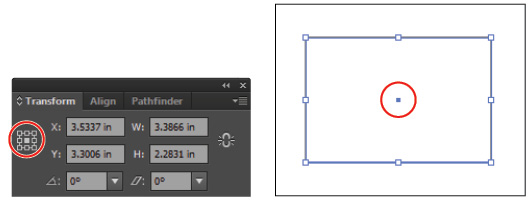
The center reference point locator.
The reference point in the shape.
2 Click the upper-left corner of the reference point locator to see that the X and Y values change, reflecting the shape’s position based upon the upper-left corner as the reference point. Because you created your rectangle without given parameters, its values are different from those displayed in the figure below.
The X and Y coordinates change depending on the reference point selected.
3 Choose View > Rulers > Show Rulers to display the rulers, or use the keyboard shortcut Ctrl+R (Windows) or Command+R (Mac OS).
4 In the Transform panel, type 2 into the X text field and press the Tab key to move the cursor to the Y text field. Type 2 into the Y text field. Make sure the Constrain Width and Height proportions button (![]() ) is not selected, then type 1 into the W (Width) text field and 1 into the H (Height) text field. The rectangle is now positioned and sized according to these values.
) is not selected, then type 1 into the W (Width) text field and 1 into the H (Height) text field. The rectangle is now positioned and sized according to these values.
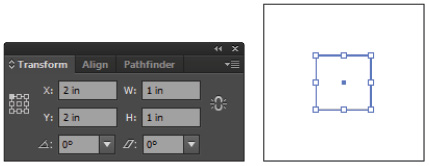
Manually enter values.
The result.
5 Choose File > Save to save your work.
Rotating and shearing using the Transform panel
You can also use the Transform panel to enter exact rotation and shear values for the shapes on the artboard.
1 With the shape still selected, type 25 into the Rotate text field at the bottom of the Transform panel and press Enter (Windows) or Return (Mac OS). The square rotates 25 degrees counterclockwise and the dimensions in the Transform panel are updated.

Type 25 into the Rotate text field.
The result.
2 Click and hold the arrow to the right of the Shear text field and choose -30° from the drop-down menu. Illustrator shears the shape by 30 degrees.

Choose a value from the Shear drop-down menu.
The result.
3 Choose File > Save.
Constraining a shape
You have created a shape visually and then used the Transform feature to make the rectangle a square. You can also use keyboard commands to create the shape that you want right from the Tools panel.
1 Select the Rectangle tool (![]() ) from the Tools panel.
) from the Tools panel.
2 Press and hold the Shift key and click and drag on an empty area on the artboard. Note that the Shape tool is constrained to create a square. In order for the finished product to remain a square (and not become a rectangle), you must release the mouse before you release the Shift key. Now try this with the Ellipse tool.
3 The Ellipse tool (![]() ) is hidden beneath the Rectangle tool. Click and hold the Rectangle tool in the Tools panel to reveal and select the Ellipse tool.
) is hidden beneath the Rectangle tool. Click and hold the Rectangle tool in the Tools panel to reveal and select the Ellipse tool.

Select the hidden Ellipse tool.
4 Press and hold the Shift key, click an empty area of the artboard, and drag to create a circle. Remember to release the mouse before you release the Shift key to keep the shape a circle.
5 Choose File > Save. Keep this file open for the next part of the lesson.
Entering exact dimensions
You can also modify a shape’s properties and dimensions through the shape tool’s dialog box. You’ll do that now using the Ellipse tool.
Before you start, you should know where to set the units of measurement. Even after indicating that you want the rulers to use inches, you might still have values recognized in points.
1 Choose Edit > Preferences > Units (Windows) or Illustrator > Preferences > Units (Mac OS). The Preferences dialog box appears.
2 Select Inches from the General drop-down menu, if it is not already selected. Leave all other measurements the same and click OK.

Change the general units of measurements to inches.
3 Using the Ellipse tool (![]() ), click once on the artboard. The Ellipse dialog box appears.
), click once on the artboard. The Ellipse dialog box appears.
 If the Ellipse dialog box does not appear, you might have inadvertently clicked and dragged. Even a slight drag instructs Illustrator to create a tiny shape rather than open the dialog box. If this happens, press Ctrl+Z (Windows) or Command+Z (Mac OS) and click the artboard again.
4 Type 4 into the Width text field, and then press the Tab key to highlight the Height text field. Type 4 into the Height text field and click OK.

Change the Width and Height to matching values.
The result.
You can use this same method to change shape options.
5 Hidden beneath the Ellipse tool in the Tools panel are a number of other shape tools. Click and hold the Ellipse tool to see the other options. Select the Star tool (![]() ) and click once on a blank area of the artboard. The Star dialog box appears.
) and click once on a blank area of the artboard. The Star dialog box appears.
6 Set the star’s Radius 1 to 1.5 inches and its Radius 2 to 2 inches; then type 15 in the Points text field. Click OK.
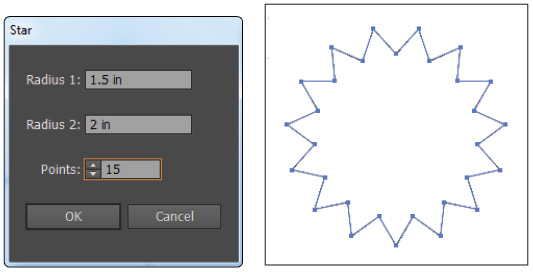
Enter star values.
The result.
7 Choose File > Save, then File > Close. You won’t be working with this file anymore.
You will now create a basic illustration using some of these basic shapes as well as additional fundamental features.
Selecting artwork
In this part of the lesson, you will receive a quick primer on the selection tools and techniques in Adobe Illustrator. As the old saying goes, you have to select it to affect it. You need to know how to select objects in order to reposition, color, transform, and apply effects to them.
Helpful keyboard shortcuts for selections
|
Helpful keyboard shortcuts for selections |
||
|
Function |
Windows |
Mac OS |
|
Switch to last-used selection tool |
Ctrl |
Command |
|
Switch between Direct Selection tool and Group Selection tool |
Alt |
Option |
|
Add to a selection |
Shift+click |
Shift+click |
|
Subtract from a selection |
Shift+click |
Shift+click |
|
Change pointer to cross hair for selected tools |
Caps Lock |
Caps Lock |
The selection tools
While there are several selection tools in Adobe Illustrator, the three main tools are the Selection tool, the Direct Selection tool, and the Group Selection tool. You will have an opportunity to experiment with selections in this part of the lesson.
1 Choose File > Open and navigate to the ai03lessons folder. Select the file named ai0302.ai and click Open. A file opens with a completed fish illustration on the top and the individual components of that fish at the bottom. The top fish artwork is locked and not accessible; use this for reference as you follow the exercise.
2 Choose File > Save As. The Save As dialog box appears.
3 Type ai0302_work into the File name text field and click Save. When the Illustrator Options dialog box appears, click OK.
4 Choose the Selection tool (![]() ) from the Tools panel and pass the cursor over the shape pieces at the bottom of the artwork. As you pass over the objects, notice that the cursor changes to reflect where there are selectable objects. Do not click to select any of these objects just yet.
) from the Tools panel and pass the cursor over the shape pieces at the bottom of the artwork. As you pass over the objects, notice that the cursor changes to reflect where there are selectable objects. Do not click to select any of these objects just yet.

Selectable object.
Anchor point.
No selectable object.
5 Click the large red fin; the entire fin is selected. If you do not see the bounding box appear around the fin, choose View > Show Bounding Box.

The entire shape is selected and has a bounding box surrounding it.
6 Click and drag to reposition the fin anywhere on the page. When you use the Selection tool, you select an entire object or group.
7 Choose the Direct Selection tool (![]() ) from the Tools panel. Using this tool allows you to select individual points or path segments of an object.
) from the Tools panel. Using this tool allows you to select individual points or path segments of an object.
8 Without clicking the selected large fin, reposition the cursor over one of the tips of the fin to see how the cursor changes to indicate that there is a selectable anchor beneath the cursor. A light-gray box giving the X- and Y-coordinates of the anchor point also appears. Click when you see the arrow with the small white square.
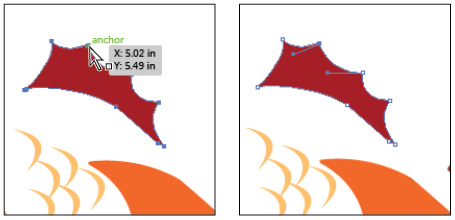
Cursor changes to show the selectable item.
Individual anchor point selected.
9 Notice that only the anchor point that you clicked on is solid; all the other anchor points are hollow and not active.
10 Click the solid anchor point and drag upward to reposition the anchor point and change the shape of the fin. By using the Direct Selection tool, you can alter the shape of an object.

Click and drag with the Direct Selection tool to alter a shape.
11 Press Ctrl+Z (Windows) or Command+Z (Mac OS) to undo the last step, or choose Edit > Undo Move.
12 Choose File > Save. Keep this file open for the next part of this lesson.
Grouping the scales
You will now turn the individual scales in the artwork into a group that you can move and modify as a collective unit.
1 Activate the Selection tool (![]() ). Click one of the pale orange scales, then add to the selection by pressing and holding the Shift key and clicking one of the other five scales.
). Click one of the pale orange scales, then add to the selection by pressing and holding the Shift key and clicking one of the other five scales.

Shift+click to add to the selection.
2 With the two scales selected, choose Object > Group or use the keyboard shortcut Ctrl+G (Windows) or Command+G (Mac OS). The two scales are grouped together. When you select one with the Selection tool, the other is also selected.
3 Shift+click a third scale to add to the selection, then Shift+click the remaining scales. All the scales are now selected.
4 Press Ctrl+G (Windows) or Command+G (Mac OS) to group all six scales together.
5 Choose Select > Deselect, or press Shift+Ctrl+A (Windows) or Shift+Command+A (Mac OS), to deselect the scales.
6 Using the Selection tool, click one of the first scales you selected. The scales act as a collective group now, and all the scales are selected.
7 Press Shift+Ctrl+A (Windows) or Shift+Command+A (Mac OS) to deselect everything again.
You will now use the Group Selection tool to select individual items in a group.
8 Click and hold the Direct Selection tool (![]() ) in the Tools panel and choose the hidden Group Selection tool (
) in the Tools panel and choose the hidden Group Selection tool (![]() ).
).
9 Click once on the top-most scale of the group; only the one scale is selected.
10 Now click the same scale again and the second scale that you grouped back in step 2 also becomes selected.
11 Click the same scale a third time and the entire last group of items becomes selected. By using the Group Selection tool, you can select individual items and even groups within groups.
12 With all the scales selected, click and drag the scales on top of the fish’s orange body.

Click and drag to reposition the scales.
13 Now switch back to the Selection tool to reposition the rest of the separate components together to complete the fish. The positioning guides help you to best position and arrange the different pieces into one fish.

The completed fish.
14 Choose File > Save, then File > Close to close the document. You won’t be working with this file anymore.
- • Double-click a group using the Selection tool ().

- • Click the Isolate Selected Object button () in the Control panel.

- • Select a group and choose Enter Isolation Mode from the Layers panel menu ().

Using shape and transform tools to create artwork
You will add to the basics that you have discovered to complete some different fish artwork.
1 Choose File > Open and navigate to the ai03lessons folder. Double-click ai0303_done.ai to open the file in Adobe Illustrator. Artwork of two swimming fish appear.
2 This is the file you will create. You can choose File > Close, or keep it open for reference throughout this exercise.

You can leave this file open for reference or choose File > Close.
3 Choose File > Open, navigate to the ai03lessons folder, and double-click the ai0303.ai file. A document with four guides in the center of the page opens.
4 If your units are not in inches choose Edit > Preferences > Units (Windows) or Illustrator > Preferences > Units (Mac OS) and change the measurement units in the General drop-down menu to Inches. Click OK.
5 Choose File > Save As. The Save As dialog box appears.
6 Type ai0303_work into the File name text field and navigate to the ai03lessons folder you saved on your hard drive; then click Save.
7 When the Illustrator Options dialog box appears, click OK.
Using the transform tools
There are several basic transform tools. Though each performs a different task, they are essentially used in the same manner.

A. Rotate. B. Width tool. C. Scale. D. Free Transform. E. Shear. F. Reshape. G. Reflect tool. H. Additional Warp tools.
You used the Transform panel to rotate and shear earlier in this lesson. You will now use the transform tools to make changes by entering exact values.
1 Click and hold the Star tool (![]() ) in the Tools panel to reveal the hidden tools. Select the Rounded Rectangle tool (
) in the Tools panel to reveal the hidden tools. Select the Rounded Rectangle tool (![]() ).
).
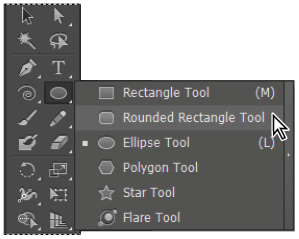
Select the Rounded Rectangle tool.
2 Click and drag to create a rectangle with rounded corners of any size.
3 Activate the Selection tool (![]() ), and using the bounding box’s anchors, click and drag until the rounded rectangle fits the dimensions of the guides located in the center of the document.
), and using the bounding box’s anchors, click and drag until the rounded rectangle fits the dimensions of the guides located in the center of the document.

Manually drag anchors to fit the rectangle inside the guides.
Adding a fill color
You will now fill the rounded rectangle with a color.
1 Make sure the rounded rectangle is still selected. If it is not selected, click it using the Selection tool (![]() ).
).
2 Locate the Control panel at the top of your workspace and click the Fill box on the left side of the panel. Color swatches appear, from which you can choose a color. Pass your cursor over the swatches, and each color’s name appears in a tooltip. Select the color named CMYK Blue. If the tooltip does not appear, select the color you see highlighted in the figure below. The shape’s fill becomes blue.

Select CMYK Blue for the fill.
The result.
3 Lock the selected rectangle by pressing Ctrl+2 (Windows) or Command+2 (Mac OS), or by choosing Object > Lock > Selection. This makes it impossible to select the rectangle unless you unlock it. This feature is extremely helpful when you start creating more complicated artwork.
Modifying a shape
You will now use the shape tools to create and add light rays to the illustration.
1 From the list of hidden shape tools beneath the Rounded Rectangle tool in the Tools panel, select the Polygon tool (![]() ) and click once on the artboard. The Polygon dialog box appears.
) and click once on the artboard. The Polygon dialog box appears.
2 Leave the radius as it is; type 3 into the Sides text field and click OK. A triangle is drawn.
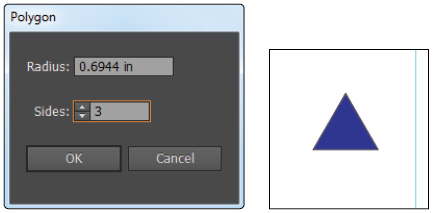
Change the amount of sides.
The result.
3 Choose the Selection tool (![]() ), and click and drag the top-center anchor of the bounding box upward, to stretch the triangle.
), and click and drag the top-center anchor of the bounding box upward, to stretch the triangle.
4 Elongate the triangle more by clicking the lower-right corner of the bounding box, pulling down, and dragging the anchor to the left.

Click and drag upward.
Drag inward and down.
The result.
By clicking and dragging the anchor, you visually resize the shape.
Entering a shape size in the Transform panel
For the purpose of this illustration, you will use the Transform panel to make sure that the triangle is sized correctly.
1 If it is not visible, choose Window > Transform, or click the word Transform in the Control panel. The Transform panel appears.
2 With the triangle still selected, type .5 in the W (Width) text field, and type 2 into the H (Height) text field. Press Enter (Windows) or Return (Mac OS).
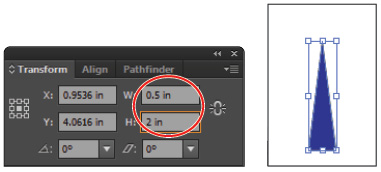
Enter values in the Transform panel.
The result.
3 Press D; the triangle’s color reverts to the default white fill and black stroke colors.
4 Click once on the Stroke box in the Control panel at the top of the Illustrator work area and select None from the Stroke swatches drop-down menu. The triangle is not visible at this time (as it is white on a white background), but you can still see its anchor points.
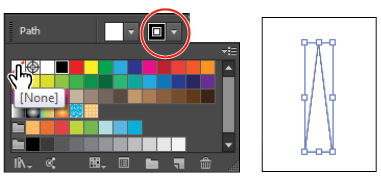
Change the stroke color to None.
The result.
Viewing in Outline view
By default, previews of Adobe Illustrator artwork are in color. There will be times, however, when you create shapes that are white, or possibly have no fill or stroke color. Finding these items on your white artboard after you deselect them can be difficult. This is where Outline view can help.
1 With the Selection tool (![]() ), click somewhere on the artboard to deselect the triangle. Unless your triangle crosses over the rectangle you created earlier, you can no longer see the shape.
), click somewhere on the artboard to deselect the triangle. Unless your triangle crosses over the rectangle you created earlier, you can no longer see the shape.
2 Choose View > Outline, or press Ctrl+Y (Windows) or Command+Y (Mac OS). Outline view displays artwork so that only its outlines (or paths) are visible. Viewing artwork without fill and stroke attributes speeds up the time it takes Illustrator to redraw the screen when working with complex artwork; it is also helpful when you need to locate hidden shapes.
3 With the Selection tool, click one of the triangle’s sides and reposition it so its tip touches the center (indicated by an X) of the rectangle.

The triangle and rectangle arranged in the Outline view.
4 Choose View > Preview, or press Ctrl+Y (Windows) or Command+Y (Mac OS) once more. The color attributes are visible again.
Rotating the shape
You will now create a series of triangle shapes and rotate them 360 degrees, creating what will look like rays of light.
1 Make sure the triangle is selected.
2 Select the Rotate tool (![]() ) from the Tools panel. The Rotate tool allows you to visually rotate objects, as well as enter specific rotation angles. In this example, you will enter values so that the triangles are evenly spaced.
) from the Tools panel. The Rotate tool allows you to visually rotate objects, as well as enter specific rotation angles. In this example, you will enter values so that the triangles are evenly spaced.
3 Alt+click (Windows) or Option+click (Mac OS) the tip of the triangle aligned with the rectangle’s center. When you have the Rotate tool selected, and you Alt+click (Windows) or Option+click (Mac OS) on the artboard, you define the reference point from which the selected shape is rotated. Doing this also displays the Rotate dialog box, in which you can enter an exact value for the angle.
4 Type 18 into the Angle text field and click Copy. This rotates a copy of your triangle 18 degrees and keeps the original triangle intact. The value of 18 degrees evenly divides into 360 degrees, which will make the distribution of these rays even when you circle back to the starting point.

Enter rotate values and click Copy.
A rotated copy is created.
5 Press Ctrl+D (Windows) or Command+D (Mac OS) to repeat the transformation. The triangle shape copies, and rotates again.
6 Continue to press Ctrl+D (Windows) or Command+D (Mac OS) until you reach the original triangle.

The triangle after being rotated.
7 If you are still in Outline view, press Ctrl+Y (Windows) or Command+Y (Mac OS) to return to the Preview view.
Changing the color of the triangles
You will now select the triangles and change their opacity.
1 Switch to the Selection tool (![]() ) and select any one of the white triangles.
) and select any one of the white triangles.
2 Choose Select > Same > Fill Color and all the white triangles become selected. The Select > Same feature can be helpful when selecting objects that share a common feature, including fill color, stroke color, stroke point size, and more.
3 Choose Object > Group. Grouping these shapes together makes it easier to select them later.
4 Type 50 into the Opacity text field in the Control panel and press Enter (Windows) or Return (Mac OS) to change the opacity of the white triangles to 50 percent.

Select the triangles and change the opacity to 50 percent.
5 Choose File > Save to save your work.
Using layers when building an illustration
Layers have many uses in Adobe Illustrator. In this lesson, you will find out how to use layers to lock and temporarily hide artwork that you don’t want to inadvertently select while you work on other things.
1 Open the Layers panel by clicking the Layers button (![]() ) in the dock on the right side of the workspace. Notice that when you start to work in Illustrator, you begin with a layer named Layer 1. All the artwork that you have created throughout this lesson is added as a sub-layer to this layer. You will now lock a layer and create a new layer onto which you can put additional artwork.
) in the dock on the right side of the workspace. Notice that when you start to work in Illustrator, you begin with a layer named Layer 1. All the artwork that you have created throughout this lesson is added as a sub-layer to this layer. You will now lock a layer and create a new layer onto which you can put additional artwork.
2 Click the Toggles lock (a small empty box) to the left of Layer 1 in the Layers panel. A Padlock icon (![]() ) appears, indicating that this layer is locked. You cannot select or change any items on this layer.
) appears, indicating that this layer is locked. You cannot select or change any items on this layer.
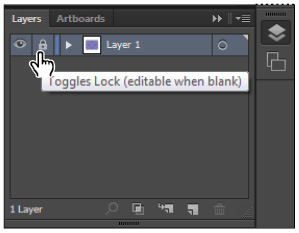
The Toggles lock area of the Layers panel.
 Earlier in this lesson, you selected and locked the rectangle using the Object > Lock menu item. That method works well for individual items, especially if you don’t typically work with layers. Locking a layer is different, since it locks all items on the layer at once.
3 To unlock the layer, click the Padlock icon. The layer unlocks.
4 Relock Layer 1 by clicking the Toggles lock square again.
Creating a new blank layer
You will now create a new blank layer onto which you can paste artwork.
1 Alt+click (Windows) or Option+click (Mac OS) the Create New Layer button (![]() ) at the bottom of the Layers panel. The Layer Options dialog box appears. By pressing and holding the Alt/Option key, you can name the layer before its creation.
) at the bottom of the Layers panel. The Layer Options dialog box appears. By pressing and holding the Alt/Option key, you can name the layer before its creation.
2 Type Fish into the File name text field and click OK. A new empty layer appears on top of the original (Layer 1) displayed in the Layers panel. You are now ready to copy and paste artwork from another Illustrator file into this one.
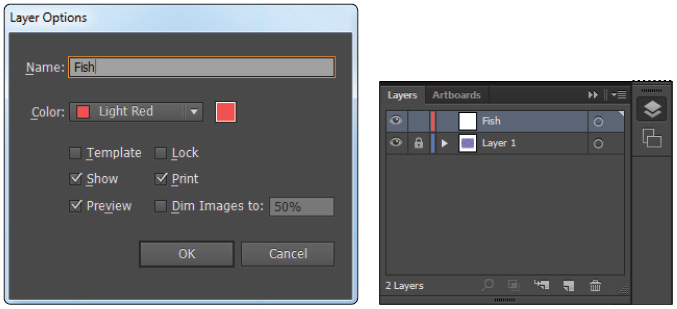
Name the new layer.
The layer in the Layers panel.
Cutting and pasting objects
You will now open another document and cut and paste artwork from one Illustrator file to another.
1 Choose File > Open. In the Open dialog box, navigate to the ai03lessons folder and double-click the file named ai0304.ai. Artwork of two fish appears.
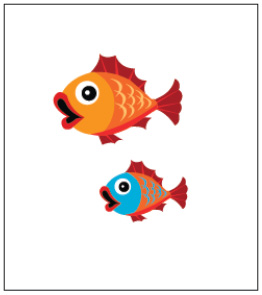
The fish artwork.
2 Use the Selection tool (![]() ) to click once on the larger of the two fish, then Shift+click the second fish to add it to the selection.
) to click once on the larger of the two fish, then Shift+click the second fish to add it to the selection.
3 Choose Edit > Cut, or press Ctrl+X (Windows) or Command+X (Mac OS), to cut the fish.
4 Return to the work file by choosing Window > ai0303_work.ai. Choose Edit > Paste, or press Ctrl+V (Windows) or Command+V (Mac OS), to paste the fish onto the artboard. The fish are pasted onto the Fish layer, which is the active layer.
5 Press Shift+Ctrl+A (Windows) or Shift+Command+A (Mac OS), or click a blank area of the artboard, to deselect the fish.
6 Activate the Selection tool; click the smaller of the two fish and drag it to a spot on top of the larger fish. Notice that the smaller fish disappears behind the larger fish. The order in which artwork appears is based on the order in which artwork is created. Newer artwork is placed higher in the object stacking order, which can be changed using the Arrange feature.

The smaller fish falls behind the larger fish in the stacking order.
7 With the smaller fish still selected, choose Object > Arrange > Bring to Front.

Choose to bring the small fish to the front, and then view the result.
8 Select the smaller fish and reposition it so that it slightly overlaps the bottom of the larger fish.

Reposition the smaller fish to overlap the larger fish slightly.
9 Choose File > Save. Keep this file open for the next part of this lesson, but close ai0304.ai. When asked if you’d like to save the changes made to the document, choose No (Windows) or Don’t Save (Mac OS).
Creating bubbles
You will now create a bubble, and then clone it several times to finish the illustration.
1 Click and hold the last-used shape tool (the Polygon tool) in the Tools panel and select the hidden Ellipse tool (![]() ).
).
2 Click once on the artboard to display the Ellipse dialog box.
3 Type .5 into the Width and Height text fields. Click OK. A small circle is created.
4 Click the Fill color swatch in the Control panel and choose the color CMYK Cyan from the drop-down swatches menu.

Change the fill color to CMYK Cyan.
The result.
5 If the Stroke is not set to none (![]() ), choose the Stroke box in the Control panel and choose None from the drop-down swatches menu.
), choose the Stroke box in the Control panel and choose None from the drop-down swatches menu.
Now you will create a smaller circle to use as a reflection in the circle you already created.
6 With the Ellipse tool still active, click once on the artboard.
7 In the resulting Ellipse dialog box, type .1 into the Width and Height text fields and click OK.

Create a smaller circle.
The result.
8 Use the Fill box in the Control panel to select White for the small circle’s fill.
9 Activate the Selection tool (![]() ), then click and drag the smaller circle on top of the larger cyan (blue) circle. Position it anywhere you want on the circle, as long as it looks like a light reflection on the bubble.
), then click and drag the smaller circle on top of the larger cyan (blue) circle. Position it anywhere you want on the circle, as long as it looks like a light reflection on the bubble.

Position the smaller white circle on top of the cyan circle.
10 Shift+click the larger and smaller circles to select them both. Choose Object > Group, or press Ctrl+G (Windows) or Command+G (Mac OS), to group the circles.
11 Choose File > Save to save your work.
Cloning the bubble group
You will now clone, or duplicate, the bubble several times.
1 Make sure the bubble group is selected.
2 Hover your cursor over the bubble and press and hold the Alt (Windows) or Option (Mac OS) key. Note that the icon becomes a double cursor (![]() ).
).
3 While pressing and holding on the Alt/Option key, click and drag to the right. Notice that as you drag, the original group of circles remains intact and you create a second group. Release the mouse when you are off to the right and the cloned bubble no longer touches the original.

Press and hold the Alt (Windows) or Option (Mac OS) key, then click and drag.
4 Press Ctrl+D (Windows) or Command+D (Mac OS) to repeat the duplication. Illustrator remembers the distance and angle of the last movement. You can also perform this function by selecting Object > Transform > Transform Again.
5 Press Ctrl+D (Windows) or Command+D (Mac OS) once more to create a total of four circle groups.
 If you press and hold the Shift key while cloning, you can constrain the cloned objects to move on a straight path, or a 45 or 90-degree angle.
Clone the circle group three times.
6 Choose File > Save to save your work. Keep the file open for the next part of the lesson.
Repeating a resize transform
You will now use the Transform Again keyboard shortcut to transform the bubbles so they are varying sizes.
1 Select the second bubble. You will leave the original bubble at its current size.
2 Press and hold the Shift key (to constrain the proportions as you resize), and click and drag a corner anchor point to resize the bubble only slightly. An exact amount is not important for this. Once you resize, do not perform any other actions, such as repositioning. The resizing has to be the last action that you performed for the Transform Again feature to work properly.
3 Select the third bubble group and press Ctrl+D (Windows) or Command+D (Mac OS). This applies the same transformation to the third bubble. With the same bubble still selected, press Ctrl+D (Windows) or Command+D (Mac OS) again and the resize transformation is applied, making it even smaller.
4 Select the last (fourth) bubble and press Ctrl+D (Windows) or Command+D (Mac OS) three times, making this the smallest bubble.

The bubbles after they have been transformed into differently sized bubbles.
 Remember that the Transform Again feature (Ctrl+D [Windows] or Command+D [Mac OS]) repeats the most recent transformation, including positioning, that you performed. If you resize and then move an object, the repositioning, not the resizing, is repeated. If this occurs, press Ctrl+Z (Windows) or Command+Z (Mac OS) until you return to the point where all the bubbles are the same size. Then restart at step 1.
5 Using the Selection tool (![]() ), click and drag each bubble down and position them around the fish, on top of the rectangle. No exact position is necessary.
), click and drag each bubble down and position them around the fish, on top of the rectangle. No exact position is necessary.

Click and drag the bubbles to reposition them in the artwork.
6 Choose File > Save to save your work. Keep the file open for the next part of the lesson.
Moving objects from one layer to another
You will now move the bubbles onto Layer 1, under the rays of light.
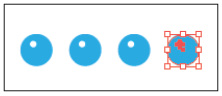
1 Select one of the bubble groups, then Shift+click the remaining three so that all four bubble groups are selected.
2 If the Layers panel is not visible, open it by clicking the Layers button (![]() ) in the dock or by choosing Windows > Layers.
) in the dock or by choosing Windows > Layers.
A colored square appears to the right of the Fish layer in the Layers panel. This colored square is called the selection indicator. If Illustrator’s settings are at their defaults, the indicator is red, matching the layer selection color.

When something on a layer is selected, the selection indicator appears.
3 Click the Padlock icon (![]() ) to the left of Layer 1 to unlock the layer.
) to the left of Layer 1 to unlock the layer.
4 Click and drag the selection indicator from the Fish layer down to Layer 1. The bubbles are now on Layer 1 instead of on the Fish layer.
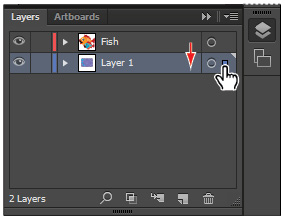
Click and drag the selection indicator to the layer beneath.
5 Click any one of the triangles that you used to create the rays of light. Because they were grouped earlier, selecting one selects the entire group.
6 Choose Object > Arrange > Bring to Front; the triangles are now on top of the bubbles, but not on top of the fish. This is because the Fish layer is higher in the stacking order than any objects on Layer 1.
7 Choose File > Save, then File > Close.
Self study
Practice will help you to create the shapes that you want. To practice on your own, open the file named ai0305.ai and create the shapes that are locked on the base layer.
Review
Questions
1 Which selection tool allows you to select an individual anchor point or path segment?
2 What key modifier do you press and hold to constrain a shape to equal width and height values?
3 What are two methods of inputting exact height and width values for shapes?
Answers
1 The Direct Selection tool allows you to select an individual anchor point or path segment.
2 Constrain a shape’s proportions by pressing the Shift key while dragging the shape.
3 You can enter values for shapes by doing either of the following:
a. Select a Shape tool and click once on the artboard. This opens the shape options dialog box, in which you can enter width and height values.
b. After a shape has been created, choose Window > Transform and enter values into the Width and Height text fields.