
Lesson 6: Exploring Additional Color Options

Adobe Illustrator offers an expansive amount of features that allow you to create original fill colors and strokes. In this lesson, you find out how to create and use patterns, and to take advantage of gradients. You also learn how to explore more color opportunities with the Color Guide.
What you’ll learn in this lesson:
- • Adding tonal variations with gradients
- • Saving custom swatches
- • Creating and using patterns
- • Using the Color Guide
- • Creating a color group
Starting up
Before starting, make sure that your tools and panels are consistent by resetting your workspace. See “Resetting Adobe Illustrator CC Preferences” in the Starting up section of this book.
You will work with several files from the ai06lessons folder in this lesson. Make sure that you have loaded the ailessons folder onto your hard drive from www.digitalclassroombooks.com/epub/illustratorcc. See “Loading lesson files” in the Starting up section of this book.
Taking a look at the finished illustration
In this lesson, you will take a black-and-white illustration and liven it up with gradients and patterns. You will then discover how to build interesting combinations of color together using the Color Guide.
1 To view the completed illustration, choose File > Browse in Bridge, and using the Favorites tab, click Desktop.
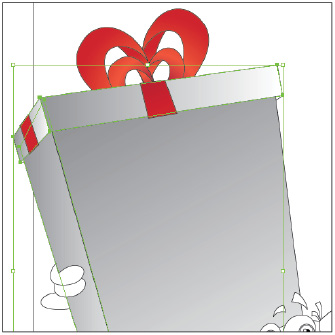
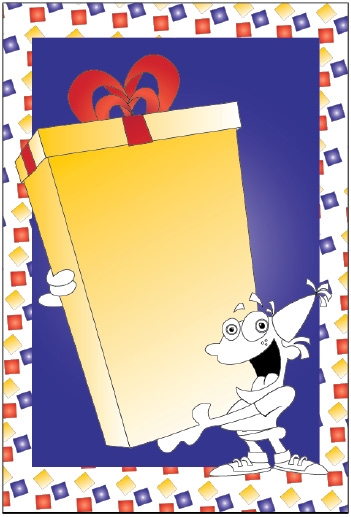
2 Once at the Desktop, double-click the ai06lessons folder and double-click the file named ai0601_done.ai. An illustration of a boy holding a gift appears.
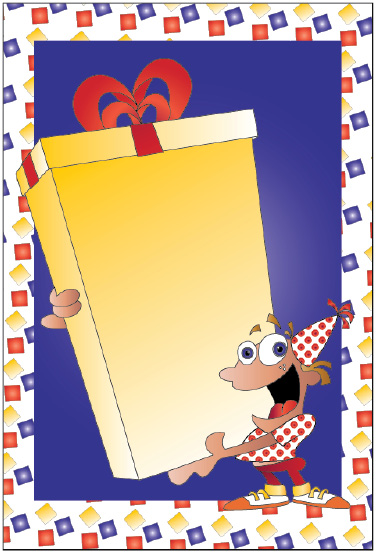
The completed illustration.
3 After examining the finished file, choose File > Close to close the file, or keep it open for reference throughout this lesson.
4 Choose File > Browse in Bridge, in the ai06lessons folder double-click the file named ai0601_start.ai; a black-and-white illustration appears.

The black-and-white start file.
5 Choose File > Save As. In the Save As dialog box, navigate to the ai06lessons folder and type ai0601_work.ai into the Name text field, then click Save. In the Illustrator Options dialog box, click OK to accept the default settings. Keep the file open for the next part of this lesson.
Adding tonal values with gradients
Gradients are used to add tonal shading to illustrations. In this lesson, you discover how to use existing gradients, and take advantage of the Gradient panel and Gradient tool. You also find out how to create your own custom gradients and store them for repeated use.
You will start by using an existing gradient, from the Swatches panel, to color the ribbons.
1 Zoom in on the area of the top portion of the box and ribbon, then using the Selection tool (![]() ), click and drag a marquee around the top ribbon to select most of the ribbon parts. Don’t worry about crossing over the rectangle in the background, since it is on a locked layer and will not become selected.
), click and drag a marquee around the top ribbon to select most of the ribbon parts. Don’t worry about crossing over the rectangle in the background, since it is on a locked layer and will not become selected.

Click and drag a marquee with the Selection tool.
2 Now, press and hold the Shift key and click the two remaining pieces of ribbon.

Shift-click the two remaining pieces of ribbon.
In order to save yourself time later, you will save this selection. By saving the selection, you can avoid having to reselect over and over again. Anytime that you inadvertently deselect the ribbon, you can reselect by selecting Select > Ribbon.
3 With the ribbon selection active, choose Select > Save Selection. When the Save Selection dialog box appears, type Ribbon into the Name text field, then click OK.

Save your selection for future use.
4 Click the Fill box at the bottom of the Tool bar to make sure that the Fill is selected instead of the Stroke. If the Swatches panel is not visible, choose Window > Swatches. With the ribbon selected, choose the Summer Red Radial gradient swatch. The ribbon now has the gradient applied.
Apply the Summer Red Radial gradient to the ribbon.
Notice that the radial gradient starts and stops in every shape that the gradient was applied to. You will now use the Gradient tool to change how the radial gradient is applied to these shapes.
5 With the ribbon still selected, choose the Gradient tool (![]() ) from the Tools panel.
) from the Tools panel.
6 With the Gradient tool selected, ignore the gradient ramp that appears on the ribbon and click and drag down and to the left from the center of the selected ribbon outward. This directs the radial gradient to start from the center. Note that the gradient is now continuing throughout all of the shapes instead of starting individual radial gradients in each shape.

The radial gradient.
Using the Gradient tool, pull from the center creating the ramp.
The gradient after using the Gradient tool.
7 Choose File > Save to save this file, keep the file open for the next part of this lesson.
Customizing an existing gradient
You will now have the opportunity to customize the existing gradient.
1 If the ribbon is not selected, choose Select > Ribbon to reactivate the selection. If you do not have the Ribbon as an option under the Select menu, refer back to step 3 in the previous exercise of this lesson.
2 With the Gradient tool active, cross over the gradient annotator (or gradient ramp) that appears on the Ribbon selection with your cursor. If you do not see the color stops, click back on the Summer Red Radius swatch again. There are three color stops on this gradient, indicating that the gradient has three colors that are being blended. You will now select one of the stops and make it darker.
3 Double-click the gradient stop on the far right; the Colors panel appears.
4 Click and drag the Magenta slider to the value of 100%, or enter 100 into the Magenta text field.
5 Click and drag the Black value to 50%, or enter 50 into the Black (K) text field. Press the Return or Enter key to exit the Colors panel. The color value is changed.
6 With the Ribbon selection still active, and the Gradient tool still selected, click and drag up to change the look of the gradient. You can click and drag as many times as you like until you get the look you like.
Keep in mind that the gradient will create a more gradual blending effect from one color to another with a longer ramp than if you pull the gradient ramp a shorter distance. You can also click the gradient ramp and relocate it to another location.

Change a color stop.
Drag the gradient in a different direction.
 You can enter an exact angle for your gradient by choosing Window > Gradient, and entering a value into the Angle text field.
You will now remove a color stop from the gradient.
7 With the gradient ramp still selected, click the center color stop and click and drag it off the ramp (any direction), it is now removed from the gradient.
Easily remove color stops by dragging them off the ramp.
Saving the gradient
Now that you spent a fair amount of time creating your own custom gradient, you will save it for future use.
1 Using the Selection tool (![]() ), click anywhere on the scratch area to deselect the ribbon, then click any one of the ribbon sections to activate a single selection. The new gradient fill you created is now in the Fill box at the bottom of the Tools panel.
), click anywhere on the scratch area to deselect the ribbon, then click any one of the ribbon sections to activate a single selection. The new gradient fill you created is now in the Fill box at the bottom of the Tools panel.
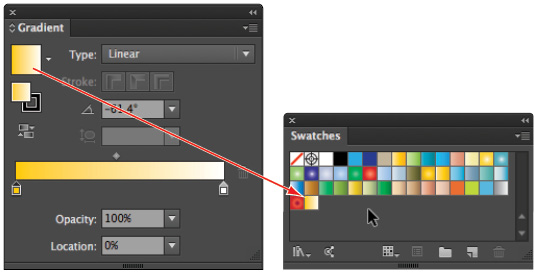
2 If the Swatches panel is not visible, choose Windows > Swatches, then click the New Swatch button (![]() ).
).
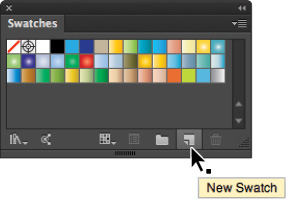
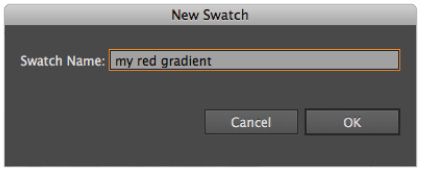
Click the New Swatch button.
3 When the New Swatch dialog box appears, type my red gradient in the Swatch Name text field and click OK. The new gradient is added to your Swatches panel.
Save the gradient.
Applying a second instance of the gradient
You can apply the same gradient over and over again to separate objects in an illustration. Each instance can look very different based upon how you use the Gradient tool.
1 Select the Direct Selection tool (![]() ), and while pressing and holding the Shift key, click all four parts of the inside of the ribbon (see figure below).
), and while pressing and holding the Shift key, click all four parts of the inside of the ribbon (see figure below).
2 If necessary, click the my red gradient swatch in the Swatches panel to make sure that it is applied.
3 Select Window > Gradient, the Gradient panel appears. You can use the Gradient panel to change colors in the gradient, as well as the angle and type of gradient.
4 Click and hold Radial to change the type of gradient to Linear. Several gradient annotators appear.
5 Select the Gradient tool, then click and drag up from the bottom of the Ribbon selection.

In the Gradient panel change the direction of the gradient.
Multiple annotators will appear.
With just the inside of the ribbon selected, change from Radial to Linear.
6 With the shapes still selected, click the New Swatch icon in the Swatches panel. When the New Swatch dialog box appears, type the name red linear gradient, and click OK.
7 Choose File > Save to save this file, keep it open for the next part of this lesson.
Using the Gradient panel
In the previous exercise, you edited an existing gradient using the gradient annotator. In this next part of the lesson, you will use the Gradient panel to create another custom gray gradient.
1 Choose View > Fit Artboard in Window, then using the Selection tool (![]() ), click the large front panel of the box.
), click the large front panel of the box.
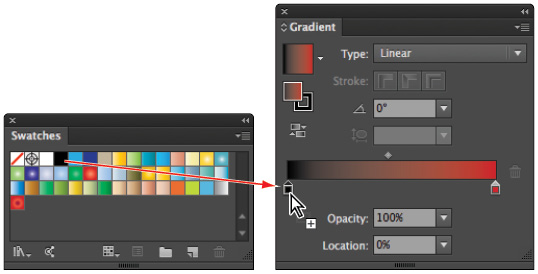
2 Choose Window > Gradient. The Gradient panel appears, and the last used gradient appears in the panel. Click and drag the Gradient tab to undock the Gradient panel from the docking area.

A. Gradient Fill box. B. Reverse Gradient. C. Gradient Type drop-down menu. D. Panel menu. E. Midpoints. F. Delete stop. G. Color stop. H. Opacity.
3 If the Swatches panel is not open, choose Window > Swatches. When the Swatches panel appears, click and drag the tab in order to undock the Swatches panel.
4 With the front panel selected, click anywhere on the gradient ramp. The front panel is filled with the red gradient.
5 In the Gradient panel, click the center color stop, then click and drag it off the ramp to remove it from the gradient.
6 In the Swatches panel, click and drag the black swatch to the left color stop in the Gradients panel. The red color is replaced with the black swatch.
Click and drag the black color swatch to the first color stop.
7 Now, double-click the black color stop. When the Color panel appears, change the black value to 50, then press Enter or Return.

Double-click the color stop and change the value to 50% black.
8 Click and drag the White Swatch (in the Swatches panel) to the right color stop in the Gradient panel. The gradient now blends from black to white.
9 Using the Gradient tool (![]() ), click and drag from the top of the gift to the bottom in the front panel.
), click and drag from the top of the gift to the bottom in the front panel.
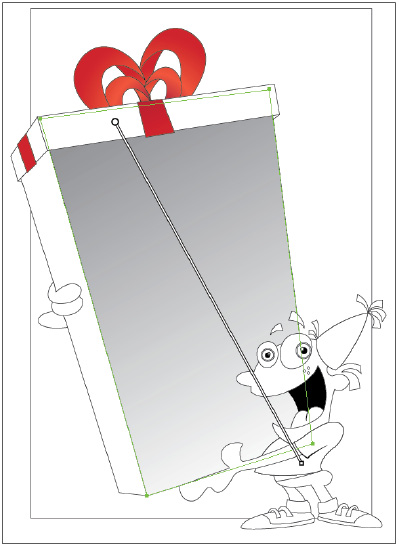
Click and drag from top to bottom.
10 Save the new gradient by clicking the New Swatch button (![]() ) at the bottom of the Swatches panel. When the New Swatch dialog box appears, type gray gradient into the Swatch Name text field and click OK.
) at the bottom of the Swatches panel. When the New Swatch dialog box appears, type gray gradient into the Swatch Name text field and click OK.
11 Switch to the Selection tool, click the side panel, and then Shift+click the two lid panels.
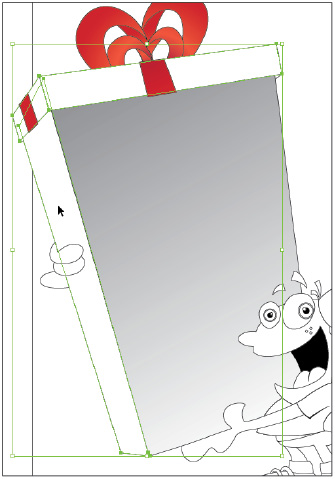
Select the other three panels.
12 Click the newly saved gray gradient in the swatches panel to apply it to the other three panels.
The gradient applied to the other panels.
13 Chose File > Save. Keep this file open for the next part of this lesson.
Updating a gradient
You can easily update a saved gradient swatch and replace all instances. In this part of the lesson, you will open a swatch library and then you will change the gray gradient stop to a yellow gradient stop.
1 Select the front panel, and make sure the Gradient panel and Swatches panel are still undocked and visible in your workspace.
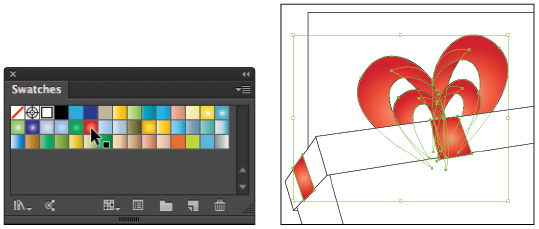
2 From the Swatches panel menu (![]() ), select Open Swatch Library > Celebration. A separate panel appears with additional colors you can use to color your artwork.
), select Open Swatch Library > Celebration. A separate panel appears with additional colors you can use to color your artwork.
3 Select the yellow color named with the values C=0, M=20, Y=100, K=0, and drag the swatch to the gray color stop on the gradient ramp. The gray gradient is replaced with yellow.

Select the yellow color in the Celebrations swatches.
Drag the yellow to the gradient ramp to replace the gray color stop.
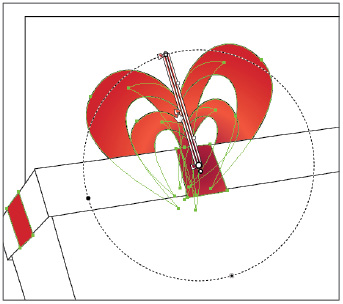
4 While pressing and holding the Alt (Windows) or Option (Mac OS) key, click the gradient preview in the Gradient panel and drag it on top of the same gray gradient swatch in the Swatches panel. By pressing and holding the Alt/Option key, you replace all instance of that gradient. If you did not press and hold the Alt/Option key, a new swatch would be created.
Press and hold the Alt/Option key while dragging a replacement gradient on top of another.
Creating and using patterns
Using Adobe Illustrator, you can create reusable patterns quickly and easily. In this next part of the lesson, you create several patterns to be used in the illustration. You will also discover keyboard shortcuts to rotate and resize patterns, as well as other tips and tricks to customize your patterns.
1 With the ai0601_work file open, select the Polygon tool (![]() ) that is hidden underneath the Rectangle tool (
) that is hidden underneath the Rectangle tool (![]() ).
).
2 Click and drag out on the artboard (away from any other artwork), but do not release the mouse. While dragging, press the arrow key down twice. This reduces the number of sides from 6 to 4. Try to angle the polygon so that it is a diamond shape. The shape is created, and automatically filled with the last-used yellow gradient.
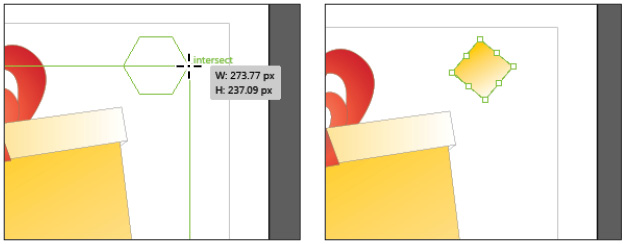
Create a diamond shape using the Polygon tool.
3 Angle your polygon to appear as a diamond by choosing the Selection tool (![]() ) and clicking and dragging any corner (of the bounding box) repositioning the shape.
) and clicking and dragging any corner (of the bounding box) repositioning the shape.
4 With the Selection tool still active, position your cursor over the diamond shape. Clone the diamond by pressing and holding the Alt (Windows) or Option (Mac OS) key and dragging to another location near to the original. No exact position is necessary.
5 Repeat the cloning of the diamond shape one more time. You will then have a total of three diamonds.
6 With the Selection tool, change the angle of the two newly cloned diamonds so that no diamonds are at the same angle.
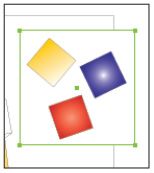
7 Click any one of the diamond shapes, then click the Purple Radial Swatch in the Swatches panel. You can close the Celebration swatch panel to tidy up your workspace.
8 Click another diamond shape and then click the Summer Red Radial swatch in the Swatches panel.

Change the angle of the diamonds.
Apply new swatch colors.
9 Choose File > Save. Keep the file open for the next part of this lesson.
Creating a bounding box
In this next section, you create a bounding box that will determine how your pattern will repeat. It is not necessary to create a bounding box, but if you do not, your pattern is automatically defined by the edge of your objects. Once the bounding box is created, you will turn your shapes into a repeatable pattern.
1 Since you want to make sure the bounding box is the backmost object, select the Draw Behind button at the bottom of the Tools panel.
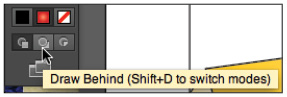
Click the Draw Behind button.
2 Select the Rectangle tool (![]() ) and click and drag to surround your diamond shapes. Keep in mind that you are creating a repeatable tile, so that if you have lots of space around the diamond shapes, you will have more space between the repeat.
) and click and drag to surround your diamond shapes. Keep in mind that you are creating a repeatable tile, so that if you have lots of space around the diamond shapes, you will have more space between the repeat.
3 With the backmost shape still selected, choose Stroke from the Control panel and select None.
4 Click Fill in the Control panel and select the White swatch. The white bounding box you created is now behind the shapes.
Create a white bounding box behind the shapes.
5 If necessary, adjust the sizing of the bounding box using the Selection tool.
Now you will create the pattern swatch.
6 Using the Selection tool, click and drag to create a marquee around the diamond shapes and the bounding box to select all four objects.
7 Make sure that the Swatches panel is still visible, and then click and drag the objects right into the Swatches panel and release. The pattern is now added as a swatch to the Swatches panel.
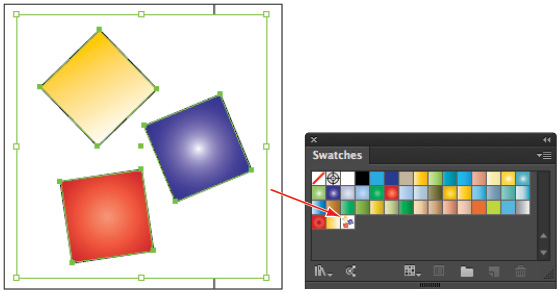
Drag your bounding box and new shapes to the Swatches panel.
Applying the pattern
You will now apply the pattern to your illustration. Before doing that, you will delete the original artwork that created the pattern and unlock a layer.
1 Check to see that the elements used to create the pattern (three diamonds and the bounding box) are selected and then choose Edit > Clear. The objects are deleted.
2 Choose Window > Layers to show the Layers panel, and then click the padlock icon to the left of the background layer. This unlocks the elements on this layer.
3 Click the background layer to make it active.

Unlock the background layer.
4 Make sure the Draw Behind button (at the bottom of the Tools panel) is selected, then select the Rectangle tool and draw a rectangle that fills the entire artboard, from edge to edge. If necessary, use the Selection tool to resize this rectangle.
5 When the rectangle is completed, make sure that Fill is forward (in the Tools panel) and then click the new pattern swatch you created. The pattern is applied to the rectangle’s fill.
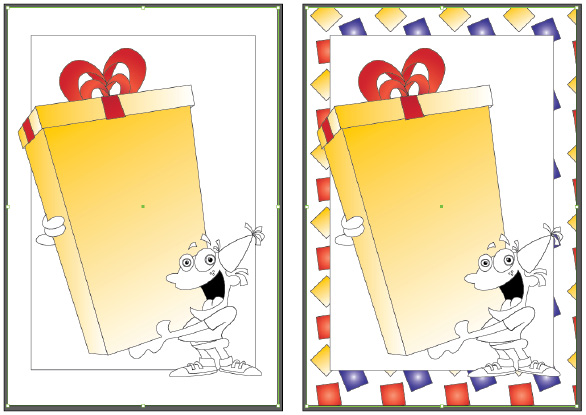
Create a rectangle behind the existing shape.
Fill with your pattern.
6 Choose File > Save to save this file. Keep it open for the next part of this lesson.
Editing a pattern fill
There are many ways that you can edit a pattern. In this next part of the lesson, you will change the size and rotation of the pattern.
1 Select the large rectangle shape that has the pattern fill, and then double-click the Scale tool (![]() ) in the Tools panel. The Scale dialog box appears.
) in the Tools panel. The Scale dialog box appears.
2 Change the Uniform scale to 50%, uncheck Transform Objects, and check Preview. By unchecking Objects you scale only the pattern, not the shape that contains the pattern.
Note that you can pick a more appropriate value as there was not a specific size requested for the original pattern shapes. Click OK.

Select to scale only the pattern.
The result.
3 Now select the Rotate tool (![]() ).
).
Even though you can double-click and enter an exact value with the Rotate tool, you will take advantage of a more visual method for rotating your pattern within the rectangle.
4 Press and hold the Tilde (~) key and click and drag. The Tilde (~) key is a shortcut key for rotating the pattern fill in an object. This also works with scale, but is a little difficult to control.

Use a keyboard shortcut to rotate the pattern only, in an object.
The Result. Your pattern has been rotated.
5 Using the Selection tool, click the white rectangle that is in front of your pattern.
6 Click the Purple Radial swatch in the Swatches panel. The pattern fills the rectangle.
Finish the background by applying a gradient.
 A Pattern Options dialog box has been added for Illustrator CC to allow you to more easily create and edit seamless tiled vector patterns. Read more about this new feature in Lesson 14, “Adobe Illustrator CC New Features.”
Locating existing patterns
You can also take advantage of existing patterns. In this lesson, you find a pattern in the swatches library, and then edit it.
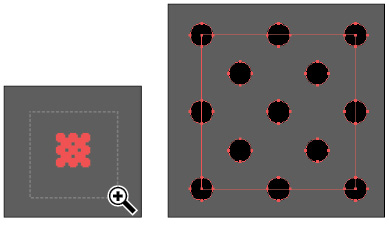
1 From the Swatches panel menu (![]() ), choose Open Swatch Library > Patterns > Basic Graphics > Basic Graphics Dots. A Basic Graphics Dots panel appears.
), choose Open Swatch Library > Patterns > Basic Graphics > Basic Graphics Dots. A Basic Graphics Dots panel appears.
2 Select the hat of the boy holding the present, then choose the dot pattern labeled 6 dpi 50% (for those from the print environment, this represents a 6 lines per inch dot pattern, at a 50% tint). The pattern is applied to the hat.

Select the 6 dpi 50% pattern swatch.
It is applied to the selected hat.
3 Click the shirt of the boy and apply the 6 dpi 50% pattern.
You will now edit this pattern and resize it.
4 Once you choose to use a pattern it is added to the Swatches panel. Click and drag the new dot pattern from the Swatches panel to the pasteboard. The original artwork that created the pattern is now able to be edited.

Click and drag the swatch from the Swatches panel to the pasteboard.
5 Select the Zoom tool (![]() ), then click and drag around the pattern to zoom into the pattern.
), then click and drag around the pattern to zoom into the pattern.
Click and drag with the Zoom tool.
The result.
6 In the Tool bar, click and hold the Direct Selection tool and select the Group Selection tool (![]() ), then click and drag a marquee around the pattern artwork. Notice that the bounding box is also included in this selection.
), then click and drag a marquee around the pattern artwork. Notice that the bounding box is also included in this selection.
7 Press and hold the Shift key and click the border of the bounding box to deselect it.
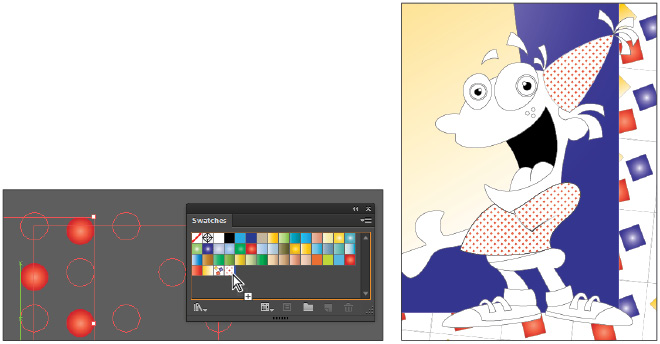
8 With the dots selected, click the swatch you created earlier named my red gradient.

Select the dots.
Apply your custom gradient.
9 Switch to the Selection tool (![]() ) and click and drag a marquee around all the pattern elements to make a selection that includes all of the dots and the bounding box.
) and click and drag a marquee around all the pattern elements to make a selection that includes all of the dots and the bounding box.
10 Press and hold the Alt (Windows) or Option (Mac OS) key and drag the new pattern on top of the existing black-and-white 6 dpi 50% pattern (in the Swatches panel). Just like with the gradient, you have replaced all instances of that pattern with a new one.
Alt/Option new pattern on top of existing pattern.
Instances of pattern are replaced.
11 You can now delete the artwork creating the pattern that is on your pasteboard. Don’t forget that you can access the original artwork of any pattern by dragging it to the pasteboard at any time.
12 Using the Selection tool, select the shirt and hat and then double-click the Scale tool. Type 300 into the Uniform Scale text field. Make sure that Transform Objects is unchecked, and Preview is on, and click OK.
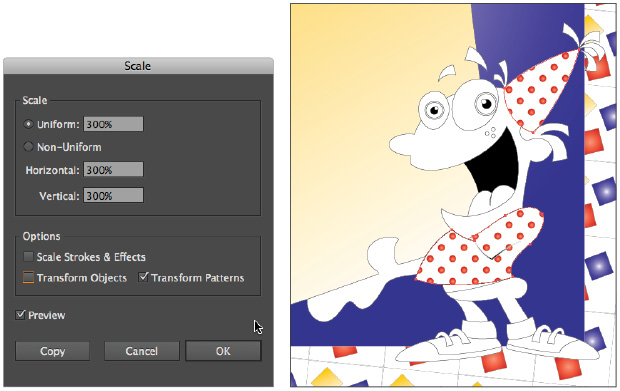
Change the scale of the dots.
The result.
13 Choose File > Save to save this file. Keep it open for the next part of this lesson.
Finishing up the illustration
In this next part of the lesson, you have some freedom to choose various fills. You can either use our suggestions, or pick your own. We have saved views in this file to make it easy for you to zoom into certain areas.
1 Choose View > Eyes. You are zoomed into the eye area.
 You can save views too. All you need to do is choose View > New View when you are in a view you would like to save.
2 Using the Group Selection tool (![]() ), Shift+click the two large circles creating the irises of the eyes, and then choose the swatch Purple Radial.
), Shift+click the two large circles creating the irises of the eyes, and then choose the swatch Purple Radial.
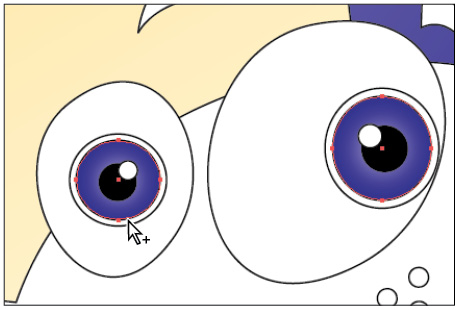
Color the iris of the eye.
3 Now press Ctrl+0 (zero) (Windows) or Command+0 (zero) (Mac OS) to fit the artboard to the window.
4 Using the Group Selection tool select the face, arm, belly, and three fingers (on the left side of the gift).
5 Select the color named Skintone 7 from Fill in the Control panel, or the Swatches panel.

Add skin color to the boy holding the gift.
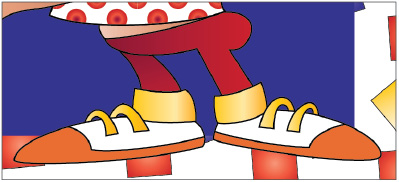
6 Choose View > Shoes. The saved Shoes view is applied.
7 Apply colors that you like to the shoes, pants and shoelaces.

Choose colors for the shoes and pants.


8 Select View > Face. The face is now zoomed into.
9 Using the Group Selection tool, select the tassel on the hat and change it to my red gradient.
10 Using the Group Selection tool, select the hair and eyebrows, and then select the swatch named Autumn Dark Gold.
Change the color of the hair, eyebrows, tongue, and tassel.
11 Finish off the illustration by selecting the tongue and changing its fill to the red linear gradient.
12 Choose File > Save. Keep this file open for the next part of this lesson.
Creating a color group
In this part of the lesson, you will store all your used colors into a color group. By creating a color group, you can easily reference colors and apply them to other artwork. First of all, you will save a new version of your illustration.
1 Choose File > Save As. If necessary, browse to save your file in the ai06lessons folder. In the File Name text field, type ai0601_colorguide.ai, and then click Save. When the Illustrator Options dialog box appears, click OK.
2 With the Selection tool (![]() ), press Ctrl+A (Windows) or Command+A (Mac OS) to select all the objects in the illustration.
), press Ctrl+A (Windows) or Command+A (Mac OS) to select all the objects in the illustration.
3 From the Swatches panel menu (![]() ), choose New Color Group. The New Color Group dialog box appears.
), choose New Color Group. The New Color Group dialog box appears.
4 Type Party Colors. Make sure that Selected Artwork is selected, and that the two options below are selected. Click OK. A color group has been added to the Swatches panel.

Select the colors you want to create a color group.
The result.
Using the Color Guide
Now that you have stored your original colors in the Swatches panel, you will reduce the illustration to one color using the Color Guide.
The Color Guide provides you with inspiration as you apply color to your artwork. It suggests harmonious colors based on the color that is active in the Tools panel. You can change the suggested colors by changing the harmony rule, which is the method by which the Color Guide panel makes its color suggestions. Let’s see how you can use the Color Guide panel to translate your artwork into one color.
1 Choose Select > All to select the illustration.
2 Choose Window > Color Guide to open the Color Guide panel.
3 Click the Edit or Apply Colors button at the bottom of the Color Guide panel. The Recolor Artwork dialog box appears. If you have Recolor artwork checked in the lower-left corner, the artwork is automatically recolored, based upon the default selection in the Harmony Rules drop-down menu.

Choose to recolor the artwork.
4 Choose different options from the Harmony Rules dialog box to experiment with color and your illustration.
5 Click Edit to see the color wheel and click and drag to make additional color selections.
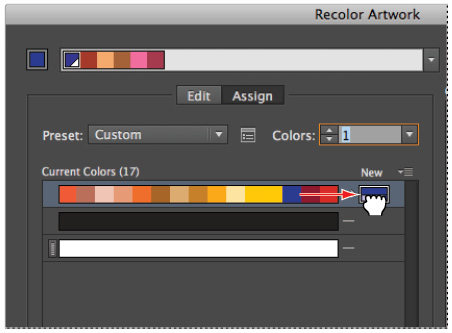
6 When you are finished experimenting, click back on Assign, then choose 1 from the Colors drop-down menu. All colors are assigned (as tints) to one color.

Convert all colors to tints of one color.
Next, you will change that color.
7 Select the blue color that appears in your original colors and drag it on top of the assigned color (on the right). The illustration is now created from tints of your blue color. Click OK. If a dialog box opens asking you if you want to save changes to your swatch group, click Yes.
Click and drag a color to assign it.
8 Choose File > Save to save your file.

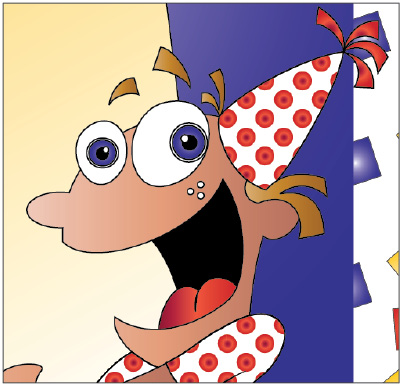
The completed illustration.
Self study
Return to the 0601_work.ai file (Save another version if you like), and make these changes to it:
1 Explore the possibilities with transparent gradients by changing the opacity on the selected gradient stopper. You can also use gradients on strokes.
2 Create a new pattern to use in the background, and replace the existing one.
3 Bring the Illustration down to four colors using the Recolor artwork dialog box.
Have fun, make changes, and save multiple versions if you are afraid of destroying your artwork.
Review
Questions
1 What key do you press and hold when replacing a gradient or pattern swatch?
2 What are two methods you can use to change the angle of a gradient?
3 How do you create a pattern?
4 How can you extract all the colors that you used in an illustration?
5 How do you edit an existing pattern?
Answers
1 To replace a gradient or pattern swatch, press and hold the Alt/Option key as you drag a new swatch version on top of the original.
2 You can change the angle of a gradient by clicking and dragging over a selected object (that has a gradient applied to it) with the Gradient tool, or you can input an angle into the Angle text field in the Gradient panel.
3 To create a pattern, you can create the artwork that you want to repeat and then drag it into the Swatches panel. If you want a tile to repeat, you can create a bounding box behind the artwork. Note that if the bounding box has a stroke applied, it will be visible in the repeat.
4 You can save used colors by selecting the illustration, then selecting New Color Group from the Swatches panel.
5 You can edit an existing pattern by dragging it from the Swatches panel to the pasteboard. Make the changes that you want and then Alt/Option drag it back on top of the original pattern (in the Swatches panel).