
Lesson 2: Getting to Know the Workspace

The Adobe Illustrator workspace includes tools, panels, and windows that you use to create and manipulate your artwork. In this lesson, you find out where all these necessary components are located and how they can be organized. You also discover how to customize the workspace for your specific needs.
What you’ll learn in this lesson:
- • Opening an existing Illustrator file
- • Navigating the document window
- • Finding and using common panels
- • Selecting and using tools
- • Saving workspaces and keyboard shortcuts
Starting up
Before starting, make sure that your tools and panels are consistent by resetting your workspace. See “Resetting Adobe Illustrator CC Preferences” in the Starting up section of this book.
You will work with several files from the ai02lessons folder in this lesson. Make sure that you have loaded the ailessons folder onto your hard drive from www.digitalclassroombooks.com/epub/illustratorcc. See “Loading lesson files” in the Starting up section of this book.
Opening Illustrator
When you launch Illustrator for the first time you will see the Tools panel on the left, Menu bar at the top, and panels on the right.

The Illustrator CC workspace as it appears when first launched.
Exploring the Illustrator CC interface
You can adjust the interface incrementally from bright to dark, giving you the ability to choose a design that is more pleasing to the eye than previous versions. Additionally, the canvas color can be keyed to match the brightness of the interface, toning down the white expanse on either side of the artboard.
1 Choose Edit > Preferences > User Interface (Windows) or Illustrator > Preferences > User Interface (Mac OS) to display the new interface options.
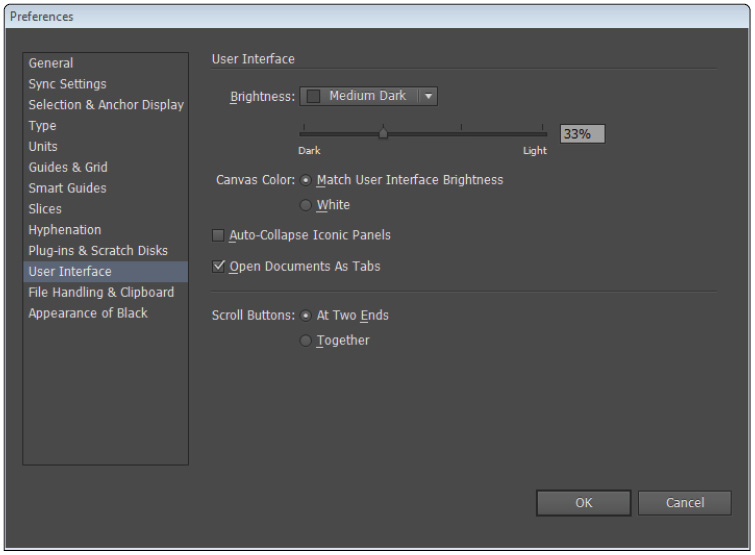
Change the contrast settings of the Illustrator CC workspace.
2 From the Brightness drop-down menu, choose Medium Light to return the interface to the brighter contrast of previous settings.
3 Drag the slider below from Light to Medium Dark to return the interface to the low-contrast view that is the default in Illustrator CC.
4 Under Canvas Color, verify that Match User Interface Brightness option button is selected. This will ensure that the canvas remains consistent with the contrast of the rest of the workspace.
5 Leave the other settings at their defaults, and click OK.
Choosing a workspace
Workspaces define which panels are visible on your screen. Illustrator starts you off with a number of workspaces: Automation, Essentials, Layout, Painting, Printing and Proofing, Tracing, Typography and Web. You will learn a little more about these later in the lesson.
1 Choose the Essentials workspace from the Workspace Switcher drop-down menu, in the top right corner of the screen, to display the Illustrator Application bar, Tools panel, Control panel, and five panel groups that are collapsed into tabs and docked on the right side of the workspace.
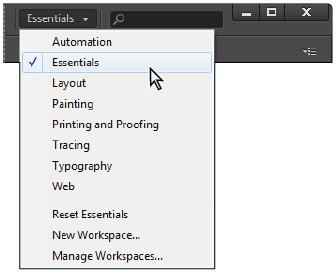
Choosing the Essentials workspace displays the most commonly used panels.
You could also have selected the Typography workspace, which gives you instant access to the docked, expanded panels you’ll use most frequently for type formatting, or the Painting or Printing and Proofing workspaces, which are reserved for those common Illustrator functions.
2 Click one of the icons in the panel docking area on the right side of the workspace. This expands the panel. Click the same panel icon again to collapse the panel.

Click the panel icon to expand the panel.
The panels currently listed in the dock are displayed by default, but you can add any panel to the workspace by selecting it specifically from the Window menu. You can also save and manage your own custom workspaces from the Window > Workspace menu. These functions are described in more detail later in this lesson.
Opening a file
To begin this lesson, you’ll open an existing file using Adobe Bridge.
1 Choose File > Browse in Bridge to open Adobe Bridge. In Bridge, if the Folders panel is not in the foreground, select the Folders tab (by default in the upper-left of the Adobe Bridge workspace) to bring it forward, then choose Desktop from the list of folders.
2 In the large Content panel to the right of the Folders panel, double-click the ailessons folder that you copied onto your computer, and then open the ai02lessons folder.
3 Locate and double-click the file named ai0201.ai to open it within Illustrator.
 A Convert to Artboards dialog box might appear when you open certain files. Click OK to continue opening the file.

Illustrator files can be opened using Adobe Bridge.
4 In Illustrator, choose File > Save As. In the Save As dialog box, navigate to the ai02lessons folder. In the Name text field, type ai0201_work.ai and click Save.
 If a dialog box appears warning you about converting spot colors in transparency to process colors outside of Illustrator, take note, then click Continue.
5 In the Illustrator Options dialog box, make sure the Version is set to Illustrator CC, and the other settings are at their defaults, and click OK.
The document window
The document window displays the entire contents of your file. In this example, it shows a design for the liner notes (front and back) for a CD. In addition to the artwork, the document window also displays the following:
- • Artboards: The artboard represents the printable page containing your artwork. It’s bounded by solid lines and can be enlarged or reduced to accommodate larger or smaller artwork. The default artboard size is U.S. Letter (8.5 inches wide by 11 inches tall), but it can be set as large as 227 inches by 227 inches, or almost 19 feet by 19 feet. You can have up to 100 artboards in a single Illustrator document. You will use multiple artboards later in this lesson.
- • Scratch Area: The scratch area is a space for experimenting with and storing elements of your design before moving them onto the artboard. It consists of the blank area outside of the artboard, and extends to 227 inches in each direction. Although visible on screen, elements placed on the scratch area will not print, and should be removed before printing to reduce file complexity.
- • Imageable and Non-imageable Areas: The imageable and non-imageable (or printable and non-printable) areas of a page can also be displayed on the Illustrator artboard, and are delineated by a series of dotted lines. To see the printable area you can choose View > Show Print Tiling.
 If you turned on the print tiling view, turn it back off by selecting View > Hide Print Tiling. Since you are using multiple artboards, the print tiling is not accurate at this time.
Using Artboards
Adobe Illustrator offers the ability to build illustrations using multiple artboards. This gives you the ability to crop several pieces of artwork to different sizes, print components of your illustration separately, as well as provide you with an easy method to keep related artwork together. You can have up to 100 artboards per document (depending on the size of those artboards). You can specify the number of artboards for a document when you create it, and add and remove artboards at any time. You can create artboards in different sizes, resize them by using the Artboard tool, and position them anywhere on the screen—even overlapping one another. In this lesson file, two artboards are used: one for the front side of the artwork, and one for the back.
Navigating multiple Artboards
You can easily navigate artboards by clicking and holding the Artboard Navigation drop-down menu in the lower-left of the work area.
1 Click and hold the Artboard Navigation drop-down menu in the lower-left and choose 2. This navigates you to the second artboard.
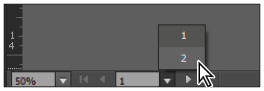
Click and hold Artboard Navigation to switch from one artboard to another.
2 Press Ctrl+0 (zero) (Windows) or Command+0 (zero)(Mac OS) to fit the artboard into the window.
3 Click the Previous button to navigate to Artboard 1.

Navigate to the other artboards by using the arrows.
Using the Artboards panel
You can manage your artboards more easily by using the Artboards panel. Using the Artboards panel, you can select, add, reorder, and duplicate artboards.
1 Choose Window > Artboards to show the Artboards panel.
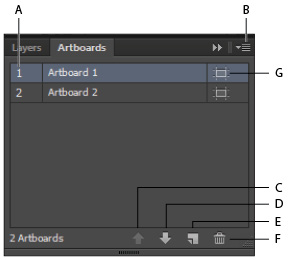
A. Name and number of artboard. B. Panel Menu. C. Move Up. D. Move Down. E. New Artboard. F. Delete Artboard. G. Page Icon.
2 Double-click the number to the left of Artboard 2 in the Artboards panel to view the second artboard.
3 Click the page icon to the right of Artboard 2, in the Artboards panel, to open the Artboard options. Type Artwork-Back into the Name text field. Notice that you can change the size of an artboard using the Artboard Options dialog box. In this example, you will only change the name. Click OK.

The Artboard Options dialog box.
Creating new Artboards
Now that you know how to navigate from one artboard to another, you can give creating a new one a try. In this example, you will duplicate one of the existing artboards.
You can create a new artboard using several methods:
- • Click the New Artboard button (
 ) in the Artboards panel. This creates a new artboard for you to work with that is the same size as the artboard you selected. This is good if you are working on a project that has multiple pages, or a front and back as in our example.
 - • Create a custom artboard by selecting the Artboard tool (
 ) in the Tools panel, and then clicking and dragging a new artboard anywhere in your document window.
 - • Duplicate an existing artboard by selecting it in the Artboards panel and then selecting Duplicate Artboards from the panel menu.
To duplicate an artboard, follow these steps.
1 Select Artboard 1 in the Artboards panel, then click the panel menu (![]() ) to select Duplicate Artboards. The artboard is replicated, and Artboard 1 copy appears in the Artboards panel.
) to select Duplicate Artboards. The artboard is replicated, and Artboard 1 copy appears in the Artboards panel.

Duplicating an existing artboard.
2 With Artboard 1 copy still selected, click the Delete Artboard button at the bottom of the Artboards panel. The new artboard is deleted, but the artwork is still positioned in the scratch area of the document. When using the Artboard panel, the artwork can be repositioned using an artboard, but does not delete with it.
3 Choose File > Revert to return to the last saved version of this file. When asked if you want to Revert to the saved version of the document, click Revert.
Switching screen modes
For easier viewing of the artwork, the display properties of the document window and accompanying menu bar can be changed by switching screen modes. By switching screen modes, you can open up your workspace.
1 With the ai0201_work.ai file open, click the Change Screen Mode button (![]() ) at the bottom of the Tools panel to expand the Screen Mode drop-down menu, and cycle through the options.
) at the bottom of the Tools panel to expand the Screen Mode drop-down menu, and cycle through the options.

Switching screen modes allows easier viewing of artwork.
2 If necessary, choose Normal Screen Mode to show the artwork in a standard document window that contains a menu bar, scroll bars, and a title bar.
3 Choose Full Screen Mode with Menu Bar to show the artwork in a full-screen document window with only a menu bar (and no scroll bars or title bars).
4 Choose Full Screen Mode to show the artwork in a full-screen document window without menu bars, or title bars.
Even without the Tools panel in view, you can still access the tools using keyboard shortcuts. In this next section, you have the opportunity to use some of these shortcuts; you can find more in the Tools panel section in this lesson.
5 Press Z. The cursor turns into the Zoom cursor (![]() ). Click to zoom into the image.
). Click to zoom into the image.
6 Now press V. By pressing V, you have switched to the Selection tool. Each tool has a keyboard shortcut to access it. You will discover more shortcuts later, in this lesson, in the section covering the Tools panel.
7 Press the Escape key to return to Normal Screen mode to continue this lesson.
Changing your view
Because you’ll be creating artwork visually in Illustrator, the way in which that artwork is displayed on-screen (the size, color, and location of objects) is a primary concern. Illustrator provides the flexibility with which you can change the view of your artwork to best suit your needs.
Preview versus Outlines
By default, Illustrator displays artwork colors, gradients, meshes, and complex paths. The more complex the elements are, the more time it takes Illustrator to render the artwork. This can cause a delay when you are editing an illustration.
You might also discover that attributes of the objects that you are creating, such as strokes and colors, can make it difficult to make precise adjustments to detailed artwork. To help you, Illustrator provides you with several view modes, the most commonly used modes being the Preview (default) and Outline modes.
1 To toggle between view modes, choose View > Outline, or use the keyboard shortcut Ctrl+Y (Windows) or Command+Y (Mac OS). In Outline mode, Illustrator displays artwork so that only its outlines (or paths) are visible.

Viewing artwork in Outline mode displays only the paths used to build it.
2 Choose View > Preview. In Preview mode, the paint attributes of the artwork are displayed.
Zooming and scrolling
It is amazing how details seem different when you zoom in and out of artwork. Usually, you discover that the artwork isn’t as precise as you think it should be. Fortunately, you have the opportunity to zoom in to 6400 percent in Adobe Illustrator CC. Keep in mind that changing the view of a file changes the on-screen display only, not the actual size of your artwork. There are many ways to change the view of your artwork in Illustrator:
Zooming with the View commands
The easiest, but most time-consuming, method for zooming in and out is using the View menu. You will be using keyboard shortcuts throughout the lessons in this book, but it is helpful to know where you can find the zoom menu items in case you have a lapse in keyboard shortcut memory.
1 Choose View > Zoom In to enlarge the display of the CD artwork. The view depth increases incrementally each time you choose View > Zoom In from this menu, and allows you to closely examine portions of the design that were not otherwise visible.

Commands under the View menu allow you to change the magnification of your artwork.
2 Choose View > Zoom Out to reduce the display of the CD artwork. The view depth decreases incrementally each time you choose View > Zoom Out from this menu, and allows you to view the artwork from a distance to see how the elements work together.
 By default, Illustrator zooms in or out on the center of your document window when the View commands are used. You can then scroll to different areas of your artwork using the scroll bars.
Keep in mind that the Illustrator Artboard can be up 227˝ × 227˝. If your artboard is much smaller, perhaps letter-sized, that remaining area becomes your scratch area. The scratch area frequently becomes “nowhere land” for new users as they accidently navigate into blank space. Once in this blank area, it can be difficult to find your artwork again.
3 Choose View > Fit All in Window to instantly center the document window (both artboards) into your viewing area. The keyboard shortcut is Alt+Ctrl+0 (zero) (Windows) or Option+Command+0 (zero) (Mac OS).
4 If the Artboards panel is not visible, choose Window > Artboards now. Double-click the number to the left of Artboard 1 to make sure it is the selected artboard. Choose View > Fit Artboard in Window to center the artboard only in the workspace.
Zooming using the View Depth text field and drop-down menu
Whenever you zoom in or out on your artwork, the view depth percentage is displayed in a field in the lower-left corner of the document window. This field, along with an attached drop-down menu, allows you to make further changes to the view depth of your artwork.
1 In the lower-left corner of the document window, type 120% into the View Depth text field. Typing into this field allows you to choose whatever enlargement or reduction percentage you’d like to view your artwork at. Press Enter (Windows) or Return (Mac OS) on your keyboard to enlarge the view of your artwork to 120 percent.

Type 120% in the View Depth text field to zoom in on the document.
2 Click the arrow to the right of the View Depth text field. A drop-down menu appears that allows you to choose a preset zoom percentage, from 3.13 percent to 6400 percent, by selecting it.
3 Choose 66.67 percent from the drop-down menu to continue this lesson.
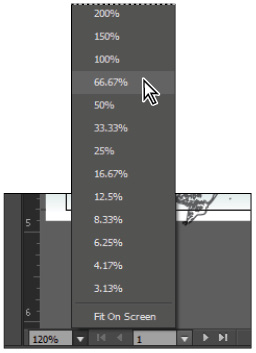
Choose magnifications from 3.13 percent to 6400 percent.
Zooming with the Zoom tool
1 Select the Zoom tool (![]() ) from the Tools panel on the left of the workspace.
) from the Tools panel on the left of the workspace.
2 Using the Zoom tool, click the photo of the guitarist in the lower-left corner of the document window to enlarge the view. Each click enlarges the photo at a higher (preset) magnification.
3 Press and hold the Alt (Windows) or Option (Mac OS) key on your keyboard, and note that the zoom cursor now contains a minus sign (![]() ).
).
4 Click the photo of the guitarist to reduce the view of the photo. Release the Alt (Windows) or Option (Mac OS) key to return the Zoom tool to its default Zoom In function.
You might have discovered that by clicking to Zoom (with the Zoom tool) that you have very little control over the resulting zoomed in view. You can better control your zooming by clicking and dragging with the Zoom tool selected.
5 With the Zoom tool, drag a marquee (box) around the photo of the guitarist to zoom in on that particular area of the artwork, without the redundancy of clicking multiple times. Note that you cannot draw a marquee to reduce the display size.

Drag a marquee around selected portions of your artwork with the Zoom tool.
There might be times when you wish to access the Zoom controls without leaving the active tool. You can use keyboard shortcuts to temporarily activate the Zoom tool, then quickly return back to your work in progress.
6 Press V to switch to the Selection tool.
7 Press and hold the Ctrl+Spacebar keys (Windows) or Command+Spacebar (Mac OS) to temporarily switch to the Zoom tool. Note that on the Mac OS, you can start Spotlight, which will not affect the Zoom tool in Illustrator.
8 While keeping the Ctrl/Command+Spacebar keys pressed, click and drag in any area in the image to zoom into a specific area.
9 Release the Ctrl+Spacebar, or Command+Spacebar, and the tool is returned to the Selection tool.
10 Easily zoom back out by pressing Ctrl+0 (zero) (Windows) or Command+0 (zero) (Mac OS).
Scrolling with the Hand tool
Much like moving a piece of paper around on your desk, you can use the Hand tool to push your artboard around. This is much more time efficient than using the scroll bars, and you can even access the Hand tool without leaving any other tools that you have active.
1 Select the Hand tool (![]() ) from the Tools panel.
) from the Tools panel.
2 Click and drag in the document window. The artwork moves in the direction you drag.

The Hand tool moves the artwork as if it were a piece of paper on your desk.
3 Now press V to return to the Selection tool, click any item to select it, then press and hold the spacebar. Notice that the cursor now changes into the Hand tool.
4 Click and drag to reposition your artboard, then release the spacebar. You are returned to the Selection tool. This feature is extremely handy, especially when you are working with operations that require you to be zoomed into your artwork.
The Hand tool can also be used as a Zoom tool, to fit all artwork in the document window.
5 Double-click the Hand tool in the Tools panel to return the file to Fit Artboard in Window view.
Changing views with the Navigator panel
If you prefer a more visual method for zooming in and out of an image, you can use the navigator panel.
1 Choose Window > Navigator to open the Navigator panel.
2 In the Navigator panel, click the Zoom In button (![]() ) at the bottom-right of the panel, or drag the slider to the right to enlarge the view percentage of your artwork. As you do so, watch the View Depth percentage change in the lower-left corner of this panel, and stop enlarging when you reach 150 percent. If it is easier, you can type 150 into the view percentage text box. The current view of your artwork increases to 150 percent.
) at the bottom-right of the panel, or drag the slider to the right to enlarge the view percentage of your artwork. As you do so, watch the View Depth percentage change in the lower-left corner of this panel, and stop enlarging when you reach 150 percent. If it is easier, you can type 150 into the view percentage text box. The current view of your artwork increases to 150 percent.
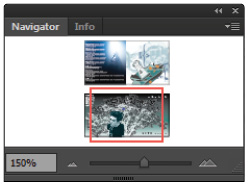
The Navigator panel.
3 Note that a red box is visible in the panel, showing the content currently being displayed inside your document window. This red box shrinks as you increase the magnification of your artwork, and can also be used to scroll around your illustration. Position your cursor over the red box in the Navigator panel, and when the cursor changes to a hand, drag the red box to scroll to the lower-left corner of the artboard. This allows you to view the intricate branches of the tree illustration in closer detail.

Using the Navigator panel simplifies the process of zooming and scrolling in your artwork.
4 In the Navigator panel, drag the slider to the left to reduce the view percentage of your artwork. Note that the red box increases in size to show the increased content inside your document window.
5 Position your cursor over the red box in the Navigator panel, and when the cursor changes to a hand, drag the red box to scroll to the upper-right corner of the artboard. This enables you to view the guitar illustration from farther away and see how it interacts with the other parts of the design.
6 Control the zoom even more by pressing and holding the Ctrl key (Windows) or Command key (Mac OS) and then dragging over an area that you want to zoom into in the Navigator panel. By essentially drawing a zoom area with the cursor, you control the final zoom result in the artboard.
7 Type 100 into the View Depth text field in the Navigator panel and press Enter (Windows) or Return (Mac OS) to return to actual size.
The Tools panel
In Illustrator, you use the tools in the Tools panel to create, select, and edit portions of your Illustrator artwork.
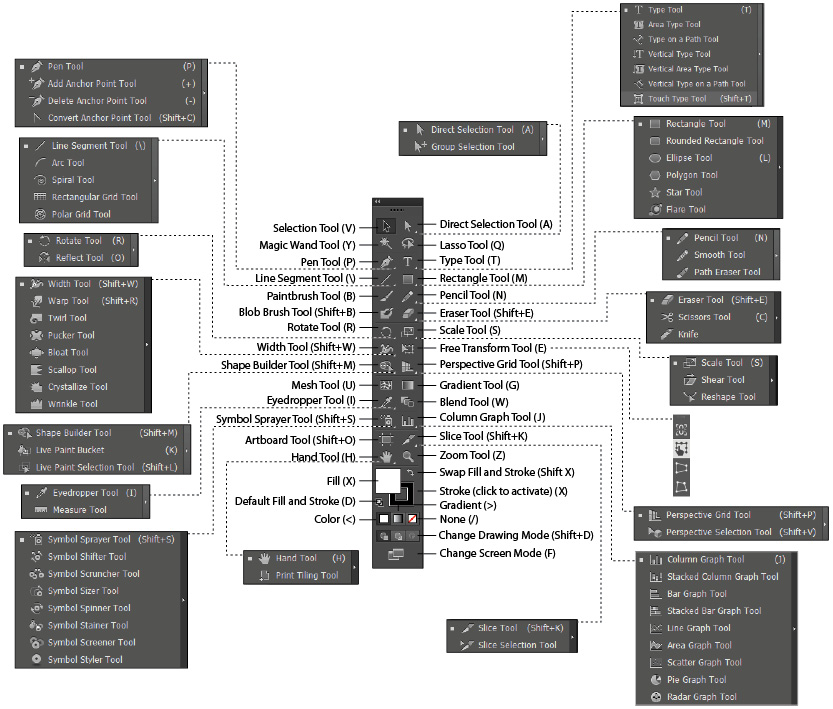
The Tools panel provides the means for creating, selecting, and editing artwork.
 Nearly all the tools in the Tools panel have keyboard shortcuts that can be used to access them. Place your cursor over a tool in the panel to display its tooltip, which includes the tool’s name and its shortcut (in parentheses).
Using tools and panels
To keep all the options organized, Adobe Illustrator uses panels. Some panels are displayed in the default Illustrator workspace, and all other panels can be displayed by choosing them from the Window menu. Most panels have panel menus containing options specific to that panel’s functions.
By default, when you open Illustrator, you’ll see the Essentials workspace. The Essentials workspace includes the Tools panel on the left side of your screen, the Control panel at the top of your screen (under the application bar), and five panel groups collapsed into the panel dock on the right side of your screen.
1 The Selection tool (![]() ) is used to identify objects in your artwork for editing. Choose the Selection tool from the Tools panel.
) is used to identify objects in your artwork for editing. Choose the Selection tool from the Tools panel.
2 Select the closeup photo of the guitarist in the lower part of your document window.
3 Certain tools offer additional options for selecting, drawing, painting, and repositioning objects. To access the Selection tool’s options, double-click the Selection tool in the Tools panel. In the Move dialog box that appears, activate the preview option to explore the possibilities. For example, you can use your up or down cursor keys in the fields, to reposition the photo. Click the Cancel button when you are finished experimenting.
4 To switch to another tool, you can either click the new tool to select it, or access it using a keyboard command. Press T on your keyboard or select the Type tool (![]() ) in the Tools panel to access the Type tool.
) in the Tools panel to access the Type tool.
5 Using the Type tool, select the s in the word sketch in the top-right corner of the artwork’s bottom panel, and type an uppercase S to replace it.
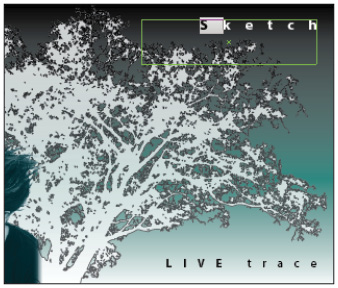
Replace the character using the Type tool.
 Due to the spacing between the letters, you might have some difficulty selecting just the letter S. If this is the case, click to the left of the letter K, press and hold the Shift key, and then press the left arrow once.
6 Press the Esc key. This closes the text frame and returns you to the Selection tool.
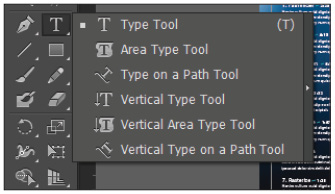
Hidden tools
Some tools in the Tools panel have white triangles in the lower-right corner of their icons, which indicate that there are hidden (related) tools beneath them.
1 Choose Select > Deselect to deselect items on the artboard that might be selected, then click and hold the Type tool (![]() ) in the Tools panel.
) in the Tools panel.
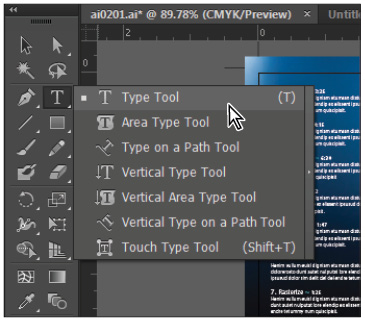
Some tools have hidden tools nested beneath them.
2 Notice the keyboard shortcuts in parenthesis for the Type Tool (T) and the new Touch Type Tool (Shift-T) that appear while pressing and holding the mouse button to reveal hidden tools.

Tooltips display tools’ names.
 These and other keyboard shortcuts can be changed and saved as part of a personal workspace. Techniques for creating shortcuts and saving workspaces are discussed later in this lesson.
Tearing off tools
Related tools (both default and hidden) can be separated from the Tools panel and displayed as a separate, repositionable panel.
1 Click and hold the Type tool in the Tools panel. With the mouse button held down, move the cursor to the tab marked with an arrow at the far right of the hidden tools menu.
Tearoff tabs allow you to separate groups of tools.
2 When the tooltip Tearoff appears, release your mouse button to tear off the tools into a separate panel.
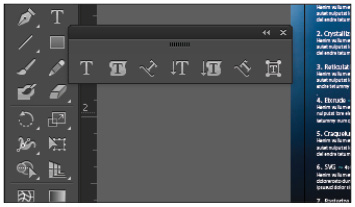
The separated tools.
 In Illustrator CC, you can tear off and dock previously hidden tools, such as the Shape and Pen tools. You can also dock tools horizontally or vertically for a more efficient workspace.
Adjusting the Tools panel
The Tools panel can be reconfigured to different views, and repositioned to different locations on your screen.
1 To change the visual configuration of the Tools panel, click the double-arrow in the upper-left corner of the Tools panel to change it from its default two-column configuration to a one-column configuration.
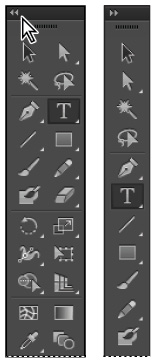
Change the column width of the Tools panel from two columns to one column by clicking the double arrows at the top of the panel.
2 Select the double arrow again to return the Tools panel to two-column view.
3 To move the Tools panel, click the dark gray bar at the top of the Tools panel and drag it to a new location on your screen.
4 Release the mouse button when the Tools panel is at the desired location.
5 Dock your Tools panel at any time by dragging it back to the left side of the workspace and pausing. When a blue bar appears, release the mouse. The Tools panel is docked again.

Dock the Tools panel by dragging it back to the left side of the workspace.
The Control panel
The Control panel provides easy access to options used to modify your artwork. It is context-sensitive, meaning that the options displayed will change depending on the type of object you select, and the tool you used to select it. For example, text-formatting settings are displayed in the Control panel when a text object is selected in your artwork.
![]()
When text is selected in your artwork, text-formatting settings are displayed in the Control panel.
When an option name is orange and underlined in the Control panel, you can click it to display a related dialog box or panel. Click anywhere outside the panel or dialog box to close it.
You can customize the content of the Control panel at any time by making choices from its panel menu.
1 Click the Control panel menu button (![]() ) in the upper-right corner of the Control panel to show the settings that can be displayed in the Control panel. Those that are currently being displayed have check marks next to them.
) in the upper-right corner of the Control panel to show the settings that can be displayed in the Control panel. Those that are currently being displayed have check marks next to them.
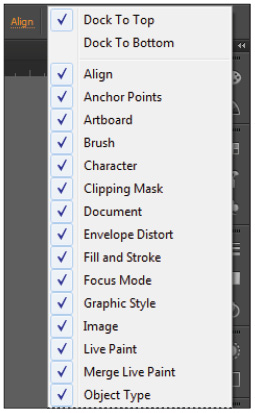
The Control panel options can be found by clicking the panel menu button.
2 Select Fill and Stroke from the menu, and notice that the Fill and Stroke settings disappear from the Control panel to the left.
3 Access the panel menu again, and select Fill and Stroke again to turn these settings on in the panel.
Moving the Control panel
As with other panels, the Control panel can be repositioned on your screen to further customize your workspace.
1 Drag the dashed bar on the left edge of the Control panel away from its default position.
2 Drop the Control panel at another location in your workspace.
3 From the Control panel menu (![]() ), choose Dock to Top or Dock to Bottom to change the docking location of the panel.
), choose Dock to Top or Dock to Bottom to change the docking location of the panel.
 You can quickly find what you need in Illustrator CC’s more efficient Control panel, now with consistency across options, anchor point controls, clipping masks, envelope distortions, and more.
Panel groups and the dock
The ability to arrange panels in groups, and then dock them to the Illustrator workspace, allows for both better organization and increased functionality.
Panel groups
Panels with related functions can be nested and displayed together in panel groups. An example is the Navigator panel (described earlier in this chapter), which is part of a panel group that also includes the Info panel.
1 From the Window menu, choose Window > Align. The Align panel appears as part of a panel group that includes the Transform and Pathfinder panels.
2 Choose Window > Attributes to also display the Attributes panel in the workspace.
3 Select the Attributes tab at the top of the Attributes panel and drag it to the Align panel.

Drag the Attributes tab to the Align panel.
4 Release the mouse button to add the Attributes panel to the panel group.
Release the mouse button to add the Attributes panel to the group.
5 To remove the Align panel from the panel group, select the Align tab at the top of the panel and drag it away from the panel group you just created.
6 Release the mouse button to separate the Align panel from the panel group.
Using the dock
If you choose, you can store panels and panel groups in the panel dock, located on the right side of your screen. In the Essentials workspace, there are five panel groups displayed by default, including panels such as Color, Swatches, Stroke, Appearance, and Layers.
1 To dock a panel, select the Align panel, which you made independent in the last exercise, and drag it to the dock at the top, bottom, left, right, or in between existing panels.
2 When you see a light-blue line marking the panel’s desired position in the dock, release the mouse button and the panel becomes docked.

Drag a panel by its tab, and position it over the dock to store it there.
Docking a panel group
To dock a panel group, you’ll need to drag the group by its title bar (not individual panel tabs) into the dock.
1 Select the bar at the top of the Attributes panel and drag it into the dock.
2 Release the mouse button when a light-blue line marks the panel’s desired position, and it becomes docked.
Removing a panel or panel group from the dock
To remove a panel or panel group, drag it out of the dock by its tab or title bar. You can drag it into another dock or make it free-floating.
1 To remove a panel from the dock, select the desired button and drag it away from the dock. To remove a panel group, select the dashed bar at the top of the group in the dock and drag it away from the dock.
2 Release the mouse to move it into another dock or make it a floating panel group.
 If you remove all panels and panel groups from the dock, the dock will disappear. It will reappear when new panels or groups are dragged into it.
Adjusting the dock
Like the Tools panel (which, incidentally, can also be docked), the panel dock can be reconfigured to further customize your workspace.
1 To change the configuration of the dock, press the double arrow in the upper-right corner of the dock to expand all the panels therein to their full width.
Press the double arrow at the top of the dock to change from Icon to Expanded mode.
2 Press the double arrow again to collapse the panels to icons.
3 Expand the width of panels in the panel dock by clicking and dragging the left side of the dock to the left.
4 Reduce the width of panels in the panel dock by clicking and dragging the left side of the dock to the right.
5 Alternately, double-click the dark gray bar at the top of the dock to toggle between Icon and Expanded modes.
Custom workspaces
Once you’ve configured, moved, and manipulated Illustrator’s panels to your liking, you can save custom workspaces and switch among them.
Saving workspaces
When you save the current size and position of panels as a custom workspace, you can restore that workspace even if you’ve moved or closed panels in the meantime.
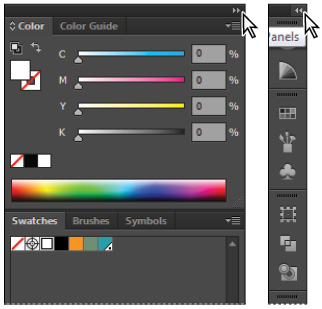
1 Dragging them by their name tabs, pull the Color and Swatches panels out from the dock and drop them on your artboard. Nest the Swatches panel inside the Color panel by dragging it on top of the Color panel. Drag the new panel group by its title bar and position it next to the Tools panel on the left side of your screen.
2 Collapse all other panels in the dock by clicking the double-arrow in the upper-right corner of the dock.
3 To save this customized workspace, choose Window > Workspace > New Workspace.
4 In the New Workspace dialog box, type Color Workspace in the text field to label your new workspace, and click OK.
5 Choose Window > Workspace again, and notice that your named workspace is now at the top of the list.
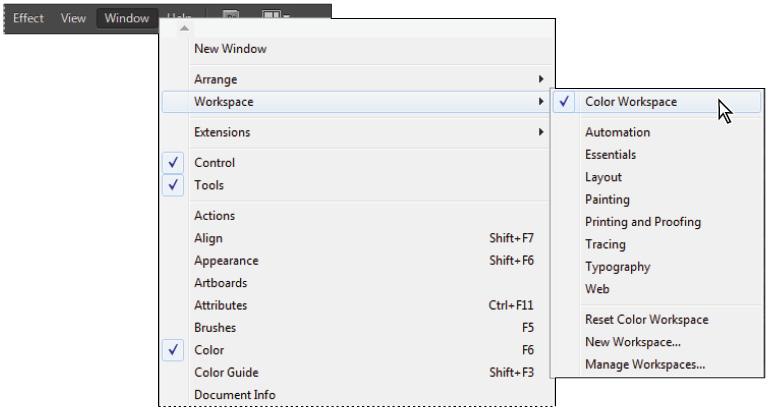
Choose Window > Workspace to save a customized workspace.
6 To restore a default workspace, choose Window > Workspace to display both the preset workspaces and the custom workspace you just saved. Choose Essentials, then choose Window > Workspace > Reset Essentials to return to that workspace. All panels return to their original appearance.
Now you can see how Illustrator allows you to return to the custom workspace you’ve saved.
7 To restore your custom workspace, choose Window > Workspace, noting that your Color Workspace appears at the top of the list. Choose the Color Workspace from the list to return to that workspace. All panels return to the customized appearance you chose to save.
Using the Manage Workspaces dialog box
Custom workspaces can also be saved (and deleted) using the Manage Workspaces dialog box.
1 To add a new custom workspace using the Manage Workspaces feature, choose Window > Workspace > Manage Workspaces. The Manage Workspaces dialog box appears.
2 Click the New Workspace button (![]() ) at the bottom of this dialog box to save the current panel configuration as a custom workspace.
) at the bottom of this dialog box to save the current panel configuration as a custom workspace.
3 Name the new workspace Color Workspace 2 in the text field at the bottom and click OK. You are creating this replica merely to practice deleting an undesired workspace.
4 Your new workspace is added to both the list in the Manage Workspaces dialog box, and the Window > Workspace menu.

Choose Window > Manage Workspaces to add and delete custom workspaces.
Deleting a custom workspace
Using the Manage Workspaces dialog box to delete a custom workspace is just as easy as it was to add one.
1 To delete a custom workspace using the Manage Workspaces feature, choose Window > Workspace > Manage Workspaces. The Manage Workspaces dialog box appears.
2 Select the Color Workspace 2 you just added from the list at the top.
3 Click the Delete button (![]() ) at the bottom of the dialog box.
) at the bottom of the dialog box.
4 The Color Workspace 2 is deleted from both the list in the Manage Workspaces dialog box and the Window > Workspace menu. Click OK.
5 Choose Window > Workspace > Essentials to revert back to the original workspace.
 The default workspaces are not listed in the Manage Workspaces dialog box and cannot be deleted.
Customizing keyboard shortcuts
A keyboard shortcut is a combination of keys that, when pressed simultaneously, perform some task that ordinarily could take longer to do if you use a mouse or other input device. In Illustrator, keyboard shortcuts are provided for many tools and commands to save you the trouble of searching for these options in its menus and panels. You can view a list of all the shortcuts, and create or edit your own, using the Keyboard Shortcuts dialog box.
Default shortcuts
Illustrator’s set of default shortcuts can be viewed and printed from an easy-to-create plain-text file.
1 To view a list of default keyboard shortcuts, choose Edit > Keyboard Shortcuts.
2 In the Keyboard Shortcuts dialog box, choose Illustrator Defaults from the Set drop-down menu.
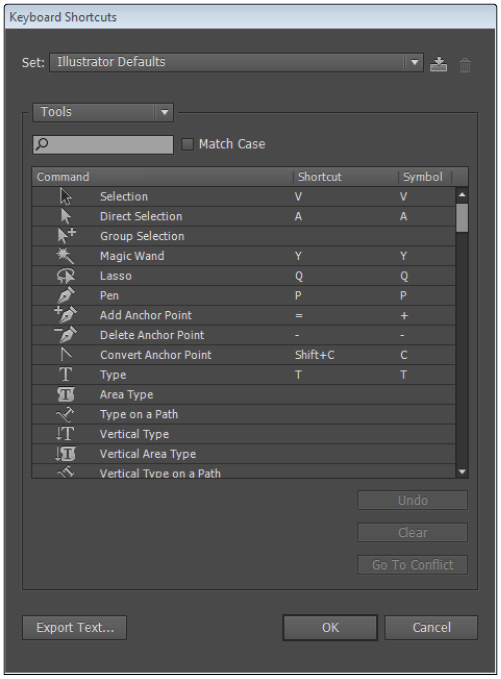
The Keyboard Shortcuts dialog box allows you to view a list of all shortcuts, and create or edit your own.
3 To create a text file containing the default shortcuts, click the Export Text button.
4 When prompted, save your Illustrator Defaults text file to the desktop, leaving the name as Illustrator Defaults.
5 Use Notepad (Windows), TextEdit (Mac OS), or another text editing application to open, view and print your default shortcuts file.
Custom shortcuts
For missing or hard-to-remember keyboard shortcuts, Illustrator allows you to add to or edit its list of defaults. It is highly recommended that you make a copy of the default keyboard shortcuts first before altering the original shortcut list. To do so, click the Save button and rename the new listing, then choose that new listing from the Set drop-down menu.
1 To add a custom shortcut, choose Edit > Keyboard Shortcuts.
2 In the Keyboard Shortcuts dialog box, choose the Menu Commands shortcut type from the drop-down menu above the shortcut list.
3 In the shortcut list below, click the arrow next to the File menu designation to expand that portion of the list.
4 Scroll down the menu list to the Place command, which, by default, doesn’t have a keyboard shortcut.
5 Click the Shortcut column next to the Place command, and press Ctrl+E (Windows) or Command+E (Mac OS) to enter that shortcut.
6 Click the Symbol column next to the Place command, and type E, if there’s not already one there. This is the symbol that will appear in the menu next to the Place command.
If you enter a shortcut that’s already assigned to another command or tool, you’ll get a warning about this at the bottom of the Keyboard Shortcuts dialog box.
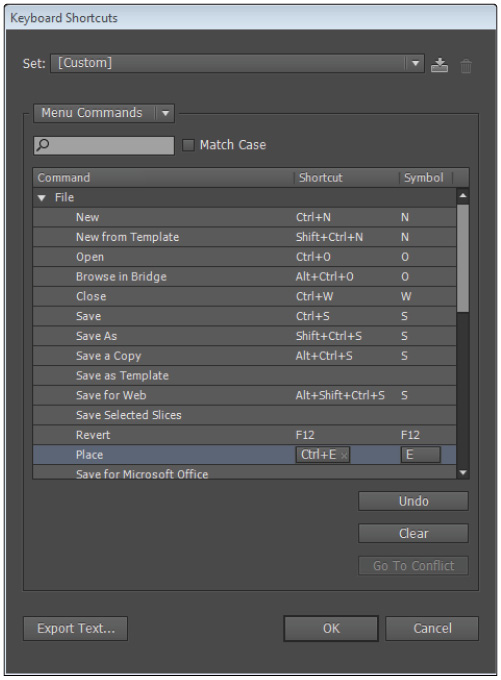
Change the keyboard shortcut for the Place command.
If this happens, do one of the following:
- • Click the Undo button below to withdraw the entry.
- • Click the Go To Conflict button to enter a different shortcut for the other command.
- • Ignore the warning, and Illustrator will delete the shortcut for the other command in favor of your new one.
7 To edit an existing shortcut, click the shortcut you want to change in the Shortcut column of the list, and type a new shortcut.
8 If that shortcut has already been assigned, follow the directions above to Undo or Go To the other command.
Saving shortcut sets
Saving sets of custom shortcuts in Illustrator will allow you to return to them and use them whenever you choose.
1 To save a new set of custom shortcuts, make changes to an existing shortcut set in the Keyboard Shortcuts dialog box, as noted in the previous section, “Custom shortcuts.”
2 Click OK to save those changes to the currently selected shortcut set.
 You cannot save changes to the Illustrator Defaults set.
3 When the Save Keyset File dialog box appears, type MySet in the Name text field, and then click OK. The new keyset will appear in the Set drop-down menu under its new name.

Save the new set.
Deleting shortcut sets
You can delete unused or unwanted shortcut sets in the Keyboard Shortcuts dialog box.
1 To re-visit your shortcut set, choose Edit > Keyboard Shortcuts.
2 Select the unwanted new set from the Set drop-down menu at the top of the dialog box.
3 Click the Delete button (![]() ), then click Yes to confirm in the alert box that appears to remove that set from the list. Note that you cannot delete the Illustrator Default set.
), then click Yes to confirm in the alert box that appears to remove that set from the list. Note that you cannot delete the Illustrator Default set.

Illustrator warns you when you try to delete an existing set of keyboard shortcuts.
4 Click OK to exit the dialog box. Choose File > Save, then choose File > Close.
Now that you’re familiar with the features and customization options of Illustrator workspaces, you’re ready to begin creating and editing artwork in the next chapter.
Self study
Using your new knowledge of Illustrator workspaces, try some of the following tasks to build on your experience. Use the ai0201.ai file from your ai02lessons folder as an example file.
1 Choose the Selection tool (![]() ) from the Tools panel, and select different objects within the example artwork. Watch as the options available in the Control panel change based on what’s selected, and try to make yourself familiar with how and why these options change.
) from the Tools panel, and select different objects within the example artwork. Watch as the options available in the Control panel change based on what’s selected, and try to make yourself familiar with how and why these options change.
2 Explore the default workspaces. Rearrange the panels in each workspace to meet your needs. Create and save your own custom workspace, and then return to the Essentials workspace, noting the differences between the workspaces.
3 Create your own set of keyboard shortcuts, changing those that you think are less intuitive than others, and adding shortcuts where there aren’t any by default. Think about how these shortcuts can speed up your workflow and customize the way Illustrator creates and edits artwork.
Review
Questions
1 Describe the advantages of using the Navigator panel to change the view of your artwork.
2 How do you select hidden tools in Illustrator?
3 Describe three ways to change the configuration of the panel dock.
4 How can saving workspaces help you work more efficiently?
5 What can you do if a keyboard shortcut you’ve added is the same as one already in existence?
Answers
1 The Navigator panel allows you to reduce or enlarge the view of your artwork in the document window by dragging its Zoom slider. It also allows you to scroll to different locations within your artwork by dragging the box in its proxy window. These options, along with the ability to marquee-zoom in on areas of your illustration, are all available in the same panel and do not require you to switch tools or choose different commands to access them. This makes it a more efficient choice for changing the view of your artwork while you’re working.
2 Tools that have other, related tools hidden beneath them are indicated by a small white triangle in the lower-right corner of the tool icon. To access these hidden tools, position your cursor over any tool that has a white triangle displayed, then click and hold the mouse button to expose the hidden tools nested within it. Once the hidden related tools appear, you can click to switch to the desired tool.
3 The panel dock can be reconfigured by clicking the double-arrow in its upper-right corner. This toggles the dock between expanded and collapsed view. In addition, you can click and drag the left edge to expand or reduce the width of the panels contained in it. You can also double-click the dark gray bar at the top of the dock to toggle between icon and expanded mode.
4 Saving a workspace allows you to lock in the position and visibility of panels on your screen. It also allows you to return to that workspace whenever you choose, even after you’ve opened and closed panels or switched to other workspaces. This ability to customize your workspace ensures that you only have to work with the panels that you need the most at any given time, and streamlines your workflow in the process.
5 If you’ve added a keyboard shortcut in Illustrator, either to an existing set or to a new custom set, and you get a warning about another command that already uses the same shortcut, you have three choices: you can ignore the warning and forfeit the shortcut for the other command in favor of a new choice; you can click the Undo button in the Keyboard Shortcuts dialog box to reverse the change; or you can click the Go To Conflict button to change the other command’s shortcut so they no longer conflict.