
Lesson 14: Adobe Illustrator CC New Features

In this lesson, you discover some of the major improvements that have been implemented in Adobe Illustrator CC. Many features are included in this lesson, and you will find more incorporated into the lesson files throughout the rest of this book.
What you’ll learn in this lesson:
- • Using Multiple Place
- • Unembedding images
- • Helpful link information
- • New Brush features
- • Packaging your files
- • New CSS and SVG workflows
Starting up
Before starting, make sure that your tools and panels are consistent by resetting your workspace. See “Resetting Adobe Illustrator CC Preferences” in the Starting up section of this book.
You will work with several files from the ai14lessons folder in this lesson. Make sure that you have loaded the ailessons folder onto your hard drive from www.digitalclassroombooks.com/epub/illustratorcc. See “Loading lesson files” in the Starting up section of this book.
What makes Adobe Illustrator CC so great?
At first glance, the new features in Adobe Illustrator CC might not be apparent, but once you start working, especially with placed imagery, you will find numerous improvements that save time and frustration. In this lesson, you will have the opportunity to try out some of these great new features.
Note that not all the features included in this lesson’s step-by-step exercises are new; many are helpful features that relate to the task at hand. Many shortcuts are included so you can pick up other helpful tips and tricks as you work. In this lesson, you will create a custom oversized luggage tag using several images, the tracing feature, new text controls, image brushes, and more.
Opening the finished file
You can take a peek at the original file by opening the finished version of this file.
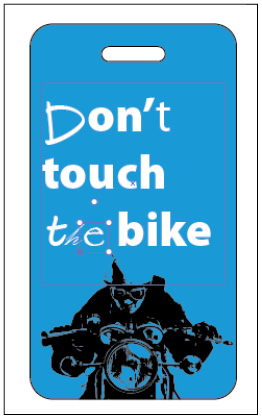
1 Choose File > Browse in Bridge. When Bridge appears, navigate to the ai14lessons folder and open the file named ai1401_done. An image of a front and back of a luggage tag appears. This illustration takes advantage of several new image and text features that you will use in this lesson.
2 You can leave this file open for reference or choose File > Close to close it.
Creating the luggage tag
In this part of the lesson, you will create the luggage tag outline and assign a Pantone color to the tag.
1 In Illustrator, choose File > New, or use the keyboard shortcut Ctrl+N (Windows) or Command+N (Mac OS). The New Document dialog box appears.
2 If they are not already selected, choose Print from the New Document Profile drop-down menu and Inches from the Units drop-down menu. When you change the units to inches, the New Document Profile setting changes to [Custom]. You can always change the Document Profile and the units of measurement after creating the file. Leave all other settings at their defaults and click OK.

Specify the settings of your new Illustrator document.
You will start this illustration by building the outline for the luggage tags.
3 Click and hold the Rectangle tool to select the hidden Rounded Rectangle tool.
4 With the Rounded Rectangle tool selected, click once anywhere on the artboard. A rounded Rectangle dialog box appears.
5 To create a rounded rectangle in the correct dimensions for your tag, enter 2.75 for the Width, 5 for the Height, and .3 for the corner radius. Click OK; the rounded rectangle is created to the size of a typical oversized luggage tag. You will now apply a Pantone color to the luggage tag.

Create the rounded rectangle to size.
6 Make sure the Swatches panel is visible. If it is not, select Windows > Swatches.
7 Make sure that the rounded rectangle shape is selected, and then select the Swatch Libraries menu icon (![]() ) from the lower-left area of the Swatches panel. A list of available color libraries is visible; select the one named Color Books, and then select the color book named Pantone+ Solid Coated. A separate Pantone+ Solid Coated panel appears, and it contains most of the colors from the Pantone Color library (PMS colors).
) from the lower-left area of the Swatches panel. A list of available color libraries is visible; select the one named Color Books, and then select the color book named Pantone+ Solid Coated. A separate Pantone+ Solid Coated panel appears, and it contains most of the colors from the Pantone Color library (PMS colors).

Select to view the Pantone+Solid Coated panel.
8 Click the panel menu in the upper-right area of the Pantone+ Solid Coated Panel to display the panel menu, and then select to view the PMS colors in the Small List View. Your colors now appear in a detail list.
9 From that same panel menu, select Show Find Field; a Find text box appears. Use this text box to type the PMS color you want to locate.
10 Type 2925 into the Find text box; the Pantone 2925 C swatch appears.
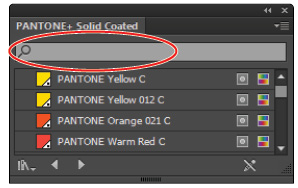
Type a PMS number into the Find text box.
11 Click the 2925 color swatch to fill the selected Rounded Rectangle box with the color and add the color to the Swatches panel.
12 Press Ctrl+S (Windows) or Command+S (Mac OS); the Save dialog box appears. Type ai1401_work into the File name text field. Keep the Save as type set to Adobe Illustrator. Navigate to the ai14lessons folder and click Save. If you receive a dialog box warning about spot colors, click Continue.
13 When the Illustrator Options dialog box appears, click OK to keep the default and save the file. Keep this file open for the next part of this lesson.
Punching out the strap holder
In this next exercise, you will create the hold that is needed for the strap.
1 Select the Rounded Rectangle tool and click once on the artboard; the Rounded Rectangle dialog box appears.
2 Type .85 into the Width text box and .2 into the Height text box; leave the Corner Radius value at .3 and then click OK. The rectangle is created.
3 With the small Rounded Rectangle selected, position the cut mark for the strap so that it is approximately in the center and relatively close to the top. Don’t worry about exact position, since you will adjust that shortly.

Position the hold for the strap on the tag.
4 Using the Selection tool, Shift+Click to add the large luggage tag to the selection. You now have both the hold for the strap and the large tag selected.
5 Choose Window > Align, and then select the Horizontal Align Center button.

Select Horizontal Align Center.
The strap hole is now centered horizontally.
6 With both the strap hole and the large tag selected, press Ctrl+8 (Windows) or Command+8 (Mac OS). (You can also choose Object > Compound Path > Make). This essentially punches out the small strap shape that was on top of the large tag.
7 Press Ctrl+S (Windows) or Command+S (Mac OS) to save this file. Keep it open for the next part of this lesson.
Cloning the tag
Since you are creating a front and back of a luggage tag, you will clone the artwork that you just created.
1 Make sure that you still have the luggage tag selected and that the Selection tool is active.
2 Press and hold the Alt (Windows) or Option (Mac OS) key; a double arrow cursor appears, indicating that you are about to clone the selected artwork.
3 While pressing and holding the Alt/Option key, press and hold the Shift key and drag to the right. By pressing and holding the combination of Alt+Shift (Windows) or Option+Shift (Mac OS), you can clone and keep the cloned artwork constrained to the same horizontal position. When you have positioned your cloned artwork off to the right, release the mouse first, and then the modifier keys.
 If you release the Shift or Alt/Option keys before releasing the mouse, the clone will not be successful, and the cloned shape can “bump” out of position.
You now have a front and back for your luggage tag. In the next part of this lesson, you will start taking advantage of some of the new features in Illustrator CC.
Placing multiple images
In Illustrator CC, you can select multiple files to place at one time. In this section, you will place the two images that you will use for this tag.
1 Choose File > Place; the Place dialog box appears.
2 Navigate to the ai14lessons folder and select the image named ai1402. Then, Shift+click the image file named ai1403. Verify that when you select these images, the Link check box, located in the lower portion of the Place dialog box, becomes selected. This indicates that the images are not going to be embedded into this Illustrator file, but will be linked to the original files. You will find out how this affects your workflow later in this lesson.

When placing these files, make sure that the Link check box is selected.
3 Choose Place. If an embedded profile message appears, click OK. A loaded cursor appears with a small thumbnail of the first image that you are about to place.

A loaded cursor appears when you choose to place multiple images.
4 Click once anywhere on your artboard to place the first image (a person on a motorcycle); your cursor “loads-up” with the second image. Click again on your artboard to place the second image (a small .png of a motorcycle).
5 Press Ctrl+S (Windows) or Command+S (Mac OS) to save this file. Keep it open for the next part of this lesson.
Converting an image to vector art
You will now quickly convert the artwork of the woman on the motorcycle to vector art to create the effect of pen and ink. If you want more details about how to use the Tracing features in Adobe Illustrator, read Lesson 5, “Working with Drawing Tools.”
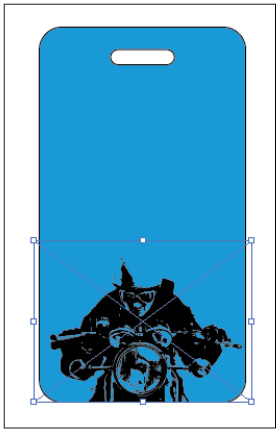
1 Using your Selection tool, select only the image of the person on the bike.
2 Click the Tracing Presets downward pointing arrow to the right of Image Trace in the Control panel at the top of your artboard. Select Sketched Art from the drop-down list that appears. The image changes into a black and white sketchy Image.

Select Sketched Art for a tracing preset.
Investigating the improved Links panel
In this section, you will have the opportunity of investigating the new Links panel. In Illustrator CC, the Links panel offers additional information and capabilities.
1 If the Links panel is not visible, select Window > Links.
When the Links panel appears, you see your two place images listed in the panel. Using the Links panel, you can discover details about the images and other placed files you are using in your Illustrator file.
2 Double-click the file named ai1402 that is listed in the Links panel. The information about the image appears in the lower portion of the Links panel, and it includes details such as the fact that the file is a 300 ppi, PSD file that is at 100% scale.
In the Links panel for Illustrator CC, you can now locate the Color Space, PPI (Pixels per inch), Dimensions, and transparency information. You can also find helpful tools to help you locate your placed file in your Illustrator file, and edit the original file.
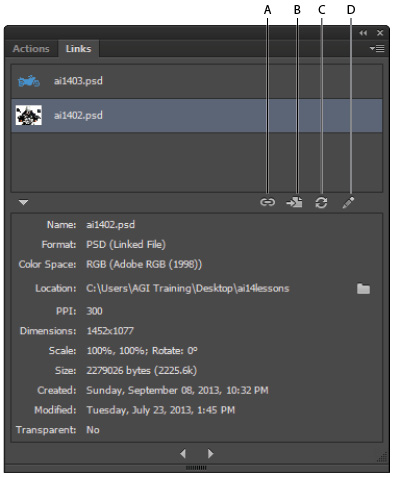
Find the details about placed files in the Links panel.
A. Relink. B. Go To Link. C. Update Link. D. Edit Original.
3 With the ai1402 image still selected in the Links panel, click Edit Original (![]() ) in the Links panel. Photoshop launches and the ai1402 image is opened in Photoshop. You will make some simple editing changes in this image, and then return to Illustrator.
) in the Links panel. Photoshop launches and the ai1402 image is opened in Photoshop. You will make some simple editing changes in this image, and then return to Illustrator.
 If you do not have Adobe Photoshop installed, you can launch Creative cloud to download and install Photoshop as a part of your subscription or as a trial.
4 In Photoshop, select the Eraser tool, and then erase the mirrors on either side of the bike. Don’t worry about doing a perfect job, since this is just an exercise of workflow.
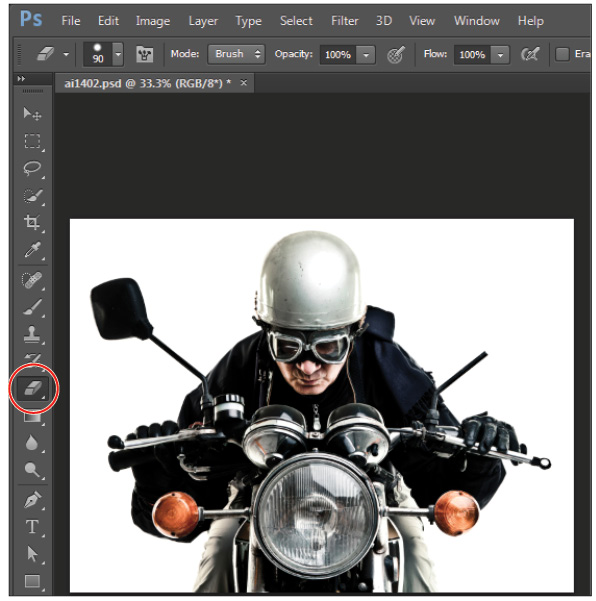
Use the Eraser tools to remove the side mirrors.
5 Once you are finished removing the mirrors, choose File > Save and then File > Close.
6 Return to Illustrator. Since your placed file is linked to the original, you will receive a message indicating that some files are missing or modified. Click Yes to indicate that you would like to update those files now. The traced file is updated and the mirrors are removed.
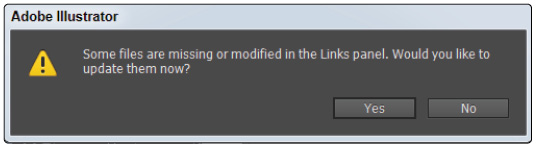
Adobe Illustrator notes that the placed file has been updated.
7 With the ai1402.psd image still selected, double-click the Scale tool (![]() ); the Scale dialog box appears. Type 60 into the Uniform text field, and then click OK. The image is scaled down in size. Note that the Links panel documents this scaled size.
); the Scale dialog box appears. Type 60 into the Uniform text field, and then click OK. The image is scaled down in size. Note that the Links panel documents this scaled size.

Scale the image down to 60%
The Links panel tracks the scaled size.
8 Using the Selection tool, click and drag to position the traced image into the lower portion of the luggage tag.
Position the image in the lower portion of the tag.
9 Press Ctrl+S (Windows) or Command+S (Mac OS) to save this file. Keep it open for the next part of this lesson.
Adding text
In this next section, you will add text to your tag and take advantage of the new Touch Type tool.
1 Select the Type tool (![]() ), and then click and drag a text area across the luggage tag with the image.
), and then click and drag a text area across the luggage tag with the image.
2 Type Don’t touch the bike using any typeface and size.
3 Press Ctrl+A (Windows) or Command+A (Mac OS) to select all the text.
4 Press Ctrl+T (Windows) or Command+T (Mac OS) to see the Character panel, or choose Window > Type > Character.
5 Choose Myriad Pro (as in our example), or any other typeface.
6 To set the size, with your text still selected, press Ctrl+Shift+> (Greater Than) or Command+Shift+> (Greater Than) repeatedly to increase your type in 2 point increments. Do this until you are happy with the text size.

Select a typeface and then select a size.
7 Select White from Fill in the Control panel across the top; the text is now white.

Change the Fill of the text to white.
8 Press Ctrl+S (Windows) or Command+S (Mac OS) to save this file. Keep it open for the next part of this lesson.
Using the new Touch Type tool
In Illustrator CC, you can now take advantage of several tools built for touch. An example is the Touch Type tool that allows you to modify the properties of characters using the cursor or touch controls. In this exercise, you will use your mouse and cursor.
1 Make sure that your text from the previous part of this lesson is still selected.
2 Click and hold the Type tool (![]() ) and select the new Touch Type tool (
) and select the new Touch Type tool (![]() ).
).
3 Click the letter “D” to see handles appear around it. Click and drag down to change the position of just the letter “D”.
4 Using the Character panel, change other attributes of the letter “D” including the font and size.

Using the Touch Type tool, you can customize an individual character’s properties.
5 Click other letters and click and drag up or down to change their alignment. There are no specific settings for the arrangement of your characters; just have fun and experiment with this creative tool.
Experiment with different type properties to create a unique text effect.
6 Press Ctrl+S (Windows) or Command+S (Mac OS) to save this file. Keep it open for the next part of this lesson.
Embedding an image
In this next section, you will embed your small motorcycle image into the Illustrator file.
There are many benefits to embedding an image file. Most users will make this selection if they want to ensure that the image file travels with the illustrator file when sending the file to their printer, or to someone else who might be working on a different computer. You also need to embed an image file that you plan to use as a symbol (see Lesson 10, “Working with Symbols”) or for the new Image Brush feature. You will take advantage of the new Image brush feature later in this lesson.
1 In the Links panel, click to select the image named ai1403.psd.
2 From the Links panel menu, choose Embed Image(s). If you receive a Photoshop Import Options dialog box, click OK to flatten the layers in this .psd file into a single image.
Notice that the image is no longer named ai1403.psd, and that it now has an icon to the right of the image thumbnail indicating it is embedded in this file.
 In Illustrator CC, you can now unembed an image so you can access your file for further editing work. Access Unembed using the Links panel panel menu. When selected, you will be directed to save the unembedded file in your system.
Creating an image brush
In this part of the lesson, you will create a custom brush using your embedded motorcycle image. Now in Illustrator CC, you can create a brush from an embedded image.
1 Using the Selection tool, select the motorcycle on the Illustrator artboard.
2 Choose Window > Transparency to see the Transparency panel. You will change the blending mode of the motorcycle so that the blue motorcycle appears on the blue background of the luggage tag.
3 With the motorcycle image selected, choose Multiply from the Blending mode drop-down menu. Multiply is a blending mode that will make the motorcycle art blend as though it were created with a magic marker, darkening the blue of the image.
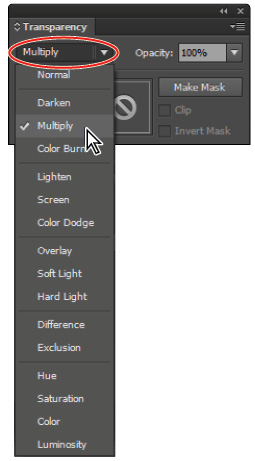
Change the blending mode to Multiply.
4 If your Brushes panel is not visible, choose Windows > Brushes.
5 Click and drag the motorcycle art directly into the Brushes panel. When you see the cursor with the plus sign, release the mouse; the New Brush dialog box appears.
6 Select Pattern Brush and click OK; the Pattern Brush Options dialog box appears. Now in Illustrator CC, you have more advanced controls for creating pattern brushes.
7 In the Pattern Brush Options dialog box, type bike pattern into the Name text field.
8 Click the Outer corner tile to see your options for creating a pattern for your pattern brush. For this example, select Auto-Centered.
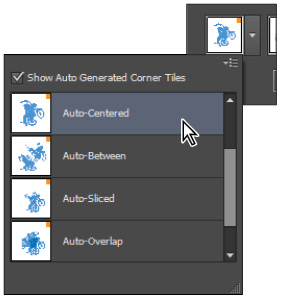
Select a method for corner creation.
9 From the fit section, choose Add space to fit. Using this method will not distort the motorcycle image.
10 For Colorization, leave this set at None and click OK. The new image brush has been added to your brushes panel.
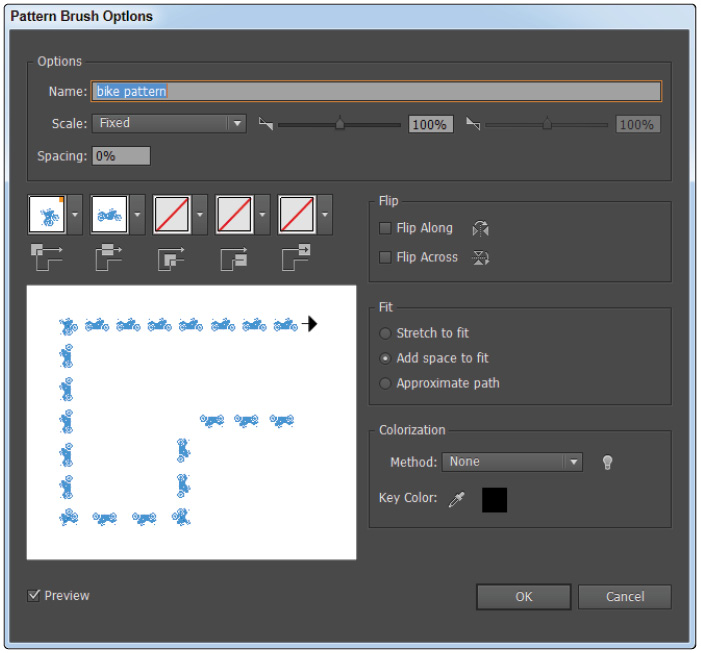
The settings for your image pattern brush.
11 Press Ctrl+S (Windows) or Command+S (Mac OS) to save this file. Keep it open for the next part of this lesson.
Applying the image brush to a stroke
You will now create a shape and use your motorcycle brush as a border.
1 Select the Rounded Rectangle tool, and click and drag a rounded rectangle on the second side (blank) of your luggage tag. Don’t worry about an exact size, but make it slightly smaller in width and height. In our example, the rectangle is approximately 2.375 in width and 3.85 in height.
2 Press D on your keyboard to put the rounded rectangle back to the default foreground and background color of white for the fill and black for the stroke.
3 Using the Selection tool, select both the luggage tag (under your new rounded rectangle) and the rounded rectangle shape.
4 Choose Window > Align. Before selecting an alignment method, click once on the luggage tag behind the rounded rectangle shape. A selection of the luggage tag becomes bolder. This indicates that this shape is locked in position and will only allow the newly created rounded rectangle to reposition when aligning.
5 Choose Horizontal Align Center from the Align panel.
6 Choose Select > Deselect to deactivate any selections.
7 Click once on the newly created rounded rectangle shape you created, and then click the new motorcycle brush you created in the Brushes panel. The motorcycle is now used as the border for the shape.
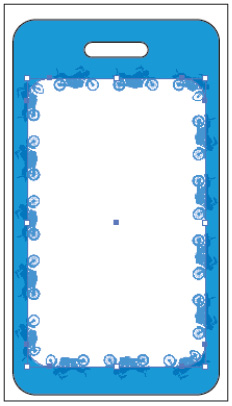
The new motorcycle stroke creates the border.
8 Press Ctrl+S (Windows) or Command+S (Mac OS) to save this file. Keep it open for the next part of this lesson.
Packaging a file
In this last section of your lesson, you will package your file. You can package a file to keep a back up of an important illustration, or to easily send all components to another person who might be working on this file.
1 Press Ctrl+S (Windows) or Command+S (Mac OS) to save your file.
2 Select File > Package. The Package dialog box appears.
3 For location, select the ai14lessons folder; you can leave the folder name at the default of ai1401_work_Folder.
4 Under Options, leave all selected. As you can see, by using the new Package feature you can now easily collect the fonts and images used in your Illustrator file. Click Package.
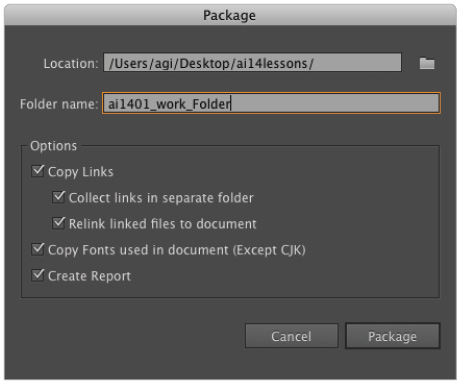
The new Package feature allows you to collect fonts and images.
5 A warning dialog box appears indication font restrictions. Read the message and click OK.
6 When the Adobe Illustrator dialog box appears indicating that your file is packaged, click Show Package. You are directed to your folder, which contains Fonts, Links and your Illustrator file and a report.
 Note that unlike the Adobe InDesign Package with Document Fonts feature, fonts packaged from Illustrator are not automatically activated when the recipient opens the Illustrator file from the package. They will need appropriate rights to manually install any appropriate fonts. Consider converting fonts to outlines as a workaround, or syncing fonts using Adobe TypeKit, which will not be packaged.
In this lesson, you discovered some of the new features available to you in Adobe Illustrator CC. There are plenty more scattered throughout other lessons in this book, and they are best explained in context with their functionality.