Lesson 8: Working with and Formatting Text

Adobe Illustrator CC boasts extensive text handling features. In this lesson, you’ll discover how Illustrator provides you with the tools and flexibility you need to work with text.
What you’ll learn in this lesson:
- • Importing text from an external file
- • Changing text formatting
- • Saving character and paragraph styles
- • Setting type on a curved path
- • Applying text wrap to an object
Starting up
Before starting, make sure that your tools and panels are consistent by resetting your workspace. See “Resetting Adobe Illustrator CC Preferences” in the Starting up section of this book.
You will work with several files from the ai08lessons folder in this lesson. Make sure that you have loaded the ailessons folder onto your hard drive fromwww.digitalclassroombooks.com/epub/illustratorcc See “Loading lesson files” in the Starting up section of this book.
Formatting type
Adobe Illustrator provides several options for formatting type in your document. Depending on your desired result, you might want to set some of these options that change the overall appearance of the type. Let’s explore the different options that are available to you.
1 Launch Adobe Illustrator CC.
2 Choose File > Browse in Bridge or click the Go to Bridge button (![]() ) in the Application bar.
) in the Application bar.
3 Navigate to the ai08lessons folder within Bridge, and double-click the file named ai0801_done.ai. The file opens in Adobe Illustrator.
4 This is the completed file. You can investigate the finished file and then choose File > Close, or you can keep it open throughout the lesson for reference.
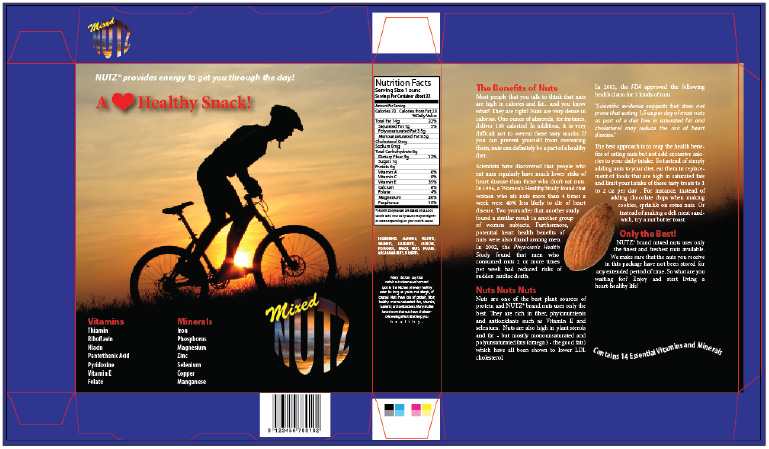
The final version.
5 Navigate to the ai08lessons folder within Bridge, and double-click the file named ai0801.ai. The file opens in Adobe Illustrator.
6 In Illustrator, choose File > Save As. In the Save As dialog box, navigate to the ai08lessons folder and type ai0801_work.ai in the File name text field. Click Save. If a dialog box appears stating that changing a used spot color to a process color can generate unexpected results, click Continue. In the Illustrator Options dialog box, leave the settings at their defaults and click OK.
7 To be sure that all the panels and tools are easy to find, choose Window > Workspace > Essentials, then choose Window > Workspace > Reset Essentials. This resets your tools and panels to their default locations.
8 This document was created using layers, so before you begin working, open the Layers panel, either by clicking the Layers button (![]() ) in the dock on the right side of the workspace, or by choosing Window > Layers. Click the Artwork layer, the second layer listed in the Layers panel, to make it active.
) in the dock on the right side of the workspace, or by choosing Window > Layers. Click the Artwork layer, the second layer listed in the Layers panel, to make it active.
9 Activate the Type tool (![]() ) in the Tools panel, then click once in the upper-left corner of the box’s left panel, which has an image of a biker on it.
) in the Tools panel, then click once in the upper-left corner of the box’s left panel, which has an image of a biker on it.
Clicking once anywhere on the artboard with the Type tool creates point type. Point type allows you to type text wherever you click with the cursor. Point type is generally used when setting a single line of copy or a headline. Later in this lesson, you’ll learn about another method of setting text, called area, and ways you can convert text from one to the other.
A blinking cursor appears where you clicked. To more closely see the cursor and the text, zoom in on the document by pressing Ctrl+(plus sign) (Windows) or Command+(plus sign) (Mac OS) a few times. If you need to reposition the artboard after increasing the page magnification, use the Hand tool (![]() ).
).
10 Type Nutz provides energy to get you through the day!
11 With the Type tool still selected, triple-click anywhere within the type you just created to select the whole line of type.
12 Click the Character link in the Control panel at the top of the workspace to open the Character panel. Change the font to Myriad Pro Bold Italic and set the font size to 18 pt, then press Enter or Return.
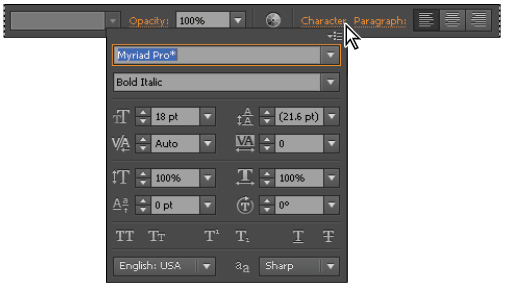
The Character panel allows you to change the attributes of the selected type.
 Some character formatting options are available directly within the Control panel. Character formatting can also be accomplished by choosing Window > Type > Character.
13 To make the type more readable, change the color of the selected type to white by clicking the Fill color swatch in the Control panel and choosing the white swatch from the Swatches panel that appears.
The word Nutz is the name of the fictional company that sells the box of mixed nuts you are creating. Because it is a company name, it should have an ® symbol next to it, indicating that the name is a registered trademark.
14 Click once to the immediate right of the word Nutz and choose Type > Glyphs to open the Glyphs panel. The Glyphs panel displays every symbol available in the currently chosen font. Scroll through the Glyphs panel, locate the ® symbol, and double-click it to insert that symbol at the location of your cursor. Close the Glyphs panel.
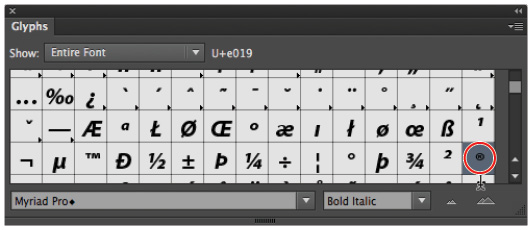
The Glyphs panel displayed.
15 Press Ctrl+Shift+A (Windows) or Command+Shift+A (Mac OS) to deselect everything in your document. Choose File > Save to save your work.
Paragraph formatting
Unlike character formatting, paragraph formatting can only be applied to one or more paragraphs at a time. You can’t apply a paragraph formatting attribute to a word, for instance; it’s the whole paragraph or nothing. The key factor with paragraph formatting is a hidden character within a body of text that defines the end of one paragraph and the beginning of another—the paragraph return, which is created when you press Enter (Windows) or Return (Mac OS) on your keyboard. Let’s apply some paragraph formatting to the text in your artwork.
1 Press Ctrl+0 (Windows) or Command+0 (Mac OS) to see the entire project, then select the Zoom tool from the Tools panel and zoom in on the area below the nutrition facts.
 The Zoom tool can also be accessed by pressing and holding Ctrl+spacebar (Windows) or Command+spacebar (Mac OS), then clicking the area you want to magnify while still pressing and holding the key combination.
2 Using the Type tool (![]() ), click and drag to create a type area beneath the nutrition facts. To be certain that you create a new area for text, confirm that the cursor icon displays the I-beam with a dotted frame around the edges (
), click and drag to create a type area beneath the nutrition facts. To be certain that you create a new area for text, confirm that the cursor icon displays the I-beam with a dotted frame around the edges (![]() ) before clicking and dragging. A blinking cursor appears in the upper-left corner of the frame that you just drew.
) before clicking and dragging. A blinking cursor appears in the upper-left corner of the frame that you just drew.

Using the Type tool, click and drag to create a text area.
 By clicking and dragging with the Type tool, you create area type. Area type differs from point type in that it acts as a text container and allows you to resize the frame while the text reflows within it. Point type doesn’t work this way; if you resize a point type frame, you scale the text within it.
3 Choose File > Place. In the Place dialog box, navigate to the Text folder inside the ai08lessons folder. Select the ingredients.txt file and check the Replace check box located in the lower portion of the Place dialog box. Select Place. In the Text Import Options dialog box that appears, leave the settings at their defaults and click OK.
 Illustrator CC offers a new feature that allows you to convert your text from area type to point type, and vice versa. Once type is established, select the text box with the Selection tool (
![]() ) and select Type > Convert to Area Type or Convert to Point Type. To toggle between area and point type, double-click the extended handle to the right of the text bounding box.
) and select Type > Convert to Area Type or Convert to Point Type. To toggle between area and point type, double-click the extended handle to the right of the text bounding box.

Double-clicking the extended handle converts your text.
4 Press Ctrl+A (Windows) or Command+A (Mac OS) to select all the text you just placed. In the Control panel, set the font to Myriad Pro Bold Condensed, and the size to 8 pt.
5 Click the Fill color swatch in the Control panel and choose the White swatch from the swatch options to turn the text white. Choose Type > Change Case > UPPERCASE to make all the text uppercase.
6 Click once within the ingredients text, then click the Paragraph link in the Control panel at the top of your screen to reveal the Paragraph panel. Click the Justify with last line aligned left button at the top of the Paragraph panel to change the alignment of the text. Deselect the Hyphenation button.

The Paragraph panel allows you to change paragraph-level attributes.
7 After formatting, the type might not fill the frame. To tidy things up, switch to the Selection tool (![]() ) and drag the center frame handle at the bottom of the frame upward to reduce the frame’s size.
) and drag the center frame handle at the bottom of the frame upward to reduce the frame’s size.
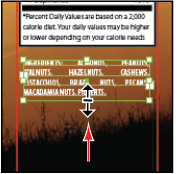
Resize the text frame by dragging one of the frame handles.
8 Choose File > Save to save your work. Keep the file open.
Formatting imported type
Next, you’ll import some additional text that will appear on the back of the box, and apply additional paragraph formatting to the text.
1 Choose View > Fit Artboard in Window, or press Ctrl+0 (Windows)/Command+0 (Mac OS) to see the entire spread.
2 Choose the Type tool (![]() ) from the Tools panel, then click and drag to create a large type area on the back of the box (the box panel on the right side of your screen.) As you did in the previous exercise, be certain that you create a new area for text by confirming that the cursor icon displays the I-beam with a dotted frame around the edges (
) from the Tools panel, then click and drag to create a large type area on the back of the box (the box panel on the right side of your screen.) As you did in the previous exercise, be certain that you create a new area for text by confirming that the cursor icon displays the I-beam with a dotted frame around the edges (![]() ) before clicking and dragging.
) before clicking and dragging.
3 To precisely position the text area, open the Transform panel by clicking the Transform link on the far right side of the Control panel. Due to varying monitor resolutions, you might not see the Transform link. If you do not see this option, click the Panel Menu button in the Control panel and choose Transform to see the text or choose Window > Transform to open the Transform panel. Click in the center of the reference point locator (![]() ) to determine that all transformations are made relative to the center of the text area. Type 1148 pt into the X text field, 425 pt into the Y text field, 450 pt into the W text field, and 550 pt into the H text field.
) to determine that all transformations are made relative to the center of the text area. Type 1148 pt into the X text field, 425 pt into the Y text field, 450 pt into the W text field, and 550 pt into the H text field.
 If you do not have the units of measurement set up for points (pts), the input measurement automatically converts to the equivalent value in the units that were last used.
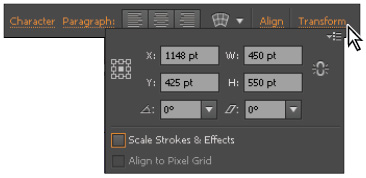
The Transform panel allows you to precisely position and size objects in your document.
4 Choose Type > Area Type Options. In the Columns area of the Area Type Options dialog box, type 2 for the number of columns, 3 in in the Span text field, and .25 in for the gutter. Click OK.

The Area Type Options dialog box allows you create columns.
5 Click in the top-left corner of the text area with your Type tool to place the cursor within the frame. Choose File > Place. In the Place dialog box, navigate to the Text folder within the ai08lessons folder and select the nuts.txt file. Make sure to check the Replace check box and then click Place. In the Text Import Options dialog box, leave the settings at their defaults and click OK. The text from the file appears within the text area, displayed in two columns.
6 Place the cursor anywhere within the text and press Ctrl+A (Windows) or Command+A (Mac OS) to select all the text. In the Control Panel, change the font to Myriad Pro Regular 12 pt. Click the Fill color swatch in the Control panel and choose White from the Swatches panel. This is just a temporary fix so that you can see the selected text against the dark background.
7 Press Ctrl+(plus sign) (Windows) or Command+(plus sign) (Mac OS) twice to better see the text. Highlight the first line of type in the text area (which reads, The Benefits of Nuts), and in the Control panel, change the font to Myriad Pro Bold and the size to 18 pt, then press Enter or Return. Now the heading, The Benefits of Nuts, stands out from the accompanying body text. In a later exercise, you will take these attributes and turn them into a general style for headings.
8 Click within the first full paragraph of text which begins with, Most people that you talk to... Click the Paragraph link in the Control panel, and set the alignment to Justify with last line aligned left. Set the spacing after the paragraph to 8 pt, then press Enter (Windows) or Return (Mac).

Adding space after a paragraph adds space without using an empty hard return in the copy.
9 Choose File > Save to save your work. Keep it open for the next part of the lesson.
You have now formatted some of the text. In the next section, you’ll create styles to streamline the formatting of additional text in your project.
Paragraph and character styles
Illustrator allows you to save the formatting applied to text as a style. A style is a way to apply consistent formatting to text without having to do it manually. There are two types of styles that can be created in Illustrator: paragraph styles and character styles. As their names imply, paragraph styles can only be applied to an entire paragraph, while character styles can be applied to a single character or a range of characters in your text. Let’s see how you can use these styles in your project.
1 With your ai0801_work.ai file still open, click once within the first line of text in the text area on the back of the box (The Benefits of Nuts). Choose Window > Type > Paragraph Styles to open the Paragraph Styles panel.
2 Click the panel menu button (![]() ) in the upper-right corner of the Paragraph Styles panel. Choose New Paragraph Style. In the New Paragraph Style dialog box, type Subhead in the Style Name text field. Click OK. The new style you created appears in the Paragraph Styles panel.
) in the upper-right corner of the Paragraph Styles panel. Choose New Paragraph Style. In the New Paragraph Style dialog box, type Subhead in the Style Name text field. Click OK. The new style you created appears in the Paragraph Styles panel.

Choose New Paragraph Style from the Paragraph Styles panel menu, and all the attributes of the text are automatically added to the style.
3 Highlight the first line (The Benefits of Nuts) with your Type tool (![]() ), and click Subhead in your Paragraph Styles panel to apply this style to the selected text. If a plus sign appears next to the Subhead style name, with the text still highlighted, Alt+click (Windows) or Option+click (Mac OS) again on the Subhead style.
), and click Subhead in your Paragraph Styles panel to apply this style to the selected text. If a plus sign appears next to the Subhead style name, with the text still highlighted, Alt+click (Windows) or Option+click (Mac OS) again on the Subhead style.
 When you apply styles to text, if you see a plus sign (+) to the right of the style name, you might need to click the name of the style once more to clear that plus sign, or Alt+click (Windows) or Option+click (Mac OS) as you apply the style to cause your text to appear properly. A plus sign next to a style name indicates that the text contains overrides or doesn’t match the definition of the style.
4 Repeat steps 2 and 3, this time clicking inside the first full paragraph of text (beginning with Most people...) and naming the style Body. Don’t forget to apply the Body style to the paragraph after you create it.
5 Finish styling the rest of the copy on the back of the box, applying the Body style to all the paragraphs and the Subhead style to the Nuts Nuts Nuts and Only the Best! headers.
 Don’t worry about any misspelled words you see, you will address them later in this lesson.
6 Click the Character Styles tab next to the Paragraph Styles panel to reveal the Character Styles panel. Find the line in the second full paragraph which starts with In 2002... and highlight the phrase Physician’s Health Study. In the Control panel, change the font to Myriad Pro Bold Italic.
7 With the text still selected, click the panel menu button in the Character Styles panel, then choose New Character Style. In the New Character Styles dialog box, type Body Italic in the Style Name text field and click OK.
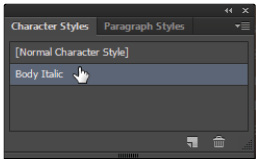
Create a new character style named Body Italic.
8 Apply the Body Italic character style to the selected text by clicking the Body Italic entry in the Character Styles panel.
9 Now navigate to the bottom of the first column of text, highlight the word FDA, and apply the Body Italic character style to it as well. Repeat this process for the following sentence (which begins with Scientific evidence...).
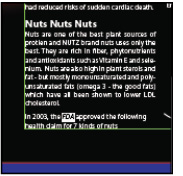
Apply the Body Italic character style.
10 Choose File > Save to save your work. Keep the file open for the next part of the lesson.
Now that your copy has been styled, maybe the subheads would look better in a different color. You could manually select each subhead and change its color, but it is much more efficient to edit the style now that all the subheads have been styled using a paragraph style.
Editing styles
Styles can be edited directly from the Paragraph Styles or Character Styles panels.
1 Choose Select > Deselect, or press Ctrl+Shift+A (Windows) or Command+Shift+A (Mac OS), to deselect all the items in your document.
2 Click the Paragraph Styles tab next to the Character Styles panel to bring the Paragraph Styles panel forward. Double-click the Subhead style in the Paragraph Styles panel.
3 In the resulting Paragraph Styles Options dialog box, make sure the Preview check box in the lower-left corner is checked so that you can see the changes before you click OK. Click the Character Color entry on the left side of the dialog box and select the red swatch, named Die Tracing, from the list of swatches. You might need to reposition the Paragraph Style Options dialog box so that you can see the change in your artwork. Click OK.
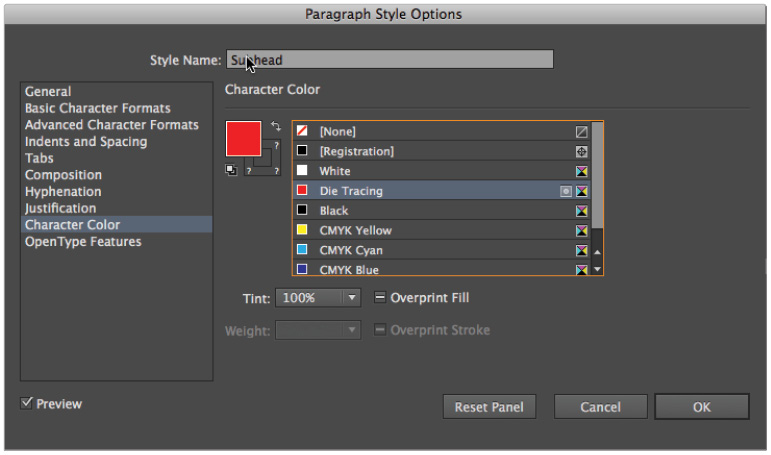
Paragraph Styles are automatically updated throughout your document.
4 Choose Select > Deselect, or press Ctrl+Shift+A (Windows) or Command+Shift+A (Mac OS), to deselect all the items in your document.
5 Double-click the Body style in the Paragraph Styles panel.
6 Click the Basic Character Formats entry on the left side of the dialog box. Choose Minion Pro from the Font Family drop-down menu and Regular from the Font Style drop-down menu. Click OK. This adjusts the style settings and all the fonts throughout the document to which the style is applied.

The finished styles for body and headers.
7 Press Ctrl+S (Windows) or Command+S (Mac OS) to save your work. Keep the file open.
Loading styles
Styles can also be imported from other Illustrator documents. This not only allows you to maintain consistency across multiple related documents, but also saves you the time and hassle of recreating styles manually. In the following steps, you will import a style from another Illustrator file to reuse in your project.
1 From the Paragraph Styles panel menu (![]() ), choose Load Paragraph Styles. The Select a File to Import dialog box appears. Navigate to the ai08lessons folder and select the styles.ai file. Click Open and notice that a new style, called Vitamins, has been added to the Paragraph Styles panel.
), choose Load Paragraph Styles. The Select a File to Import dialog box appears. Navigate to the ai08lessons folder and select the styles.ai file. Click Open and notice that a new style, called Vitamins, has been added to the Paragraph Styles panel.

By creating a paragraph style, you can efficiently apply character-based formatting to your text.
2 Choose View > Fit All in Window, then zoom in on the lower-left corner of the front of the Nutz box, where there are vitamins and minerals listed in white text. Apply the Subhead paragraph style to the words Vitamins and Minerals. Apply the Vitamins paragraph style to the remainder of the text. If you see a plus sign next to the style after applying the style, highlight the word, then Alt+click (Windows) or Option+click (Mac OS) the style to remove the plus sign.
3 Choose File > Save to save your work.
Text wrap
Illustrator allows your text, images, and objects to interact with each other by applying text wrap to objects, which causes the text to wrap around other objects in your Illustrator document. In the following steps, you’ll apply text wrap to an image that is already in your document.
1 Press Ctrl+0 (Windows) or Command+0 (Mac OS) to fit the entire spread in the window, then press Ctrl+(minus sign) (Windows) or Command+(minus sign) (Mac OS) twice, at which point you’ll see a single almond below and to the right of the spread.
 When you place an image in Illustrator, it is typically a square. The almond image is being silhouetted using a clipping mask, which gives it the proper shape of an almond.
2 Activate the Selection tool (![]() ) from the Tools panel. Drag the image of the almond so that it is on top of the two-column text on the back of the box (on your right). Resize the almond to approximately 50% by dragging a corner handle while pressing and holding the Shift key to keep its proportions intact.
) from the Tools panel. Drag the image of the almond so that it is on top of the two-column text on the back of the box (on your right). Resize the almond to approximately 50% by dragging a corner handle while pressing and holding the Shift key to keep its proportions intact.
3 Once the image is in the desired position and size, right-click (Windows) or Ctrl+click (Mac OS) on the almond image and choose Arrange > Bring to Front. Leave the image selected and choose Object > Text Wrap > Make. This applies text wrap to the selected image.
4 Press Ctrl+(plus sign) (Windows) or Command+(plus sign) (Mac OS) to zoom in on the almond image.
5 To adjust how closely the text wraps around the image, make sure that the image is still selected and choose Object > Text Wrap > Text Wrap Options. In the Text Wrap Options dialog box, check the Preview check box and increase the offset amount to 10 pt. Click OK.

The Text Wrap Options dialog box allows you to adjust the distance that the text is offset from the edge of the image.
6 Choose File > Save. Keep the document open for the next part of the lesson.
Advanced techniques with text
Adobe Illustrator offers a variety of advanced tools for working with text. Let’s explore some of those techniques now.
Text on a path
In Illustrator, type can be applied to a path of just about any shape. You can use the Pen tool (![]() ), the Pencil tool (
), the Pencil tool (![]() ), or any of the shape tools to draw a path on which type can be applied. In the following steps, you’ll add some text to a path that already exists on the box for a creative effect.
), or any of the shape tools to draw a path on which type can be applied. In the following steps, you’ll add some text to a path that already exists on the box for a creative effect.
1 With your ai0801_work.ai file still open, zoom in on the curved path in the lower-right corner of the back of the box.
2 Click and hold the Type tool (![]() ) in the Tools panel and choose the Type on a Path tool (
) in the Tools panel and choose the Type on a Path tool (![]() ). Click the far-left side of the path; this converts the existing path to a type path and allows you to enter and edit text on the path.
). Click the far-left side of the path; this converts the existing path to a type path and allows you to enter and edit text on the path.
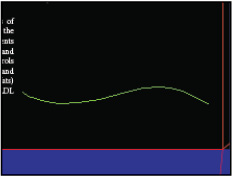
Place your Type on a Path cursor at the end of the curved line to type along it.
3 In the Control panel, click the Fill color swatch and select the white color from the Swatches panel. Change the font to Myriad Pro Bold Condensed, then type 17 in the Size text field, then press Enter or Return.
4 Type Contains 14 Essential Vitamins and Minerals. If the text does not fit completely on the path, choose Edit > Undo to remove the text and Edit > Undo again to remove the insertion point on the path. Repeat steps 2, 3, and 4.
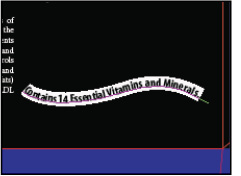
The text you entered.
5 Press Ctrl+S (Windows) or Command+S (Mac OS) to save your work.
Warping text
One of the great features of Adobe Illustrator CC is its ability to apply effects that distort and transform type in many ways, while keeping the text editable. This is advantageous in that it makes the process of editing or modifying text very efficient. Let’s apply an effect to the NUTZ logo to enhance its appearance.
1 Press Ctrl+Shift+A (Windows) or Command+Shift+A (Mac OS) to deselect all objects in your document. Choose View > Fit in Window to see the entire box. Activate the Selection tool (![]() ) and click the word NUTZ on the front cover of the box.
) and click the word NUTZ on the front cover of the box.
2 Choose Effect > Warp > Bulge.
3 In the Warp Options dialog box, turn on the Preview check box so that you can see the changes to your artwork as you adjust the values in the dialog box. Make sure the Horizontal option button is selected and set the Bend to 75 percent. Click OK.

The Warp Options dialog box allows you to adjust the effect until you obtain the desired result.
Now that you’ve applied the effect to the logo, you will add dimension by applying an image to the text of the logo.
4 Select the NUTZ text. Click the Drawing Modes button (![]() ) located at the bottom of the Tools panel and choose the Draw Behind button.
) located at the bottom of the Tools panel and choose the Draw Behind button.
5 Choose File > Place. In the Place dialog box, navigate to the Links folder inside the ai08lessons folder. Select the sky.jpg image and choose Place. A small image of a sky at dusk appears on the spread.
6 Reposition the photo behind the NUTZ logo and scale the photo so that it completely covers the logo. Do this by dragging one of the corner handles of the image using the Selection tool (![]() ) while pressing and holding the Shift key on your keyboard. The Shift key constrains the proportions of the image so that it doesn’t become stretched.
) while pressing and holding the Shift key on your keyboard. The Shift key constrains the proportions of the image so that it doesn’t become stretched.
7 Press and hold the Shift key and click the NUTZ text so that both elements are selected at the same time.
8 Click the Transparency icon (![]() ) in the dock on the right side of the workspace to open the Transparency panel. There is a preview of the selected items in the Transparency panel. If you do not see a preview, click the Transparency panel menu button (
) in the dock on the right side of the workspace to open the Transparency panel. There is a preview of the selected items in the Transparency panel. If you do not see a preview, click the Transparency panel menu button (![]() ) and choose Show Options.
) and choose Show Options.
9 Click the Transparency panel menu button and choose Make Opacity Mask. The text of the logo now masks out the photo everywhere except where the type of the logo appears.
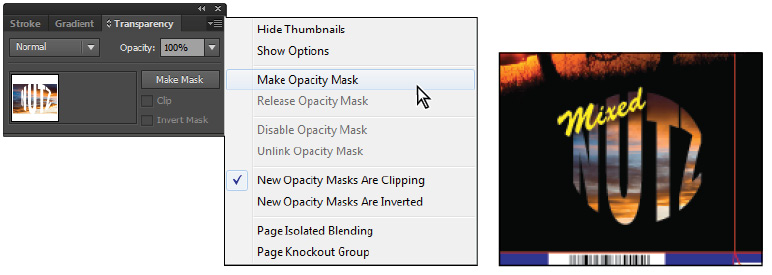
Choose Make Opacity Mask from the Transparency panel menu to make a mask out of the topmost element of your selection.
10 Select both the NUTZ and Mixed text using the Selection tool (![]() ) by pressing and holding the Shift key on your keyboard. Choose Object > Group to group the elements.
) by pressing and holding the Shift key on your keyboard. Choose Object > Group to group the elements.
11 While pressing and holding the Alt (Windows) or Option (Mac OS) key on your keyboard, drag the grouped logo up to the top flap of the box. Pressing and holding the Alt/Option key makes a copy of the object that you are dragging. If necessary, increase the page magnification to more clearly see the work you are performing.
12 Scale down the copied logo by pressing and holding the Shift key on your keyboard while dragging one of the logo’s corner handles so that it fits on the left side of the box flap.

Scale down the copied image.
13 Choose File > Save to save your work. Keep the file open.
For more information on how to use effects in Illustrator, see Lesson 11, “Using Effects and Transparency.”
Text in a shape
In addition to the type features that you applied earlier in the lesson, Illustrator gives you the ability to fit type inside various shapes. In the following steps, you will place some text inside a circle on the side of the Nutz box.
1 Click the Draw Modes button (![]() ) at the bottom of the Tools panel and select Draw Normal.
) at the bottom of the Tools panel and select Draw Normal.
2 Select the Ellipse tool by clicking and holding the Rectangle tool (![]() ) in the Tools panel and choosing the Ellipse tool (
) in the Tools panel and choosing the Ellipse tool (![]() ) from the list of options. You can also access the Ellipse tool by pressing the L key on your keyboard.
) from the list of options. You can also access the Ellipse tool by pressing the L key on your keyboard.
3 Navigate to the lower portion of the side panel, below the ingredients. Click and drag to draw a circle on the side panel of the box. Press and hold the Shift key while you drag to keep the shape proportional.
4 With the circle still selected, click and hold the Type tool (![]() ) and choose the Area Type tool () from the list of options that appears. Click the path at the top of the circle to convert the circle to a shape that will accommodate area type.
) and choose the Area Type tool () from the list of options that appears. Click the path at the top of the circle to convert the circle to a shape that will accommodate area type.
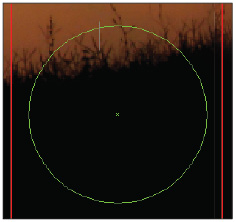
Create a circular text area using the Ellipse tool.
5 Your cursor is now inside the circle.
6 Choose File > Place and navigate to the Text folder inside the ai08lessons folder. Select the benefits.txt file and make sure that the Replace check box is checked, and then click Place. In the resulting Text Import Options dialog box, leave the settings at their defaults and click OK.
7 Press Ctrl+A (Windows) or Command+A (Mac OS) to select all the text within the circle. Using the Control panel, change the text Fill color to white.
8 Click the Paragraph link in the Control panel. When the Paragraph panel appears, select the Justify all lines button located at the top of the Paragraph panel.
9 At this point, you can adjust the text to fit the circle by changing the tracking values () in the Character panel, as well as by adjusting the leading (![]() ) and font size (
) and font size (![]() ) of the type. Sample some of these options, experimenting with different values. Don’t worry if it does not exactly fit for this exercise.
) of the type. Sample some of these options, experimenting with different values. Don’t worry if it does not exactly fit for this exercise.

Once you have text in a shape, it can be edited using the Type tool.
10 Once you’ve found a look that you like, choose File > Save to save your work. Keep the file open.
Creating outlines
You might want to modify the character shapes of type itself. Illustrator CC offers two distinct ways you can do this to type that you have already applied to your artwork. One is called Creating Outlines and the other is a new feature called Text Touchup.
In these instances, you can’t alter the shape of characters in live text, so you need to convert the characters to outlines. Converting type to outlines converts live text to editable paths in the shape of the original type. This is also useful when you are sending files to someone else and you don’t want to include the fonts. Once type is converted to outlines, you no longer need the original font that was used to create the text. Converting text to outlines is generally not recommended with small body text, since it tends to cause the text to look slightly bolder than the original text. In the following steps, you’ll see how text can be converted to outlines to create a headline on the front of the box.
1 Press Ctrl+Shift+A (Windows) or Command+Shift+A (Mac OS) to deselect all objects in your document. Click and hold the Area Type tool () from the Tools panel and choose the Type tool (![]() ), then click in an area on the front of the box to create a point type area. If necessary, increase the magnification using the Zoom tool (
), then click in an area on the front of the box to create a point type area. If necessary, increase the magnification using the Zoom tool (![]() ) so you can more clearly see your work.
) so you can more clearly see your work.
2 Type A Heart Healthy Snack!, then press Ctrl+A (Windows) or Command+A (Mac OS) to select all the text. In the Control panel, change the font to Minion Pro Bold Italic, then type 36 into the Size text field. Click the Fill color swatch and choose a red color from the Swatches panel.
3 Select the type using the Selection tool (![]() ) and choose Type > Create Outlines. This converts all the selected type to outlines (paths).
) and choose Type > Create Outlines. This converts all the selected type to outlines (paths).

After converting the text to outlines, the text reveals the paths that make up the character shapes.
4 When type is converted to outlines, all the text is grouped so that it moves and adjusts as a collective unit. Ungroup the text by choosing Object > Ungroup.
5 Using the Selection tool, drag a marquee around the word Heart to select only that word. Press the Delete key on your keyboard to remove the word.
In the next steps, you will replace the word Heart with a vector drawing of a heart.
6 Choose Select > Heart from the menu at the top of your screen. If you do not see the heart image, press Ctrl+(minus) or Command+(minus) twice to zoom out. In the Control panel, click the Fill color swatch and choose a red color from the swatches panel to fill the heart image.
7 Drag the drawing of the heart to the empty area of the text outlines where the word Heart used to be. Scale and adjust the drawing as you see fit by dragging the corner handle of the object and pressing and holding the Shift key. You might need to zoom in on the remaining text to the right of the heart to close the space and make it look more balanced. Once you finish adjusting the headline, use the Selection tool to select the heart and the text, then group them by pressing Ctrl+G (Windows) or Command+G (Mac OS).
8 To add a finishing touch to the headline, select it and choose Effect > Stylize > Drop Shadow. In the Drop Shadow dialog box, type 5 pt for both the X and Y offsets and 4 pt for blur. Click OK.

Apply a drop shadow to the headline.
Check spelling
Before you send your project to the client for approval, you should always perform a spell check to verify that there aren’t any misspelled words in your document. The Check Spelling command in Adobe Illustrator CC compares the words in your document to a built-in dictionary and alerts you to any misspelled words.
1 Press Ctrl+Shift+A (Windows) or Command+Shift+A (Mac OS) to deselect all objects on your page. Choose Edit > Check Spelling to open the Check Spelling dialog box.
2 Click the arrow icon in the lower-left corner of the dialog box to display additional options. Leave both checkboxes in the Find section checked, and check the boxes in the Ignore section to ignore words that are all uppercase and words with numbers. This speeds up the process, since the nutrition label contains several of these instances. Click the Start button to begin the spell checking process.

The Check Spelling dialog box allows you to define the parameters that determine what Illustrator flags as problems.
After clicking the Start button, the Check Spelling dialog box displays the errors that it finds in your document. Not all errors are necessarily spelling errors; some are repeated words and other miscellaneous errors. Some of these errors can be corrected by choosing an option offered in the Suggestions window in the middle of the dialog box. Illustrator displays the error at the top of the dialog box and also displays suggestions below it for correcting the error. You have the option of choosing Change, which changes the current error to the suggestion shown in the Suggestions window, or Ignore, which skips the currently flagged error.
3 Continue through the spell check by choosing either Change or Ignore, depending on the error. There are some misspelled words in the document, so as the spell checker flags them, change them to the correct spelling; other errors can be ignored. Make sure that when Illustrator flags the word NUTZ, you ignore it.
Just because a word is not found in the dictionary that Illustrator uses to spell check the document, it doesn’t necessarily mean that the word is incorrect. For instance, Spell Check finds the word Folate. Illustrator doesn’t recognize this word even though it is correct. One way to handle this situation is to click the Add button on the right side of the Check Spelling dialog box. This adds the current word to the dictionary so that Illustrator will recognize the word from now on, and will no longer flag it as an error. The Add button is useful when dealing with proper nouns and people’s names, especially when they appear more than once in a document or range of documents. By adding a word to the dictionary, Illustrator no longer considers it misspelled.
4 When you have completed checking the entire document, click Done.
5 Choose File > Save to save your work.
Find and Replace
Imagine that this project is due to the client, and at the last minute, you realize that you omitted the ® symbol next to the NUTZ brand name, identifying it as a registered trademark. Fortunately, Illustrator provides the tool needed to fix this problem quickly. Let’s see how easily this can be done.
1 Press Ctrl+Shift+A (Windows) or Command+Shift+A (Mac OS) to deselect all objects on your page. Choose Edit > Find and Replace to display the Find and Replace dialog box.
2 In the Find text field, type NUTZ (all caps). In the Replace With text field, type NUTZ (all caps) and then click the arrow to the right of the Replace With text field. From the list of options, choose Registered Trademark Symbol. This inserts an ® next to the word NUTZ in the Replace With text field. This is the character equivalent that Illustrator uses for the registered trademark symbol.
3 Click the Find button once to find the first location where NUTZ appears within your project, then click the Replace All button to replace all occurrences of NUTZ with the new text, including the necessary symbol. Adobe Illustrator notifies you that it made three replacements within your document. Click OK, then click Done.
4 Using the Text tool, remove the additional instance of the registered trademark from the text on the upper-left side of the front of the box.
5 Choose File > Save to save your document.
Self study
To add a finishing touch to your document, draw a white rectangle encompassing all the text on the back of the box. Send the rectangle backward until it is behind the text. Now choose Effect > Blur > Gaussian Blur, set the radius at 8 pixels and click OK. Next choose Window > Transparancy and change the opacity to about 40 percent. This is a great effect that you can use to subdue the background and allow the type to stand out a little bit. If necessary, change the color of your text to see the effect better.
Practice applying text to various shapes that you draw in Illustrator. Use the Pen tool (![]() ) or the Pencil tool (
) or the Pencil tool (![]() ) to draw a path, and then use your Type on a Path tool (
) to draw a path, and then use your Type on a Path tool (![]() ) to add type to the shape. You can adjust how type is positioned on a path by dragging the center bracket, using your Selection tool, and moving it left or right along the path. You can even drag the center handle down and flip the text to the other side of the path. In addition, draw some closed shapes and practice placing text inside them to see the different effects that you can achieve.
) to add type to the shape. You can adjust how type is positioned on a path by dragging the center bracket, using your Selection tool, and moving it left or right along the path. You can even drag the center handle down and flip the text to the other side of the path. In addition, draw some closed shapes and practice placing text inside them to see the different effects that you can achieve.
Add different effects to the NUTZ logo to make it stand out a little more. See Lesson 11, “Using Effects and Transparency,” for more on applying effects to objects. Try adding an outer glow to the logo, or even a drop shadow with various intensities. You could also experiment with other effects options in the Effects panel. You might want to remove the existing effect first by deleting it from the Appearance panel.
Review
Questions
1 True or false: Effects can only be applied to type that has been converted to paths.
2 If you wanted to put text that wrapped inside a given area of your artwork, would you use point type or area type?
3 Which of Illustrator’s features gives you the control needed to maintain consistency and control throughout a range of text in your document?
4 If a word that Illustrator’s dictionary doesn’t recognize appears several times in your document, how can you stop Illustrator from flagging each instance of the word?
5 Which panel in Illustrator shows you all the characters available within a given font?
Answers
1 False. Effects can be applied to live type and remain editable even after the effect has been applied.
2 To put text wrapped inside a given area of your artwork, you would use area type. Point type doesn’t wrap within a given area. Point type only wraps if you apply a hard or soft return to the type.
3 Illustrator’s feature that gives you the control needed to maintain consistency and control are character and paragraph styles.
4 To stop Illustrator from flagging each instance of an unrecognized word, add the word to the dictionary by pressing the Add button in the Check Spelling dialog box. This makes the word a recognized word and prevents Illustrator from earmarking it.
5 The Glyphs panel is the Illustrator panel that shows all the characters available within a given font.

