
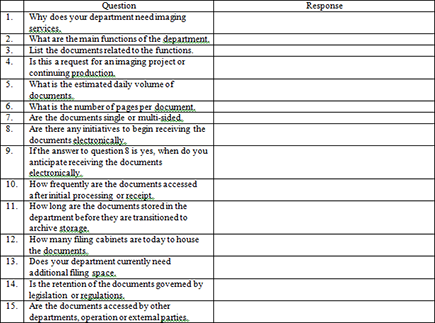
Figure 9-1: Imaging needs assessment form.
Chapter 9
Imaging Documents
In This Chapter
![]() Understanding how document imaging works
Understanding how document imaging works
![]() Reviewing the benefits
Reviewing the benefits
![]() Conducting a needs assessment
Conducting a needs assessment
![]() Studying the approaches
Studying the approaches
![]() Determining what you need
Determining what you need
![]() Determining the return on investment (ROI)
Determining the return on investment (ROI)
![]() Evaluating hardware and software
Evaluating hardware and software
Although the paperless office hasn’t yet come to fruition, document imaging can allow organizations to rely less on paper processing. Document imaging (commonly referred to as scanning or imaging) uses technology to convert paper documents to electronic format. Document imaging provides many benefits, such as reductions in physical storage space, productivity increases, and better customer service.
Sounds great, right? Not so fast. Although document imaging can provide many benefits, it first requires a thorough understanding of your business processes to determine whether imaging is a good fit for your organization. This chapter provides the knowledge you need to make an informed decision. In this chapter, you find out how to assess your document-imaging needs, review implementation options, and discover how to evaluate imaging hardware and software.
From Paper to Paperless
Paper isn’t going away. Although it’s certainly true that, in today’s corporate environment, most organizations have more digital volume than paper, many employees nevertheless continue to send electronic information to their printers so that they have a hard copy for filing and reference purposes. Therefore, it can be argued that the explosion of personal computing and electronic information has actually prevented the paperless office from becoming a reality, instead of speeding it on its way. Some companies still require all e-mails to be printed and filed. Worse yet, in some cases, the printed documents are later imaged, thus creating a digital copy!
 Implementing a document-imaging program is a significant business culture change. In many cases, it changes (for the better) the way that departments currently process their business functions. Even though document imaging can improve a process, it’s a change. It requires employees to reshape years of a paper-based mind-set. Companies should anticipate initial resistance from some employees, but after a short period of time, you will find employees singing the praises of document imaging.
Understanding the basics of document imaging
Document imaging is simply converting paper to an electronic format through the use of imaging software and hardware. The hardware and software take a digital picture of the paper document, which allows you to store and retrieve the image by using your computer.
The two main components of a document-imaging system are hardware and software. Depending on a company’s imaging needs, the investment in hardware and software can be minimal to hundreds of thousands of dollars. The extent of an organization’s investment depends upon the following factors:
![]() Volume: The volume of documents to be scanned determines the type of scanning device and software that need to be used. Low-volume imaging can be performed on an inexpensive desktop scanner or multifunctional device (MFD). (An MFD is a device that allows you to print, scan, and fax from the same machine.) For organizations that need to scan a large volume of information, it may be necessary to invest in high-volume production scanners and software.
Volume: The volume of documents to be scanned determines the type of scanning device and software that need to be used. Low-volume imaging can be performed on an inexpensive desktop scanner or multifunctional device (MFD). (An MFD is a device that allows you to print, scan, and fax from the same machine.) For organizations that need to scan a large volume of information, it may be necessary to invest in high-volume production scanners and software.
![]() Frequency: Frequency refers to how often you need to image documents. Volume alone doesn’t always provide an accurate picture of your imaging needs. For example, you may have a significant amount of documents that need to be imaged for a one-time project. In this case, you don’t want to invest a lot of money in scanners and software. However, if you have documents that need to be scanned on a regular basis, you may want to make the investment.
Frequency: Frequency refers to how often you need to image documents. Volume alone doesn’t always provide an accurate picture of your imaging needs. For example, you may have a significant amount of documents that need to be imaged for a one-time project. In this case, you don’t want to invest a lot of money in scanners and software. However, if you have documents that need to be scanned on a regular basis, you may want to make the investment.
![]() Location: Organizations that are geographically dispersed may have a need for each location to image its own documents, which can result in purchasing more scanning equipment than would be needed if the organization used a centralized imaging approach.
Location: Organizations that are geographically dispersed may have a need for each location to image its own documents, which can result in purchasing more scanning equipment than would be needed if the organization used a centralized imaging approach.
Later in this chapter, I tackle each of these issues in greater detail so that you have the info you need to determine your specific document-imaging needs.
Benefiting from an image makeover
Every organization struggles with managing paper-filing systems. Some common issues associated with paper-based file management include lost or misfiled information, decreased productivity, poor customer service, space constraints, and limited access to information. Document imaging can help you resolve each of these issues. The following list explains how:
![]() Productivity increases: Employee productivity is increased by eliminating the time it takes to walk to a file cabinet, search for a file, and then refile the information. Document imaging allows users to quickly search and retrieve information without ever leaving their computer. Document imaging also significantly reduces the occurrence of lost and misfiled documents, which is a definite productivity boost.
Productivity increases: Employee productivity is increased by eliminating the time it takes to walk to a file cabinet, search for a file, and then refile the information. Document imaging allows users to quickly search and retrieve information without ever leaving their computer. Document imaging also significantly reduces the occurrence of lost and misfiled documents, which is a definite productivity boost.
![]() Expense reductions: Imaging documents can reduce or eliminate the costs associated with maintaining paper-based filing systems. This includes the purchase of filing equipment, costs of archival storage, and labor costs related to manually retrieving physical information.
Expense reductions: Imaging documents can reduce or eliminate the costs associated with maintaining paper-based filing systems. This includes the purchase of filing equipment, costs of archival storage, and labor costs related to manually retrieving physical information.
![]() Customer service enhancements: Document imaging enhances customer services by providing quick access to customer and vendor information. It eliminates the need to place a customer “on hold” while you walk to a file cabinet and search for his information, or worse, telling the customer you have to call him back because you have to order his file from a centralized filing area.
Customer service enhancements: Document imaging enhances customer services by providing quick access to customer and vendor information. It eliminates the need to place a customer “on hold” while you walk to a file cabinet and search for his information, or worse, telling the customer you have to call him back because you have to order his file from a centralized filing area.
![]() Storage reductions: Transitioning to document imaging can significantly reduce the number of file cabinets and the amount of expensive office space needed for paper-based filing. Document imaging eliminates the need to make copies of documents and physically distribute them; a document is imaged once and becomes available to multiple users.
Storage reductions: Transitioning to document imaging can significantly reduce the number of file cabinets and the amount of expensive office space needed for paper-based filing. Document imaging eliminates the need to make copies of documents and physically distribute them; a document is imaged once and becomes available to multiple users.
![]() Improved access to information: Document imaging makes information readily available to employees, whether they are located in the same department or in another country. This approach allows organizations to effectively collaborate on projects and assists in rapid and informed decision-making.
Improved access to information: Document imaging makes information readily available to employees, whether they are located in the same department or in another country. This approach allows organizations to effectively collaborate on projects and assists in rapid and informed decision-making.
![]() Disaster recovery and vital records protection: Document imaging allows vital information to be backed up electronically and protected. In the event of a disaster, imaged documents can assist in the business resumption.
Disaster recovery and vital records protection: Document imaging allows vital information to be backed up electronically and protected. In the event of a disaster, imaged documents can assist in the business resumption.
To Image, or Not to Image
 Document imaging can provide organizations with many benefits. However, not all paper documents should be imaged. Before investing in scanning hardware and software or outsourcing the process, it’s recommended that you take time to assess your imaging needs. The lack of proper planning can be expensive in the end. Many companies have learned this the hard way by scanning years of documents that are no longer referenced and in some cases should’ve been destroyed.
In the following sections, I walk you through the process of evaluating your imaging needs, determining what documents make good imaging candidates, anticipating the cost and effort, and calculating your return on investment.
Conducting an imaging needs assessment
 Large volumes of paper don’t always translate into a need for document imaging. Some organizations feel that they need to explore document imaging because they are at a point where they need to purchase additional file cabinets or they have grown tired of paying a vendor to store their documents.
In many cases, overflowing file cabinets may seem like a good reason to scan documents, but usually they’re a symptom of not managing the information life cycle. Full file cabinets may mean that you need to send inactive information that’s not yet eligible for destruction to offsite storage for the remainder of its retention period. The cost to store a box of records with a vendor for a few years is usually less expensive than imaging the documents.
Before you invest in document imaging, you should be asking yourself one question — Why do I want to image my documents? It’s essential to know your document-imaging objective. For example, what issues or problems are you attempting to resolve? To help you answer the question, it’s recommended that you conduct an imaging needs assessment. The assessment is a tool every organization should use if it has file cabinets and file rooms full of paper and is interested in the benefits of document imaging. The assessment lists a series of questions that allow you to determine what documents are good candidates to be imaged — kind of like what you see in Figure 9-1. (Feel free to use it — think of it as my gift to you.)
The imaging needs assessment should be conducted with someone knowledgeable of the document-imaging process. This may include an employee with prior imaging experience, a qualified consultant, or a document-imaging vendor. This approach allows you to receive clarification regarding the assessment questions and ask additional questions if needed.
The assessment questions are designed to ensure that the answers provide a comprehensive picture of an operation’s imaging needs. Upon completion, most companies will find that they have a valid imaging need if the documents that are being assessed fall into one or more of the following categories:
![]() Heavy volume and frequent retrieval: A major benefit of document imaging is eliminating the time it takes to walk to a file cabinet, file a document, retrieve a document, and then refile the information. If an organization has a large volume of different document types that are frequently retrieved, imaging is a good fit.
Heavy volume and frequent retrieval: A major benefit of document imaging is eliminating the time it takes to walk to a file cabinet, file a document, retrieve a document, and then refile the information. If an organization has a large volume of different document types that are frequently retrieved, imaging is a good fit.
![]() Workflow process: In this scenario, the volume of paper documents may or may not be significant. However, the manual processing of the documents requires multiple handling and authorizations. In this case, implementing automated workflow in conjunction with document imaging can provide productivity gains, reducing labor costs and improving customer service.
Workflow process: In this scenario, the volume of paper documents may or may not be significant. However, the manual processing of the documents requires multiple handling and authorizations. In this case, implementing automated workflow in conjunction with document imaging can provide productivity gains, reducing labor costs and improving customer service.
![]() Protection: This scenario refers to the need to digitally protect information that is organizationally and operationally vital to the organization. This can include documents such as articles of incorporation, bylaws, board of directors meeting minutes, pension records, accounts receivable records, and employee-related information. In this scenario, the amount of paper may be insignificant and the information rarely accessed. However, the risks associated with losing the information outweigh the expense of imaging.
Protection: This scenario refers to the need to digitally protect information that is organizationally and operationally vital to the organization. This can include documents such as articles of incorporation, bylaws, board of directors meeting minutes, pension records, accounts receivable records, and employee-related information. In this scenario, the amount of paper may be insignificant and the information rarely accessed. However, the risks associated with losing the information outweigh the expense of imaging.
Small businesses are sometimes an exception to these scenarios. Small businesses may have significant space constraints that don’t allow many file cabinets or box storage of paper documents. In this case, an inexpensive desktop scanner or multifunctional device can be used to scan documents and store them on a computer, helping to reduce the amount of needed storage space.
Stepping through the imaging process
Now that you have a good understanding of the basics of document imaging and what documents make good imaging candidates, it’s time to look at the steps in the document-imaging process. The imaging process consists of four primary phases:
![]() Prepping
Prepping
![]() Scanning
Scanning
![]() Indexing
Indexing
![]() Quality control
Quality control
Note: Depending on the complexity of an imaging operation and the software technology being used, you may have additional processing phases such as recognition and release. Each of these processes is reviewed later in this chapter.
Prep school
Document preparation (commonly referred to as document prep) means ensuring that your documents are in the proper condition to proceed through the scanning process. Preparing your documents to be imaged is a very important step. Properly prepping your documents helps to make sure that you receive accurate scanning results. Improperly prepped documents slow the scanning process, result in invalid output, and may damage the scanning equipment.
Depending on an organization’s document-imaging approach, prepping may be performed by the department that owns the information or by a centralized scanning department. Departments usually prep documents when the company uses a back-end, or postprocessing, imaging approach. This means that documents are imaged after they have been used to process a function. Back-end imaging allows the documents to be electronically stored and retrieved for future reference. A centralized scanning department typically preps the documents when an organization uses a front-end imaging approach. Front-end imaging involves scanning departmental documents when the company receives them. For example, when paper invoices enter the mailroom, they are forwarded to the scanning department. The scanning department will prep and scan the documents, allowing the Accounts Payable department to process them electronically. Note: Later in this chapter, you see how a process such as invoice payments can be automated by using document imaging and workflow.
Prepping usually involves inserting a separator sheet (also referred to as a cover sheet) between each document. This allows the scanning software and, in some cases, the scanning hardware to determine where one document ends and another begins. Separator sheets use a patch code to trigger separation by using a pattern of alternating black bars and spaces, as shown in Figure 9-2.
Figure 9-2: Document-imaging separator sheet.

Patch codes don’t contain embedded data like a traditional bar code. However, some scanning operations use bar codes rather than patch codes to automate the indexing of documents. (See Figure 9-3.) For example, a Human Resources department that scans employee files can place bar-code sheets between each document to trigger separation and also provide indexing values such as department name, document type, employee ID, and employee name. (I cover index automating and bar-code sheets in more detail later in this chapter.)
Figure 9-3: Document-imaging separator sheet with bar codes.

In addition to inserting separator sheets, you need to remember some basic prepping “dos and don’ts” for your documents to flow smoothly through the imaging process and to ensure that you receive an accurate electronic replication of your paper documents:
![]() Highlighting: Don’t highlight text on a document that is to be imaged. In some cases, it can “black-out” the text.
Highlighting: Don’t highlight text on a document that is to be imaged. In some cases, it can “black-out” the text.
![]() Staples: Staples should be removed from all documents before they are imaged. Staples slow the imaging process and can scratch the scanner’s glass. Using a staple remover helps to ensure that the corners of the paper do not tear. Torn paper corners can result in jams during the scanning process and double feeds (two pages feeding through the scanner at one time).
Staples: Staples should be removed from all documents before they are imaged. Staples slow the imaging process and can scratch the scanner’s glass. Using a staple remover helps to ensure that the corners of the paper do not tear. Torn paper corners can result in jams during the scanning process and double feeds (two pages feeding through the scanner at one time).
![]() Tape: Sometimes it is necessary to tape a document such as a receipt to another document or a blank piece of paper. When taping a document, you need to ensure that it’s taped at least 1⁄2 inch from the top and side edges of the paper. Items taped too close to the edges can result in the paper not feeding properly through the scanner. Some scanners are equipped with a double-feed detection device. If the tape is too close to the edges, the detection device may interpret the thickness of the tape as two pages going through the scanner at the same time. In addition, avoid taping over text on the document. Tape is reflective and can cause information to be blacked out.
Tape: Sometimes it is necessary to tape a document such as a receipt to another document or a blank piece of paper. When taping a document, you need to ensure that it’s taped at least 1⁄2 inch from the top and side edges of the paper. Items taped too close to the edges can result in the paper not feeding properly through the scanner. Some scanners are equipped with a double-feed detection device. If the tape is too close to the edges, the detection device may interpret the thickness of the tape as two pages going through the scanner at the same time. In addition, avoid taping over text on the document. Tape is reflective and can cause information to be blacked out.
![]() Corners: It is important to ensure that the corners of a document are smooth and unfolded prior to being imaged. Folded corners can cause jams and misfeeds. In some cases, folded corners can cover up information on a document.
Corners: It is important to ensure that the corners of a document are smooth and unfolded prior to being imaged. Folded corners can cause jams and misfeeds. In some cases, folded corners can cover up information on a document.
Scanning documents
Scanning documents can be a simple process or involve several steps, depending on the size and complexity of an imaging operation. For a small business using a desktop scanner or multifunctional device, it may involve placing a document in a feeder tray and clicking an icon on your desktop. However, the process for large departmental and centralized production scanning operations is more complex.
Larger scanning operations typically use high-speed scanners in conjunction with capture software. Document capture software is used to profile different document types. Document profiling occurs by creating a batch class in the software. The batch class indicates the type of document, whether all documents are single page or multipage, and the different software-processing queues the documents will pass through.
Prior to scanning a document, the operator will invoke the software and choose the proper batch class. For example, if the operator is preparing to scan invoices, she will select the invoice batch class, which triggers the software to automatically know that the documents about to be imaged are all one-page, double-sided documents. This results in the software creating a separation between each one-page invoice, creating separate documents, and scanning both sides of the invoice. The capture software also knows to send the documents through the appropriate queues after they are imaged. (I say more about processing queues in the upcoming sections.)
Recognizing a good thing when you see it
Document capture software provides functionality that can read information on a document and assign the information as metadata to the image; this is referred to as recognition. Although recognition is not listed as one of the four primary steps in the document-imaging process, it plays a very important role in subsequently finding information and making the process more efficient.
In a production-oriented imaging operation, the scan operator will send the imaged documents to the recognition processing queue after the documents have been scanned. This allows the recognition module to read and apply metadata to the image. The batch class determines where on the document the software needs to look for data to read and what type of data format to expect. Capture software with recognition capability can typically read and extract the following types of information:
![]() Bar code: This includes a variety of commonly used bar-code formats such as 3-9, 128, and 2-D. (See Figure 9-4.)
Bar code: This includes a variety of commonly used bar-code formats such as 3-9, 128, and 2-D. (See Figure 9-4.)
![]() Optical Character Recognition (OCR): OCR refers to computer or machine print.
Optical Character Recognition (OCR): OCR refers to computer or machine print.
![]() Intelligent Character Recognition (ICR): ICR refers to handwriting.
Intelligent Character Recognition (ICR): ICR refers to handwriting.
![]() Optical mark reader: Check boxes and radio buttons are examples of optical marks. (See Figure 9-5.) Optical marks are commonly used on surveys, as well as on various other applications. (Remember the SAT?)
Optical mark reader: Check boxes and radio buttons are examples of optical marks. (See Figure 9-5.) Optical marks are commonly used on surveys, as well as on various other applications. (Remember the SAT?)
Figure 9-4: Bar codes.

The recognition process significantly reduces the amount of manual data entry, referred to as indexing. (More on indexing in the next section.)
Applying indexes
In some cases, automated recognition may not be able to be used due to poor-quality print or handwriting, or due to the inconsistency of the location of information on a document. When this occurs, the documents need to be manually indexed. Indexing involves data entry by a scan operator. For example, if an organization receives a high volume of invoices from multiple vendors, information such as account number, purchase order number, vendor name, and invoice amount may be located in different places on each vendor’s invoice. In this case, it’s difficult to program the capture software recognition module to know where to find the information. This usually results in a scan operator visually inspecting the scanned invoice and keying the index values into the appropriate fields in the capture software screen.
It is recommended that you minimize the amount of manual indexing that has to be performed. For many scanning operations, manual indexing is the most labor-intensive part of the document-imaging process. One tool that can be used to reduce the amount of indexing is autopopulation. Autopopulation allows you to key in one index value and, based on the value you enter, the other index fields automatically populate.
Figure 9-5: Optical marks.
No, it’s not magic. It happens by programmatically connecting your document capture software to another organizational system such as a human resources or financial application. For example, if you are indexing an employee file, you can type in John Doe in the Employee Name field. Then the capture software looks up the employee ID, division, and hire date in the human resources application and populates the other respective index fields.
Organizations that use automated recognition and manual indexing typically release documents to either a document or content management system after the imaging process is completed. This is in contrast to smaller companies, which may scan a document and then save the electronic image to a computer. Most small-volume desktop scanners or multifunctional devices apply cryptic names to imaged files such as SCAN014B12. Therefore, after the document is scanned and saved, it must be renamed.
Applying index attributes to imaged files and releasing them to a document or content management system greatly improve your ability to quickly find the information you are looking for. You can search by one of or all the index attributes that were assigned to the image. However, when you image a document and save it to your computer, you have to rely on the effectiveness of the filename and where it was saved to find the information.
Document owners (departments) usually predetermine index fields. When determining what index fields should be assigned to a document type, you need to focus on how you will need to retrieve the information in the future. I show you how to determine your index attributes in the “Gathering Requirements” section, later in this chapter.
Controlling the quality
The last major step in the scanning process is quality control (QC). Quality control involves examining imaged documents upon completion of the scanning and indexing process to ensure that the imaged document is an accurate replication of the paper document and that the appropriate indexes were assigned to the image. Quality control is a very important step in the document-imaging process. Most companies destroy the source document (paper document that’s imaged) after a predetermined period of time and rely solely on the imaged version for processing, inquiries, legal, and tax matters. Therefore, it is essential to ensure that you receive accurate scanning and indexing results.
Sampling is typically the basis for determining which imaged documents are selected for QC. An organization may determine that a 10 percent sampling is adequate for determining the accuracy of the document-imaging process. However, organizations operating in highly regulated industries such as nuclear energy and pharmaceuticals may require that QC be performed on all imaged documents.
The QC process should encompass a review of the following items:
![]() Image quality: During the scanning process, a document may be skewed (turned) as it feeds through the scanner. In addition, speckling can occur during the scanning process if a page has excessive dust on it or if dust has collected in the scanner. Most production capture software is equipped with deskewing and despeckling functionality. In some cases, it may be necessary to rescan the document to improve the image quality.
Image quality: During the scanning process, a document may be skewed (turned) as it feeds through the scanner. In addition, speckling can occur during the scanning process if a page has excessive dust on it or if dust has collected in the scanner. Most production capture software is equipped with deskewing and despeckling functionality. In some cases, it may be necessary to rescan the document to improve the image quality.
![]() Readability: Image quality can negatively impact the automated recognition process, as well as the ability of a human to read the contents of the imaged document. Therefore, during the QC process, it’s important to ensure that the document is readable and that the context or intent of the information has not been jeopardized.
Readability: Image quality can negatively impact the automated recognition process, as well as the ability of a human to read the contents of the imaged document. Therefore, during the QC process, it’s important to ensure that the document is readable and that the context or intent of the information has not been jeopardized.
![]() Indexing: This step involves verifying that the appropriate index values were assigned to the document. This may include checking the accuracy of both automated recognition and manual indexing.
Indexing: This step involves verifying that the appropriate index values were assigned to the document. This may include checking the accuracy of both automated recognition and manual indexing.
![]() Page count: This process ensures that the page count of the imaged document equals the page count of the paper document. During the scanning process, it’s possible for two pages of the document to be fed through the scanner at the same time, resulting in only one of the two pages being imaged. Additionally, scanners occasionally jam. After clearing the jam, it’s important to verify the last page that was successfully imaged so that you know what page to image next.
Page count: This process ensures that the page count of the imaged document equals the page count of the paper document. During the scanning process, it’s possible for two pages of the document to be fed through the scanner at the same time, resulting in only one of the two pages being imaged. Additionally, scanners occasionally jam. After clearing the jam, it’s important to verify the last page that was successfully imaged so that you know what page to image next.
Determining Your Imaging Approach
If you determine that imaging can provide benefits to your organization, it’s time to think about the approach. Depending on an organization’s size, imaging can be an expensive proposition. Therefore, it’s critical to understand your options and iron out a plan before imaging any documents.
You have two basic options for imaging documents — create an in-house document-imaging operation or outsource your needs to a qualified vendor. However, both options have their own subset of options. The following sections can help you sort out the approaches and determine what best meets your organization’s needs.
What happens in-house stays in-house
One option you have for imaging your documents is establishing an in-house scanning operation. The primary advantage of this approach is that it allows an organization to maintain control of its documents. Normally, when you outsource your imaging, your documents will need to be forwarded to the vendor’s location for scanning, and in some cases, the vendor will subcontract the indexing process to a third party, sometimes offshore. Some organizations may not be comfortable with relinquishing control of their documents, so for such a company, in-house imaging may be more attractive.
Before establishing an in-house document-imaging operation, you should consider the cost and effort of the investment. The investment will vary depending on the volume of information to be scanned and how quickly employees need the imaged documents. For small businesses, the expense is minimal. However, the investment is significant for large organizations wanting to create a production-level imaging operation. The following sections examine the different components needed for in-house imaging and the investment you can plan to make.
Equipping your imaging operation
Document-imaging equipment typically includes scanners, computers, and monitors. Document scanners come in many shapes and sizes. Low-volume, quality desktop scanners can be purchased for $200–$300. However, high-volume, production-level scanners capable of imaging over 120 pages per minute can cost in excess of $30,000. Depending on your organization’s imaging needs, several scanners may need to be purchased.
Before purchasing scanning equipment, it’s essential to perform a document-imaging needs assessment (reviewed earlier in this chapter) for each department interested in scanning its documents. The results of the assessment can provide you with the information you need to determine the best approach to scanning within the organization, forecast potential volume, and also see how quickly the documents need to be imaged.
After you have an understanding of the document volume and service-level requirements, it’s time to understand which approach to scanning best meets the organization’s needs. Most companies that decide to image their documents in-house use one or a combination of the following approaches:
![]() Departmental (decentralized)
Departmental (decentralized)
![]() Remote
Remote
![]() Centralized
Centralized
Read on to see the pluses and minuses of each approach.
Taking a departmental approach
Departmental imaging, commonly referred to as distributed capture, is a decentralized approach that provides individual departments with the ability to scan their own documents. Department imaging can be beneficial when documents need to be quickly imaged. For example, a healthcare operation may have a need to scan documents as a patient completes them instead of sending the documents to a centralized imaging department to be scanned later.
Using a departmental imaging approach allows departments to maintain control of sensitive information. Some departments such as Legal and Human Resources may decide, due to the confidential nature of their information, to image their own documents rather than to send them to a centralized imaging operation, where other employees could view the information.
The need for departmental imaging needs to be carefully evaluated. If this approach is not carefully researched, it may lead to the following issues:
![]() Inconsistency: When multiple departments are responsible for imaging their own documents, it can lead to inconsistencies in the management of the document-imaging process. Such inconsistencies could include the types of scanning equipment that’s purchased, the manner in which documents are prepped, how quality control is performed, and how scanning equipment is maintained.
Inconsistency: When multiple departments are responsible for imaging their own documents, it can lead to inconsistencies in the management of the document-imaging process. Such inconsistencies could include the types of scanning equipment that’s purchased, the manner in which documents are prepped, how quality control is performed, and how scanning equipment is maintained.
![]() Unneeded expense: Departmental imaging requires scanning equipment to be purchased and maintained for each individual department. In some cases, this may lead to departments buying their own scanners from different manufacturers or purchasing different model types. This approach may reduce an organization’s overall buying leverage and require support from different vendors.
Unneeded expense: Departmental imaging requires scanning equipment to be purchased and maintained for each individual department. In some cases, this may lead to departments buying their own scanners from different manufacturers or purchasing different model types. This approach may reduce an organization’s overall buying leverage and require support from different vendors.
If your organization decides to implement departmental imaging, it’s very important that consistent procedures be developed and implemented across the company to ensure that expenses are minimized and the quality of the imaged document output is acceptable.
If an organization decides to use departmental imaging, a centralized group or committee should control the purchase process to ensure that the scanning equipment and software meet each department’s needs and that it maximizes its buying power.
Some organizations decide to forgo departmental imaging due to labor costs. Typically, it’s more expensive to have higher-paid departmental employees such as accountants, human resource specialists, or paralegals scan and index their documents rather than entry-level employees who may staff a centralized document-imaging department.
![]() Underutilization: Locating a scanner (or scanners) in each department can lead to underutilization of the equipment. If a department has a valid need to image its own documents, it’s important to ensure that the right equipment is purchased based on the department’s volume and service-level requirements.
Underutilization: Locating a scanner (or scanners) in each department can lead to underutilization of the equipment. If a department has a valid need to image its own documents, it’s important to ensure that the right equipment is purchased based on the department’s volume and service-level requirements.
Purchasing a scanner that is capable of imaging 100 pages per minute when the department’s volume warrants less throughput will result in underutilization. The document-imaging needs assessment should be used to determine a department’s volume, which will allow you to select the appropriate equipment.
In a land far, far away
Remote imaging is a decentralized approach geared toward organizations that have operations in different geographical locations. Remote imaging allows the location to both scan and index documents and then transmit the information via the Internet or company’s network, where it can be deposited in a document or content management application. Or, the documents can be scanned and then transmitted to a centralized processing department, where they are indexed.
In the absence of remote imaging, locations may have to ship their information via the postal service or express courier to a centralized imaging operation. This can result in significant expense, delays in documents being imaged, and lost documents.
Like departmental imaging, you should ensure that the appropriate equipment and software are purchased to prevent unnecessary expense and underutilization. In many cases, a satellite office’s volume may not require the purchase of a dedicated scanner — multifunctional devices are sometimes perfectly adequate.
Bringing it all together
Centralized imaging operations are mainly utilized by large organizations that have significant volumes of paper documents that need to be imaged. Centralized imaging may provide departments with less flexibility in the imaging of their documents, but it provides the organization with several important benefits.
A centralized document-scanning operation is comprised of a dedicated staff that’s trained and knowledgeable in all facets of imaging. This increases the overall efficiency, consistency, and accuracy of the process. Whereas a departmental imaging approach requires that numerous scanners be placed throughout the organization, centralized imaging uses fewer scanners, but those they do have are of a higher quality and are considerably faster.
Although centralized document imaging may use fewer scanners, they are more expensive. You may be able to purchase ten or more departmental scanners for the price of one production-level scanner. Therefore, it’s a good idea to thoroughly assess your imaging needs before purchasing scanning equipment. However, regardless of the in-house scanning approach you use, you need to account for equipment failure and repair time. It’s recommended that you purchase enough scanners to allow you to meet your service requirements in the event that a scanner is inoperable for a limited period of time.
Out with it!
Many organizations decide to outsource their document imaging. This is usually based on two factors — core functions and investment. Core functions refers to allowing employees to focus on their main tasks rather than spending time on ancillary administrative tasks such as prepping, scanning, and indexing documents.
The investment in document imaging can be significant. Instead of investing in additional staff, scanning equipment, and software, some companies decide to pay a vendor that already has the imaging infrastructure to scan their documents. However, if you decide to use a document-imaging vendor, you need to ensure that it meets your operational and regulatory requirements. You should consider the following factors when evaluating a vendor:
![]() Use: How do you plan to use the imaged documents? Do you need them to process a function, or do you need an image of the documents for retrieval purposes after they have been processed? Defining your imaging needs is essential in determining your vendor requirements.
Use: How do you plan to use the imaged documents? Do you need them to process a function, or do you need an image of the documents for retrieval purposes after they have been processed? Defining your imaging needs is essential in determining your vendor requirements.
![]() Indexing: You should determine what indexing you need the vendor to perform. This starts by determining how you plan to retrieve the documents. The more indexing you require the vendor to perform, the more the vendor will charge. One option is to have the vendor scan your documents and then have them transmitted back to you for indexing. In the section “Applying indexes,” earlier in this chapter, I show you how you can use autopopulation to programmatically apply indexing values by integrating the capture software with different organizational applications. By transmitting a daily snapshot of application databases to the vendor, it can also use autopopulation.
Indexing: You should determine what indexing you need the vendor to perform. This starts by determining how you plan to retrieve the documents. The more indexing you require the vendor to perform, the more the vendor will charge. One option is to have the vendor scan your documents and then have them transmitted back to you for indexing. In the section “Applying indexes,” earlier in this chapter, I show you how you can use autopopulation to programmatically apply indexing values by integrating the capture software with different organizational applications. By transmitting a daily snapshot of application databases to the vendor, it can also use autopopulation.
Some vendors contract with offshore companies to perform indexing. If this is the case, you should ensure that the information is encrypted during the transmission process. You should require the vendor to encrypt all information that it transmits to a subcontracted organization. The subcontract vendor should encrypt the data when sending it back. It’s recommended that you consult with your IT department to ensure that the vendor and its subcontractors are using the most updated encryption methods. In addition, the vendor should provide you with information on the offshore company regarding its reputation, security controls, and accountability.
![]() Service-level agreement: You should establish a Service Level Agreement (SLA) with the vendor. An SLA defines your processing timeline and quality requirements and remedies you have if the vendor doesn’t meet your requirements. For example, the SLA may include how and when you will provide documents to the vendor, how the documents are to be prepped and indexed, and when and how the information should be provided back to you. If the vendor fails to meet any aspect of the agreement, the SLA should provide a reduction in the costs normally charged by the vendor. The amount of reduced fees should be specifically communicated in the SLA.
Service-level agreement: You should establish a Service Level Agreement (SLA) with the vendor. An SLA defines your processing timeline and quality requirements and remedies you have if the vendor doesn’t meet your requirements. For example, the SLA may include how and when you will provide documents to the vendor, how the documents are to be prepped and indexed, and when and how the information should be provided back to you. If the vendor fails to meet any aspect of the agreement, the SLA should provide a reduction in the costs normally charged by the vendor. The amount of reduced fees should be specifically communicated in the SLA.
Some organizations take a hybrid approach to outsourcing document imaging. This approach involves the vendor using its personnel, equipment, and software within the organization’s facility. This option is typically used by companies that want to maintain control of their documents through the process, but don’t want to make the investment in additional employees, equipment, and software.
Gathering Requirements
Whether an organization decides to perform document imaging in-house or to outsource the process, it’s vital that you understand — and document — your imaging requirements. Defining your requirements typically occurs after the initial document-imaging needs assessment has been reviewed and approved. Departmental imaging requirements form the basis for determining how documents need to be processed and what it will cost.
The imaging needs assessment provides a high-level overview of the types of documents to be imaged, the volume, and the retrieval rate. The assessment provides a good starting point for understanding the basics of a department’s imaging needs, but it doesn’t provide enough detail to begin imaging the department’s documents. The requirements definition phase of the initiative starts the process of collecting the details needed to move the initiative into production. It’s recommended that the requirements be gathered by someone knowledgeable of the document-imaging process, including hardware and software functionality.
Conducting a document analysis
A document analysis involves obtaining a proficient understanding of a department’s documents. This can help to ensure that the imaging process is configured to be efficient and to produce accurate results. When conducting the document analysis, you need to evaluate several distinct factors:
![]() Size: Documents of a very large or small nature need to be accounted for during the analysis. Most scanning equipment can process standard-size paper dimensions such as letter, legal, and executive. However, larger-dimension paper may have to be imaged by using a large-format scanner. Smaller documents such as receipts sometimes don’t feed well through a scanner and may have to be taped to a blank letter-size piece of paper.
Size: Documents of a very large or small nature need to be accounted for during the analysis. Most scanning equipment can process standard-size paper dimensions such as letter, legal, and executive. However, larger-dimension paper may have to be imaged by using a large-format scanner. Smaller documents such as receipts sometimes don’t feed well through a scanner and may have to be taped to a blank letter-size piece of paper.
![]() Paper characteristics: During the analysis, you need to identify any documents with unusual thickness issues. Paper thickness can impact scanning equipment. Most document capture software and scanners (not multifunctional devices) have document-thickness control settings. This allows you to program the software to accommodate variations in document thickness to prevent the triggering of the scanner’s double-feed detection sensors.
Paper characteristics: During the analysis, you need to identify any documents with unusual thickness issues. Paper thickness can impact scanning equipment. Most document capture software and scanners (not multifunctional devices) have document-thickness control settings. This allows you to program the software to accommodate variations in document thickness to prevent the triggering of the scanner’s double-feed detection sensors.
![]() Print characteristics: Faint print may not be captured by the imaging software. In some cases, you may be required to produce a darkened copy of the document, which is scanned in lieu of the original document. In addition, the capture software may drop out certain color ink. The software will have to be configured to prevent the dropout of ink.
Print characteristics: Faint print may not be captured by the imaging software. In some cases, you may be required to produce a darkened copy of the document, which is scanned in lieu of the original document. In addition, the capture software may drop out certain color ink. The software will have to be configured to prevent the dropout of ink.
![]() Raised seals: Some documents may contain raised seals or watermarks. After being imaged, a document will reflect the seal and its verbiage, but will not be raised. The department needs to determine, based on the type of document and how it’s used, whether not having a raised seal will create an operational or legal issue.
Raised seals: Some documents may contain raised seals or watermarks. After being imaged, a document will reflect the seal and its verbiage, but will not be raised. The department needs to determine, based on the type of document and how it’s used, whether not having a raised seal will create an operational or legal issue.
![]() Automated recognition: Documents should be evaluated to determine whether the document text and format will be conducive to automated recognition such as OCR, bar codes, and Optical Mark Recognition (OMR), or whether automated recognition will not be possible. Documents with a small font, minimal spacing between fields, or certain colors such as red or blue may prevent effective recognition. During the analysis, you need to document the font size and other characteristics to select the best automated recognition settings in the capture software.
Automated recognition: Documents should be evaluated to determine whether the document text and format will be conducive to automated recognition such as OCR, bar codes, and Optical Mark Recognition (OMR), or whether automated recognition will not be possible. Documents with a small font, minimal spacing between fields, or certain colors such as red or blue may prevent effective recognition. During the analysis, you need to document the font size and other characteristics to select the best automated recognition settings in the capture software.
End of the beginning
The next step in gathering requirements is deciding on what values to use to index a document. This means looking into the future to determine how the information needs to be retrieved rather than how it needs to be filed in a document or content management system. It’s common for a department to want to assign numerous index values to a document to allow every conceivable retrieval scenario. However, this approach should be discouraged. Assigning too many index values results in a significant amount of time spent by the department or the centralized imaging operation applying indexes that may not be used. Departments should be encouraged to assign a minimal number of values (one to three) needed to retrieve their documents. If a valid need exists for more index values, you should determine whether autopopulating the additional attributes from an enterprise resource system, such as a human resource or financial system, is possible.
Calculating the Return on Investment (ROI)
Whether you decide to image your documents in-house or to outsource the process, it’s recommended that you develop a method for calculating your return on investment (ROI). Most organizational initiatives require an investment of either money, effort, or both — document imaging is no exception.
Determining the ROI can help you decide whether you need to perform imaging in-house or send your documents to a vendor for processing. In addition, it can assist in determining whether a department is a good candidate for document imaging. The following sections provide tips and tools you will need to make your decisions.
Investing in the benefits
Calculating the imaging ROI involves two basic components:
![]() Investment: The investment in document imaging depends on whether you image in-house or outsource the process. An in-house operation usually includes the hiring of additional staff, purchasing equipment, and buying software and maintenance, while outsourcing the process involves paying a vendor an agreed-upon amount of money for its services.
Investment: The investment in document imaging depends on whether you image in-house or outsource the process. An in-house operation usually includes the hiring of additional staff, purchasing equipment, and buying software and maintenance, while outsourcing the process involves paying a vendor an agreed-upon amount of money for its services.
![]() Benefits: Document imaging can provide many benefits, such as reductions in physical storage space (file cabinets, paper archiving), process efficiencies, and improvements in customer service. To calculate the imaging ROI, you should apply a monetary value to the benefits.
Benefits: Document imaging can provide many benefits, such as reductions in physical storage space (file cabinets, paper archiving), process efficiencies, and improvements in customer service. To calculate the imaging ROI, you should apply a monetary value to the benefits.
The primary index used to determine the expense related to a document-imaging operation is price per image. Price per image refers to the cost of imaging each individual sheet of paper. Price per image is calculated by accounting for all or certain costs related to an imaging operation. Figure 9-6 shows what might go into such a calculation.
Figure 9-6: Calculating price per image.
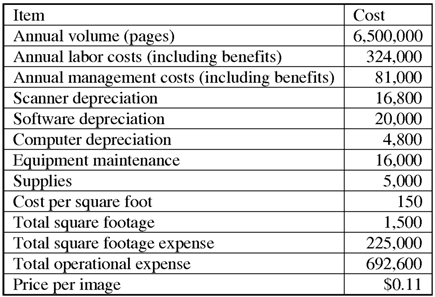
Note: To determine the price per image, divide the total operational cost by the annual number of imaged pages.
Many outsource vendors can provide you with a price-per-image quote. You should use your internally generated price-per-image estimate as a comparison to determine whether it’s more economical to do it yourself. Note: It’s important to ensure that you are making an apples-to-apples comparison. You need to determine from the vendor how it derived and itemized its price-per-image costs and see whether you included the same expense factors.
Knowing your customer
If you take another look at Figure 9-6, you see that it shows a macro-view of the overall cost of an imaging operation and the resulting price per image. However, some organizations create a micro-view for determining the imaging expense and price per image related to providing imaging services for individual departments.
Whether your organization uses a departmental or centralized approach to scanning, the expense related to imaging will vary based on a department’s needs. One department’s documents may require more prepping, while another department’s documents may require less prepping, but need more indexing. Figure 9-7 provides a micro-view of the expense and resulting price per image for scanning an individual department’s documents.
Figure 9-7: Price per image (micro-view).

Developing a departmental price per image requires an understanding of a department’s imaging requirements. Based on the requirements, the Imaging department can estimate how many documents can be prepped and indexed per minute. Figure 9-7 indicates the amount of minutes and hours required to process the department’s documents. This information can be used to determine the impact on available labor hours in the imaging department. The information allows management to decide whether additional staff needs to be hired. In addition, Figure 9-7 can be modified to include other document-imaging department overhead, such as square-footage cost, depreciation, and maintenance.
Valuating the benefits
Determining your total annual imaging costs and price per image is one-half of the ROI equation. Next, you should determine the value of the benefits that document imaging can provide the organization. The value of the benefits may come in the form of soft-dollar and hard-dollar cost savings. Soft-dollar savings may include items such as reductions in floor space needed for file cabinets and archive storage. Although the elimination of these items increases the square footage available for other uses, it’s not a direct cost savings to the organization. However, hard-dollar savings result in the elimination of direct expenses such as labor, processing time, and offsite storage costs.
When evaluating an organization’s or department’s need for document imaging, you should determine the cost savings that it will realize from the process. This typically includes the following items:
![]() Filing: Document imaging eliminates the need to manually file, retrieve, and refile documents. Time studies should be performed to estimate how much time is spent on a daily or weekly basis related to these activities. After you determine how much time employees spend filing, multiply the time by the average labor rate to arrive at total annual filing cost. This results in an annual labor savings.
Filing: Document imaging eliminates the need to manually file, retrieve, and refile documents. Time studies should be performed to estimate how much time is spent on a daily or weekly basis related to these activities. After you determine how much time employees spend filing, multiply the time by the average labor rate to arrive at total annual filing cost. This results in an annual labor savings.
![]() Efficiencies: Imaging documents in conjunction with automated workflow can significantly increase an organization’s efficiencies by reducing processing time. Steps should be taken to document and valuate the reduction in processing time. The efficiencies gained result in a direct labor expense savings related to document imaging.
Efficiencies: Imaging documents in conjunction with automated workflow can significantly increase an organization’s efficiencies by reducing processing time. Steps should be taken to document and valuate the reduction in processing time. The efficiencies gained result in a direct labor expense savings related to document imaging.
![]() Storage: Document imaging may eliminate the need to send paper documents to a vendor for storage. Most organizations retain source documents (paper documents) for a period of time after they are imaged in the event that a document needs to be rescanned. However, companies typically retain imaged source documents for a lesser period of time than they would if the information was not imaged. This may allow a company to retain the source documents onsite instead of sending them to a vendor for storage, resulting in a cost savings.
Storage: Document imaging may eliminate the need to send paper documents to a vendor for storage. Most organizations retain source documents (paper documents) for a period of time after they are imaged in the event that a document needs to be rescanned. However, companies typically retain imaged source documents for a lesser period of time than they would if the information was not imaged. This may allow a company to retain the source documents onsite instead of sending them to a vendor for storage, resulting in a cost savings.
After you have calculated the savings related to document imaging, the savings should be compared to the cost of scanning to determine an anticipated return on investment. The organization may have a valid need to image documents that doesn’t result in a monetary benefit. This includes imaging organizationally and operationally vital information so that it’s protected in the event of a catastrophic event.
Evaluating Imaging Hardware and Software
Selecting the right hardware and software is critical in the success of your document-imaging operation. You find numerous manufacturers, software vendors, and resellers that sell their products and services. Before buying scanning equipment and software, you need to define your current needs and imaging objectives as well as forecast future needs.
Purchasing equipment and software that doesn’t meet your needs may counter the document-imaging benefits you hope to attain. Therefore, it’s important to understand your options. The following sections help you evaluate different types of scanners and imaging software to help you determine what best fits your needs.
Examining document scanners
Scanner manufacturers have evolved their products to accommodate many types of document imaging; from small to large formats, color, and throughput. Although you have many models of scanners to choose from, you’ll come across three primary scanners in use by most organizations:
![]() Desktop (workgroup): Desktop scanners are used for low-volume imaging — usually less than a 1,000 pages per day, depending on the model. Desktop scanners are typically used to support just a few employees’ imaging needs. Most employees use desktop scanners to scan a few documents at a time. In some cases, multifunctional devices are used in lieu of desktop scanners. A quality desktop scanner can be purchased for approximately $400 to $600.
Desktop (workgroup): Desktop scanners are used for low-volume imaging — usually less than a 1,000 pages per day, depending on the model. Desktop scanners are typically used to support just a few employees’ imaging needs. Most employees use desktop scanners to scan a few documents at a time. In some cases, multifunctional devices are used in lieu of desktop scanners. A quality desktop scanner can be purchased for approximately $400 to $600.
![]() Departmental: Departmental scanners are designed to support the imaging needs of a single department. Departmental scanners come in several models able to scan approximately 4,000 to 10,000 pages per day. Departmental scanners typically cost between $2,000 and $8,000.
Departmental: Departmental scanners are designed to support the imaging needs of a single department. Departmental scanners come in several models able to scan approximately 4,000 to 10,000 pages per day. Departmental scanners typically cost between $2,000 and $8,000.
![]() Production: Production scanners are mainly used in centralized imaging operations. They are able to scan tens of thousands of pages per day. One production scanner is normally able to support the imaging needs of multiple departments and operations. Depending on the model, production scanners usually cost between $18,000 and $30,000.
Production: Production scanners are mainly used in centralized imaging operations. They are able to scan tens of thousands of pages per day. One production scanner is normally able to support the imaging needs of multiple departments and operations. Depending on the model, production scanners usually cost between $18,000 and $30,000.
The rated speed of a document scanner is normally derived by imaging under optimal conditions. This means scanning one-sided (simplex), letter-size (81⁄2" x 11"), portrait-oriented documents scanned at a lower resolution such as 200 dpi (dots per inch). If your organization has a need to scan documents that fall outside these parameters, you can expect to see a reduction in the number of rated pages that a scanner can process per minute.
While speed and cost are important factors in selecting a scanner, other equally important features should be taken into account:
![]() Ease of use: A document scanner should require minimal employee training. If the equipment is too complicated to use, it will reduce the efficiency of the document-imaging process and potentially increase scanning errors. Many vendors now offer one-touch buttons that are very convenient for desktop and departmental scanning. They allow users to easily select scanning functions such as OCR or scan to PDF, Microsoft Word, or Outlook, as well as to direct the imaged document to be sent to a specific file folder. One-touch functionality can significantly increase productivity.
Ease of use: A document scanner should require minimal employee training. If the equipment is too complicated to use, it will reduce the efficiency of the document-imaging process and potentially increase scanning errors. Many vendors now offer one-touch buttons that are very convenient for desktop and departmental scanning. They allow users to easily select scanning functions such as OCR or scan to PDF, Microsoft Word, or Outlook, as well as to direct the imaged document to be sent to a specific file folder. One-touch functionality can significantly increase productivity.
![]() Mechanics: You should choose a document scanner that is equipped with features that prevent or minimize mechanical errors such as double feeds and jams. Without these capabilities, employees may spend a significant amount of time correcting problems and ensuring that all pages of a document were scanned. Most scanners are now equipped with multiple sensors that detect multifeeds and prevent jams.
Mechanics: You should choose a document scanner that is equipped with features that prevent or minimize mechanical errors such as double feeds and jams. Without these capabilities, employees may spend a significant amount of time correcting problems and ensuring that all pages of a document were scanned. Most scanners are now equipped with multiple sensors that detect multifeeds and prevent jams.
![]() Feeder trays: Feeder trays are used for stacking documents that will be fed into the scanner. If you have a medium or high volume of documents that need to be imaged, you need to ensure that the feeder tray can hold hundreds of pages and can be adjusted for different document dimensions. If a feeder tray’s capacity is too low, employees will spend more time placing documents in the tray, thus reducing their productivity. Front-loading feed trays are recommended in most cases because they are easier to load than side trays.
Feeder trays: Feeder trays are used for stacking documents that will be fed into the scanner. If you have a medium or high volume of documents that need to be imaged, you need to ensure that the feeder tray can hold hundreds of pages and can be adjusted for different document dimensions. If a feeder tray’s capacity is too low, employees will spend more time placing documents in the tray, thus reducing their productivity. Front-loading feed trays are recommended in most cases because they are easier to load than side trays.
![]() Maintenance: Just like any mechanical device, scanners have to be maintained on a regular basis to ensure that you continue to produce high-quality images. Depending on the daily volume of paper you image, scanners need to be cleaned frequently due to the accumulation of paper dust. Paper dust can cause noise, or spots on your images. In addition to regular cleaning, preventive maintenance (PM) should be performed on high-volume scanners at least two to three times per year. A technician certified by the equipment manufacturer should perform preventive maintenance. Between PMs, you will need to replace the scanner consumables based on the manufacturer’s recommendation. Consumables consist of parts such as tires and rollers. These are parts of the scanner that grab the pieces of paper and feed them through the scanner. The parts wear down over time and can cause double feeds and jams if they’re not regularly replaced.
Maintenance: Just like any mechanical device, scanners have to be maintained on a regular basis to ensure that you continue to produce high-quality images. Depending on the daily volume of paper you image, scanners need to be cleaned frequently due to the accumulation of paper dust. Paper dust can cause noise, or spots on your images. In addition to regular cleaning, preventive maintenance (PM) should be performed on high-volume scanners at least two to three times per year. A technician certified by the equipment manufacturer should perform preventive maintenance. Between PMs, you will need to replace the scanner consumables based on the manufacturer’s recommendation. Consumables consist of parts such as tires and rollers. These are parts of the scanner that grab the pieces of paper and feed them through the scanner. The parts wear down over time and can cause double feeds and jams if they’re not regularly replaced.
Consumables are expensive. Therefore, you should ensure that you select a scanner that uses quality consumables so that they don’t have to be replaced as often.
The role of document-imaging software
Document scanners come bundled with software. Therefore, during the evaluation process, it’s essential to assess both the scanner’s capability as well as the software’s capability. Document-imaging software is the brains behind the scanner and can provide functionality that makes the imaging process more accurate and efficient. When evaluating document-imaging software, you should look for the following features:
![]() Recognition: Scanning software should have automated recognition capabilities that can read bar codes and perform OCR on your documents.
Recognition: Scanning software should have automated recognition capabilities that can read bar codes and perform OCR on your documents.
![]() Back-page detection: You may have the need to scan duplex pages. This means pages that have print on both sides. Rather than having to scan these pages separately from one-sided pages or manually choosing a duplex setting on the scanner, the software should automatically detect the presence of print on the back side of a page.
Back-page detection: You may have the need to scan duplex pages. This means pages that have print on both sides. Rather than having to scan these pages separately from one-sided pages or manually choosing a duplex setting on the scanner, the software should automatically detect the presence of print on the back side of a page.
![]() Page order: Sometimes it’s necessary to reorder the pages in a document. The software should allow you to rearrange the page order after the document is scanned.
Page order: Sometimes it’s necessary to reorder the pages in a document. The software should allow you to rearrange the page order after the document is scanned.
![]() Deskew/despeckle: Deskew software functionality allows you to straighten the orientation of an image that may be slightly skewed or crooked. Despeckling allows you to remove noise or spots from an image. These features provide better readability.
Deskew/despeckle: Deskew software functionality allows you to straighten the orientation of an image that may be slightly skewed or crooked. Despeckling allows you to remove noise or spots from an image. These features provide better readability.
![]() One-touch buttons: Although this feature was reviewed in the preceding section, it’s important to note that while a one-touch button may be on the scanner, it’s the software the scanner uses that enables the functions.
One-touch buttons: Although this feature was reviewed in the preceding section, it’s important to note that while a one-touch button may be on the scanner, it’s the software the scanner uses that enables the functions.
Although all document scanners come bundled with software, in many cases, production imaging departments purchase software with advanced capabilities that allow profiles (batch classes) to be created for different document types or imaging jobs. Prior to imaging a batch of documents, the scan specialist will select the corresponding batch class that instructs the software on how to process the information. This may include performing OCR, autopopulation, and scanning of the back side of the documents.
Equipment manufacturers and their resellers understand that purchasing scanning equipment and software can be a significant investment. In many cases, they will allow you to test their products in your environment. This will allow you to thoroughly evaluate the equipment and software and compare different models before making a purchase.
..................Content has been hidden....................
You can't read the all page of ebook, please click here login for view all page.