
Figure 5-1: Creating a new folder or subfolder.
Chapter 5
Drives Can Drive You Crazy
In This Chapter
![]() Managing the risks
Managing the risks
![]() Cleaning up your drives
Cleaning up your drives
![]() Keeping your drives humming
Keeping your drives humming
Over the past decade, we have witnessed an explosion of digital volume. The growth rate of electronic content is staggering, and it has impacted every organization. Industry experts project that digital information doubles every 18 months. Much of this electronic information finds its way onto your company’s personal (hard) and network drives.
Regardless of the size of your organization, if you receive and create electronic information, you have to store it somewhere. Just like paper information, digital content also has a life cycle that needs to be managed. In this chapter, I analyze how organizations are negatively impacted by unmanaged electronic information residing on hard drives and network drives and then move on to showing you how you can manage the electronic information life cycle, as well as how to maintain your drives going forward.
At-Risk Drivers
Even with the growing adoption by organizations of electronic records and Enterprise Content Management (ECM) software applications used for storing, retrieving, and managing electronic information (covered in great detail in Chapter 10), many organizations have not made the move to discontinue the use of their hard drives and shared network drives or use their ECM system in lieu of drives. Therefore, drives are still heavily used by employees to store digital content.
Employees perceive drives to be convenient and easy to use. However, a number of risks and limitations are associated with drives that most organizations aren’t aware of or aren’t prepared to resolve. These issues have appropriately led to drives being nicknamed the Wild West of computing.
Out of sight — out of mind
Most of the records and information that your company creates and receives ends up being stored on employee hard drives or network drives and, in many cases, to both. With paper file cabinets, your folders, records, and information are visible. You have to take action when you continue to receive new records and information but your file cabinets or shelves can no longer accommodate the volume. This isn’t (usually) the case with electronic records and information.
 Over the past decade, the cost of computer storage has continued to decrease. Most organizations have opted to regularly increase the storage capacity of their network drives rather than implement processes to clean up information that is no longer needed. This approach has led to an electronic out-of-sight, out-of-mind mentality. After files are saved to a drive, they tend to stay there. Organizations that continue to increase storage capacity may be unknowingly masking the fact that they’re not properly managing their information.
Driving up the costs
Although computer storage may not be as expensive as it once was, the cost of not properly managing records and information is on the rise. As organizations create and receive more electronic content, but fail to manage storage repositories such as hard drives and network drives, it can negatively impact the organizations’ bottom lines.
The problem with the out-of-sight — out-of-mind mentality with regard to electronic content is compounded by unmanaged computer drives. Hard drives and shared network drives are becoming digital graveyards. Files are being saved to hard drives and network drives and then promptly forgotten. For organizations that aren’t addressing this issue, their employees aren’t motivated to ensure that drives are appropriately used, cleaned up, and maintained.
This lack of company acknowledgment and action of hard and network drive issues typically results in gigabytes (or even terabytes) of poorly named electronic files, folders with no structure, and the continuous addition of server storage, causing employees to have to search through massive amounts of information to find the file they need. But wait, isn’t electronic retrieval supposed to be faster than getting up from your desk, walking to the file cabinet, and finding a folder? The answer is yes — theoretically. However, if files and repositories (drives) aren’t managed properly, it will take employees longer to retrieve electronic files, which equates to increased labor costs.
Driving down function lane
Having to search through massive amounts of information on hard drives and network shared drives not only increases labor costs, but it also negatively impacts an organization’s ability to effectively support its functions. This includes the ability to rapidly retrieve information for processing work, decision-making, customer service, and responding to regulatory inquiries and lawsuits.
 All information is potentially discoverable in a lawsuit. This means that in the event of a lawsuit, the plaintiff’s attorney can request an organization to produce any information that he or she believes to be relevant. The massive amounts of information on your hard drives and shared network drives are fair game during legal discovery. It can take a considerable amount of effort and expense to cull through the volume of files on corporate shared network drives. Therefore, it’s recommended that this issue serve as justification for appropriately managing drives.
In most cases, the inability of hard drives and shared network drives to adequately support business functions is due to the absence of effective folder structures, which results in a lack of organization. Many companies find their important business-related documents filed with pictures of the company luau, old spreadsheets, and other electronic content that may or may not have been useful at some point. Information that is no longer serving a business purpose typically makes up the majority of the files on your hard drives and shared network drives, and acts as noise and clutter that reduce the overall effectiveness and efficiency of employees and organizations.
Cleaning Up Your Driving Record
The explosion of electronic content on company drives didn’t happen overnight. If it had, you would’ve seen employee rebellions around the globe. The increase in volume has occurred over a span of years, resulting in employees unknowingly adapting to and accepting the growth. Many employees and organizations still don’t realize the extent and impact of the issues related to drives.
Regardless of the problems a company is experiencing with its hard drives and shared network drives, chances are that the issues are attributable to the fact that organizations did not anticipate the unbridled growth of electronic files, and how to manage that growth. The following sections help you understand the steps for getting hard drives and shared network drives under control.
Taking time to know your drives
Hard drives and shared network drives serve as convenient repositories for electronic files. However, they have inherent characteristics and limitations that can quickly negate their convenience. The first step in getting your drives under control is to understand these issues:
![]() Duplication: As implied by the name shared network drives, multiple employees have the ability to save files to the same drive. Although this is a good feature, over time, if different employees are saving the same files to different drive folders, it won’t take long for the drive to contain a significant amount of duplicated content. In some cases, different employees may be saving the same file to the same folder, but are required to assign the file a unique name. Even though the files have different names, the content is still the same.
Duplication: As implied by the name shared network drives, multiple employees have the ability to save files to the same drive. Although this is a good feature, over time, if different employees are saving the same files to different drive folders, it won’t take long for the drive to contain a significant amount of duplicated content. In some cases, different employees may be saving the same file to the same folder, but are required to assign the file a unique name. Even though the files have different names, the content is still the same.
![]() Versioning: Duplication of files also leads to the issue of versioning. When duplication exists, you may not know whether you are viewing the most current version of a document. An employee may modify a duplicated file, but another instance of the duplicated file may be accessed and incorrectly acted upon.
Versioning: Duplication of files also leads to the issue of versioning. When duplication exists, you may not know whether you are viewing the most current version of a document. An employee may modify a duplicated file, but another instance of the duplicated file may be accessed and incorrectly acted upon.
![]() Folder structure: Although hard drive and shared network drive folders can be organized and named in a structured manner to meet the needs of an employee, department, or operation; over time, new unapproved folders can be created by employees and files can be placed in the folders if the proper controls are not in place. This undermines the integrity of the filing and retrieval process.
Folder structure: Although hard drive and shared network drive folders can be organized and named in a structured manner to meet the needs of an employee, department, or operation; over time, new unapproved folders can be created by employees and files can be placed in the folders if the proper controls are not in place. This undermines the integrity of the filing and retrieval process.
![]() Naming: Hard drives and shared network drives allow employees to assign a naming convention of their choosing to folders and files. This promotes filing inconsistencies and inefficient file retrieval. One employee may refer to a topic or file differently from another employee.
Naming: Hard drives and shared network drives allow employees to assign a naming convention of their choosing to folders and files. This promotes filing inconsistencies and inefficient file retrieval. One employee may refer to a topic or file differently from another employee.
![]() Metadata: Hard drives and shared network drives don’t allow employees to assign metadata. Metadata is defined as data about data. This means that, aside from the filename, you are unable to assign additional descriptive information about the file’s contents. For example, if you are saving a contract to a shared network drive, you don’t have the ability to apply associated metadata such as the contract type, execution date, and contract duration.
Metadata: Hard drives and shared network drives don’t allow employees to assign metadata. Metadata is defined as data about data. This means that, aside from the filename, you are unable to assign additional descriptive information about the file’s contents. For example, if you are saving a contract to a shared network drive, you don’t have the ability to apply associated metadata such as the contract type, execution date, and contract duration.
![]() Searching: The absence of file metadata prevents effective searching. You must either rely on full-text searching (searching the text of the file) or on a filename search. In addition, employees in one department may not have authorization to search or access files on another department’s shared network drives. To top things off, hard drive content often isn’t located on the company’s network, but rather resides on individual computers, limiting the accessibility to information.
Searching: The absence of file metadata prevents effective searching. You must either rely on full-text searching (searching the text of the file) or on a filename search. In addition, employees in one department may not have authorization to search or access files on another department’s shared network drives. To top things off, hard drive content often isn’t located on the company’s network, but rather resides on individual computers, limiting the accessibility to information.
Mapping a course of action
Now that you understand the characteristics and limitations of hard drives and shared network drives, you can begin to take steps to manage them. It is recommended that the cleanup be a company-wide initiative supported by senior management. The effort to clean up the existing content on organizational drives can be significant due to years of file accumulation, and will need management’s support to ensure cooperation and compliance. However, cleaning up drives can also be initiated at the individual department level.
As you begin the cleanup process, it’s important to remember that computer hard drives shouldn’t be used to store official company records or information that has business value. Ideally this information should be stored in a records management or content management software system. (For more information on such software systems, see Chapter 10.) If your company does not have this type of software application, the information should be stored on the organization’s shared network drives to ensure that the content is regularly backed up, searchable, and retrievable. For small businesses that may not have a computer network, this information should be stored in logically named folders on a hard drive. If you must store important business documents on a hard drive, ensure that you conduct regular backups.
 Some organizations begin the cleanup process by diving right in and deleting files that no longer have any business value. Although this is an important part of the process, a more effective approach is to begin by developing a project team to organize and drive the initiative. The project team should consist of a minimal number of employees (4–6) from key areas of the organization. Limiting the number of team members allows adequate input, but helps to eliminate decision-making gridlocks. A typical project team should include (if applicable) representation from the Records Management, IT, Legal, and Operational departments.
Planning is an essential component of the drive cleanup process, regardless of the size of your business. The project team should include a cleanup plan that encompasses the following items:
![]() Strategy: Before reviewing or deleting any hard drive or network shared drive files, the project team should establish an information strategy that will be a road map for how the organization plans to clean up, use, and maintain its shared network drives. A strategy can help determine whether content such as databases and program files should be segregated and assigned to separate dedicated drives or servers, what information to retain and delete, a plan for developing folder structures, and when to perform routine drive maintenance.
Strategy: Before reviewing or deleting any hard drive or network shared drive files, the project team should establish an information strategy that will be a road map for how the organization plans to clean up, use, and maintain its shared network drives. A strategy can help determine whether content such as databases and program files should be segregated and assigned to separate dedicated drives or servers, what information to retain and delete, a plan for developing folder structures, and when to perform routine drive maintenance.
![]() Communication: The project team should develop an employee communication plan that encompasses the reason for the cleanup, a schedule of events, the expected benefits, and an overview of the process.
Communication: The project team should develop an employee communication plan that encompasses the reason for the cleanup, a schedule of events, the expected benefits, and an overview of the process.
![]() Deletion: The project team should consult with the appropriate organizational representatives from areas such as the Legal and Tax departments to determine what approvals, if any, need to be obtained before files can be deleted. This applies primarily to official company records listed on the company’s record retention schedule. However, both records and nonrecord information may be relevant to pending or active lawsuits or governmental inquiries. It’s recommended that the Legal and Tax departments (and any other applicable departments) provide a list to the project team of record types and nonrecord information that should be retained. This information should be distributed to the departments participating in the drive cleanup.
Deletion: The project team should consult with the appropriate organizational representatives from areas such as the Legal and Tax departments to determine what approvals, if any, need to be obtained before files can be deleted. This applies primarily to official company records listed on the company’s record retention schedule. However, both records and nonrecord information may be relevant to pending or active lawsuits or governmental inquiries. It’s recommended that the Legal and Tax departments (and any other applicable departments) provide a list to the project team of record types and nonrecord information that should be retained. This information should be distributed to the departments participating in the drive cleanup.
![]() Execution: This phase of the plan should include details of how to execute the cleanup. This involves how to create departmental folder structures, what folders should be created, how to rename individual files, distribution of the company’s retention schedule, employee procedures, and guidance and monitoring of the cleanup.
Execution: This phase of the plan should include details of how to execute the cleanup. This involves how to create departmental folder structures, what folders should be created, how to rename individual files, distribution of the company’s retention schedule, employee procedures, and guidance and monitoring of the cleanup.
Creating a folder structure
To ensure that the cleanup initiative is a success, departments need to create folders that capture the department’s primary functions and needs (refer to Chapter 4 to see how to create a folder structure). This step should occur prior to deleting, renaming, or moving any files. The steps for creating folders and subfolders in Windows are as follows.
Creating a folder:
1. Choose File⇒New.
The New submenu appears, as shown in Figure 5-1.
2. Select Folder from the New submenu.
3. In the new blank folder that appears, type a name for the new folder.
Creating a subfolder:
1. Double-click the new folder that you just created.
2. Choose File⇒ New.
The New submenu appears. (Again, see Figure 5-1.)
3. Select Folder from the New submenu.
4. In the new blank folder that appears, type a name for the new folder.
When creating your folders and subfolders, it’s critical that you name them appropriately. Folders should be named in a manner that allows anyone to reasonably determine their contents. Keep in mind that a department’s folders may be viewable by employees in other departments. Therefore, avoid using abbreviations or cryptic naming conventions that may only be familiar to certain employees.
Developing the folder structure first allows employees to place files that still need to be retained in appropriate folders during the file review process. Figure 5-2 shows how a departmental folder structure for a Human Resources department might look.
If the cleanup is a company-wide initiative, it’s important to understand that some folders may be common across departments. For example, many departments in an organization retain the same types of records and information specific to their operation, such as policies and procedures, correspondence, and budgets. During the planning phase, these categories of information should be identified in an effort to expedite the folder-creation process.
During the folder-creation process, it’s important to analyze and scrutinize requests from departments for the same folder types. Although a valid need may exist, it can also be an indicator that multiple departments are storing duplicate information. If this is the case, you should work with the departments to determine who should be considered the owner of the information. In some situations, operational needs justify duplicate information being retained in different departments. However, departments that are not considered the official owner or department of record should delete the information as soon as it no longer serves a useful business purpose.
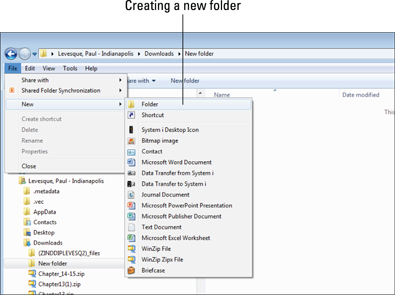
Figure 5-2: Human Resources departmental folder structure.
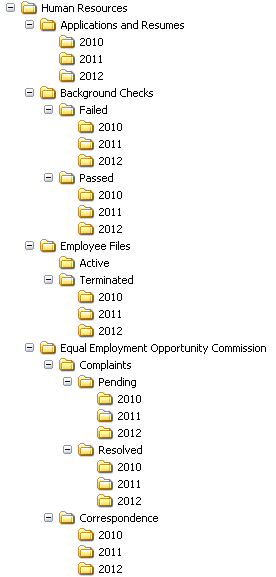
To help determine when electronic records and information should be deleted, you can assign a retention suffix to the folder name when creating your departmental folder structure, as shown in Figure 5-3. This process makes it convenient for employees to subsequently manage shared network drives.
Figure 5-3: Folder names, including the retention period suffix.

Administering shared drives
As you begin the process of creating departmental folders on your shared drives, it’s recommended that a primary and secondary employee be appointed drive or department administrator. It is the responsibility of the administrator to ensure that the network drive or department folder structure is maintained. (Additional information on maintaining shared drives is covered in detail in the section “Maintaining Your Drives,” later in this chapter.) One important aspect of the administrator’s job is to assign security and rights to the drive or department folders.
Assigning security to a drive or folder ensures that only authorized employees are able to access files. For example, the Accounting department may share a drive with the Human Resources department. However, the Accounting department shouldn’t be able to access Human Resources folders. When it comes to assigning security to an entire drive, it’s recommended that you consult your IT department. In addition, IT is usually responsible for assigning users and user groups to a network drive. However, some organizations allow drive administrators (non-IT employees) to assign user or user group permissions to a drive and folders. In fact, Windows even allows you to determine the extent of what user groups are able to do after they have accessed your folder. Table 5-1 lists the various permission categories available to you.
Table 5-1 Permission Types
|
Type |
Permission |
|
Full Control |
View filenames and subfolders |
|
Navigate to subfolders |
|
|
View data in the folder’s files |
|
|
Add files and subfolders to the folder |
|
|
Change the folder’s files |
|
|
Delete the folder and its files |
|
|
Change permissions |
|
|
Take ownership of the folder and its files |
|
|
Modify |
View the filenames and subfolders |
|
Navigate to subfolders |
|
|
View data in the folder’s files |
|
|
Add files and subfolders to the folder |
|
|
Change the folder’s files |
|
|
Delete the folder and its files |
|
|
Read & Execute |
View filenames and subfolder names |
|
Navigate to subfolders |
|
|
View data in the folder’s files |
|
|
Add files and subfolders to the folder |
|
|
List Folder Contents |
View the filenames and subfolders |
|
Navigate to subfolders |
|
|
View folders |
|
|
Doesn’t allow access to the folder’s files |
|
|
Read |
View the filenames and subfolders |
|
Navigate to subfolders |
|
|
Run applications |
|
|
Open files |
|
|
Copy and view data in the folder’s files |
|
|
Write |
Create folders |
|
Add new files |
|
|
Open and modify files |
|
|
Delete files |
To assign user group or user permissions to a folder, follow these steps:
1. Right-click the folder you are interested in.
2. On the contextual menu that appears, choose Properties.
The Properties dialog box for the folder appears.
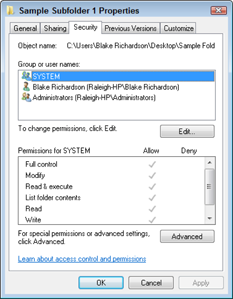
3. Click the dialog box’s Security tab to select it.
The options for the Security tab appear, as shown in Figure 5-4.
4. Click to select either the Allow or Deny check box for the listed tasks and then click OK.
Figure 5-4: Permission assignments.
Planning the file review
Knowing how to create your folders and apply security is great prep work, but it’s still only prep work. At some point, you have to get your hands dirty and start reviewing files currently stored on hard drives and shared network drives. It’s recommended that the cleanup project team provide file review procedures to employees to ensure that the process is correctly followed. The procedures should cover the following topics:
![]() Retention schedule: Before any files are reviewed, moved, or deleted, employees should be provided a current version of the organization’s records and information retention schedule. This allows employees to know whether a file is eligible to be deleted. Employees should be instructed that if they’re unsure about whether a file should be deleted, they should retain it until they receive further guidance from their management team or the records manager. (For more on retention schedules, see Chapter 12.)
Retention schedule: Before any files are reviewed, moved, or deleted, employees should be provided a current version of the organization’s records and information retention schedule. This allows employees to know whether a file is eligible to be deleted. Employees should be instructed that if they’re unsure about whether a file should be deleted, they should retain it until they receive further guidance from their management team or the records manager. (For more on retention schedules, see Chapter 12.)
![]() Hard drive usage: This part of the procedure should communicate to employees that they need to move all records and information still of business value from their own hard drives to their shared network drive.
Hard drive usage: This part of the procedure should communicate to employees that they need to move all records and information still of business value from their own hard drives to their shared network drive.
![]() Naming files: The procedure should instruct employees to review the names of files currently on their hard drives and shared network drives for appropriateness, and to modify the names if needed.
Naming files: The procedure should instruct employees to review the names of files currently on their hard drives and shared network drives for appropriateness, and to modify the names if needed.
![]() Assigning files to folders: The procedure should provide guidance on what to do if they have files that don’t seem to fit anywhere in the new folder structure. If this occurs, the employee should consult with his or her management team or the records manager. Employees should be advised not to move a file to a folder if it’s not a logical fit. The management team should review all files that don’t have a good folder fit to determine whether additional folders should be added to the structure.
Assigning files to folders: The procedure should provide guidance on what to do if they have files that don’t seem to fit anywhere in the new folder structure. If this occurs, the employee should consult with his or her management team or the records manager. Employees should be advised not to move a file to a folder if it’s not a logical fit. The management team should review all files that don’t have a good folder fit to determine whether additional folders should be added to the structure.
Reviewing files
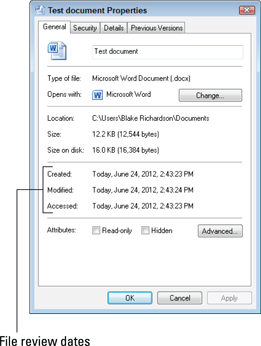
Now that you are ready to begin reviewing files, you should take advantage of all the information that your computer and network can provide so that the task is as easy as possible. The General tab of the Properties dialog box for each electronic file you have stored on your hard drive or a shared network drive contains the date the file was created, and when it was last modified and accessed. (See Figure 5-5.) This information will be helpful when determining whether a file is eligible to be deleted based on your organization’s record retention schedule.
Figure 5-5: File review dates.
As mentioned in the “Mapping a course of action” section, earlier in this chapter, you need to determine whether approvals will need to be obtained prior to deleting any files.
Each employee should first review her hard drive and move files that still need to be retained to her department folder structure on the shared network drive. Files that are no longer needed should be deleted. As a reminder, no official company records or information of business value should remain on the hard drive upon completion. Files that are deleted from a hard drive are automatically moved to the computer’s Recycle Bin. Note: The administrator can change the properties of the Recycle Bin so that deleted files are immediately removed (not sent to the Recycle Bin).
As a double-check, after all files have either been moved to a network drive or deleted, it’s recommended that each employee review the contents of his or her Recycle Bin to ensure that the files that have been placed there should be deleted. If so, the employee should take the following steps to empty the Recycle Bin. (Remember that when the Recycle Bin is emptied, the files are no longer recoverable.)
To empty the Recycle Bin, follow these steps (see Figure 5-6):
1. Go to the desktop screen.
2. Right-click the Recycle Bin icon.
3. Choose Empty Recycle Bin from the contextual menu that appears.
4. In the confirmation dialog box that appears, click Yes.
All files contained in the Recycle Bin are permanently deleted.
Figure 5-6: Emptying the Recycle Bin.

After everyone has reviewed his or her individual hard drives, it’s time to tackle the files currently stored on the shared network drive. The shared network drive file review process is basically the same as the hard drive review. Files that need to be retained should be moved to an appropriate folder and the balance deleted, pending any required approvals.
Cleaning up with software
In recent years, a new category of software referred to as classification management has emerged on the records and information management scene. This type of software was developed in response to the significant growth of information stored on network drives and was meant to assist organizations that need to migrate information from network drives to enterprise content management (ECM) applications — applications that allow companies to share information and manage the life cycle of content throughout the organization. Classification management software provides functionality that is helpful during a shared network drive cleanup. The software is capable of inventorying all information stored on the organization’s network drives and then providing information regarding files such as size, date, author, insight into the file (phrases and words), and instances of content duplication.
In addition, the software can be loaded with the organization’s records and information retention rules and can provide electronic reporting on content that’s eligible for deletion. This approach eliminates the need for departmental employees to manually review each file to determine whether it should be deleted. Chapter 10 provides a thorough review of software functionality. You can reference the appendix, available online at www.dummies.com/go/recordsmanagefd, for a comprehensive list of records, document, and enterprise content management vendors.
Maintaining Your Drives
After you have completed the hard drive and shared network drive cleanup, you want to ensure that all your hard work doesn’t go to waste. The cleanup initiative can be considered a project, but maintaining the company’s shared network drives should become an ongoing process, and the responsibility of every employee.
Amazing things can happen when a process becomes habit. To transform the process into habit, employees need guidance. The following sections assist you in developing and implementing a usage policy and options for maintaining your drives.
Creating a usage policy
Setting expectations and providing instructions to employees on the use of the organization’s shared network drives are essential for ensuring the ongoing management of your drives. The guidance should be clear, concise, and as convenient as possible. A usage policy is an effective way to accomplish this objective.
The shared network drive usage policy should cover the major areas that are susceptible to mismanagement. This includes the following topics:
![]() Attachments: Sending e-mails with attachments is a primary cause of information duplication. Instead of sending an attachment via e-mail, place the file on the shared network drive and provide the recipients with a link to the file. However, keep in mind that this only works if the recipients have access to the shared drive. Chapter 15 provides step-by-step instructions on how to create a link to a file.
Attachments: Sending e-mails with attachments is a primary cause of information duplication. Instead of sending an attachment via e-mail, place the file on the shared network drive and provide the recipients with a link to the file. However, keep in mind that this only works if the recipients have access to the shared drive. Chapter 15 provides step-by-step instructions on how to create a link to a file.
![]() Folders: After department folder structures have been developed, employees shouldn’t create additional folders or delete or modify existing folders without proper approval. Employees should be provided with a mechanism for requesting changes to the established folder structures.
Folders: After department folder structures have been developed, employees shouldn’t create additional folders or delete or modify existing folders without proper approval. Employees should be provided with a mechanism for requesting changes to the established folder structures.
![]() Naming: The usage policy should provide employees with guidance on how to properly name folders and files. They should avoid using abbreviations, numbers, and acronyms that may not be understood by other company employees. In addition, if approved by your organization, the retention period can be incorporated into the name of folders.
Naming: The usage policy should provide employees with guidance on how to properly name folders and files. They should avoid using abbreviations, numbers, and acronyms that may not be understood by other company employees. In addition, if approved by your organization, the retention period can be incorporated into the name of folders.
![]() Retention and deletion: Employees should ensure that the files stored on the shared drive are retained in accordance with the company’s record retention schedule. After a file’s retention period has expired, it should be deleted in a timely manner. An exception to this directive exists when it has been determined that a file or information is related to an active or anticipated lawsuit or governmental inquiry (see Chapter 8 for more information). In this case, you must ensure that the file isn’t deleted until the matter has been resolved.
Retention and deletion: Employees should ensure that the files stored on the shared drive are retained in accordance with the company’s record retention schedule. After a file’s retention period has expired, it should be deleted in a timely manner. An exception to this directive exists when it has been determined that a file or information is related to an active or anticipated lawsuit or governmental inquiry (see Chapter 8 for more information). In this case, you must ensure that the file isn’t deleted until the matter has been resolved.
Relying on the administrator
Smaller to medium-sized organizations can assign the task of shared network drive maintenance to an administrator. Depending on the size of your organization, one administrator may be assigned to monitor compliance usage on all shared network drives, or it may be necessary to appoint one administrator per drive. The role of the administrator is to ensure that department folders remain intact and that appropriate naming conventions of folders and files are being followed.
Assigning an administrator to oversee all network drives or one administrator per drive usually isn’t practical for large organizations. This is due to the large number of departments and volume of folders and files. In this case, the role of administrator is assigned to an employee within each department. The employee who is selected should be very knowledgeable of the department’s functions and information. The department administrator should periodically review his shared network drive and report compliance issues to his manager.
Using software to maintain your drives
Earlier in this chapter, I talk about the emergence of classification management software. These types of applications can also help with the continuing maintenance of your shared network drives. The software can be loaded with the company’s record and information retention schedule rules to assist you with files that are eligible to be deleted, as well as to electronically report on departmental folder structures and files. The reporting information that these applications can provide helps to monitor compliance to your shared drive usage policy.
..................Content has been hidden....................
You can't read the all page of ebook, please click here login for view all page.