
Chapter 2
iOS in the Enterprise
As Apple's iOS-based devices have gained popularity among consumers, more and more enterprises have begun to allow employees to access and store enterprise data on these devices. Typically, the enterprise purchases and fully manages the smartphones or other devices that may be used to access sensitive enterprise data. In some cases (and in what is becoming increasingly common), enterprises may allow employees to access enterprise data from devices they personally own. In either case, the benefits of using these mobile devices to access enterprise data must be weighed against the new security risks that they present.
Any mobile device can get misplaced, lost, or stolen. If the mobile device stores or is capable of accessing sensitive enterprise data, there is a risk that this data may be recoverable and fall into the wrong hands. For these reasons, it is important that access to the physical device be restricted by requiring a strong passcode, and that it can be remotely locked or wiped if it is lost. This chapter describes how to use Apple's iPhone Configuration Utility and Lion Server's Profile Manager to create and apply configuration profiles to iOS devices. These profiles can be used to ensure that the devices enforce your organization's security policy, including requiring a strong device passcode, for example. As a Mobile Device Management (MDM) service, Profile Manager can also be used to remotely lock or wipe a lost device.
iOS Configuration Management
iOS-based devices are managed through the creation and installation of configuration profiles. These profiles contain settings configured by an administrator for installation on a user's device. Most of these settings correspond to configuration options visible in the iOS Settings app, but some settings are available only through a configuration profile and some are available only in the iOS Settings app. The settings available in configuration profiles are the only ones that can be centrally managed.
The simplest way to create and manage configuration profiles is by using Apple's iPhone Configuration Utility for Mac or Windows. This graphical utility lets administrators create and manage configuration profiles. These profiles can be installed onto iOS devices over a USB connection, by attaching them to an e-mail message sent to the device's owner, or by hosting them on a web server.
To manage a larger number of devices, enterprises should use a Mobile Device Management (MDM) system. Apple provides one in Lion Server through the Profile Manager service. This service works well for workgroups and small- to medium-sized organizations. For larger enterprises, however, a commercial third-party MDM solution would likely work best.
This section covers the basics of configuration profiles and how to use the iPhone Configuration Utility and Lion Server's Profile Manager to create and install a simple configuration profile.
Mobile Configuration Profiles
A configuration profile is structured as an XML property list file (referred to as a plist) with data values stored in Base64. The plist data may optionally be signed and encrypted, in which case the file will be structured according to RFC 3852 Cryptographic Message Syntax (CMS). Because configuration profiles may contain sensitive information, such as user passwords and Wi-Fi network passwords, they should be encrypted if the profile is going to be sent over a network. The use of a Mobile Device Management (MDM) server automates this, which is recommended for any enterprise managing iOS devices.
The configuration profile consists of some basic metadata and zero or more configuration payloads. The configuration profile metadata includes the human-readable name, description, and creating organization of the profile, as well as some other fields that are used only under the hood. The configuration payloads are the most important portions of the profile, because they implement the configuration options specified in the profile. The available configuration payload types in iOS 5 are listed and described in Table 2.1.
Table 2.1 Configuration Profile Payload Types
| Payload | Description |
| Removal Password | Specifies a password that users must enter to remove a locked profile from the device |
| Passcode Policy | Defines whether a passcode is required to unlock the device and how complex this passcode must be |
| Configures the user's e-mail account | |
| Web Clip | Places a web clipping on the user's home screen |
| Restrictions | Restricts the user of the device from performing certain actions, such as using the camera, iTunes App Store, Siri, YouTube, Safari, and so on |
| LDAP | Configures an LDAP server to use |
| CalDAV | Configures a user's network calendar account using CalDAV |
| Calendar Subscription | Subscribes the user to a shared CalDAV calendar |
| SCEP | Associates the device with a Simple Certificate Enrollment Protocol server |
| APN | Configures an iOS device with a cellular baseband (iPhone or iPad) to use a specific mobile carrier |
| Exchange | Configures a user's Microsoft Exchange e-mail account |
| VPN | Specifies a Virtual Private Network (VPN) configuration for the device to use |
| Wi-Fi | Configures the device to use the specified 802.11 network |
Each payload type has a set of property list keys and values that define the supported set of configuration settings. The full list of these keys and their available values for each payload are listed in Apple's iOS Configuration Profile Reference in the iOS Developer Library. Although you can create the configuration profile manually using this specification, only Mobile Device Management product developers are likely to do so. Apple recommends that most users rely on Apple's iPhone Configuration Utility or a Mobile Device Management product to create, manage, and deploy their configuration profiles. Enterprises with a small number of iOS-based devices are likely to configure them using the iPhone Configuration Utility, which is described next.
iPhone Configuration Utility
Apple's iPhone Configuration Utility is a graphical utility for Mac OS X and Windows that helps users create, manage, and install configuration profiles on iOS devices. At the time of writing, the latest available version is 3.4, which has just been updated to support the new configuration options in iOS 5.0.
The iPhone Configuration Utility automatically creates a root certificate authority (CA) certificate in the user's keychain the first time it is run. This CA certificate is used to sign the certificate that is automatically created for each device connected over USB to the host running the iPhone Configuration Utility. These certificates are used to sign and encrypt configuration profiles for secure transmission to the intended device. This allows you to securely send configuration profiles containing user credentials over insecure networks (such as e-mail or the web), assuming that the recipient device had already been assigned a certificate by the host running the iPhone Configuration Utility.
Creating a Configuration Profile
As a demonstration of how to use the iPhone Configuration Utility, here you create a simple configuration profile containing only a Passcode Policy payload and install it on an iOS device over a direct USB connection.
To get started, click Configuration Profiles under Library in the sidebar. This lists your existing configuration profiles, if any. To create a new profile, click the New button. This brings up the configuration pane shown in Figure 2.1 that allows you to configure the general and identity settings of the configuration profile. You should fill in the Name, Identifier, Description, and Organization fields to identify this profile to the users whose devices you will be installing it on.
Figure 2.1 Creating a configuration profile
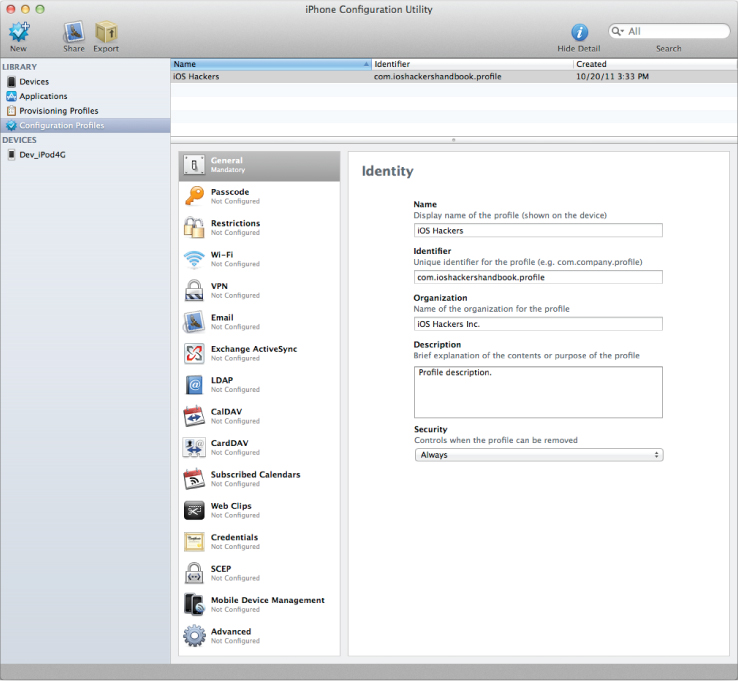
The other important setting in this pane is the Security setting, which defines whether the profile can be removed. This option can be set to Always, With Authorization, or Never. If it is set to With Authorization, the profile can be removed only if the user enters the configured Authorization password. If the option is set to Never, the user may not remove it from his or her device. The only way to remove the profile from the iOS user interface is to erase the device completely by going into the Settings application, tapping the General submenu, proceeding into the Reset submenu, and tapping the Erase All Content and Settings button. This performs a very similar operation to the remote wipe command that a user may send through iCloud's Find My iPhone or an enterprise administrator may send through ActiveSync or Mobile Device Management. Keep in mind that knowledgeable users can also jailbreak their device and forcibly remove the configuration profile by deleting it from the underlying filesystem. For more details on the underlying configuration profiles on the filesystem, see David Schuetz's BlackHat 2011 whitepaper “The iOS MDM Protocol.”
Now, you can actually create a configuration payload for the profile. Click the Passcode section in the left-hand side of the Configuration Profile pane. This brings up the available passcode settings in the right-hand side. You should configure these settings to require a sufficiently strong passcode that is appropriate to the sensitive nature of the data that will be accessible on your employees' iOS devices. As an example, Figure 2.2 shows our recommended settings for an iOS device that may be used to store or access sensitive enterprise data.
Figure 2.2 Configuring the Passcode payload

The iPhone Configuration Utility lets you distribute configuration profiles to devices by either installing them over USB, sending them to users attached to an e-mail message, or exporting the profile as a .mobileconfig file that can be hosted on a web server. We use the simplest method of profile installation here: installing the new profile on an iOS device directly connected to a Mac with a USB cable.
Installing the Configuration Profile
After you connect an iOS device to your Mac with a USB cable, it appears under the Devices heading in the sidebar of the iPhone Configuration Utility, as shown in Figure 2.3. Click the Configuration Profiles tab to list the already installed profiles on the device, as well as the configuration profiles created by the iPhone Configuration Utility that have not yet been installed on the device. Configuration profiles that haven't been installed yet will have an Install button next to them. Click the Install button next to the profile that you have just created to install it on your iOS device. This brings up the screen shown in Figure 2.4 to confirm the installation of the configuration profile.
Figure 2.3 Installing the configuration profile over USB

Figure 2.4 Configuration profile installation confirmation screen
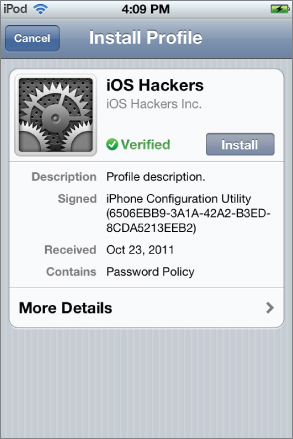
The confirmation screen in Figure 2.4 shows the basic information on the configuration profile and lists the configuration payloads that it includes. The profile has a green Verified badge on it. This is because the iPhone Configuration Utility automatically creates a self-signed X.509 root certificate authority certificate for itself. It uses this root CA to create a signed certificate for each device that is connected over USB while it is running. These device-specific certificates are used by the iPhone Configuration Utility to sign and encrypt configuration profiles sent to that device. Because the device has the certificate installed on it automatically, it can verify the authenticity of a configuration profile that is sent to it over USB, e-mail, or the web.
If you tap More Details, you see a screen like the one shown in Figure 2.5. This screen enables you to examine the certificate used to sign the configuration profile and lists more details about the configuration payloads contained in it.
Figure 2.5 Configuration profile details screen

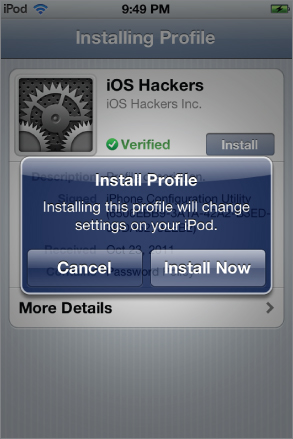
Go back to the previous screen and tap the Install button to install the configuration profile. This brings up the confirmation dialog as shown in Figure 2.6.
Figure 2.6 Configuration profile installation confirmation
If you have not already set a passcode on the device, or your existing passcode does not satisfy the complexity requirements in the profile, installing the configuration profile forces you to set a passcode immediately. This will look like the screen shown in Figure 2.7. Notice how the instructions describe how strong the passcode must be according to the settings in the configuration profile.
Figure 2.7 Immediate prompting to create a passcode

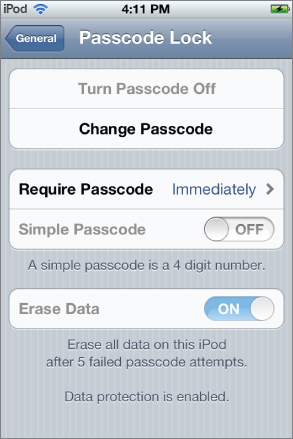
After you have set a passcode, you should see a screen like the one shown in Figure 2.8, confirming that the profile has been successfully installed. Now the settings specified in the configuration profile should have also taken effect. To verify this, go to the Passcode Lock screen in the General menu of Settings. It should look like the screen in Figure 2.9. As you can see, some of the options have been disabled by the profile and are grayed out.
Figure 2.8 Confirmation that the configuration profile has been installed

Figure 2.9 Passcode Lock screen showing the effect of the configuration profile
Updating Profiles
The iPhone Configuration Utility automatically creates and installs a certificate on each iOS device that is connected to the Mac running it. This allows configuration profiles to be securely updated because there will be an existing secure trust relationship between the desktop running the iPhone Configuration Utility and the mobile device. If a configuration profile is installed with the same identifier as an already installed configuration profile, and the same certificate as the existing profile signs the new profile, it will replace the existing configuration profile.
The certificate-based secure pairing between a desktop running the iPhone Configuration Utility and the iOS devices it has been connected to over USB allows you to install the initial configuration profile directly over USB, and then safely send encrypted and signed updated configuration profiles over e-mail or the web. As long as users are trained to ensure that the profiles they are sent display the green Verified label on the installation screen, this is both secure and time-efficient.
Removing Profiles
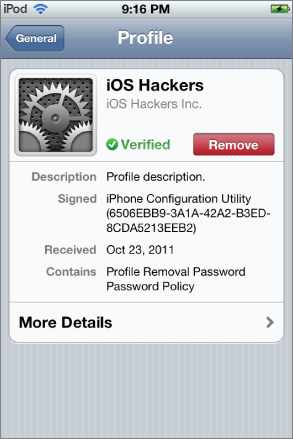
You can remove a configuration profile by opening the Settings application, selecting the General submenu, and selecting the Profile submenu (or Profiles if more than one is installed). Normally, this will look like Figure 2.10. You can remove the profile by tapping the Remove button.
Figure 2.10 Profile details screen
Keep in mind, however, that configuration profiles can also be configured to be removed only with an authorization password or to prevent removal completely. If the profile has a removal passcode configured, the user will be prompted for the removal passcode, as shown in Figure 2.11. Alternatively, if the profile does not support removal, the user will not even see a Remove button in the Profile details screen.
Figure 2.11 Removing a protected profile

Applications and Provisioning Profiles
The iPhone Configuration Utility can also be used to install applications and provisioning profiles onto iOS devices. For now, all you need to know is that custom applications require an Apple-issued Provisioning Profile for the application's developer in order to run on an iOS device. These provisioning profiles may be installed separately or they may also be bundled with the application when it is distributed.
Mobile Device Management
The iPhone Configuration Utility can be used to perform basic enterprise management of iOS devices, but it clearly doesn't scale well to managing a large number of devices. For enterprises with a larger number of devices, Apple has implemented Mobile Device Management (MDM) functionality in iOS that allows the devices to be managed completely over the air.
Apple has released the MDM API to third-party providers, and a large number of third-party Mobile Device Management product vendors exist. Apple also provides an MDM solution in Lion Server. Apple's implementation in Lion Server is the Profile Manager; a facility for managing settings for users of both iOS devices and computers running Mac OS X. Profile Manager is a simple MDM solution that should work well for small organizations or workgroups. If you are managing a large number of devices or require more features than Profile Manager provides, you should investigate one of the many commercial MDM solutions that support iOS-based devices.
MDM Network Communication
In Apple's MDM architecture (depicted in Figure 2.12), network communication is performed between three entities: the user's iOS device, his or her organization's MDM server, and Apple's Push Notification Service (APNS). The MDM server communicates with the APNS to publish push notifications that are routed to the specified device and delivered through that device's persistent connection to the APNS. Upon receiving a push notification, the iOS device establishes a direct connection to the configured MDM server.
Figure 2.12 MDM network communication

The iOS device itself maintains a persistent connection to one of the APNS courier servers at courier.push.apple.com, which is the centralized communications channel used for all push notifications on iOS. This connection is established using client-certificate authenticated TLS to TCP port 5223 and uses the XMPP protocol. iPhones and iPads with a cellular data connection make this connection over the cellular network, whereas other mobile iOS devices are able to make this connection only when they are on a Wi-Fi network. The XMPP protocol was designed for the Jabber instant messaging system; however, it is flexible enough to be used for any system needing presence notification and a publish/subscribe model for message distribution. The iOS device simply informs Apple's APNS servers which topics to subscribe to, and those servers will route messages published to those topics to the device. In the case of MDM, a managed client device is configured to subscribe to a unique topic corresponding to the MDM server that is managing the device.
The MDM server acts as a push notification provider, similar to the way third-party application developers implement push notifications for their iOS applications. In this role, the server connects to Apple's APNS gateway servers at gateway.push.apple.com. This connection is also over client-certificate authenticated TLS, but this time it is to TCP port 2195. Push notifications are formatted as JSON dictionaries and are sent to Apple's APNS servers through a custom binary network protocol. The push notification provider also makes a similar connection to Apple's APNS servers on TCP port 2196 for the feedback service. Apple does not guarantee that these services will remain on a defined IP subnet, so it recommends that firewall administrators permit outbound access to Apple's entire assigned IP space of 17.0.0.0/8. For more specifics on these communications, see Apple's Local and Push Notification Programming Guide in the iOS Developer Library.
Finally, the MDM server serves the MDM API over HTTPS. When an iOS device receives an MDM push notification, it contacts the MDM server at the URL configured when the device was enrolled for management and queries the MDM server directly for the sent command. The response to the downloaded command is sent over HTTPS back to the MDM server. The MDM server may optionally provide a Simple Certificate Enrollment Protocol (SCEP) server on TCP port 1640, which is also built on top of HTTP. The protocol-level details of the MDM API are beyond the scope of this chapter. For more information on these, see David Schuetz's presentation “Inside Apple's MDM Black Box,” presented at BlackHat USA 2011 (https://media.blackhat.com/bh-us-11/Schuetz/BH_US_11_Schuetz_InsideAppleMDM_WP.pdf).
Lion Server Profile Manager
Lion Server's Profile Manager is a Ruby-on-Rails web application that acts as an MDM API server and administration console. The initial setup and configuration is performed through the Server app, but after the initial setup, most administration tasks are performed through a web browser to the Profile Manager web application.
Profile Manager can apply settings on a user, user group, device, or device group basis. If the devices' owners have accounts in Open Directory, they can log in to the Profile Manager web application directly to enroll and manage their devices. If the devices are shared or the users do not have accounts in OD, a Lion Server administrator will have to enroll their devices for them. Profile Manager supports a special type of profile, called an Enrollment Profile, to assist in enrolling devices for remote management without requiring the user to log in to the Profile Manager web application. This chapter assumes that device owners also have accounts in Open Directory on the Lion Server. For more information on using Enrollment Profiles, consult the eBook “Managing iOS Devices with OS X Lion Server” by Arek Dreyer from Peachpit Press.
Setting Up Profile Manager
To set up Profile Manager, launch the Server application and click Profile Manager in the sidebar. This brings up the basic Settings pane for Profile Manager, as shown in Figure 2.13. Before you can start the service, you have to perform some basic configuration. To get this started, click the Configure button.
Figure 2.13 Profile Manager service configuration in the Server application

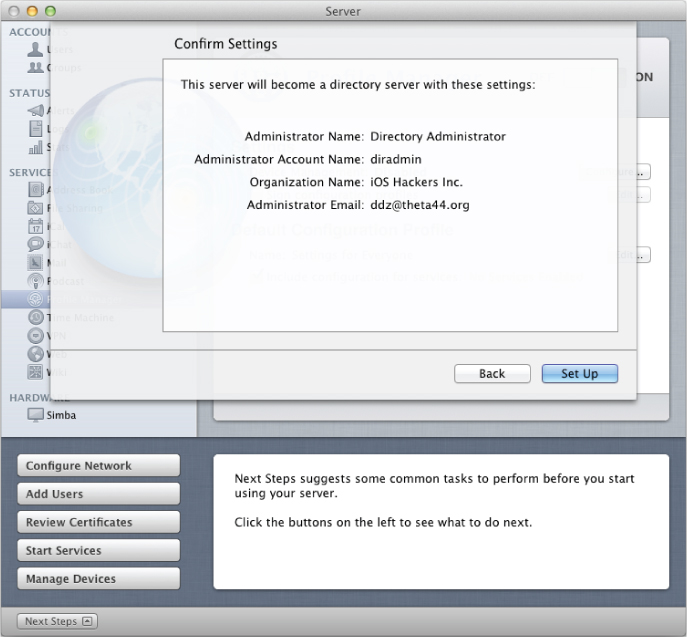
If you haven't already configured your Lion Server as an Open Directory (OD) master, you are guided through the process of doing so. An Open Directory master is used by Profile Manager to store device settings per OD User and Group. The setup process prompts you for some basic settings for the OD LDAP server and then configures and enables the service, as shown in Figure 2.14.
Figure 2.14 Creating an Open Directory master
The Profile Manager web application is available only over SSL. It is important that communication with this web application is secure because it is used for both device communication and profile administration. The setup process asks you to select an SSL certificate to use for the web service. Ideally, you should use a properly formed SSL web server certificate issued by a trusted CA or your organization's own internal CA. If your organization is smaller or if you are just testing, you can also use the certificate that was automatically generated for your server when it was made an Open Directory master. As shown in Figure 2.15, this certificate is issued to your server's hostname and signed by your server's Open Directory Intermediate CA.
Figure 2.15 Choosing an SSL certificate for the Profile Manager web application

To communicate with the Apple Push Notification Service (APNS), your Profile Manager needs a client certificate to authenticate itself to Apple's servers. If you have not already configured your server to enable Apple Push notifications, the setup process requests a free APNS certificate from Apple for you. To obtain an APNS certificate on Lion Server, all you need is an Apple ID. You don't need to be enrolled in the iOS Developer Enterprise Program (iDEP), as was required before Lion Server was released. You should create and use an Apple ID for your organization, not one that is tied to a specific individual. In the test setup shown in the figures in this chapter, we used the author's Apple ID. Using an individual's Apple ID should be done only in testing, not in any production environment.
To automatically create and download an APNS certificate, enter your organization's Apple ID as shown in Figure 2.16.
Figure 2.16 Requesting an Apple Push Notification Service certificate

If you successfully completed all the previous configuration steps, you should see the screen shown in Figure 2.17 confirming that your server has met all of the requirements to properly run Profile Manager. After you click the Finish button, you are returned to the main Profile Manager configuration pane.
Figure 2.17 Profile Manager configuration complete

For greater security, you should enable configuration profile signing. To do so, check the Sign Configuration Profiles check box, as shown in Figure 2.18. Next you will need to select a code-signing certificate to sign the profiles. If you already have a code-signing certificate for your organization (perhaps one issued by Apple's iOS Developer Program), you can use that here. Otherwise, you should use the certificate issued by your server's Open Directory Intermediate CA. By signing the configuration profiles with a certificate issued by a trusted certificate authority, you can help your users verify that the profile they are about to install is authentic.
Figure 2.18 Choosing a code-signing certificate to sign configuration profiles

Now Profile Manager should be configured and ready to run. (See Figure 2.19.) To start the service, click the switch in the upper-right corner to move it to the ON position. The Profile Manager service should now be running, and you can create a configuration profile through the Profile Manager web application. To begin using the Profile Manager web application, click Open Profile Manager at the bottom of the Profile Manager configuration pane.
Figure 2.19 Profile Manager configured and enabled

Creating Settings
The login page for the Profile Manager is shown in Figure 2.20. You should log in using an administrator account for your Lion Server.
Figure 2.20 Profile Manager login page

After you have logged in as an administrator, you see the main Profile Manager navigation screen, as shown in Figure 2.21. The Profile Manager has a sidebar with Library and Activity sections. If you have created an enrollment profile (discussed later), there will also be an Enrollment Profiles section of the sidebar. The navigation pane in the center enables you to select a particular entity, and the Configuration pane on the right enables you to manage the configuration profile for the selected entity. As you can see, you can create and manage device settings per device, device group, user, or user group.
Figure 2.21 Profile Manager navigation

The Profile Manager configuration pane in the Server application enables you to select a default configuration profile that will be sent to newly enrolled users and devices. By default, this is the Settings for Everyone profile. The profile is reachable by clicking Groups in the sidebar and selecting the Everyone group. If you click the Edit button in the configuration pane, you can edit the associated configuration profile.
When you edit a configuration profile in Profile Manager, you see a screen similar to the one in Figure 2.22. You will notice that this looks very similar to the user interface of the iPhone Configuration Utility. This is not coincidental because both are used to create configuration profiles. There is one major difference with Profile Manager, however. Profile Manager splits the configuration profile payloads into three sections — Mac OS X and iOS, iOS, and Mac OS X — because Profile Manager can also be used to manage settings for desktops and laptops running Mac OS X Lion.
Figure 2.22 Settings for Everyone configuration profile

Similar to the process you use when creating a configuration profile using the iPhone Configuration Utility, you should enter a description for your profile and configure when (and if) the configuration profile can be removed.
Select Passcode on the left pane. If a Passcode payload has not yet been created, you see the screen shown in Figure 2.23. To create the configuration payload, click the Configure button.
Figure 2.23 Creating a Passcode configuration payload

The passcode settings shown in Figure 2.24 are identical to those that are shown in the iPhone Configuration Utility (refer to Figure 2.2). Again, this is because the settings in both applications are used to create configuration profiles in the same format.
Figure 2.24 Configuring passcode requirements

To complete the configuration, click the OK button and then click the Save button in the Configuration pane to save your changes. If you have this profile assigned to any devices, saving the changes causes the updated profile to be pushed to those devices.
Enrolling Devices
Now that you have created a configuration profile using Profile Manager, you need to enroll a device to have the profile applied to it. To get started, make sure that your iOS device is on a network that can reach the server running Profile Manager.
You should enter the URL of Profile Manager's My Devices page into Mobile Safari's URL bar, as shown in Figure 2.25. For a simple configuration, this will be at https://<server>/mydevices. In a production deployment, you will likely send the URL to the Profile Manager to users over e-mail or SMS.
Figure 2.25 Connecting to the Profile Manager server in Mobile Safari

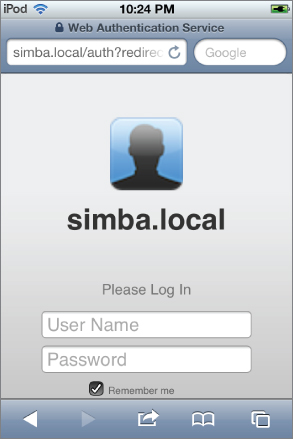
At the profile Manager login page (shown in Figure 2.26), you should log in as a user account that exists in Open Directory.
Figure 2.26 Profile Manager login page
After you have logged in, you are shown the My Devices page, as shown in Figure 2.27. If the device that you are using has not yet been enrolled in Profile Manager, you are shown a button to enroll it. First, however, you need to install the Trust Profile for your server so that you can properly verify the signature of the enrollment profile.
Figure 2.27 My Devices screen

If you tap the Profiles tab, you are shown a list of available profiles. (See Figure 2.28.) You should install the Trust Profile first because it includes the certificates used to sign the other profiles. To install the profile, tap the Install button to the right of the name of the Trust Profile.
Figure 2.28 My Devices Profiles list

After you tap the Install button, you see a confirmation screen like the one shown in Figure 2.29. For more information on the profile, tap More Details. To install the profile, tap the Install button.
Figure 2.29 Confirmation screen to install Trust Profile

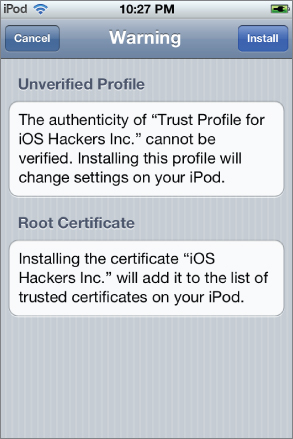
Because the Trust Profile cannot be verified, you see a warning screen like the one shown in Figure 2.30. This screen notifies the user that her list of trusted root certificates will be changed.
Figure 2.30 Trust Profile warning screen
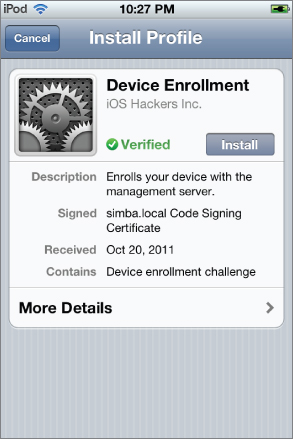
Now, if you go back to the My Devices screen and tap the Enroll button to enroll your device, you see a screen like the one in Figure 2.31. The green Verified label indicates that the profile's signature has been verified and is trusted. Tap the Install button to install the Device Enrollment profile, which enables remote device management for this device.
Figure 2.31 Device Enrollment confirmation screen
A warning screen like the one shown in Figure 2.32 displays. Notice that it gives the full URL to the API endpoint used for device management.
Figure 2.32 Mobile Device Management warning screen

After the profile has been installed, you see a screen like the one in Figure 2.33.
Figure 2.33 Profile installation completion screen

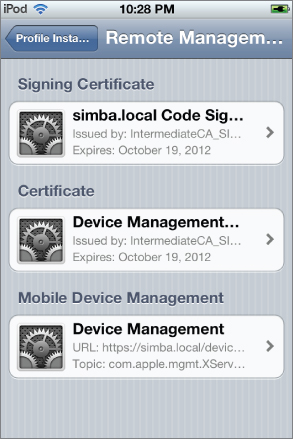
You can tap More Details to see the certificates included in the profile and used to sign it, as well as to get more information on the Device Management profile that was installed. You should see a details screen similar to the one shown in Figure 2.34.
Figure 2.34 Remote Management details screen
Now, if you go back to the My Devices page in Profile Manager, you see your device listed, as shown in Figure 2.35. From this page, you can remotely lock, wipe, or clear the passcode on your device.
Figure 2.35 My Devices screen after enrollment

Summary
Any iOS device that will be used to store or access sensitive enterprise data must be configured to adequately protect it. This includes requiring a strong passcode, auto-lock, and other security-related configuration settings. Although this could be ensured by having IT administrators manually configure each user's device, this is labor-intensive and error-prone. Centrally managing these configurations is a much better approach.
This chapter described two alternatives for centrally managing iOS configurations: the iPhone Configuration Utility and Lion Server's Profile Manager. The iPhone Configuration Utility is much easier and faster to get started with, but it does not scale well to many devices. For a larger number of devices, a Mobile Device Management (MDM) solution such as Lion Server's Profile Manager is a much better solution. In addition to providing the same configuration features, an MDM solution also provides additional capabilities such as remotely locking, wiping, or clearing the passcode.