
Chapter 1
Developing for Android Tablets and Smartphones
WHAT’S IN THIS CHAPTER?
- Getting your tools set up
- Testing your tools setup
- What a modern Android application looks like
- Introducing a concise application framework that works on all sizes of Android devices
- Exploring Android component lifecycles and the Android task model
WROX.COM CODE DOWNLOADS FOR THIS CHAPTER
Please note that all the code examples in this chapter are available at https://github.com/wileyenterpriseandroid/Examples.git and as a part of the book’s code download at www.wrox.com on the Download Code tab. At various points throughout the book, the authors refer to the “Examples” directory using a pseudo-variable called, “CODE”. Readers can either explicity set this value as a shell variable or can just keep in mind that the variable refers to the book example code directory.
This book is about best practices in handling data for enterprise application across the client and RESTful backend services, and this chapter gets you through the basics at a brisk pace while providing a framework, which is the starting point for the example code in this book. The advice in this chapter, especially the advice to pay attention to Android component lifecycles, will enable you to complete an Android coding project efficiently, without having to know everything about Android, and with a minimum of grief.
Many Android books were written before there were Android tablet devices, and before the APIs central to creating good UIs for those devices were a mainstream concern for Android developers. This chapter starts by assuming your apps will run on both tablets and handsets and provides a framework that embodies the best practices for doing so.
This chapter also covers tools — and knowledge resources for the tools — that you need to follow the code examples in this book.
This isn’t a beginner’s book. If this is your first time programming Android applications, use the information resources listed here for filling in the gaps in your knowledge of and experience with Java and Android programming.
ANDROID IS A JAVA OPERATING SYSTEM
Almost all applications and all system services in Android are coded in Java (and other JVM languages). Code is compiled to Java bytecode before being translated into Dalvik bytecode, which, in turn, runs in the Android managed runtime environment. These characteristics make Android at once familiar and strange: If you have used Java or a similar managed language before, you will find Android code fairly easy to read. You will find the tools for Android programming familiar. Many aspects of Android’s managed language run time are identical to Java. Android relies on Java base classes, and wouldn’t work if the semantics of the Android runtime environment were not very similar to those of a standard Java runtime environment.
If you come to this book not having written Android-specific code, you have probably never written code for an operating system like Android. Android uses managed language runtime concepts in ways you may find unfamiliar, especially in the ways Android implements modularity and memory management. In many ways, Android is the most sophisticated environment for interactive Java programs ever created.
YOUR TOOLS AND YOUR FIRST ANDROID APP
This section covers setting up your programming tools. You will run your first example application, which is a user interface framework.
Prerequisites and Getting Ready
You can use any of the three major operating systems for PCs to develop Android software: Linux, Mac OS, or Windows. You will need three independent pieces to assemble your toolchain for creating Android applications: The Java JDK, Eclipse, and the Android SDK. All three of these pieces work on all three operating systems.
The place to find reference information on developing Android is http://developer.android.com and the place to get started with instructions on installing your tool set is http://developer.android.com/guide/developing/index.html.
Follow the instructions at the URL to install the tools you need. If you follow the instructions correctly, you will install a toolchain consisting of the three pieces listed previously.
Java and Java Knowledge
The first piece of the tool set you need is the Java Development Kit, or JDK. The JDK provides both a Java runtime environment, which is needed by Eclipse, and some tools for creating Android applications.
Java is a cross-platform runtime environment and is the key to developing Android software on any of the top three personal computer operating systems.
You will write your Android programs in Java, even though the runtime environment in the Android operating system is internally substantially different from Java runtime environments. Although you don’t need to know the details of the way your programming tools are implemented using Java, you have to know Java to write Android programs. There are numerous tutorials on the web and books to help you learn Java. One free resource for learning Java is Oracle’s Java Tutorials site:
http://docs.oracle.com/javase/tutorial/java/index.html
Eclipse and Eclipse Knowledge
Eclipse is the integrated development environment (IDE) you will be using. An IDE is an all-in-one software development tool that enables you to create source code with correct syntax and style, run that code, and examine and debug it if you need to find out why it isn’t working correctly. As you create Android software, you will spend most of your time using the Eclipse IDE.
Eclipse is a Java program and it uses the Java run time in the JDK you installed to run on your personal computer. Eclipse is widely used for many kinds of programming, including creating Java-based server software for the kinds of applications described in this book.
The use of Eclipse is one of the reasons Android was born with a mature toolchain. You write Android programs using the Java language, and most of the toolchain for writing “normal” Java programs can be applied to Android.
Eclipse enables you to edit your code while providing quick access to documentation. It enhances productivity through automatic completion of symbols and automatic formatting. It helps you find syntax errors, and it performs static analysis that finds potential runtime errors. It also enables you to inspect running applications, stop them, single-step across code that corresponds to lines of source code, inspect variables, examine unhandled exceptions, and perform dozens of other operations that will improve your productivity in creating Android applications.
Knowing your IDE’s features is key to productivity and to avoiding frustration when programs don’t work. This is especially true for Eclipse, which is very powerful and has many more useful tools available for it than listed here, but it isn’t as simple as some other IDEs, such as Apple’s IDE for iOS development. So it is likely you will need to become more familiar with Eclipse if you are a first-time user. Tutorials on Eclipse can be found at http://www.eclipse.org/resources/?category=Tutorial. To run all the examples in this book, you will need to download and install Eclipse IDE for Java EE Developers.
The Android SDK and Resources for Android Tools Knowledge
The third part of your toolchain is the Android Software Development Kit (SDK). The SDK is documented in Google’s online documentation for Android developers at http://developer.android.com/index.html.
The SDK turns the Eclipse IDE into an IDE that can create Android programs. The SDK provides plugins for Eclipse and many external components that are used to create Android applications and diagnose problems in Android software. Eclipse can be adapted to many purposes with plugins. In fact, Eclipse is made almost entirely of plugins. The set of plugins you started with when you installed Eclipse make Eclipse suitable for creating Java programs. For the purposes of this book, you will mostly work in the Eclipse IDE, and all you need to do at this point is to configure Eclipse to use the Android plugins and to be able to locate other programs installed with the SDK. You will be prompted to do so when you start Eclipse after the Android SDK is installed.
Now you have all the tools for general Android programming, and for this chapter. Later in this book, other tools specific to topics introduced in those chapters will be added to your toolchain.
Toolchain Test Drive
You can test that your toolchain is installed correctly by creating a new Android project, and selecting an example from the SDK as the basis of your project. You should be able to run your project in an Android Virtual Device (AVD).
Directions for creating a project are here:
http://developer.android.com/training/basics/firstapp/creating-project.html
Directions for running a project are here:
http://developer.android.com/training/basics/firstapp/running-app.html
By doing this, you have created an Android project in Eclipse, and created and run an Android application, even though you have not written any code yet. If you are successful in doing this, you can be confident your toolchain and the software it depends on have been correctly installed. The next section describes how to download and use the example code in this chapter to create another Android project. But you might want to explore your toolchain at this point.
ONE CODE-BASE FOR ALL TYPES OF DEVICES
This section introduces the first code that is specific to this book. This framework is used to illustrate some important points about Android application fundamentals, to get you used to the tools you just installed, and to provide a quick way to start writing application-specific code rather than use boilerplate. There are two related approaches we adhere to in the examples in this book because we assume that enterprise deployments will be for a controlled set of mobile devices:
- Develop a single code-base for tablets and handsets.
- Develop for the latest APIs, as of this writing, and encourage the use of the back-compatibility support classes provided with the Android SDK to enable compatibility for a range of earlier versions of Android, if needed.
You will use a design pattern in which you allow the Android system to select different layouts based on screen size and pixel density and write code that is largely independent of the choice the system made. This technique makes your apps more robust by not duplicating the mechanisms Android uses to make decisions about display geometry.
Following this pattern simplifies your tasks in publishing software, makes the example code as concise as possible, and enables you to publish a single version for many kinds of devices.
Getting Started with the Code Framework Example
Here you will perform a further check that you have installed your toolchain correctly and import the example code for this chapter. Later, you will examine the code in this example, and run it in order to see what it does.
You can obtain the example code as an archive at www.wrox.com and https://github.com/wileyenterpriseandroid/Examples.git. The first thing you do to use example code is to extract the project folder from the archive into your workspace folder. Then, import the project from the archive file. You will use the File ![]() Import... command to display the Import dialog box as in Figure 1-1.
Import... command to display the Import dialog box as in Figure 1-1.

Select General and Existing Projects into Workspace. Pressing Next will display the Import dialog box shown in Figure 1-2. Select the folder you extracted, and press Finish. Depending on the platform you are using, the project name may differ from what you see in the screen shot in Figures 1-2 and 1-3.


You should now see the example project in your Eclipse Project Explorer window, as shown in Figure 1-3.
Now right-click on the name of the project and select Run as ![]() Android Application. If you have not connected your Android device to a USB cable connected to your PC, and you have not created an emulator configuration for running examples, you will see a dialog box like the one in the Figure 1-4. If you do, press Yes.
Android Application. If you have not connected your Android device to a USB cable connected to your PC, and you have not created an emulator configuration for running examples, you will see a dialog box like the one in the Figure 1-4. If you do, press Yes.

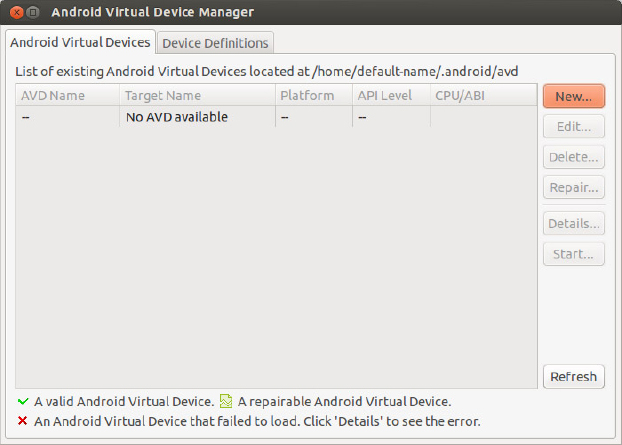
Pressing Yes displays the Android Virtual Device (AVD) Manager. If you got here from the error dialog box indicating no AVDs have yet been created, you will see an empty list of AVDs, as in the Figure 1-5. Press the button labeled New....
Now you see a dialog box for creating a new Android AVD. Pick Nexus 7 from the list of available AVD configurations, and name it something sensible like nexus7. This conveniently selects all the right parameters for emulating hardware that resembles a Nexus 7 tablet, including the correct API level for the example, as seen in the Figure 1-6.

When you press OK, you will return to the AVD Manager and see that an AVD named nexus7 now exists in the previously empty list, as shown in the Figure 1-7. Press the button labeled Start....

Pressing the Start button launches the AVD. First, it may want some more information from you about how it should be rendered. The Launch Options dialog box shown in Figure 1-8 can be used to scale the display of an AVD. We won’t do that, so press the Launch button.

And now...still no emulator. If you are using a fresh installation of the SDK, you may encounter the dialog box in Figure 1-9. This dialog box lets you enable the logcat view, provided by the Android SDK plugins in the Eclipse IDE. Select the Yes option here. You will need logcat a bit later in this chapter to see what your application is doing.

Now you have done it! The emulator will launch. Android will start up on the emulator, and the example application will start up in Android, as shown in Figure 1-10.

If you encountered a problem at any step here, you may need to reinstall your toolchain. If you previously validated the installation of your toolchain through to the steps where you launch an Android application, you will not encounter some of the steps here, which happen only once upon a first use after a new installation.
You now have running an example application that configures itself to different screen sizes.
Automatically Adapting to Screen Size
You can see the results of the design pattern example in this chapter by creating an AVD for a small Android device and a larger tablet style Android device (see Figure 1-10).
You can see that the design pattern used in this framework application automatically adapts, depending on the system displaying it. Users will see a single screen with a list on the left and fragments selected using tabs on the right if the screen is big enough. Otherwise, users see two separate screens, one showing the list of choices and the other containing tabs and fragments corresponding to those tabs. The content depends on the choice users make from the list.
This is a typical UI design pattern. This framework will speed your way past the obligatory parts of Android application development so you can get to the parts most useful to the enterprise application developer.
But, before you adapt this framework to the kinds of applications that use local and networked data resources, you’ll first take a look at this code in greater detail and see how it embodies many of the Android features that users expect and that conform to Android best-practices for a broad class of Android applications.
COMPONENTS, VIEWS, AND LIFECYCLE
The example code in this chapter contains all the objects needed for a minimal, but typical, Android application. Since this book is about enterprise Android applications, this minimal framework application includes a field for entering search terms, a list for the results of the search/query, and places where search results and information about those results are displayed.
Most of the classes used in this minimal application framework are components or Android widgets from the View class hierarchy.
Components are the large-scale building blocks of Android applications:
- You create a subclass of Activity for every major grouping of interactive functionality that is distinctive enough for the user to notice that something different is displayed on the screen.
- Fragments are used to organize interactive code within an activity. On big screens, multiple fragments might be visible at the same time, while on smaller screens, a single fragment is usually contained in each activity.
- You will subclass Service for code that performs long-running processing and that has no interactive elements. Service components are an important part of the code in subsequent chapters.
Components have lifecycles. You may be familiar with the concepts of components with lifecycles from the J2ME MIDlet lifecycle, where apps that are paused should release resources. But the Android component and lifecycle is far richer and more powerful. The Android lifecycle enables large, complex apps to fit in small heap sizes.
Destroying and Re-creating Components
Every instance of every component in an Android application can be destroyed, releasing the memory it used. The lifecycle methods in components enable them to save their state before they are destroyed, as well as to initialize themselves when first created, and to restore their state when they are re-created.
For components that have state, lifecycle methods indicate that a component is a candidate for being destroyed, and you have to provide code that saves the state of your component. This isn’t optional. Functionally, this is a bit like “swapping.” Instead of swapping all instance data, the lifecycle methods enable you to save only the data needed to restore state, in the form most convenient for doing so.
There are no workarounds. If you attempt to subvert component destruction by keeping a reference to a component, all you have done is create a memory leak.
The MainActivity Class
The code in this subclass of Activity (Listing 1-1) shows how to implement lifecycle handling for Android. Each lifecycle method is logged, which means you are aware of what happens when this Activity instance is no longer on the display, and you know when the Android system decides to destroy an instance of this Activity.
In your Eclipse IDE, you can use the logcat view to display this logging information. Normally, this view appears at the bottom of your screen.
Activity: The Basic Unit of User Interaction
Even though there is no code in Listing 1-1 for interacting with the users, you can call an activity the basic unit of user interaction because it represents a screen-full of user interaction.
In a subsequent section, you will see how user interaction is handled by the Fragment subclasses in this application.
The Activity class is the basis of the card-stack metaphor of user interaction in Android, and navigating between activities is an important part of user interaction. This Activity subclass is the main activity of this application. This is where the application starts when users touch the application’s icon, and this is the bottom of the application’s back-stack.
LISTING 1-1: MainActivity.java
package com.enterpriseandroidbook.fragmentframework;

import android.app.ActionBar;
import android.content.res.Configuration;
import android.os.Bundle;
import android.util.Log;

/**
* @author zigurd
*
*/
public class MainActivity extends TabbedActivity {

// String for logging the class name
private final String CLASSNAME = getClass().getSimpleName();

// Turn logging on or off
private final boolean L = true;
The code shown in this example for the lifecycle methods is here to help you visualize the application lifecycle. Visualizing the application lifecycle is important because it is easy to ignore. You will want to see what the Android OS is doing to your application by way of the component lifecycle in order to plan your application implementation to most readily adapt to the component lifecycle.
The code for the onCreate method that follows shows that the parent class’s method should first be called, and then code specific to the subclass added. In this case, that code logs the method call, and it logs whether the method was called to create this Activity instance the first time, or whether a previous instance existed and the state of that instance should be restored. (More about that after you see some of the other lifecycle methods.) The bulk of the work performed during the onCreate call is factored out into the doCreate method. It loads the layout, sets up the action bar, and initializes the tabs in the action bar.
@Override
protected void onCreate(Bundle savedState) {
super.onCreate(savedState);
// To keep this method simple
doCreate(savedState);

// If we had state to restore, we note that in the log message
if (L) Log.i(CLASSNAME, "onCreate" +
(null == savedState ? " Restored state" : ""));
}

@Override
protected void onRestart() {
super.onRestart();
// Notification that the activity will be started
if (L) Log.i(CLASSNAME, "onRestart");
}

@Override
protected void onStart() {
super.onStart();
// Notification that the activity is starting
if (L) Log.i(CLASSNAME, "onStart");
}

@Override
protected void onResume() {
super.onResume();
// Notification that the activity will interact with the user
if (L) Log.i(CLASSNAME, "onResume");
}

protected void onPause() {
super.onPause();
// Notification that the activity will stop interacting with the user
if (L) Log.i(CLASSNAME, "onPause" + (isFinishing() ? " Finishing" : ""));
}

@Override
protected void onStop() {
super.onStop();
// Notification that the activity is no longer visible
if (L) Log.i(CLASSNAME, "onStop");
}
The code for the onDestroy method that follows next logs when this method is called. The method name onDestroy causes some confusion. What is being destroyed? In fact what happens at this point is that the Android system “destroys,” or sets to null, its reference to this instance of this subclass of Activity, so it can be garbage-collected. You may think that thwarting this destruction is possible by simply holding a reference to this Activity instance. That won’t work: The Android system will create a new instance of this Activity after it has “destroyed” this one, whether a reference to it is being held or not. You could prevent this now-useless instance from being garbage-collected, but it is a zombie, wreaking havoc in the heap. Note that the onDestroy method tests and logs whether the activity is “finishing” — meaning that this instance of Activity won’t be re-created because it is done, not because it was destroyed to recover memory space.
@Override
protected void onDestroy() {
super.onDestroy();
// Notification the activity will be destroyed
if (L) Log.i(CLASSNAME, "onDestroy"
// Are we finishing?
+ (isFinishing() ? " Finishing" : ""));
}
The code for the onSaveInstanceState method that follows next logs when it is called. Note that a Bundle object is passed to this method. This Bundle object enables you to attach serializable objects implementing the Parcelable interface. The Bundle object itself implements the Parcelable interface, so it and all the objects it holds references to can be serialized and stored — or “persisted” in Java parlance.
This is where the Bundle object that’s passed to the onCreate method comes from. If you added objects to it, they will be there when the onCreate and onRestoreInstanceState are called.
@Override
protected void onSaveInstanceState(Bundle outState) {
super.onSaveInstanceState(outState);
saveState(outState);

// Called when state should be saved
if (L) Log.i(CLASSNAME, "onSaveInstanceState");

}

@Override
protected void onRestoreInstanceState(Bundle savedState) {
super.onRestoreInstanceState(savedState);
if (null != savedState) restoreState(savedState);

// If we had state to restore, we note that in the log message
if (L) Log.i(CLASSNAME, "onRestoreInstanceState" +
(null == savedState ? " Restored state" : ""));
}

///////////////////////////////////////////////////////////////////////////////
// The minor lifecycle methods - you probably won't need these
///////////////////////////////////////////////////////////////////////////////

@Override
protected void onPostCreate(Bundle savedState) {
super.onPostCreate(savedState);
if (null != savedState) restoreState(savedState);

// If we had state to restore, we note that in the log message
if (L) Log.i(CLASSNAME, "onCreate" +
(null == savedState ? " Restored state" : ""));

}

@Override
protected void onPostResume() {
super.onPostResume();
// Notification that resuming the activity is complete
if (L) Log.i(CLASSNAME, "onPostResume");
}

@Override
protected void onUserLeaveHint() {
super.onUserLeaveHint();
// Notification that user navigated away from this activity
if (L) Log.i(CLASSNAME, "onUserLeaveHint");
}

///////////////////////////////////////////////////////////////////////////////
// Overrides of the implementations ComponentCallbacks methods in Activity
///////////////////////////////////////////////////////////////////////////////

@Override
public void onConfigurationChanged(Configuration newConfiguration) {
super.onConfigurationChanged(newConfiguration);

// This won't happen unless we declare changes we handle in the manifest
if (L) Log.i(CLASSNAME, "onConfigurationChanged");
}

@Override
public void onLowMemory() {
// No guarantee this is called before or after other callbacks
if (L) Log.i(CLASSNAME, "onLowMemory");
}

///////////////////////////////////////////////////////////////////////////////
// App-specific code here
///////////////////////////////////////////////////////////////////////////////


/**
* This is where we restore state we previously saved.
* @param savedState the Bundle we got from the callback
*/
private void restoreState(Bundle savedState) {
// Add your code to restore state here

}

/**
* Add this activity's state to the bundle and/or commit pending data
*/
private void saveState(Bundle state) {
// Add your code to add state to the bundle here
}

/**
* Perform initializations on creation of this Activity instance
* @param savedState
*/
private void doCreate(Bundle savedState) {
setContentView(R.layout.main);

if (null != savedState) restoreState(savedState);

       ActionBar bar = getActionBar();
       bar.setDisplayShowTitleEnabled(false);
       bar.setNavigationMode(ActionBar.NAVIGATION_MODE_TABS);

// Initialize the tabs (Fails silently if the tab fragments don't exist)
int names[] = {R.string.item, R.string.detail };
int fragments[] = { R.id.content_frag, R.id.detail_frag };
initializeTabs(0, names, fragments);
}

}
The preceding code contains the method implementations for the lifecycle methods onRestart, onStart, onResume, onPause, and onStop. These callbacks are, like the other important lifecycle methods in this example, logged to illustrate when they are called. These methods inform you when this activity is becoming visible or is obscured by other activities on the screen. You may find it useful to observe these logging messages in the logcat view in the Eclipse IDE, and follow along with the diagrams in the Android documentation covering the activity lifecycle in order to see when the state transitions in those diagrams occurs. See http://developer.android.com/training/basics/activity-lifecycle/starting.html.
Note that you are not required to use the Bundle object to save state. There are three fundamental ways to save state in Android:
- Recover state — If your state is the result of a database query, you can save the query in the bundle (or even recover the query if it is, for example, based on the time of day) and re-run it.
- Save state in a database — If your state is in a database, locally, on the client device on which your app is running, you can read it from that database if your components are re-created.
- Put it in the bundle — You can, as described previously, save your state in the Bundle object.
In most non-trivial applications, some combination of these methods for saving state is used. The need to save state in Android applications has an influence on how they are designed. A data model that lives primarily in a SQLite database is a convenient way to minimize the state your application needs to preserve. Putting that database in a ContentProvider object removes it from the Activity object. The ContentProvider API enables a simple implementation of the observer pattern, and it puts your application on track with a design pattern that will be elaborated throughout this book, where local databases are synched to a network database.
Fragment: A Tool for Organizing Code and UI
In Android versions prior to Honeycomb, the typical Android application implementation placed the code for interacting with user interface widgets in subclasses of Activity. When Google’s partners introduced tablet computers using the Android OS, Google responded by redesigning the user interface — and the APIs developers use to create a user interface — around a new class called Fragment.
Fragment is not a subclass of Activity, nor is it a subclass of View. Like an activity, a fragment can contain the code that handles user interaction. A fragment can be laid out like an Android widget, but it isn’t a widget. A fragment is a container for code that interacts with the users.
The Fragment class includes lifecycle methods, but it isn’t an Android component. The lifecycle methods in Fragment exist as a way for the Activity containing the fragment to propagate lifecycle events into the fragments contained in that activity. That is, individual fragment instances are never destroyed, but the Activity instances that contain them are destroyed.
In the chapter’s example, the three most important things you will find are:
- Code for handling user interactions with Android widgets.
- Lifecycle method overrides, as in the Activity example, that enable logging, so you can see when these methods are called relative to the activity lifecycle.
- Some lifecycle methods that are unique to Fragment, mostly for implementing how a fragment object is initialized.
In addition to these aspects of this Fragment subclass, you will see some code for putting example data into a list.
The PickFragment Class
The code in Listing 1-2 looks very much like an Activity subclass would look if you were not using Fragment. But, unlike an Activity, the fragment’s lifecycle is tied to the lifecycle of the Activity in which it is contained. In a large-screen layout, that means that all the Fragment objects in an Activity have their lifecycle methods called when the corresponding lifecycle methods of the Activity are called.
LISTING 1-2: PickFragment.java
package com.enterpriseandroidbook.fragmentframework;

import android.app.Activity;
import android.app.Fragment;
import android.content.res.Configuration;
import android.os.Bundle;
import android.util.Log;
import android.view.LayoutInflater;
import android.view.Menu;
import android.view.MenuInflater;
import android.view.View;
import android.view.ViewGroup;
import android.widget.AdapterView;
import android.widget.AdapterView.OnItemClickListener;
import android.widget.ArrayAdapter;
import android.widget.ListView;

public class PickFragment extends Fragment implements OnItemClickListener {

// String for logging the class name
private final String CLASSNAME = getClass().getSimpleName();

// Turn logging on or off
private static final boolean L = true;

public void onAttach(Activity activity) {
super.onAttach(activity);

// Notification that the fragment is associated with an Activity
if (L)
Log.i(CLASSNAME, "onAttach " + activity.getClass().getSimpleName());
}

public void onCreate(Bundle savedInstanceState) {
super.onCreate(savedInstanceState);

// Tell the system we have an options menu
this.setHasOptionsMenu(true);

if (null != savedInstanceState)
restoreState(savedInstanceState);

// Notification that
if (L)
Log.i(CLASSNAME, "onCreate");
}

// Factor this out of methods that get saved state
private void restoreState(Bundle savedInstanceState) {
// TODO Auto-generated method stub

}
The onCreate method calls attachAdapter and setOnItemClickListener, initializing this fragment.
@Override
public View onCreateView(LayoutInflater inflater, ViewGroup container,
Bundle savedInstanceState) {

final ListView list = (ListView) inflater.inflate(
R.layout.list_frag_list, container, false);
if (L)
Log.i(CLASSNAME, "onCreateView");

attachAdapter(list);
list.setOnItemClickListener(this);

return list;
}

public void onStart() {
super.onStart();
if (L)
Log.i(CLASSNAME, "onStart");
}

public void onresume() {
super.onResume();
if (L)
Log.i(CLASSNAME, "onResume");
}

public void onPause() {
super.onPause();
if (L)
Log.i(CLASSNAME, "onPause");
}

public void onStop() {
super.onStop();
if (L)
Log.i(CLASSNAME, "onStop");
}

public void onDestroyView() {
super.onDestroyView();
if (L)
Log.i(CLASSNAME, "onDestroyView");
}

public void onDestroy() {
super.onDestroy();
if (L)
Log.i(CLASSNAME, "onDestroy");
}

public void onDetach() {
super.onDetach();
if (L)
Log.i(CLASSNAME, "onDetach");
}

// ////////////////////////////////////////////////////////////////////////////
// Minor lifecycle methods
// ////////////////////////////////////////////////////////////////////////////

public void onActivityCreated() {
// Notification that the containing activiy and its View hierarchy exist
if (L)
Log.i(CLASSNAME, "onActivityCreated");
}

// /////////////////////////////////////////////////////////////////////////////
// Overrides of the implementations ComponentCallbacks methods in Fragment
// /////////////////////////////////////////////////////////////////////////////

@Override
public void onConfigurationChanged(Configuration newConfiguration) {
super.onConfigurationChanged(newConfiguration);

// This won't happen unless we declare changes we handle in the manifest
if (L)
Log.i(CLASSNAME, "onConfigurationChanged");
}

@Override
public void onLowMemory() {
// No guarantee this is called before or after other callbacks
if (L)
Log.i(CLASSNAME, "onLowMemory");
}

// /////////////////////////////////////////////////////////////////////////////
// Menu handling code
// /////////////////////////////////////////////////////////////////////////////

public void onCreateOptionsMenu(Menu menu, MenuInflater inflater) {
inflater.inflate(R.menu.search_menu, menu);
}

// ////////////////////////////////////////////////////////////////////////////
// App-specific code
// ////////////////////////////////////////////////////////////////////////////
The attachAdapter method is used to attach an ArrayAdapter to the ListView object in this fragment. The ArrayAdapater contains test values for this application.
/**
* Attach an adapter that loads the data to the specified list
*
* @param list
*/
private void attachAdapter(final ListView list) {

// Make a trivial adapter that loads an array of strings
ArrayAdapter<String> numbers = new ArrayAdapter<String>(list
.getContext().getApplicationContext(),
android.R.layout.simple_list_item_1, new String[] { "one",
"two", "three", "four", "five", "six" });

// tell the list to use it
list.setAdapter(numbers);
// l.setOnItemClickListener(this);
}

// ////////////////////////////////////////////////////////////////////////////
// Implementation of the OnItemClickListener interface
// ///////////////////////////////////////////////////////////////////////////
The onItemClick method implements the onItemClickListener interface. This means that the onItemClick method is called whenever an Android item has been clicked. In this case, the whole fragment is full of one ListView, and clicking on an item in the list causes some data to be loaded into the fragments on the right side of the screen, or, in the case of small screens, in a separate Activity.
@Override
public void onItemClick(AdapterView<?> arg0, View view, int position,
long id) {
// As an example of sending data to our fragments, we will create a
// bundle
// with an int and a string, based on which view was clicked
Bundle data = new Bundle();
int ordinal = position + 1;
data.putInt("place", ordinal);
data.putString("placeName", Integer.toString(ordinal));
((TabbedActivity) getActivity()).loadTabFragments(data);

}

}
The ItemFragment Class
When you run this application on a large-screen device, the ItemFragment object appears next or below the PickFragment object and displays the data corresponding to what the user selected in the PickFragment object, in Listing 1-3.
Like all the other classes that might need to respond to lifecycle methods, the methods are implemented and logged here, so you can readily see when they are called.
LISTING 1-3: ItemFragment.java
package com.enterpriseandroidbook.fragmentframework;

import android.app.ActionBar.Tab;
import android.app.ActionBar.TabListener;
import android.app.Activity;
import android.app.Fragment;
import android.app.FragmentTransaction;
import android.content.res.Configuration;
import android.os.Bundle;
import android.util.Log;
import android.view.LayoutInflater;
import android.view.View;
import android.view.ViewGroup;
import android.widget.EditText;
import android.widget.FrameLayout;

public class ItemFragment extends Fragment implements TabListener,
      TabbedActivity.SetData {

// String for logging the class name
private final String CLASSNAME = getClass().getSimpleName();

//Turn logging on or off
private final boolean L = true;

public void onAttach(Activity activity) {
super.onAttach(activity);

// Notification that the fragment is associated with an Activity
if (L) Log.i(CLASSNAME, "onAttach " + activity.getClass().getSimpleName());
}

public void onCreate(Bundle savedInstanceState) {
super.onCreate(savedInstanceState);

// Notification that
Log.i(CLASSNAME, "onCreate");
}

public View onCreateView(LayoutInflater inflater, ViewGroup container,
      Bundle savedInstanceState) {
FrameLayout content = (FrameLayout) inflater.inflate(R.layout.content, container,
      false);
if (L) Log.i(CLASSNAME, "onCreateView");
return content;

}

public void onStart() {
super.onStart();
Log.i(CLASSNAME, "onStart");
}

public void onresume() {
super.onResume();
Log.i(CLASSNAME, "onResume");
}

public void onPause() {
super.onPause();
Log.i(CLASSNAME, "onPause");
}

public void onStop() {
super.onStop();
Log.i(CLASSNAME, "onStop");
}

public void onDestroyView() {
super.onDestroyView();
Log.i(CLASSNAME, "onDestroyView");
}

public void onDestroy() {
super.onDestroy();
Log.i(CLASSNAME, "onDestroy");
}

public void onDetach() {
super.onDetach();
Log.i(CLASSNAME, "onDetach");
}

//////////////////////////////////////////////////////////////////////////////
// Minor lifecycle methods
//////////////////////////////////////////////////////////////////////////////

public void onActivityCreated() {
// Notification that the containing activiy and its View hierarchy exist
Log.i(CLASSNAME, "onActivityCreated");
}

///////////////////////////////////////////////////////////////////////////////
// Overrides of the implementations ComponentCallbacks methods in Fragment
///////////////////////////////////////////////////////////////////////////////

@Override
public void onConfigurationChanged(Configuration newConfiguration) {
super.onConfigurationChanged(newConfiguration);

// This won't happen unless we declare changes we handle in the manifest
if (L) Log.i(CLASSNAME, "onConfigurationChanged");
}

@Override
public void onLowMemory() {
// No guarantee this is called before or after other callbacks
if (L) Log.i(CLASSNAME, "onLowMemory");
}

///////////////////////////////////////////////////////////////////////////////
// Implementation of TabListener
///////////////////////////////////////////////////////////////////////////////
The following three methods implement the TabListener interface. They are passed a FragmentTransaction object, which aggregates all the actions taken when navigating between fragments. Here, you simply show or hide the fragment.
@Override
public void onTabReselected(Tab tab, FragmentTransaction ft) {
// TODO Auto-generated method stub

}

@Override
public void onTabSelected(Tab tab, FragmentTransaction ft) {
ft.show(this);

}

@Override
public void onTabUnselected(Tab tab, FragmentTransaction ft) {
ft.hide(this);

}

///////////////////////////////////////////////////////////////////////////////
// Implementation of SetData
///////////////////////////////////////////////////////////////////////////////
The following is the setData method, which implements the SetData interface. This interface tells this fragment what data it should display.
@Override
public void setData(Bundle data) {
// Display the number
EditText t = (EditText) getActivity().findViewById(R.id.editText1);
int i = data.getInt("place");
t.setText(Integer.toString(i));
}

}
The ItemDetailFragment Class
The ItemDetail fragment class is similar enough to the ItemFragment class that it does not merit displaying the listing in this chapter. You can find it in the file ItemDetailFragment.java in this chapter’s downloadable files available at www.wrox.com and https://github.com/wileyenterpriseandroid/Examples.git.
TYING TOGETHER ACTIVITIES, FRAGMENTS, AND THE ACTION BAR
The Android APIs provide you with infinite ways to design your user experiences. Your challenge is to find a consistent path through those infinite choices that can be considered “typical.” One typical approach is to combine the Activity, Fragment, and ActionBar classes, along with the View class hierarchy and tabs to provide a user experience that resembles other well-designed Android applications. The TabbedActivity class in Listing 1-4 glues together the use of Activity, Fragment, and ActionBar.
The TabbedActivity Class
The TabbedActivity class is an abstract subclass of Activity. The other Activity subclasses in this application framework extend TabbedActivity, and if you go on to use this framework, the Activity subclasses you add to this framework will also likely extend this class.
As an abstract parent class of the concrete classes in this framework, TabbedActivity provides some capabilities inherited by those subclasses, specifically:
- Enabling tabs in the action bar to select among fragments
- Enabling the app to load data into fragments
- Abstracting whether the user interface is on one large screen, or divided across two smaller screens
LISTING 1-4: TabbedActivity.java
package com.enterpriseandroidbook.fragmentframework;

import android.app.ActionBar;
import android.app.ActionBar.Tab;
import android.app.ActionBar.TabListener;
import android.app.Activity;
import android.content.Intent;
import android.os.Bundle;

public abstract class TabbedActivity extends Activity {
This abstract class is where most of the work, and most of the cleverness, resides. The initializeTabs method initializes the names of the tabs and connects the tabs to the fragments they control. This is called from the onCreate method of the Activity.
/**
* Initialize tabs in an activity that uses tabs to switch among fragments
*
* @param defaultIndex
*            The index of the Fragment shown first
* @param nameIDs
*            an array of ID for tab names
* @param fragmentIDs
*            an array of IDs of Fragment resources
*/
public void initializeTabs(int defaultIndex, int[] nameIDs, int[] fragmentIDs) {

// How many do we have?
int n = nameIDs.length;
int i = 0;

// Find at least one fragment that should implement TabListener
TabListener tlFrag = (TabListener) getFragmentManager()
      .findFragmentById(fragmentIDs[i]);

// Null check - harmless to call if there are no such fragments
if (null != tlFrag) {

// Get the action bar and remove existing tabs
ActionBar bar = getActionBar();
bar.removeAllTabs();

// Make new tabs and assign tags and listeners
for (; i < n; i++) {
tlFrag = (TabListener) getFragmentManager().findFragmentById(fragmentIDs[i]);
Tab t = bar.newTab().setText(nameIDs[i]).setTag(tlFrag).setTabListener(tlFrag);
bar.addTab(t);
}
bar.getTabAt(defaultIndex).select();
}
}
The loadTabFragments method is called whenever the user picks an item from the list on the left side of the screen. It loads the selected data into the views in the fragments on the right side of the screen. This method contains the only logic in the app that can be said to be somewhat aware of the layout of the screen. If there are tabs in this activity, the doLoad method is called. If not, something interesting happens — a new activity is started and the Bundle object containing the data is attached to the intent.
Despite the fact that there is an if statement here that, effectively, distinguishes between the one-activity case on larger screens and the two-activity case on smaller screens, none of the code has any logic that makes decisions based on screen size or pixel density. That is as it should be. Your program will always encounter new screen geometries. Code that makes decisions based on the parameters of the screen is always susceptible to being surprised by new devices. Instead, you should let the system make decisions about which layout to use, and ensure that your code accommodates all the possible choices.
/**
* If we have tabs and fragments in this activity, pass the bundle data to
* the fragments. Otherwise start an activity that should contain the
* fragments.
*
* @param data
*/
public void loadTabFragments(Bundle data) {
int n = getActionBar().getTabCount();
if (0 != n) {
doLoad(n, data);
} else {
startActivity(new Intent(this, TabActivity.class).putExtras(data));
}
}

/**
* An interface to pass data to a Fragment
*/
public interface SetData {
public void setData(Bundle data);
}

/**
* Iterate over the tabs, get their tags, and use these as Fragment
* references to pass the bundle data to the fragments
*
* @param n
* @param data
*/
private void doLoad(int n, Bundle data) {

// Null check - harmless if no data
if (null == data) return;

int i;
ActionBar actionBar = getActionBar();

for (i = 0; i < n; i++) {
SetData f = (SetData) actionBar.getTabAt(i).getTag();
f.setData(data);
}
actionBar.selectTab(actionBar.getTabAt(0));
}


}
A Main.xml File for Large Tablets
If the code isn’t making decisions about screen size, what is? In this framework, you harness the decisions the Android system makes about layouts to also determine the number of fragments displayed on different screen sizes.
This file (Listing 1-5) contains a layout that includes both the list fragment on the left and the information fragments on the right. It is in the directory called layout-large. So, whenever the system decides to find layouts in the layout-large folder, it will pick this file and all the fragments will be displayed.
LISTING 1-5: Main.xml
<?xml version="1.0" encoding="utf-8"?>
<LinearLayout xmlns:android="http://schemas.android.com/apk/res/android"
   android:id="@+id/content_layout"
   android:layout_width="fill_parent"
   android:layout_height="fill_parent"
   android:orientation="horizontal" >

   <fragment
       android:id="@+id/list_frag"
       android:name="com.enterpriseandroidbook.fragmentframework.PickFragment"
       android:layout_width="250dp"
       android:layout_height="match_parent"
       class="com.enterpriseandroidbook.fragmentframework.PickFragment" />

   <LinearLayout
       xmlns:android="http://schemas.android.com/apk/res/android"
       android:layout_width="match_parent"
       android:layout_height="match_parent"
       android:orientation="vertical" >

       <fragment
           android:id="@+id/content_frag"
           android:name="com.enterpriseandroidbook.fragmentframework.ItemFragment"
           android:layout_width="match_parent"
           android:layout_height="match_parent"
           class="com.enterpriseandroidbook.fragmentframework.ItemFragment" />

       <fragment
       android:id="@+id/detail_frag"
       android:name="com.enterpriseandroidbook.fragmentframework
  .ItemDetailFragment"
       android:layout_width="match_parent"
       android:layout_height="match_parent"
       class="com.enterpriseandroidbook.fragmentframework.ItemDetailFragment"
                 />
   </LinearLayout>

</LinearLayout>
The code in the fragment doesn’t ask which layout was chosen. It doesn’t make decisions based on screen size or pixel density either. All it does is accommodate having, or not having, all the fragments on the screen. That accommodation is made in the loadTabFragments method of the TabbedActivity class.
A Main.xml and a Subsidiary Activity for Smaller Screens
This version of the main.xml file (Listing 1-6) is found in the layout folder, as opposed to the layout-large folder, where the other main.xml file is placed. This version is used for every screen size other than ones the Android system deems to be “large.”
LISTING 1-6: Main.xml
<?xml version="1.0" encoding="utf-8"?>
<LinearLayout xmlns:android="http://schemas.android.com/apk/res/android"
   android:layout_width="fill_parent"
   android:layout_height="fill_parent"
   android:orientation="horizontal" >

   <fragment
       android:id="@+id/list_frag"
       android:name="com.enterpriseandroidbook.fragmentframework.PickFragment"
       android:layout_width="match_parent"
       android:layout_height="match_parent"
       class="com.enterpriseandroidbook.fragmentframework.PickFragment" />

</LinearLayout>
Note that only the fragment that on a large screen displays the list on the left side of the screen appears in this layout. That means that an instance of that Fragment subclass is created when this layout is used. The Fragment subclasses that would on a large screen correspond to the fragments on the right side of the screen are never instantiated.
This isn’t a problem because all the code that interacts with the user is in those Fragment subclasses. As long as the other code makes no assumptions about those classes, their presence (or absence) makes no difference.
The TabActivity Class
This activity, in Listing 1-7, starts when the loadTabFragments method finds no tabs. It is notable, as with the other Activity class in this example, for what it doesn’t do. It exists to load the layout containing the fragments that would on a larger screen appear to the right of the list, but it makes no decisions or assumptions about screen sizes or layouts, or which Fragment subclasses are used in the layout.
The result is that on small screens this activity is launched, and it displays the tabs that would otherwise be on the right side of a larger screen.
LISTING 1-7: TabActivity.java
package com.enterpriseandroidbook.fragmentframework;

import android.app.ActionBar;
import android.content.res.Configuration;
import android.os.Bundle;
import android.util.Log;

public class TabActivity extends TabbedActivity {

// String for logging the class name
private final String CLASSNAME = getClass().getSimpleName();

// Turn logging on or off
private static final boolean L = true;

@Override
protected void onCreate(Bundle savedState) {
super.onCreate(savedState);

// To keep this method simple
doCreate(savedState);

// If we had state to restore, we note that in the log message
if (L) Log.i(CLASSNAME, "onCreate" +
(null == savedState ? " Restored state" : ""));
}

@Override
protected void onRestart() {
super.onRestart();
// Notification that the activity will be started
if (L) Log.i(CLASSNAME, "onRestart");
}

@Override
protected void onStart() {
super.onStart();
// Notification that the activity is starting
if (L) Log.i(CLASSNAME, "onStart");
}

@Override
protected void onResume() {
super.onResume();
// Notification that the activity will interact with the user
if (L) Log.i(CLASSNAME, "onResume");
}

protected void onPause() {
super.onPause();
// Notification that the activity will stop interacting with the user
if (L) Log.i(CLASSNAME, "onPause" + (isFinishing() ? " Finishing" : ""));
}

@Override
protected void onStop() {
super.onStop();
// Notification that the activity is no longer visible
if (L) Log.i(CLASSNAME, "onStop");
}

@Override
protected void onDestroy() {
super.onDestroy();
// Notification the activity will be destroyed
if (L) Log.i(CLASSNAME, "onDestroy"
// Are we finishing?
+ (isFinishing() ? " Finishing" : ""));
}

@Override
protected void onSaveInstanceState(Bundle outState) {
super.onSaveInstanceState(outState);
saveState(outState);

// Called when state should be saved
if (L) Log.i(CLASSNAME, "onSaveInstanceState");

}

@Override
protected void onRestoreInstanceState(Bundle savedState) {
super.onRestoreInstanceState(savedState);
if (null != savedState) restoreState(savedState);

// If we had state to restore, we note that in the log message
if (L) Log.i(CLASSNAME, "onRestoreInstanceState" +
(null == savedState ? " Restored state" : ""));
}

///////////////////////////////////////////////////////////////////////////////
// The minor lifecycle methods - you probably won't need these
///////////////////////////////////////////////////////////////////////////////

@Override
protected void onPostCreate(Bundle savedState) {
super.onPostCreate(savedState);
if (null != savedState) restoreState(savedState);

// If we had state to restore, we note that in the log message
if (L) Log.i(CLASSNAME, "onCreate" + (null == savedState ?
      " Restored state" : ""));

}

@Override
protected void onPostResume() {
super.onPostResume();
// Notification that resuming the activity is complete
if (L) Log.i(CLASSNAME, "onPostResume");
}

@Override
protected void onUserLeaveHint() {
super.onUserLeaveHint();
// Notification that user navigated away from this activity
if (L) Log.i(CLASSNAME, "onUserLeaveHint");
}

///////////////////////////////////////////////////////////////////////////////
// Overrides of the implementations ComponentCallbacks methods in Activity
///////////////////////////////////////////////////////////////////////////////

@Override
public void onConfigurationChanged(Configuration newConfiguration) {
super.onConfigurationChanged(newConfiguration);

// This won't happen unless we declare changes we handle in the manifest
if (L) Log.i(CLASSNAME, "onConfigurationChanged");
}

@Override
public void onLowMemory() {
// No guarantee this is called before or after other callbacks
if (L) Log.i(CLASSNAME, "onLowMemory");
}

///////////////////////////////////////////////////////////////////////////////
// App-specific code here
///////////////////////////////////////////////////////////////////////////////


/**
* This is where we restore state we previously saved.
* @param savedState the Bundle we got from the callback
*/
private void restoreState(Bundle savedState) {
// Add your code to restore state here

}

/**
* Add this activity's state to the bundle and/or commit pending data
*/
private void saveState(Bundle state) {
// Add your code to add state to the bundle here
}

/**
* Perform initializations on creation of this Activity instance
* @param savedState
*/
private void doCreate(Bundle savedState) {
setContentView(R.layout.content_control_activity);

if (null != savedState) restoreState(savedState);

       ActionBar bar = getActionBar();
        bar.setDisplayShowTitleEnabled(false);
       bar.setNavigationMode(ActionBar.NAVIGATION_MODE_TABS);

// Initialize the tabs
int names[] = {R.string.item, R.string.detail };
int fragments[] = { R.id.content_frag, R.id.detail_frag };
initializeTabs(0, names, fragments);

// Load data if there is some
loadTabFragments(getIntent().getExtras());
}

}THE ANDROID TASK AND PROCESS MODEL
In the previous sections you learned how an Android process is assembled out of components, and how components work together with garbage collection in the Android managed run time to keep per-process heap size small. One reason per-process heap size needs to be small is that Android runs many instances of the run time at once, one for each process where a Java program is running in the Android environment. A “small” heap size means specifically that the total amount of memory available to all the applications in an Android device ranges between a few tens of megabytes to a few hundred megabytes. Each process is limited to between 24MB and 48MB, although some devices may have lower or higher limits. This means you cannot count on a fixed amount of memory, or on being able to use more than a small share of the total memory in the device.
Android’s approach differs from most systems where per-process heap size can take up a large amount of available memory, and it is not uncommon for Java VM instances to have heap sizes in the hundreds of megabytes.
Starting Dalvik Instances
Although you don’t need to know the details to write Android applications, it’s still a good idea to know why you can start dozens of instances of the Dalvik virtual machine (VM), which is the basis of Android’s managed language runtime environment, when trying to do the same with a conventional Java VM would bog down your computer, never mind a mobile device.
One problem with managed language runtime environments is that bytecodes, such as those used in Java VMs and Dalvik, are loaded like data, not like the machine instructions that computer processors run. Dalvik optimizes the creation and initialization of new instances of Dalvik by using a template process, or an instance. This template process starts, loads, and initializes many base classes, and it then waits until it needs to be “cloned,” using the fork system call. See Figure 1-11 for an example.

When the Dalvik template instance, called the Zygote, is forked, it both speeds up the loading and initialization of new processes and reduces the memory footprint of every Dalvik instance. It does this by treating the pre-loaded base classes as if they were pure code and sharing this code across all the Dalvik instances forked from the Zygote.
For you, the developer, this means that you don’t have to avoid starting Dalvik instances. If it makes sense to start an Activity from another app to, for example, pick an image file to load, do it, and don’t worry about the overhead.
Death, but No Transfiguration
In the section on the Activity class and its component lifecycle, you saw how an activity can be destroyed and re-created. Every component in an Android process can be destroyed and, if the developer correctly handles lifecycle method calls, re-created. Every object in an Android process is contained in components. That is, there is nothing in an Android process that can hold a reference to an instance of any class that is not itself referred to only by a component. That means that whole processes could be destroyed and re-created. And they routinely are.
You can demonstrate this by running the example in this chapter and watching the logcat view in Eclipse. Note that each line in the log lists a process ID or PID. After starting the example app and observing the lifecycle method calls in the logcat view, start a large number of other applications. Eventually you will see that, when you go back to this example app, not only are the instances of every component destroyed and re-created, but the process ID (PID) has changed too! This is a bit remarkable: The user sees no difference in the operation and state of the app he is interacting with, but every object in that app has been destroyed and re-created, and it is in an entirely new process. This also illustrates that “process” and “task” are only loosely coupled in the Android task model.
This is how Android recovers memory at the granularity of a process. It also “resets” the heap size for a running app, in case the app had used a large block of memory for some purpose and then freed it. This should also convince you, if you have not already been convinced, that any attempts to thwart the Android lifecycle are futile. Occasionally, your whole process is going to get reaped by Android’s memory management. There is no place to hide from the component lifecycle.
Tasks Span Applications and Processes
Android also differs from most OSs in that a task in Android isn’t synonymous with a process. Android applications can, using the startActivity method, cause another application to be started. But that application is often part of the same task. Its capabilities are being borrowed. For example, the Gallery app is frequently used to select an image file. When this happens, another app creates an Intent object with the PICK action and asks for an image. The Gallery app has a matching intent filter, and it starts an activity enabling the user to pick an image from the gallery. While this is happening, the app that was launched and the Gallery app are part of the same task, even though they are in two separate processes.
This kind of late-binding, loosely-coupled modularity is characteristic of Android applications, and the component-based implementation of Android apps, where an Activity component is used to group Fragment objects and the View objects they contain into screens of UI work. Note in the TabbedActivity.java listing (Listing 1-4 earlier in the chapter) that an Intent object is used in the startActivity method call that results in a new activity being started. In this case, a class name is specified. But an Intent can contain a looser specification than actions and data types, instead of class names. That enables you to consume pieces of other application’s UI and provide pieces of a UI to other applications.
Later in this chapter you will see how Intent objects are used to start applications.
MULTIPROCESSING, SECURITY, AND LIFECYCLE
Android’s designers faced a difficult problem. Unlike a web server, in which all the software is controlled by one developer/administrator, a mobile device runs applications developed by multiple developers. The user has limited trust for these developers, and the developers have limited trust of one another. They all need to share memory resources, and you can’t predict how many applications the user will want to run.
The Process and User ID as Security Boundary
A single runtime environment with multiple threads just isn’t going to cut it for enabling a secure multiprocessing environment. Every Android application runs in its own process, which is an instance of the Dalvik managed runtime environment.
Each Android developer gets a signature (the examples you are running now are signed with a temporary signature), and every signature creates a separate user ID (UID) and group ID (GID) in the Android system. Access to each developer’s application’s files is limited to the UID and GID of that developer’s applications.
Android processes cannot access memory in other processes, and they cannot access files with other UIDs/GIDs.
DECLARING APPLICATION PROPERTIES
Previously in this chapter you saw how Android components, especially the Activity component, are used to group elements of a user interface onto a device screen, and how the Fragment subclasses defined here are used to group View objects and the code that handles user interaction with those objects, and how declarative UI can drive the configuration of activities and fragments to adapt to a wide range of device sizes. But how did your application get started?
Components are central to starting applications. So are Intent objects. Manifest files are used to bring together information about all the components in your application, plus some data about names and system compatibility. Intent filter specifications are key to the loosely coupled, high-level modularity of Android applications.
You see all this information come together in the manifest file (Listing 1-8) for the framework application:
LISTING 1-8: manifest.xml
<?xml version="1.0" encoding="utf-8"?>
<manifest xmlns:android="http://schemas.android.com/apk/res/android"
     package="com.enterpriseandroidbook.fragmentframework"
     android:versionCode="1"
     android:versionName="1.0">
   <uses-sdk android:minSdkVersion="15" />

   <application android:icon="@drawable/icon" android:label="@string/app_name"
       android:uiOptions="splitActionBarWhenNarrow"
             android:theme="@android:style/Theme.Holo">
       <activity android:name=".MainActivity"
                 android:label="@string/app_name">
           <intent-filter>
               <action android:name="android.intent.action.MAIN" />
               <category android:name="android.intent.category.LAUNCHER" />
           </intent-filter>
       </activity>
       <activity android:name="com.enterpriseandroidbook.fragmentframework
             .TabActivity" android:label="@string/data"></activity>

   </application>
</manifest>
A file called a “manifest” lists the contents of something; in this case, it lists the contents of an Android application. Android application manifests list all the components in an application. If, in addition to the name of an activity, an intent filter is defined for an activity, that activity can be “matched” instead of being specified by name.
In this manifest, the intent filter for MainActivity matches the action android.intent.action.MAIN. It specifies that it also matches the category android.intent.category.LAUNCHER. These are the constants that Android launchers use to launch applications.
SUMMARY
This chapter guided you through setting up your tools and verifying that they were set up correctly.
You saw how a modern Android framework suitable for database applications is put together:
- It adapts to all sizes of Android devices. It’s time to stop whining about “fragmentation” and write apps that adapt.
- It harnesses declarative UI in Android to avoid making decisions about screen configuration in code.
- It organizes code that interacts with the user into Fragment subclasses that can be combined into activities.
- It looks, acts, and interacts with the user like the latest generation of Android applications. It’s up to date inside and out.
Although the example framework code in this chapter embodies how to write code for the most recent versions of Android, it can be back-ported to earlier versions of Android using the Support Package (discussed more in Chapter 11). By following the design patterns in this framework you can have code that is up to date, forward-compatible, and back-compatible as well.