
Chapter 12. Command-Line Networking Tools
There are two certainties in the networking world. The first is that you will work on networks that use Transmission Control Protocol/Internet Protocol (TCP/IP). The second is that at some point, you will troubleshoot those networks. This chapter focuses on identifying the TCP/IP utilities commonly used when working with TCP/IP networks and explains how to use those utilities in the troubleshooting process.
Foundation Topics: Common Networking Utilities
The best way to work through this chapter is to try each of the utilities as they are discussed. This can give you a better idea of how to use the tools and what they are designed to do. These tools are the core utilities used in the troubleshooting of TCP/IP networks and are used extensively in real-world environments. The following sections describe these utilities:
• ping
• traceroute (also called tracert)
• mtr
• arp ping
• netstat
• nbtstat
• ipconfig
• ifconfig
• winipcfg
• nslookup
• dig
• host
• route
Note that not all the tools discussed here are available on every operating system. However, the discussion begins by looking at one that is not only available on all platforms but also is arguably the most used—and most useful—of all troubleshooting utilities: ping.
Note: Help Facility
Many of the utilities discussed in this chapter have a help facility that you can access by typing the command followed by /? or a -?. On a Windows system, for example, you can get help on the netstat utility by typing the command netstat /? Sometimes, using a utility with an invalid switch will also bring up the help screen.
The ping Utility
ping is a command-line utility designed to test connectivity between systems on a TCP/IP-based network. Its basic function is to answer one simple question: “Can I connect to another host?” ping can be a network administrator’s right hand; most TCP/IP troubleshooting procedures begin with the ping utility and, if necessary, work from there. We say “if necessary” because the information provided by the ping command can often isolate the cause of a problem so well that further action from the command line is not needed.
ping works by using Internet Control Message Protocol (ICMP) packets to ascertain whether another system is connected to the network and can respond. A successful ping request requires that a packet, called an ICMP echo request, be sent to a remote host. If the remote host receives the packet, it sends an ICMP echo reply in return, and the ping is a success. Figure 12.1 shows the output from a successful ping request on a Windows Server system.
![]()
Figure 12.1 A successful ping request.

Notice in Figure 12.1 that four packets are sent to the remote host. These packets are 32 bytes in size and took 94ms, 86ms, 89ms, and 88ms to reach their destination. The time= section of the ping command output is often important because a high number could indicate congestion on the network or a routing problem. The version of the ping utility shown in Figure 12.1 is from a Windows Server system. Other versions of Windows or other operating systems might send more packets or larger packets.
Tip: Command Output
For each of the commands discussed in this chapter, make sure that you can identify the output. On the Network+ exam, you will likely be asked to identify the output from these commands. This aspect of each tool’s use is covered in more detail later in this chapter.
Note
Sometimes ping requests fail. When a ping fails, you know that you cannot connect to a remote host. Figure 12.2 shows the output from a failed ping command.
![]()
Figure 12.2 A failed ping request.

Switches for ping
If you’ve spent any time working with command-line utilities, you no doubt already know that every command is accompanied by a number of switches, or options. The switches let you customize the behavior of the command. Although some switches (we’ll call them that from now on) are rarely used, others come in handy under a number of circumstances.
Tip: Switches
Even the most obscure switches for the commands discussed in this chapter might appear on the Network+ exam.
The ping command offers several switches. The most widely used, -t, sends continuous packets rather than just a few. This switch sets the ping command to continue to ping the remote host until it is stopped by keyboard input. This switch is particularly helpful when you troubleshoot connectivity issues such as a suspect cable. Table 12.1 shows some of the more useful switches available for the ping command on a Windows Vista system. Some options can vary depending on the Windows version used. Notice the ping switches used for IPv6.
![]()
Table 12.1 ping Switches on a Windows Vista System

One of the main reasons administrators rely on the ping utility is its capability to provide quick information that can be used for troubleshooting. Troubleshooting with ping is something all administrators will do at some point.
Troubleshooting Steps with ping
Although ping does not completely isolate problems, you can use it to help identify where a problem lies. When troubleshooting with ping, take the following steps:
1. ping the IP address of your local loopback, using the command ping 127.0.0.1. If this command is successful, you know that the TCP/IP protocol suite is installed correctly on your system and functioning. If you cannot ping the local loopback, TCP/IP might need to be reloaded or reconfigured on the machine you use.
2. ping the IP address assigned to your local network interface card (NIC). If the ping is successful, you know that your interface is functioning on the network and has TCP/IP correctly installed. If you cannot ping the local interface, TCP/IP might not be bound correctly to the card; the network card drivers might be improperly installed; or the computer might not be cabled to the network.
Note: Loopback Address
The loopback is a special function within the TCP/IP protocol stack provided for troubleshooting purposes. The Class A IP address 127.X.X.X is reserved for the loopback; although convention dictates that you use 127.0.0.1, you can use any address in the 127.X.X.X range, except for the network number itself (127.0.0.0) and the broadcast address (127.255.255.255). You can also ping by using the default hostname for the local system, which is called localhost (for example, ping_localhost).
3. ping the IP address of another known working node on your local network. By doing so you can determine whether the computer you use can see other computers on the network. If you can ping other devices on your local network, you have network connectivity.
If you cannot ping other devices on your local network you might not be connected to the network correctly, or there might be a cable problem on the computer.
4. After you confirm that you have network connectivity for the local network, you can help verify connectivity to a remote network by sending a ping to the IP address of the default gateway.
5. If you can ping the default gateway, you can verify remote connectivity by sending a ping to the IP address of a system on a remote network. However, this doesn’t always work because some routers and firewalls are configured to prevent ICMP echoes (pings). This is done to prevent certain types of malicious attacks that use ICMP.
Note: Connectivity Problems
On the Network+ exam, you might be asked to relate the correct procedure for using ping for a connectivity problem.
If you are an optimistic person, you can perform step 5 first. If that works, all the other steps will also work, saving you the need to test them. If your step 5 trial fails, you can go back to step 1 and start the troubleshooting process from the beginning.
Tip: Testing TCP/IP Installations
To test a system to see whether TCP/IP is installed, working, and configured correctly, you can ping the loopback address and then ping the IP address of the local system.
By using just the ping command in the manner described, you can confirm network connectivity to not only the local network but also to a remote network. The whole process requires as much time as it takes to type in the command—and you can do it all from a single location.
Note: ping Using DNS
The ping examples used in this section show the ping command using the IP address of the remote host. It is also possible to ping the Domain Name System (DNS) name of the remote host (for example, ping www.comptia.org, ping server1.network.com); this can be done only if your network uses a DNS server. On a Windows-based network, you can also ping by using the Network Basic Input/Output System (NetBIOS) computer name.
Ping Error Messages
When you’re troubleshooting with the ping command, four key error messages can be returned: Destination Host Unreachable, Request Timed Out, Unknown Host, Expired Time-To-Live (TTL). The following sections describe these results of a ping command.
The Destination Host Unreachable Message
The Destination Host Unreachable error message means that a route to the destination computer system cannot be found. To remedy this problem, you might need to examine the TCP/IP configuration or routing information on the local host to confirm that the configuration is correct or, if static routes are used, verify that the local routing table is configured correctly. Listing 12.1 shows an example of a ping failure that gives the Destination Host Unreachable message.
Listing 12.1 A ping Failure with the Destination Host Unreachable

The Request Timed Out Message
The Request Timed Out error message is common when you use the ping command. Essentially, this error message indicates that your host did not receive the ping message back from the other host within the designated time period. This is typically an indicator that the destination device is not connected to the network, is powered off, or is not configured correctly; however it could also mean that some intermediate device is not operating correctly. In some rare cases, it can also indicate that there is so much congestion on the network that timely delivery of the ping message could not be completed. It might also mean that the ping is sent to an invalid IP address or that the system is not on the same network as the remote host, and an intermediary device is not configured correctly. In any of these cases, the failed ping should initiate a troubleshooting process that might involve other tools, manual inspection, and possibly reconfiguration. Listing 12.2 shows the output from a ping to an invalid IP address.
Listing 12.2 Output for a ping to an Invalid IP Address

When running ping, you might receive some successful replies from the remote host intermixed with Request Timed Out errors. This is often a result of a congested network. An example follows; notice that the example in Listing 12.3, which was run on a Windows Server system, uses the -t switch to generate continuous pings.
Listing 12.3 The –t Switch Generating Continuous ping Messages
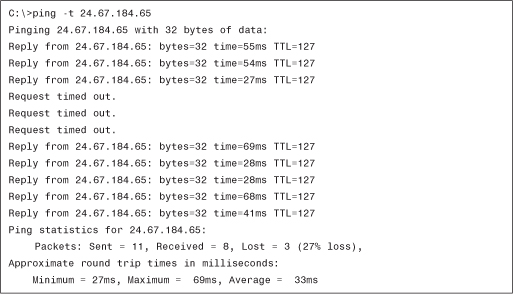
In this example, three packets were lost. If you experienced this type of error frequently, you would need to determine what was causing packets to be dropped from the network.
The Unknown Host Message
The Unknown Host error message is generated when the hostname of the destination computer cannot be resolved. This error usually occurs when you ping an incorrect hostname, as shown in the following example, or when trying to use ping with a hostname when hostname resolution (via DNS or a HOSTS text file) is not configured:
C:>ping www.comptia.ca
Unknown host www.comptia.ca
If the ping fails, you need to verify that the ping is sent to the correct remote host. If it is, and if name resolution is configured, you have to dig a little more to find the problem. This error might indicate a problem with the name resolution process, and you might need to verify that the DNS or WINS server is available. Other commands, such as nslookup, can help in this process.
Note: Security Settings and Connection Errors
A remote host connection error can sometimes be caused by your server’s security settings. For example, the IPsec policies might restrict access to certain hosts. You might need to disable security measures temporarily when you troubleshoot errors.
The Expired TTL Message
The Time-To-Live (TTL) is an important consideration in understanding the ping command. The function of the TTL is to prevent circular routing, which occurs when a ping request keeps looping through a series of hosts. The TTL counts each hop along the way toward its destination device. Each time it counts one hop, the hop is subtracted from the TTL. If the TTL reaches 0, the TTL has expired, and you get a message like the following:
Reply from 24.67.180.1: TTL expired in transit
If the TTL is exceeded with ping, you might have a routing problem on the network. You can modify the TTL for ping on a Windows system by using the ping -i command.
Note: More on ping
As you can see from each of the ping examples, a common set of information is provided each time you run ping. This summary can be useful for getting an overall picture of the ping information.
The traceroute Utility
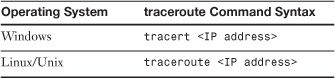
As great as ping is, sometimes it just isn’t enough. In such cases, you need to reach for something a little stronger. traceroute (also called tracert) is a TCP/IP utility used to track the path a packet takes to reach a remote host. Each of the network operating systems used on today’s networks provide a route tracing type of utility, but the name of the command and the output vary slightly in each. Table 12.2 shows the tracert command syntax used in various operating systems.
![]()
Table 12.2 traceroute Utility Commands
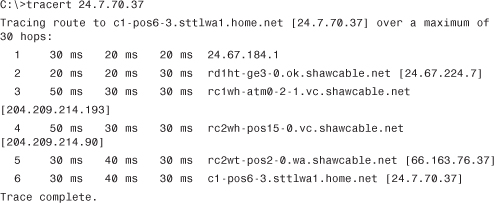
What exactly does a traceroute command trace? The simple answer is routes. Local area networks (LANs) and wide area networks (WANs) can have several routes that packets can follow to reach their destinations. These routes are kept in routing tables. Systems use the information from these routing tables to tell the packets how they will travel through the network. The tracert utility lets you track the path a packet takes through the network. Figure 12.3 shows the results of a successful tracert command in a Windows system.
![]()
Figure 12.3 A successful traceroute command in a Windows system.

Not all route tracing commands are as successful as the one in Figure 12.3. A tracert command that has an asterisk (*) in the entries shows that the particular hop was timed out. Several consecutive asterisks indicate a problem with the routing information or congestion on the network. Figure 12.4 shows an example of a failed traceroute command.
![]()
Figure 12.4 A failed traceroute command from a Windows system.

Note: Isolating bottlenecks
Because traceroute reports the amount of time it takes to reach each host in the path, it is a useful tool for isolating bottlenecks in a network. You need to know this for the exam.
In the example shown in Figure 12.4, the route is traced over a number of hops before it times out on the next hop of the route. In this example, pressing Ctrl+C terminates the trace; but if the tracert command were left to its own devices, it could run to 30 hops to complete the trace.
In a network troubleshooting situation, traceroute is often used in concert with ping. First, you use traceroute to determine where on a route the connectivity problem lies. Then, from the point of the problem, you can determine the possible cause of the problem by using ping.
Depending on the version of Windows you use and the type of operating system, switches are available for trace route commands. Table 12.3 identifies some of the switches available for the tracert command on a Windows Vista system.
![]()
Table 12.3 Switches for tracert

Reviewing tracert Command Printouts
The tracert command provides a lot of useful information, including the IP address of every router connection it passes through, and in many cases the name of the router. (Although, this depends on the router’s configuration.) tracert also reports the length, in milliseconds, of the round-trip the packet made from the source location to the router and back. This information can tell you a lot about where network bottlenecks or breakdowns may be. Listing 12.4 shows an example of a successful tracert command on a Windows Server system.
Listing 12.4 A tracert Command
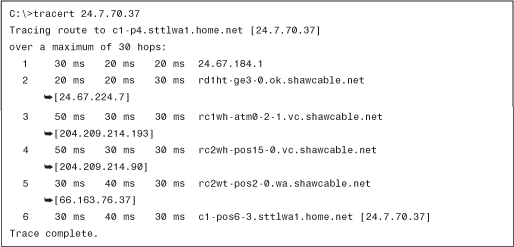
The tracert display on a Windows-based system includes several columns of information. The first column represents the hop number. The next three columns indicate the round-trip time, in milliseconds, that a packet takes in its attempts to reach the destination. The last column is the hostname and the IP address of the responding device.
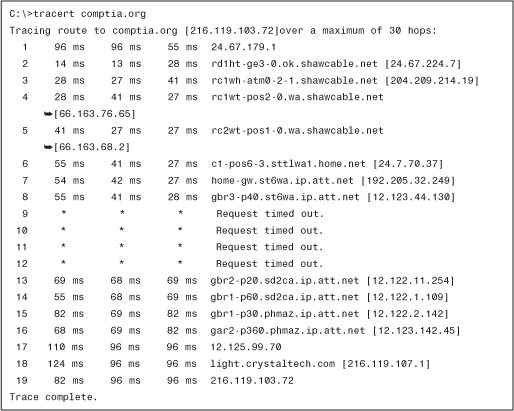
Of course, not all tracert commands are successful. Listing 12.5 shows the output from a tracert command that doesn’t manage to get to the remote host.
Listing 12.5 A tracert Command That Doesn’t Get to the Remote Host

In this example, the tracert gets only to the seventh hop, at which point it fails; this failure indicates that the problem lies on the far side of the device in step 7 or on the near side of the device in step 8. In other words, the device at step 7 is functioning but might not make the next hop. The cause of the problem could be a range of issues, such as an error in the routing table or a faulty connection. Alternatively, the seventh device might be operating 100%, but device 8 might not be functioning at all. In any case, you can isolate the problem to just one or two devices.
The tracert command can also help you isolate a heavily congested network. In the following example, the trace route packets fail in the midst of the tracert but subsequently can continue. This behavior can be an indicator of network congestion, as shown in Listing 12.6. To test this assumption, you can run the tracert command at different times of the day. If the tracert is successful during low network usage times, such as at night, it could be daytime congestion.
Listing 12.6 A Trace Route Packet Failure During the tracert
Note: route Interpretation
This section explores the results from the Windows tracert command, but the information provided is equally relevant to interpreting traceroute command results from UNIX, Linux, or Macintosh systems.
Generally, tracert enables you to identify the location of a problem in the connectivity between two devices. After you determine this location, you might need to use a utility such as ping to continue troubleshooting. In many cases, as in the examples provided in this chapter, the routers might be on a network such as the Internet and so not be within your control. In that case, there is little you can do except inform your ISP of the problem.
The traceroute Command
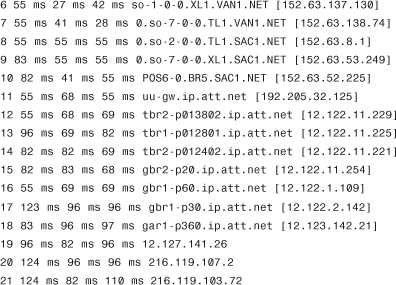
As discussed previously, the traceroute command performs the same function as tracert but can be used on UNIX, Linux, and Macintosh systems. Output from the traceroute command is almost identical to that produced by tracert on a Windows system, but for the purpose of comparison, you can see an example of the output from a traceroute command run on a Linux system in Listing 12.7.
Listing 12.7 Output from a traceroute Command on a Linux System

As mentioned earlier, from a troubleshooting perspective, the information provided by traceroute can be interpreted in the same way as with tracert.
The mtr Utility
The my traceroute (mtr) command is used on Linux/UNIX systems and essentially combines the functionality of ping with that of traceroute. After it is issued, the command provides details of the path between two hosts (similar to the traceroute command) and additional statistics for each node in the path based on samples taken over a time period (similar to the ping command).
In a Windows environment, a similar command is the pathping command. pathping has been available since Windows NT and is used with modern Windows versions including Windows 2003, Windows 2008, Windows XP, and Windows Vista.
Tip: mtr
Be prepared for the Network+ exam to identify the function of the mtr command. It has features of both the ping and traceroute commands.
The arp Utility
The Address Resolution Protocol (ARP) is the part of the TCP/IP suite and is responsible for resolving IP addresses to Media Access Control (MAC) addresses. Such a translation is necessary because even though systems use IP addresses to find each other, the low-level communication between devices occurs using the MAC address.
When two systems on an IP network want to communicate, they first establish each other’s location by using the IP address. Then, ARP requests are sent to ascertain the MAC address of the devices so that they can communicate with each other. In a sense, the IP address can be thought of as the name by which a system can be found in a phone book. The MAC address is the actual phone number used to establish communication.
The arp utility is used to review and modify a host’s ARP cache table, which contains mappings between TCP/IP hostnames and IP addresses. The ARP cache is discussed next.
The ARP Cache
ARP translations are typically stored locally on systems in the ARP cache. But how does the MAC address from another computer system end up in your system’s ARP cache? Each time you access another host, your system broadcasts to the ARP component of every host on the network. Because the IP address is embedded in the request, all systems other than the chosen one ignore the request, but the target system receives the request and replies accordingly. At this point both hosts record each other’s MAC address in their local ARP cache, and these entries remain in the cache until they are timed out, which depends on how often they are accessed. If the ARP entry is reused, the time period is extended further.
The ARP table can hold two types of entries: static and dynamic. Static entries do not expire and can be added to the ARP cache manually via the -s switch. Dynamic entries are added as the system accesses other hosts on the network.
Note: ARP and OSI
ARP operates at the network layer of the Open Systems Interconnect (OSI) model.
To view the ARP cache on a Windows computer, you use the arp -a command. Figure 12.5 shows an example of an ARP cache, the result of using arp -a.
![]()

Switches for arp
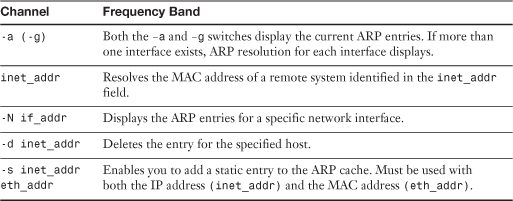
As with the other command-line utilities discussed in this chapter, arp has a few associated switches. Table 12.4 lists some of the switches commonly used with the arp command.
![]()
Table 12.4 Commonly Used arp Command Switches
The arp Command Printout
In practical terms, the information provided by the arp utility is of little use beyond the role of identifying the origin of a duplicate IP address. Even so, you still need to identify and interpret the output from an arp command for both the Network+ exam and the real world. With that in mind, Listing 12.8 shows the output from the arp -a command.
Listing 12.8 Output from an arp -a Command on a Windows XP Professional System
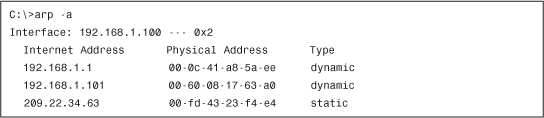
As you can see, there are three entries in the arp table of this system. For each entry, the IP address and the resolved hardware (MAC) address that corresponds to that address is shown. Two of the entries are dynamic, whereas the other is static. Generally, dynamic entries give you few problems because the automatic resolution process is almost always successful. Static entries, in other words those that have been entered manually, are another matter. If for some reason you decide to add static entries to the arp table, and you then subsequently have problems accessing that host, check the information for the arp entry to ensure that it is correct. Although the arp command will not enable you to add a static entry to the arp table that does not conform to the syntax for either the IP address or the MAC address, it doesn’t stop from you entering the wrong information for either of these fields.
The arp ping Utility
Earlier in this chapter we talked about the ping command and how it is used to test connectivity between devices on a network. Using the ping command is often an administrator’s first step to test connectivity between network devices. If the ping fails, it is assumed that the device you are pinging is offline, but this might not always be the case.
Most companies now use firewalls or other security measures that may block Internet Control Message Protocol (ICMP) requests. This means that a ping request will not work. Blocking ICMP is a security measure designed to prevent ICMP-type attacks. These attacks are outlined in Chapter 15, “Security Technologies and Malicious Software.”
If ICMP is blocked, there is still another option to test connectivity with a device on the network: the arp ping utility. As mentioned, the arp utility is used to resolve IP addresses to MAC addresses. The arp ping utility uses ARP rather than ICMP to test connectivity. However, the ARP protocol is not routable and the arp ping cannot be routed to work over separate networks. The arp ping works only on the local subnet.
Note: Why Block ICMP?
One type of attack is called an ICMP flood attack (also known as a ping flood). The attacker sends continuous ping packets to a server or network system, eventually tying up that system’s resources, making it unable to respond to requests from other systems.
Like a regular ping, an arp ping specifies an IP address; however, instead of returning regular ping results, the arp ping responds with the MAC address and name of the computer system. So, when a regular ping using ICMP fails to locate a system, the arp ping uses a different method to find the system. With arp ping, it is possible to ping a MAC address directly. From this, it is possible to determine if duplicate IP addresses are used and, as mentioned, determine if a system is responding.
arp ping is not built into Windows, but you can download a number of programs that enable you to ping using ARP. Linux, on the other hand, has an arp ping utility ready to use. Figure 12.6 shows the results of an arp ping from a shareware Windows utility.
![]()
Figure 12.6 A third-party arp ping utility.

The netstat Utility
The netstat utility displays packet statistics such as how many packets have been sent and received from and to the system and other related protocol information. It is also used to view both inbound and outbound TCP/IP network connections. This utility is popular with seasoned network administrators who need more information than what utilities such as ping can provide.
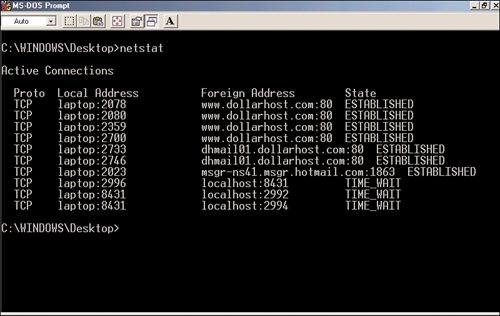
As with the other command-line utilities, you can use a number of available switches with the netstat command. Without using any of these switches, the output from a netstat command would resemble the output shown in Figure 12.7. Note that in its default usage, the netstat command shows outbound connections that have been established by TCP.
![]()
Figure 12.7 Output from a netstat command.
A handful of switches are used with the netstat command. Table 12.5 shows some of the key netstat switches used from a Windows system.
![]()
Table 12.5 netstat Switches on Windows
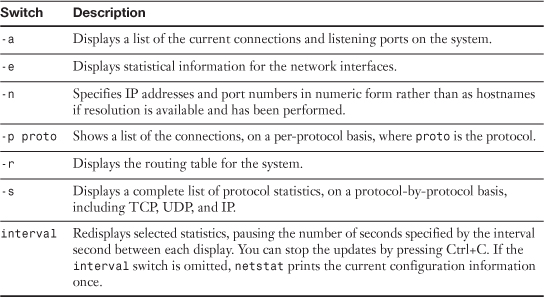
Of these switches, you’re likely to use one far more than any other: -r. The netstat -r command provides an easy way to see the routes configured on the system.
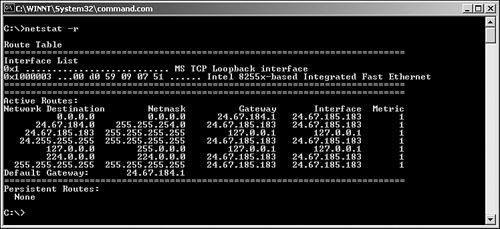
In time, you will be able to read a routing table and determine whether a routing problem exists on the network. Figure 12.8 shows the output from the netstat -r command.
![]()
Figure 12.8 Output from the netstat -r command.
Tip: Viewing Routing Information
In addition to using netstat –r to view routing information, you can use the route print command.
Tip: netstat -r Command
The netstat -r command is commonly used to view routing information. You are likely to be asked about it on the Network+ exam.
The netstat Command Printouts
The netstat command displays the protocol statistics and current TCP/IP connections. Used without any switches, the netstat command shows the active connections for all outbound TCP/IP connections. In addition, several switches are available that change the type of information displayed by netstat.
The following sections show the output from several netstat switches and identify and interpret the output from each command.
netstat -e
The netstat -e command shows the activity for the NIC and displays the number of packets that have been both sent and received. Listing 12.9 shows an example of the netstat -e command.
Listing 12.9 Example of the netstat -e Command

As you can see, the netstat -e command shows more than just the packets that have been sent and received. The following list briefly explains the information provided in the netstat -e command:
• Bytes—The number of bytes that have been sent or received by the NIC since the computer was turned on.
• Unicast packets—Packets sent and received directly to this interface.
• Nonunicast packets—Broadcast or multicast packets picked up by the NIC.
• Discards—The number of packets rejected by the NIC, perhaps because they were damaged.
• Errors—The errors that occurred during either the sending or receiving process. As you would expect, this column should be a low number. If it is not, it could indicate a problem with the NIC.
• Unknown protocols—The number of packets that were not recognizable by the system.
netstat -a
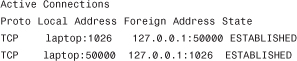
The netstat -a command displays statistics for both the TCP and User Datagram Protocol (UDP). Listing 12.10 shows an example of the netstat -a command.
Listing 12.10 Example of the netstat –a Command
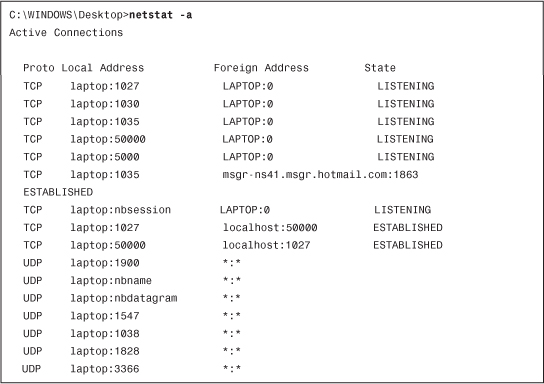
As you can see, the output includes four columns, which show the protocol, local address, foreign address, and state of the port. The TCP connections show the local and foreign destination address and the current state of the connection. UDP, however, is a little different; it does not list a state status because, as mentioned throughout this book, UDP is a connectionless protocol and does not establish connections. The following list briefly explains the information provided by the netstat -a command:
• Proto—The protocol used by the connection.
• Local address—The IP address of the local computer system and the port number it uses. If the entry in the local address field is an asterisk (*), it indicates that the port has not yet been established.
• Foreign address—The IP address of a remote computer system and the associated port. When a port has not been established, as with the UDP connections, *:* appears in the column.
• State—The current state of the TCP connection. Possible states include established, listening, closed, and waiting.
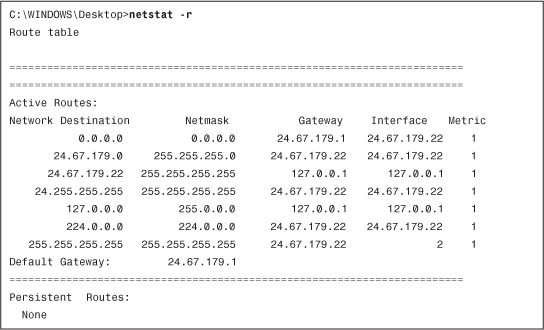
netstat -r
The netstat -r command is often used to view the routing table for a system. A system uses a routing table to determine routing information for TCP/IP traffic. Listing 12.11 shows an example of the netstat -r command from a Windows XP system.
Listing 12.11 Example of the netstat –r Command
netstat -s
The netstat -s command displays a number of statistics related to the TCP/IP protocol suite. Understanding the purpose of every field in the output is beyond the scope of the Network+ exam, but for your reference, Listing 12.12 shows sample output from the netstat -s command.
Listing 12.12 Example of the netstat –s Command


The nbtstat Utility
The NetBIOS statistic utility, nbtstat, can display protocol and statistical information for NetBIOS over TCP/IP (sometimes called NetBT) connections. Among other things, the nbtstat utility displays the NetBIOS names of systems that have been resolved.
Because nbtstat is used for the resolution of NetBIOS names, it’s available only on Windows systems. Neither NetWare nor Linux supports NetBIOS, or subsequently nbstat.
Table 12.6 shows some of the most frequently used switches for nbtstat.
![]()

When you look at the output from certain nbtstat commands, you might see reference to a scope ID. Do not confuse this with Dynamic Host Configuration Protocol (DHCP) scopes. In NetBIOS, you can create scopes to logically group systems together. It is this grouping that the scope ID information refers to.
Figure 12.9 shows the output from using nbtstat -r in Windows.
![]()
Figure 12.9 The output from the nbtstat -r command.

The nbtstat command is used on Windows platforms to show protocol and statistic information for NetBIOS over TCP/IP (NetBT) traffic. Because Microsoft now prefers the Domain Name System (DNS) over the Windows Internet Name Service (WINS) for name resolutions, the need to use nbtstat in troubleshooting scenarios is somewhat reduced. However, you should still be aware of the information that nbtstat provides. Listing 12.13 shows the result of one of the most common uses for nbtstat -r.
Listing 12.13 Output from the nbtstat -r Command

Note: Don’t Confuse Your Rs
Don’t get confused between nbtstat -r and netstat -r. nbtstat -r shows a list of the NetBIOS names that have been resolved via broadcasts or by some other name resolution method such as a WINS server. netstat -r displays the routing table for the system.
As you can see, the information provided by the nbtstat -r command is straightforward. The first part of the listing defines the number of resolutions that have been achieved via broadcast or through a name server. It also shows the number of times that this system has been registered via a broadcast or by a name server. Below that are listed the NetBIOS names of other computers that have been resolved by this system.
The ipconfig and ifconfig Utilities
When it comes to troubleshooting connectivity on a network, you won’t get too far without first determining the current TCP/IP configuration of the systems in question. Two utilities, ipconfig and ifconfig, can provide much of the information you require. The ipconfig utility shows the TCP/IP configuration of Windows systems, whereas ifconfig is used on Linux, UNIX, and Macintosh systems. In both cases, the same utility that you can use to obtain configuration information can also be used to perform certain configuration tasks. We look at the two utilities separately, beginning with ipconfig.
The ipconfig Utility
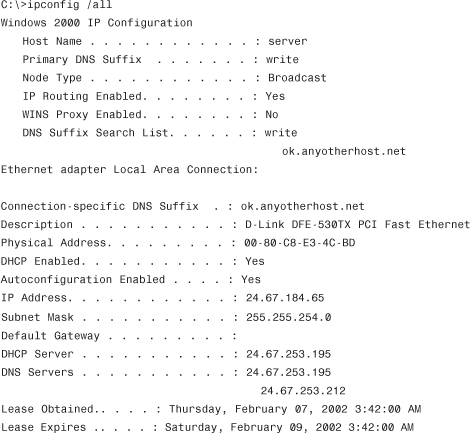
The ipconfig utility shows the TCP/IP configuration information for all network cards installed in a Windows system. Information provided includes the IP address, the subnet mask, and the current default gateway. To find additional information, the ipconfig command is often used with the /all switch, which then yields additional information on Windows Internet Name Service (WINS) servers, DNS configuration, the MAC address of the interface, and whether DHCP is enabled. If DHCP is enabled, information about the DHCP address lease is provided, including how much time is left on the lease.
Because it provides such a wealth of information, ipconfig is the utility of choice for network administrators looking for configuration information; therefore, you can expect it to be on the Network+ exam. Figure 12.10 shows the output from the ipconfig /all command.
![]()
Figure 12.10 Output from the ipconfig /all command.

Only a limited number of switches are available for the ipconfig command, but they are important. Table 12.7 lists some of the commonly used switches and what they do.
![]()
Table 12.7 Commonly Used ipconfig Switches

Note: Multiple NICs
Using the ipconfig command with the switches listed in Table 12.8 can affect all the interfaces on the system. This is fine if you have only one network interface, but on systems with more than one network interface, it’s possible to specify the interface rather than have the command applied to all interfaces.
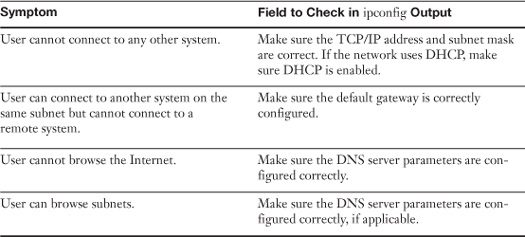
![]()
Table 12.8 Common Troubleshooting Symptoms That ipconfig Can Help Solve
The ipconfig Command Printouts
The ipconfig command is a technician’s best friend when it comes to viewing the TCP/IP configuration of a Windows system—at least most Windows-based systems. Used on its own, the ipconfig command shows basic information, such as the name of the network interface, the IP address, the subnet mask, and the default gateway. Combined with the /all switch, it shows a detailed set of information, as you see in Listing 12.14.
Listing 12.14 Example of the ipconfig /all Command

Tip: Check the ipconfig Information
When looking at ipconfig information, make sure that all information is present and correct. For example, a missing or incorrect default gateway parameter would limit communication to the local segment. Be sure to know this for the exam.
As you can imagine, you can use the output from an ipconfig /all command in a massive range of troubleshooting scenarios. Table 12.8 lists some of the most common troubleshooting symptoms, along with where to look for clues about solving them in the ipconfig /all output.
Tip: Identify the ipconfig Output
Be prepared to identify the output from an ipconfig command in relationship to a troubleshooting scenario for the Network+ exam.
As mentioned previously, ipconfig is a Windows-based utility. The equivalent on a Linux, UNIX, or Macintosh system is ifconfig. Because Linux relies more heavily on command-line utilities than Windows does, the Linux and UNIX version of ifconfig provides much more functionality than ipconfig. On a Linux or UNIX system you can get information about the usage of the ifconfig command by using ifconfig—help. Figure 12.11 shows the output from the basic ifconfig command run on a Linux system.
![]()
Figure 12.11 Output from an ifconfig command on a Linux system.

The ifconfig Command Printout
The basic information provided by ifconfig includes the hardware (MAC) address of the installed network adapters, and the IP address, subnet mask, and default gateway parameters. It also provides information on the number of packets sent and received by the interface. A high number in any of the error categories might indicate a problem with the network adapter. A high number of collisions might indicate a problem with the network itself. Listing 12.15 shows sample output from the ifconfig command.
Listing 12.15 Sample Output from an ifconfig Command

Although the ifconfig command displays the IP address, subnet mask, and default gateway information for both the installed network adapter and the local loopback adapter, it does not report DCHP lease information. Instead, you can use the pump -s command to view detailed information on the DHCP lease, including the assigned IP address, the address of the DHCP server, and the time remaining on the lease. The pump command can also be used to release and renew IP addresses assigned via DHCP and to view DNS server information.
The issues and suggested solutions described earlier in Table 12.8 for using ipconfig on Windows systems are equally applicable to basic troubleshooting with ifconfig on a Linux, UNIX, or Macintosh system. The only thing to remember is that you might need to run both ifconfig and pump -s to gain all the information required. Also, you might find that the additional statistical information provided by the ifconfig command points toward other sources of a problem, such as a faulty network adapter, or a high level of traffic on the network.
The nslookup and dig Utilities
The nslookup and dig utilities are TCP/IP diagnostic tools that can be used to troubleshoot DNS problems. They let you interact with a DNS server and locate records by performing manual DNS lookups. nslookup is used on Windows systems, whereas Linux, UNIX, and Macintosh systems support both dig and nslookup.
We can start by reviewing the nslookup utility.
The nslookup Utility
Using nslookup, you can run manual name resolution queries against DNS servers, get information about the DNS configuration of your system, or specify what kind of DNS record should be resolved.
If you provide a server name with nslookup, the command performs a DNS lookup and returns the IP address for the server name you entered. If you provide an IP address with nslookup, the command performs a reverse DNS lookup and provides you with the server name.
Figure 12.12 shows an example of nslookup usage and its output.
![]()
Figure 12.12 Output from the nslookup command.

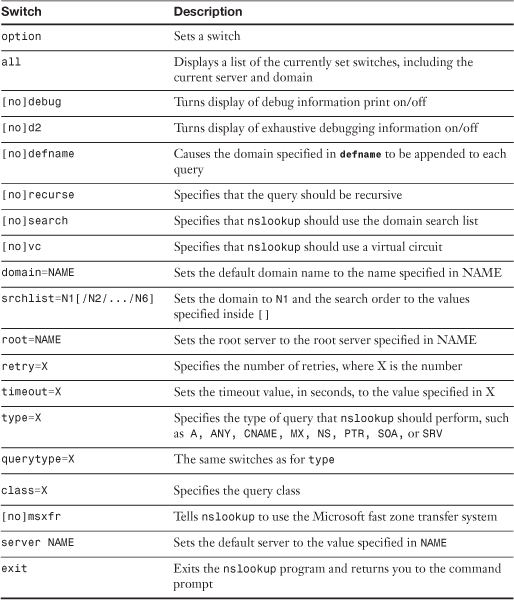
Entering nslookup by itself at the command prompt and pressing Enter starts the nslookup utility in interactive mode. Instead of being returned to the command prompt, you stay in the utility and receive a > prompt. At the > prompt, you can issue more commands or switches. A list of some of the nslookup switches is provided in Table 12.9. You can get a full list of the switches by typing ? at the > command prompt.
![]()
Table 12.9 nslookup Switches in Interactive Mode
The nslookup Command Printout
The most common use of nslookup is to perform a simple manual name resolution request against a DNS server. Listing 12.16 shows the output from this process on a Windows XP Vista system.
Listing 12.16 Output from a Manual Name Resolution Using Nslookup
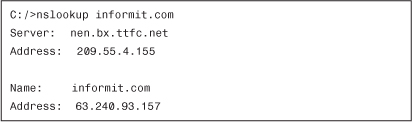
There are two sections to the information provided by nslookup. The first part provides the hostname and IP address of the DNS server that performed the resolution. The second part is the domain name that was resolved along with its corresponding IP address. From a troubleshooting perspective, you can use this information if you suspect that a record held on a DNS server is incorrect.
You can also verify that the DNS server is operating correctly by specifying the DNS server against which the resolution should be performed. For example, consider Listing 12.17, which shows a failed resolution run against a specified DNS server.
Listing 12.17 Sample Output from an nslookup Command

By adding the IP address of the DNS server to the nslookup command syntax, the resolution request is directed at that server. As you can see, the request timed out, which could indicate that the DNS server is down or inaccessible. The problem also might be with your ISP provider, router, or firewall configurations.
The dig Utility
As mentioned previously, on a Linux, UNIX, or Macintosh system, you can also use the dig command to perform manual DNS lookups. dig performs the same basic task as nslookup but with one major distinction—the dig command does not have an interactive mode and instead uses only command-line switches to customize results. Figure 12.13 shows an example of the output from a manual name resolution request with the dig command.
![]()
Figure 12.13 Output from dig command on a Linux system.

The dig Command Printout
The dig tool is generally considered a more powerful tool than nslookup, but in the course of a typical network administrator’s day, the minor limitations of nslookup are unlikely to be too much of a factor. Instead, dig is often simply the tool of choice for DNS information and troubleshooting on UNIX, Linux, or Macintosh systems. Like nslookup, dig can be used to perform simple name-resolution requests. Listing 12.18 shows the output from this process.
Listing 12.18 Output from a Name Resolution Request on the Domain examcram.com Performed with dig
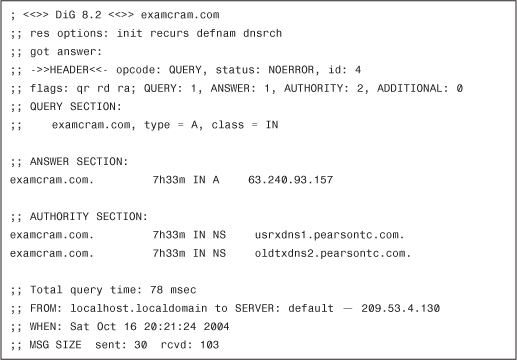
As you can see, dig provides a variety of information in the basic output, more so than nslookup. Administrators can gain information from three key areas of the output: the Answer Section, the Authority Section, and the last four lines of the output.
The Answer Section of the output provides the name of the domain or host being resolved, along with its IP address. The “A” in the results line indicates the record type being resolved. In this case it is an Alias record, the standard type of DNS record used to define IP address to hostname resolutions.
The Authority Section provides information on the authoritative DNS servers for the domain against which the resolution request was performed. This information can be useful in determining whether the correct DNS servers are considered authoritative for a domain.
The last four lines of the output, which don’t have a section name, show how long the name resolution request took to process, in this case 78 milliseconds, and the IP address of the DNS server that performed the resolution. It also shows the date and time of the request and the size of the packets sent and received.
The host Command
The host command is used on Linux/UNIX systems to perform a reverse or a forward lookup on an IP address. A reverse lookup involves looking up an IP address and resolving the hostname from that. Users running Microsoft Windows operating systems could use the nslookup command to perform a reverse lookup on an IP address, and Linux users can use the host command or nslookup.
Following is an example of the host command:
host 24.67.108.119
The command would return the hostname associated with the IP address 24.67.108.119. For example, the host command would return www.justmakeiteasy.com if that hostname were associated with 24.67.108.119.
The route Utility
The route utility is an often-used and handy tool. Using the route command, you can display and modify the routing table on your Windows or Linux systems. Figure 12.14 shows the output from a route print command on a Windows system.
![]()
Figure 12.14 The output from a route print command on a Windows system.

Note: Linux and the route Command
The discussion here focuses on the Windows route command, but other operating systems have equivalent commands. On a Linux system, for example, the command is also route, but the usage and switches are different.
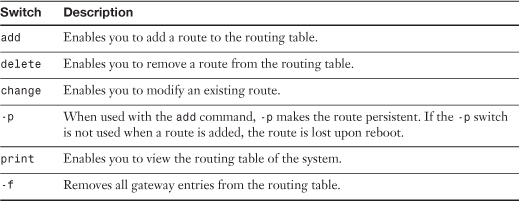
In addition to displaying the routing table, the Windows version of the route command has a number of other switches, detailed in Table 12.10. For complete information about all the switches available with the route command in Windows systems, use the command route at the command line. To see a list of the route command switches on a Linux system, use the command route --help.
![]()
Table 12.10 Switches for the route Command in Windows
Tip: Know the Command Output
On the Network+ exam, you will be asked to identify the output from a given command. It is also highly likely that you will be asked to interpret the information provided by a command.
Summary
Knowing how to troubleshoot network connectivity is an important part of a network administrator’s role. Fortunately, many utilities are designed to make the process of determining and correcting connectivity issues easier. The most common utilities for this type of troubleshooting include ping, ipconfig, ifconfig, tracert, traceroute, nbtstat, mtr Arp, arp ping, route, nslookup, host, and netstat.
In addition to knowing what utility to use and where, you need to interpret the output from those commands. This ability allows you to identify configuration problems with a system, the network to which it is attached, and even remote hosts on other networks.
The tools discussed in this chapter represent an important part of any network administrator’s toolbox. You will find that your knowledge of these utilities will prove to be useful for much more than just passing the CompTIA Network+ exam.
Exam Preparation Tasks: Review All the Key Topics
![]()
Review the most important topics in the chapter, noted with the Key Topics icon in the outer margin of the page. Table 12.11 lists a reference of these key topics and the page numbers on which each is found.
Table 12.11 Key Topics for Chapter 12


Define Key Terms
Define the following key terms from this chapter, and check your answers in the Glossary.
• ipconfig
• ifconfig
• ping
• arp ping
• arp
• nslookup
• host
• dig
• mtr
• route
• nbtstat
• netstat
Apply Your Knowledge
Exercise 12.1 Using the ipconfig command
By using the troubleshooting commands, you can reinforce the knowledge you need for the Network+ exam. In this exercise you use a Windows Server 2003 system to view the information provided by the ipconfig command. The exercise also works on other versions of Windows, including Windows 2000, Windows XP, and Windows Vista.
Estimated time: 10 minutes
1. Open a command prompt by selecting Start, Run and then typing cmd in the Run dialog box. Click OK, and a command prompt dialog box opens.
2. At the command prompt, type ipconfig. Note what information is displayed.
3. At the command prompt, type ipconfig /all. Note what additional information is displayed.
4. Determine whether you use DHCP by looking for the entry for the DHCP server. If you use DHCP, when was your address assigned? How much time is left on the lease?
5. If you use DHCP, attempt to renew the address lease by using the command ipconfig /renew. Note whether you can renew the lease.
6. To see the updated lease information, type ipconfig /all. The date and time for the DHCP lease information should now be updated. Leave the command prompt dialog open. You can use it in the next exercise.
Exercise 12.2 Using the ping utility
In this exercise, you follow the ping troubleshooting sequence. How far you go depends on your network connectivity. If you can connect to the Internet, you should complete all the steps in this exercise.
1. In the command prompt dialog, ping the local loopback of your system by using the command ping 127.0.0.1.
2. Determine your IP address by using the ipconfig command.
3. ping the IP address of your system by using the ping <IP ADDRESS> command.
4. Use the ipconfig command to determine the address of your default gateway and then ping it.
5. ping a remote host by IP address. Use the ipconfig /all to discover the IP address of your DNS server. If you can determine (from the address) that your DNS server is on a remote network, ping that.
6. If you have DNS capability (which is likely, if you connect to the Internet), you can also try to ping a remote host by its hostname (for example, ping comptia.org). Leave the command prompt dialog open. You can use it in the next exercise.
Exercise 12.3 Using the arp Command
In this exercise, you use the arp command to look at the local ARP cache and observe the process of the ARP cache being updated. As in the previous exercise, being connected to a network makes a big difference in the amount and variety of information displayed in this exercise.
Estimated time: 10 minutes
1. In the command prompt dialog, view the ARP cache on your local system by using the arp -a command. Note how many devices are listed in the ARP cache.
2. Determine the IP address of your default gateway by using the ipconfig command. Ping the IP address of your default gateway system. Does the first ping take longer than the subsequent pings? If so, why do you think it does? Immediately run the ping utility again. Is the first ping quicker than the first ping of the first attempt?
3. Using the arp -a command again, view the ARP cache. Note whether any entries have been added. Write down the IP address and MAC address of the default gateway; you’ll use them later in the exercise.
4. By using the ipconfig command, determine the IP address of your default gateway and then ping the address.
5. Immediately view the ARP cache again. Note whether any new entries have been added.
6. Wait about 3 minutes and then view the ARP cache again. Is the entry for the default gateway still there?
7. Using the information you wrote down in step 3, add a static entry for your default gateway by using the following command:
![]()
For help with the syntax, type arp at the command line to display the help screen.
8. After you have successfully added the new entry, view the ARP cache. The static entry should now be listed.
9. Delete the static entry you just created by using the following command:
arp -d <IP ADDRESS OF DEFAULT GATEWAY>
10. View the ARP cache one last time to ensure that the static entry has been removed. Leave the command prompt dialog open. You can use it in the next exercise.
Exercise 12.4 Using the tracert utility
In this exercise, you use the tracert command to look at how a trace route works.
Estimated time: 10 minutes
1. In the command prompt dialog, ascertain the IP address of your DNS server by using the ipconfig /all command.
2. Trace the route to your DNS server by using the command tracert <ADDRESS OF DNS SERVER>. Note how many hops you are from your DNS server and how long the trip took.
3. Trace the route to the CompTIA web server by using the command tracert www.comptia.org. Note how many hops you are away from the web server and how long the trip took.
4. Use the same command as in step 3, but add the -d switch to the command line, as follows: tracert www.comptia.org.com -d. Note what changes in the output from the command.
Review Questions
You can find answers to the review questions in Appendix A, “Answers to Review Questions.”
1. Which of the following TCP/IP utilities can be used to view routing tables on a Windows system? (Choose the two best answers.)
a. netstat
b. nbtstat
c. route
e. tracert
2. Which of the following commands can be used to purge and reload the remote cache name table?
a. nbtstat -R
b. nbtstat -n
c. nbtstat -r
d. nbtstat -S
3. You are trying to use the tracert command to determine the route a packet takes. You receive five successful hops, followed by several asterisks (*). What is the likely cause of the problem?
a. The destination host is not online.
b. The router at steps 4 or 5 has a problem.
c. The router at steps 5 or 6 has a problem.
d. The router at step 5 is not powered on.
4. Which of the following commands can be used to display the protocol statistics on a per-protocol basis?
a. netstat -S
b. netstat -r
c. netstat -R
d. netstat -s
e. netstat -a
5. The following is output from which of the following commands?
a. nbtstat
b. netstat
c. arp
d. ipconfig
6. You are trying to ping a remote host with the command ping desertforme.co.uk. The ping returns an Unknown Host error message. What is the cause of the problem?
a. The remote host is not responding.
b. The name of the destination computer cannot be resolved.
c. The route to the destination computer is incorrect.
d. WINS is not configured.
7. From your Linux system, you try unsuccessfully to ping a remote host on another network. What utility might you use to determine where the packet was dropped?
a. arp
b. tracert
d. nbtstat
8. You troubleshoot a client connectivity problem in which a system cannot log on to the network. The client system uses the Linux operating system. Which of the following commands would you use to view the current TCP/IP configuration?
a. ipconfig
b. ipconfig /all
c. ifconfig
d. config
9. Which of the following switches is used on a Windows Server system to perform a continuous ping?
a. -c
b. -d
c. -t
d. -ct
10. Which of the following represents a reason to use arp ping over ping?
a. Firewalls or other security measures may block Internet Control Message Protocol (ICMP) requests.
b. ping cannot travel as far.
c. arp ping enables for per protocol statistics.
d. ping rejects CNAME references.
11. You troubleshoot a connectivity problem in which the user cannot connect to any systems on remote networks. Connectivity to systems on the local network appears to work correctly. Based on the following output from an ipconfig /all command, what is the most likely cause of the problem?
a. The DNS server information is missing.
b. The node type is set to broadcast.
c. The default gateway parameter is missing.
d. DHCP is enabled.
12. Which utility is used to view NetBIOS over TCP/IP statistics?
a. ping -t
b. netstat
c. nbtstat
d. arp
e. tracert
13. Consider the following output from the netstat -e command. What might you determine from this information?

a. The NIC in this system is faulty.
b. This is normal.
c. Errors are generated on the network but not by this system.
d. This system is generating errors.
14. Which utility would produce the following output?
b. netstat -R
c. arp -s
d. tracert
15. Examine the following output from the tracert command. What, if anything, is wrong with this trace route?
a. The IP address is invalid.
b. There is nothing wrong with this output.
c. The trace was not completed.
d. The maximum hop count has restricted the number of hops reported.
16. Examine the following output from the ping command. Based on this information, what are you likely to check first in your troubleshooting process? (Choose the two best answers.)

a. That the remote host is online
b. The default gateway setting of the system
c. The routing table on the system
d. The patch cable for the system
17. Which of the following tools can you use to perform manual DNS lookups on a Linux system? (Choose two.)
a. dig
b. nslookup
c. tracert
d. dnslookup
18. Which of the following commands would generate a Request Timed Out error message?
a. ping
b. netstat
c. ipconfig
d. nbtstat
19. Which of the following commands would you use to add a static entry to the ARP table of a Windows system?
a. arp -a IP ADDRESS> <MAC ADDRESS
b. arp -s MAC ADDRESS> <IP ADDRESS
c. arp -s IP ADDRESS> <MAC ADDRESS
d. arp -i IP ADDRESS> <MAC ADDRESS
20. Which command created the following output?

a. nbtstat
b. ipconfig
c. tracert
d. nslookup