Chapter 13. New and Notable
In this chapter, you’ll learn about a few changes that have happened since we started writing this book, and how to keep using your old Palm OS applications on your new Palm Pre:
→ Palm Pre Plus
→ Palm Pixi and Palm Pixi Plus
→ The Classic application
The thing about writing a technical book is sometimes the device manufacturer releases updates to the device software that add features and change some of the screens. Sometimes they will release a new version of the device. Both happened during the writing of My Palm Pre as well as Palm releasing a new webOS Smartphone, the Pixi. As much as I have strived to keep everything in this book as up to date as I can possibly make it, there were a few items, like the Pixi, that didn’t just slot into the other chapters in this book. In this chapter I briefly touch on some of them, including the Palm Pixi, the Palm Pre Plus, and I show you a Palm OS emulator that enables you to run old Palm OS applications that you might find handy.
The Palm Pre Plus
The Palm Pre Plus was released in February 2010 and runs on the Verizon Wireless network, but will likely be released in GSM form so that other carriers inside and outside the US can support it. The Palm Pre Plus is the same in every way as the original Palm Pre, with the following exceptions:
• The Palm Pre Plus has 16GB of memory as opposed to the Palm Pre’s 8GB.
• The Palm Pre Plus does not have a Center Button. The functionality of the Center Button has been replaced with the swipe up in the gesture area.
• The Palm Pre Plus can do video recording.
• The Palm Pre Plus ships with the Touchstone battery cover. The Touchstone is a wireless charging system consisting of a Touchstone base and a special battery cover for the Palm Pre and Palm Pre Plus. The inclusion of the Touchstone cover makes purchasing the Touchstone charging system a little cheaper.

The Palm Pixi and Pixi Plus
Palm released the Palm Pixi in late 2009 as their second Smartphone running webOS. The Palm Pixi is a thinner phone than the Palm Pre and it does not have a slide out keyboard. Its keyboard is part of the main body of the phone. The Palm Pixi Plus was released in February 2010 along with the Palm Pre Plus on the Verizon Wireless network. Since the Palm Pixi runs webOS, you can use this book to learn everything there is to know about your Palm Pixi.
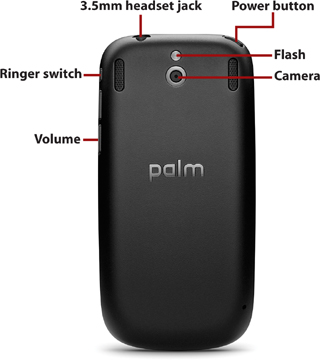
Here is a quick look at the Palm Pixi and Pixi Plus.
On the front you can see:

The Palm OS Emulator
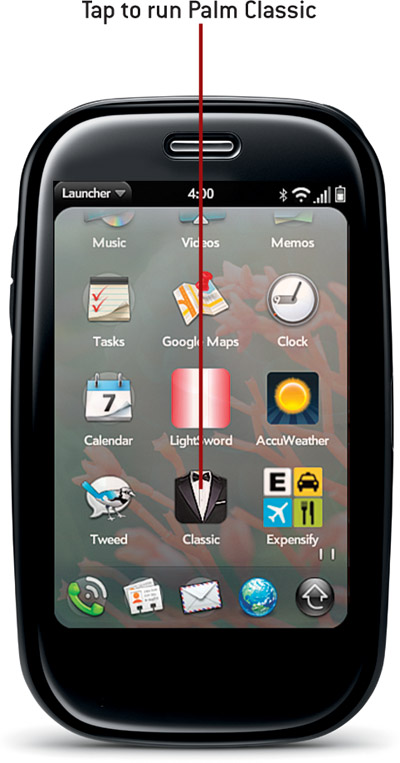
Before Palm released their new lineup of Smartphones running webOS, Palm Smartphones and PDAs used to run Palm OS. Applications written for Palm OS cannot run on webOS because the operating systems are incompatible. If you want to upgrade your old Palm PDA or Smartphone to a Palm Pre or Pixi, but need to continue to use some old Palm OS applications, the solution might be to use a Palm OS emulator. There is one called Classic by a company called Motion Apps.
You can download Classic trial from the App Catalog for free. It will run normally for seven days before requiring you to purchase it for US $30.
Using Classic
When you run Classic, it loads up and makes your Palm Pre look like an older Palm OS PDA or Smartphone. Navigation is handled using the old-style 5-way navigation pad, but in this case it is represented graphically on the screen. All of the familiar Palm OS buttons are there to make you feel quite at home.
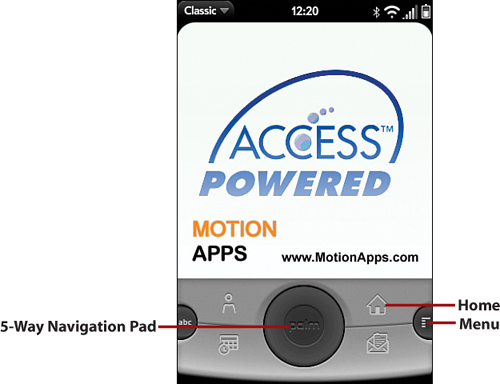
While original Palm OS never supported touch screens, Classic lets you touch the screen as you do with other Palm Pre applications. It will take you a while to get used to this so be patient. Tapping on the 5-way navigation pad may be the best way to move around the screens since the area to tap is wider than many of the scroll bars in Palm OS.
Installing Your Palm Applications
If you need to install your old Palm OS applications, Classic supports HotSync which allows you to install those applications and synchronize data to and from them using the old Conduits. If you have a Mac running OSX, you cannot use HotSync but you can copy over your old applications.
Step-by-Step: Using HotSync
HotSync for Classic cannot use the USB cable to synchronize with your PC, but it can synchronize over Wi-Fi. Here is how to set up and use HotSync.
- First we need to find our your PC’s IP address. From the Start button, choose All Programs, Accessories, Command Prompt.

- When the Command Prompt opens, type IPCONFIG and hit enter. Your IP address will appear on a line labeled IP Address or IPv4 Address.

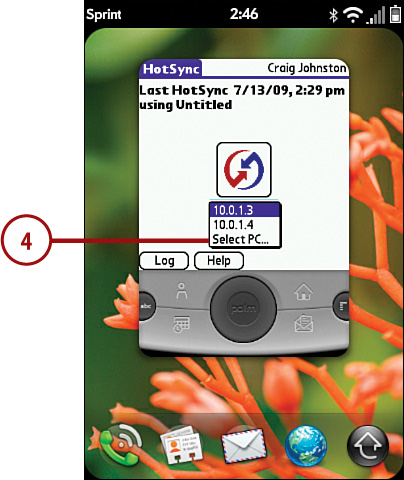
- After you know your PC’s IP address, run Classic and tap HotSync.

- Don’t tap the HotSync icon in the middle of the screen just yet. Tap under it where you see a drop-down list and tap Select PC.
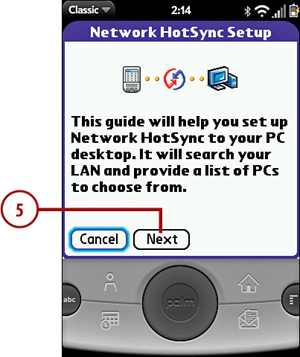
- Tap Next to allow HotSync to search for your PC. It won’t find it but you need to let it search and time out. When the search times out, tap Other. When you tap Other, you will be able to enter the IP address of your PC.
- Enter the IP address and tap Next.

- On the next screen tap Done to return to the main HotSync screen.

- Tap the HotSync button and Classic should synchronize with your PC.

Manual Application Installation
If you have a Mac running OSX or you don’t feel like setting up HotSync, you can install your Palm OS applications manually by dragging them to a specific folder on the Palm Pre. Here is how you do that.
- Attach your Palm Pre to your desktop computer using the supplied USB cable. Tap USB Drive on the Pre when prompted.

- On your desktop computer, browse to the Palm Pre’s drive, ClassicApps, Install.

- Drag your old Palm OS applications to this folder. When you start Classic the next time, it will automatically install those applications.