
The term Web Parts can actually mean two different things: Web Parts as a technology and Web Parts as the controls that reside on an ASP.NET Web Page.
Web Parts technology consists of a series of ASP.NET controls that make it easy to develop portal-like Web pages that can be customized and arranged within a browser while viewing a Web page. Web Parts technology also supports ASP.NET personalization, a feature that allows individual users of a site to customize the appearance and layout of a page and to have that customization applied automatically each time they visit the site.
Note
ASP.NET personalization features rely on a database to store data on individual users. Before you go through the examples in this chapter, you should download and install Visual Web Developer Express Edition from Microsoft by browsing to http://www.microsoft.com/express/vwd/Default.aspx.
When you install Visual Web Developer Express Edition, choose the option to install SQL Server 2005 Express Edition.
Web Parts controls are the controls that are inserted onto a Web Parts page. They can be either custom controls that you or other developers create or the Web Parts controls that exist within the Expression Web 2 Toolbox.
Web Parts controls are added to a page inside an area called a Web Parts zone. When you design your page, you first add one or more WebPartZone controls to the page, and then you add other controls to the Web Parts zone. Depending on the configuration of the page, users can drag and drop Web Parts between Web Parts zones.
Note
In this chapter, we won’t go into detail on every feature concerning Web Parts, but we will cover enough of the features so that you’ll feel comfortable experimenting with them and using them in your own Web site.
As mentioned previously, you can create your own custom Web Parts for use in your pages. The most common method of creating a custom Web Parts control is to create a special kind of ASP.NET page called a user control.
Note
While all the Web Parts controls used in this chapter are made up of user controls and existing ASP.NET controls, a developer can also create custom Web Parts controls from scratch. Doing so is not trivial and is far outside the scope of this book.
If you’re interested in more advanced material on the topic of custom Web Parts controls, Microsoft has some great documentation available at www.asp.net/QuickStart/aspnet/doc/webparts/custom.aspx.
Let’s create a user control now. We can use it in a Web Parts page later in this chapter.
As mentioned previously, an ASP.NET user control is a special kind of ASP.NET page. You can think of a user control as a sort of “page within a page.”
When you are designing a user control, you work with it just as you work with a regular ASP.NET page. You can add controls to it, use Expression Web 2 behaviors, create layers, and so on. However, the user control cannot be browsed directly. Instead, you must place it onto an ASP.NET page and then browse to the ASP.NET page to use the user control.
Note
ASP.NET user controls can also contain ASP.NET code. When a user control is placed on an ASP.NET Web page, the code it contains is also available.
As you might have surmised, ASP.NET user controls are extremely useful for creating reusable components that can be inserted onto an ASP.NET Web page. You’ll have the chance to create a couple of user controls as you progress through this chapter. As a matter of fact, let’s go ahead and create a simple user control now.
Note
Now is a good time to create a new Web site that you can use to work through the samples in this chapter. If you don’t want to create your own site, you can find all the finished files for this chapter’s Web site in the ExamplesChapter33FilesWebsite folder on the CD that accompanies this book.
The sample Web site was developed in C#, but code samples in this chapter will be provided in both C# and VB.
To create an ASP.NET user control, follow these steps:
Select File, New, Page.
Select ASP.NET from the list of page types on the left.
Select Web User Control from the list of ASP.NET page types.
Select the language of your choice and click OK to create the user control.
Note
Even though Expression Web provides VJ# as a language choice, VJ# doesn’t fully support the architecture of ASP.NET, so I won’t be including code samples in VJ#.
After you’ve created your user control, drag a few controls onto it:
Drag an ASP.NET Label control onto the user control.
→
For more information on adding ASP.NET controls to a page, see Chapter 28, “Using Standard ASP.NET Controls,” p. 491.
→
For more information on using ASP.NET controls in the Toolbox, see Chapter 28, “Using Standard ASP.NET Controls,” p. 491.
Position the insertion point just to the right of the
Labelcontrol and press Enter.Drag an ASP.NET Textbox control onto the user control.
Position the insertion point just to the right of the
Textboxcontrol and press the Spacebar.Drag an ASP.NET Button control onto the user control.
Switch to Code View and change the first line of code in the control from this:
<%@ Control Language="C#" ClassName="WebUserControl1" %>
to this:
<%@ Control Language="C#" ClassName="PropControl" %>
Save the page.
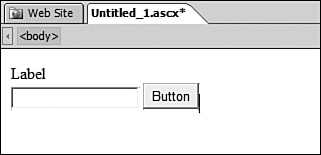
Your user control should now look like Figure 33.1. Save the user control as prop.ascx. Later in the chapter, we’ll use this user control to create a Web Parts control.
ASP.NET comes with several Web Parts controls that are used to create Web Parts pages. These controls are located in the ASP.NET section of the Expression Web Toolbox.
We don’t have room to go into the details of every Web Parts control in the Toolbox, but we will discuss the following controls as we progress through this chapter:
WebPartManager—. TheWebPartManageris a nonvisual control that manages all the Web Parts controls and zones on a page. Any page that uses Web Parts controls must have exactly oneWebPartManageron the page.WebPartZone—. AWebPartZoneis a container for Web Parts controls. EachWebPartZonecontrol is identified with a unique ID. Depending on the current configuration of theWebPartManagercontrol, users may be able to drag and drop Web Parts between zones in the browser. Users may also be able to add new Web Parts controls to the zone of their choice.CatalogZone—. TheCatalogZoneis a special Web Parts zone that allows users to browse available Web Parts controls and add them to the Web Parts zone of their choice.EditorZone—. TheEditorZonecontrol adds editing functionality to a Web Parts page. It is used in conjunction with an editing control such as theAppearanceEditorPartcontrol.AppearanceEditorPart—. TheAppearanceEditorPartprovides a user interface with which a user can modify the appearance of Web Parts controls on a page.
You’ve now got enough information regarding Web Parts controls to create a Web Parts page. We’ll start simple and then build on the page as we progress through the rest of the chapter.
Create a new ASP.NET page.
Drag a
WebPartManagercontrol onto the page.Tip
Because the
WebPartManageris a nonvisual control, you might be prompted to enable the Visual Aid so you can see theWebPartManagercontrol. You should enable the Visual Aid because it will give you a better understanding of the makeup of a Web Parts page. However, not enabling the Visual Aid will not prevent you from completing the example in this chapter.Place the insertion point to the right of the
WebPartManagercontrol and press Enter to insert a new line.Insert a new table. Set the number of rows to
1, the number of columns to2, and the table width to500pixels. Leave all other settings at the default values.Insert one
WebPartZonecontrol in each table cell.Select the first
WebPartZonecontrol and click the arrow button to display the Common WebPartZone Tasks pop-up as shown in Figure 33.2.Click the AutoFormat link, choose the Professional scheme, and click OK.
Select the second
WebPartZonecontrol and click the arrow button to display the Common WebPartZone Tasks pop-up.Click the AutoFormat link, choose the Colorful scheme, and click OK.
Drag a
Calendarcontrol from the Standard ASP.NET Controls section of the Toolbox and drop it into the firstWebPartZonecontrol.Drag a
Logincontrol from the Login ASP.NET Controls section of the Toolbox and drop it into the secondWebPartZonecontrol.Save the page as
default.aspx.
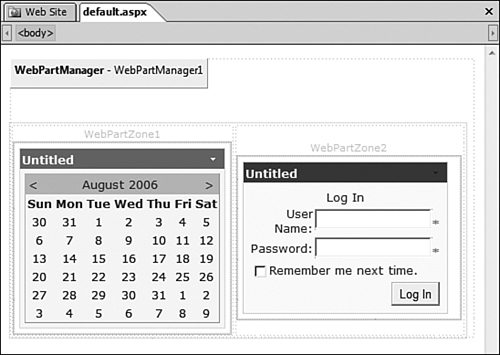
Your page should look like Figure 33.3. You can’t tell from the black-and-white image in Figure 33.3, but the controls you dropped in each WebPartZone control take on the formatting of that zone.

Go ahead and browse the page. Each Web Parts control on the page has a small downward-pointing arrow button in the upper-right corner. If you click that button, a menu is displayed that allows you to either minimize or close the Web Parts control, as shown in Figure 33.4. As we add additional features to this Web Parts page, you’ll see new items appear on this menu.

Note

If you get an error saying you must add a WebPartManager to enable Web Parts, see “WebPartManager Error When Browsing Web Parts Page” in the “Troubleshooting” section of this chapter.
Note
If you see a “SQLExpress database file auto-creation error” when browsing the Web Parts page, see “Error Connecting to SQL Server” in the “Troubleshooting” section of this chapter.
Note
When you preview your Web Parts page, ASP.NET will automatically create a SQL Server 2005 Express Edition database and add it to the App_Data folder in your Web site. ASP.NET will use this database to store personalization information for the Web Parts page.
Note
If you get an error connecting to SQL Server at this point, see “Error Connecting to SQL Server” in the “Troubleshooting” section of this chapter.
If you click Minimize on the menu, the Web Parts control collapses so that only the title is displayed and the Minimize menu item changes to Restore. If you click Close on the menu, the Web Parts control is removed from the page.
Caution
Make sure you don’t select Close from the menu of either Web Part at this point. If you close a Web Part, it will remove it from the page and there is no easy way to get it back until we add that functionality later.
At this stage, you can’t customize the page or move Web Parts controls around. To do that, we’ll need to change the display mode of the page.
A Web Parts page can be displayed in one of five different display modes:
BrowseDisplayMode—. This is the default view of the page. It allows minimal configuration of the page. The page you previewed earlier was inBrowseDisplayMode.CatalogDisplayMode—. In this mode, the Web Parts Catalog is displayed so that users can add or remove Web Parts controls from the page. Web Parts controls can also be dragged and dropped in this mode.ConnectDisplayMode—. In this mode, the Web Parts page displays user interface elements that aid in connecting Web Parts together. (For example, you might have a Zip code lookup Web Part that communicates with a weather map Web Part.)DesignDisplayMode—. In this mode, the Web Parts zones are visible and users can drag and drop Web Parts controls between zones and within zones.EditDisplayMode—. In this mode, Web Parts controls can be edited. To allow editing of a Web Parts control, the page must contain anEditorZonecontrol and at least one editor control such as theAppearanceEditorPartmentioned earlier.
To change the display mode of a Web Parts page, set the DisplayMode property of the WebPartsManager control. Unlike many of the other properties we’ve set on ASP.NET controls so far in this book, you cannot set the DisplayMode property declaratively in the HTML code for the control. Instead, you must do it using server-side ASP.NET code.
It’s common practice to provide users with a user interface for changing the display mode of a Web Parts page. Because an interface that changes display modes is something you might want to use in all your Web Parts pages, creating the interface as a user control is the perfect choice.
Let’s create a simple user control that can be used on any Web Parts page you create to change the display mode.
Create a new user control.
Add a
DropDownList ASP.NETcontrol to the user control and change the ID property toddlDisplayMode.In the Common DropDownList Tasks pop-up, check the Enable AutoPostBack checkbox.
In the Common DropDownList Tasks pop-up, click the Edit Items link.
Click Add in the ListItem Collection Editor dialog.
Change the
Textproperty toBrowse, as shown in Figure 33.5.Click Add to add a new ListItem.
Change the
Textproperty toEdit.Add two more ListItems. Change the text to
Designfor the first andCatalogfor the second.Click OK in the ListItem Collection Editor dialog.
Save the user control as
displaymodeui.ascx.

At this point, the user control has no functionality. Let’s add some code to change the display mode of the Web Parts page to which the user control will be added.
Switch to Code View in the user control and add the following code after the first line of code that starts with <%@ Control. If you are using C#, use the code in Listing 33.1; if you are using VB, use the code in Listing 33.2.
Example 33.1. C# Code for User Control
<script runat="server">
  // create a local WebPartManager
  WebPartManager _mgr;

  void ddlDisplayMode_SelectedIndexChanged(object sender, EventArgs e)
  {
    WebPartDisplayMode mode =
_mgr.SupportedDisplayModes[ddlDisplayMode.SelectedValue];
    _mgr.DisplayMode = mode;
  }

    void Page_Load(object sender, EventArgs e)
    {
        _mgr = WebPartManager.GetCurrentWebPartManager(this.Page);

    }
</script>
Example 33.2. VB Code for User Control
<script runat="server">
  'create a local WebPartManager
  Dim _mgr As WebPartManager

  Sub ddlDisplayMode_SelectedIndexChanged(ByVal sender As object, ByVal e As
EventArgs)
    Dim mode As WebPartDisplayMode =
_mgr.SupportedDisplayModes(ddlDisplayMode.SelectedValue)
    _mgr.DisplayMode = mode
  End Sub

    Sub Page_Load(ByVal sender As object, ByVal e As EventArgs)
        _mgr = WebPartManager.GetCurrentWebPartManager(Me.Page)
  End Sub

</script>
This code is pretty simple. It uses the SupportedDisplayModes method of the WebPartDisplayMode to determine whether the selected mode is supported. It then changes the DisplayMode property of the WebPartManager to the mode you selected.
The final code change in the user control is to hook up the server-side code you just added to the DropDownList control. Locate the code in the user control for the DropDownList control and change it from this:
<asp:DropDownList runat="server" id="ddlDisplayMode" AutoPostBack="True">
to this:
<asp:DropDownList OnSelectedIndexChanged="ddlDisplayMode_SelectedIndexChanged"
runat="server" id="ddlDisplayMode" AutoPostBack="True">
Note
You might have noticed that the server-side code includes code that runs when the page runs, but you are not required to hook up that code so that it runs when the user control is loaded. That’s because ASP.NET handles that automatically for you.
Go ahead and save the user control. The user control is now complete and is ready to be added to the Web Parts page.
Open the Web Parts page (
default.aspx) and switch to Design View if it’s not already visible.From the Folder List in Expression Web, drag the
displaymodeui.ascxuser control and drop it right under theWebPartManagercontrol indefault.aspx.Save
default.aspx.
Tip
By dragging and dropping the user control onto the page, you have added the functionality provided by the user control to the page. In this case, you’ve just added a user interface for switching the display mode of the Web Parts page. To add the same user interface to any other Web Parts page, simply drop the same user control onto the Web Parts page.
Browse default.aspx and you’ll notice that the drop-down from the user control appears above the Web Parts zones, as shown in Figure 33.6.

If you select Design from the drop-down, you’ll notice that the Web Parts zones become visible and you can drag and drop controls from one Web Parts zone to the other, as shown in Figure 33.7.

Note
At this point, if you select anything other than Browse or Design, you will see an error in the browser. We will add additional functionality later in this chapter.
Note
If you see an error that says “Value cannot be null” when browsing the page, see “Null Value Message When Browsing Web Parts Page” in the “Troubleshooting” section of this chapter.
Note
You might not know it, but ASP.NET personalization features are kicking in at this point. If you move a control from one Web Parts zone to another and then close your browser, that move will still be in effect the next time you browse the page.
Because you haven’t actually logged in to this Web site, ASP.NET personalization features are using client cookies to identify you. If you move to another computer and browse the same page, changes you made on the first computer will no longer apply.
The Web Parts page you’ve created to this point contains only two Web Parts controls. To fully utilize the power of Web Parts, let’s add the capability to add new Web Parts controls to the page.
The ability to add Web Parts controls to a page is provided by the CatalogZone and DeclarativeCatalogPart Web Parts controls.
Open
default.aspxin Expression Web.Create a new table column to the right of the existing table columns.
→
For more information on adding columns to tables, see Chapter 9, “Using Tables and Layout Tables,” p. 145.
Drag a
CatalogZonecontrol from the Toolbox to the new table cell.Click the AutoFormat link in the Common Catalog Zone Tasks pop-up and apply a formatting scheme of your choice.
Drag a
DeclarativeCatalogPartcontrol from the Toolbox and drop it inside theCatalogZonecontrol you added in step 3.Click the Edit Templates link in the Common DeclarativeCatalogPart Tasks pop-up.
Drag the
prop.ascxuser control you created earlier into theDeclarativeCatalogPartcontrol, as shown in Figure 33.8.Save the page.
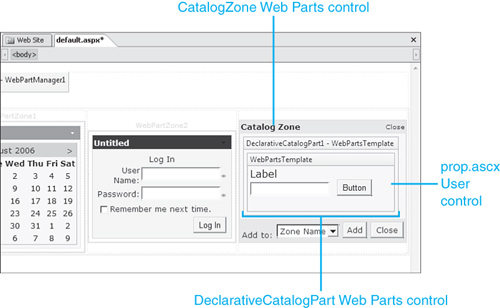
Browse the default.aspx page now to test the new Web Parts Catalog.
Note
If you see an error saying that WebUserControl1 is defined in multiple assemblies, see “Error When Browsing Page with User Controls” in the “Troubleshooting” section of this chapter.
When the page is displayed, select Catalog from the drop-down and you will see the Web Parts Catalog, inside of which is a checkbox labeled Untitled. It would be nice to provide a more descriptive name.
Open
default.aspxin Expression Web and locate the code for theprop.ascxuser control.Change the code for the user control from this:
<uc2:prop id="prop1" runat="server" />
to this:
<uc2:prop title="Prop Control" id="prop1" runat="server" />
Save
default.aspx.
Now browse default.aspx and switch to Catalog mode. The control now shows a descriptive name. Check the check box for the Prop Control control, select a Web Parts zone, and click Add to add the control, as shown in Figure 33.9.

Tip
You can add title attributes to the Calendar and Login controls you added earlier if you want to give them more descriptive names. If you do, you’ll notice that neither the Calendar nor the Login control will recognize title as a valid attribute and Expression Web will identify the code as invalid. You can safely ignore Expression Web’s complaint about the attribute.
As you progressed through this chapter, you created a powerful portal-like page that contains robust user interface features, personalization features, and customization features, and you did all of it with only a small amount of code. You also learned how to create user controls so you can build your own Web Parts controls for use in Web Parts pages.
The best way to get comfortable with using Web Parts is to experiment with them. This chapter should have provided a solid foundation for doing just that.
I’ve added a WebPartManager Web Parts control and some Web Parts zones to my page. However, when I browse the page, I see an error telling me that I need to add a WebPartManager control to enable Web Parts.
The WebPartManager must be added before any other Web Parts controls. If you add the WebPartManager after other Web Parts controls, you can drag and drop the WebPartManager to the top of the page to get rid of this error.
Note that you may need to enable the ASP.NET nonvisual controls Visual Aid to accomplish this.
When I browse my Web Parts page, it seems to hang for a long time and then I see an error saying it couldn’t connect to SQL Server. I haven’t added anything that should be connecting to a database. What’s going on?
ASP.NET Web Parts pages use SQL Server 2005 Express Edition by default to store data about how a page is laid out for individual users. If you haven’t installed SQL Server 2005 Express Edition, you’ll see an error indicating that ASP.NET could not connect to SQL Server.
You can get SQL Server 2005 Express Edition free from Microsoft by browsing to http://www.microsoft.com/express/sql/Default.aspx or by installing it along with Visual Web Developer Express Edition as previously mentioned in this chapter.
I am browsing my Web Parts page after adding the displaymodeui.ascx user control. When it loads in the browser, all I see is an error that says “Value cannot be null.” I have no idea what that means.
The code that we added to the displaymodeui.ascx user control uses a value in a DropDownList control to set the display mode. ASP.NET knows which display modes are valid, and if you attempt to set one that isn’t valid, you’ll see this message.
There could be a couple of reasons for this. If you are selecting a mode that should be valid, it’s likely that you simply misspelled one of the entries in the DropDownList control. Check the items in the DropDownList carefully and make sure they are spelled correctly.
Another cause of this problem is selecting a mode that is not currently valid. For example, if you were to choose Edit at this point, it would display the error you are seeing because Edit is not a valid mode until the page has been configured to allow for the editing of Web Parts controls.
In a real application, the code in the user control would intercept this error and perhaps just display a neatly formatted informational message to the user. However, that kind of complexity is outside the scope of this book.
I have added the prop.ascx user control to the Catalog. Now when I browse the page, I get an error that says that WebUserControl1 exists in multiple places.
ASP.NET creates a representation of every user control in memory and uses these “duplicates” to create the user controls on a page. Every instance in memory must be uniquely identified. ASP.NET does this using class names.
When you created the prop.ascx user control, you should have changed the ClassName attribute in Code View from WebUserControl1 to PropControl. If you are getting the error you describe, you likely forgot that step.
In addition to adding Web Parts controls and moving them between Web Parts zones, you can also add the capability of editing controls. Editing Web Parts controls is accomplished using one or more of the following Web Parts controls:
AppearanceEditorPart—. Allows editing of the appearance of a Web Parts control.BehaviorEditorPart—. Allows editing of the behavior of a Web Parts control. For example, you can use theBehaviorEditorPartto allow users to specify whether a specific Web Parts control can be minimized or closed.LayoutEditorPart—. Allows the editing of several layout elements of a Web Parts control. For example, you can useLayoutEditorPartto add the capability of configuring in which Web Parts zone a particular Web Parts control appears.PropertyGridEditorPart—. Allows the editing of properties of a Web Parts control. The developer of the Web Parts control can specify which properties are editable by thePropertyGridEditorPart.
Let’s add the capability to edit the appearance of Web Parts controls on the page you created in this chapter.
Open
default.aspxand make sure you are in Design View.Drag an
EditorZoneWeb Parts control from the Toolbox and drop it directly under the display mode drop-down.Drag an
AppearanceEditorPartcontrol from the Toolbox and drop it into theEditorZoneWeb Parts control.Configure an
AutoFormatscheme for theEditorZoneWeb Parts control if you wish and save thedefault.aspxpage.
Your page should now look like Figure 33.10.

Browse the page and select Edit from the display mode drop-down. At first glance, choosing Edit seems to have no effect. However, if you click the arrow button at the upper right of any Web Parts control, you’ll notice there is now an Edit menu item.
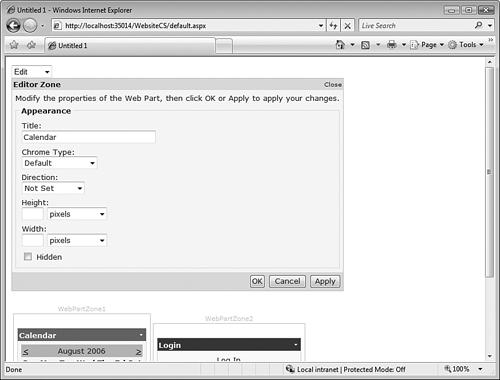
When you click Edit, the AppearanceEditorPart Web Parts control is displayed, as shown in Figure 33.11. Make a change to one of the Web Parts controls and click OK to apply it.
You’ve now completed the functionality of the Web Parts page. I think you’ll agree that you can create some incredibly powerful functions with minimal effort. I hope the information in this chapter will encourage you to experiment more with Web Parts controls and Web Parts pages.