
Expression Web 2 is highly configurable and most of its configuration options are packed into a single dialog—the Page Editor Options dialog. To access the Page Editor Options dialog, select Tools, Page Editor Options.
The first thing you’ll notice is the vast array of options spread out among 12 tabs. Instead of covering these options throughout the entire book, I cover most of them in this chapter so you’ll learn how to use these settings effectively.
As mentioned previously, the Page Editor Options dialog consists of 12 tabs, many of which are packed full of options. We’ll cover each of these tabs (with the exception of the AutoThumbnail tab, the Code Formatting tab, and the Code Snippets tab, which are covered elsewhere in the book) in this section.
The General tab (shown in Figure 15.1) contains general options for Expression Web 2 divided into five sections.
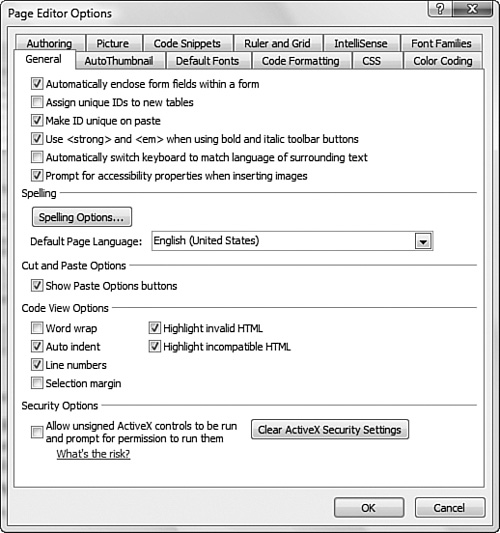
The following options are available in the first section on the General tab:
Automatically Enclose Form Fields Within a Form—. By default, the first form field you insert on a page is automatically wrapped in an HTML
<form>tag. You can override this behavior by unchecking this box.Assign Unique IDs to New Tables—. If you’d like Expression Web 2 to add an ID attribute to all new tables, check this box. Existing tables will not be affected.
Make ID Unique on Paste—. When this option is checked, Expression Web 2 will ensure that no duplicate control IDs are created when a control is pasted onto a page.
Use
<strong>and<em>when Using Bold and Italic Toolbar Buttons—. By default, Expression Web 2 will use the<strong>and<em>tags to apply bold and italic formatting, respectively. This method is preferred to the alternative of using<b>and<i>tags, both of which are obsolete.Automatically Switch Keyboard to Match Language of Surrounding Text—. Windows has the ability to use different virtual keyboard layouts for different languages. You can check this box to cause Expression Web 2 to automatically switch your keyboard based on the language of the text surrounding the insertion point.
Prompt for Accessibility Properties when Inserting Images—. Expression Web 2 will prompt you for alternative text and long descriptions when inserting images. If you’d prefer not to be prompted, uncheck this box.
Caution
Turning off the Prompt for Accessibility Properties when Inserting Images feature makes it more likely that you will forget to add alternate text or long descriptions to your images. If you omit these attributes from your images, your Web site will not pass accessibility standards.
→ | For more information on accessibility settings, see Chapter 19, “Accessibility Features in Expression Web 2,” p. 343. |
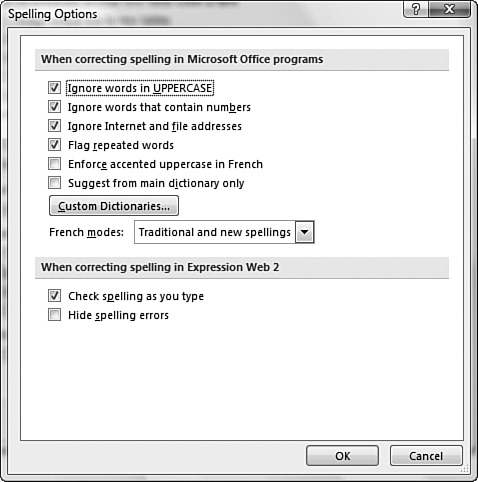
The second section of the General tab provides access to spelling options, most of which are configured by clicking the Spelling Options button, as shown previously in Figure 15.1. When the Spelling Options button is clicked, the Spelling Options dialog shown in Figure 15.2 is displayed so you can configure how Expression Web 2 checks spelling.
You can also choose a language for spell-checking by clicking the Default Page Language drop-down. on the General tab and selecting the language of your choice.
The third section of the General tab contains one check box: Show Paste Options Buttons.. This check box is checked by default and will cause Expression Web 2 to display the Paste Options button when you paste content onto a Web page, as shown in Figure 15.3. You can disable the Paste Options button by unchecking the box..

The fourth section of the General tab contains options for Code View. The following options are available:
Word Wrap—. This check box controls whether word wrap is enabled in Code View.
Auto Indent—. This check box controls whether HTML elements are automatically indented underneath the parent element.
Line Numbers—. This check box controls whether line numbers are displayed.
Selection Margin—. When this check box is checked, a left margin will be added in Code View to make selecting code easier.
Highlight Invalid HTML—. By default, Expression Web 2 will highlight any invalid HTML in a page. By unchecking this box, you can turn off this behavior.
Highlight Incompatible HTML—. By default, Expression Web 2 will highlight any HTML that is incompatible with the current schema. By unchecking this box, you can turn off this behavior.
The final section of the General tab contains a security setting for ActiveX controls. Expression Web 2 will run Microsoft Silverlight, Windows Media content, and Adobe Flash content without any prompt. However, by default, if you open a page with any other type of ActiveX control, Expression Web 2 prompts you to run the control unless it is signed. By unchecking the Allow Unsigned ActiveX Controls to Be Run and Prompt for Permission to Run Them check box, you can prevent Expression Web 2 from ever running an unsigned ActiveX control.
When you choose to run an unsigned ActiveX control, Expression Web 2 keeps track of those controls that you have trusted. If you’d like to clear the list of trusted controls, click the Clear ActiveX Security Settings button.
The options available in the AutoThumbnail tab are covered in detail in Chapter 14, “Using Graphics and Multimedia.”
The Default Fonts tab (shown in Figure 15.4) controls the font that Expression Web 2 will use for a particular language when no font is configured in HTML or CSS code.

The options available in the Code Formatting tab are described in Chapter 8, “Using Web Page Views.”
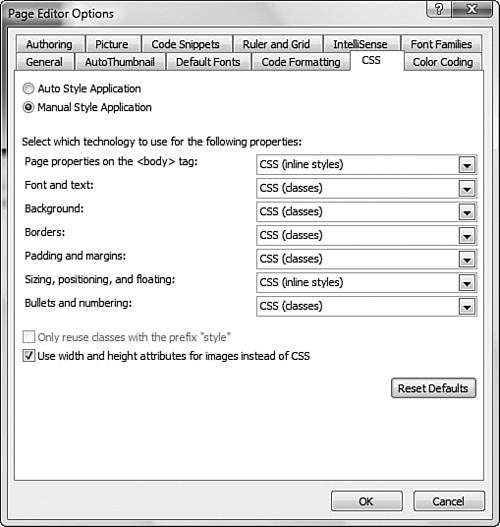
The CSS tab (shown in Figure 15.5) allows you to control how Expression Web 2 uses CSS styles in your pages.
→ | For more information on using CSS with Expression Web 2, see Chapter 18, “Managing CSS Styles,” p. 315. |
By default, Expression Web 2 will automatically add CSS code to your page when you apply formatting. This behavior is controlled by the following radio buttons in the CSS tab:
Auto Style Application—. Expression Web 2 will automatically apply CSS styles to formatted text using the CSS technology selected in the series of drop-downs. This is the default setting.
Manual Style Application—. Expression Web 2 will display the Style Application toolbar shown in Figure 15.6 to allow you to manually choose how to apply styles.
In addition, there are a couple of check boxes to control how Expression Web 2 deals with CSS styles:
Only reuse classes with the prefix “style”—. CSS classes that are added automatically by Expression Web 2 will always have a prefix of “style.” By checking this box, you can ensure that Expression Web 2 will not modify any CSS styles that were not auto-generated. This option is available only when the Auto Style Application option is selected.
Use width and height attributes for images instead of CSS—. By default, Expression Web 2 will use the
widthandheightattributes to specify the width and height of images. By unchecking this box, you can force Expression Web 2 to use CSS styling when specifying the height and width of images.
The Color Coding tab (shown in Figure 15.7) provides precise control over not only text elements, but also user interface elements in Expression Web 2.

By selecting either the Code View Settings, you can control which items appear in the Display Items list.
The Authoring tab (shown in Figure 15.8) lets you choose what kind of document Expression Web 2 creates by default and also controls schemas for HTML documents.
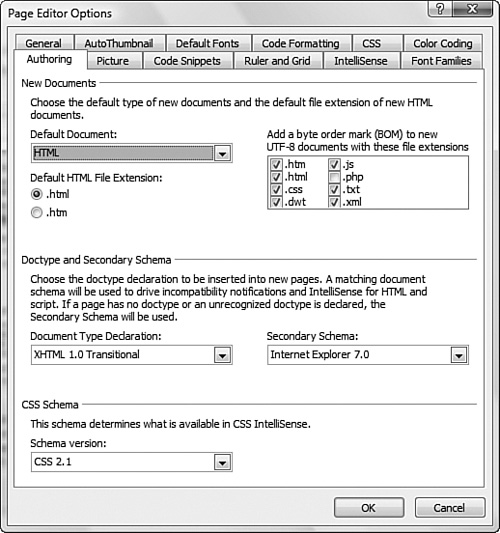
The Default Document Type drop-down configures the type of document that Expression Web 2 creates by default when you click the New Document button on the toolbar or press Ctrl-N on your keyboard. You can choose from HTML, ASPX, CSS, XML, or text file.
![]() The Default HTML File Extension radio buttons allow you to choose the file extension that Expression Web 2 uses by default for new HTML files.
The Default HTML File Extension radio buttons allow you to choose the file extension that Expression Web 2 uses by default for new HTML files.
The Authoring tab also provides settings for configuring a byte order mark (BOM) for specific file extensions. The first version of Expression Web caused problems for PHP developers because it added a BOM to all PHP pages. Expression Web 2 will not add a BOM to PHP files by default, and it adds control over the BOM for specific file types.
The Document Type Declaration drop-down controls the DOCTYPE declaration included at the top of your pages. The DOCTYPE controls how Expression Web 2 determines what code is valid. If code in the page isn’t valid or compatible with the selected schema, Expression Web 2 will warn you, as shown in Figure 15.9.

The Schema Version drop-down list contains configuration options for the CSS schema of the document. This setting affects only what appears in IntelliSense for CSS in the document. By selecting the CSS schema you want to target, you ensure that IntelliSense in Expression Web 2 doesn’t display invalid CSS values.
The Picture tab (shown in Figure 15.10) configures how Expression Web 2 works with images.

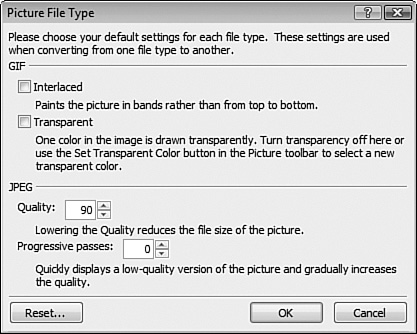
The File Type Settings button displays the Picture File Type dialog, as shown in Figure 15.11. This dialog makes it easy to configure settings for both GIF and JPEG images.
→ | For more information on image file formats, see Chapter 14, “Using Graphics and Multimedia,” p. 237. |
Details on the Code Snippets tab are available in Chapter 7, “Creating Pages and Content.”
The Ruler and Grid tab (shown in Figure 15.12) controls the appearance of the grid and ruler that can be displayed in Design View. You can also choose the unit used for both the grid and the ruler.

The Display Grid section controls the grid that is visible when selecting View, Ruler and Grid, Show Grid. The Snapping Grid section allows you to configure the spacing for the Snap to Grid feature that is accessed by selecting View, Ruler and Grid, Snap to Grid.
→ | For more information on the grid and ruler, see Chapter 8, “Using Web Page Views,” p. 123. |
![]() The IntelliSense tab (shown in Figure 15.13) controls what IntelliSense will display in Code View. You can turn off specific elements in IntelliSense by unchecking the desired check boxes. New to this version of Expression Web 2, PHP IntelliSense options can also be configured from this tab.
The IntelliSense tab (shown in Figure 15.13) controls what IntelliSense will display in Code View. You can turn off specific elements in IntelliSense by unchecking the desired check boxes. New to this version of Expression Web 2, PHP IntelliSense options can also be configured from this tab.

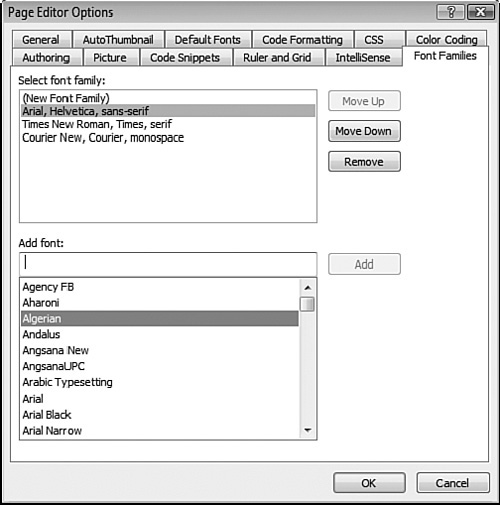
The Font Families tab (shown in Figure 15.14) makes it easy to configure one or more font families for selection in the Font drop-down on the Common toolbar, as shown in Figure 15.15.

→ | For more information on using font families, see Chapter 7, “Creating Pages and Content,” p. 97. |
You can build a new font family by selecting fonts from the Add Font list and clicking Add. After you’ve created the desired font family, you can arrange the fonts by clicking Move Up or Move Down. You also can remove the font family by selecting it and clicking Remove.
There are numerous options that affect the way code is generated by Expression Web 2. Most of these options won’t affect code that has already been generated. Because of that, it’s important for you to understand how each option affects code so you can make good decisions.
Some of the options we’ve covered in this chapter cause subtle changes in the way Expression Web 2 creates code. For example, changes to the Code Formatting or CSS properties may not cause obvious changes in the way Expression Web 2 generates code. The best way to fully understand these options is to create a new page and use it to test how different options affect the code Expression Web 2 creates. By limiting your testing to small amounts of code, changes in Expression Web 2’s code will be more apparent.
If you’ve experimented with options in the Page Editor Options dialog and want to revert to the original settings, you can click the Reset or Reset Defaults button that exists on many tabs. Note that each tab’s button will reset the options only on that particular tab.