4
Preparing the Presentation

Learning Objectives
By the end of this chapter, you should be able to:
• Prepare a presentation script and/or set of notes.
• Prepare and become familiar with the presentation environment.
• Prepare for question and answer sessions.
• Anticipate and prepare for possible problems.
In Chapter 3 you learned to use a step-by-step planning process to develop a working outline for the body of your presentation. You identified your objectives and primary message, decided what presentation methods to use, selected the information to include and determined how to organize it, and identified where to use presentation aids.
Now you’re ready to use your working outline to prepare the presentation. In this chapter, you’ll learn how to transform that outline into a script or set of notes that will guide you through the presentation. You’ll examine factors to consider about the presentation environment. You’ll learn how to prepare for questions and anticipate problems.
SCRIPT OR NOTES?
When the President of the United States gives a speech, chances are that he is reading the words from a script or a Teleprompter. He might deviate from the script (to the dismay of his speech writers), but the words and phrases he speaks are usually carefully selected ahead of time. Why do you think the President uses prepared scripts?
The President uses prepared scripts because for most of his speeches, an ill-chosen word can have grave consequences. By following a script, he can use exactly the words he and his advisors believe are the best words to use for the topic and the situation.
Most of us, however, seldom need word-for-word scripts. In fact, a word-for-word script can result in a presentation that sounds “canned.” A presenter who reads from a script can find it hard to maintain real contact with the audience. Scripts also make it harder to recover if you lose your place or are interrupted.
Unless the information you’re delivering is extremely sensitive, you’ll do better with a set of notes to guide your delivery. If you’re very familiar with the topic and comfortable with the situation, you might need only a few words to jog your memory about the points to cover and the sequence to follow. Sometimes you’ll want detailed notes that include a scripted opening, transitions, and closing; lists of points to include; detailed descriptions of activities; and so on.
Exhibit 4–1 shows examples of varying levels of detail. To determine whether you need a script and, if not, how detailed your notes should be, answer the questions below:
• How long is the presentation? For a very short presentation, you might be able to rely on your memory, using only a few note cards listing the key points to include. The longer the presentation, the more notes you will need to keep yourself on track and make sure you cover everything.
• How complex is the material and/or the presentation format? If the subject is highly technical or difficult to explain, you’ll need more details in your notes. You’ll also need more detailed notes if your presentation includes a large number of presentation aids and/or activities.
• How familiar are you with the subject and how comfortable are you with the situation? If you know the subject and audience well, you might need only a few notes to guide you through the presentation. Even then, detailed notes might make you feel more comfortable—even if you rarely refer to them.
• How sensitive is the topic? Like the President, you might need very detailed notes or a word-for-word script for very sensitive topics, where each word you use is crucial.
• How formal is the presentation? Word-for-word scripts can be appropriate for formal speeches of 30 minutes or less. But in more casual situations, such as a conference room presentation to a group of colleagues, reading from a script creates a barrier between you and the audience. Also, people are more likely to interrupt with questions in a less formal situation, and it’s tricky to find your place in a script after you’ve been interrupted.
![]() xhibit 4-1
xhibit 4-1
Levels of Detail for Script or Notes
Below are excerpts from a script and two sets of notes for the same presentation.
EXAMPLE 1. WORD-FOR-WORD SCRIPT
(Put up slide #1: Photo of student and volunteer)
Let me begin by describing the Literacy Project. Each year, the Literacy Project teaches approximately fifty adults to read. All the teaching is done by volunteers, like yourselves, who work on a one-to-one basis with students. The program is designed to help people help themselves, and both volunteers and students find it worthwhile and rewarding.
EXAMPLE 2. DETAILED NOTES
Slide #1:
Say: Let me begin by describing the Literacy Project.
Describe program:
Say: Each year, the Literacy Project teaches approximately fifty adults to read.
—teaching done by volunteers, like yourselves
—volunteers work on one-to-one basis with students
—program designed to help people help themselves
—both volunteers and students find program worthwhile and rewarding
EXAMPLE 3. MINIMAL NOTES
Describe program (Slide #1)
![]() Think About It…
Think About It…
Instructions: Consider your presentation. Determine where it lies on the following continuum.

Instructions: Turn to the back of this course and remove a Presentation Preparation Worksheet from the section called “Presentation Job Aids.” Just as you did with the Planning Worksheet, complete the top with the Topic, Date, and Time Available.
Review your presentation outline. Think about the situation, the subject, the audience, the type of presentation you’re giving, and the length of the presentation. Refer to the Think About It above and determine whether you will need a script, detailed notes, or simple notes that only indicate the sequence of key points. In Step 1 on the Preparation Worksheet, check the appropriate box. (Refer to Exhibit 4–1 for an example.)
FROM OUTLINE TO SCRIPT OR NOTES
Just as following a step-by-step planning process helps you develop your presentation outline, a similar step-by-step process can help you expand your presentation outline into a script or set of notes.
The following are brief descriptions of the steps. After you read them, you’ll examine each step in detail and then follow the steps to prepare a script or notes for your own presentation. Once again, the order of the steps is not as important as doing them all.
• Preparing the opening. The opening is where you get the audience’s attention, establish rapport, set the tone, and provide essential background information. In the opening, you deliver the main point and tell the audience what to expect during the presentation.
• Preparing transitions. Transitions help you move smoothly from segment to segment and point to point. You’ll also use them to introduce activities and speakers.
• Preparing the closing. The closing is where you restate your main point and tell the audience what happens next. Depending on your objectives and subject, you might also summarize key points or make a “call to action.”
• Adding details. The presentation outline you developed during the planning process shows the facts and ideas you’ll use to explain, illustrate, support, or expand on your primary message. Now you’ll add the other details, anecdotes, and examples you need to communicate points.
• Incorporate presentation aids and activities. If you’re using guided discussions or other activities, you need to add the necessary information about them. You’ll also add details about the presentation aids you plan to use.
• Estimating time for each segment. Timing is crucial for a successful presentation—and difficult to estimate. You’ll need to determine how long it will take to deliver each segment and make adjustments needed to ensure you can cover everything without going overtime.
![]() xhibit 4-2
xhibit 4-2
Sample Presentation Preparation Worksheet
TOPIC: Literacy Program
DATE (if known): March 3 TIME AVAILABLE (if known): 45 minutes
STEP 1. SCRIPT OR NOTES?
![]() Word-for-word script
Word-for-word script ![]() Detailed notes
Detailed notes ![]() Simple notes
Simple notes
STEP 2. PREPARE YOUR OPENING
A few years ago, I discovered that my neighbor, who had been running a successful child care business for years, could not read.
—Learned about literacy Project (Slide #1)
—will tell you about project & reasons to help
Transition: I’ll begin by telling you what the project hopes to accomplish and how it works.
STEP 3. IDENTIFY AND PREPARE TRANSITIONS
(Transition from opening to program description)
We teach 50 adults to read each year
(Introduce slide #1)
Match volunteer teachers with students
Work one-of-one
Helps people help themselves
(Introduce testimonials)
Worthwhile and rewarding program
STEP 4. PREPARE YOUR CLOSING
Now that you know how the Literacy Project helps people improve their lives by learning to read. I’d like to offer you the chance to participate.
—volunteer or make donation
—sing up sheet on back table, see me afterwards
—thank audience
STEP 5. ADD DETAILS TO YOUR SCRIPT OR NOTES
We teach 50 adults to read each year
—from community at large
—men and women
—wide rang of jobs, income levels
STEP 6. INCORPORATE PRESENTATION AIDS AND ACTIVITIES
Slide #1: “Here’s a volunteer, working with a student”
Match volunteer teachers with students
Work one-to-one
Helps people help themselves
Slides (from public relations life):
#1 Volunteer with student
#2 Testimonial
Handouts (on back table) (Jane to provide)
Brochure
Volunteer sing up form
Donation form
STEP 7. PLAN THE ENVIRONMENT

Room setup: auditorium style, 35 people expected.
Equipment needed: slide projector
Other factors to consider about environment: Next door to lunchroom—noisy: must keep door closed.
STEP 8. PLAN Q&A
I will take questions: ![]() At any time
At any time ![]() At the end of each segment
At the end of each segment
![]() At the end of the presentation
At the end of the presentation ![]() Written questions only
Written questions only ![]() No Q&A
No Q&A
Questions to expect:
How many hours a week or a month do volunteers put in? 2–4 hrs. ma. What if I have to go out town? Reschedule or set up a substitute. What if my student an I don’t get along? Can be reassigned.
Refer to frequently asked question in brochure.
These problems might interfere with my presentation:

Preparing the Opening
The opening is where you establish contact with the audience, set the tone, and convey your most important message. A good opening relaxes the audience, gets people’s attention, and prepares them for what’s coming.
Read the following two openings. Which is more effective? Why?
Opening #1
“Good morning, everyone. My name is Sara Woo, and I’m the project leader for the TimeMinder development team. I know you all expected the TimeMinder system to be ready for launch in October. During the next forty-five minutes, I’m going to explain why we’ve moved the launch date to January 15, give you an overview of the development process, and try to answer the questions you’re dying to ask.
Opening #2
I guess you’re wondering why I’ve called you here today. (Pause) Well, anyway, how many of you people out there would like to know more about the TimeMinder system? Yeah? All three of you? Well, I’m going to tell you anyway. I’m Jason Trent, and they told me to bring you up to date on what’s up with TimeMinder, so that’s what I’ll try to do. Hold on a minute while I set up the first slide.
You probably prefer Opening #1. Sara Woo uses her opening to set a friendly tone, tell people who she is and why she’s there, and “preview” her presentation. Her opening is concise, relevant, and to the point. Now she can move directly into the presentation.
Unfortunately, Jason Trent’s opening (Opening #2) is liable to confuse and even alienate his audience. He begins with a bad—and unnecessary—joke. He waits too long to tell people who he is, and he doesn’t convey his main point or tell people what to expect. He refers to a vague “they” whose instructions he appears to be following without much enthusiasm. Instead of moving right into the content, he asks his audience to wait while he fiddles with the machinery.
Here’s what an effective opening accomplishes:
• Gets the audience’s attention and helps people settle down
• Sets the tone: formal, informal, friendly, casual, funny, serious
• Helps establish rapport
• Provides essential background information
• Tells audience who you are and establishes your credibility
• Tells audience why you’re there
• Lets you deliver the main point (“tell them what you’re going to tell them”)
• Lets you acknowledge and address people’s concerns (“We will explain the reasons for changing HMOs”; “We will not ask for a decision today”)
• Provides a “preview” of the presentation content and format
Guidelines for Effective Openings
The opening is so important to your presentation, it’s worth taking the time to get it right. Here are some points to consider:
• Always prepare your opening. No matter how comfortable you are with the subject matter, the situation, and the audience, always decide ahead of time how you will begin.
At a minimum, write out the first sentence you will speak. Then list the other points to include in the opening. It’s also helpful to write out the sentence you will use to make a transition to the body of the presentation: “Let’s begin with a quick look at the ways in which the reorganization will affect you …”
If you’re using an anecdote in the opening, it can be helpful to write out the beginning, note the key story points, and write out the end.
• Tell people what the presentation is about. An important purpose of the opening is to prepare people for what they’re going to hear or do or learn. In most situations, you’ll deliver the most important point in the opening: “During the next hour and a half, I’ll show you how our new project planning software can help you keep your projects on track and achieve your project goals.”
• Keep the opening short and simple. People haven’t come to hear the opening, they’ve come to hear what you have to say about the topic. Maybe all you need is something like, “Good Morning. I’m Jane Doe from Human Resources, and I’m here to tell you how to apply for retirement benefits.” Just remember that the purpose of the opening is to launch the presentation.
• Only use anecdotes that are relevant. Stories can be interesting and they can make the audience laugh. But those are not good enough reasons to include them. Use anecdotes to introduce, illustrate, or explain your primary message. Even the most interesting—or funniest—story should be left out if it doesn’t serve this function.
• Use caution with personal experiences. Personal experiences can draw an audience in, introduce or clarify points, and help people relate to what you have to say. But avoid revealing anything personal that might make the audience feel uncomfortable—such as an embarrassing situation that still makes you feel embarrassed.
• Stay away from inappropriate humor. Humor is great when it works, and when it doesn’t offend or embarrass anyone. Always make sure humor fits the situation and does not seek laughs at the expense of anyone’s gender, race, ethnic origin, physical characteristics, age, religion, or other personal characteristics. Also keep in mind that not everyone tells jokes well—it’s okay not to be funny.
Attention Getters
It’s important to get a presentation started in a way that engages the audience and makes them want to hear what you’re going to say next. While you won’t always need an attention getter similar to those shown below, using one can help stimulate interest, establish a context, and prepare people for what you plan to say.
• Personal experience: “Several years ago, I discovered a fascinating document at the back of a file folder I was about to throw away. That document changed my life …”
• Hypothetical situation: “I’d like you to think about what might happen if you came into work tomorrow to find that you’d been given a six-month leave, with full pay.”
• Startling statistic or fact: “Property values in this area have risen an average of 20 percent since last year at this time.”
• Rhetorical question: “How many of you would like more take-home pay?”
• Reference to recent news: “As Secretary Albright said at her meeting with the secretary-general of…”
• Anecdote: “When I was interviewing for my first job, I was asked to describe my life ten years in the future. That process made me think carefully about my goals and how I hoped to achieve them. We can use the same process to determine where we are going as an organization …”
![]() Think About It…
Think About It…
Instructions: Think about your topic and the type of attention getter that might be effective. Try several. Even if you don’t have the information now, you might have an idea you could research later.
![]() Apply What You Learn
Apply What You Learn
Instructions: Think about your own presentation. Considering the audience, the subject, and the situation, what would be the best way to open? Do you need an attention getter such as a personal experience?
Complete Step 2 on the Presentation Preparation Worksheet to prepare your opening. Remember to write out the first sentence and the sentence you’ll use to make a transition to the body of the presentation.
NOTE: There are a variety of ways to add the opening and other elements to your presentation outline. Some presenters work on a computer and simply expand the outline by adding elements until their notes are complete. Then they shape those notes into the form they want to use during the presentation—perhaps loose-leaf pages in a binder.
Other presenters prefer to develop “note cards” as they work, putting the separate elements—opening, closing, anecdotes, activities, detailed information for each segment of the presentation, etc.—on separate 4×6 or 3×5 cards that they will then use to deliver the presentation.
Still other presenters like to work by hand on ruled tablets, using a separate sheet for each element and later retyping or rewriting the notes into their final form.
You might want to experiment with different methods until you find the one that works best for you.
Preparing Transitions
Transitions are bridges. They take you from place to place without interrupting the journey. Transitions link your points and alert the audience that you’re moving on. (You’ve already written one transition, the one that takes your audience from the opening to the body of the presentation.)
If you have a well-developed presentation outline, you’ll know exactly where you need transitions because you already have a logical sequence of points. You’ll need a transition when you move from key idea to key idea, and when you move from a discussion into an activity. You’ll use transitions to introduce slides or demonstrations or speakers. Transitions offer opportunities to take breaks or elicit questions.
Here are examples of transitions:
“Now that you know the project history and goals, I’ll go through the development process step-by-step.”
“Before we examine reasons for setting up a face-to-face meeting with the client, let’s take five minutes to practice asking those open-ended questions we’ve been discussing.”
“Next, I’ll discuss the stages of the construction process. First, does anyone have any questions?”
![]() Think About It…
Think About It…
Instructions: Brainstorm other transitional phrases. Sometimes you may want to make all your transitions parallel in style, other times you may want a variety. Jot down some phrases you might use.
Transitions can be as simple as repeating the point you just made and previewing the point you’re about to make. You can write out transitions word-for-word, or simply indicate them in your notes. Some presenters use colored highlighters to call out the transitions.
![]() Apply What You Learn
Apply What You Learn
Instructions: Complete Step 3 on your own Presentation Preparation Worksheet:
• Identify places where you need transitions (“transition to team exercise”)
• If you wish, write in the transitions you will use (“Now we’ll work in teams to use the software to identify project resources”)
Preparing the Closing
For some presentations, the closing is almost as important as the opening. Take the case of Beniamo.
Beniamo is a member of the Big Brothers organization. He has organized a brown-bag lunch to explain the organization’s goals to his colleagues at work and motivate people to volunteer. Beniamo gave an interesting presentation, during which he used slides to show various Big Brothers and Big Sisters sharing different activities with their Little Brothers and Sisters.
Here’s how Beniamo closed the presentation:
Well, that’s about it, and it looks like we’re out of time. I’d like to thank you all for coming—and I hope you enjoyed your lunch. I’ll be in my office later if you have any questions. That’s it. Thanks again.
Beniamo had the impression that people enjoyed the presentation—they were attentive throughout and gave him a round of applause when he finished. But he was disappointed that no one came up afterward to volunteer or even ask for more information. Part of the reason might have been the way Beniamo closed the presentation. What was missing?
Although Beniamo’s closing was friendly and polite, he needed the crucial “call to action” that might have stimulated signups. He made a common mistake: assuming that if people paid attention to the presentation, they would sign up for his program. But he left the audience without a clear understanding of what was supposed to happen next, so people simply drifted away.
Beniamo might have had better results if he closed this way:
As I mentioned at the beginning, we have a long list of children waiting for a Big Brother or Big Sister. If you agree that this is a worthwhile, rewarding cause, please help. You don’t have to make a commitment today—but if you’re at all interested, sign the sheet on the table at the back of the room—I’ll get in touch with you in a couple of days with more information. Thanks very much for coming, and I hope you’ll seriously think about joining us. It’s a great feeling to help a child.
![]() Think About It…
Think About It…
Instructions: Write out the expected outcome of your presentation.
___________________________________________________
___________________________________________________
Guidelines for Closings
Here are some points to consider when preparing the closing for your own presentation:
• Always prepare a closing. Even a brief presentation needs a closing. Decide what you want to say—and write it down. It’s easy to feel rushed towards the end of your presentation, and you want to be sure not to forget the important points you need your closing to include.
• Always restate the main point and, perhaps, the key supporting points. In your opening, you told people what you were going to tell them. Now restate what you told them. It helps to circle to the beginning by referring to something you said in the opening (“When we began, I asked how many of you … I hope that you now understand why it’s so important to …”).
• Say clearly what happens next. Don’t assume that people will know what they or others are going to do. Tell them clearly what they are supposed to do next or what they can expect to happen (“Next week, I will send each of you a summary of the points that were brought up today …” or “Please complete your research by May 1 and bring your findings to the next meeting.”)
• If appropriate, make a call to action. Tell people what you want them to do, why they should do it, and how to do it.
• Thank the audience. A presentation only happens when there is an audience. Let the audience know that you appreciate their attendance and attention—and make sure your thanks are sincere.
![]() Apply What You Learn
Apply What You Learn
Instructions: Review Step 4 on the sample worksheet and then complete Step 4 on your Preparation Worksheet to prepare a closing for your practice presentation. Jot down some notes here, then transfer your comments to the worksheet.
• Points to include in the closing________________________
• Key point_________________________________________
• What happens next_________________________________
• Call to action (if appropriate) _________________________
• Say thank you_____________________________________
Adding Details
You now have a working outline that includes an opening, transitions, key points and subpoints for the body, and a closing.
Next, you will expand the body of the presentation to include the details—the facts, ideas, anecdotes, and examples you’ll use to explain, illustrate, support, or expand on your main points.
Unless you’re using a script that includes every detail, you’ll need to decide how much information to include in your presentation notes. Too few details and you might forget to cover important points; too many details and your notes might be too complex to follow.
Here are some guidelines for deciding what details to include (when you’re not using a word-for-word script):
Err on the Side of Brevity
Extremely detailed notes are only a short step from a word-for-word script. They’re hard to follow, and the tendency is to focus on the notes instead of on the audience.
It’s best to include only the key details you need to keep yourself on track and avoid forgetting important details: “Describe assessment process”; “30 percent of customers pay by credit card.”
HINT: Some details, such as statistics, need to be reinforced or explained through the use of a visual aid. You can use the visual aids to jog your own memory instead of writing every detail into your notes.
Use Lists
Generally, avoid writing details into sentences and paragraphs. Instead, list them. They’ll be easier to see at a glance, as in this example:
Five reasons for using financial planning software:
—Save time
—Increase accuracy (etc.)
Consider Writing Out the Key Lines of Stories and Anecdotes
The actual words and phrasing sometimes affects whether a story “works.” Unless you’re a very good storyteller, you might need to work out the words and phrasing ahead of time. Later, after you’ve practiced, you can reduce the stories and anecdotes to key word reminders if you wish.
![]() Apply What You Learn
Apply What You Learn
Instructions: Jot down some details or stories (that you may expand later) to include in the presentation. Then complete Step 5 on your Presentation Preparation Worksheet. Try to keep the notes as brief as possible while including the details you need.
NOTE: When you practice your presentation, you will probably add or delete details. You’ll learn practice techniques in Chapter 5.
Incorporate Presentation Aids and Activities
There’s only one thing to do to complete your presentation script or notes: incorporate the presentation aids and activities you plan to use.
You have already thought about where you need presentation aids and might also have thought about where to use activities. You might already have prepared or obtained some of the materials you need or might still need to develop or locate them.
At this point, you need to incorporate presentation aids and activities into your script or set of notes by developing introductions and transitions. Follow these guidelines.
Incorporating Presentation Aids
When you developed your original presentation outline, you indicated where you might use presentation aids such as handouts, flip charts, computer generated slides, videos, or props. As you expanded your outline into a script or detailed set of notes, you might have found other places in which to use presentation aids.
Now do the following:
• Go back through your script or notes to make sure you have clearly indicated when to use a specific presentation. Some presenters like to highlight points at which they will use presentation aids or use a special code to set them off.
• Write introductions as needed: “Now here are some slides that show the architectural design of the new processing plant”; “Turn to page 7 in your handout packet.”
• Write transitions as needed: “Now that we’ve seen last quarter’s sales figures, let’s compare those figures to those of the past five years.”
• Make a comprehensive list of the presentation aids you plan to use. For presentation aids you do not yet have, indicate how and when you will prepare (or obtain) them. Also indicate the equipment you will need (a slide projector, a computer, a flip chart easel).
![]() Think About It…
Think About It…
Instructions: Indicate the types of presentation aids available to you:

NOTE: In Chapter 6, you’ll learn about the different types of presentation aids and how to use presentation aids effectively. Read that chapter carefully before actually incorporating presentation aids into your presentation script or notes.
Incorporating Activities
Experiential activities engage and involve the audience, transforming people into active participants during the presentation. They can make your presentation more interesting and useful; for some presentations, the audience’s participation is essential for the presentation to achieve its objectives. It’s important, however, to be sure that each activity has a clear purpose and that is relevant to the situation.
You might already have activities in mind when you begin planning your presentation, or you might identify the activities to use as you expand your outline. Exhibit 4–3 describes some common experiential activities. The following are guidelines for incorporating them into your script or notes:
• Indicate where you will conduct an activity and give yourself instructions: “Divide group into small groups of 4-5 people and hand out discussion cards.”
• Write an introduction for each activity. The introduction should briefly describe the activity, explain its purpose, and state how long it will take.
• rite a transition from the activity to the next part of the presentation.
• Make a separate list of all the activities you plan to use. Describe the equipment or materials you’ll need and how long you expect the activity to take. Indicate how and when you’ll develop (or obtain) the materials you need.
![]() xhibit 4-3
xhibit 4-3
Experiential Activities
Here are examples of activities that can involve your audience, help people learn and understand information, and make the presentation more interesting.
• Discussion groups. Break the large group into groups of 4-6 people and ask the groups to discuss a specific issue or topic for a specific amount of time. When the time is up, ask each group to summarize their discussion for the group as a whole.
• Work groups. Break the large group into smaller groups and ask each group to complete a task. When the time is up, ask each group to report its experience to the larger group.
• Problem-solving. Pose a problem or question to the group and ask people to brainstorm solutions or answers. Record their responses on a white board, chalkboard, or flip chart page.
• Role playing. Ask people to work in teams of two or three to practice something they are learning, such as communication or interviewing skills.
• Open-ended questions. Ask people to respond to questions that cannot be answered “yes” or no.
• Practice exercises. Ask people to complete exercises in a workbook.
• Hands-on practice or simulations. Give people a chance to try out what they’re learning in a real or simulated situation.
![]() Think About It…
Think About It…
Instructions: Think about any exercises or activities you either have done or have seen done that might make your presentation more compelling. Jot down any ideas you have.
___________________________________________________
![]() Apply What You Learn
Apply What You Learn
Instructions: Complete Step 6 on the sample Preparation Worksheet.
• For each presentation aid or activity, write an introduction and transitions as needed.
• Make a separate list showing all the presentation aids and activities you’ll be using and the equipment and materials you’ll need. Then specify how and when you’ll prepare or obtain materials.
NOTE: If you wish, read Chapter 6 first to learn about the different presentation aids you might use.
THE PRESENTATION ENVIRONMENT
A perfect presentation environment won’t do much to help a poorly prepared presentation—but a poor environment can ruin an otherwise excellent presentation.
Think about some presentations you’ve attended. Can you remember a time when the environment made it difficult to hear or focus on the presenter? If so, what were the problems?
You might have found that the room was too small and crowded, that the seating arrangement made it hard to see the presenter or the visuals, or that the room was uncomfortably warm or cold. Other problems could have been that the chairs were uncomfortable, the room was noisy, the lighting was poor, or you didn’t have a place to take notes.
At a minimum, those kinds of problems are distracting; at the worst, they make it all but impossible to deliver a successful presentation. People must be able to see and hear you, and, perhaps, each other. They should be relatively comfortable and able to concentrate. They need sufficient space for activities.
It’s best, of course, if you are able to select the room and set it up exactly the way you want it. That’s not always possible. But there are steps you can take to improve even a poor environment.
First, let’s look at what you need to consider when selecting or adapting an environment. Then we’ll examine strategies for improving an unsatisfactory environment.
Factors to Consider about the Presentation Environment
Here are some key factors to consider when selecting and setting up the presentation environment:
Size and Shape of Room
Remember the story of the three bears? The bed had to be not too hard, not too soft, but just right. It’s the same with the room for your presentation. Ideally, it should be not too big, not too small, but just right, considering the type of presentation and the number of people you expect.
A room that’s too large can make it difficult for the group to focus. A room that’s too small means that people will feel crowded. A long, narrow room means that a larger percentage of the audience will be farther away from you and some people might have difficult seeing and hearing the presentation.
If possible, select a room that is square rather than rectangular and that is just large enough for the size of group you expect and the room setup you plan to use.
The Room Setup
The way the room is set up establishes the relationship of the participants to you and to each other. The room setup can encourage or discourage participation and affect participants’ ability to see and hear easily.
Exhibit 4–4 shows some sample room setups. Notice that the room setup has two key elements: audience seating and your presentation area/Here are some points to keep in mind about each element:
• Participant seating: Do you want an informal or formal atmosphere? Will people need to talk to one another? Take notes? Do activities?
Auditorium seating, with people in fixed seats or chairs facing the presenter, works well only for speeches that require no audience participation or interaction between audience members. It’s almost impossible to take notes or do activities from an auditorium seat.
Classroom-style seating, where people sit at tables arranged in rows facing front, gives people space to write or work at computers, but that setup discourages interaction. Conference-table seating, with people arranged around a single table, encourages interaction but works well only for very small groups. For larger groups, people cannot easily see others on their side of the table.
If audience members need to interact with you or each other, it’s more effective to set up tables in a U-shape or chevron-shape. That way, people can see each other, and you can walk into the open space to create a more intimate atmosphere. Also, it’s easier to create small discussion or task groups when people are already grouped at tables.
• Your presentation area: Do you want a formal or informal relationship to the audience? Do you want people to perceive you as an expert? A teacher? A facilitator? Do you need to be on a raised platform so everyone can see you?
Consider the nature and size of space you need. For a large group, you might need a stage, so everyone can see you. Some presenters like the formality and comfort of a podium, while others find that a podium creates a barrier between them and the audience. A good compromise is a small table on which you can place your notes and materials. You can then speak from behind the table or in front of it.
Try to leave yourself enough space so you don’t feel crowded but not so much that there is a no-man’s-land between you and the audience. If you plan to engage the audience, use a seating arrangement such as a chevron or U-shape that lets you “step into the U” and move close to people.
Comfort Factors
It’s hard to hold an audience’s attention when people are crowded together on metal folding chairs in a cold—or overly warm—room. It’s hard to get your message across when people have to crane their necks to see and cup their ears to hear.
The longer your presentation and the more difficult the topic, the more important it is to make sure that your audience is as comfortable as possible.
In the ideal presentation environment:
• The chairs are comfortable to sit on for long periods of time
• The tables, if any, sit solidly on the floor and do not wobble
• The room temperature is not too hot, and not too cold
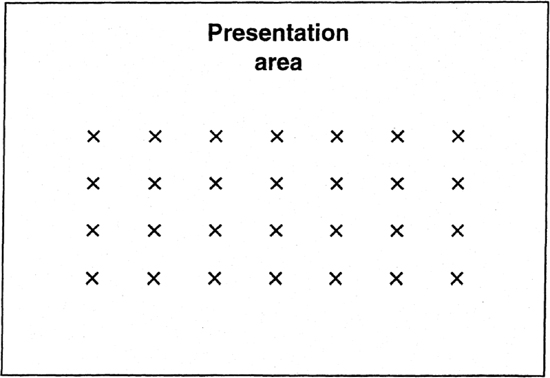
Auditorium seating
Large groups—formal speech
Little or no interaction
Presenter must stay in presentation area

Chevron-shape
Small-medium size groups
Can be highly interactive—people can easily see and hear one another
Discussions, decisions, training, activities
Presenter can move into audience area
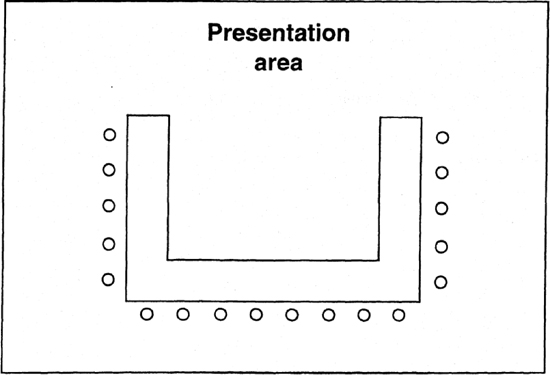
U-Shape
Small-medium-size groups
Discussions, decisions, training
Somewhat interactive depending on size—for large groups—not everyone can see/hear everyone else
Presenter can move into audience area
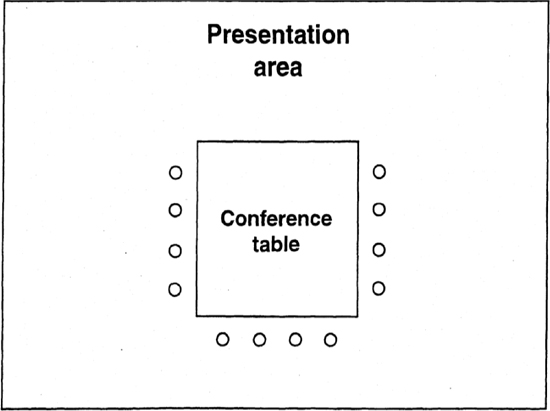
Conference room
Small groups—highly interactive
Discussions—Decisions
Presenter must stay in presentation area
Large groups—people can’t all see/hear one another
• There is sufficient ventilation
• The lighting is bright enough but not too bright
• Everyone can see and hear you easily
• The visuals are readable from the worst seat in the house
• Restrooms, food, and drink are nearby
When you select the room and decide how to set it up, ask yourself: “If I were attending this presentation, is there anything in this environment that would make it difficult for me to focus on the presenter? Would I be comfortable? Could I see and hear?”
![]() Think About It…
Think About It…
Instructions: For the presentation you are about to give, describe (sketch) the ideal room, considering the following factors. If you know the room you are likely to be in, use that as your model.
Size and shape of your room:___________________________
Room setup:_________________________________________
Comfort issues:
Chairs ___________________________________________
Tables ___________________________________________
Sound system (or voice): ____________________________
Visuals (if any): ____________________________________
Lighting __________________________________________
Distractions and Interruptions
Have you ever tried to listen to a presenter over the noise of a jackhammer outside the window? Where does your attention go when a beeper goes off? To hold the audience’s attention, it’s important to eliminate or reduce distractions.
Exterior distractions include construction and traffic noise, conversations in the corridor or the next room, sunlight through an uncurtained window, or even a compelling view.
Interior distractions include beepers and telephones; noisy ventilation, heating and air conditioning systems; the noise of the fan in overhead projectors; flickering lighting; loudspeaker announcements; and people entering and leaving the room.
To Improve the Environment
It would be wonderful if you always had complete control over the environments in which you delivered your presentations. Unfortunately, you usually have to compromise in some way. Sometimes, you simply have to take what you can get—and you might not even be able to see the room until you arrive for the presentation.
Even when you request a certain type of room and a specific setup, you may find that your requests have not been honored. That’s what happened to Marlene.
Marlene was pleased to be asked to give a sales presentation in another city. The purpose of the presentation was to introduce 40 managers to her company’s hiring interview software.
Marlene planned a casual, interactive presentation during which the managers could work in small groups to practice using the software. She sent the client’s representative an e-mail describing the room, room setup, and equipment she would need. When she arrived at her hotel the day before the presentation, she phoned her contact and received a voice mail message saying that everything would be ready when she arrived.
When she arrived ten minutes before the presentation was to begin the next morning, Marlene was dismayed. She had requested a medium-sized room with the forty people grouped at ten round tables and a laptop computer for each table. What she found was a huge meeting room, chairs with fold-up writing desks arranged in four straight rows facing a stage, and four PCs on a long tables on one side of the room.
Is there anything Marlene might have done to prevent this situation? Was there anything she could have done to improve it?
Marlene might have avoided room setup problems or at least known about them ahead of time if she had taken a few simple steps. She might have taken the time to discuss her room setup needs with the client’s representative. She could have sent a detailed drawing and asked the person to let her know if what she needed wasn’t available so they could explore options.
Marlene should have checked out the room when she arrived the day before the presentation—or at least arrived well in advance of the presentation start time. At least she could have made some last-minute changes, such as arranging the chairs in groups instead of rows.
Here are some suggestions that might have helped Marlene, and that might help you in similar situations:
• Ask questions. Find out everything you can about the room, the setup, and other environmental factors ahead of time.
• Provide a drawing. To avoid misunderstandings, provide the people in charge of room setup a detailed drawing showing exactly what you want. Make sure people understand why the room selection and setup is important.
• Check and double-check room arrangements and setups. Instructions can be mislaid or misunderstood. Scheduling conflicts can cause last-minute changes.
• Preview the room. If possible, visit the room before the presentation. (Presenters have been known to ask Security to unlock a room in the middle of the night.) Walk around it. Take note of any problems, such as noisy fans or faint lighting or difficult shape, and figure out how to minimize them.
• Arrive early. By arriving an hour ahead of time, you can make last-minute adjustments in the setup and become familiar with the room. For example, you can check to make sure everyone can see flip charts or slides and move chairs and tables if they’re not in the right configuration.
• Create a smaller space. If an auditorium is too large, you can rope off the back and side sections so that everyone sits together. If a classroom feels cavernous, arrange the seating at one end, using screens or furniture to create a more intimate space.
• Supplement poor lighting. Poor lighting not only makes it hard to see, but it makes a room gloomy. If necessary, bring in lamps to add more light.
• Use music and art. You can soften or liven up an overly formal or cold room by playing music in the background, especially as people arrive and during breaks. You can also make a room more attractive by putting art on the walls.
• Adjust your presentation if necessary. If you can’t make an essential change to the environment, change the presentation. For example, people won’t be able to do a lot of writing or engage in small group discussions if they’re tightly packed into auditorium seats.
• Use a microphone. If there’s any chance people can’t hear you or there is a great deal of interior or exterior noise, use a microphone.
• Acknowledge problems. Despite your best efforts, there might be problems you can’t avoid. Let people know you are aware of them, and do what you can to mitigate them. For example, if you know the chairs are uncomfortable, take more frequent breaks.
![]() Apply What You Learn
Apply What You Learn
Instructions: Complete Step 7 on the Presentation Preparation Worksheet to sketch the room setup for your practice presentation. Refer to Exhibit 4–4 for examples of room setups. List the equipment you’ll need along with other factors to consider about the environment. On your sketch of the presentation room, add the position of equipment (projector, flip charts, I computer monitor), as well as light switches and electrical outlets.
PREPARE FOR QUESTIONS AND ANSWERS (Q&A)
Not all presentations include a question and answer segment, but many do. In fact, for some presentations, the audience’s primary reason for attending is the opportunity to ask questions.
Let the Audience Know Right Away How You Plan to Handle Questions
Will you have a separate question and answer session at the end? Allow time for questions when you finish each segment? Take questions at any time? Do you want people to write down their questions on note cards and hand them in?
No matter how you handle questions, it can be as important to plan the Q&A as it is to plan the content part of the presentation. Below are some points to consider.
Anticipate Questions and Prepare Responses
You can’t anticipate every question people will ask. But you can make some educated guesses.
List questions your audience might have, and then decide how you will respond to specific questions. If necessary, prepare backup materials—handouts, overhead projections, etc.—to help you answer the questions. Pay particular attention to questions that might raise sensitive issues.
HINT: To identify questions people might ask, rehearse your presentation in front of a few colleagues and ask them to raise questions they think your audience might have.
Leave Enough Time
People get very frustrated when presenters run out of time before they are able to ask their questions. It’s better to cover a little less content than to sacrifice the Q&A segment to time constraints.
Estimate the time you’ll need to answer questions. Then build that time into the presentation.
HINT: If you do run out of time, ask people to write their questions down and hand them in, and promise to get back to them with responses. Occasionally, the answers to people’s questions shape the content of another presentation.
Questions You Can’t—or Don’t Want to—Answer
If you don’t have the answer to a question, you might say, “I’ll try to find out and get back to you.” If a question raises sensitive or inappropriate issues, you might say, “I’m not sure this is the right forum for that discussion,” or “I’m not sure everyone is interested in that topic,” and add that you will be glad to meet after the presentation to discuss the issue with anyone who is interested.
Instructions: Brainstorm questions that your audience might ask. Write down at least five. Decide what you will say if those questions are asked.
___________________________________________________
___________________________________________________
___________________________________________________
![]() Apply What You Learn
Apply What You Learn
Instructions: Complete Step 8 on the Presentation Preparation Worksheet to plan the Q&A segment (if any) for your presentation.
ANTICIPATE PROBLEMS
There are few things you can count on in this life. One is that things will change. The other is that problems will occur. You can’t anticipate every problem that might affect your presentation. But you can take steps to avoid certain problems and handle others if they do occur.
Avoiding Problems
Many problems can be avoided altogether. What are some steps you think a presenter can take ahead of time to avoid problems during the presentation itself?
Here are three steps you might have come up with:
• Anticipate problems and prepare backup plans. Make a list of possible problems and decide what you’ll do if they occur.
• Double-check everything. Go through handouts, slides, and overhead transparencies at least one day before the presentation so you’ll have time to correct any problems. Check with the room scheduler to make sure the room will be ready when you need it and set up the way you requested.
Try to check out the equipment the day before to make sure it’s in the room and in working order.
• Get there early. That way, you can rearrange the room, replace malfunctioning equipment, track down missing supplies, or make last-minute adjustments to your presentation if necessary.
Strategies for Handling Problems
The following are strategies for handling common problems that presenters encounter.
• Problem: The equipment you need—a VCR, slide projector, overhead projector, flip chart easel—malfunctions or is not available.
Strategy: Prepare a backup segment so you can deliver the same information another way.
• Problem: Handouts, slides, or overhead transparencies have been printed incorrectly or are in the wrong order.
Strategy: Double-checking should eliminate this problem. If it occurs anyway, and you cannot proceed without the materials, take a break so you can correct or re-order them.
• Problem: You can’t get started on time because people arrive late or the previous group finishes late.
Strategy: If people tend to arrive late, consider setting a start time that’s 10-15 minutes ahead of the time you actually plan to begin. Offer refreshments or other inducements to get people there early so they can be settled and ready to start on time.
If the previous group finishes late, know what part of your presentation you can compress or drop if necessary. Never run overtime unless the audience agrees that it’s okay.
• Problem: There is a room scheduling conflict—another group is using or expects to use the room.
Strategy: Do not allow this problem to occur. Double-check the schedule the day before the presentation. Then arrive early so you can head off any group that thinks the room is free.
• Problem: A key speaker has a last-minute conflict.
Strategy: Have a video, a substitute, or an additional presentation segment ready to go.
• Problem: There is a fire drill, and you lose presentation time.
Strategy: Know what part of the presentation you can drop. If you run out of time, consider going directly to Q&A, thus limiting the coverage to what people are most interested in.
• Problem: The power goes off.
Strategy: Always have backup plans for delivering the presentation without equipment that requires electricity.
Instructions: Complete Step 9 on your Presentation Preparation Worksheet. What problems could come up during your presentation? What can you do to prevent them? What backup plans do you need?

Once you’ve completed a working outline for your presentation, the next step is to prepare the presentation. The preparation process is a series of steps that begins with expanding the outline into a script or notes that include an opening, transitions, a closing, and details. Next, you will incorporate presentation aids and activities by preparing introductions and transitions. You continue your preparation by setting up or arranging for a comfortable environment that makes it easy for people to see, hear, and complete activities. Finally, you will determine how to handle questions and anticipate possible problems so you can take steps to reduce them and develop backup plans.
1. Word-for-word scripts: | 1. (b) |
(a) should be used whenever you feel nervous about making a presentation. |
|
(b) can make it difficult for you to make real contact with the audience. |
|
(c) should only be used by attorneys and presidents. |
|
(d) always need to be professionally prepared. |
|
2. When preparing an opening, it’s always important to: | 2. (b) |
(a) include a joke, making sure that it’s not offensive. |
|
(b) deliver the main point and tell the audience what to expect during the presentation. |
|
(c) use a personal experience to get the audience on your side. |
|
(d) allow at least five minutes so everyone in the audience can settle down before you get to the important information. |
|
3. The closing of your presentation: | 3. (c) |
(a) is the least important part. |
|
(b) should always include a call to action. |
|
(c) should usually include a “thank-you” to the audience. |
|
(d) should never restate the main point. |
|
4. The most important factor to consider about the presentation environment is: | 4. (d) |
(a) the size of the room. |
|
(b) the size of your presentation area. |
|
(c) whether people have comfortable chairs. |
|
(d) whether people can see and hear. |
|
5. The room setup: | 5. (b) |
(a) doesn’t matter much for most presentations. |
|
(b) can encourage or discourage interaction. |
|
(c) is usually something the presenter cannot control. |
|
(d) only matters when lunch is being served. |
|