VoIP, or Enterprise Voice, requires additional configuration and the deployment of new server roles to support this functionality. Enterprise Voice can be easily added to an existing Office Communications Server 2007 IM and Web Conferencing deployment. Enabling Enterprise Voice involves the following activities covered in the next section:
Configuring global Voice settings, as covered in the previous section
Administrating users to be Enterprise Voice enabled
Deploying media gateways to connect to the PSTN or PBX network
Deploying a Mediation Server for each corresponding media gateway
Optionally deploying one or more Monitoring Servers to collect, aggregate, and report Call Detail Records (CDRs)
Optionally deploying the Deployment Validation Tool to monitor voice quality within and outside the organization's network
Configuring users for Unified Communications (UC) is quite simple. Before a user or group of users can be configured for Enterprise Voice, they must be enabled for Office Communications Server and assigned a SIP URI and home pool. A different license agreement than the standard IM or Web Conferencing client access license (CAL) is required before enabling users for Enterprise Voice. Office Communications Server 2007 offers three CALs based on the type of functionality users can be enabled for.
To configure a single user for Enterprise Voice, select the user's Properties from the right-click menu in DSA.MSC or the Admin Tools MMC. Under the Communications tab, select the Configure button to view additional options. In the Telephony section, select the Enable Enterprise Voice Routing option and configure the user's phone number. The option to change the policy selection becomes available so that administrators can specify a different Voice policy. Every Enterprise Voice user must be assigned a Voice policy. This phone number is specified in a valid TEL URI format that is globally unique, meaning no other person has the same phone number extension within the organization. This number is entered in the Line URI field by using the format tel:<phone>. These settings are shown in Figure 10-29.
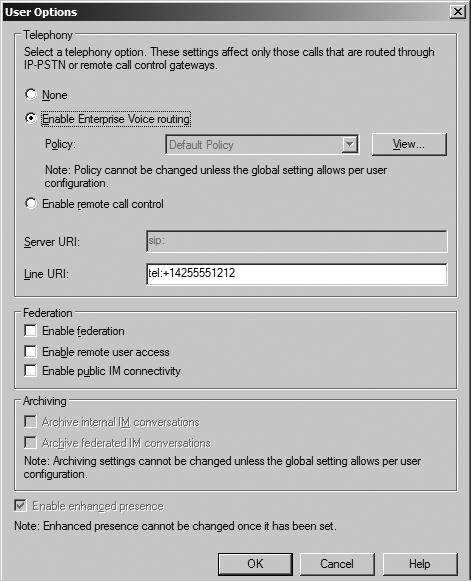
If an incorrect format is entered, an error warning is displayed. To specify an extension in addition to the phone number, use the following format: tel:<phone>;ext=<extension>. The phone number specified in the Line URI field uniquely associates the user's SIP URI to this TEL URI. This association allows Office Communications Servers to translate between the two URI formats.
By default, the Policy drop-down option is disabled. The global Voice policy is set to the out-of-the-box Default Policy. To be able to modify the policy assigned to the user, the global policy setting must be changed. To access this global policy, navigate to the forest level Voice Properties in the Admin Tools MMC and select the Policy tab. Click the Global Policy drop-down option, and choose Use Per User Policy. This is illustrated in Figure 10-30. Once the global Voice policy is modified, the user's Voice policy can be changed and viewed. When the View button is selected, the phone usage associated with the policy is shown.

To configure multiple users at once, a better option is to use the Configure Communications Server Users Wizard. To bulk configure, select all the users to enable for Enterprise Voice from DSA.MSC or Admin Tools MMC, and choose this wizard from the right-click menu (as shown in Figure 10-31).

Because this wizard allows the configuring of all user settings, click Next to arrive at the Enterprise Voice settings. The Enterprise Voice settings to configure are shown in Figure 10-32. The top-level check box, Change Enterprise Voice Settings, must be selected to enable users for Enterprise Voice. The top-level check box indicates that you want to configure the embedded settings. To enable users for Enterprise Voice, the Enable Voice check box must be selected. The policy drop-down list becomes available if the global policy permits it. (See Figure 10-30.) To bulk disable users, select the Change Enterprise Voice Settings check box and leave the Enable Voice check box unselected. This combination of settings effectively prevents users from using Enterprise Voice. Click Next and finally Finish to complete the wizard. The final page of the wizard displays the results of the operation performed. If the wizard indicates that the operation failed for some or all of the users, check whether these users are enabled for Office Communications Server and are assigned a SIP URI and a home pool.

One important point to keep in mind about using the Configure Office Communications Server Users Wizard is although users might be enabled for Enterprise Voice, unless these users were previously provisioned with a TEL URI that remains unique, they will not be reachable via a phone number if the Line URI field remains blank. The Configure Office Communications Server Users Wizard does not configure the Line URI field because each user must have a unique TEL URI. To bulk configure the Line URI field, you need to resort to using the following Office Communications Server WMI interface: MSFT_SIPESUserSetting.LineURI.
The media gateway is a third-party server role offered by Microsoft's partners that is used to convert the signaling portion, SS7, of the PSTN traffic into SIP and the media portion of the PSTN traffic into RTP. Because each media gateway vendor will likely expose its management settings differently, this book will not cover the step-by-step guidelines necessary to configure all the settings of the media gateway. Instead, the administrator should refer to the media gateway vendor's documentation, which is often available online.
Aside from differences in pricing and features, Microsoft differentiates media gateway vendors into three categories that it supports. The first category, referred to as basic media gateways, requires the deployment of Office Communications Server, Mediation Server to work with Office Communications Server 2007. Depending on the vendor, installing its media gateway service on the same physical server co-located with the Mediation Server service might be supported. Nevertheless, from a logical perspective, they are considered separate servers. The second category, referred to as advanced media gateways, does not require deploying Mediation Servers to interface with Office Communications Server 2007. The third category, referred to as hybrid media gateways, consists of a basic media gateway with the functionality of the Mediation Server coexisting on the same physical server. More details are covered in the Bridging VoIP to the PSTN Network by Using a Media Gateway section in Chapter 3.
The media gateway must be configured with the Primary Rate Interface/Basic Rate Interface (PRI/BRI) lines allocated by your telecom provider, which connect it to the PSTN network. On the network interface card (NIC) connected to the internal IP network, the gateway should be configured to connect to the Mediation Server if you are using a basic media gateway. To configure the media gateway to send and receive traffic from the Mediation Server, the following settings must be configured:
This configuration is illustrated in Figure 10-33.
The Mediation Server is a server role that is required if you are using a basic media gateway to function with Office Communications Server 2007. Since the majority of basic media gateways support only SIP over TCP or UDP, the Mediation Server extends the security of the Office Communications Server system up to the basic media gateways by translating SIP over TCP/UDP to SIP over MTLS. This is why it is recommended that you deploy a Mediation Server within proximity to its associated media gateway. To prevent internal users from eavesdropping on phone conversations, the network connection between the Mediation Server and media gateway should be placed on a separate network inaccessible to the users. Microsoft's objective is to help media gateway third-party vendors integrate as much of the Mediation Server functionality into the media gateway servers referred to as "advanced media gateways." The objective is to remove the Mediation Server role entirely. This will help reduce the added complexity that deploying and managing another server running the Mediation Server role creates, and consequently it will likely reduce total cost of ownership (TCO). Until third-party media gateway vendors are able to integrate this functionality into their offerings, a Mediation Server is required. The Mediation Server provides the following functions:
Intermediate signaling (SIP) between Office Communications Servers and the media gateway.
Transcode RTP media traffic from legacy codecs—such as G.711, G.722.1/SIREN, G.723.1, G.726, and GSM—that are used by media gateways to the Office Communications Server 2007 advanced audio codec, Real-time Audio (RTAudio).
Acts as an Interactive Connectivity Establishment (ICE) client to enable PSTN-originated media flows to traverse intervening Network Address Translators (NATs) and firewalls.
Provides management, provisioning, and monitoring for the media gateway to integrate into Office Communications Server's infrastructure of Active Directory, WMI, and MMC.
The Mediation Server installation can be found under the Deploy Other Server Roles option in Office Communications Server 2007 Setup. This is illustrated in Figure 10-34. Office Communications Server 2007 Setup provides a step-by-step set of wizards for installing your Mediation Server.

From a configuration perspective, a one-to-one correspondence between Mediation Server and the media gateway is required. That is, one Mediation Server is required for each media gateway deployed. The Mediation Server role must run on a computer that is domain joined to the Active Directory forest where the Office Communications Server 2007 infrastructure is deployed. The Mediation Server must be configured to connect to an Office Communications Server. If a Director is deployed, the Mediation Server can be configured to route calls to the Director; otherwise, the Mediation Server should be configured to route traffic to the home pool closest to it.
Because the Mediation Server is the only Office Communications Server role that connects directly to a basic media gateway, it must be configured to send and receive network traffic to and from the media gateway. The Mediation Server must have at least two NICs configured on the physical computer—one NIC is used for sending and receiving signaling (SIP protocol) traffic from Office Communications Servers as well as audio (RTAudio codec) traffic from internal phone clients, and the other NIC is for sending and receiving signaling (SIP protocol) and audio (G.711 codec) traffic from the media gateway. This is illustrated in Figure 10-35.

To allow remote users (users connecting from the Internet) who are Enterprise Voice enabled to dial and receive calls from outside the enterprise's network, the administrator must specify the A/V Edge Server that the Mediation Server should connect to for both inbound and outbound calls. For security reasons, the A/V Edge Server does not initiate connections to servers in the corporate internal network. When a remote user dials a phone number, the signaling (SIP) traffic to initiate the call traverses the Access Edge Server to the Director, which routes the request to the user's home pool. The home pool sends the request to the Mediation Server. The Mediation Server forwards the request out to the PSTN through the media gateway. When the call is answered, the Mediation Server needs to establish a connection with the client to obtain the audio portion of the call. The Mediation Server specifies the address of the A/V Edge Server the client should connect to through the signaling channel, and on its end establishes a connection to the A/V Edge Server. The address of the A/V Edge Server is the one the administrator configured the Mediation Server with. Once the client and the Mediation Server set up a tunnel across the A/V Edge Server, audio can flow through. The Mediation Server forwards this audio to the media gateway. A similar process occurs when the remote user receives a call. This is illustrated in Figure 10-36.

Figure 10-37 shows, from the perspective of the Mediation Server, what configuration is necessary to make it work with the other server roles.

The following are descriptions of the numbers keyed to Figure 10-37:
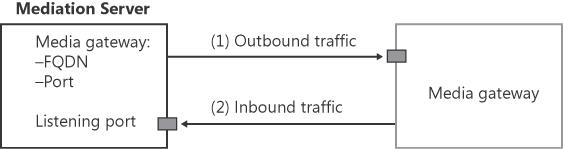
Outbound traffic to media gateway The Mediation Server must be configured with the IP address of the media gateway and port number it will send outbound traffic to, which it receives from the Office Communications Server or A/V Edge Server.
Inbound traffic from media gateway This is the IP address on the Mediation Server that will be used to listen for inbound traffic from the media gateway.
Outbound traffic to Office Communications Server The Mediation Server is configured with the FQDN and port number of an Office Communications Server to which it will send outbound traffic it receives from the media gateway.
Inbound traffic from Office Communications Server This is the IP address on the Mediation Server that will be used to listen for inbound traffic from the Office Communications Server.
Inbound/outbound traffic to A/V Edge Server The Mediation Server is configured with the FQDN and A/V Authentication port number of the A/V Edge Server. The Mediation Server should be configured with a local A/V Edge Server to allow remote users to dial out to the PSTN as well as receive calls originating from outside the user's organization.
To configure the Mediation Server, the administrator must use the Admin Tools MMC. After installing the Mediation Server, open the Admin Tools MMC and locate your Mediation Server by its FQDN. Right-click your Mediation Server, and select Properties (as shown in Figure 10-38).

The six settings to configure the Mediation Server so that it can route traffic between the Office Communications Server and A/V Edge Server to the media gateway are split between two tabs. These settings are shown in Figure 10-39, and they are numbered to match the logical representation of these settings that was shown in Figure 10-37. The first tab, called the General tab, is used to specify the IP addresses that the Mediation Server listens on for inbound connections (numbered item 4 in Figure 10-39). In addition, the administrator can specify a location profile for the Mediation Server (numbered item 6). The range of media ports used by the Mediation Server is configurable; however, in most cases the default values do not need to be modified. The second tab, called the Next Hop Connections, is where the administrator specifies the outbound connections to the Office Communications Server (numbered item 3) and media gateway (numbered item 1).

Before the Mediation Server can establish network connections with other Office Communications Servers it interacts with, it must be configured with a server certificate issued by a certificate authority (CA) that is trusted by the other Office Communications Servers. This configuration can be completed from the Certificate tab.
Returning to the configuration of an A/V Edge Server connection in the Mediation Server properties, if the A/V Edge Server drop-down option (shown as 5 in Figure 10-39) is empty, this is because no trusted A/V Edge Servers were configured in the Office Communications Server's global settings at the Active Directory forest level. Once an A/V Edge Server is specified, it becomes visible in the drop-down list of the General tab of the Mediation Server's properties. To configure your A/V Edge Server, navigate to the Global Properties of the forest node in the Admin Tools MMC, and select the Edge Servers tab (shown in Figure 10-40). Click the Add button to specify an A/V Edge Server. The dialog box will prompt you for the FQDN and authentication port number of the A/V Edge Server.

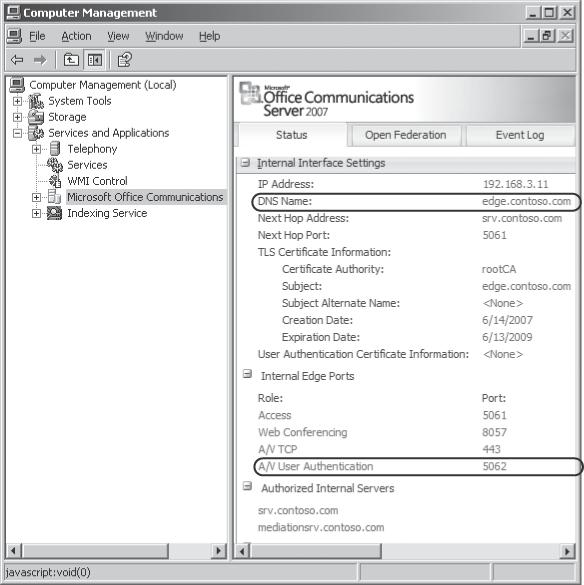
To determine the FQDN and A/V authentication port number of the A/V Edge Server, navigate to the Admin Tools MMC of your A/V Edge Server. The way to get to the Admin Tools MMC of Edge Servers is to right-click My Computer and select Manage. (See Figure 10-41.)

Expand the Services And Applications node to reach the Microsoft Office Communications Server 2007 node. Click the plus sign (+) next to Internal Interface Settings in the Status pane to expand it. The information to configure the global Edge Server settings is displayed in the Status pane. (See Figure 10-42.)
Once the A/V Edge Server is specified in the global settings, the A/V Edge Server's FQDN and authentication port number are visible in the General tab of the Mediation Server (shown in Figure 10-43).

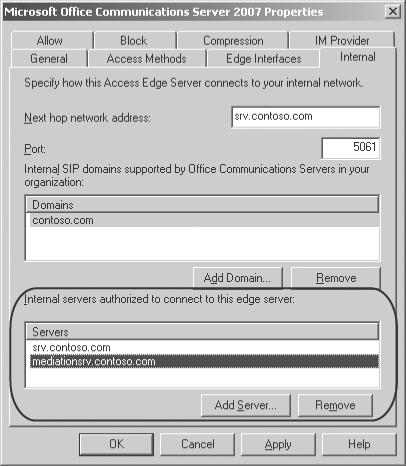
Configuring the Mediation Server to connect is nearly complete. The Mediation Server is now configured to connect to the A/V Edge Server; however, the A/V Edge Server is not configured to trust incoming network connections from the Mediation Server. To specify the A/V Edge Server to trust the Mediation Server, the administrator must return to the Admin Tools MMC of the A/V Edge Server, select Properties, and navigate to the Internal tab. To add the Mediation Server as an internal server authorized to connect to the A/V Edge Server, click the Add Server button, and specify the FQDN of your Mediation Server (as shown in Figure 10-44).
Your configuration of the Mediation Server now allows remote users to place and receive calls when signing in from the Internet.
Microsoft Office Communications Server 2007 Quality of Experience (QoE) Monitoring Server enables you to perform near real-time monitoring and service assessment of unified communications media. This server role collects Call Detail Record (CDR) metrics from all the Office Communications Servers. The Call Detail Record metrics are routed to the QoE Monitoring Server as SIP traffic. It then analyzes the quality of calls, referred to as Quality of Experience (QoE), and provides root-cause analysis and alarms to administrators.
Quantifying and monitoring the Quality of Experience of all users in all calls is one of the unique differentiations of Office Communications Server 2007. The user endpoints (Office Communicator and Office Communicator Phone Edition) measure the actual experience and generate all relevant metrics of each call, which are collected and aggregated in a CDR by Office Communications Server. The CDRs are sent to the Monitoring Server, which aggregates the data. In total, more than 30 parameters that pertain to quality are logged by each endpoint in a call.
The Monitoring Server provides reporting interfaces that integrate with Microsoft Operations Manager (MOM) 2005 and runs analytics on data that the administrator can use to monitor and proactively remove network bottlenecks. Before the Monitoring Server can be installed, Microsoft Messaging Queue (MSMQ) must be installed.
To install MSMQ on Windows Server 2003, follow these steps:
Note
For more information about Microsoft Message Queuing, see the following link: http://www.microsoft.com/windowsserver2003/technologies/msmq/default.mspx#E3D.
The Deployment Validation Tool (DVT) provides a very easy and convenient way for checking the quality of calls. This is a resource tool that can help monitor the voice quality of an Office Communications Server Enterprise Voice deployment. Installing DVT is completely optional. It can be used independently or to complement the Monitoring Server.
The Deployment Validation Tool consists of a server, called the Organizer, and multiple clients, called Agents. The Agents are configured similarly to how Office Communicator 2007 is configured. The Agents sign in to Office Communications Server, each with a distinct user account. The Organizer controls the Agents, and the administrator manages the Agents from the Administrative Console. The administrator adds the Agents to the Organizer's roster and can run or schedule recurring tests. The tests are performed between the Agents. The Agents initiate voice calls—both peer-to-peer and conference calls—and then send the results to the Organizer. This helps the administrator test out the voice quality of the Office Communications system without using real users. It helps troubleshoot networks with traffic congestion or poor bandwidth. It's important to properly place Agents in locations where voice quality is likely to degrade or locations that have been reported by users as having poor voice quality.
If setting up an Organizer seems like too much work, another option is to install only Answering Agents. This is a mode that an Agent can run in that does not require the use of an Organizer. An Answering Agent is similar to a bot. Users call the Answering Agent as they would any other contact. The Answering Agent prompts the user to record a message, which it then replays back to the user. This process allows the user to verify the audio quality of the network connection before placing a call to a contact. This is particularly beneficial for remote users who are not sure whether the connectivity at the hotel, customer site, home, café, or wherever they might be will offer sufficient bandwidth for quality audio. This feature requires installing only an Agent. Because the Organizer does not manage this type of Agent, it is not necessary to add it to the roster in the Administrative Console.
When setting up Agents, it's recommended to set up at least a couple of Agents inside the corporate network so that they can initiate calls between each other. Placing Agents in remote branch offices allows monitoring the audio quality across WAN links. If remote access is configured, it's recommended to set up at least one Agent outside the corporate network. Agents can be deployed behind each media gateway. The more Agents that are deployed, the more precisely the administrator can isolate a problem to a specific network segment. A maximum of 16 Agents can be deployed per Organizer.
The Organizer (server) and Agents (clients) must be configured with different SIP URIs that are not used by any existing users. Installing an Agent on the same computer as the Organizer is not recommended. Every time a configuration change is made to either an Agent or the Organizer, the corresponding service must be restarted. To restart the service, navigate to the Services MMC from the Administrative Tools folder. Locate the service, and click the restart button as shown in Figure 10-45.

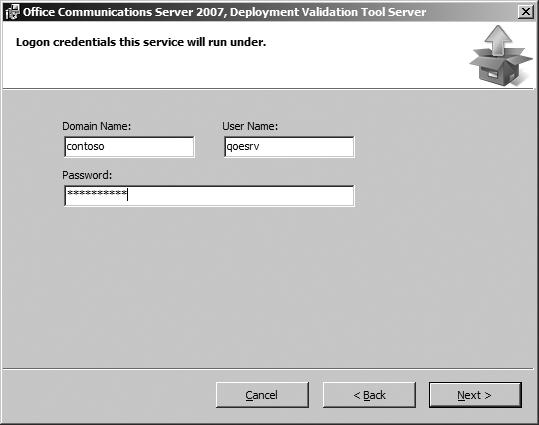
To install the Organizer, run the command script setupserver.cmd. Alternatively, the command setup.exe /Server can be used to install the Organizer. Setup will ask to install Microsoft Visual C++ 2005 SP1 development system Redistributable and .NET Framework 2.0 if they are not installed on the computer. During the installation of the Organizer, Setup will prompt for credentials to run the service under. It's recommended to use an account that is communications enabled. Specify these credentials as shown in Figure 10-46.
Note
If the Windows Firewall Internet Connection Sharing service is not running during installation, a message indicates an unspecified error (error code 0x80004005) while running Netsh.exe. Click OK in the message box to continue.
Configure the Organizer (server) with a user's SIP URI and credentials. The credentials need to be entered only if you are using a different account than the one specified during the installation of the Organizer. Because the Deployment Validation Tool stores these credentials in plaintext if you are not using the default credentials, for security reasons it's best to use the credentials of the account specified during the Organizer Setup. The configuration (automatic or manual) and connection type (TCP or TLS) should be configured similar to how Office Communicator 2007 is configured. The agent parameters can be ignored, as these are configuration settings for the Agent. These settings are shown in Figure 10-47.

Setup also automatically installs the Administrative Console during installation of the Organizer. The DVT Administrative Console is where the administrator associates agents to the Organizer to control, and it specifies when to run a test suite and how to report the results.
To install the Agent, run the command script setupagent.cmd. Alternatively, the following setup.exe command can be run: setup /Agent. The Agent uses Microsoft SQL Server. If SQL Server 2005 Express is not available, Setup will fail to install. DVT comes packaged with SQL Server 2005 Express. To install SQL Server 2005 Express, run the executable sqlexpr.exe before continuing with the installation of the Agent. Setup will ask to install Microsoft Visual C++ 2005 SP1 development system Redistributable and .NET Framework 2.0 if they are not installed on the computer. Similar to the Server Setup, the Agent Setup Wizard prompts you for user credentials to run the service as. This user account must be enabled for communications. If the Windows Firewall Internet Connection Sharing service is not running during installation, a message indicates an unspecified error (error code 0x80004005) while running Netsh.exe. Click OK in the message box to continue. The message can be safely ignored.
In the Agent Configurator, Setup prompts you for the account's SIP URI and credentials if you are using a different account than the one used to run the agent. It's recommended not to use a different account because the password will be stored unencrypted. Specify the configuration type—either Automatic or Manual—to Office Communications Server, and specify the connection type—TCP, TLS, or Auto—in the Agent Configurator dialog box. These settings should be similar to the type of settings used by Office Communicator 2007. There are three modes the agent can be configured to behave as:
Unified Communication This type specifies that the Agent should simulate an Office Communicator 2007 client when a user calls it.
PSTN This type specifies that the Agent should simulate a PSTN phone when a user calls it.
Answering Agent This type specifies that the Agent should simulate an answering system when a user calls it. The Agent prompts the user to record her voice and replays it back to the user so that she can evaluate the audio quality of the call.
The phone number of the account used by the Agent is optional except in the case of the Agent configured in the PSTN mode. The phone number should be specified in E.164 format in the Agent Configurator. This dialog box is shown in Figure 10-48.

The administrator has the option to return to this dialog box to modify the configuration of the Agent. To access these settings again, click Start, select All Programs, navigate to Deployment Navigation Tool, and click Agent Configurator. Configuration changes do not take effect until the next time the Agent service is restarted.
The Administrative Console provides a simple interface to configure DVT. The primary activities an administrator must do are associate Agents to the Organizer, set up and run a test suite, specify how the Administrative Console should alert the administrator, and review results. The Administrative Console provides five tabs to perform these activities:
Main This tab can be used to alert the administrator of any failures.
Roster This tab shows all the Agents that are associated with the Organizer. The Roster shows the status of each Agent.
Test Suite This tab shows all the test cases that the Organizer orchestrates between the registered Agents. It automatically generates a full mesh of test cases for both peer-to-peer and conference calls. The administrator can control each individual test case. The administrator can configure the Organizer to automatically run through the test suite every 60 minutes (the time delay is configurable) or run immediately by clicking the Run Suite button.
Reports This tab reports on the results of the test suite.
Alerts This tab alerts the administrator of all the connectivity results from test suites that have been run. It provides searching functions to query for specific results.
The type of metrics collected by the Agents can be viewed by right-clicking a result entry in the Reports tab and selecting View Details. A Reports Details shows the set of metrics collected and any failure information. The following graphics show an example of a test with no failures and another test with a failure.


The Deployment Validation Tool is a convenient tool to verify an organization's Enterprise Voice deployment and perform regular check-ups in a dynamic network environment. It is a tool that is relatively easy to install and configure. Administrators should consider adding DVT to their toolsets for managing Office Communications Server Enterprise Voice deployment.