The topics in this section include general VoIP features of Office Communications Server 2007. The next section, Examining the Technical Details Behind VoIP Scenarios describes the technical aspects of using these features.
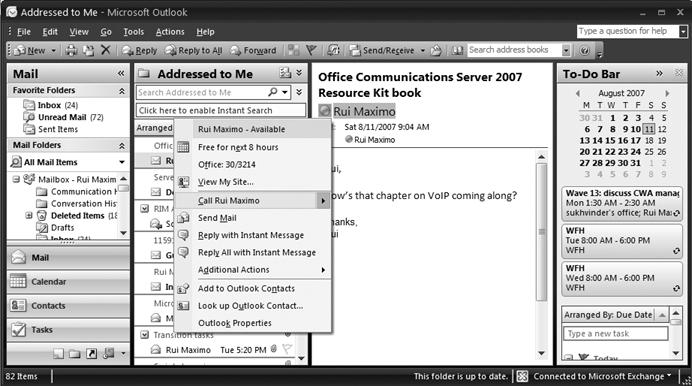
With basic two-party calling, one party can dial a number and establish an audio conversation with another party. The user can select a contact from his contact list and click the call icon. A conversation subject can be set so that the called party knows what the call is about. Alternatively, the user can right-click the contact and select a call from the drop-down menu. (See Figure 10-2.) After the user installs Office Communicator, this right-click menu is also available in every Microsoft Office program (Word, Excel, Outlook, and so on) as well as SharePoint. (See Figure 10-3.) This consistent user experience reinforces users' familiarity with making a call.

Calling an internal user is one click away because the caller can dial based on user name by locating the called party in the contact list or performing a search, but what about external users? In the case of external users, the caller will not be able to locate the party to be called by name unless they are added to the Outlook address book by the user. Instead a phone number must be dialed. Dialing from Communicator is as simple as typing the phone number in the search field and pressing the Enter key or clicking the phone icon. (See Figure 10-4.)

When an internal or external call is placed, Communicator displays an unobtrusive conversation window with visual controls that replace the obscure dial codes of PBX phones, making it much easier for users to discover these features and use them. (See Figure 10-5.) A description of the controls available in the conversation window is described after Figure 10-5.

The controls shown in Figure 10-5 are numbered to match the following descriptions:
End the call.
Hold the call.
Transfer the call.
Expand the standard 3x4 dial pad.
Change the volume.
Mute the microphone.
End the call.
Add video to the call.
Add IM to the call.
Invite additional participants to the call.
Take notes associated with the call by using Microsoft OneNote.
The down-arrow caret displays a drop-down menu with additional options, such as taking notes, sending a file to the other person the user is talking to, and setting and changing the conversation subject so that the called party gets an indication of the topic the calling party wants to discuss before answering the call. Also, similar to e-mail messages, the caller has the option to set a high-priority importance indicator to the called party.

Once the call is established, the audio comes through the computer speakers and built-in microphone. Although the built-in audio system isn't meant for audio calls, as the other party will likely hear the clicking of the keyboard when typing, the quality is relatively good. For optimal audio quality, use a headset or USB phone.
Call deflection refers to the ability of the called party to redirect the calling party to a different phone number before picking up the call. This capability is valuable if you're about to step out for a meeting but need to answer the call, which perhaps is a call you've been expecting. Ideally, the called party is able to redirect the call to her cell phone to take the call while commuting to her next appointment. Redirecting the call from your office phone to your mobile phone is a valuable feature that's possible with Office Communicator 2007. When a call comes in, a toast appears with an accompanying ringing sound. Deflecting the call is as simple as clicking the Redirect caret, and selecting a phone number to forward the call to as shown in Figure 10-6. This is essentially call forwarding on the fly.

Another example is the flexibility to receive calls directed to your work number at home. For example, if your home computer doesn't have Communicator 2007 installed, you can still connect using Communicator Web Access (2007 release). Like Communicator 2007, Communicator Web Access (2007 release) also supports call deflection. Similar to Office Communicator, a toast appears on the screen indicating a call is incoming (as shown in Figure 10-7). To deflect the incoming call from your work number to your home number, click on the Redirect caret and select one of the published phone numbers to forward the call to. The caller thinks the call was answered at the office even though the call was forwarded seamlessly to a different number.

Before an incoming call can be redirected to a predefined phone number, the phone number must be published in the user's settings. Once published, these phone numbers are available for selection in the Redirect drop-down menu. To publish these phone numbers, navigate to the Options dialog box under Tools and select the Phones tab as shown in Figure 10-8.

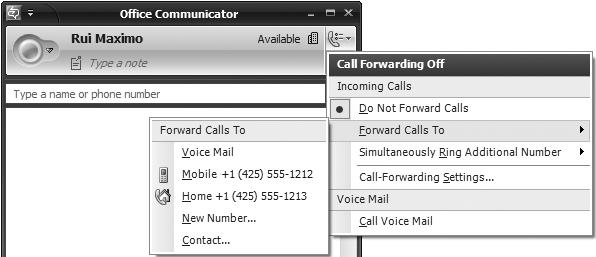
Call forwarding refers to the feature of configuring your phone to automatically forward incoming calls directly to voice mail, to a contact, or to another phone number published in the user's Phones tab (which was shown in Figure 10-8) without ringing that user's phone. Alternatively, the option to simultaneously ring and forward the call is available. Figure 10-9 shows how to locate these settings to configure them from Communicator.

Another convenient way of configuring call forwarding is directly from the main Communicator or Communicator Web Access window as shown in Figure 10-10.
Communicator Web Access (2007 release) provides a nearly identical interface for configuring these settings as well. So, if you've already left the office and forgot to configure your call-forwarding settings, it's never too late to do it as soon as you're within reach of any computer with an Internet connection. (See Figure 10-11.)

Voice mail is a required feature of any self-respecting phone system, and Office Communications Server 2007 supports voice mail with Microsoft Exchange Server 2007 Unified Messaging as the voice mail storage application—or in the case where Office Communications Server 2007 is integrated with a supported PBX, Office Communications Server 2007 allows the PBX to handle voice mail. Even if Communicator is not running, calls are routed to the user's voice mail, and the user can later call her voice mail to listen to her messages or retrieve them directly from within her Outlook inbox. Figure 10-12 shows how to call your voice mail directly from within Communicator.

With Exchange Server 2007 Unified Messaging deployed, users have a rich voice mail experience from within Outlook 2007. Voice messages can be listened to directly from within Outlook. Each voice message is shown as a separate e-mail. The experience of listening to voice mail is similar to reading e-mail messages in Outlook. (See Figure 10-13.)

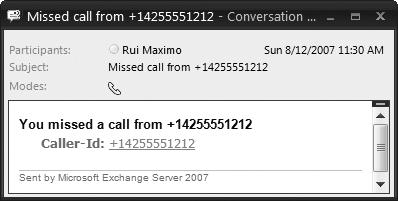
Missed calls are also shown as e-mail notifications showing the caller ID and a link to call back the calling party. (See Figure 10-14.)
In the Conversation History folder in Outlook 2007 is a call log of all outgoing calls made (shown in Figure 10-15). This folder is automatically created by Outlook 2007.

An ad hoc conference call occurs when three or more parties participate in the same call. There are multiple ways to establish a conference call. A conference call can be started by adding all the parties at once—such as calling everyone on an e-mail thread or selecting the participants from the contact list in Office Communicator and initiating the call, or adding additional participants to a two-party call in progress. Figure 10-16 shows how to add participants to a two-party call. The peer-to-peer two-party call is changed on the server into a conference call. A focus is started. The focus is directed to one of the available conferencing servers associated with the pool, where the leader is homed to create a conferencing session. The session mixes all the audio feeds before sending the audio back to all the participants.

Another way of conducting an ad hoc conference call is to select all the participants before beginning the conversation. This approach immediately establishes a conference call instead of escalating from a two-party call. (See Figure 10-17.)
