Lesson 12. Blogging on the Go
You can’t always be on your computer. With a smart phone and the availability of Wi-Fi, you can take the blogging experience with you almost anywhere you go. There are several ways to get posts to your blog, from email to iPhone apps. This lesson describes the various ways you can blog on the go.
Setting Up Your Blog for Remote Access
Blogging can be fun, and with wireless technology there’s no reason you can’t do it while you are out and about. Perhaps you are at a conference or on a special vacation, and you would like to blog about your experiences as they happen. WordPress can make that a very real possibility. Capturing your thoughts and blogging them right away can be very captivating for readers of your site.
To remotely access your blog, you have to turn on the WordPress feature to allow outside applications to connect and interact with your site. By default, this feature is turned off. There are two ways that outside applications can interact with WordPress:
• Atom Publishing
• XML-RPC
Note: WordPress.com Versus WordPress.org
If you are using a WordPress.com account, the Remote Publishing feature is turned on by default as opposed to your WordPress.org install.
Use the following steps to turn on an option for remote access:
- Open your site’s Dashboard.
- Select Settings, Writing.
- In the Remote Publishing section, select the XML-RPC option.
- Click Save Changes.
Caution: Enable Only What You Need
I recommend turning on only the options you believe you are going to use. Turning on features you are not using could be a security risk.
Note: XML-RPC or Atom Publishing?
I cannot say that one publishing protocol is better than another; however, the applications that are discussed in this lesson support XML-RPC for remote operations, so that’s the protocol used in this lesson. Of course, if you come across an application that supports Atom Publishing, you can come back here and easily turn it on.
Now, to use your remote blogging capabilities, you need to know only your site’s URL, username, and password, and you are set.
Note: Finding the XML-RPC Script
Some sites and applications are smart enough to figure out where your XML-RPC script is, and others want a complete URL to your site, including the XML-RPC script. If that is the case, use http://www.yoursite.com/xml-rpc.php instead of http://www.yoursite.com.
Posting from Other Websites
Some websites offer interaction with other sites using remote publishing. This can be very beneficial by allowing you to create more compelling content on your site by including material from other places across the internet.
Flickr
Flickr, a popular photo-sharing site, offers support for a variety of websites.
Say you upload a picture from your camera phone to Flickr, and you want to also post that image on your blog. Flickr allows you to set up several blogs to publish to, not just one.
Note: Flickr Accounts
To use Flickr to post photos, you need a Flickr account. It is free, and you get a generous amount of space to store images. Flickr does offer Pro accounts with a few more features and more storage space.
- After you set up your Flickr account and are logged in, click the arrow directly to the right of You and select Your Account.
- Now you see a tab labeled Extending Flickr, Click it.
- On that tab, you see Your Blogs, Click it.
- Click the Configure-Flickr-to-Blogs Setting link.
- Flickr walks you through the process with a wizard that will eventually ask for your URL, username, and password.
After you configure your blog, you can go directly back to the same location and edit the settings for your blog, including the default layout, and even post a test post.
The layout allows you to set the default image site and text flow, so it looks correct on your blog each time (see Figure 12.1).
Figure 12.1. Using Flickr to configure the default layout of your blog.

After you set up your blog, above any picture in your photostream that you have marked as public is a Blog This icon. The Blog This icon is also available for any photo that is on Flickr that is marked as public and the photographer has allowed allow blogging of his or her photos.
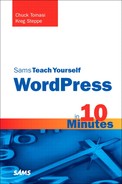
After you click Blog This, as shown in Figure 12.2, Flickr asks which blog (you can configure more than one) and prompts you for a title and text body. After you submit this information, it is published to your site.
Figure 12.2. Blogging a picture from Flickr.
Posterous
The Posterous service enables you to send emails to your Posterous account, and it creates a blog for you. Posterous not only creates a blog for you (non-WordPress), but also directs your messages to several services on your behalf, including Twitter, Facebook, WordPress, and others.
The Posterous page tells you that you don’t have to set up an account to start using the services; however, to add your WordPress blog for posting, you need to set up one.
To set up a page, visit the Posterous site at http://posterous.com and click on the login in the top-right corner.
- You can create an account using your Facebook credentials if you want or click on the Sign up with Posterous button.
- The service asks what you want your site’s name to be and your email address (for your account login) and a password. When this setup is complete, you can email [email protected], and the service routes your message wherever you have it set to go.
- After creating your account, log in. You see Manage at the top of the page. From there, you can set up where your messages will be routed.
Setting up WordPress autoposting is easy.
- Click on the Autopost heading on the left side.
- Click on the large green Add a Service button (see Figure 12.3). The resulting pop-up shows you all the services that Posterous uses.
Figure 12.3. Setting up autoposting in Posterous.

- In the Blogs section on the pop-up window, select WordPress, and you are presented with the familiar settings that you have been using, including your site’s URL, username, and password.
Note: Post to Multiple Sites with Posterous
What is nice about Posterous is that anything you send in is sent to all the services you have set up. So, one post is posted to many sites, or Posterous can provide you with a special email address so you can post to just one site at a time.
Now you are all set. You can post text, pictures, and video to your WordPress site and other services, all at the same time, through one email message.
Using Mobile Applications
There are lots of mobile applications for either the iPhone or BlackBerry. There are also applications for other mobile devices, such as Android, but not an official one as of yet. Here we focus on the Official WordPress application written by Automattic, Inc., the company behind WordPress.
There are versions for the iPhone and the BlackBerry; they both work similarly and both support a WordPress.com account as well as your own self-hosted WordPress.org site.
Using the iPhone App
The WordPress application is available through the App Store. You can install it by opening the App Store and searching for WordPress. The App Store walks you through the installation process.
To configure the iPhone app with your first blog:
- Click on the app’s icon to open it.
- You are prompted for your username, password, and URL.
- After you have entered your credentials, click Save.
- A pop-up window tells you that the app is being validated. Let the validation process complete.
- After the app is installed, you see content from your site starting with comments.
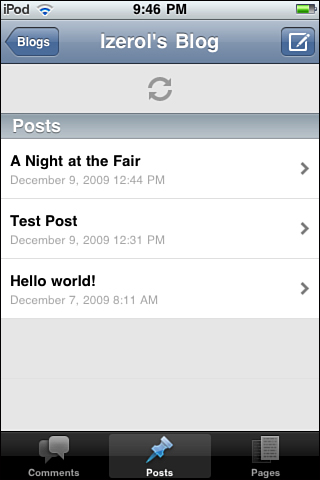
Now that you are viewing your blog, at the top left of the screen is a link to go back to your blog’s list, and a button on the right has an edit button (see Figure 12.4). This is the place where you make new posts.
Figure 12.4. WordPress functions on the iPhone and iPod touch.
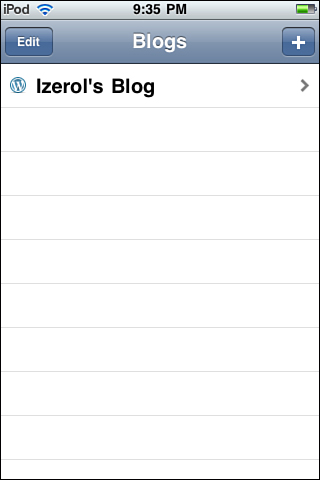
At the bottom, you see three buttons:
• Comments—Allows you to moderate comments as they come in
• Posts—Enables you to create and edit posts
• Pages—Enables you to create pages on your site
You can perform any blogging function from this application. Creating a post is intuitive. You can even add media; for example, you can upload pictures that you have taken with your cell phone camera or even take one at that moment.
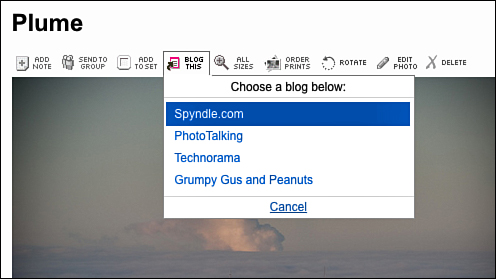
Clicking Blogs will take you back to your Blog List. An Edit button appears at the top left, and a + button is on the right (see Figure 12.5).
Figure 12.5. Using your blog on your iPhone or iPod touch.
Clicking Edit changes to edit mode and allows you to delete any blogs that you have listed, and clicking + prompts you to add a new blog, if you have another to add. While in Edit mode, you can click on your blog and change any settings for it, such as your username and password.
If you’re not in Edit mode, clicking on the blog’s title takes you to the screen where you can view the content and work with your selected blog.
BlackBerry
If you are a BlackBerry user, an application is also available for that platform.
Caution
Something to keep in mind before you install the BlackBerry app is that at press time of this book, the Blackberry application is in beta and not a final release version. Options and features could change by the time you read this and, as with all beta/pre-release software, you should be aware that you could run into bugs that might cause you trouble.
To install the BlackBerry application:
- Open your web browser and navigate to http://blackberry.wordpress.org.
- Click the download link on the top-right side.
- Your BlackBerry asks if you want to install the application and walks you through the rest of the installation process.
After installing the BlackBerry application, you can start adding blogs that you write for and start posting.
The main difference between this and the iPhone application is that the BlackBerry relies on the context menu (by clicking the BlackBerry Menu button) to perform many of its functions.
To start adding a blog, click the BlackBerry Menu button. You then can perform several functions:
• Show Blog—Shows you the options for the blog you have highlighted (if you already have one set up on the main page).
• Add Blog—Allows you to create and set up a blog for posting or managing.
• Delete Blog—Will remove a blog that you have highlighted (if you already have one set up on the main page).
• Setup—Allows you to set various options regarding how this application talks to the Internet and so on. Most likely, the defaults will work for you.
• Check Update—Checks to see whether you have an update to your WordPress mobile application.
• About—Displays version and other information about this application.
Select Add Blog. You are asked for the familiar credentials described earlier in the lesson. Once set, your BlackBerry application tries to authenticate you and download information, such as the last 10 posts and any comments that need approving.
Now you are set and ready to blog from your BlackBerry. You can add posts and media from your cell phone’s camera and moderate comments as you would on your blog from your computer.
Tip: Why Can’t I See My Posts?
If posts have been made since you last opened your BlackBerry application—for example, posts you made from your computer—you might have to click the Refresh menu option to see the newer posts (see Figure 12.6).
Figure 12.6. WordPress functions for a blog on the BlackBerry.

Using Email to Post
I like to blog from my mobile device, but there are some issues to consider when you do so, especially while you’re on vacation. Usually I vacation with my family, and they tend to frown on my monkeying around on my BlackBerry. And to be honest, trying to make a quick post with the BlackBerry, iPhone, or iPod Touch using the mobile applications can take a little longer than shooting off an email.
The mobile apps are great, but sending an email to your blog can be a quick and effective way to blog. You can add pictures or media, and everything is picked up on the other end. This approach is quicker and less cumbersome and will score some points with whomever you are vacationing with.
Email Posting with WordPress.com
If you want to set up your WordPress.com blog for email posting, visit WordPress.com and log in with your account.
- Along the menu at the top of your screen, click My Dashboards to see a drop-down menu with all the blogs you have configured.
- At the bottom, click Manage Blogs.
- You now see a page titled Blogs You’re a Member Of.
- To the right is a column called Post by Email. For each blog listed, you see an Enable button.
- Clicking Enable generates a secret email address for your blog.
That’s it; now you’re ready to post by email to your WordPress.com blog.
Tip: My Secret Email Isn’t Secret Anymore!
If you hover your mouse cursor over the email address, you see the Regenerate and Delete options. If your secret email address becomes public, or you need to change it for another reason, you can regenerate it by clicking Regenerate, and you create a completely new address to post to.
Email Posting with WordPress.org
To set up your WordPress.org blog for email posting:
- Open your Dashboard in your web browser and navigate to Settings, Writing.
- You then see a section called Post via E-mail. It is recommended that you create a special email address to use as your publishing email.
You can create an email address for posting to your blog through your web host, or you can create one through one of the free email services offered by Yahoo!, Google, and others.
Caution: Don’t Share This Email Address
WordPress recommends posting via email using an email address that is secret—for example, [email protected]. It is a good idea not to share this email address with anyone because anyone who has the address is able to post to your blog.
- After you have your secret email address, you need the URL of the email server, your username, and your password to proceed (see Figure 12.7).
Figure 12.7. Settings for email publishing.
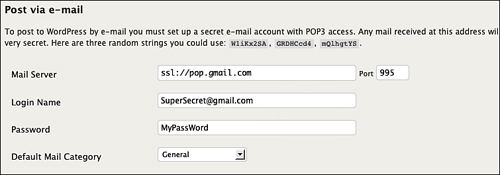
Tip: SSL on Email Servers
Some services, such as Google’s Gmail, use SSL to secure your connection to your email. If you use a service that requires SSL, you might have to indicate that as part of the email server’s URL—for example, ssl://pop.gmail.com (see Figure 12.7).
- After filling out your information, click Save Changes.
There is one caveat with posting in this manner: When you are running your own WordPress.org site much like you have to check your email, your WordPress blog has to check for email, too. Unfortunately, this process is not automatic. Each time you send an email to your secret email address, you have to visit the URL http://yourdomain.com/wp-mail.php for it to pick up your posts.
For WordPress.com sites, this is automatic.
This procedure can be automated with a CRON job for your WordPress.org site. CRON is a UNIX application that runs jobs at a certain time and date of your choosing. Some web hosts allow you to create a CRON job and automate the process of having WordPress check for messages.
Caution: Setting the Frequency of CRON Jobs
Don’t set your CRON job to have WordPress check your email too often. Some email providers may frown on that. I recommend setting up your CRON job to check once an hour or perhaps twice a day, depending on your expected use.
Now that you have your settings in place, you are ready to email your blog messages and pictures as you travel around.
Note: Formatting in Emails
If you send emails with HTML formatting, be aware that WordPress.com and .org strip unnecessary HTML from your messages while retaining some of the formatting. When your emails appear on your blog, they might not look exactly as you created them.
Also, be aware that any email signature you have on your outgoing email (including disclaimers) could show up on your blog posts.
Using ScribeFire
ScribeFire is a free plug-in for Firefox that allows you to post directly from your web browser. If you’re wondering why you would use a plug-in instead of just using the Dashboard to make a post, the reason is that ScribeFire makes it extra easy to reference other pages or blog posts in posts you write. You can cut and paste from the page you are viewing, as well as create links and add pictures from the plug-in, all without having to open your blog to switch between tabs or open windows to gather your information.
To install ScribeFire in Firefox, visit the plug-in’s page at http://scribefire.com.
- On the right side of the page, click the Install ScribeFire Now link. This link takes you to the ScribeFire page at the Firefox Add-ons page.
- Click on the Add to Firefox button, and Firefox walks you through the rest of the process. If you have installed plug-ins previously in Firefox, this process will be familiar.
- After the plug-in is installed, an orange icon appears on the bottom-right side of Firefox’s status bar (see Figure 12.8).
Figure 12.8. The ScribeFire button in Firefox.

- Clicking this icon opens a window that overlays about one third of the viewing area of your browser.
This window should look familiar in the sense that there is an editor in which you can view the WYSIWYG editor, the source, or a preview of what your post will look like.
On the right side is a button labeled Launch Account Wizard. If this is your first time running ScribeFire, the wizard might start automatically. If not, click Launch Account Wizard, and ScribeFire walks you through the process of adding your blog or blogs. First, you add your blog’s URL and click Continue.
The wizard identifies the software you are using for your blog; in this case, it is WordPress. The wizard also automatically supplies the API URL. Click Continue again. Then you are asked for the username and password for your blog. After entering this information, click Continue.
The wizard logs in to your website and then asks you to confirm the addition. Click Continue. On the last wizard screen, ScribeFire tells you it has added the account. Click Done. Now you are ready to blog from ScribeFire.
Note: Adding More Than One Blog
If you have more than one blog you want to configure, clicking the Add button below your list of blogs also launches the Account Wizard.
Before you create a post, look at the options on the right. Clicking on the orange ScribeFire icon opens an area on the right with tabs. These tabs are as follows:
• Blogs—Provides a list of all the blogs you have configured.
• Entries—Offers you a view into the content on your site. There are three tabs under the Entries tab: Posts, Notes, and Pages. This is content on your site. You can select any of these tabs and edit your content directly from here without having to visit your site’s Dashboard.
• Categories—Lists all the categories you have configured on your site for your content. ScribeFire reads them in and makes them available for you to use as you create posts. It also lists your tags at the bottom.
• Options—Provides options for the post you are creating; for example, you can change some of the settings, including changing the time stamp of a post so it will show in the future. You can also set tags and turn on pinging if you want.
To create a post, you can just open ScribeFire by clicking the orange icon in Firefox (refer to Figure 12.8). You can also right-click on a page in Firefox that you want to reference, and you can use the ScribeFire options in the context menu.
Try opening any web page and highlighting some text. Then right-click and select Blog This Page (see Figure 12.9). ScribeFire opens, and a link to the blog is created with the text that you highlighted shown in the editor.
Figure 12.9. Using the context menu to blog about the page you are on.

From here, you can add your own commentary into your post, or you can cut and paste more quotes from the page you are viewing.
After you create your post and are happy with it, be sure to assign it a category. On the right side is a tab called Categories, beside the Entries tab. This is a list of the categories you have on your site set up for categorizing your posts.
Click Publish to (Your Blog), and a small pop-up window asks if you want to publish as new posts or page. Select the appropriate choice for your post, normally Post. Then click Publish. When the item is successfully published, click OK to clear the editor. Alternatively, you can click Keep Content or View this Blog. When finished, close the window.
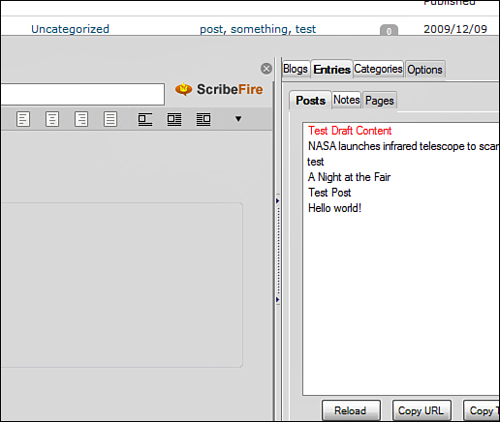
You can also save a draft of your post if you like. Select the check box, and when you publish as a draft, the post is not live, but you can edit it and continue with it later from your Entries, Posts tab (see Figure 12.10) or from your WordPress Dashboard. Drafts are shown in Red.
Figure 12.10. Viewing existing content and drafts in ScribeFire.
Note: Editing in ScribeFire
If you are editing content that already exists, you see the pop-up windows that ask you whether you want to post as an edit.
ScribeFire provides many more options, including using bookmarking services to share content with other social networks, creating notes for research on posts you want to make, and uploading media to your site.
Summary
In this lesson, you discovered how powerful remote publishing to WordPress can be, yet this lesson only scratched the surface with a few convenient services and applications. You set up WordPress to allow remote publishing, configured it to accept email submissions, and configured several websites to interact with your site, making publishing easy and flexible for yourself.