Lesson 9. Installing WordPress
In this lesson, you learn about scripting services that can help you install WordPress, and you walk through installing it manually.
Using Automated Script Services
Installing WordPress can be as automatic or as manual as you would like the process to be. Some web hosts even provide services that install WordPress, among other web applications, for you with little or no hassle.
Note: What You Need to Have
This lesson assumes that you have chosen a web hosting provider and are able to access your account via File Transfer Protocol (FTP). It is important that you have a hosting service and domain name because you will be uploading and possibly manipulating files and using the database server as part of the installation. You should make sure your web host supports PHP and MySQL.
Using Script Services
Scripting services can make it easy to install WordPress or any number of web applications on your web hosting account and can also assist in keeping you up to date with security patches. The examples of scripting services described here are just two of many options.
Note: Use Your Preferred Scripting Service
To be clear, you may choose any scripting service you prefer. The services listed here are similar to most other services.
Go Daddy provides a service called Hosting Connection. If you have already purchased and set up a Go Daddy hosting account, or are planning to, the Hosting Connection can assist you in setting up your WordPress site.
After you set up your web hosting account with Go Daddy, visit the list of applications that Go Daddy offers and select WordPress. Go Daddy asks you to complete a form with some information needed to set up your blog, such as title, passwords, and so on. Go Daddy does the rest of the heavy lifting for you and notifies you after the process is complete. From there, you have a functioning blog.
Simple Scripts is a similar service that enables you to install any number of web applications on any web hosting account as long as you have FTP access. You can use the service for up to three installations; however, you can pay for these services and have Simple Scripts install a number of web applications in different places as well as help you keep your system up to date by automating software updates. Some web hosting companies offer Simple Scripts free with your account.
Installing WordPress Manually
Now it’s time to put together the pieces to create your own blog using WordPress.
Downloading the Software from WordPress.org
To download WordPress, visit http://WordPress.org/download. From there, you can read the release notes and see the current version available.
Tip: Finding Earlier Versions of WordPress
If you need to install a previous version other than the current release, use the Release Archive link to find what you need.
To download, click the Download WordPress button (see Figure 9.1).
Figure 9.1. Downloading WordPress.

Your browser asks you to save the WordPress zip file to a location on your computer. Normally, this is a folder named Download, but sometimes your browser defaults to your desktop. Make a note of the location where your file is being saved so it is easy to find later.
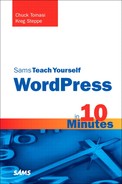
After your download is complete, you see a new file in your download folder. Its name is similar to WordPress-2.9.zip (see Figure 9.2).
Figure 9.2. The WordPress file in the downloads folder.
Unpacking the Software
Now that you have downloaded the WordPress zip archive from WordPress.org, we need to unpack it. A zip archive is a compressed collection of files. There are two reasons the files are compressed into a zip file. They are kept together in a container, and the file size is reduced for easy downloading. We need to open the zip archive and extract its contents.
Tip: Unzipping WordPress
Mac and Linux include archive software, but if you use Windows, you may not have such software installed to unzip WordPress. If you need software to unzip files, try 7-Zip at www.7-zip.org/ or WinZip at www.winzip.com/.
• Mac—Double-click on the file named WordPress-2.9.zip.
• Linux—Right-click on the WordPress-2.9.zip and select Extract Here.
• Windows—Right-click on the file and select Extract Here. After the files are extracted from the WordPress zip archive, a newly created folder named wordpress appears in your Downloads folder (see Figure 9.3). Inside the WordPress folder you just created are all the files that will make up your blog. Now it’s time to upload them.
Figure 9.3. The WordPress folder after it has been unzipped.

Uploading Your Files
After you have all your files successfully extracted out of the zip archive, you need to move them from your computer to your website. To do this, you need to plan a bit on where you are going to move them to and then you can use an FTP program to physically copy them to your webserver.
Choosing Your Blog Folder
Before you upload your files to your web host, it is important to establish where you are going to put them. If you are adding a WordPress blog to your existing site, it is likely that you already have a main page on your site for visitors and already have a main folder created. If this is the case, you might want to put your blog in a subfolder of your website folder.
For example, you may have a Home page, photo gallery, and some other pages you have created. When you install your blog, you wouldn’t want WordPress to interfere with what is already there. So it makes sense to put WordPress in a folder by itself, such as blog. Your blog site address then would be www.yoursite.com/blog.
If you are not concerned about existing content or if your site is completely new, you might want WordPress at the top level of your site so that when visitors come to your website, they are automatically greeted with your WordPress.org installation.
Copying WordPress Files to Your Site
To upload the WordPress files to your site, you need an FTP client. An FTP client provides the functionality to log in to your remote account and upload and manipulate files. You need an FTP program to use FTP. There are many options for FTP clients, including free and pay applications. For this example, I used FileZilla. It is an open source application that costs nothing to download and use. It is available for Windows, Mac, and Linux.
Note: Choosing an FTP Client
If you want to use FileZilla, you can find it at http://filezilla-project.org/.
If you use another FTP client, you should be able to follow the steps with no trouble. FileZilla’s settings are similar to other FTP clients.
Your web hosting service should have provided you with file locations, a username, and a password to access your files via FTP. Make sure you have that information handy. Follow these instructions to transfer your WordPress files via FTP to your web host:
- Start FileZilla.
- Click File and select Site Manager.
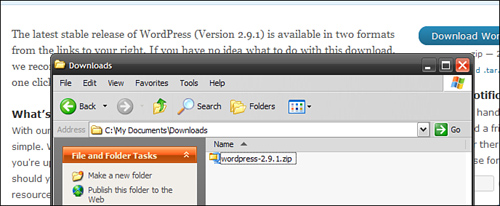
- In the window that opens, click on the New Site button and add the name of your website on the left side of the window (see Figure 9.4).
Figure 9.4. Creating a new site to transfer files to.
- On the right side, enter the information provided by your host in the appropriate boxes. In the Host box—type the name of the server that you will be logging in to—for example, ftp.yoursite.com. You can leave the Port box empty.
- Leave FTP as the selection in the Servertype box unless you have another specification from your web host.
- Further down in the window is the Logontype box. You need to change this setting to Ask for a Password or Normal.
Caution: Always Ask for a Password
Using the Normal type allows you to specify your username and password one time. Thereafter, you are automatically logged in. In the interest of security, though, I recommend you use the Ask for a Password setting so that a password is required each time you connect.
- After you add the necessary information, you can click on OK or Connect. Connect does just that: It saves the settings and connects you right away.
- Now on the left side, you can view the local files that are on your computer’s hard drive, and the remote files on your website are on the right side (see Figure 9.5). Not seeing any files in the remote view could be completely normal if this is a new site.
Figure 9.5. Viewing local and remote files in your FTP client.

At this point, you are ready to copy over your WordPress files. On the left side of the window, navigate to the WordPress folder you created when you extracted your files from the WordPress zip file (more than likely, this folder is in your download folder). On the right side of the window, you may see a folder named public_html, htdocs, or httpdocs. This is normal. Some hosts, depending on their setup, may have a folder intended for you to put any files that you want to make public to the world, such as your WordPress files. This folder, if it exists, is called your web root folder. This is the place where you put your WordPress files. Not seeing a web root folder also could be normal, so you can just upload your files as they are.
Note: Creating a Folder for Your Blog
If you already have a site, or want to put your blog in a folder as mentioned earlier in this lesson, now is the time to create that folder on your remote site. For example, if you want to create a folder called blog, you need to create a blog folder in your web root folder. After you create a folder, double-click it to open it and then proceed to copy files into it.
In your WordPress folder, you should see several files and folders that have “wp_” at the beginning of the filename. Select all of them using the keyboard shortcut Cmd-A on a Mac or Ctrl+A on Windows. When you have them all highlighted, drag and drop them to the right side. At this point, the file transfer starts, and you see activity as the files start to upload.
After this process is complete, your local files on the left should look the same as your remote files on the right side. If they do, congratulations! You have successfully uploaded your copy of WordPress. You are now ready to create the database for WordPress to use.
Creating the Database
WordPress needs a database to store all the posts, comments, and settings for your site. WordPress uses a MySQL database.
To create the database for your web site, you need to use the administration site provided by your web host. There are a lot of different ways your web host can give you access to your database server. No matter which administrative tool your web host uses, the basic steps to create your database for WordPress are the same.
Note: Required Database Information for WordPress
When you are done creating your database, you should have a server address, database name, username, and password. You need all that information for the last part of the installation.
- Log in to your site’s management console using the access information provided by your web host.
- Find the section that says MySQL Server, Database Server, or something similar. Click the link to open it.
- In the Create Database or New Database field, provide a database name. I recommend that you call your database something that is easy to recognize. For example, if your site domain name is izerol.com, consider using the database name izerol or wp_izerol.
- You may be asked to create a username and password associated with your database. If so, be sure to make a note of this information. You will need it when running the WordPress install script. Also, make a strong password that includes numbers, uppercase and lowercase characters, and symbols. This is a place where security really matters.
It might take a little while for your database to be created after you complete these steps.
Running the Install Script
If you have come this far, you are doing great. The installation is all downhill from here, but you are not done yet.
To finish the install, you need to run the install script. If you have uploaded all your files and created the database, you have all the tools you need to follow these steps and finish:
- To run the installer, point your web browser to your blog’s URL. You should see the first startup screen (see Figure 9.6).
Figure 9.6. Creating your wp-config file.

- Click Create a Configuration File.
- Gather the following information before proceeding:
• Database name
• Database username
• Database password
• Database host (the address of the server). Sometimes this can be localhost or an actual name of a server. If you are unsure, check with your web host, who should be able to provide you with that information
• Table prefix. This is a prefix for the tables in your database. If you want to run more than one WordPress installation with the same database, you can change the prefix. Doing so is not necessary for this lesson, however. On the next page, you see the prefix defaults to “wp_.” Use the default.
- Click Let’s Go. Again, the resulting screen should look familiar. Fill out these fields with the appropriate information (see Figure 9.7).
Figure 9.7. Entering your database credentials. After you have filled out these fields, click Submit.

Now WordPress has all the information it needs to proceed. It is ready to create your configuration file and create all the data needed for WordPress to run in the database.
- Click Run the install. If everything works as expected, the next screen asks you for some more information:
• Blog title—Give your blog a title. It could be a phrase, something like your business name, or “My Awesome Blog” for something personal. Feel free to be more creative than that.
• Your E-mail—Your email address is required in case you need to reset your Admin account password within this install of WordPress or for notifications when there are comments or other events on the blog that you need to be made aware of.
• Also displayed is a check box asking whether you would like your blog to appear in search engines such as Google and Technorati. Leave the box checked if you would like your blog to be visible to everyone, including search engines. Uncheck the box if you want to block search engines but allow normal visitors. For example, if you make a post about my hometown, Middling Fair, PA, when people search for “Middling Fair, PA,” they will more than likely have the chance to find your post. I recommend you leave this box checked, unless you are creating a private blog.
- Click Install WordPress, and you are taken to the final screen with your administrator username and password. The username is admin and the password is a mix of characters, numbers, and symbols. Be sure to write down this information. You need it in a moment after you click Log In.
At the login prompt, put in your username and the password for your admin user; then you are taken to the Dashboard for your new blog.
One final step in the completion of your installation appears at the top of your Dashboard: You are alerted that you need to change the password for the user named admin (see Figure 9.8).
Figure 9.8. Warning to change the Admin user password.

I recommend taking this opportunity to change the Admin password right away. The password provided for you is a random set of characters, but you may want to change this to something more meaningful to yourself. I also recommend making your password for Admin something good and secure, including numbers, uppercase and lowercase characters, and a symbol or two.
Summary
In this lesson, you successfully installed WordPress. You uploaded your files, created a database on the database server, and proceeded through the install script to create a functioning blog.