
Lesson 7. Using RSS and Data Migration Tools
In this lesson, you learn what RSS is, the value of having an RSS feed, and how to set one up. You also learn how to back up and migrate your data to another blog.
Syndicate Your Blog with RSS
RSS stands for Really Simple Syndication. It is a method by which readers can subscribe to your blog by means of an RSS file, often called an RSS feed.
When your readers subscribe to RSS, they don’t have to visit your website periodically to check for new content. Instead, programs such as Mozilla Thunderbird, Google Reader, NetNewsWire, Microsoft Outlook, and Internet Explorer download the RSS files from all sites readers subscribe to at regular intervals. The postings are then displayed much like email to make it easy for the readers to quickly glance over the headlines and open postings that are of interest.
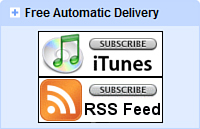
RSS feeds are available from most blog and news sites. They are typically indicated by an orange icon (see Figure 7.1) or the words RSS or Subscribe.
Figure 7.1. The RSS icon is a quick way to indicate people can subscribe to a site.
Tip: Add an RSS Feed
If your blog does not currently have an RSS feed available, consider adding one to increase readership. With RSS functionality becoming more popular in applications, a large number of people on the Internet use RSS readers almost exclusively for content delivery (see Figure 7.2).
Figure 7.2. RSS applications like Google Reader deliver websites directly to you.

Setting Up an RSS Feed
You can set up RSS feeds for posts or comments. The most common feed is the one containing your most recent posts. To create an RSS feed, follow these steps:
- Select Appearance, Widgets.
- Add the RSS Links widget to your sidebar by dragging it from Active (or Inactive) widgets to the sidebar.
- Click the downward-facing triangle on the right side of the RSS widget (see Figure 7.3).
Figure 7.3. Use the RSS Links widget to allow your readers to subscribe to your blog.

- Provide a title for your sidebar widget. Many people simply put “Subscribe”.
- Indicate which feeds to display. You can choose to have either a feed for your posts, a feed for your comments feed, or one of each.
- Select how your feed links will be displayed with the Format option. You can choose to display an RSS icon (image), text, or both. If you choose to display an image, two additional options appear that let you set the image size (small, medium, or large) and the image color.
- Click the Save button to save your changes and then Close to close the widget.
Now when readers want to subscribe to a feed on your site, they right-click on the orange icon, copy the link location, and paste it into their RSS reader. From then on, they will automatically know when you have posted something to your site.
Your link shows up on your page similar to the one shown in Figure 7.4.
Figure 7.4. Sample RSS links and icons using the RSS Links widget.

Adding Other RSS Feeds
You can also add feeds to other sites using the same widget by including their RSS feed. Having a feed from another blog is useful if you have multiple blogs that are related and want to show the latest content from one on the other. For example, I have a personal blog that has a sidebar widget with links from my various podcasts. When I update one of the podcasts, the content on my personal blog is updated automatically via the RSS feed (see Figure 7.5). To obtain the RSS feed from another site, follow these steps:
- Visit another website or blog and look for the orange icon, Subscribe, or RSS.
- Right-click and choose the option to copy the link location.
- Paste the link location into your RSS feed URL space in the RSS widget.
- Click the Save button and then the Close link.
Figure 7.5. The RSS widget allows you to show content from another feed on your site.
Using a Redirected Feed
An RSS feed is a convenience for your readers. However, you might want to better understand how many people are subscribed to your feed and what posts are generating traffic. You can do that by using a redirected feed.
Using a redirected feed might sound like something the “big guys” use to track statistics and drive traffic, but it’s also useful for occasional bloggers to just find out the health of their feed.
A common way to do this is to create one feed that you make public and keep your real feed private. The public feed sends subscribers through a service that gathers statistical information about their habits. One popular service is called FeedBurner. It offers basic stats free and extended services for a fee. To get set up with FeedBurner, do the following:
- Go to the FeedBurner site (http://feedburner.google.com).
- Create an account or log in with your Google account if you already have one.
- Enter your blog or RSS feed URL in the box under the label Burn a Feed Right This Instant (see Figure 7.6).
Figure 7.6. FeedBurner makes it easy to collect subscriber statistics.

- Click Next.
- Edit the Feed Title and Feed Address if necessary. In most cases, the default values work fine.
- Click Next.
- The critical part is done. FeedBurner displays the URL of the feed you can publish to the public. Use this as the URL in your RSS widget described earlier. If you want to collect additional feed stats, click Next one more time and check the options you like; otherwise, click Skip Directly to Feed Management.
- Click Next.
Log in to FeedBurner and check your stats, growth, and readers’ behaviors at any time.
Tip: Set Up a Redirected Feed Right Away
If you are considering gathering statistics about your blog, it is strongly recommended that you establish and publish the redirected feed right away. If you make your default WordPress feed and then decide to gather stats with a redirected feed later, all your readers will have to unsubscribe from the original feed and resubscribe to the new feed, which can cause you to lose some of your audience.
Other Useful Tools
Several other useful tools in WordPress don’t seem to fit anywhere else in the side menu, so they are placed under Tools, Tools.
Turbo: Gears Status
Gears is a way to speed up your blog experience. Normally, your web browser has to download everything from your blog to your local computer each time you perform an operation like editing a post. Turbo mode uses a Google technology known as Gears to download certain pieces of the system to your local machine so it doesn’t have to be downloaded each time—making your blog tasks faster.
Caution: Gears Support for Mac OS X
At this time, Gears is not compatible with Mac OS X higher than 10.5 (Leopard).
Gears currently supports Firefox version 1.5 and higher, Internet Explorer version 6 and higher, and Safari 3.1.1 and higher. To use Turbo mode, follow these steps:
- From the side menu in WordPress, select Tools, Tools.
- In the Turbo section, click Install Now.
- If get a Gears Security Window, check the setting labeled I Trust This Site. Allow It to Use Gears and click Allow.
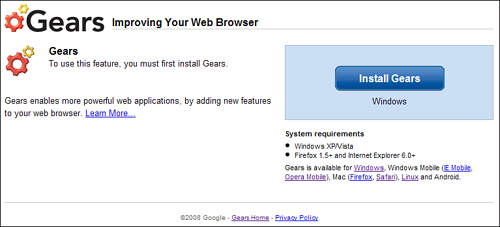
- Click Install Gears from the Google site (see Figure 7.7). The download link recognizes and defaults to your current computer system (Windows, Mac, and so on).
Figure 7.7. You need to download Google Gears and allow it access to use Turbo mode.
- Review the terms of service and click Agree and Download.
- Run the installer that gets downloaded and restart your browser if instructed to do so.
Downloading the necessary components may take a minute or two. When the process is complete, you are using Turbo mode.
Note: Results Will Vary
If you have a high-speed Internet connection, you may not see a marked improvement in performance.
Press This
Press This is a small web application that streamlines the process of posting articles as you are browsing around the Web. As you are browsing the Internet and come across text, images, or video you want to reference, you can use Press This to quickly make a post in your blog.
You can find Press This under Tools, Tools in the side menu. To start using Press This, follow these steps:
- Either drag the Press This link to your browser’s link bar or add it as a favorite.
- Find a story you like and then click the Press This link (or favorite).
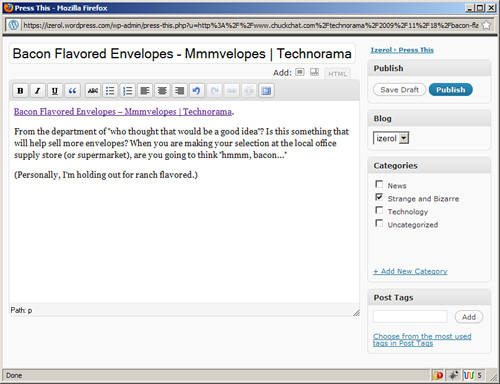
- The Press This window appears with the title and link in the article body already filled in (see Figure 7.8). Add your additional text, images, categories, tags, and other standard post material.
Figure 7.8. Grab bits of the Internet and post it back to your blog with Press This.
- Click Publish.
Your post has been published. Press This offers you the options to view your post, edit your post, or close the window. When you are done, your main browser window is still where you left it. Press This can be a real time saver.
Webmaster Tools Verification
Google, Bing, and Yahoo! offer tools that provide you with detailed information and statistics about how your readers access and index your website. They can provide you with additional information to the standard WordPress statistics. Using the webmaster tools is completely optional. You can verify your site with one or all if you like with no impact to your site’s performance or your readers’ experience.
Before you can use these tools, you need to sign up for an account with the service of your choice and verify your blog. Use the instructions from the appropriate following section to verify your blog with one or more of the services.
Google Webmaster Tools
- Log in to www.google.com/webmasters/tools/ with your Google account.
- Click Add a site.
- Enter your blog URL then click Continue.
- Copy the meta tag, which looks something like
<meta name='google-site-verification' content='dBw5CvburAxi537Rp9qi5uG2174Vb6JwHwIRwPSLIK8'>. - Leave the verification page open and go to your blog Dashboard.
- Open the Tools, Tools page and paste the code in the appropriate field.
- Click Save Changes.
- Go back to the verification page and click Verify.
Yahoo! Site Explorer
- Log in to https://siteexplorer.search.yahoo.com/ with your Yahoo! account.
- Enter your blog URL and click Add My Site.
- You are presented with several authentication methods. Choose By Adding a META Tag to My Home Page.
- Copy the meta tag, which looks something like
<meta name='y_key' content='3236dee82aabe064'>. - Leave the verification page open and go to your blog Dashboard.
- Open the Tools, Tools page and paste the code in the appropriate field.
- Click Save Changes.
- Go back to the verification page and click Ready to Authenticate.
- Go to the main page using the My Sites link on the left. In the status column, look for a green check mark indicating your site has been validated.
Bing Webmaster Center
- Log in to www.bing.com/webmaster with your Live! account.
- Click Add a Site.
- Enter your blog URL and click Submit.
- Copy the meta tag from the text area at the bottom. It looks something like
<meta name='msvalidate.01' content='12C1203B5086AECE94EB3A3D9830B2E'>. - Leave the verification page open and go to your blog Dashboard.
- Open the Tools, Tools page and paste the code in the appropriate field.
- Click Save Changes.
- Go back to the verification page and click Return to the Site List.
Note: Authentication Takes Time
Most authentication with Google, Yahoo, or Bing happens within a few minutes; however, it might take up to 24 hours.
After you’ve got your site validated, you can use the webmaster tools to leverage the power of these search engines to determine who is linking to your site, what pages are most popular, and other statistics. You can even block the search engines from indexing part of your blog if you have pages you would like to exclude.
Backing Up Your Data
Computers are not perfect. Sooner or later, we all lose data. To reduce your risk, make regular backups of your information including your blog data.
The way to make backups of your WordPress data is to go to Tools, Export in the side menu. Fortunately, this is one of the easiest things to do in WordPress; there is only one button! (See Figure 7.9.)
Figure 7.9. Use the export feature to back up or migrate your blog data.

When you click the Download Export File button, WordPress saves all your information in a file and sends it to your computer. Save the file on your computer. If you ever need to restore the information, you can use the Import feature.
Note: Take Note Where You Save Your Export File
Mac OS X automatically saves the file in your Download folder, whereas Windows users need to tell the computer to open or save the file. Be sure you know where your browser is saving the file in the event you ever need to import it.
Migrating Your Blog
There are several reasons why you might want to move your blog data from one WordPress instance to another. You may be starting your own website with its own hosted WordPress blog, or you want to change the name of your blog and keep the content, or you want to transfer ownership and control of the blog to another user account. WordPress has a way to address all these requirements.
If you are starting your own hosted website, the process is as follows:
- Register your domain.
- Download the software from WordPress.org.
- Install the WordPress software.
- Export the data from your current blog (refer to “Backing Up Your Data” earlier in this lesson).
- Import the data to your new blog (refer to “Importing Data from a WordPress Export in the next section).
The first three steps are covered in greater detail in Lesson 8, “Setting Up Hosting.”
If you are renaming your blog or migrating from one WordPress.com blog to another, the process is similar:
- Register the new blog (refer to Lesson 1, “Introducing WordPress”).
- Export the data from your current blog (refer to “Backing Up Your Data” earlier in this lesson).
- Import the data to your new blog (refer to “Importing Data from a WordPress Export” in the next section).
Note: Media Not Included
Creating an export file only exports the posts, pages, comments, categories, and tags. With the exception of migrating between two WordPress.com sites, you need to manually migrate the media files. If you have a large number of files and are migrating from one WordPress.com blog to another, you can contact support at http://en.support.wordpress.com/contact for assistance.
Importing Data from a WordPress Export
If you are importing from a previously exported WordPress (XML) file, follow these steps:
- Log in to your blog as an administrator.
- Go to Tools, Import in the side menu.
- Choose WordPress from the list.
- Select and import the file. Click the browse button and navigate to your export file. WordPress names the exported file wordpress.date.xml, where date is in the year-month-date format, such as wordpress.2009-11-30.xml. When you’ve located the file, select it and click Open. On the WordPress page, click the Upload file and import button.
- Map the authors in the export file to users on the blog. For each author, you may choose to map to an existing user on the blog or to create a new user.
- Check the box marked Download and import attachments. This downloads the media library from the original site if possible. This option is only available if you are migrating between two WordPress.com sites.
- Click Submit. A screen is displayed indicating the import has started. You will receive an email when it is complete.
- WordPress then imports each of the posts, comments, and categories contained in this file into your new blog.
The import could take up to 24 hours, depending on the amount of data in your blog. You will receive an email when the import is complete. If you do not, contact WordPress.com support at http://en.support.wordpress.com/contact. When the import is complete, review your new blog to ensure everything migrated correctly.
Transferring a Blog
WordPress allows you to transfer your blog to another WordPress.com user. You may choose to do this to transfer ownership to someone new, or you may have created a new account for yourself and want all your previously independent blogs under one account. The procedure to transfer a blog is as follows:
- Log in as an administrator.
- Go to Dashboard, My Blogs.
- Move your cursor over the address of the blog you want to transfer.
- Click on the Transfer Blog link. Note that you do not see this link if you are not the owner.
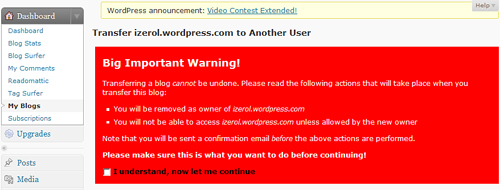
- Read and review the Big Important Warning that appears. It is important that you understand all the terms and conditions of the transfer. This procedure cannot be undone (see Figure 7.10).
Figure 7.10. Transferring a blog to another user cannot be undone.
- Check the check box on the bottom of the warning.
- Enter the WordPress.com account or email address of the person you are transferring the blog to and click the Transfer Blog button.
- A confirmation email is sent to your registered WordPress email address. The transfer does not occur until you read the message and click the link in email.
Note: Upgrades Transfer, Too
Upgrades to a blog are transferred with that blog to the new owner. A blog with domain upgrades is processed manually by a member of the WordPress.com staff. All other upgrades (space, videopress, and so on) are processed automatically.
Importing from Another Blog
If you have set up a blog on another site, WordPress allows you to import the content from that blog using the Tools, Import feature (see Figure 7.11). You can import from several other blogging platforms (including other WordPress sites).
Figure 7.11. The Import subpanel allows you to import your blog data from another location.

Currently, it is possible to import your content from the following blogs:
• Blogger
• LiveJournal
• Movable Type or TypePad
• WordPress
• Yahoo! 360
Each import tool walks you through the specific steps to import your data from your old blog to your new one. Follow the onscreen instructions for your particular situation. The importer is used only to retrieve the content. It does not import any themes, images, or media files you may have had on your other blog. In some cases, the importer brings in only posts and comments (Blogger). When you import from another WordPress blog, you can restore posts, pages, comments, custom fields, categories, and tags.
In addition, you can also import links and convert WordPress tags to categories and vice versa using Tools, Import (WordPress.org only).
Importing from Blogger, TypePad, or LiveJournal might seem like a logical thing to do if you are just getting set up with a WordPress blog; however, the WordPress option might not seem like an obvious choice at first. There are a few reasons why you might choose this option:
• Restoring a previous backup of your blog. Some people like to have two sites. The first is a public site that they want highly available, often called a production site. The second is a sandbox (or development) site where they can make changes without the public noticing. After they have made the necessary changes in development, they can promote the changes quickly from the development site to the production site. Periodically, they might want to refresh the information in development with the more current information in production. This is done by first creating an export file (covered later in this lesson) and then using the import to update the development site.
• Migrating from the WordPress.com to WordPress.org site. You might find that WordPress.com’s features are too constraining and you would like to host your own blog. Similar to the preceding scenario, you import an existing WordPress export file to bring over the content. The import subpanel is available in the self-hosted software discussed in greater detail starting in Lesson 8, “Setting Up Hosting.” To learn more about how to migrate your blog from WordPress.com to WordPress.org, read the sections at the end of this lesson.
• Renaming your blog. You might find at some point that your blog name and URL do not match the brand of content you are providing. You cannot rename the WordPress.com URL, but you can register a new blog and migrate the information from your old blog to your new blog.
Summary
Your WordPress.com blog is set up, and you have the skills to create the content you need and make it appear in a variety of formats. Now you have the necessary information to make it easy for readers to get your posts automatically with RSS. When you are ready to move to another WordPress blog or just make a backup to ensure your work’s safety, WordPress has you covered there too.