Hour 22. Working with Web-Based Forms
To this point, pretty much everything in this book has focused on getting information out to others. But you can also use your web pages to gather information from the people who read them.
Web forms allow you to receive feedback, orders, or other information from the users who visit your web pages. If you’ve ever used a search engine such as Google, Yahoo!, or Bing, you’re familiar with HTML forms—those single field entry forms with one button that, when pressed, give you all the information you are looking for and then some. Product order forms are also an extremely popular use of forms; if you’ve ordered anything from Amazon.com or purchased something from an eBay seller, you’ve used forms. In this hour, you learn how to create your own forms, but you learn only how to create the front-end of those forms. Working with the back-end of forms requires the knowledge of a programming language and is beyond the scope of this book.
An HTML form is part of a web page that includes areas where users can enter information to be sent back to you, sent to another e-mail address that you specify, sent to a database that you manage, or sent to another system altogether such as a third-party management system for your forms such as Salesforce.com.
How HTML Forms Work
Before you learn the HTML tags that are used to make your own forms, you should at least conceptually understand how the information from those forms makes its way back to you. The actual behind-the-scenes (the server-side or back-end) process requires knowledge of at least one programming language or at least the ability to follow specific instructions when using someone else’s server-side script to handle the form input. At that point in the process, you should either work with someone who has the technical knowledge or you should learn the basics on your own. Simple form-processing is not difficult at all and it is likely that your web-hosting provider has several back-end scripts that you can use with minimal customization.
Note
PHP is the most popular server-side programming language; it’s supported by any web-hosting provider worth their salt. You can learn more about PHP at http://www.php.net/ or you can just dive right in to learning this programming language (plus database interactivity, as discussed in Hour 21) from the ground up in Sams Teach Yourself PHP, Apache, and MySQL All-in-One. Although several other books on PHP and related technologies are available, I am partial to this one because I wrote it. It is geared toward the absolute beginners with PHP or any other programming language.
Forms include a button for the user to submit the form; that button can be an image that you create yourself or a standard HTML form button that is created when a form <input> tag is created and given a type value of submit. When someone clicks a form submission button, all the information typed in the form is sent to a URL that you specify in the action attribute of the <form> tag. That URL should point to a specific script that will process your form, sending the form contents via email or performing another step in an interactive process (such as requesting results from a search engine or placing items in an online shopping cart).
Once you start thinking about doing more with form content than simply e-mailing results to yourself, additional technical knowledge is required. For example, if you want to create an online store that accepts credit cards and processes transactions, there are some well-established practices for doing so, all geared toward ensuring the security of your customers’ data. That is not an operation that you’ll want to enter into lightly; you’ll need more knowledge than that which is provided in this book.
Note
Technically, there is a way to send form data without a server-side script, but that method—which uses a mailto link in the action attribute of the <form>—produces inconsistent results. Individual web browsers, as well as personal security settings, will cause that action to respond differently than you intended and certainly not as the user expects. When users submit a form, they expect it to invoke a script, perform a process that is invisible to them, and then return a message stating that the process has been completed. That is not the case with a form that invokes a mailto.
Before you put a form online, you should look in the user guide for your web-hosting provider and see what they offer in the way of form-processing scripts. A keyword you might search for is CGI (Common Gateway Interface). CGI is a standard way for programs (such as form-handling scripts) to interact with web servers.
Creating a Form
Every form must begin with a <form> tag, which can be located anywhere in the body of the HTML document. The <form> tag normally has two attributes, method and action:
![]()
The most common method is post, which sends the form entry results as a document. In some situations, you might need to use method="get", which submits the results as part of the URL header instead. For example, get is sometimes used when submitting queries to search engines from a web form. Because you’re not yet an expert on forms, just use post unless your web-hosting provider’s documentation tells you to do otherwise.
The action attribute specifies the address to which to send the form data. You have two options here:
• You can type the location of a form-processing program or script on a web server and the form data will then be sent to that program.
• You can type mailto: followed by your email address and the form data will be sent directly to you whenever someone fills out the form. However, this approach is completely dependent on the user’s computer being properly configured with an email client. People accessing your site from a public computer without an email client will be left out in the cold.
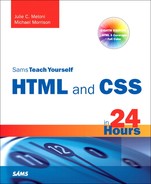
The form created in Listing 22.1 and shown in Figure 22.1 includes just about every type of user input component you can currently use on HTML forms. Refer to this figure and listing as you read the following explanations of each type of input element.
Listing 22.1 A Form with Various User-Input Components


Figure 22.1 The code shown in Listing 22.1 uses nearly every type of HTML form input element.
The code in Listing 22.1 uses a <form> tag that contains quite a few <input /> tags. Each <input /> tag corresponds to a specific user input component, such as a check box or radio button. The input, select, and text area elements contain borders in the style sheet, so it is easy to see the outline of the elements in the form. Keep in mind that you can apply all sorts of CSS to those elements.
The next few sections dig into the <input /> and other form-related tags in detail.
Accepting Text Input
To ask the user for a specific piece of information within a form, use the <input /> tag. This tag must fall between the <form> and </form> tags, but it can be anywhere on the page in relation to text, images, and other HTML tags. For example, to ask for someone’s name, you could type the following:
![]()
The type attribute indicates what type of form element to display—a simple, one-line text entry box in this case. (Each element type is discussed individually in the following sections.)
Tip
If you want the user to enter text without the text being displayed on the screen, you can use <input type="password" /> instead of <input type="text" />. Asterisks (***) are then displayed in place of the text the user types. The size, maxlength, and name attributes work exactly the same for type="password" as they do for type="text". Keep in mind that this technique of hiding a password provides only visual protection; there is no encryption or other protection associated with the password being transmitted.
The size attribute indicates approximately how many characters wide the text input box should be. If you are using a proportionally spaced font, the width of the input will vary depending on what the user enters. If the input is too long to fit in the box, most web browsers will automatically scroll the text to the left.
The maxlength attribute determines the number of characters the user is allowed to type into the text box. If a user tries to type beyond the specified length, the extra characters won’t appear. You can specify a length that is longer, shorter, or the same as the physical size of the text box. size and maxlength are used only for type="text" because other input types (check boxes, radio buttons, and so on) have fixed sizes.
Naming Each Piece of Form Data
No matter what type an input element is, you must give a name to the data it gathers. You can use any name you like for each input item, as long as each one on the form is different (except in the case of radio buttons and checkboxes, which are discussed later in this hour). When the form is processed by a back-end script, each data item is identified by name. This name becomes a variable, which is filled with a value. The value is either what the user typed in the form or the value associated with the element the user selected.
For example, if a user enters Jane Doe in the text box defined previously, a variable is sent to the form processing script; the variable is name and the value of the variable is Jane Doe. Form-processing scripts work with these types of variable names and values.
Note
Form-processing scripts are oversimplified here for the sake of explanation within the scope of this book. The exact appearance (or name) of the variables made available to your processing script depends on the programming language of that script. But conceptually, it’s valid to say that the name of the input element becomes the name of the variable and the value of the input element becomes that variable’s value on the back-end.
Additional examples of name/value pairs are covered in the following sections.
Including Hidden Data in Forms
Want to send certain data items to the server script that processes a form but don’t want the user to see those data items? Use an <input /> tag with a type="hidden" attribute. This attribute has no effect on the display; it just adds any name and value you specify to the form results when they are submitted.
If you are using a form-processing script provided by your web-hosting provider, you might use this attribute to tell a script where to email the form results. For example, the following code will e-mail the results to [email protected]:
![]()
Scripts often use at least one or two hidden input elements to carry additional data along for the ride that might be useful when you receive the results of the form submission; some examples include an e-mail address and a subject for the e-mail. If you are using a script provided by your web hosting provider, consult the documentation provided with that script for additional details about potential required hidden fields.
Exploring Form Input Controls
Various input controls are available for retrieving information from the user. You’ve already seen one text-entry option, and the next few sections introduce you to most of the remaining form-input options you can use to design forms.
Check Boxes
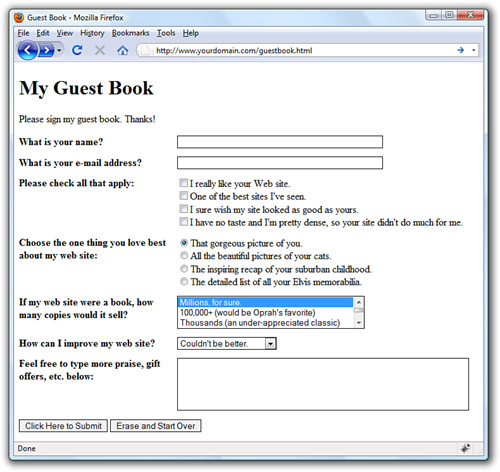
The simplest input type is a check box, which appears as a small square. Users can click checkboxes to select or deselect one or more items in a group. For example, the checkboxes listed in Listing 22.1 display after a label that reads “Please check all that apply,” implying that the user could indeed check all that apply.
The HTML for the checkboxes in Listing 22.1 shows that the value of the name attribute is the same for all of them: website_response[].

The use of the brackets ([]) indicates to the processing script that a series of values will be placed into this one variable, instead of just one value (well, it might just be one value if the user only selects one checkbox). If a user selects the first checkbox, the text string “I really like your Web site.” will be placed in the website_response[] bucket. If the user selects the third checkbox, the text string “I sure wish my site looked as good as yours.” will also be put into the website_response[] bucket. The processing script will then work with that variable as an array of data rather just a single entry.
Tip
If you find that the label for an input element is displayed too close to the element, just add a space between the close of the <input /> tag and the start of the label text, like this:
![]()
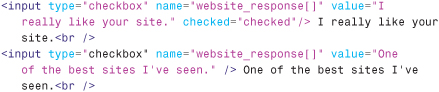
However, you might see groups of checkboxes that do use individual names for the variables in the group. For example, the following is another way of writing the checkbox group:

In the previous checkboxes, the variable name of the first checkbox is “liked_site” and the value (if checked) is “yes.”
If you want a check box to be checked by default when the form is rendered by the web browser, include the checked attribute. For example, the following code creates two check boxes and the first is checked by default:
Warning
XHTML requires all attributes to have an equal sign followed by a value. This explains why checked="checked" is used to indicate that a check box is checked (as opposed to just checked). This rule applies to all Boolean (true/false, on/off, yes/no, and so on) attributes that you might come across in HTML.
The check box labeled ”I really like your site.” is checked in this example. The user would have to click the checkbox to indicate they had another opinion of your site. The checkbox marked ”One of the best I’ve seen.” would be unchecked to begin with, so the user would have to click it to turn it on.
Check boxes that are not selected do not appear in the form output at all.
Radio Buttons
Radio buttons, for which only one choice can be selected at a time, are almost as simple to implement as check boxes. The simplest use of a radio button is for yes/no questions or for voting when only one candidate can be selected.
Note
If you look at other web designers’ forms, you might see checkboxes use the same names but with different values, as in the following code:
If the user checks more than one checkbox, it is more than likely only the last value will be processed by the script. This is one reason why you should give some thought to your checkbox groups, the name of the group, and the individual values you want sent to the script before you submit it.
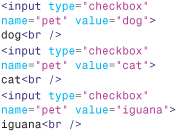
To create a radio button, just use type="radio" and give each option its own <input /> tag. Use the same name for all the radio buttons in a group, but don’t use the [] that you used with the checkbox:
![]()
The value can be any name or code you choose. If you include the checked attribute, that button is selected by default. No more than one radio button with the same name can be checked.
When designing your form and choosing between checkboxes and radio buttons, ask yourself: is the question being asked or implied one that could be answered only one way? If so, use a radio button.
Selection Lists
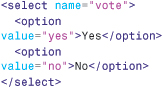
Both scrolling lists and pull-down pick lists are created with the <select> tag. You use this tag together with the <option> tag, as the following example shows:

No HTML tags other than <option> and </option> should appear between the <select> and </select> tags.
Unlike the text input type, the size attribute here determines how many items show at once on the selection list. If size="2" were used in the preceding code, only the first two options would be visible and a scrollbar would appear next to the list so the user could scroll down to see the third option.
Including the multiple attribute allows users to select more than one option at a time; the selected attribute makes an option initially selected by default. When the form is submitted, the text specified in the value attribute for each option accompanies the selected option.
Tip
If you leave out the size attribute or specify size="1", the list creates a drop-down pick list. Pick lists don’t allow for multiple choices; they are logically equivalent to a group of radio buttons. The following example shows another way to choose yes or no for a question:
Text Areas
The <input type="text"> attribute mentioned earlier this hour allows the user to enter only a single line of text. When you want to allow multiple lines of text in a single input item, use the <textarea> and </textarea> tags. Any text you include between these two tags is displayed as the default entry. Here’s an example:
![]()
As you probably guessed, the rows and cols attributes control the number of rows and columns of text that fit in the input box. The cols attribute is a little less exact than rows and approximates the number of characters that fit in a row of text. Text area boxes do have a scrollbar, however, so the user can enter more text than what fits in the display area.
Submitting Form Data
Every form must include a button that submits the form data to a script on the server. You can put any label you like on this button with the value attribute:
![]()
A gray button will be sized to fit the label you put in the value attribute. When the user clicks it, all data items on the form are sent to the email address or program script specified in the form’s action attribute.
You can also include a Submit Reset button that clears all entries on the form so users can start over if they change their minds or make mistakes. Use the following:
![]()
If the standard Submit and Reset buttons look a little bland to you, remember that you can style them using CSS. If that’s not good enough, you’ll be glad to know that there is an easy way to substitute your own graphics for these buttons. To use an image of your choice for a Submit button, type the following:
![]()
The button.gif image will display on the page and the form will be submitted when a user clicks the button.gif image. You can also include any attributes normally used with the <img /> tag, such as alt and style.
Summary
This hour demonstrated how to create HTML forms, which allow your web page visitors to enter specific information. We stopped short of doing anything with that information because form-handling requires an external script to process that form.
You learned about all the major form elements, as well as how form-processing scripts interpret the names and value attributes of those elements. When you are ready to try a back-end form processing script, you’re now well-versed in the front-end details.
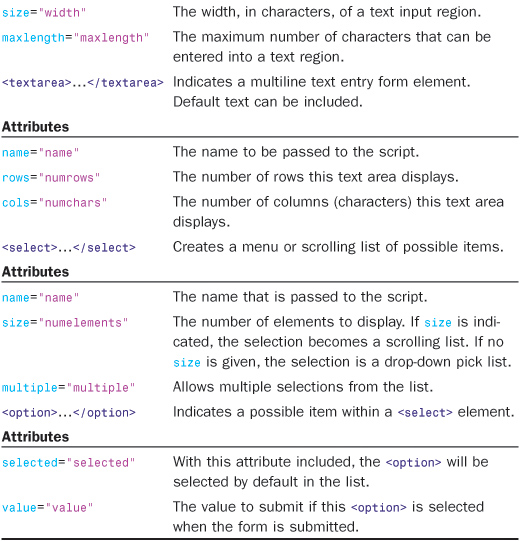
Table 22.1 summarizes the HTML tags and attributes covered in this hour.
Table 22.1 HTML Tags and Attributes Covered in Hour 22

Q&A
Q I’ve heard that it’s dangerous to send credit card numbers over the Internet. Can’t thieves intercept form data on its way to me?
A It is possible to intercept form data (and any web pages or email messages) as it travels through the Internet. If you ask for credit card numbers or other sensitive information on your forms, you should implement secure web browsing on a secure server using an SSL (Secure Sockets Layer) certificate. These SSL certificates are available from companies such as VeriSign (http://www.verisign.com/), but you should check with your web-hosting provider for the types of SSL certificates they install and resell.
To put the level of risk in perspective, remember that it is much more difficult to intercept information traveling through the Internet than it is to look over someone’s shoulder in a restaurant or retail store. Even so, you should always utilize secure pages anytime you’re handling sensitive financial information such as credit card numbers, especially when someone else is trusting you to handle their sensitive information.
Q Can I put forms on a CD/DVD-ROM or do they have to be on the Internet?
A You can put a form anywhere you can put a web page. If it’s on a disk or CD-ROM instead of a web server, it can be filled out by users whether or not they are connected to the Internet. Of course, they must be connected to the Internet (or your local intranet) when they click the Submit button or the information won’t reach the processing script.
Workshop
The workshop contains quiz questions and activities to help you solidify your understanding of the material covered. Try to answer all questions before looking at the “Answers” section that follows.
Quiz
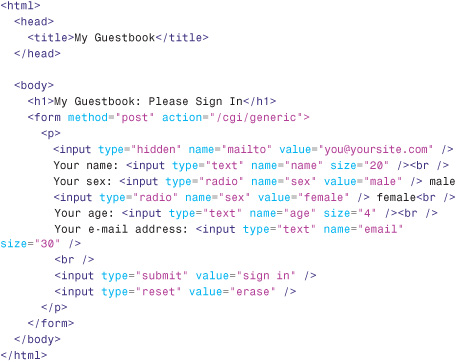
1. What HTML code would you use to create a guestbook form that asks someone for his or her name, sex, age, and email address? Assume that you have a form-processing script set up at /cgi/generic and that you need to include the following hidden input element to tell the script where to send the form results:
![]()
2. If you created an image named sign-in.gif, how would you use it as the Submit button for the guestbook you created in Question 1?
Answers
1. You would use HTML code similar to the following (with the appropriate DOCTYPE declaration, of course):
2. Replace the following code:
![]()
with this code:
![]()
Exercises
• Create a form using all the different types of input elements and selection lists to make sure you understand how each of them works.
• Investigate the form-handling options at your web-hosting provider and use a script made available to you by the web-hosting provider to process the form you created in the previous exercise.