
Chapter 10. Using Word, Excel, and Excel Services with SharePoint 2007
IN THIS CHAPTER
- Overview of the New File Types in Office 2007
- Using Word 2007 and 2003 with SharePoint 2007
- Using Excel with SharePoint 2007
- Using Excel Services in SharePoint 2007
- Best Practices
One SharePoint strength is its tight integration with the Office family of products. Competitors such as Stellent find it hard to compete against SharePoint in the collaboration area because most corporate users “live and breathe” Word, Excel, and Outlook. Competitors can add hooks into the Office products and try to emulate features such as spreadsheets and email, but SharePoint’s tight integration is a definite SharePoint advantage.
This integration continues with SharePoint 2007, even becoming more complex and thorough. As no surprise, the most complete integration occurs with Office 2007 products. However, most clients that the authors have worked with tend to have a mixture of different versions of Office. Some clients still have Office 2000 products and 2003 products, and some are just starting (at the time of this writing) to implement Office 2007 products.
This chapter provides an overview of the features offered in Office 2003 and Office 2007 products. We decided not to cover Office 2000 products because those are arguably near the end of their life span (and two full versions back). Chapter 11, “Leveraging Additional Office 2007 Products in a SharePoint 2007 Environment,” covers the use of additional Office 2007 products with SharePoint 2007.
Because determining which members of the Office family are needed can sometimes prove confusing, Chapter 4, “Planning the SharePoint 2007 User Environment,” provides additional information about the different Office products available and high-level integration points.
Unless otherwise specified, this text assumes the installation of the Professional version of Office 2003 and the Enterprise version of Office 2007.
Overview of the New File Types in Office 2007
Microsoft Office 2007 has moved away from the binary file types used in previous versions to an XML-based file format called Open Office XML format. When a user sees a file with an extension such as .xslx, this is actually a collection of files compressed with the Zip algorithm. An interesting exercise involves changing the file extension of an Office 2007 file, such as an .xslx file, to .zip and then opening the Zip file with the operating system (via, for instance, XP Pro) or a compatible program. An .xslx file actually contains several folders (for example, _rels, customXML, docProps, xl) and a [Content_Types].xml document. You can find the actual content of the spreadsheet in the xlworksheetssheet1.xml file. A review of the contents of this file after some changes have occurred, such as conditional formatting, can prove quite revealing. Although this might seem unnecessarily complex, the file format change results in a number of advantages:
- Compression technology is used to store the documents, and thus reduces the overall size of the document (compared to no compression on older file formats).
- Data integrity is protected and data recovery is facilitated by the segmentation of information within the compressed file.
- Accessing the data contained within the file is facilitated through the use of standard XML formats.
In addition, the Office 2007 products are designed to be backward compatible. Therefore, Office 2007 products can still use the Office 2003, Office XP, and Office 2000 file formats; and Office 2007 users can save to the older file formats. Compatibility software is available for users of older Office versions, enabling them to open the 2007 file formats. The following sections provide more information about these topics.
Using Word 2007 and 2003 with SharePoint 2007
This section covers the Word user experience in a SharePoint 2007 environment (both Word 2007 users and Word 2003 users). Mixed environments are more challenging than Word 2007 environments because training and support must be provided for at least two sets of users.
Strategies for “Mixed” Word (2007, 2003, and Earlier) Environments
Although many large organizations are starting to implement Office 2007, most of these organizations still have workers using Office 2003 (and maybe even earlier versions). Therefore, it is important to decide which file types will be used in “mixed” environments (mixed Office versions) and to understand the ramifications of this choice. For example, you can configure Office 2007 to save files in Office 97–2003 compatibility mode by default by using Group Policy or the new Office Customization tool (part of the Office 2007 Resource Kit). However, you might want to use the new Open XML file formats and some of the new features available in Office 2007; this will cause problems for users of older versions of Office because they cannot open these file types (.docx and .docm) without additional software.
Microsoft offers two solutions that enable Word 2003 users to view/open .docx and .docm files:
- Office 2000, 2002, and 2003 users can install a compatibility pack from Microsoft (search for and download the file FileFormatConverters.exe from Microsoft.com). After the Microsoft Office Compatibility Pack for Word, Excel, and PowerPoint 2007 File Formats has been installed, users of Office 2000, Office XP, and Office 2003 can open, edit, and save files using the file formats new to Word, Excel, and PowerPoint 2007. Note, however, that when the compatibility pack is used, it actively changes the file in the conversion process, stripping out features that didn’t exist in the previous version (such as digital signatures). See Microsoft KB article 923505 for additional information.
- The Word Viewer program (search for and download wdviewer.exe from Microsoft.com) can be installed. It was designed to enable users to open Word 2003 documents and documents that were created in all earlier versions of Word for Windows and Word for Macintosh without having to have the full Word 2003 application installed. However, it works in conjunction with the Microsoft Office Compatibility Pack for Word, Excel, and PowerPoint 2007 File Formats; so if they are both installed on the same desktop, the user can then use the Word Viewer to view Word 2007 documents.
- There is also an Excel Viewer program (search for and download xlviewer.exe from Microsoft.com) that can be installed, with a similar goal to that of the Word Viewer program for Excel users.
Following are two examples to illustrate the user experience.
Example 1: The compatibility pack is installed. The user just accesses the Edit menu in a SharePoint 2007 document library and selects Edit in Microsoft Office Word. The document opens in Word 2003, with a message appearing in the status bar of Word letting the user know Word is converting the document. When the conversion completes, a message appears: “Because this file was created in a newer version of Word, it has been converted to a format that you can work with. However, the following items have been affected: Features that do not exist in this version of Word have been removed ... Layout and the ability to edit certain features have changed.” So, the file has actually been modified at this point, and if saved might have lost functionality.
Example 2: As an example of the scenario provided in the second bullet of the preceding list, an Office 2003 user installs the Word Viewer program on his desktop and installs the compatibility pack. The user then opens the Word Viewer and uses the File, Open method to browse to the file located on the SharePoint 2007 site and then views it. Alternatively, the workstation can be configured to automatically use the Word Viewer program to open a .docx or .docm file through the Folder Option window accessible from Windows Explorer. To do this, follow these steps:
- Open Windows Explorer, access the Tools menu, select Folder Options, and select the File Types tab.
- Locate and select the DOCX extension from the Registered File Types list, click the Change button in the Details for DOCX Extension area, and select Microsoft Word Viewer.
- Locate and select the DOCM extension from the Registered File Types list, click the Change button in the Details for DOCM Extension area, and select Microsoft Word Viewer.
- Click Close.
For additional information, see the article “How to View Word 2007 and Excel 2007 Files by Using Word Viewer 2003 and Excel Viewer 2003” (http://support.microsoft.com/kb/925180).
When the user now browses to the file via My Network Places, or Explorer, or uses the Explorer view in SharePoint 2007 and double-clicks the file, it will automatically open in the Word Viewer. Note, however, that if the Edit menu is accessed for the file, and Word 2003 is installed on the desktop, it will default to the full version of Word (rather than the Word Viewer, despite the settings in Registered File Types) and will then use the compatibility pack to open the document. You can modify the SharePoint 2007 Edit menu to default to the viewer programmatically, but that requires some customization.
Because most organizations have Word 2003 users (and, likely, users of earlier Word versions) and will be moving toward Word 2007, it is worth experimenting with the Microsoft Office Compatibility Pack for Word, Excel, and PowerPoint 2007 File Formats and the Word Viewer application in the proof-of-concept phase. By so doing, IT can determine the best combination of products and policies needed to ensure a positive user experience. If the use of Word 2007 file types (.docx and .docm) causes too much complexity in the environment or with external contacts, policies can then be set to encourage or force Word 2007 users to save documents in downward-compatible modes and avoid Word 2007 features that might be stripped out when the compatibility pack is used. A more draconian step is to not allow the new .docx and .docm file types to be uploaded to SharePoint 2007; this restriction is enabled via the Blocked File Types page in the Operations tab in Central Administration.
Using Word 2003 with SharePoint 2007
You must ensure that Word 2003 users have the latest updates and patches for Word 2003 (and other Office 2003 applications). Microsoft makes this easy by providing software that checks the computer for the latest patches and updates on their website (http://office.microsoft.com/en-us/downloads/). Users should be encouraged to update their Office 2003 installations. Alternatively, you can use a product such as the free Microsoft Windows Server Update Services or the more comprehensive Microsoft Systems Management Server solution to push out the latest patches and updates. If the most current versions are not being used, the user experience with SharePoint 2007 might not be acceptable (because of potential errors).
Using the Shared Workspace Task Pane in Word 2003
The basic look and feel of a SharePoint 2007 document library is the same whether Word 2003 or Word 2007 is installed. If Word 2003 is used to open a document from a SharePoint 2007 document library, the standard options are offered in the Edit menu. If the Edit in Microsoft Office Word option is selected, the document opens, and the Shared Workspace task pane is available to the user, as shown in Figure 10.1. In Figure 10.1 the Members tab is active in the Shared Workspace task pane, and the SharePoint 2007 users and groups are listed normally.
Figure 10.1. A document opened in Word 2003 from a SharePoint 2007 document library.

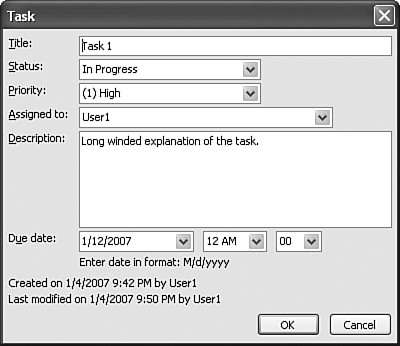
All tabs in the task pane function in the same way they functioned with SharePoint 2003 sites. Tasks that exist in a tasks list (if there is one) on the site that contains the document will also display in the Tasks tab. If the user has the appropriate rights, tasks can also be updated from Word 2003, as shown in Figure 10.2. Note that only tasks from one tasks list will display. If additional tasks lists are created on the same site, only items from the first one display. The same is true for the Links tab; so if multiple links lists exist on the site, only the contents of the first one created will display.
Figure 10.2. Editing task information in Word 2003.
The Documents tab, however, displays other documents that are in the document library from which the current document was opened, even if there are multiple document libraries on the site. If the drop-down menu is selected for a document shown in the Documents tab, a new workspace can be created by clicking Create Document Workspace. If this option is selected, the user must confirm that he wants to create a workspace; then the creation process occurs. The document will then be stored in a document workspace, and changes made will apply to the copy in the workspace, not the copy in the document library that was originally opened. When the user closes the document, he is prompted as follows: “This document is now stored in a Document Workspace. If you save a copy of this document on your computer, you can easily find it again and keep it up to date with the workspace copy. It is strongly recommended that you save a local copy of this document.” The user can then decide to Save Local Copy, Skip, or Cancel. If saved locally, the document will alert the user that a copy exists in a document workspace and will give the options to update the copy in the document workspace if changes are made.
If the Alert Me option is chosen for one of the entries in the Share Workspace task pane, the SharePoint 2007 site will become active, and the New Alert page (_layouts/SubNew.aspx) will open, enabling the user to take advantage of the new alerting features.
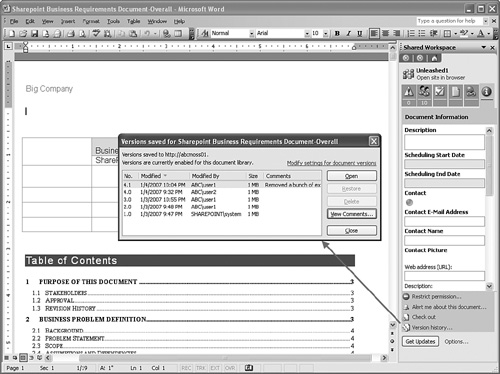
The Document Information tab displays metadata information about the document. This can prove extremely handy, because some content types require that great deal of information be entered. Figure 10.3 shows the Document Information tab for a document that uses the article content type. Note also in Figure 10.3 that the Version History link was selected, and both major and minor versions are shown. If the View Comments button is clicked in the Versions window, the full comments will display.
Figure 10.3. Document Information tab and version history in Word 2003.
At the time of this writing, the Members tab of the Shared Workspace task pane is not functioning properly when a document housed in a SharePoint 2007 document library is opened in Word 2003. If a group is moused over and Remove Member from Workspace is selected by a user with sufficient privileges, this group will not actually be removed, but rather the group at the top of the list will be. Most likely, this will be fixed in the near future; but this should be tested if Word 2003 is being used with SharePoint 2007.
Using Word 2007
When Word 2007 is used to open a document from a SharePoint 2007 document library, the document properties bar is open by default, as shown in Figure 10.4. In this case, there are quite a few fields of metadata because the Dublin core content type was applied to this document. These fields can be edited and will be saved when the document is saved. If the down arrow is clicked (indicated by the pointer in Figure 10.4), the options of Document Properties and Advanced Document Properties are offered.
Figure 10.4. Document properties in Word 2007.

As circled in Figure 10.4, the location of the document is shown. This could be either the SharePoint document library that houses the document or the local folder where it was saved, depending on whether the user checked out the document and whether she decided to Use My Local Drafts Folder, which can be found in My DocumentsSharePoint Drafts. In Figure 10.4, the user did check out the document, and did use a local drafts folder, so the address listed is on the person’s computer. Note also that in the Document Management task pane on the right side of the screen only the Status tab is visible. This is because the user chose to save a copy of the document locally; so, it is technically separated from the SharePoint document library that houses it, and therefore information on members, tasks, links, and other documents is not available.
If the document was not saved locally during the checkout process, the Location information will show the SharePoint document library from which the document was opened, and the full set of tabs will be visible in the Document Management task pane, as shown in Figure 10.5. The standard tabs are available: Status, Members, Tasks, Documents, and Links.
Figure 10.5. Document Management task pane in Word 2007.

Saving and Publishing Files from Word 2007
As with SharePoint 2003, it is handy to add commonly accessed SharePoint 2007 sites to My Network Places. One problem with this tool is that it also contains other network resources and can autopopulate in certain situations, resulting in a large number of entries, which can make it hard to find exactly which network place to use (more information about preventing this is available in Microsoft KB article 242578). Word 2007 makes it easier to track these commonly used URLs, as illustrated in the following example:
1. Create a new Network Place in My Network Places for a SharePoint 2007 site.
2. Open Word 2007 and create a document that you want to save to a SharePoint 2007 site. Click the Office button, then select Save As, and then choose the top option Word Document.
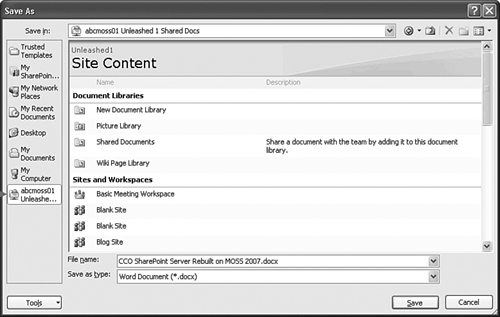
3. In the Save As window, click My Network Places in the My Sites pane on the left (as shown in Figure 10.6), right-click the network place you want to copy, and select Copy from the menu.
Figure 10.6. Word 2007 Save As window.

4. Click My SharePoint Sites above My Network Places in the My Sites pane, and then right-click in the right pane and select Paste. Then test the link by clicking it. The My SharePoint sites folder is located in c:Documents and SettingsusernameLocal SettingsApplication DataMicrosoftOfficeMy SharePoint Sites; so, network places can be manually copied to this location for standardization purposes.
5. Then right-click below the last entry in the My Places bar (in this example, underneath My Computer) and select Add ‘Sitename’ (where Sitename is the name of the sitename contained in the network place). The My Places bar will now have a separate entry for this site, as shown in Figure 10.7. In Figure 10.7, this new link has been clicked, and the pane on the right now shows the libraries, sites, and workspaces contained in the site that are able to save the document.
Figure 10.7. Word 2007 Save As window with new entry.
The Publish link under the Office button can also be used. Two standard options offered are to publish to a Blog or to a Document Management Server. If the Blog option is selected, the user will then be shown a preview and be asked to select the SharePoint blog site to publish to. If Document Management Server is chosen, the Save As window will open with a list of possible locations, which typically includes My SharePoint Sites, My Network Places, and any individual SharePoint sites added in that My Sites pane on the left.
Using the Prepare and Options in the File Menu
The Prepare menu offers a number of other useful tools:
- Properties—View and edit document properties, such as Title, Author, and Keywords.
- Inspect Document—Checks the document for hidden metadata or personal information. Several different components can be verified: Comments, Revisions, Versions and Annotations; Document Properties and Personal Information; Custom XML Data; Headers, Footers and Watermarks; Hidden Text. Items that are found in the selected categories can then be removed if needed. This is a welcome option because it can prevent document change history from being published within a final version of a document.
- Encrypt Document—Increase the security of the document by adding encryption and requiring a password to open the document. This is an alternative to using item-level security in a document library. However, if the password is forgotten, the item cannot theoretically be opened, so it is a more risky strategy.
- Restrict Permission—Grant people access while restricting their ability to edit, copy, and print. Settings include Unrestricted Access, Restricted Access, and Manage Credentials. This requires the installation of the Windows Rights Management Client with Service Pack 2 and an Information Rights Management Server on the network, or the use of Windows Live services.
- Add a Digital Signature (or View Digital Signatures)—Ensure the integrity of the document by adding an invisible digital signature. The process of adding a digital signature then involves either selecting Signature Services from the Office Marketplace, which opens an Office.Microsoft.com site that lists several different digital signature products (http://office.microsoft.com/en-us/marketplace/CE010955311033.aspx), or the default Microsoft Office digital signature can be selected by clicking OK. Figure 10.8 shows the Sign window where notes can be entered on the purpose for signing the document; the Signing as information can, in some cases, be changed. When Sign is clicked, the signature is saved with the document; if the document is changed, the signature becomes invalid. Figure 10.9 shows the Signatures task pane, which lists the valid signatures associated with the document. To access the additional information, select Signature Details from the drop-down menu for User1 in the Signatures task pane.
Figure 10.8. Creating a digital signature in Word 2007.

Figure 10.9. Signature details in Word 2007.

- Mark as Final—When a document is marked as final, the status property is set to Final and typing, editing commands, and proofing marks are turned off. The Mark As Final icon will also display in the status bar. The Microsoft file format converter will strip this feature, reducing its usefulness.
- Run Compatibility Checker—Check for features not supported by earlier versions of Word. In testing, however, this did not catch that digital signatures were not supported by Word 2003.
Using the Server Tools in Word 2007
Another option under the Office button in Word 2007 is the Server entry, which is available when a document has been opened from SharePoint 2007. One of these is Check Out if the document is not already checked out. Another is View Version History, which allows the user to see the version number, the modified date, who made the changes, size of the document, and any comments, as shown in Figure 10.10. Note that there is also an option to Compare a version with the current version. If the Compare button is clicked, a new document will open with a summary document organized into four different panes (as shown in Figure 10.11): Summary pane, Compared Document, Original Document (with document title and version information), Revised Document (with document title and version information). Although the screen looks very cluttered at 1024×768, the pane sizes can be changed, or the tool ribbon hidden (using the Ctrl-F1 keyboard shortcut), and, of course, higher resolutions can be used. One of the extremely nice features of this tool is that a change listed in the Summary pane can be double-clicked, and all three other windows will scroll to the item that has changed, enabling the user to see the original version, the revised version, and the comparison of the two with tracked changes shown. This meets a need for editors and document approvers, enabling them to easily see what has changed instead of sorting through the whole document. When combined with workflows, this can greatly enhance the approval process.
Figure 10.10. Version information Window in Word 2007.

Figure 10.11. Comparison document in Word 2007.

If View Workflow Tasks is selected from the Server menu, any tasks assigned to the current user will display. Note that there might also be a Workflow entry on the Office button menu, and if selected this will display workflows available for the document, and a Start option might be offered. If the workflow has already been started for the document, the Workflow Status page can be opened. Workflows are discussed in more detail in Chapter 21, “Using Designer 2007 to Extend SharePoint 2007 Workflows and Customize the User Experience.”
The final entry in the Server menu is Document Management Information, which will open the Document Management task pane to display the different available tabs.
Using Excel with SharePoint 2007
Excel 2007 offers a number of new tools for power users and new users alike. As with Word, the 2007 version also includes some extra functionality when used with SharePoint 2007 sites. It is likely that Excel power users will get excited by the conditional formatting and other “cool” new features. Although this is to be encouraged, as discussed in the previous section on Word 2007, issues might arise when users of earlier versions of Excel are working with Excel 2007 files. This section spends some time on these issues.
The use of the Datasheet view will also be covered in this section, because this feature is often used to reproduce a spreadsheet within a SharePoint list. A new feature of SharePoint 2007 that has received a lot of attention is Excel Shared Services, and this section gives a high-level review of the configuration options available with Excel Services.
Using Excel 2003 with SharePoint 2007
Excel 2003 users cannot open Excel 2007 .xslx or .xslb documents stored in the new file formats without the use of the Microsoft Office Compatibility Pack for Word, Excel, and PowerPoint 2007 File Formats, as discussed in the previous section. This software allows the Excel 2003 user to convert the following file types so that they can be accessed:
- Excel 2007 binary workbook (*.xlsb)
- Excel 2007 workbook (*.xlsx)
- Excel 2007 macro-enabled workbook (*.xlsm)
- Excel 2007 template (*.xltx)
- Excel 2007 macro-enabled template (*.xltm)
- Excel 2007 add-in (*.xlam)
So, as with Word documents, it is important to understand and test the ramifications of saving Excel 2007 documents in one of the new file formats, if Excel 2003 users want to edit them.
If an Excel 2003 user has the compatibility pack loaded, he will have a slightly different experience opening an Excel 2007 .xlsx document than the Word 2003 user with the compatibility pack opening a Word 2007 .docx file. As discussed in the section “Using Word 2003 with SharePoint 2007,” Word 2003 will open the file and leave it in Edit mode, whereas Excel 2003 will open the file via the compatibility pack but set the document to Read-Only mode. When the Excel 2007 .xslx file is opened, the message will be similar to the following: “This file was created in a newer version of Microsoft Excel. The file has been converted to a format you can work with, but the following issues were encountered. The file has been opened in Read Only mode to protect the original file.” A description of the issues will then follow (for example, “Some cells contain types of conditional formatting that are not supported in this version of Excel").
Accessing Excel 2007 Documents with Excel 2003
An Excel 2003 user accessing an Excel 2007 format document (such as .xlsx) in a SharePoint 2007 document library is offered several options in the Edit menu, not all of which she can use. The basic options offered are Edit in Microsoft Excel, View in Web Browser, and Snapshot in Excel.
If the user chooses Edit in Microsoft Excel, and if the compatibility pack is installed, the user must click OK when informed that the file has been converted. If the compatibility pack is not installed, the user receives an error and cannot open the document. Assuming the compatibility pack is installed, the user will then be in Read-Only mode when the spreadsheet opens, as shown in Figure 10.12. She can still edit the document, but when saving must give it a new name. Note that in SharePoint 2003 files opened in Read-Only mode could still be saved over the file store in the SharePoint document library. This is not the case in SharePoint 2007, thankfully, and if the user tries to simply overwrite the original document that was opened in Read-Only mode, she will get an error. When the file is saved, the compatibility pack saves it in the same Excel 2007 that it had when it was opened, and the new features, such as conditional formatting, should still be in place.
Figure 10.12. Excel 2007 document opened in Excel 2003.

If the user selects View in Web Browser from the Edit menu, a preview of the spreadsheet is presented in the browser. As mentioned previously, this option is only available for documents in the Excel 2007 format. The next section goes into more detail about this feature.
If the user selects Snapshot in Excel, she receives an error message and is provided the Web Browser view instead. The error message is somewhat misleading: “The workbook cannot be opened. Excel may not be installed properly (or was set to install on first use), the path to the document may be incorrect, or you session may have timed out. Try opening the workbook again, or clicking Reload on the Excel Web Access toolbar.” In fact, the issue has to do with Excel 2007 not being installed.
If the document is opened in Excel 2003, the user has access to the Shared Workspace task pane, and functionality in Excel 2003 is similar to Word 2003, as covered in the section “Using the Shared Workspace Task Pane in Word 2003.”
Viewing in Web Browser Feature from Excel 2003
Excel 2003 users can take advantage of one of the new Excel Services features in a SharePoint 2007 document library: the View in Web Browser feature. This option appears in the Edit menu if an Excel 2007 file was saved to a document library that is included in an Excel Services trusted file location (see the following section on Excel services configuration). Figure 10.13 shows a sample view of an Excel 2007 .xslx file that was saved to an Excel Services trusted document library, after View in Web Browser was clicked.
Figure 10.13. Excel web browser display of Excel 2007 sheet.

A user might receive an error after clicking View in Web Browser that states, “You do not have permissions to open this file on Excel Services. Make sure that the file is in an Excel Services trusted location and that you have access to the file.” This might mean that an administrator has removed the location from the Trusted File Locations page (_layouts/ExcelServerTrustedLocations.aspx in the Shared Services Administration site) in the Shared Services administration tab.
If the Open menu circled in Figure 10.13 is accessed by an Excel 2003 user, however, and either option available is selected (Open in Excel or Open Snapshot in Excel), an error messages appears stating, “The workbook cannot be opened. Excel may not be installed properly (or was set to install on first use), the path to the document may be incorrect, or you session may have timed out. Try opening the workbook again, or clicking Reload on the Excel Web Access toolbar.”
An Excel 2003 user can also access the Update menu. The links offered are Refresh Selected Connection, Refresh All Connections, Calculate Workbook, Reload Workbook. Note that the Refresh Selected Connection only applies to Pivot Tables. Refresh All Data Connections only applies if the spreadsheet contains data connections. Calculate Workbook applies if the view of the worksheet contains editable cells, and Reload Workbook will reload the workbook from its file location. The Find function locates text within the spreadsheet.
More information on this example is given in the following section on using Excel 2007 with SharePoint 2007.
Using the Datasheet View with Excel 2003
If a user with Excel 2003 installed as part of an Office 2003 Professional installation accesses the Datasheet view, that user sees the 2003 tools as opposed to the 2007 tools. Figure 10.14 compares the tools available to an Office 2003 Professional user side by side with an Office 2007 user. Note that the tools shown on the left include the 2003 tools even though SharePoint 2007 is being accessed. Some of the tools overlap (Print with Excel, Chart with Excel, Create Excel PivotTable Report, Export to Access, Report with Access), but Export and Link to Excel is changed to Query List with Excel, and Create Linked Table in Access is replaced with Track This List in Access.
Figure 10.14. Datasheet view tools in Office 2003 versus Office 2007.

Despite these differences, the Export and Link to Excel, Print with Excel, Chart with Excel, and Create Excel PivotTable Report function properly. So, SharePoint 2003 users will feel at home with the toolset they see in a SharePoint 2007 list when in Datasheet view.
Using Excel 2007 with SharePoint 2007
This section builds on information provided in the section “Using Excel 2003 with SharePoint 2007.” Viewing an Excel 2007 spreadsheet in a web browser (and the use of datasheets) is covered. It is assumed that most users will experiment with the many other new features in Excel 2007 on their own.
Standard Edit Menu Tools for Excel 2007 Spreadsheets
If Excel 2007 is used to save a spreadsheet to a SharePoint 2007 document library, the standard options offered by the Edit menu are as follows: Edit in Microsoft Excel, View in Web Browser, and Snapshot in Excel.
If the filename of an Excel 2007 spreadsheet is clicked in the document library, one of two things happens, depending on the configuration of the library. If Opening Browser-Enabled Documents on the Advanced Settings page (_layouts/advsetng.aspx page) is set to Open in the Client Application, Excel is opened to display the file. If Display as a Web Page is selected, the file displays in the web browser. And, of course, the library needs to be trusted by Excel services to open the page in the web browser.
Publishing to a Web Browser from Excel 2007
The basics of using Excel services to view an Excel 2007 spreadsheet in a web browser were provided in the previous section where the end user was using Excel 2003. An additional feature available from Excel 2007 is the ability to publish an .xslx or .xslb file to Excel Services. The following example shows how to do so. In this example, a spreadsheet and a chart are published so that users can add their own data to one column and then compare their data to the existing entries to see how their division is performing.
In Figure 10.15, an Excel 2007 workbook is open and contains some data and a sample chart. If the Formulas tab is activated, the option to Define Name is available so that the cell can be referenced by its name rather than its column and row number. If this is selected, as shown in Figure 10.15, the user can define a name for a cell, determine the scope of this name (workbook or a specific worksheet), and then define the range. As shown in the example, the name contains an underscore (_) to start with, because the name cannot start with a number; this ensures that when the names display in the Parameters pane they will be in order. Note also that for this named cell to be accessible during the Excel publishing process, only a single cell can be selected. In this case, therefore, to make multiple cells editable on SharePoint 2007 site in Web Browser view, each cell needs to be defined separately.
Figure 10.15. Defining the name of a cell in Excel 2007.

After each cell in the range G3 to G14 has a name, they can be referenced during the publishing process. To publish to Excel Services, follow these steps:
1. Click the Office button and then the Publish link. Then you can select the Excel Services publishing tool.
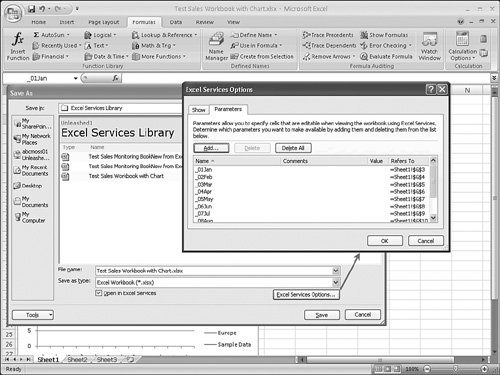
2. The Save As window has Excel Services Options button (shown in Figure 10.16). Click this to determine which items are shown in the browser (the whole workbook or just specific tabs), and which named cells can be edited. Figure 10.16 shows the Parameters tab active in the Excel Services Options window, and a number of named cells that have been added.
Figure 10.16. Publishing a workbook to Excel Services in Excel 2007.
3. Click OK, and the publishing process will occur. If the Open in Excel Services box is checked in the Save As window, the Web Browser view will appear, as shown in Figure 10.17.
Figure 10.17. Web Browser view of workbook published to Excel Services from Excel 2007.

As shown in Figure 10.17, the screen contains a Parameters pane to the right, where text can be entered, and the worksheet display on the left. In Figure 10.17, entries were added in the _01Jan, _02Feb, and _03Mar fields, and Apply was clicked, causing these values to update the worksheet on the left (circled in the Sample Data column). This data also updates the graph, as indicated by the arrow. The conditional formatting applied in Excel 2007 changes accordingly. For this particular spreadsheet, each row has an icon conditional formatting set applied. Each data entry in each row is treated as a percentage, based on the range of values in that specific row. So, for each month, it is clear which values are the lowest (X icon), which are in the middle (! icon), and which are the best (checkmark icon). So, any new values entered in the Sample Data column change the range, making the spreadsheet more adaptive.
The Open menu can be accessed from the Web Browser view, and Open Snapshot in Excel can be selected. This captures the data as it has been entered and opens a new Excel 2007 document containing this data. This might be important, because the Excel Services Browser view is read-only, so the data entered in the Parameters pane is not saved anywhere. Alternatively, the tool Open in Excel can be selected. This tool opens the file with the current data entered as a read-only Excel 2007 document. These two features are useful for a variety of different tasks, such as saving “what if” scenarios or printing the “what if” scenarios.
This discussion should give you a good idea of how you can create a “dashboard” from a workbook and then display it in Excel Services.
Microsoft offers an add-in to Excel 2007 that enables users to save files in XPS (XML Paper Specification) or PDF file types. To download the add-in, search for “SaveAsPRDandXPS.exe” on Microsoft.com, and then download and install.
If Excel Services will be used to display workbooks in a web browser, it is recommended to use Microsoft Windows SharePoint Services rights and permissions at the document, folder, or library level. Excel Services will not display a workbook that has digital signatures, that has protected ranges, or that uses Information Rights Management (IRM).
Exporting a Table to a SharePoint 2007 List
Another way to share data in an Excel workbook with SharePoint 2007 users is to export the contents, or a subset, to a SharePoint list. For this to work, a table first needs to be created in Excel 2007, and then populated. After that, the export process can occur. An extremely powerful feature of SharePoint lists is that multiple people can edit them at the same time, which can be an advantage over users fighting to check out, edit, and check in documents one at a time. To export data to a SharePoint list, follow these steps:
1. On a worksheet, select the range of empty cells or data that you want to make into a table. On the Insert tab, in the Tables group, click Table.
2. The Create Table window opens. You must define the range. You must also check the box next to My Table Has Headers if needed.
3. Click OK. A blank table is created in the range defined.
4. Now populate this table with sample or real data. Figure 10.18 shows the same data from the 2006 Sales Numbers worksheet used in the previous section pasted into a table and includes the conditional formatting.
Figure 10.18. Creating a table in Excel 2007.
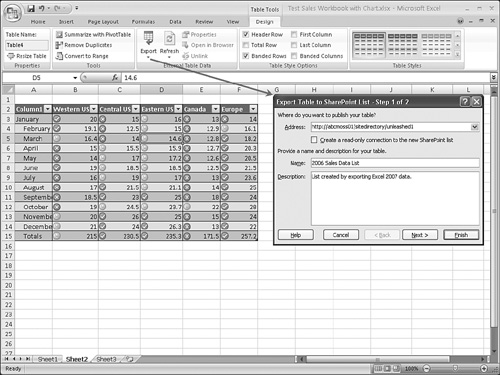
5. With a cell selected in the table, the Design tab will be active. Select it and access the Export drop-down menu. Then select Export Table to SharePoint List.
6. Figure 10.18 also shows the first step of the export. In this step, you must enter the address of the site that will house the new list. The option to Create a Read-Only Connection to the New SharePoint List is given. You must assign a name. You can also enter descriptive text. Click Next.
7. The window that appears for the second step of the export summarizes the data types that will be used. Formulas are stripped at this point, and only the values are kept. Click Finish.
8. A summary window provides a URL to the new list. Click this URL to open the new list.
9. Figure 10.19 shows the new list (in this case, the 2006 Sales Data List). Since the data was exported, there is no longer a link between Excel and this data.
Figure 10.19. Results of exporting an Excel 2007 table to a new SharePoint 2007 list.

Data exported from Excel 2007 to a SharePoint 2007 list is no longer connected to the SharePoint 2007 list, so changes in either the workbook or the list will not affect one another. If the Export to Spreadsheet option is used from the SharePoint 2007 list, however, the SharePoint 2007 list pushes changes to the Excel 2007 workbook.
Export to Spreadsheet Tool from a SharePoint 2007 List
If the Export to Spreadsheet tool from the Action menu is used from within a SharePoint 2007 list, a more enduring connection is created where changes in the SharePoint 2007 list will be pushed to the workbook using a so-called Web Query File.
Figure 10.20 shows the result of using this tool from the list that was created in the preceding section. Although this is a fairly convoluted example, any SharePoint 2007 list (or library content, for that matter) can be exported. As shown in Figure 10.20, Excel 2007 provides several data view options. It can be viewed as a Table, PivotTable Report, or PivotChart and PivotTable Report, and the data can be inserted in an Existing Worksheet, New Worksheet, or New Workbook. If you click the Properties button, you can configure additional settings such as Enable Background Refresh, Refresh Data when Opening File; and connection file information is provided, along with the option to Export Connection File. You can access these settings later by opening the Design tab and selecting the Properties tool in the Connections area. (Connectivity can also be broken by clicking the Unlink tool in the Design tab.)
Figure 10.20. Results of exporting SharePoint 2007 list data to Excel 2007.

Excel Services in SharePoint 2007
Some examples in the previous sections showed how Excel Services enables SharePoint 2007 users to publish views of workbooks or worksheets so that other users, even users of Office 2003, can see and interact in a limited fashion with these views. A detailed review of Excel Services is beyond the scope of this chapter, but a summary is provided so that administrators will have a sense of the configuration options and basic capabilities of the product.
Excel Services is comprised of three components:
- Excel Calculation Services (ECS)—This is the engine of Excel Services that loads the workbook, calculates in full fidelity with Microsoft Office Excel 2007, refreshes external data, and maintains sessions.
- Excel Web Access (EWA)—This is a web part that displays and enables interaction with the Microsoft Office Excel workbook in a browser by using Dynamic Hierarchical Tag Markup Language (DHTML) and JavaScript, and can be connected to other Web Parts on dashboards and other web part pages. No ActiveX controls need to be downloaded to the client computer. An example of the use of this web part is provided below.
- Excel Web Services (EWS)—This is a web service hosted in SharePoint 2007 that provides several methods that a developer can use as an application programming interface (API) to build custom applications based on the Excel workbook.
Many different types of configurations are possible, depending on the needs of the organization. During installation, Excel Services installs EWA and EWS on the front-end web server tier, and one ECS on the application server tier. If the installation is a single-server installation, they will all be on the same server; if services are distributed in a server farm, however, they could be on different servers. For more complex environments, Constrained Kerberos delegation should be used as the most secure way of communicating between front-end web servers and ECS application servers.
Excel Services Settings in Shared Services Administration
To use Excel Services, SharePoint Server 2007 Enterprise edition needs to be installed, and clients are required to have the Microsoft Office SharePoint Server 2007 Enterprise Client Access License (CAL) to use this service. The Excel Services Settings can be accessed in the Shared Services Administration tool on the administrative web application. This provides access to the five different toolsets:
- Edit Excel Services Settings—Choose settings for Security (file access method, connection encryption), Load Balancing, Session Management (number of sessions per user), Memory Utilization (maximum number of private bytes [in megabytes] allocated by the ECS process), Workbook Cache (location, maximum cache size in megabytes), and External Data (connection lifetime, credentials to use when connecting to data sources that require username and password strings).
- Trusted file locations—Allow the Shared Services administrator to determine which locations are supported by Excel Services in SharePoint 2007. These locations can be Windows SharePoint Services, UNC, or HTTP locations. For a Windows SharePoint Services location (such as http://abcmoss01/), child libraries and directories can be trusted, which can be easier than configuring individual sites.
- Trusted data connection libraries—Provide the address for data connection libraries from which workbooks opened in Excel Services are permitted to access data connection description files.
- Trusted data providers—A predefined list is given, as shown in Figure 10.21.
Figure 10.21. Excel Services default trusted data providers.

- User-defined function assemblies—New assemblies can be entered. The requirements include giving the location of an assembly that contains user-defined functions that ECS can call, enabling the assembly, and providing a description.
Using the Excel Web Access Web Part
This section describes using the Excel Web Access web part to access data in a workbook. The steps are as follows:
1. Access the Edit mode for the page to be modified.
2. Click Add a Web Part, click Advanced Web Part Gallery and Options, and then drag and drop the Excel Web Access web part to the appropriate location.
3. Click the Edit menu for the web part when it appears, and select Modify Shared Web Part. As shown in Figure 10.22, the Excel Web Access editing pane opens.
Figure 10.22. Excel Web Access web part in Edit mode.
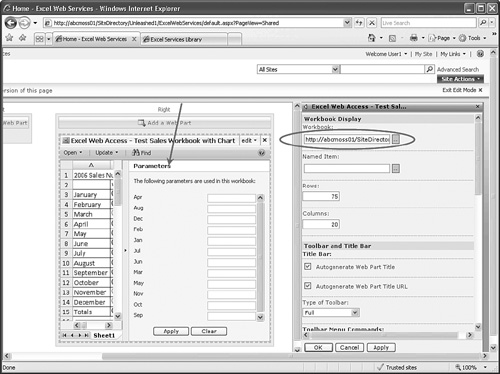
4. Enter the URL for a workbook published to an Excel Services trusted location in the Workbook field. Click Apply to test the connection. As shown in Figure 10.22, the data should appear in preview format in the Excel Web Access web part on the left.
5. Change the number in the Rows field and the Columns field to match the number of rows and columns to be displayed.
6. As indicated by the arrow in Figure 10.22, the Parameters information is appearing; so to hide this, scroll down in the Excel Web Access editing pane and uncheck the box next to Display Parameters Task Pane, and then next to Parameter Modification.
7. Scroll down to the Appearance submenu, expand it, and in the Width section, select Yes and enter an appropriate number for the width and select Inches from the drop-down menu. Click Apply.
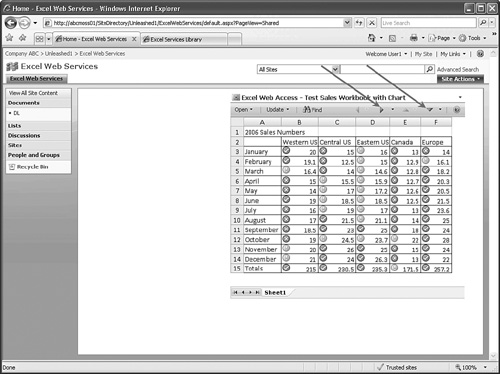
8. Click Exit Edit Mode, and the results should appear similar to Figure 10.23. The toolbar within the web part allows access to the Open menu and Update menu, which were discussed previously in this chapter. As indicated by the arrows in Figure 10.23, there are buttons to click to view data to the right of that displayed, and below (in this case, there is a chart further down).
Figure 10.23. Excel Web Access web part after configuration.
Many more configuration options are available for the Excel Web Access web part that determine the level of interactivity the user has with the data. By experimenting with these different features, the site administrator or designer can fine-tune what the users can and cannot do to the data.
Supported and Unsupported Features When Loading a Workbook in Excel Services
When you load a workbook in Excel Services, some features are supported, some are not supported (and actually stop a spreadsheet from loading), and some display differently in Excel Services. These are detailed in the Help article titled “Differences Between Using a Workbook in Excel and Excel Services” but a subset is presented in the following section to give an idea of what is allowed, and some of the items that can stop the spreadsheet from loading.
The following features are supported by Excel Web Services in Web Browser view:
- Calculation—Calculation and recalculation settings, including automatic, automatic except tables, manual, and iterative calculation settings for ranges or entire worksheets.
- Cells—Cell values, including merged cells and cell content overflow.
- Charts—Charts, chart ranges, and PivotChart reports.
- Connections—Connections to external data sources, including OLAP PivotTables.
- Consolidation—Consolidated data from ranges.
- Dates—Windows and Macintosh date systems.
- Excel tables—Excel table data, column headers, calculated columns, total rows, structured references, and styles.
- Formatting—Cell and cell range formatting, conditional formatting (except by using data bars and icons) in workbooks, and number formats.
- Functions—All Excel worksheet functions are supported, with a few exceptions. See the Help article titled “Differences Between Using a Workbook in Excel and Excel Services.”
- Names—Defined names and named ranges.
- What-if analysis—The results of what-if analysis tools, including Goal Seek, Data Tables, Scenarios, Solver, and Series.
Some features are not supported by Excel Services and stop a spreadsheet from loading, including the following:
- Comments—Display of and adjustment of comments
- Controls—Form toolbar controls, toolbox controls, and all ActiveX controls
- Data validation—Preventing invalid data entry and creating drop-down lists
- Displayed formulas—Workbooks saved with the formulas that are displayed
- External references to linked workbooks—External references (also called links) to a specific cell range, a defined name for the cell range, or a defined name for the external reference
- Images and objects—Linked or embedded objects or images, inserted pictures, AutoShapes, WordArt, and diagrams such as organization charts
- Legacy list data—Query tables and tables linked to Windows SharePoint Services lists
- Legacy macro languages—Microsoft Excel 4.0 Macro Functions and Microsoft 5.0 dialog sheets
- OLE and DDE—Object Linking and Embedding (OLE) objects and Dynamic Data Exchange (DDE) links
- Queries—Web queries and text queries
- Security and privacy—Workbooks, worksheets, or ranges with protection, and workbooks that have IRM
Other features do not display properly, including the following:
- Cell fill patterns—All fill patterns.
- Certain charts—Office 2007 3D graphic effects, such as shadow, glow, warp, bevel, soft edges, recolor, and reflection. These effects are either removed or converted to an alternative effect. The following 3D charts are not supported—3-D surface, Wireframe 3-D surface, Contour surface, Wireframe contour surface.
- Hyperlinks in charts—Clicking and following hyperlinks in charts is not supported.
- Printing settings—Page layout and page headers and footers will not be used or displayed.
For more complex spreadsheets and workbooks that use one or more of the preceding features, testing is required to determine whether the content published to Excel Services will display in the Web Browser view properly (or generate an error). Even with these limitations, however, Excel Services can present information to site visitors in myriad ways that can prove beneficial to the flow of information in the organization.
Summary
This chapter covered the basic user experience for those who use Word 2003, Word 2007, Excel 2003, and Excel 2007 when accessing SharePoint 2007 resources. The chapter also provided examples of the tools and features that SharePoint users will find interesting. Excel Services was also explored at a high level, and examples showed how organizations can use it. A complete exploration of the different design options for Excel Services is beyond the scope of this chapter, but Excel 2007 features that are supported and those that should be avoided were listed.
Best Practices
- Make sure to update any Office 2003 applications by accessing the Microsoft Office site prior to using them with SharePoint 2007. If possible, upgrade users to Office 2007 applications for the more complete level of integration with SharePoint 2007.
- Mixed environments, in which Office 2007 and earlier versions are being used, are more complex to support than environments that only use Office 2007. Decisions should be made as to which file types will be officially supported and allowed to be saved to SharePoint 2007 document libraries. Decisions should be made whether file viewers or file conversion applications will be used by the users of the older versions of Office. Testing is needed to make sure that the help desk can support issues that might result from the use of these applications.
- Word 2003 and Excel 2003 users can download the FileFormatConverters.exe program (a.k.a. compatibility pack) from the Microsoft website. This compatibility pack automatically converts the new Office 2007 format for Word 2007 and Excel 2007 to a 2003-compatible version upon opening. However, the behavior differs slightly for Word 2007 and Excel 2007 documents, as outlined in this chapter, so testing is definitely required to make sure it meets the needs of the organization.
- The View Version History tool in Word 2007 has a powerful Compare feature that opens a new document showing the differences between the old version and the current one. A summary pane of all changes and auto-scrolling “before” and “after” panes make the review process extremely easy.
- Excel 2007 users can publish spreadsheets to Excel Services if it is enabled in SharePoint 2007 Enterprise, and if the location is included in the trusted file locations in the Shared Services provider. This is a powerful way to share complex spreadsheets and graphical information with end users. Some interaction is possible with these web browser views by defining named cells and using the Parameters tab.
- Excel 2007 users can publish table information to a SharePoint 2007 list. This is an easy way to publish data to a list that, in turn, allows multiple users to edit the data at the same time. Excel 2007 users can also use the Export to Spreadsheet tool to create a workbook that is still connected to the SharePoint list. This workbook can be updated based on changes to the SharePoint 2007 list. A SharePoint 2007 site administrator should become familiar with these processes to understand how best to use them.
- Excel Services design can be quite complex, so additional planning and testing is required in a server farm environment where the Excel Calculation Services (ECS), Excel Web Access (EWA), and Excel Web Services (EWS) will be distributed among different front-end application servers. Another key choice is whether Constrained Kerberos delegation will be used for the most secure Excel Services environment.
- The Excel Web Access web part can be used to create “permanent” views of Excel 2007 workbooks that have been published to a trusted Excel Services location. A number of configuration options make this web part a powerful communications tool, and it allows data used in Excel to be used in dashboard displays.
- Although Excel Services and Excel Web Access are powerful features, there are a number of unsupported features when loading a workbook in Excel Services. More complex Excel 2007 workbooks that include extensive formatting, certain worksheet functions, and external references to data (or old macros) might not display at all, or might appear differently than in Excel 2007. Testing should be performed on key workbooks, and training given to their main users and individuals in charge of publishing content to the SharePoint 2007 environment.
- A general best practice is to avoid internal security controls in Excel 2007 workbooks if they will be published using Excel Services. Instead, use SharePoint 2007 security and privileges to control access.