
Chapter 21. Using Designer 2007 to Extend SharePoint 2007 Workflows and Customize the User Experience
IN THIS CHAPTER
- Workflow Basics in SharePoint 2007
- Authoring Workflows Using SharePoint Designer 2007
- Additional Designer 2007 Tools
- Best Practices
In a business environment, workflows exist throughout the organization in formal and informal incarnations, and organizations of all sizes are increasingly concerned with formalizing and streamlining the processes most critical to the business. Workflow is one of the enterprise-level features that many users clamored for in the SharePoint 2003 product line. Although SharePoint 2001 included some workflow capabilities, these were removed from 2003, leaving room for many third-party companies, such as Nintex, CorasWorks, or K2.net, to offer solutions depending on the complexity of the needs of the business. Many companies found that they could survive without workflow until the SharePoint 2007 products shipped, and these patient souls won’t be disappointed as SharePoint 2007 offers an impressive set of tools out of the box, and Designer 2007 can then be used to expand upon the capabilities of the basic workflows.
Several advantages of creating and managing workflows in a SharePoint 2007 environment include
- An easy-to-use design interface in SharePoint 2007 that quickly enables site administrators and power users to translate informal processes into well-defined, automated, and audited processes
- A structure that contains and manages the workflow engines, leveraging the hardware and software investment already made in SharePoint
- Interaction with SharePoint web parts, such as the Tasks list to facilitate the use and management of workflows and reduce the learning curve for end users
- The option of using SharePoint Designer 2007 to create different types of workflows than in the SharePoint user interface that offer more options, flexibility, and intelligence
This chapter covers SharePoint 2007 workflow basics, as well as the use of Designer 2007 to enhance the design and management of these workflows. In addition, some insight is provided into further ways that Designer 2007 can enhance the SharePoint 2007 environment. Visual Studio can also be used to extend the capabilities of workflows, but will not be covered in this chapter.
Workflow Basics in SharePoint 2007
Both Windows SharePoint Services 3.0 and SharePoint Server 2007 provide workflow functionality as they require the Windows Workflow Foundation to be installed during the SharePoint installation process. Windows SharePoint Services 3.0, however, provides only one basic type of workflow, and cannot be extended by Designer 2007.
As defined in the MSDN Library, the Windows Workflow Foundation is “the programming model, engine, and tools for quickly building workflow-enabled applications on Windows. It consists of a namespace, an in-process workflow engine, and designers for Visual Studio 2005.” Using the Windows Workflow Foundation, a developer can create workflow applications using C# or Visual Basic and never involve SharePoint, but SharePoint 2007 provides a programming-free way of creating workflows that allow organizations to quickly and effectively implement workflows that are basic or mid-level in terms of complexity.
In SharePoint 2007 workflows are a series of activities that are triggered by a specific event. An activity can perform a single action or multiple actions and then trigger the next activity, until the flow is complete. The tools that SharePoint Server 2007 provides which allow IT resources to re-create and manage these activities within the SharePoint environment are covered in the next sections.
Configuring Workflow Settings
The administration tools are quite simple for workflow settings, as most of the configuration and management takes place on the site level in document libraries or lists. The Configure Workflow Settings link can be found in the Application Management tab, and the following options are available:
- User-defined workflows for the site collection can be enabled or disabled.
- Internal users who do not have site access can be alerted when they are assigned a workflow task, or not.
- External users can be sent a copy of the document, or not, to include them in the workflow.
Predefined Workflows
A Windows SharePoint Services 3.0 document library or list does not offer any pre-configured workflows, but it does allow for the creation of a three-state workflow. This workflow can be used to manage business processes that require organizations to track a high volume of issues or items, such as customer support issues, sales leads, or project tasks.
A SharePoint Server 2007 document library offers two pre-configured workflows that are available through the Edit menu, by clicking on Workflows:
- Approval
- Collect Feedback
Several standard workflow templates are available in SharePoint Server 2007 from the Settings page for a document library and by clicking Workflow Settings, Add a Workflow:
- Approval—Associated by default with the Document content type in a document library and with the Pages library in a publishing site, the Approval workflow routes a document for approval. Approvers can approve or reject the document, reassign the approval task, or request changes to the document.
- Collect Feedback—This is also associated with the Document content type by default, and routes a document for review. Reviewers can provide feedback, which is compiled and sent to the person who initiated the workflow.
- Collect Signatures—This workflow is also associated with the Document content type, and is available in document libraries only if that document contains one or more Microsoft Office Signature Lines. This workflow routes a Microsoft Office document to a group of people to collect their digital signatures and must be started in an Office application that is part of Office 2007.
- Disposition Approval—This workflow is intended for use within a Records Center site and manages document expiration and retention by allowing participants to decide whether to retain or delete expired documents.
- Translation Management—This workflow manages the manual document translation process by creating copies of the document to be translated and assigning translation tasks to translators. This workflow is available only for Translation Management libraries.
Available only in East Asian versions of Office SharePoint Server 2007, the Group Approval workflow is similar to the Approval workflow but provides a hierarchical organization chart from which to select the approvers and allows the approvers to use a stamp control instead of a signature.
The following workflow tasks can be performed either in a SharePoint Server 2007 site or directly within certain client programs that are part of the 2007 Office release:
- View the list of workflows that are available for a document or item.
- Start a workflow on a document or item.
- View, edit, or reassign a workflow task.
- Complete a workflow task.
Deciding Where to Add the Workflow
A workflow can be added directly to a list, a library, a list content type, or a site content type. This gives the administrator a great deal of flexibility on how workflows are used in sites.
Following are some restrictions for workflows:
- If a workflow is added directly to a list or library, it is available only for items in that list or library.
- If you add a workflow to a list content type (an instance of a site content type that was added to a specific list or library), it is available only for items of that content type in the specific list or library with which that content type is associated.
- If you add a workflow to a site content type, that workflow is available for any items of that content type in every list and library to which an instance of that site content type was added. If you want a workflow to be widely available across lists or libraries in a site collection for items of a specific content type, the most efficient way to achieve this result is by adding that workflow directly to a site content type.
Using a Predefined Workflow
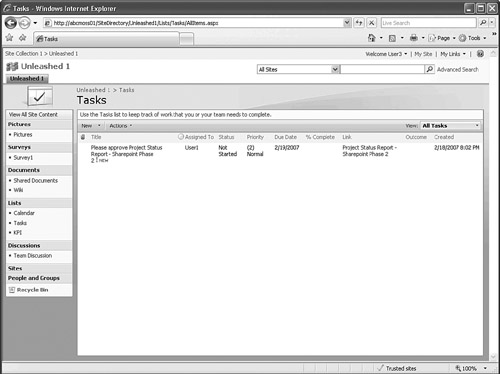
This section covers the creation of a predefined workflow in SharePoint Portal 2007. A workflow can be created by simply accessing the Edit menu for an item in a document library and selecting Workflows. The Approval and Collect Feedback workflows are available by default (assuming workflows are enabled for the site collection in the Central Administration Application Management tab). If the Approval workflow is selected, for example, the user then simply selects one or more approvers, includes a message, defines a due date, and decides whether to notify others by copying the message to them, as shown in Figure 21.1. After the workflow has been started, a task is entered in the default tasks list on the site, as shown in Figure 21.2, and it shows to whom it has been assigned.
Figure 21.1. Creating an ad hoc Approval workflow from a document library.
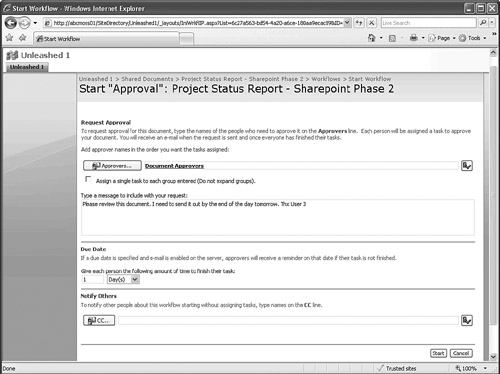
Figure 21.2. A new workflow task.
In addition, emails are sent to the members of the group specified (see Figure 21.3) and the initiator of the workflow receives an email that the workflow has started. When someone receives a workflow task assignment email, it includes information about who assigned the task, what day it was assigned, what day it is due, the message from the workflow initiator, a link to the document, and a link to request access to the task if the individual does not actually have access to the task list. If the Edit This Task button is clicked (upper-left corner below the Office button visible in Figure 21.3), the task opens and comments can be entered, the item can be approved or rejected, the task can be reassigned, or a change can be requested.
Figure 21.3. An email regarding workflow task.

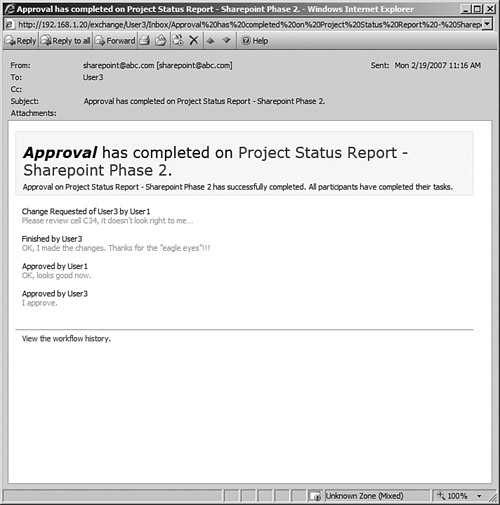
Figure 21.4 shows the window that opens if Request a Change is selected, which is a common occurrence in an approval workflow. The default is to request a change from the initiator of the workflow, but another individual can be selected if needed (for example, if the workflow initiator isn’t the author of the document, but just a workflow facilitator or manager). Then notes on the details of the change are entered, as shown in Figure 21.4, a due date is assigned to this task, and the Send button is clicked. This process may continue for a while—for example, if there are multiple approvers, each of whom requests changes—but when the document is finally completed, the initiator receives confirmation that the workflow has been completed. Figure 21.5 shows the final email that indicates the workflow is complete.
Figure 21.4. Editing a workflow task from an email.

Figure 21.5. An email indicating completion of the workflow.
Accessing Reports About Workflows
To access workflow reports, an administrator can either use the Edit menu for an individual document or access the Settings page for the document library or list. Selecting the Workflow option from the Edit menu brings up the Workflows page (/_layouts/Workflow.aspx) for the document, which then lists the Completed Workflows at the bottom. Clicking on the name of the completed workflow brings up the Workflow Status page (/_layouts/WrkStat.aspx), which as shown in Figure 21.6. The Workflow Status page provides a great deal of information about the workflow, including workflow information, tasks that were created as part of the workflow, and workflow history, which details all of the events that occurred as part of the workflow. As indicated by the arrow in Figure 21.6, workflow reports can also be accessed from this page.
Figure 21.6. The Workflow Status page.

The administrator can also view workflow reports by accessing the Settings page for the document library that is housing the workflow, and then click the Workflow Settings link, which opens the Change Workflow Settings page (/_layouts/WrkSetng.aspx) for the document library. Click the View Workflow Reports link to open the Library Name- View Workflow Reports page (/_layouts/Reporting.aspx). Reports available include the Activity Duration Report and the Cancellation and Error Report for each workflow that has been created or used in that document library. If a report is selected, it opens in Excel for review, printing, or archiving.
If a user has an alert set for a task list that will be receiving items from one or more workflows, it can get confusing to tell which are alerts about changes in the list and which are assignments to complete a task. Although the emails do look different, it is advisable to use dedicated task lists for workflow tasks to reduce confusion and to limit or not use alerts in workflow-specific task lists.
Creating a Three-State Workflow
Available in Windows SharePoint Services 3.0 when installed on its own, but oddly not in SharePoint Server 2007, the three-state workflow creates tasks and assigns them to a user, and then changes the state of a document or list after the task is complete. This section gives a brief overview of the workflow, and Windows SharePoint Services 3.0 users will become very familiar with it as it is the only default workflow available.
The three-state workflow can be accessed on the Settings page for a document library or list and by clicking Workflow Settings. As shown in Figure 21.7, it is the only option. A title needs to be given to it, an existing task list selected to use with the workflow or a new one created, a history list selected, and then the Start Options selected. In Figure 21.7 the Allow This Workflow to Be Manually Started by an Authenticated User with Edit Items Permissions option and the Require Manage Lists Permissions to Start the Workflow option are selected. This allows the list or library administrator to easily differentiate between the users who can start a workflow and those who can’t.
Figure 21.7. Creating a three-state workflow from a tasks list (1 of 3).

Figure 21.8 shows the top portion of the next page in the workflow creation process, where the functionality of the workflow is defined. A choice field (such as Status or Priority) needs to be selected, and the initial, middle, and final states need to be chosen. The administrator then determines which fields are included in the task that is generated by the workflow, whether an email is sent out, and its contents. Figure 21.9 shows the bottom half of this page where the middle state details of the task are defined.
Figure 21.8. Creating a three-state workflow from a tasks list (2 of 3).
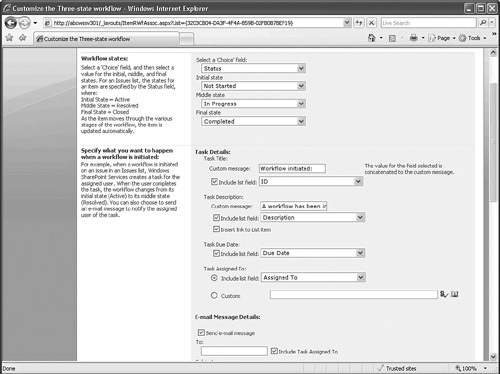
Figure 21.9. Creating a three-state workflow from a tasks list (3 of 3).

In summary, this workflow assigns tasks when initiated and can send emails to specific individuals or individuals defined in the list or library. After that individual completes the task assigned to her, the original state of the item is updated, kicking off the next step. This is probably most useful in document review processes, but could also be useful in certain lists.
Creating a New Customized Workflow
Although the previous sections gave two examples of the steps involved in starting a predefined workflow, the following steps give an example of creating a workflow from scratch, starting the workflow for a sample document and then completing workflow tasks. These customized workflows can be more complex and have additional settings that can be configured to meet the needs of the workflow initiator. The following steps give an example of the creation of a new customized workflow:
1. A workflow needs to be created for the document library. To do this, click Settings, Document Library Settings, Workflow Settings. The Add a Workflow page (/_layouts/AddWrkfl.aspx) opens, as shown in Figure 21.10.
Figure 21.10. Adding an Approval workflow to a document library (1 of 3).

2. A workflow template is selected from the list. In this example, the Approval workflow is selected. A unique name is assigned to the workflow.
3. An existing task list needs to be selected from the drop-down menu in the Task List section, or a new task list will be created to track workflow tasks. It is a general best practice to have a task list dedicated to workflow management, rather than to combine standard tasks with workflow tasks, which can be confusing to manage.
4. Similarly, an existing history list needs to be selected in the History List section or a new one will be created.
5. In the Start Options section, select the most suitable start method for the workflow and then click Next. The options are:
• Allow This Workflow to Be Manually Started by an Authenticated User with Edit Items Permissions. This option also has the option Require Manage Lists Permissions to start the workflow.
• Start This Workflow to Approve Publishing a Major Version of an Item. Because versioning is on in this document library, this option is available (it is grayed out if versioning is not on). Selecting this option grays out the final two options.
• Start This Workflow when a New Item Is Created. In general, this criterion should be used in document libraries or lists where only a limited number of users can create new items; otherwise, a new user might accidentally upload a large number of documents and create a number of workflows.
• Start This Workflow when an Item Is Changed. As with the previous option, this should be used with caution in lists or libraries with more experienced users.
6. After the Customize Workflow page opens (/_layouts/CstWrkflIP.aspx), shown in Figure 21.11, the administrator needs to make additional configuration choices, starting with whether to assign tasks simultaneously (parallel) or one participant at a time (serial). For this example, the serial method is used. Also, workflow participants can be allowed to reassign a task to another person and/or request a change before completing the task. For this example, both options are selected.
Figure 21.11. Adding an Approval workflow to a document library (2 of 3).
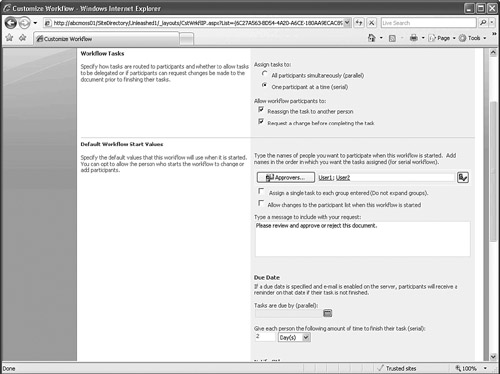
7. Next, the default workflow start values need to be selected. The Approvers need to be selected. If groups are selected as approvers, the Assign a Single Task to Each Group Entered (Do Not Expand Groups) option is provided. So in a serial workflow containing multiple groups, each group is treated as a single user, rather than expanding the group and assigning the task to each user in a row. The Allow Changes to the Participant List when This Workflow Is Started option is also provided. A message can be included with the workflow task request as well.
8. Next, a due date needs to be assigned, and fields are available for parallel and serial tasks. The time period of two days is chosen for this example. Users who will be notified when the workflow starts can be added.
9. In the Complete the Workflow section (shown in Figure 21.12), the criteria for determining when the workflow is complete needs to be chosen. The default is when all tasks are complete, but the option of completing the workflow after a set number of tasks are finished is provided. Criteria for the cancellation of a workflow can be set, with the choices being when the document is rejected or when the document is changed.
Figure 21.12. Adding an Approval workflow to a document library (3 of 3).

10. Finally, in the Post-Completion Workflow Activities section, the approval status of the document can be changed after the workflow is complete. After these decisions have been made, click the OK button.
The administrator can review the configuration of the new workflow by accessing the settings page for the document library and then clicking the Workflow Settings link, as shown in Figure 21.13. From this page, a new workflow can be created, a workflow can be removed, workflow reports can be viewed, or settings for an existing workflow can be changed.
Figure 21.13. The Change Workflow Settings page.

Now that a workflow has been created, a new workflow can be started for a document by accessing the Edit menu for a document, selecting Workflows, and then selecting the customized workflow (Unleashed1 Approval Workflow in this case). After it is selected, the user sees the Start “Name of Workflow”: Document Name page, as shown in Figure 21.14. Note that the approvers’ names are grayed out (circled in Figure 21.14), and cannot be changed in this example, but the message, the number of days given until the due date, and the individuals who receive a message copy can be changed. After the Start button is clicked the workflow begins.
Figure 21.14. Starting the Approval Workflow for a document.

Authoring Workflows Using SharePoint Designer 2007
For more advanced workflows, SharePoint Designer 2007 offers a powerful set of tools to create customized workflows and forms. The basic process involves authoring the workflow in SharePoint Designer 2007, and after the workflow is complete, Designer 2007 then automatically generates the workflow definition template and deploys the workflow to the specified list. Because these workflows contain no custom code, they are stored as source files and only compiled into memory when needed. A separate document library is used to store these workflows, and it includes the following:
- The workflow markup file
- The workflow rules file
- ASPX forms for any custom workflow forms that are needed
For SharePoint Designer 2007 to be able to work with SharePoint 2007 sites and create workflows, the Microsoft .NET Framework 2.0 and .NET Framework 3.0 need to be installed. Also, the same versions of the .NET Framework need to be installed on the client as on the server.
The steps involved in creating workflows in Designer 2007 are very different than in SharePoint 2007, and the tools, logic, and options are also different. Workflow designers are encouraged to experiment with creating several workflows in Designer 2007 before spending time in detailed planning exercises.
Preparing to Create a Workflow in Designer 2007
Due to the range and complexity of the tools available in Designer 2007, some preparatory steps are recommended to ensure the proper creation of the workflow in Designer 2007. This section walks through some of the basics of Designer 2007, as well as the standard conditions, operands, and actions that can be included in workflows steps. Hopefully, this information makes it clear that any workflow created in Designer 2007 needs to be tested to ensure that the results are as expected, and the testing process helps the workflows designer better understand the wealth of possibilities available.
Following are some basic laws of Designer 2007:
- A workflow is always attached to one SharePoint list or library. Prior to creating the workflow, determine to which list or library the workflow will be attached.
- If the workflow will use any custom columns or settings, these changes must be made before the workflow is created. Ensure that the list or library has all of the columns that will be required for the workflow to function properly; otherwise the workflow will need to be restarted or modified later. Changing the name of a list, library, or column does not generally break the workflow, but the site containing it might need to be reloaded in Designer 2007.
- If the workflow will use any list or library features that are not turned on by default, such as Content Approval, they must be turned on before designing the workflow in Designer 2007.
It is also important to understand the basic functionality of Designer 2007 in the areas of Conditions and Actions, the main components that will be used when creating workflow steps. Each workflow step can consist of multiple conditions and actions, and else/if conditional branches can be used within a single step. It is also important to note that data from other lists and libraries contained in the site can be used in a workflow by using the Compare Any Data Source condition.
Designer 2007 workflows can have one of three start options:
- Allow this workflow to be manually started from an item
- Automatically start this workflow when a new item is created
- Automatically start this workflow whenever an item is changed
A workflow can then have one or more steps, each of which is made up of conditions, actions and else/if conditional branches.
The standard conditions are:
- Compare documentlibraryname or listname field
- Compare any data source
- Title field contains keywords
- Modified in a specific date span
- Modified by a specific person
- Created in a specific date span
- Created by a specific person
Operands included in conditions include a variety of functions, as shown in Table 21.1.

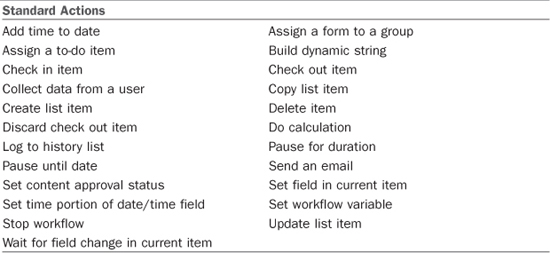
The standard actions are shown in Table 21.2. It is beyond the scope of this chapter to cover all of these actions, but a great number of possibilities are available for creating powerful and flexible workflows with these actions.
Creating a Designer 2007 Workflow
Many different kinds of workflows can be created in Designer 2007, as evidenced in the previous section. A particularly powerful option is the Wait for Field Change in Current Item option. This creates a form of intelligence that can monitor the content of a list or library and then initiate a workflow.
The following steps show how to create a workflow in Designer 2007 that monitors the contents of a list, and when certain conditions are met, the workflow copies the item to another list, and emails a specific individual. The purpose of this sample workflow is to check the Issue Status value for an issue in the list, and when it changes to Completed, the workflow checks to see if the abc.com value is included in the Customer Email field in the Issue. If it is not included, the workflow copies the item to a different list and emails the manager of the help desk department (User1 in the example). This workflow was created in the fictitious Company ABC Help Desk department when an external partner complained that he was getting inferior service, and the Help Desk Manager (User1) decided to be more proactive and set up a second Issues List that will contain copies of the issues for external partners. User1 is also a little concerned that Help Desk staff might be changing tickets after they have been set to closed status, and this workflow will provide an archive version of the issue. Figure 21.15 shows a diagram of this workflow.
Figure 21.15. Sample workflow logic.

To create this workflow, follow these steps:
1. Create a new issue tracking list in a SharePoint Server 2007 site (Unleashed1 in this example) titled “Help Desk Issues.” Add a column, and title it “Customer Email” with the content set to Single Line of Text, and the Require that This Column Contains Information value set to Yes. This column will be used to enter an email address which identifies the end user who requested the help desk assistance, which is a critical component of this workflow.
2. Create a new issue tracking list in the same SharePoint Server 2007 site titled “External Partner Closed Issues.” Add a column and title it “Customer Email” with the content set to Single Line of Text. This list will receive a copy of the list item when the workflow executes.
3. Open SharePoint Designer 2007 and open the site that contains this list (or use the Edit with Microsoft Office SharePoint Designer option from the File menu in Internet Explorer if it is enabled).
4. After the site is open in Designer 2007, access File, New, Workflow, and the Workflow Designer window opens. Give the workflow a unique name (such as “External Users Workflow"), and then select the new Help Desk Issues list from the drop-down menu to attach the workflow to it. Select Automatically Start This Workflow Whenever an Item Is Changed, as shown in Figure 21.16. Click Next.
Figure 21.16. The define your new workflow page.

5. The next window should be titled “Step 1” and offers a new workflow with which to work. Click the Conditions button, select the option Compare Listname Field, and then click the blue Field link. Select Customer Email. Then select the blue Equals (=) link, and choose Does Not Contain. Then click the blue Value link, type the text abc.com, and press Enter.
6. Now click the Actions button. Locate the Wait for Field Change in Current Item option (click More Actions... if needed). Click the blue Field link and select Issue Status. Leave the equals value as is. Click the blue Value link and select Closed.
7. Click the Actions button again and locate Copy List Item. Then click the first blue This List link and select Current Item. Click the second blue This List link and select External Partner Closed Issues.
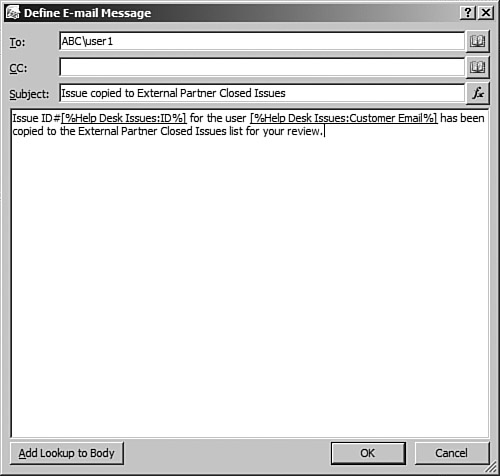
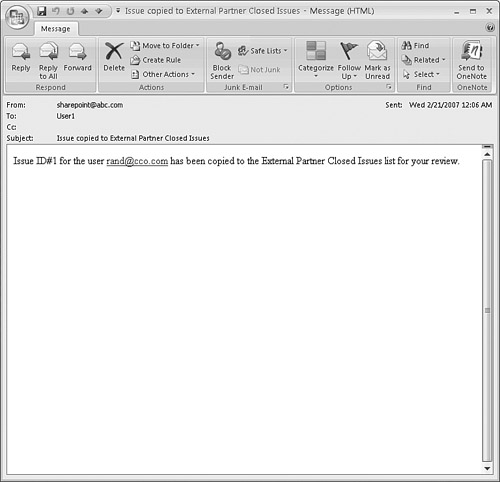
8. Click the Actions button one more time and select Send an Email. Click the blue This Message link. Enter a user’s email in the To field (ABCUser1 in this example). Enter text in the subject field such as “Issue copied to External Partner Closed Issues.” Click the Add Lookup to Body button, verify that Current Item is selected as the source, and then in the Field drop-down menu, select ID and click OK. Click the Add Lookup to Body button, verify that Current Item is selected as the source, and then in the Field drop-down menu, select Customer Email and click OK. Add descriptive text to the email to make it more user friendly, such as shown in Figure 21.17. Click OK when complete.
Figure 21.17. Defining an email message in a workflow.
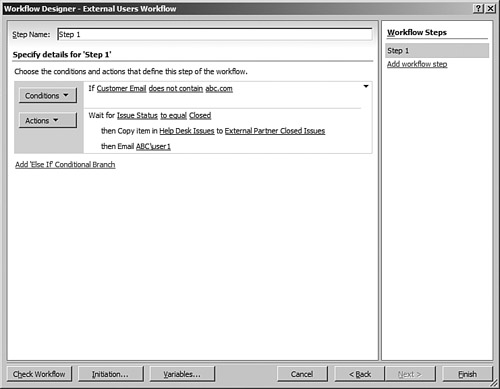
9. The workflow Step 1 should now look similar to the layout and options shown in Figure 21.18. Additional conditions, actions, conditional branches, and steps can be entered. For example, additional intelligence could be added to this workflow to look for other conditions. An else/if conditional branch could search for customer emails that contain an individual’s name and also forward those items to the special issues list for review. For example, the CEO’s name could be entered, and the resulting email could make it clear that the help desk issue in question is for the CEO! Click Finish to save the new workflow.
Figure 21.18. A sample configuration for the Step 1 workflow.
After the workflow is saved, notice that additional folders are included in the folder view in Designer 2007. The Workflows folder contains files that include the workflowname.apsx page, workflowname.xoml file, workflowname.xoml.rules file, and the workflowname.xoml and wfconfig.xml files. Double-clicking on either of the .aspx files opens them in Designer 2007 and shows the format that will be seen in SharePoint when a user accesses the Feedback.aspx page or workflowname.aspx page. These pages can be edited and saved, which affects the appearance and functionality of the page in SharePoint, so this should be done with caution. The .xoml and .xoml.rules files can be right-clicked and opened as XML files in Designer 2007 for review and modification if needed.
The .xoml files are written in Extensible Application Markup Language (XAML), which is given a file extension of .xoml. When the workflow project is compiled, the .xoml partial classes are combined into a .NET assembly.
Association and initiation forms are important to understand when working with SharePoint Designer 2007 workflows. They are displayed for users to complete before any workflow actually starts and enable users to set parameters and other information for the workflow. The Windows SharePoint Services 3.0 SDK provides additional information on using and customizing these forms.
Executing a Designer 2007 Workflow
This section walks through the sample workflow created in the previous section to give an idea of the steps that need to be taken. The example given was quite simple, but if more complex workflows are created, users should be provided with some training to ensure that they are comfortable with the process.
The following steps are required to launch the workflow, enter required data, and see the workflow through to completion:
- From within the list to which the workflow created in Designer 2007 was attached (Help Desk Issues in the previous example), create a new issue, include an email address that will trigger the condition defined in the previous example (for example, [email protected]), enter some sample values for the ticket, and save the issue.
- After the issue has been saved, assuming the conditions set in the workflow have been met, the workflow starts. Verify that the issue has in fact been copied to the second issues list (External Partner Closed Issues in this example), and verify that the email was in fact sent to the user (User1 in this example) who should have received it. Figure 21.19 shows the sample email.
Figure 21.19. The email generated by the workflow.
Additional Designer 2007 Tools
Designer 2007 offers a number of other tools that an administrator or web designer will find extremely useful. Users should be aware that using Designer 2007 to modify pages does break the connection of that page to the template that is housed on the front-end server. In SharePoint 2003 parlance, this was called unghosting the page, but in SharePoint 2007 terminology, pages are referred to as uncustomized (equivalent to ghosted) or customized (equivalent to unghosted), which will hopefully be simpler to understand.
Designer 2007 is by design not able to edit pages that are managed by a publishing site. Essentially, if the home page of a site is located in a Pages folder (as displayed in the URL), the pages are managed by a SharePoint publishing–enabled site. These include sites created from
- The Publishing tab on the New SharePoint Site page (/_layouts/newsbweb.aspx)
- The home page of the top-level site, News site, Reports site, or Search site included in the Collaboration Portal and Publishing Portal templates. These templates are in the Publishing tab on the Create Site Collection page (/_admin/createsite.aspx) in the Central Administration Console.
The designer or administrator sees a message if she tries to open a published page in SharePoint designer (such as http://servername/pages/default.aspx) that states “This page cannot be edited in SharePoint Designer. You can edit the content in the browser, or edit the corresponding page layout in SharePoint Designer.” The options to Edit in Browser or Edit Page Layout are provided.
Chapter 12, “Implementing Records Management and Enabling Web Content Management in SharePoint 2007,” provides examples of using the browser editing tools in publishing enabled sites. An example is also given of editing a master page (BlueBand.master) in Designer 2007, so reference that chapter for some additional editing tips.
This is important because many site collections in SharePoint Server 2007 are created using the Collaboration Portal template. This is by design, because restricting users from using Designer 2007 to edit pages managed by publishing enabled sites ensures that only the editing tools offered in SharePoint 2007 can be used on the content. This controls the amount of customization that can be performed and reduces potential publishing issues.
Designer can be used in many ways, however, to modify SharePoint 2007 pages and master pages that will be appreciated by site administrators, site designers, and end users. The following sections give a quick sampling of capabilities to encourage experimentation (ideally with demo sites to begin with!) and enhancements.
Site Management Tools
Designer 2007 offers a variety of tools that can make the life of the site administrator much easier. For example, after a site is opened in Designer 2007 and Tools, Accessibility Reports is accessed, several options are available:
- Check All Pages or Selected Pages
- Check for WCAG Priority 1, WCAG Priority 2, Access Board Section 508
- Show Errors, Warnings, Manual Checklist
WCAG stands for Web Content Accessibility Guidelines, and help determine whether a site is accessible to individuals with handicaps who might not be able to see, hear, or use a keyboard or mouse. This can be very important to companies that are making customized sites available to partners or the external world (such as a hospital) and want to take steps to ensure the accessibility of their sites.
The Compatibility Reports link from the Tools menu checks the following:
- Check All Pages or Selected Pages
- Check HTML/XHTML compatibility with HTML Framesets (such as 4.01 variations), Internet Explorer 3.02–6.0, XHTML 1.0 Frameset variations, or XHTML 1.1
- Check CSS compatibility with CSS 1.0, 2.1, 2.1, or CSS IE6
This report can be valuable to organizations supporting older browsers and a variety of platforms and external users who might have a variety of browsers.
Site Summary Report
Access the Site menu, and then select Reports, Site Summary. Figure 21.20 shows a sample report that contains a variety of useful items of information, including the total count of all files, size, number of pictures, unlinked and linked files, files that haven’t been modified in more than 72 days, checked-out files, broken hyperlinks, component errors, files associated with master pages, and customized pages. This can be extremely helpful information for the site administrator to help monitor total number and size of files, clean up or archive files that haven’t been modified in many months, finding broken links that can be cleaned up, and resolving any component errors. This feature alone can justify the price of Designer 2007 for site administrators of busy site collections.
Figure 21.20. The Site Summary report in Designer 2007.

Site Backup Tool
Every site administrator likes to believe that regular backups of the site are happening, and that data can be restored in a relatively short amount of time, but that doesn’t mean that he doesn’t want a quick way of backing up his own site and data, especially if he is doing live modifications to pages due to time constraints or over-eager designers. Clicking Site, Administration, Backup Website brings up the Backup Website window. The only options are to include subsites and a location for the temporary files. A filename then needs to be given to the backup and it will be saved as a Content Migration Package (.cmp file). Designer 2007 can then be used to restore these backups to development or lab systems for more dangerous testing or simply for archival purposes.
Editing Standard SharePoint 2007 Sites
Sites that are not housed in a publishing-enabled site can be edited extensively in Designer 2007. When a page is opened in Designer 2007, the default task panes are the Folder List, Tag Properties, Toolbox, and Apply Styles panes. Minor adjustments, such as dragging and dropping a horizontal line from the Toolbox pane or creating a new style and applying it to text on the page, are very easy to make. Figure 21.21 shows the result of creating a new style in the Apply Styles task pane and applying it to an announcements web part.
Figure 21.21. Applying a new style in Designer 2007.

Other task panes that can be used include the following:
- CSS Properties
- Layout Tables
- Manage Styles
- Behaviors
- Layers
- Data Source Library
- Data Source Details
- Conditional Formatting
- Web Parts
- Clip Art
A detailed overview of these tools is outside of the scope of this chapter, but the possibilities are extensive. The administrator needs to work with the designer(s) to set some limitations on the customizations that are allowed and encouraged, while making sure that the end users’ needs are taken into account.
Adding a Web Part Zone
A common request is to add a web part zone to an existing page. A site administrator cannot change the zones on a page using the browser editing tools, but can easily do this using Designer 2007 by following these steps:
1. In Designer 2007, open the page that needs the new web part zone.
2. If the Web Parts task pane is not already open, open it by clicking Web Parts on the Task Panes menu.
3. In Design view, click the location on the page where you want to insert the web part zone.
4. At the bottom of the Web Parts pane, click New Web Part Zone and the web part zone appears, as shown circled in Figure 21.22.
Figure 21.22. New web part zone in Designer 2007.
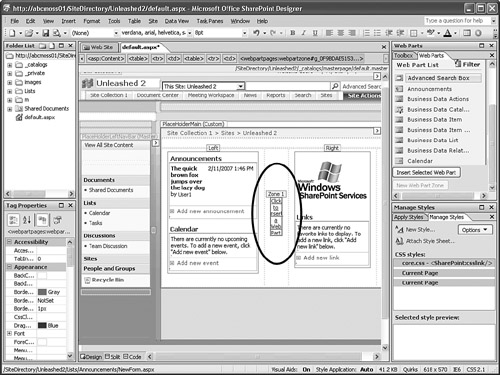
5. Right-click the new web part zone and then click Web Part Zone Properties on the shortcut menu. Under General settings, in the Zone title box, type a name for the new zone. Other settings can be customized as well, including choosing a frame style and choosing Top-to-bottom (vertical layout) or Side-by-side (horizontal layout). Click OK when finished.
6. Click Save to save changes. A warning appears stating “Saving your changes will customize a page from the site definition. Are you sure you want to do this?” Click Yes to confirm. An icon now appears next to the default.apsx page for the site indicating it has been modified.
Summary
This chapter provides an overview of basic workflow functionality in Windows SharePoint Services 3.0 and SharePoint Server 2007 by reviewing two predefined workflows, one from Windows SharePoint Services 3.0 and one from SharePoint Server 2007. Then a workflow template is used to create a more complex workflow in SharePoint Server 2007 to show the flexibility of the templates and to demonstrate the user experience. Next the chapter covered the process of creating a workflow in Designer 2007, as well as some preparatory steps that should be taken to understand the variety of conditions, operands, and actions available. The chapter concluded with a brief overview of a sampling of other tools and features in Designer 2007, which will prove valuable in any production SharePoint implementation in the testing phases, as well as customization process and on-going support and administration.
Best Practices
- Although workflows can be created for Windows SharePoint Services 3.0 document libraries or lists, no predefined workflows are available. The three-state workflow is the only template offered. This workflow might be sufficient to track issues or items such as customer support issues, sales leads, or project tasks.
- Two predefined workflows (Approval and Collect Feedback) are available in a SharePoint Server 2007 document library, and four templates are available for more complex workflows: Approval, Collect Feedback, Collect Signatures, and Disposition Approval.
- Although no predefined workflows are available in most SharePoint Server 2007 lists, the same templates are available as in document libraries: Approval, Collect Feedback, Collect Signatures, and Disposition Approval.
- Workflows can be added directly to a list, a library, a list content type, or a site content type. This gives the administrator a great deal of flexibility on how workflows can be used in sites.
- Monitoring workflow status can be done in the task list designated for custom workflows, the default task list for predefined workflows, from the library or list’s settings, or using reports available for the specific workflows.
- SharePoint Designer 2007 offers a powerful interface and set of tools for extending the power and flexibility of workflows as covered in this chapter. Some preparation is needed, both in configuring the list or library and in understanding the capabilities of the conditions, operands, and actions available in SharePoint Designer 2007.
- SharePoint Designer 2007 workflows are customizable down to the pages and forms that are part of the workflows, and the Windows SharePoint Services 3.0 SDK is recommended as a resource to better understand the changes and customizations that are possible.
- A basic item to understand about Designer 2007 workflows is that the workflow start options are to manually start from an item, automatically start when a new item is created, or automatically start when an item is changed. After this basic determination is made, the conditions and actions can be assigned to the workflow.
- Designer 2007 also provides a number of site management and compatibility reports that provide easy access to valuable information about site content and accessibility for people with disabilities and compatibility with different browsers.