
Chapter 6. Open Source Networking Solutions
“Ninety-nine percent of the people who reject using the software until it gets open sourced will never even look at its source code when it’s done.”
“Most people are not planning to use airbags in cars, but they want them anyway.”
The selection of a communication protocol can be as crucial for the success of your RIA as a professionally designed UI. LiveCycle Data Services (LCDS) is an excellent solution for building enterprise-grade scalable RIAs, but some enterprises just don’t have the budget for it. Many smaller IT organizations still use the more familiar HTTP or SOAP web services, because it’s an easy route into the world of RIA with only minor changes on the backend.
Now there’s a faster, more powerful open source option. In February 2008, Adobe released BlazeDS in conjunction with open sourcing the specification of the Action Message Format (AMF) communication protocol. Offering many of the same capabilities as LCDS, BlazeDS is a Java-based open source implementation of AMF, which sends the data over the wire in a highly compressed binary form.
Large distributed applications greatly benefit by working with the strongly typed data. Sooner or later developers will need to refactor the code, and if there is no data type information available, changing the code in one place might break the code in another and the compiler might not help you in identifying such newly introduced bugs.
This chapter will unleash the power of AMF and provide illustrations of how to create a robust platform for development of modern RIA without paying hefty licensing fees. It will discuss polling and server-side push techniques for client/server communications, as well as how to extend the capabilities of BlazeDS to bring it closer to LCDS.
BlazeDS Versus LCDS
Prior to Adobe’s BlazeDS, Flex developers who wanted to use the AMF protocol to speed up the data communication between Flex and the server side of their application had to select one of the third-party libraries, such as Open AMF, WebORB, or GraniteDS. The release of the open source BlazeDS, however, brought a lot more than just support of AMF. You can think of BlazeDS as a scaled-down version of LCDS. As opposed to LCDS, BlazeDS doesn’t support RTMP protocol, Data Management Services, or PDF generation, and has limited scalability. But even with these limitations, its AMF support, ability to communicate with Plain Old Java Objects (POJOs), and support of messaging via integration with the Java Messaging Protocol make BlazeDS a highly competitive player in the world of RIA. These features alone make it a good choice for architecting RIA data communication compared to any AJAX library or a package that just implements the AMF protocol.
Figure 6-1 provides a capsule comparison of BlazeDS and LiveCycle functions. The items shown in regular type represent the features available only in LCDS. The features of BlazeDS are in bold.

One limitation of BlazeDS is that its publish/subscribe messaging is implemented over HTTP using long-running connections rather than via RTMP as in LCDS. Under the HTTP approach, the client opens a connection with the server, which allocates a thread that holds this connection on the server. The server thread gets the data and flushes it down to the client but then continues to hold the connection.
You can see the limit right there: because creating each thread has some overhead, the server can hold only a limited number of threads. By default, BlazeDS is configured to hold 10 threads, but it can be increased to several hundred depending on the server being used. Even so, this may not be enough for enterprise-grade applications that need to accommodate thousands of concurrent users.
Note
Real-Time Messaging Protocol (RTMP) is not HTTP-based. It works like a two-way socket channel without having the overhead of AMF, which is built on top of HTTP. One data stream goes from the server to the client, and the other goes in the opposite direction. Because the RTMP solution requires either a dedicated IP address or port, it is not firewall-friendly, which may be a serious drawback for enterprises that are very strict about security. Adobe has announced its plans to open source RTMP.
With a little help, however, BlazeDS can handle this level of traffic, as well as close some of the other gaps between it and LCDS. For example, the section The Networking Architecture of BlazeDS offers a scalable solution based on the BlazeDS/Jetty server. Also later in this chapter, you’ll learn how to enhance BlazeDS to support data synchronization, PDF generation, and scalable real-time data push. In addition to feature support, you’ll examine the other piece of the puzzle: increasing the scalability of the AMF protocol in BlazeDS.
Why Is AMF Important?
You may ask, “Why should I bother with AMF instead of using standard HTTP, REST, SOAP, or similar protocols?” The short answer is because the AMF specification is open sourced and publicly available.
The longer answer begins with the fact that AMF is a compact binary format that is used to serialize ActionScript object graphs. An object can include both primitive and complex data types, and the process of serialization turns an object into a sequence of bytes, which contains all required information about the structure of the original object. Because AMF’s format is open to all, Adobe as well as third-party developers can implement it in various products to deserialize such pieces of binary data into an object in a different VM (Virtual Machine), which does not have to be Flash Player. For example, both BlazeDS and LCDS implement the AMF protocol to exchange objects between Flash Player and the Java VM. There are third-party implementations of AMF to support data communication between Flash Player and such server-side environments as Python, PHP, .NET, Ruby, and others.
Some of the technical merits of this protocol, when used for the enterprise application, are:
- Serialization and deserialization with AMF is fast
BlazeDS (and LCDS) implementation of AMF is done in C and native to the platform where Flash Player runs. Because of this, AMF has a small memory footprint and is easy on CPU processing. Objects are being created in a single pass—there is no need to parse the data (e.g., XML or strings of characters), which is common for nonnative protocols.
- AMF data streams are small and well compressed (in addition to GZip)
AMF tries to recognize the common types of data and group them by type so that every value doesn’t have to carry the information about its type. For example, if there are numeric values that fit in two bytes, AMF won’t use four as was required by the variable data type.
- AMF supports the native data types and classes
You can serialize and deserialize any object with complex data types, including the instances of custom classes. Flex uses AMF in such objects as
RemoteObject,SharedObject,ByteArray,LocalConnection,SharedObject, and all messaging operations and any class that implements theIExternalizableinterface.- Connections between the client and the server are being used much more efficiently
The connections are more efficient because the AMF implementation in Flex uses automatic batching of the requests and built-in failover policies, providing robustness that does not exist in HTTP or SOAP.
The remainder of the chapter will focus on how you can leverage these merits for your own applications, as well as contrast AMF and the technologies that use it with traditional HTTP approaches.
AMF Performance Comparison
AMF usually consumes half the bandwidth of and outperforms (has a shorter execution time than) other text-based data transfer technologies by 3 to 10 times depending on the amount of data you are bringing to the client. It also usually takes several times less memory compared to other protocols that use untyped objects or XML.
Note
If your application has a server that just sends to the client a couple of hundred bytes once in a while, AMF performance benefits over text protocols are not obvious.
To see for yourself, visit http://www.jamesward.com/census, a useful website that enables you to compare the data transfer performance of various protocols. Created by James Ward, a Flex evangelist at Adobe, the test site lets you specify the number of database records you’d like to bring to the client, then graphs the performance times and bandwidth consumed for multiple protocols.
Figure 6-2 shows the results of a test conducted for a medium result set of 5,000 records using out-of-the-box implementations of the technologies with standard GZip compression.
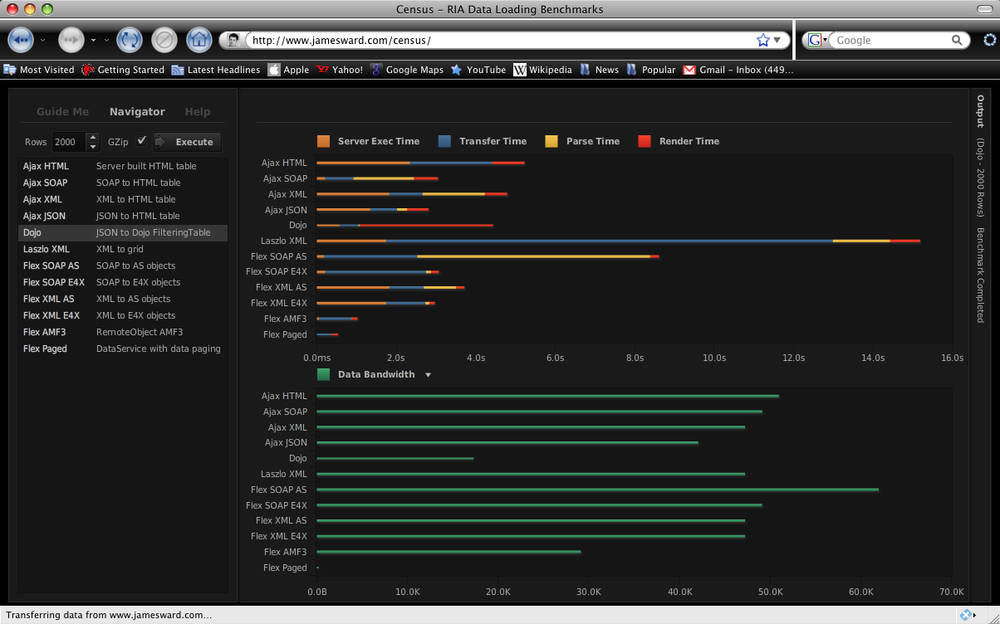
Visit this website and run some tests on your own. The numbers become even more favorable toward AMF if you run these tests on slow networks and low-end client computers.
The other interesting way to look at performance is to consider what happens to the data when it finally arrives at the client. Because HTTP and SOAP are text-based protocols, they include a parsing phase, which is pretty expensive in terms of time. The RIA needs to operate with native data types, such as numbers, dates, and Booleans. Think about the volume of data conversion that has to be made on the client after the arrival of 5,000 1 KB records.
Steve Souders, a Yahoo! expert in performance tuning of traditional (DHTML) websites, stresses that major improvements can be achieved by minimizing the amount of data processing performed on the client in an HTML page; see High Performance Web Sites by Steve Souders (O’Reilly). Using the AMF protocol allows you to substantially lower the need for such processing, because the data arrives at the client already strongly typed.
AMF and Client-Side Serialization
AMF is crucial for all types of serialization and communications.
All native data serialization is customarily handled by the class ByteArray. When serialized, the data type
information is marked out by the name included in the metadata tag
RemoteClass.
Example 6-1 is a
small example from the Flash Builder’s NetworkingSamples project that comes with the
book. It includes an application RegisteredClassvsUnregistered.mxml and two
classes: RegisteredClass and Unregistered.
package
{
    [RemoteClass(alias="com.RegisteredClass")]
   public class RegisteredClass{
   }
}

package
{
   public class UnregisteredClass{
   }
}


<?xml version="1.0" encoding="utf-8"?>
<mx:Application xmlns:mx="http://www.adobe.com/2006/mxml"
                                    creationComplete="test()">
<mx:Script>
   <![CDATA[
      import flash.utils.ByteArray

      private function serializeDeserialize(a:Object) : void {
         var ba : ByteArray = new ByteArray();
         ba.writeObject(a);
         ba.position = 0;
         var aa:Object = ba.readObject();
         trace( aa );
      }

      private function test():void {
         serializeDeserialize( new RegisteredClass());
         serializeDeserialize( new UnregisteredClass());
      }
   ]]>
</mx:Script>
</mx:Application>
In Example 6-1, the
function serializeDeserialize()
serializes the object passed as an argument into a ByteArray, and then reads it back into a
variable aa of type Object. The application makes two calls to this
function. During the first call, it passes an object that contains the
metadata tag, marking the object with a data type RegisteredClass; the second call passes
the object that does not use this metadata tag. Running this program
through a debugger displays the following output in the console:
[SWF] /NetworkingSamples/NetworkingSamples.swf -
                                    798,429 bytes after decompression
[object RegisteredClass]
[object Object]
Annotating a class with the RemoteClass metadata tag allows Flash Player to
store, send, and restore information in the predictable, strongly typed
format. If you need to persist this class, say in AIR disconnected mode,
or communicate with another .swf
locally via the class LocalConnection,
following the rules of AMF communications is crucial. In the example,
RemoteClass ensures that during
serialization, the information about the class will be preserved.
HTTP Connection Management
To really appreciate the advantages of binary data transfers and a persistent connection to the server, take a step back and consider how web browsers in traditional web applications connect to servers.
For years, web browsers would allow only two connections per domain. Because Flash Player uses the browser’s connection for running HTTP requests to the server, it shares the same limitations as all browser-based applications.
The latest versions of Internet Explorer (IE) and Mozilla Firefox increased the default number of simultaneous parallel HTTP requests per domain/window from two to six. It’s probably the biggest news in the AJAX world in the last three years. For the current crop of AJAX sites serving real WAN connections it means increasing the load speed and fewer timeouts/reliability issues. By the way, most of the Opera and Safari performance gains over IE and Firefox in the past are attributed to the fact that they allowed and used four connections, ignoring the recommendations of the W3C (which suggested allowing only two connections).
The fact that increasing the number of parallel connections increases network throughput is easy to understand. Today’s request/response approach for browser communications is very similar to the village bike concept. Imagine that there are only a couple of bikes that serve the entire village. People ride a bike and come back to give it to the next person in line. People wait for their turns, keeping their fingers crossed that the person in front of them won’t get lost in the woods during her ride. If that happens, they need to wait till all hope is gone (i.e., timeout) and the village authorities provide them with a new bike circa 1996.
Pretty often, by the time the new bike arrives it’s too late: the person decided to get engaged in a different activity (abandon this site). As the travel destinations become more distant (WAN), people are exposed to real-world troubles of commuting—latency (500 ms for a geostatic satellite network), bandwidth limitations, jitter (errors), unrecoverable losses, etc. Besides that, the users may experience congestion caused by the fact that your ISP decided to make some extra cash by trying to become a TV broadcaster and a Voice over Internet Protocol (VoIP) company but lacks the required infrastructure. The applications that worked perfectly on local/fast networks will crumble in every imaginable way.
Obviously, more bikes (browser connections) mean that with some traffic planning you can offer a lot more fun to the bikers (get much better performance and reliability). You might even allocate one bike to a sheriff/firefighter/village doctor so he will provide information on conditions and lost/damaged goods carried by the bikers. You can route important goods in parallel so they will not get lost or damaged that easily.
You can really start utilizing the long-running connection for real data push now. But first, let’s go back 10 years and try to figure out how the early adopters of RIAs developed with AJAX survived.
Note
Even though AJAX as a term was coined only in
2005, the authors of this book started using the
DHTML/XMLHttpRequest combo (currently known as AJAX)
in the year 2000.
The Hack to Increase a Web Browser’s Performance
In the beginning of this century, most of the enterprises we worked with quietly rolled out browser builds/service packs increasing the number of allowed HTTP connections. This was just a hack. For Internet Explorer, the following changes to Windows registry keys would increase the number of the browser connections to 10:
HKEY_CURRENT_USERSoftwareMicrosoftWindowsCurrentVersionInternet Settings
MaxConnectionsPer1_0Server    10
MaxConnectionsPerServer       10
With Mozilla’s Firefox, you has to recompile the source code of the entire browser.
The hack does solve most of the performance and reliability issues for a short while. The main reason is that without imposed limits, software increases in size faster than transistor capacity under Moore’s Law. And unlike in private networks in enterprises, without a proper “city framework,” rampant requests will cause an overall Internet meltdown as the initial rollout of more capable browsers gives them an unfair advantage in terms of bandwidth share.
If a server receives eight connection requests, it’ll try to allocate the limited available bandwidth accordingly, and, for instance, Firefox’s requests will enjoy better throughput than those of Internet Explorer, which on older and slower networks will cause quality of service (QoS) problems. In other words, this solution has a very real potential to cause more of the same problems it’s expected to solve.
Other Ways of Increasing a Web Browser’s Performance
Most enterprises have to control QoS of their clients’ communications. For example, a company that trades stock has a service level agreement (SLA) with their clients promising to push the new price quotes twice a second. To keep such a promise, the enterprise should create and adopt a number of point-to-point solutions that provide more efficient communication models, which fall into three categories:
- HTTP batching and streaming of multiple requests in a single HTTP call and Comet communications
Comet, a.k.a. reverse AJAX, allows the web server to push data to the web browser, as opposed to a traditional request/response model. AMF performs automatic batching of the requests. If your program executes a loop that generates 50 HTTP requests to the server, AMF will batch them and will send them as one HTTP request.
Note
Imagine that someone wrote a loop in JavaScript that makes an HTTP server request on each iteration. The browser can batch these requests and send, say, 10 requests at a time. This is HTTP batching. In this scenario, the browser would assign a message ID to each request included in the batch, and arriving responses would contain correlation IDs that would allow the browser to find the matching requestors.
- Binary components that work with two-directional sockets
This is the case used in multimedia streaming, where there are two separate channels, and each is used for sending data in one direction: either to or from the server.
- Pluggable protocols, which are wrappers for standard protocols
Say you can develop some custom protocol called HTTPZ, which for the browsers will look like HTTP, but under the hood will use streaming or even a socket-based protocol like RTMP. The browser “believes” that it uses HTTP, the web server receives RTMP, and the translation is done by HTTPZ—every party is happy.
The pluggable protocol option did not become popular, even though it allows moving most of the problems from the browser to the OS level. The batching and streaming options, however, did.
Regular HTTP is based on the request/response model, which has an overhead of establishing a connection (and consequently disconnecting) on each request. In the case of streaming, this connection is opened only once (for more information, see the section Putting Streaming to Work).
HTTP batching and streaming is a combination of a few technologies with a close resemblance to how car traffic is controlled on some highways. There are dedicated lanes for high-occupancy vehicles (HOVs) that move faster during the rush hours. Such HOV lanes can be compared to the HTTP channels opened for streaming. For example, you can program network communications in such a way that one channel allows only two data pushes per second (a guaranteed QoS), while the other channel will try to push all the data, which may cause network congestion, delays, and queuing.
As an example, the Flex/Flash AMF protocol tries to squeeze out every bit of bandwidth and optimize queuing of the requests in the most efficient way—both on client and server. As a result, your application uses the maximum bandwidth, and request queues are short.
The results of such batching were so good that at Farata Systems,
we started recommending AMF to most of our customers (even those that
have to use WebService or HTTPService objects for communication). Using
AMF to proxy requests via an AMF-enabled server delivers results from
the HTTP servers more efficiently.
Note
If a client request uses a specific destination on a proxy
server, this destination can be configured to use an AMF channel, even
if an HTTPService object has been used as
a means of communications.
With AMF, the data gets loaded faster than with nonbatched requests/responses. And it plays nicely with the typical infrastructures that use firewalls as it piggybacks on the existing browser HTTP requests.
However, for critical applications built on plain infrastructures a problem remains: there is no QoS provided by the HTTP protocol, which may become a showstopper. For example, think of a financial application that sends real-time price quotes to its users. The server keeps sending messages, regardless of the current throughput of the network, which in the case of network congestion will be causing problems with queue overruns or lost packages.
Binary always on (re)connected socket protocols are a more logical and efficient solution. Unlike the request/response model, a typical socket connection is like a two-way highway, with data moving in opposite directions independently. But before we fully depart into the Communications 2.0 world, let’s make sure that you understand how HTTP is shaping up these days.
The disconnected model of HTTP 1.0 was not practical. The overhead
of connecting/disconnecting for each request was not tolerable, and for
the last eight years we have not seen a single web browser using it. It
has been completely replaced by HTTP
1.1—the protocol that keeps connections open beyond
request/response so the next communications with the server happen
faster. Under the hood, there are two-way sockets that stay open—but
browsers diligently follow the old model. They don’t create bidirectional pipe-like connections, as in
flash.net.NetConnection.
As web browsers started to host business applications, the need to process the real-time data forced people to look into solutions better than polling, and a few server-side push solutions were discovered. Although there were differences in implementations, the main theme remained the same—the server would get requests and hold them for a long time, flushing packages down when it became available.
The packages would reach the browser to be interpreted either by
programs upon arrival or executed in the iFrame (if packaged as <script/> sections of DHTML). The
important part was that people started to see that a server-driven model
was valid, and that it was a better fit for some applications. The
servers started controlling the clients.
Currently, there are two approaches to breaking the request/response paradigm: the Comet model and the model offered by the creators of the Jetty application server.
Note
When we started writing this book, the draft of the Java Servlet 3.0 specification (JSR-315) was based on asynchronous servlets implemented in the Jetty Servlet container. Then, the public review of JSR-315 was drastically changed. You can read more on the subject in the post titled “JSR-315: JSP Failings.”
What Is Comet?
A number of open source and commercial implementations of Comet exist in Java and Python. They can be very different, capitalizing on nonblocking I/O, using optimized threads, or offering more efficient native sockets support.
A servlet container in Jetty works in a half-duplex mode: it opens a dedicated streaming connection for flushing the data to the client, but also allows request/responses.
The Comet model is a full duplex that uses a two-way socket implementation (like in Apache Tomcat), which extends a conventional request/response model with events that are being sent on an established HTTP connection.
With Comet, the idea is that the server provides a second model
for the requests handler in addition to the conventional one. There is a
dedicated open connection that receives events related to the requests.
If you run a Java servlet, it will receive additional events from the
server: connect, read, error, and disconnect:
connectanddisconnectDefine the life span of the connection object available for communications.
errorNotifies the servlet of the low-level errors in the transmission protocol.
readDispatched when there is a request coming from the client; allows the server to read and process it. The server keeps connection and response objects and writes (flushes) the information to the client as needed.
Adding an event model to the server side brings symmetry to the client/server programming model and greatly simplifies the asynchronous programming. Unfortunately, existing implementations of this model are not overly reliable.
Note
If you want to use the two-way socket model, you will need to
write some custom code using the Flash NetConnection object to stream the data from
the client to the server, too.
Consider how this model is different for fine-grained requests common in today’s AJAX applications. Imagine that you’re in a coffee shop with a lousy WiFi connection sporting 1-second latency for a typical eBay response implemented as a web device, watching 30 items.
With the current browser settings (two connections per domain), it would take you 15 seconds to refresh all 30 items. With six allowed browser connections, this time is reduced to five seconds, but will require a more powerful infrastructure on the server side.
With the Comet-type requests, you can send all 30 requests without waiting for a single response (the same will be done with AMF HTTP batching) and will receive all 30 responses asynchronously. Meanwhile, with HTTP batching, you would get all 30 responses at once, and need some kind of sorting adapters on both sides to distribute batch members to the proper responders.
Putting Streaming to Work
Imagine a small village by the river. There is one boat, and whoever needs to go to the other bank to buy some food takes this boat. No one in the village can go to the other bank until the boat’s back. This is in some sense similar to the HTTP request/response model of communication.
At some point, people who lived in the same village built a two-lane bridge over this river. Each lane allows walking in one direction. All of a sudden you see that lots of people are moving in both directions at the same time. The number of trips to the other riverbank is a lot higher now. Yes, people carrying the shopping bags may go slower, but they are all moving at the same time. And each trip is faster, too; there is no need to embark/disembark from the boat (connect/disconnect). This is streaming.
Note
RTMP implementation offers two-lane traffic (a two-directional socket) and is a lot more efficient than the request/response model. Each connected computer just sends the data in one direction to a dedicated socket, which allows you to measure and estimate delivery metrics in each direction. RTMP is an open protocol available at http://www.adobe.com/devnet/rtmp/.
In multimedia applications, having an uninterrupted data delivery is a must, and the request/response model doesn’t work here. When you go to http://www.youtube.com, you expect to start watching the video immediately, without waiting until the entire file is downloaded to the client. And after seeing the first frames of the video, you’d like to have the rest in a smooth, uninterrupted mode, and this type of playback is supported by buffering of the stream data.
The users of the business Flex applications want to have the same experience, too. In this case, the stream consists of the Flex code and the data, so it’s important to make the right decision about the amount of code that will have to be downloaded to the user’s computer.
Consider a few types of web applications that benefit from breaking free from a traditional request/response model:
- Applications built on the publish/subscribe model or the server-side push
In this scenario, the data is being sent to the client as soon as it becomes available on the server. Typical examples of such applications are chat rooms, stock market data feeds, and delivering videos to users.
- Online transaction processing, analytical applications, and distributed services that need to extend the request/response model
For example, a call center application has to broadcast the data modifications done by one clerk to another to ensure that the second doesn’t work on the stale data. For distributed request/response services, you can’t guarantee the response time, because the response may sit on the server just because the client has a very limited set of available connection objects, in which case your application would stall.
- Applications that need to force the execution of the code on the client
Some applications benefit from the server-side components being able to directly call methods on the objects that exist on the client side in Flash Player. Typical cases are remote support and administration or workflow systems in which the server needs to force the client to move to a new node of the workflow. BlazeDS needs to be enhanced to support servers that can call clients.
Figure 6-3 illustrates three use cases of enterprise RIA:
- Subscribe and publish
You send the data using BlazeDS and improve the scalability of the application. You’ll see this demonstrated with the Jetty server scenario in the following section.
- Remoting and SOA
A remote object takes care of publishing and subscribing, keeps track of the correlation IDs of the messages received from the clients, and pushes the data to the clients. In the service-oriented architecture (SOA) world, the data returned by the service may change over time, and you can’t control it. In this model, you can’t control the response time, either. SOA is a good use case for introducing data push to a rich client.
- Remote control
You need to push the software or data updates to the client.

To start building streaming solutions, you need to extend BlazeDS to utilize modern JEE technologies. We’ll use asynchronous servlets offered by the Jetty server.
The Networking Architecture of BlazeDS
BlazeDS provides a clean separation of the networking layer (a servlet container) from the actual implementation of server-side services used by Flex clients. To recap what you learned in Chapter 5, the elements that are communicating on the servlet container level and delivering messages to and from services are called endpoints. If you open the configuration file services-config.xml that comes with BlazeDS, you’ll find declarations of several communication channels, for example:
<channel-definition id="my-amf" class="mx.messaging.channels.AMFChannel">
 <endpoint
url="http://{server.name}:{server.port}/{context.root}/messagebroker/amf"
class="flex.messaging.endpoints.AMFEndpoint"/>
</channel-definition>
By adding new or extending existing endpoints, you can add new or extend existing protocols or even expose the low-level networking in the way required by your application. Figure 6-4 depicts the business part of the application as a service that can be accessed via an endpoint of the protocol being used (a BlazeDS implementation of AMF, in our example). Both your application and BlazeDS live inside the servlet container.

The following sections demonstrate how Farata Systems extended BlazeDS to work with Java nonblocking I/O (NIO) and continuations (suspend/resume mode) offered by the Jetty API.
Setting Up a BlazeDS Sample Application on Jetty
In this exercise, you’ll need to use Jetty, as it’s the only open source implementation of the asynchronous servlets based on the suspend/resume mode at the time of this writing.
To set up a BlazeDS sample application with Jetty, follow these three steps:
Download and install Jetty from http://dist.codehaus.org/jetty/ according to its installation instructions. The steps assume that you’ll install it into the folder /jetty, but you can use any other folder; just modify the configuration files accordingly.
Download the BlazeDS turnkey distribution file from http://opensource.adobe.com/wiki/display/blazeds/Release+Builds. Unzip it to a /samples folder. Locate the file samples.war there and unzip it into the /samples folder under jetty/webapps-plus/. Start the sampledb database by executing the script provided with this turnkey distro for your OS—for example, /samples/sampledb/startdb.sh.
Uncomment the following section in the file /jetty/etc/jetty-plus.xml to automatically include all applications located in the folder webapps-plus:
<Call name="addLifeCycle">
<Arg>
<New class="org.mortbay.jetty.deployer.WebAppDeployer">
    <Set name="contexts"><Ref id="Contexts"/></Set>
    <Set name="webAppDir"><SystemProperty name="jetty.home"
               default="."/>/webapps-plus</Set>
    <Set name="parentLoaderPriority">false</Set>
    <Set name="extract">true</Set>
    <Set name="allowDuplicates">false</Set>
    <Set name="defaultsDescriptor"><SystemProperty name="jetty.home"
    default="."/>/etc/webdefault.xml</Set>
    <Set name="configurationClasses"><Ref id="plusConfig"/></Set>
</New>
</Arg>
</Call>
Now you can start Jetty by entering the following command at the
prompt (in Windows, replace the etc/
with another folder):
java -DOPTIONS=plus,jsp,ssl -jar start.jar etc/jetty.xml etc/jetty-ssl.xml
etc/jetty-plus.xml
Once the server starts, open http://localhost:8080/samples/ in your web browser and make sure that both the Traders Desktop and the Chat sample applications that come with BlazeDS work.
Setting BlazeDS Messaging to Use the Jetty NIO API
Add the NIO messaging endpoint to the BlazeDS configuration:
Get the file http://myflex.org/books/entflex/nioblaze.jar and copy it into the application’s folder, /jetty/webapps-plus/samples/WEB-INF/lib. This file is also available with this book’s samples.
Open /jetty/webapps-plus/samples/WEB-INF/flex/services-config.xml and comment out this section:
<!--channel-definition id="my-streaming-amf"
class="mx.messaging.channel.StreamingAMFChannel">
<endpoint
   url="http://{server.name}:{server.port}/{context.root}/messagebroker/
        streamingamf"
   class="flex.messaging.endpoints.StreamingAmfEndpoint"/>
</channel-definition-->
Add the following section there instead (please note that we are replacing the standard
StreamingAmfEndpointwith our ownNioAmfEndpoint):<channel-definition id="my-streaming-amf" class="mx.messaging.channel.StreamingAMFChannel"> <endpoint url="http://{server.name}:{server.port}/{context.root}/messagebroker/ streamingamf" class="com.farata.nioblaze.messaging.endpoints.NioAmfEndpoint"/> </channel-definition>Restart Jetty. You should be able to run the same Trader Desktop or Chat application, only this time you can support far more concurrent users, and shortly you’ll see why.
NIO Performance Test
Jetty itself is powerful enough to support 20,000 connected users. The benchmark tests were performed on a standard Amazon EC2 virtual server, and you can find details about these tests at the site http://cometdaily.com/2008/01/07/20000-reasons-that-comet-scales/.
When infused with BlazeDS, however, can Jetty still support thousands of users? We recently put this question to the test at Farata Systems.
The Theory
BlazeDS was offered as a free version of LCDS remoting that also promised scaled-down support of a modest number of concurrent users for data push.
But enterprise IT shops wanted the best of both worlds: an inexpensive but scalable solution. The great part about LCDS and BlazeDS is that their code base is extendable and you can teach these old dogs new tricks. The problem is that their original code is targeting only conventional Java Servlet containers, and that the performance/scalability of BlazeDS also depends on the number of concurrent connections supported by the hosting server, such as Tomcat, JBoss, WebSphere, and so on.
Farata Systems architects started experiments in this area when the prerelease of Jetty 7 was announced.
BlazeDS runs in a servlet container, which maintains a thread pool. A thread is given to a client request and is returned back to the reusable pool after the client has been served. When the client uses a so-called long-running connection, the thread becomes locked by that client until it finishes the request. So the number of the concurrent subscribers in BlazeDS depends on the number of threads that a particular servlet container can hold simultaneously.
Though the source code of BlazeDS has 10 as a default number of simultaneous connections, it can be increased to several hundred, and the actual number depends on the server’s threading configuration, CPU, and the size of its Java Virtual Machine (JVM) heap memory. This number can also be affected by the number of messages processed by the server in the unit of time as well as the size of the messages.
Nonblocking I/O combined with Jetty’s suspend/resume processing mode allows you to write code that is not tied to available server threads. The servlet container sends a request for execution and puts it in a suspended mode, releasing the thread for other requests. When the result comes back, it resumes the processing of the request, efficiently recycling a smaller number of threads. Because of that, the number of streaming connections can be increased to thousands.
The first goal was to create a module for BlazeDS to support Jetty’s suspend/resume mode with the messaging based on AMF streaming. Additional endpoints (components responsible for binding actual application services with the servlet container) were created based on the BlazeDS open source implementation.
Three small changes are required to add NIO endpoints to a standard BlazeDS (or LCDS for that matter) application in the standard Jetty installation:
Add Farata’s nioblazeds.jar to Jetty’s lib folder.
Modify the services-config.xml file of BlazeDS to change the standard thread-based endpoint for AMF streaming with Farata’s
NioAmfEndpoint, which supports Jetty’s API.Increase the parameter of Jetty’s number of open file handlers based on the number of concurrent user requests that you are planning to process.
The Trader Desktop, a sample application that comes with BlazeDS, was successfully deployed under BlazeDS/Jetty and tested without any changes in enhanced endpoints.
Note
The source code of this solution is available in the CVS repository of the Clear Toolkit framework in the NIOBlaze package, available at http://cleartoolkit.cvs.sourceforge.net/viewvc/cleartoolkit/.
The next step was to stress-test this application using one of the commercial testing software suites that supports the AMF protocol. Farata engineers teamed up with a company called Neotys, the creator of a robust stress-testing product called NeoLoad that allows testers to emulate the workload of tens of thousands of users hitting a server via both the HTTP and AMF protocols.
This test was recorded, and you can watch a short screencast that emulates 5,000 users working with the Trader Desktop over a five-minute period. To view it, go to http://myflex.org/demos/JettyBlazeDS/JettyBlazeDSloadTest.html. One screen is shown in Figure 6-5.
The test starts with 200 users ramping up at the rate of 500 users per 10 seconds.

In this demo, the server-side feed sends the messages about the latest stock prices to the Flex subscribers. After that, you’ll be monitoring this process using ds-console, which is yet another sample application that comes with BlazeDS.
First, the monitor will show just one client with a small number of messages, and the number of maximum streaming clients is set to 65,535.
Next, NeoLoad creates a large number of users. This test uses five machines to emulate the load. The push count is the number of messages sent by the server. The server runs on an eight-CPU machine. Watch the number of allocated threads and the number of users—the number of threads is several times lower than the number of users at any given time. Please note that even when the number of users grows, the number of threads doesn’t. These processes are not expensive from the perspective of either the memory or the CPU utilization.
In this test, the system was purposely restricted by introducing throttling in the Feed.java file. During this 5-minute test, the server pushed about 2.1 million messages. Because during the first 3 minutes (180 seconds) of the test NeoLoad was ramping up the number of users until it reached 5,000, you should count this time as half of this amount, or 90 seconds. Adding another 2 minutes (after the first 3) brings the adjusted test time to 210 seconds, or 10,000 messages per second. This means that each of 5,000 users received 2 messages per second, which matches the throttling parameter that was set in Feed.java (400 ms of sleep time between messages broadcast).
Based on the server CPU and memory utilization this setup won’t have difficulties supporting over 12,000 users, as long as external load generators are added and the network bandwidth is increased.
One of the machines used in this test was an eight-core MacPro for the server, where four of the cores were shared with the VM emulating one of the client’s machines. There were also two 3 Ghz desktops, one MacBook Pro, and one 2 Ghz Dell laptop; that’s the one that will work really hard trying to parse 300 messages per second.
Figure 6-6 depicts a snapshot of the NeoLoad window during our performance test.

Farata ran the same test with an Apache Tomcat server using traditional thread-based I/O and standard BlazeDS long polling. Tomcat comes preconfigured with 250 threads. After gradually increasing this number, the same test can run for about 800 users, but pretty soon the system becomes unstable, running out of threads and giving out memory errors.
Tomcat also has experimental NIO implementation of the servlet container implementing Comet techniques. Farata Systems has created an endpoint adapter to utilize the NIO of Jetty with BlazeDS. But while holding high the promises of a more efficient full-duplex protocol, the current Tomcat Comet implementation had some reliability issues.
The screencast should be treated as a feasibility study and technical comment, and not as a benchmark of any sort, as the implementation still has a lot of room for improvement. More tests are required for a proper scalability benchmark.
Based on these results, you may consider using open source BlazeDS in the most demanding enterprise Flex applications. If you are looking for a no-cost extensible solution that works in a standard web environment with corporate firewalls and requires session management, properly tuned BlazeDS under a Jetty server becomes a good scalable solution for your next RIA.
Note
In the summer of 2009, Jetty started offering its own asynchronous implementation of BlazeDS that utilizes Jetty 7 continuations. You can read about it at a blog post titled, “Asynchronous BlazeDS Polling with Jetty 7 Continuations.”
Both LCDS and BlazeDS can be treated as a very good transport solution between Flash Player on the client side and Java application server on the server side. But the main focus of RIA architects should remain the same—how to minimize the amount of coding of application programmers that need to communicate with the server, which will be the subject of the next section.
Data Access Automation
Once the transport technology has been selected, you need to try to remove the complexity of the data access and persistence layer. The Data Management Services that come with LCDS provide an excellent model for automation of this task. But you can develop your own framework based on the open source products, and in the following sections, you’ll learn how to re-create all the necessary components for a data persistence framework.
To offer functionality similar to that of LCDS in our framework, we need to create the following data management components:
Data transfer objects
ChangeObjectAssemblerA change-tracking collection
A destination-aware collection
Note
In the following sections, we’ll offer you Farata Systems’ version of such components. If you like them, get their source code in the CVS repository at SourceForge and use them as you see fit. We also encourage you to enhance them and make them available for others in the same code repository.
Data Transfer Objects
Using data transfer objects (DTOs) is very important for architecting automated updates and synchronization. In Flex/Java RIA, there are at least two parties that need to have an “exchange currency”: ActionScript and Java. Each of these parties has their own contracts on how to support the data persistence. Let’s concentrate on the ActionScript part first.
In the Café Townsend sample, the data objects responsible for the
exchange between Java and ActionScript are EmployeDTO.java and EmployeeDTO.as (see a fragment of
EmployeeDTO.as in Example 6-2). The Java side sends instances of EmployeDTO objects, which are automatically
re-created as their ActionScript peers on the frontend.
/* Generated by Clear Data Builder (ActionScriptDTO_IManaged.xsl) */
package com.farata.datasource.dto
{
    import flash.events.EventDispatcher;
    import flash.utils.Dictionary;
    import flash.utils.ByteArray;
    import mx.events.PropertyChangeEvent;
    import mx.core.IUID;
    import mx.utils.UIDUtil;

    [RemoteClass(alias="com.farata.datasource.dto.EmployeeDTO")]
    [Bindable(event="propertyChange")]
    public dynamic class EmployeeDTO extends EventDispatcher //implements IManaged
    {
            // Internals
            public var _nulls:String;

            // Properties
        private var _EMP_ID : Number;
        private var _MANAGER_ID : Number;
        ...
            public function get EMP_ID() : Number{
                    return _EMP_ID;
            }
            public function set EMP_ID( value : Number ):void{
                    var oldValue:Object = this._EMP_ID;
                    if (oldValue !== value)   {
                            this._EMP_ID = value;
                            dispatchUpdateEvent("EMP_ID", oldValue, value);
                    }
            }

            public function get MANAGER_ID() : Number{
                    return _MANAGER_ID;
            }
            public function set MANAGER_ID( value : Number ):void{
                    var oldValue:Object = this._MANAGER_ID;
                    if (oldValue !== value)   {
                            this._MANAGER_ID = value;
                            dispatchUpdateEvent("MANAGER_ID", oldValue, value);
                    }
            }


            public function get properties():Dictionary {
                    var properties:Dictionary = new Dictionary();
                    properties["EMP_ID"] = _EMP_ID;
                    properties["MANAGER_ID"] = _MANAGER_ID;

                        return properties;
                }

            public function set properties(properties:Dictionary):void {

             _EMP_ID = properties["EMP_ID"];
             _MANAGER_ID = properties["MANAGER_ID"];
             ...
            }

            private var _uid:String;
            public function get uid():String
            {
                    return _uid;
            }
            public function set uid(value:String):void
            {
                    _uid = value;
            }

            public function EmployeeDTO() {
                    _uid = UIDUtil.createUID();
            }

            public function newInstance() : * { return new EmployeeDTO();}

            private function dispatchUpdateEvent(propertyName:String,
                                                 oldValue:Object, value:Object):void {
                dispatchEvent(
                    PropertyChangeEvent.createUpdateEvent(this, propertyName,
                                                          oldValue, value)
                );
            }

            public function clone(): EmployeeDTO {
                var x:EmployeeDTO = new com.farata.datasource.dto.EmployeeDTO();
                x.properties = this.properties;
                return x;
            }
    }
}
The class starts with a [RemoteClass] metadata tag that instructs the
compiler that this class should be
marshaled and re-created as its peer com.farata.datasource.dto.EmployeeDTO on the server
side.
This class is an event dispatcher and any changes to its members
will result in the update event, which allows you to perform easy
tracking of its properties’ changes by dispatching appropriate events.
This feature is also important for the UI updates if the DTOs are bound
to UI controls, such as a DataGrid.
Note that all the properties in this class are getter/setter
pairs: they can’t remain public variables, because we want the dispatchUpdateEvent() method to be called
every time the variable’s value is being changed.
In addition to the functional properties like EMP_ID and EMP_FNAME, the class also contains a setter
and getter for the uid property; this
qualifies the class as an implementer of the IUID interface. Existence
of a uid property allows easy
indexing and searching of records on the client.
However, implementing uid as a
primary key on the server side is crucial in order to ensure
synchronization and uniqueness of updates. Usually uid represents the primary key from a database
table. The other function often required by automatic persistence
algorithms is getChangedPropertyNames(), in order to teach
DTO to mark updated properties (Example 6-3).
package com.farata.datasource.dto;
import java.io.Serializable;
import com.farata.remoting.ChangeSupport;
import java.util.*;
import flex.messaging.util.UUIDUtils;

public class EmployeeDTO implements Serializable, ChangeSupport {

 private static final long serialVersionUID = 1L;
 public String _nulls; // internals
 public long EMP_ID;
 public long MANAGER_ID;
 ...
 public Map getProperties() {
 HashMap map =  new HashMap();
 map.put("EMP_ID", new Long(EMP_ID));
 map.put("MANAGER_ID", new Long(MANAGER_ID));
...
 return map;
}

// Alias names is used by code generator of CDB in the situations
// if select with aliases is used, i.e.
// SELECT from A,B  a.customer cust1, b.customer cust2

// In this case plain names on the result set would be cust1 and cust2,
// which would complicate generation of the UPDATE statement.
// If you don't use code generators, there is no need to add aliasMap
// to your DTOs
public static HashMap aliasMap =  new HashMap();

public String getUnaliasedName(String name) {
 String result = (String) aliasMap.get(name);
 if (result==null)
  result = name;

return result;
}

public String[] getChangedPropertyNames(Object o) {
 Vector  v =  new Vector();
 EmployeeDTO old = (EmployeeDTO)o;
 if (EMP_ID != old.EMP_ID)
     v.add(getUnaliasedName("EMP_ID"));

 if (MANAGER_ID != old.MANAGER_ID)
     v.add(getUnaliasedName("MANAGER_ID"));
 ...
 String [] _sa = new String[v.size()];
 return (String[])v.toArray(_sa);
}
}
To better understand how changes are kept, take a look at the
internals of the ChangeObject class, which stores all
modifications performed on the DTO. It travels between the client and
the server.
ChangeObject
ChangeObject is a special DTO
that is used to propagate the changes between the server and the client.
The ChangeObject class exists in the
Data Management Services of LCDS, and is shown in Example 6-4. On the client side, it is just a simple
storage container for original and new versions of a record that is
undergoing some changes. For example, if the user changes some data in a
DataGrid row, the instance of the
ChangeObject will be created, and the
previous version of the DTO that represents this row will be stored
along with the new one.
package  com.farata.remoting {
   [RemoteClass(alias="com.farata.remoting.ChangeObjectImpl")]
   public class ChangeObject {

      public var state:int;
      public var newVersion:Object = null;
      public var previousVersion:Object = null;
      public var error:String = "";
      public var changedPropertyNames:Array= null;

      public static const UPDATE:int=2;
      public static const DELETE:int=3;
      public static const CREATE:int=1;

       public function ChangeObject(state:int=0,
             newVersion:Object=null, previousVersion:Object = null) {
          this.state = state;
          this.newVersion = newVersion;
          this.previousVersion = previousVersion;
       }

       public function isCreate():Boolean {
          return state==ChangeObject.CREATE;
       }
       public function isUpdate():Boolean {
          return state==ChangeObject.UPDATE;
       }
       public function isDelete():Boolean {
          return state==ChangeObject.DELETE;
       }
   }
}
As you can see, every changed record can be in a DELETE, UPDATE, or CREATE state. The original version of the
object is stored in the previousVersion property and the current one
is in the newVersion. That turns the
ChangeObject into a lightweight
implementation of the Assembler pattern, which offers a simple API to
process all the data changes in a standard way, similar to what’s done
in the Data Management Services that come with LCDS.
The Java counterpart of the ChangeObject (Example 6-5) should have few extra convenience
generic methods. All specifics are implemented in a standard way in the
EmployeeDTO.
Package com.theriabook.remoting;
import java.util.*;
public class ChangeObjectImpl {
   public void fail() {
      state = 100;
   }
   public void fail(String desc) {
      // TODO Auto-generated method stub
      fail();
        error = desc;
   }
   public String[] getChangedPropertyNames() {
      // TODO Auto-generated method stub
      changedNames = newVersion.getChangedPropertyNames(previousVersion);
      return changedNames;
   }
    public Map getChangedValues()
    {
       if ((newVersion==null) || (previousVersion==null)) return null;
        if(changedValues == null)
        {
            if(changedNames == null)
               changedNames = getChangedPropertyNames();
            if (newMap == null)
               newMap = newVersion.getProperties();
            changedValues = new HashMap();
            for(int i = 0; i < changedNames.length; i++)
            {
                String field = changedNames[i];
                changedValues.put(field, newMap.get( field));
            }
      }
        return Collections.unmodifiableMap(changedValues);
    }
   public Object getPreviousValue(String field) {
      if (previousMap == null)
         previousMap = previousVersion.getProperties();
      return previousMap.get( field );
   }
   public boolean isCreate() {
      return state == 1;
   }
   public boolean isDelete() {
      return state == 3;
   }
   public boolean isUpdate() {
      return state == 2;
   }
public void setChangedPropertyNames(String [] columns)
    {
       changedNames = columns;
       changedValues = null;
    }
public void setError(String s) {
       error = s;
    }
   public void setNewVersion(Object nv) {
      newVersion = (ChangeSupport)nv;
        changedValues = null;
   }
   public void setPreviousVersion(Object o) {
      previousVersion = (ChangeSupport)o;
   }
   public void setState(int s) {
      state = s;
   }

//---------------------- E X T E N S I O N S--------------------------
   public int state = 0;
   public ChangeSupport newVersion = null;
   public ChangeSupport previousVersion = null;
   public String error ="";

   protected Map newMap = null;
   protected Map previousMap = null;
   protected String[] changedNames = null;
   protected Map changedValues = null;
}
Assembler and DAO Classes
In Core J2EE Patterns, the Transfer Object Assembler means a class
that can build DTOs from different data sources (see http://java.sun.com/blueprints/corej2eepatterns/Patterns/TransferObjectAssembler.html).
In Flex/Java RIA, the Assembler class
would hide from the Flex client actual data sources used for data
retrieval. For example, it can expose the method getEmployees() for retrieval of the EmployeeDTO objects that are actually
retrieved from more than one data source.
For simplicity, the method getEmployees() shown in Example 6-6 delegates the processing to a single
Data Access Object (DAO), but this does not have to be the case, and the
data required for population of the list of EmployeeDTOs can be coming from several data
sources.
Similarly, for data updates the client calls the sync() method without knowing the specifics;
the DAO class or classes take care of the data persistence.
In the example framework, you’ll build an
Assembler class similar to what Adobe recommends
creating in the case of using LCDS. The instances of ChangeObject are used for communication
between Flex and the Java Assembler
class, which in turn will use them for communication with DAO
classes.
The Assembler pattern cleanly separates the generic
Assembler’s APIs from specifics of the DAO
implementation.
package com.farata.datasource;

import java.util.*;

public final class EmployeeAssembler{
        public EmployeeAssembler(){
        }

        public  List getEmployees() throws Exception{
                return new EmployeeDAO().getEmployees();
        }

        public final List getEmployees_sync(List items){
                return new EmployeeDAO().getEmployees_sync(items);
        }
}
The two main entry points (data retrieval and updates) will show you how easy it is to build a DAO adapter.
First, you need to separate the task into the DAO and Assembler
layers by introducing methods with fill (retrieve)
and sync (update) functionality. The complete
source code of the EmployeeDAO class
is included in the code samples accompanying this book, and the relevant
fragments from this class follow in Example 6-7.
package com.farata.datasource;
import java.sql.*;
import java.util.*;
import flex.data.*;
import javax.naming.Context;
import javax.naming.InitialContext;
import javax.transaction.*;
import com.farata.daoflex.*;

public final class EmployeeDAO extends Employee {

   public final List getEmployees_sync(List items)    {
      Coonection conn = null;
      try  {
         conn = JDBCConnection.getConnection("jdbc/test");
         ChangeObject co = null;
         for (int state=3;  state > 0; state--) { //DELETE, UPDATE, CREATE
              Iterator iterator = items.iterator();
                 while (iterator.hasNext()) {   // Proceed to all updates next
                      co = (ChangeObject)iterator.next();
                      if(co.state == state && co.isUpdate())
                          doUpdate_getEmployees(conn, co);
               if(co.state == state && co.isDelete())
                          doDelete_getEmployees(conn, co);
               if(co.state == state && co.isCreate())
                          doCreate_getEmployees(conn, co);
            }
         }
      } catch(DataSyncException dse) {
              dse.printStackTrace();
              throw dse;
      } catch(Throwable te) {
            te.printStackTrace();
            throw new DAOException(te.getMessage(), te);
      } finally {
         JDBCConnection.releaseConnection(conn);
      }
         return items;
    }
  public final List /*com.farata.datasource.dto.EmployeeDTO[]*/
                                                getEmployees_fill() {

        String sql = "select * from employee    where dept_id=100";
        ArrayList list = new ArrayList();
        ResultSet rs = null;
        PreparedStatement stmt = null;
        Connection conn = null;
        try   {
            conn = JDBCConnection.getConnection("jdbc/test");
            stmt = conn.prepareStatement(sql);
            rs = stmt.executeQuery();
            StringBuffer nulls = new StringBuffer(256);
            while( rs.next() )    {
              EmployeeDTO dto = new dto.EmployeeDTO();
              dto.EMP_ID = rs.getLong("EMP_ID");
              if( rs.wasNull() ) { nulls.append("EMP_ID|"); }
              dto.MANAGER_ID = rs.getLong("MANAGER_ID");
              if( rs.wasNull() ) { nulls.append("MANAGER_ID|"); }
              ...
              dto.uid = "|" +   dto.EMP_ID;
              list.add(dto);
            }
            return list;
        } catch(Throwable te) {
            te.printStackTrace();
            throw new DAOException(te);
        } finally {
            try {rs.close(); rs = null;} catch (Exception e){}
            try {stmt.close(); stmt = null;} catch (Exception e){}
            JDBCConnection.releaseConnection(conn);
    }   }
As you can see in Example 6-7, the
implementation of the fill method is
really straightforward. Review the code of the sync method, and you’ll see that it iterates
through the collection of ChangeObjects; calls their methods isCreate(), isUpdate(), and isDelete(); and calls the corresponding
function in the DAO class. These functions are shown in the
example.
Implementation of the insert and
delete statements is based on new or old versions
wrapped inside ChangeObject. Example 6-8 calls the method
getNewVersion() to get the data for
insertion in the database and getPreviousVersion() for delete.
  private ChangeObject doCreate_getEmployees(Connection conn,
           ChangeObject co) throws SQLException{

        PreparedStatement stmt = null;
        try {
            String sql = "INSERT INTO EMPLOYEE " +
              "(EMP_ID,MANAGER_ID,EMP_FNAME,EMP_LNAME,
              DEPT_ID,STREET,CITY,STATE,ZIP_CODE,PHONE,
              STATUS,SS_NUMBER,SALARY,START_DATE,TERMINATION_DATE,
              BIRTH_DATE,BENE_HEALTH_INS,BENE_LIFE_INS,
              BENE_DAY_CARE,SEX)"+
              " values (?,?,?,?,?,?,?,?,?,?,?,?,?,?,?,?,?,?,?,?)";

            stmt = conn.prepareStatement(sql);
            EmployeeDTO item = (EmployeeDTO) co.getNewVersion();
            stmt.setLong(1, item.EMP_ID);
            stmt.setLong(2, item.MANAGER_ID);
            ...
            if (stmt.executeUpdate()==0)
               throw new DAOException("Failed inserting.");
            co.setNewVersion(item);
            return co;
        } finally {
            try { if( stmt!=null) stmt.close(); stmt = null;}
            catch (Exception e){// exception processing goes here}
    }   }

    private void doDelete_getEmployees(Connection conn, ChangeObject co)
                                          throws SQLException{
        PreparedStatement stmt = null;
        try {
            StringBuffer sql = new StringBuffer
                        ("DELETE FROM EMPLOYEE WHERE (EMP_ID=?)");
            EmployeeDTO item = (EmployeeDTO) co.getPreviousVersion();
            stmt = conn.prepareStatement(sql.toString());
            stmt.setLong(1, item.EMP_ID);

            if (stmt.executeUpdate()==0)
                throw new DataSyncException(co, null,
                   Arrays.asList(new String[]{"EMP_ID"}));
            } finally {
            try { if( stmt!=null) stmt.close(); stmt = null;
            } catch (Exception e){}
    }   }
To form the update statement, you need both the previous and the
new versions of the data available inside ChangeObject instances (Example 6-9).
private void doUpdate_getEmployees(Connection conn, ChangeObject co)
                                                throws SQLException{

      String updatableColumns ",EMP_ID,MANAGER_ID,EMP_FNAME,EMP_LNAME,
             DEPT_ID,STREET,CITY,STATE,ZIP_CODE,
             PHONE,STATUS,SS_NUMBER,SALARY,START_DATE,
             TERMINATION_DATE,BIRTH_DATE,BENE_HEALTH_INS,
             BENE_LIFE_INS,BENE_DAY_CARE,SEX,";

        PreparedStatement stmt = null;

        try {
            StringBuffer sql = new StringBuffer("UPDATE EMPLOYEE SET ");
            EmployeeDTO oldItem =
                      (EmployeeDTO) co.getPreviousVersion();
            String [] names = co.getChangedPropertyNames();
            if (names.length==0) return;

            for (int ii=0; ii < names.length; ii++) {
               if (updatableColumns.indexOf("," + names[ii] +",")>=0)
                    sql.append((ii!=0?", ":"") + names[ii] +" = ? ");
            }

            sql.append( " WHERE (EMP_ID=?)" );
            stmt = conn.prepareStatement(sql.toString());

            Map values = co.getChangedValues();
            int ii, _jj;
            Object o;
            _jj = 0;

            for (ii=0; ii <    names.length; ii++) {
               if (updatableColumns.indexOf("," + names[ii] +",")>=0) {
                  _jj++;
                  o =  values.get(names[ii]);
                    if ( o instanceof java.util.Date)
                       stmt.setObject(
             _jj,DateTimeConversion.toSqlTimestamp((java.util.Date)o) );
                    else
                        stmt.setObject( _jj, o );
                }
            }

            _jj++;
            stmt.setLong(_jj++, oldItem.EMP_ID);

            if (stmt.executeUpdate()==0)
                throw new DataSyncException(co, null,
                         Arrays.asList(new String[]{"EMP_ID"}));
        } finally {
            try { if( stmt!=null) stmt.close(); stmt = null;
            } catch (Exception e){}
         }    }

}
You can either manually write the code shown in Examples 6-2 to 6-9, or use the Clear Data Builder for automated code generation.
The code in the examples is generic and can be either generated for the best performance or parameterized for Java frameworks such as Spring or Hibernate.
DataCollection Class
It’s time to establish an ActionScript collection that will have two important features:
It will know how to keep track of changes to its data.
It will be destination-aware.
Such a collection would keep track of the data changes made from
the UI. For example, a user modifies the data in a DataGrid that has a collection of some objects
used as a data provider. You want to make a standard Flex ArrayCollection a little smarter so that it’ll
automatically create and maintain a collection of ChangeObject instances for every modified,
new, and deleted row.
We’ve developed a class DataCollection that will do exactly this
seamlessly for the application developer. This collection also
encapsulates all communications with the server side via RemoteObject, and it knows how to notify other
users about the changes made by you if they are working with the same
data at the same time.
Shown in Example 6-10, this
collection stores its data in the property source, the array of ChangeObjects in modified, and the name of the remote
destination in destination. Every
time the data in the underlying collection changes, this collection
catches the COLLECTION_CHANGE event, and based on
the event’s property kind
(remove, update,
add) removes or modifies the data in the collection.
To support undo functionality, all modified objects are stored in the
properties deleted and modified.
package com.farata.collections {
   [Event(name="propertyChange", type="mx.events.PropertyChangeEvent")]
   [Bindable(event="propertyChange")]

   public class DataCollection extends ArrayCollection {

  public var destination:String=null;
      protected var ro:RemoteObject = null;
      public var deleted:Array = new Array();
      public var modified:Dictionary = new Dictionary();
      public var alertOnFault:Boolean=true;
      private var trackChanges:Boolean=true;

      // The underlying data of the ArrayCollection
      override public function set source(s:Array):void {
      super.source = s;
       list.addEventListener(CollectionEvent.COLLECTION_CHANGE,
                                               onCollectionEvent);
          resetState();
          refresh();
    }
       // collection's data changed
   private function onCollectionEvent(event:CollectionEvent) :void {
         if (!trackChanges) return;
         switch(event.kind) {
         case "remove":
            for (var i:int = 0; i < event.items.length; i++) {
             var item:Object = event.items[i];
                var evt:DynamicEvent = new DynamicEvent("itemTracking");
                evt.item = item;
                dispatchEvent(evt);
                if (evt.isDefaultPrevented()) break;
                var co:ChangeObject = ChangeObject(modified[item]);
                var originalItem:Object=null;
            if (co == null) {
               // NotModified
                   originalItem = item;
               } else if (!co.isCreate()) {
                  // Modified
                   originalItem = co.previousVersion;
                   delete modified[item];
                   modifiedCount--;
                } else {
                   // NewModified
                   delete modified[item];
                   modifiedCount--;
                }
                if (originalItem!=null) {
               deleted.push(originalItem);
               deletedCount = deleted.length;
                };
             }
          break;
          case "add":
             for ( i = 0; i < event.items.length; i++) {
                item = event.items[i];
                evt = new DynamicEvent("itemTracking");
                evt.item = item;
                dispatchEvent(evt);
                if (evt.isDefaultPrevented()) break;
                modified[item] = new ChangeObject
                         (ChangeObject.CREATE, cloneItem(item), null);
            modifiedCount++;
             }
             break;
          case "update":
             for (i = 0; i < event.items.length; i++) {
                item = null;
            var pce:PropertyChangeEvent =
                           event.items[i] as PropertyChangeEvent;
                if ( pce != null) {
                   item = pce.currentTarget; //as DTO;
                   if( item==null )
                      item = pce.source;
                   evt = new DynamicEvent("itemTracking");
                   evt.item = item;
                   dispatchEvent(evt);
                   if (evt.isDefaultPrevented()) break;
                }
                if (item != null) {
                   if(modified[item] == null) {
                      if (item.hasOwnProperty("properties")) {
                         var oldProperties:Dictionary =
                                                   item["properties"];
                         oldProperties[pce.property] = pce.oldValue;
                     var previousVersion:Object = cloneItem(item,
                                                               oldProperties)
                      } else {
                         previousVersion = ObjectUtil.copy(item);
                         previousVersion[pce.property] = pce.oldValue;
                      }
                      modified[item] = new ChangeObject(ChangeObject.UPDATE,
                                             item, previousVersion);
                     modifiedCount++;
                      }
                      co = ChangeObject(modified[item]);
                      if (co.changedPropertyNames == null) {
                         co.changedPropertyNames = [];
                      }
                      for (  i = 0; i < co.changedPropertyNames.length; i++ )
                         if (  co.changedPropertyNames[i] == pce.property)
                            break;
                      if ( i >= co.changedPropertyNames.length)
                         co.changedPropertyNames.push(pce.property);
                   }
                }

                break;

          }
            // to be continued
       }
For our DataCollection to
really be useful for developers, it has to offer an API for querying and
manipulating its state. Developers should be able to query the
collection to find out whether this particular object is new, updated,
or removed. The modified variable of
DataCollection is a reference to
ChangeObject’s, and each ChangeObject instance can “introduce” itself
as new, updated, or removed. Hence we are adding the methods listed in
Example 6-11 to the DataCollection.
   public function isItemNew(item:Object):Boolean {
      var co: ChangeObject = modified[item] as ChangeObject;
      return (co!=null && co.isCreate());
   }
   public function setItemNew(item:Object):void {
      var co: ChangeObject = modified[item] as ChangeObject;
      if (co!=null){
         co.state = ChangeObject.CREATE;
      }
   }
   public function isItemModified(item:Object):Boolean {
      var co: ChangeObject = modified[item] as ChangeObject;
      return (co!=null && !co.isCreate());
   }
   public function setItemNotModified(item:Object):void {
      var co: ChangeObject = modified[item] as ChangeObject;
      if (co!=null) {
         delete modified[item];
            modifiedCount--;
      }
   }

   private var _deletedCount : int = 0;
    public function get deletedCount():uint {
      return _deletedCount;
   }

    public function set deletedCount(val:uint):void {
      var oldValue :uint = _deletedCount ;
      _deletedCount = val;
      commitRequired = (_modifiedCount>0 || deletedCount>0);
      dispatchEvent(PropertyChangeEvent.createUpdateEvent(this, "deletedCount",
                                                     oldValue, _deletedCount));
   }

   private var _modifiedCount : int = 0;
   public function get modifiedCount():uint {
      return _modifiedCount;
   }
   public function set modifiedCount(val:uint ) : void{
      var oldValue :uint = _modifiedCount ;
      _modifiedCount = val;
      commitRequired = (_modifiedCount>0 || deletedCount>0);
      dispatchEvent(PropertyChangeEvent.createUpdateEvent(this, "modifiedCount",
                                                     oldValue, _modifiedCount));
      }

     private var _commitRequired:Boolean = false;
     public function set commitRequired(val :Boolean) :void {
        if (val!==_commitRequired) {
         _commitRequired = val;
         dispatchEvent(PropertyChangeEvent.createUpdateEvent(this,
                          "commitRequired", !_commitRequired, _commitRequired));
        }
     }
     public function get commitRequired() :Boolean {
        return _commitRequired;
     }

   public function resetState():void {
      deleted = new Array();
      modified = new Dictionary();
      modifiedCount = 0;
      deletedCount = 0;
   }
The DataCollection can “tell”
if any of its objects are new, removed, or updated; keeps the counts of
modified and deleted objects; and knows if a commit (saving changes) is
required.
All the changes are accessible as the properties deletes, inserts, and updates. The property changes will get you the entire collection of
the ChangeObjects (Example 6-12).
public function get changes():Array {
   var args:Array = deletes;
   for ( var item:Object in modified) {
      var co: ChangeObject =
         ChangeObject(modified[item]);
      co.newVersion = cloneItem(item);
      args.push(co);
   }
     return args;
  }

  public function get deletes():Array {
   var args:Array = [];
   for ( var i :int = 0; i < deleted.length; i++) {
      args.push(
         new ChangeObject(
            ChangeObject.DELETE, null,
               ObjectUtils.cloneItem(deleted[i])
         )
      );
   }
   return args;
  }
  public function get inserts():Array {
   var args:Array = [];
   for ( var item:Object in modified) {
      var co: ChangeObject = ChangeObject(modified[item]);
      if (co.isCreate()) {
         co.newVersion = ObjectUtils.cloneItem(item);
         args.push( co );
      }
   }
   return args;
  }
  public function get updates():Array {
   var args:Array = [];
   for ( var item:Object in modified) {
      var co: ChangeObject = ChangeObject(modified[item]);
      if (!co.isCreate()) {
            // make up to date clone of the item
         co.newVersion = ObjectUtils.cloneItem(item);
         args.push( co );
      }
   }
     return args;
  }
This collection should also take care of the communication with
the server and call the fill() and
sync() methods. Because the DataCollection internally uses Flex remoting,
it’ll create the instance of the RemoteObject with result and fault
handlers.
The application developer will just need to create an instance of
DataCollection, then specify the name
of the remote destination and the remote method to call for data
retrieval and update.
As you saw in Example 1-27:
collection = new DataCollection();
collection.destination="com.farata.Employee";
collection.method="getEmployees";
...
collection.fill();
The fill() method here invokes
the remote method getEmployees(). If
the sync() method is not specified,
its default name will be getEmployees_sync(). After the code fragment
in Example 6-13 is added
to DataCollection, it’ll be able to
invoke a remote object on the server after creating the instance of
RemoteObject in the method createRemoteobject(). The method
fill() calls invoke(), which in turn creates an instance of
the remote method using getOperation() on the remote object.
   public var _method : String = null;
   public var syncMethod : String = null;

   public function set method (newMethod:String):void {
      _method = newMethod;
      if (syncMethod==null)
         syncMethod = newMethod + "_sync";
   }
   public function get method():String {   return _method;      }

   protected function createRemoteObject():RemoteObject {
      var ro:RemoteObject = null;
      if( destination==null || destination.length==0 )
         throw new Error("No destination specified");

      ro = new RemoteObject();
      ro.destination    = destination;
      ro.concurrency    = "last";
      ro.addEventListener(ResultEvent.RESULT, ro_onResult);
      ro.addEventListener(FaultEvent.FAULT,   ro_onFault);
      return ro;
   }

   public function fill(... args): AsyncToken {
      var act:AsyncToken = invoke(method, args);
      act.method = "fill";
      return act;
   }

   protected function invoke(method:String, args:Array):AsyncToken {
      if( ro==null ) ro = createRemoteObject();
      ro.showBusyCursor = true;
      var operation:AbstractOperation = ro.getOperation(method);
      operation.arguments = args;
      var act:AsyncToken = operation.send();
      return act;
   }

   protected function ro_onFault(evt:FaultEvent):void {
          CursorManager.removeBusyCursor();
      if (evt.token.method == "sync") {
         modified = evt.token.modified;
         modifiedCount = evt.token.modifiedCount;
         deleted = evt.token.deleted;
      }
      dispatchEvent(evt);
      if( alertOnFault && !evt.isDefaultPrevented() ) {
         var dst:String = evt.message.destination;
         if( dst==null || (dst!=null && dst.length==0) )
         try{ dst = evt.target.destination; } catch(e:*){};

         var ue:UnhandledError = UnhandledError.create(null, evt,
               DataCollection, this, evt.fault.faultString,
                 "Error on destination: " + dst);
         ue.report();
      }
   }


   public function sync():AsyncToken {
      var act:AsyncToken = invoke(syncMethod, [changes]);
      act.method = "sync";
      act.modified = modified;
      act.deleted = deleted;
      act.modifiedCount=modifiedCount;
      return act;
   }

   }
}
Let’s recap what you’ve done. You subclassed ArrayCollection and created the DataCollection class that remembers
all the changes to the underlying collection in the form of ChangeObject instances. Each ChangeObject “knows” if it’s there because the
user modified, removed, or added a new object to the collection. The
DataCollection internally creates a
RemoteObject based on the name of the
destination and calls the sync()
method, passing the collection of ChangeObjects to it for persistence on the
server. Data retrieval is performed by calling DataCollection.fill().
Deep Data Synchronization with BlazeDS
Due to space constraints, you’ve been presented with the simplified
fragments of the DataCollection code to
highlight its main features and give you a push in the right direction,
should you want to create your own version of such a collection. Here are
a few more possible approaches that may prove useful.
Note
You can find the complete and up-to-date source code of the
DataCollection class (900+ lines of
code) in the SourceForge
repository.
Nested DataCollections
Previously, you learned about data synchronization between
DataCollection and remote Java
objects via the method sync(). But
what if you have a situation with nested DataCollection objects that can be modified on
the client side? How do you synchronize the changes in this case? Here’s
the magic line of code that will perform deep synchronization of the
DataCollection and all its nested
children:
collection.sync(true);
If you don’t like manual coding, Clear Data Builder will perform
deep synchronization of hierarchical DataCollections with the server, so that if an
item of the collection contains child collections (Example 6-16, shown later), the
entire tree of changes gets synchronized with the Java backend in one
transaction.
Consider a sample order-processing application (Figure 6-7) that allows the user to navigate from order to order, editing the master information (order) as well as its details (order items).

The user can modify either of the data grids. All interactive
changes are accumulated in the underlying DataCollection until the button labeled Commit
is clicked. That’s exactly when deep sync happens in one
transaction—it’s all or nothing, the commit of all changes or complete
rollback.
Each of the data grids is supported by a subclass of DataCollection: OrderCollection and OrderItemCollection, respectively (Example 6-14).
package collections {
import com.farata.collections.DataCollection;
public class OrderCollection extends DataCollection {
   public function OrderCollection(source:Array=null) {
      super(source);
      destination="com.farata.test.Order";
      method="getOrders";
   }
}
}

package collections {
import com.farata.collections.DataCollection;
public class OrderItemCollection extends DataCollection {
   public function OrderItemCollection(source:Array=null) {
      super(source);
      destination="com.farata.test.Order";
      method="getOrderItems";
   }
}
}
The source code of the application shown in Figure 6-7 is listed in Example 6-15.
<?xml version="1.0" encoding="UTF-8"?>
<!--OrderEntryDemo.mxml -->
<mx:Application
   xmlns:mx="http://www.adobe.com/2006/mxml"
   xmlns="*" xmlns:collections="collections.*">
   <collections:OrderCollection id="orders"/>
   <mx:ControlBar>
      <mx:Button label="Fill"  click="selectedOrder=null;orders.fill()"  />
      <mx:Button label="Commit"  click="orders.sync(true)"
         enabled="{orders.commitRequired}" />
   </mx:ControlBar>
   <mx:VDividedBox  >
      <OrdersPanel id="master" orders="{orders}"
         orderSelectionChange="selectedOrder = event.order"
      />
      <OrderItemsPanel id="detail" width="100%"
         selectedOrder="{selectedOrder}"
      />
   </mx:VDividedBox>
   <mx:Script>
      <![CDATA[
         import com.farata.test.dto.OrderDTO;
         [Bindable] private var selectedOrder:OrderDTO;
      ]]>
   </mx:Script>
</mx:Application>
The example application contains two custom objects: OrdersPanel and OrderItemsPanel. The OrdersPanel object uses OrderCollection as a data provider for its
data grid. Each item of the OrderCollection carries orderItems referring to the child collection
of line items of this order. At the application level, you need to
expose only the master collection orders, which hold the entire
master/detail data hierarchy.
The Commit button is enabled automatically when there are changes
to commit (the collection’s array of ChangeObjects is not empty). On click, the
sync(true) is called, requesting deep
synchronization, or persistence of all nested DataCollections:
<mx:Button label="Commit"  click="orders.sync(true)"
   enabled="{orders.commitRequired}" />
As mentioned earlier, you can substantially reduce the amount of
manual coding in DTOs: Clear Data Builder will do it for you. In
particular, it takes the Java class Order written by you (Example 6-17, shown later) and generates the ActionScript
class _OrderDTO and its subclass
OrderDTO (Example 6-16).
package com.farata.test.dto{
import collections.OrderItemCollection;
import com.farata.collections.dto.HierarchicalDTOAdapter;
import com.farata.collections.dto.IHierarchicalDTO;

[RemoteClass(alias="com.farata.test.dto.OrderDTO")]
public class OrderDTO extends _OrderDTO implements IHierarchicalDTO{
[Transient] [Bindable] public var orderItems:OrderItemCollection;
[Transient] public var adapter:HierarchicalDTOAdapter;

public function OrderDTO() {
    super();
    adapter = new HierarchicalDTOAdapter(this);
    orderItems = new OrderItemCollection();
    adapter.addCollection(orderItems);
}

public function get childCollections():Array {
    return adapter.childCollections;
}

public override function set order_id(orderId:String):void {
    if (orderId !== super.order_id) {
         super.order_id = orderId;
         orderItems.fill(order_id);
    }
}
}//OrderDTO
}
Note the [Transient] metadata
tags that ensure that these objects won’t be serialized and sent to the
server.
Though the properties of the _OrderDTO will match the fields returned by
the SQL select specified in the doclet section of getOrders() in Example 6-17,
the subclass OrderDTO is your
playground. You can add any code there, and it won’t be overwritten by
the next CDB code generation.
In particular, the secret sauce here is that OrderDTO implements the IHierarchicalDTO interface, which you have to
add manually to the generated OrderDTO if you want your collection to
include nested collections. You’ll also need to add code that uses
HierarchicalDTOAdapter, the getter
childCollections, and the setter
order_id as it’s done in the
example.
Example 6-17 is the abstract Java class that is used with CDB to generate an ActionScript DTO from Example 6-16.
package com.farata.test;
import java.util.List;
/**
* @daoflex:webservice
* pool=jdbc/test
*/
public abstract class Order
{
/**
* @daoflex:sql
* sql=:: select order_id, customer_first_name,
* customer_last_name, order_date from simple_order
* ::
* transferType=OrderDTO[]
* keyColumns=order_id
* updateTable=simple_order
* autoSyncEnabled=true
*/
public abstract List getOrders();
/**
* @daoflex:sql
* sql=select * from simple_order_item WHERE ORDER_ID=:orderId
* transferType=OrderItemDTO[]
* updateTable=simple_order_item
* keyColumns=order_id,item_id,product_name
* autoSyncEnabled=true
*/
public abstract List getOrderItems(String orderId);
}
Note
CDB doesn’t force you to use SQL for the generation of
ActionScript DTOs and automating the work with fill() and sync() methods. CDB allows your DataCollections to remote to any Java class
implementing the com.farata.daoflex.IJavaDAO interface that
returns an arbitrary Java DTO. See the CDB
documentation for more details.
The autoSyncEnabled attribute
in Example 6-17 comes in handy when more than one user
works with the same application and the same piece of data; Clear Data
Builder offers an autonotification mechanism for data modifications.
Changing the value of the autoSyncEnabled attribute allows you to turn
on or off the sending of such notifications. For details, see the post
at http://www.tinyurl.com/autosync.
Batching Remote Calls
In Example 6-7,
you saw that the sync() method
performed three steps (delete, update, and insert items) to maintain the
referential integrity of data changes. If you want to perform updates of
more than one DataCollection in one
transaction, you can batch them. In the order-processing application,
you have a case of nested collections, children have to be deleted prior
to parents, and parents need to be inserted prior to children. But you
may have another business reason to run multiple updates as one transaction.
That’s where the BatchService
class from clear.swc comes into
play. It treats a sequence of several remote method calls as a batch, or
simply as an array of BatchMember
objects containing such elements as destination name, method name, and
array of arguments.
Instead of making multiple remote calls, BatchService sends the entire batch as an
argument of one remote call. On the server side, this call is performed
by a Java class, com.farata.remoting.BatchGateway,
located in daoflex-runtime.jar, which comes with
CDB. In turn, BatchGateway’s method
execute(List<BatchMember>)
invokes the required remote calls sequentially, wrapping the entire
sequence begin/commit/rollback as prescribed by the Java Transaction API
(Figure 6-8).

The following code snippet illustrates how you can add two collections from the order-processing example to one batch and send it for processing to the server:
var bs: com.farata.remoting.BatchService;
  ...
  bs = new BatchService();
  bs.addEventListener(FaultEvent.FAULT, onFault);
  bs.registerCollection(orders, 0); //0 - default (top) priority, parent
  bs.registerCollection(orderItems,1); //1 - priority, child of "0"
  ...
  var batch:Array = bs.batchRegisteredCollections();
  bs.send(batch);
You can use the BatchService
not only with DataCollections, but
also with regular Flex collections. It allows you to batch the execution
of any sequence of remote calls.
Users of the SQL-based branch of CDB benefit from automatic
generation of the required Java functions. Otherwise, your Java DAO has
to implement the interface IBatchTransactionServiceSupport.
If your transaction includes only a data collection, consider
using DataCollection.sync(true),
which further reduces the amount of manually written code required to
perform transactional persistence of associated collections.
By now, you should have a good understanding of how to approach data automation in Flex and BlazeDS, and the next section will show you how to use the headers of the AMF messages that travel with your data in the protocol layer.
Using AMF Message Headers
The data access is automated, and the data gets transferred over the AMF protocol, which, as you may remember, is built on top of HTTP. The next goal is to continue minimizing the amount of coding that application programmers need to do in the client/server communication. For this, we’ll try to modify the existing communications layer by adding to it application-specific information.
Sometimes, certain information needs to be passed from the client
without introducing additional arguments to the application function
calls. For example, if the user ID needs to be passed to the server-side
function getEmployee(), you may avoid
adding a parameter userId to the
function signature. Instead, it can be added to the AMF message on the
protocol level. Besides the user ID, you may need to pass some security
restrictions, application tokens, or the client context—think of HTTP
cookies. Although you might need to add these parameters at certain
execution points, you may not pass them as part of the API.
Though the AMF payload is located in the bodies of the messages that are being sent, you can still add headers to these messages. Here is a quick five-step process:
Define a class to store the data you want to be passed in the message headers—sort of like your own cookies—for example, some operation context (Example 6-18).
Example 6-18. OperationContext.aspackage com.farata.rpc.remoting { import flash.utils.Dictionary; import mx.messaging.messages.IMessage; public final class OperationContext extends Object { public static var globalHeaders : Dictionary = new Dictionary(); public var headers : Dictionary = new Dictionary(); public function _onBeforeInvoke(msg:IMessage):void { var fld:Object = null; for(fld in globalHeaders) msg.headers[fld] = globalHeaders[fld]; for(fld in headers) msg.headers[fld] = headers[fld]; } } }Extend the Flex
Operationclass from the communication layer to append the previous headers on the Remote Method Invocation. OurOperationclass will instantiateOperationContextand will call its method_onBeforeInvoke()every time itsinvoke()method is being called (Example 6-19).Example 6-19. Customized Operation.aspackage com.farata.rpc.remoting.mxml { import mx.core.mx_internal; use namespace mx_internal; import mx.rpc.remoting.mxml.Operation; import mx.rpc.remoting.RemoteObject; import mx.rpc.AsyncToken; import mx.messaging.messages.IMessage; import com.farata.rpc.remoting.OperationContext; public class Operation extends mx.rpc.remoting.mxml.Operation { public function Operation (remoteObject : RemoteObject = null, name : String = null) { super(remoteObject, name); } public var context:OperationContext = new OperationContext(); mx_internal override function invoke(msg:IMessage, token:AsyncToken=null):AsyncToken { context._onBeforeInvoke(msg); return super.invoke(msg, token); } } }To complete the client-side extensions, extend Flex
RemoteObjectand make sure that it uses the extendedOperationinstead of its original one (Example 6-20).Example 6-20. Customized RemoteObject.aspackage com.farata.rpc.remoting.mxml { import mx.rpc.remoting.mxml.RemoteObject; import mx.rpc.AbstractOperation; import mx.core.mx_internal; use namespace mx_internal; public class RemoteObject extends mx.rpc.remoting.mxml.RemoteObject { public function RemoteObject(destination:String=null):void { super(destination); } override public function getOperation(name:String):AbstractOperation { var o:Object = _operations[name]; var op:AbstractOperation = o as AbstractOperation; if (op == null) { op = new Operation(this, name); // extended Operation _operations[name] = op; op.asyncRequest = asyncRequest; } return op; } } }To intercept the additional headers and make them available to the server-side Java programs, create a placeholder for the headers on the Java side and keep the data located in this placeholder in the Java
ThreadLocalobject to avoid a mix-up between different client requests (Example 6-21).Example 6-21. MessageContext.javapackage com.farata.remoting; import java.util.Hashtable; public class MessageContext { public static void setParams(Hashtable session) {sessions.set(session); } public static Hashtable getParams() { return (Hashtable)sessions.get(); } private static ThreadLocalsessions= new ThreadLocal(); }As shown in Example 6-22, modify the AMF endpoint to load the
MessageContextobject upon servicing the client’s requests (don’t forget to specify this endpoint on the AMF channel in the services-config.xml configuration file).Example 6-22. CustomAMFEndpoint.javapackage com.farata.remoting; import java.util.Hashtable; import flex.messaging.endpoints.*; import flex.messaging.MessageBroker; import flex.messaging.config.ChannelSettings; import flex.messaging.messages.Message; public class CustomAMFEndpoint extends AMFEndpoint { public CustomAMFEndpoint() { super(); } public CustomAMFEndpoint( boolean enableManagement) { super( enableManagement); } public Message serviceMessage(Message message) { Hashtable ht = new Hashtable(); ht.put("context", message.getHeaders()); MessageContext.setParams(ht); return super.serviceMessage(message); } }Once the system part is done, you can set the properties on the
OperationContextobject in your application code, just like this:OperationContext.globalHeaders["name"] = "john".
On the Java side, you can retrieve headers sent from the client by retrieving the corresponding parameter(s) from the
MessageContextobject:public String helloUser() { Hashtable ht = MessageContext.getParams(); String userId = (String)context.get("name"); return "Hello, " + userId; }
Data Push in Data Access
To give you an example of BlazeDS at work, we’re going to revisit the Café Townsend application and bring it even closer to reality. It’s great that the Café owner’s wife can populate (and update) employee data from a database, but in the real world of enterprise applications, more than one user often must work with the same data.
Say that users A and B have populated the employees’ data, and user B decides to update a record in the database. Will user A be notified about this change, or will she keep working with stale data?
You want multiple users to be able to update the table Employee simultaneously and
to promote the data changes to other users
instantaneously. Such data synchronization is
available with LCDS Data Management Services, and with adjustments, you
can achieve similar functionality using the open source implementation of
AMF as well.
To start, examine the Assembler
class that will be working closely with EmployeeDAO. As you can see in Example 6-23, the Java code takes
all the changes submitted by any user and broadcasts them to all clients
subscribed to the destination com.farata.datasource.Employee.getEmployees.
package com.farata.datasource;
import java.util.*;
import flex.messaging.MessageBroker;
import flex.messaging.messages.AsyncMessage;
import flex.messaging.util.UUIDUtils;

public final class EmployeeAssembler{

 public  List /*EmployeeDTO[]*/  getEmployees() throws Exception        {
  return new EmployeeDAO().getEmployees();
 }

 public final List getEmployees_sync(List items)        {

    List result = new EmployeeDAO().getEmployees_sync(items);

   MessageBroker msgBroker = MessageBroker.getMessageBroker(null);
   AsyncMessage msg = new AsyncMessage();
   msg.setDestination("com.farata.datasource.Employee.getEmployees");
   msg.setClientId(UUIDUtils.createUUID(true));
   msg.setMessageId(UUIDUtils.createUUID(true));
   msg.setTimestamp(System.currentTimeMillis());
   msg.setBody(result);
   msgBroker.routeMessageToService(msg, null);

    return result;
 }

 public  List /*DepartmentDTO[]*/  getDepartments() throws Exception{
  return new EmployeeDAO().getDepartments();
 }
}
Next, you need to receive these messages on the client and apply the changes. As you can see in Example 6-24, the Flex client receives the changes via subscription and applies them (the subscription name is a destination name).
private var _subscription : Consumer ;
private var _subscriptionName : String ;

public function set feed( subscriptionName : String ) : void {
   _subscription = new  Consumer();
   _subscription.destination = subscriptionName;
   _subscription.addEventListener("message", messageHandler );
   _subscription.subscribe();
   _subscriptionName = subscriptionName;
}

public function get feed() : String {
   return _subscriptionName;
}

protected function messageHandler(ev:MessageEvent):void
{
   if ( ev.message.body is ChangeObject)
      processChange(ev.message.body as ChangeObject) ;
   if ( ev.message.body is ArrayCollection)
     for (var i:int = 0; i<ev.message.body.length; i++)
      processChange(ev.message.body[i] as ChangeObject) ;
   }

protected function processChange( co : ChangeObject) : void {

switch ( co.state) {
   case ChangeObject.CREATE:
      addItem(co.newVersion);
      break;
   case ChangeObject.DELETE:
      var uid:String = co.previousVersion.uid;
      for ( var j :int = 0; j < length; j++ ) {
         if(getItemAt(j).uid == uid) {
            removeItemAt(j);
            break;
         }
      }
      break;
   case ChangeObject.UPDATE:
      uid = co.newVersion.uid;
      for ( j  = 0; j < length; j++ ) {
        if(getItemAt(j).uid == uid ) {
        var item: EventDispatcher=getItemAt(j) as EventDispatcher;
             item["properties"] = co.newVersion["properties"];
                     // notify the UI of the change
             item.dispatchEvent(
                  PropertyChangeEvent.createUpdateEvent(item,"any","x","y"));
         break;
         }
      }
      break;
   }
}
Example 6-24 is a
simplified code snippet of updating the client content based on the data
pushed from the server. It assumes that the function getItemAt() works with the data collection that
needs to be updated. It does not deal with conflicts or application of
concurrent changes, because this part is application-specific and has to
be enforced based on the best strategy to avoid conflicts rather than
forcing the user to deal with them—either via record locking or multistage
update.
Note
The code of Example 6-24
depends upon the uid value of the
DTO. You need to make sure that a unique, consistent ID is being used by
every user. The simplest way to do it is by mapping uid to the database primary key on the server
side.
You can also use a data push to implement the background retrieval
of the large data sets. All you need to do is to push the retrieval
results as ChangeObjects with the
CREATED flag on.
A Server As a Command Center
Strange as it sounds, a clock is another excellent example of streaming. Using a streaming AMF channel to deliver the server time, you can create a clock that updates its display every second. As a bonus, the clock application demonstrates another useful concept: the reverse remote procedure call (RPC).
Reverse RPC
A remote procedure call is when a client
invokes a function on the server-side object. For example, you can
create an instance of the RemoteObject that points at a destination (a
Java class) configured in the server-side BlazeDS. Then this Flex client
calls a method on this destination.
The example clock application instructs a server to control the client when it wants, the way it wants. This is a reverse RPC: the server calls a client. Traditional server-side destinations are usually preconfigured in XML files, such as remoting-config.xml; however, you don’t have this luxury on the client. Instead, during runtime you need to pass the name of the client destination, the method to call, and an array of parameters, if any. Here, the AMF protocol becomes quite handy once again. Remember, it offers an easy way to serialize a Java object on the server and deserialize it as an ActionScript object on the client.
If you understand the concept of DTO being an exchange currency between Java and ActionScript, the rest of this section won’t be difficult. Just think outside the box and create a DTO that will carry not some application-specific data (e.g.,the current server time), but the metadata—the name of the destination, a method to call on the client, and its parameters.
Example 6-25 shows the server-side Java DTO that wraps up the data and metadata.
package com.farata.remoting ;
import java.util.*;

public class RemoteCall {
 public String destinationName; // destination configured on the server
 public String methodName;      // method to call on the client
 public List   parameters;      // method arguments

 public RemoteCall(String d, String m, List p) {
      destinationName = d;
      methodName = m;
      parameters = p;
 }
}
When instances of RemoteCall
objects arrive at the client, they are represented as the ActionScript
instances in Example 6-26.
package  com.farata.remoting {
   import mx.collections.ArrayCollection;

   [RemoteClass(alias="com.farata.remoting.RemoteCall")]
   public class RemoteCall {
      public var destinationName:String;
      public var methodName:String;
      public var parameters:ArrayCollection;

     public function RemoteCall(destinationName:String=null,
                          methodName:String=null,
                          parameters:ArrayCollection=null) {

      this.destinationName = destinationName;
      this.methodName = methodName;
      this.parameters = parameters;
       }
   }
}
BlazeDS, with the help of AMF, automatically turns any instance of
RemoteCall.java into an instance of
RemoteCall.as. The big idea is to have the server
push this RemoteCall to the client, which should
obediently call the requested method (the methodName property of the RemoteCall instance) on the specified object
with the provided parameters.
Add the following destination in the message-config.xml file where BlazeDS is deployed:
<destination id="ControlCenter">
  <channels>
   <channel ref="my-streaming-amf"/>
  </channels>
</destination>
Please note that this destination is configured to use the
streaming AMF channel. BlazeDS includes a class,
MessageBroker, that knows how to push
messages to destinations.
At this point, you know that the server will have to create
instances of RemoteCall objects and
send them to the destination called ControlCenter. To do this, simply write
another Java class called ControlCenter.java, as shown in Example 6-27. Note once again that this code sends not
just the data to the client, but also the information about the
RPC.
package com.farata.remoting;
import java.util.*;
import flex.messaging.MessageBroker;
import flex.messaging.messages.AsyncMessage;
import flex.messaging.util.UUIDUtils;

public class ControlCenter {
   private static ControlCenterThread thread;

    //start a new thread to send RemoteCall instances
   public void start() {
      if (thread == null) {
         thread = new ControlCenterThread();
         thread.start();
      }
   }

   public void stop() {
      if (thread != null){
         thread.running = false;
         thread = null;
      }
   }

   public static class ControlCenterThread extends Thread {
      public boolean running = true;

      public void run() {

         MessageBroker msgBroker = MessageBroker.getMessageBroker(null);
         String clientID = UUIDUtils.createUUID();

         while (running) {

                   // create a message object set the destination and
                   // assign unique client and message IDs
            AsyncMessage msg = new AsyncMessage();
            msg.setDestination("ControlCenter");
            msg.setClientId(clientID);
            msg.setMessageId(UUIDUtils.createUUID());
            msg.setTimestamp(System.currentTimeMillis());

                   // Create an array of parameters to be used as
                   // arguments for the setTime() function call
            ArrayList params = new ArrayList();
                   // Add current system time
            params.add( new Date()); //

                   // Create RemoteCall wrapper an use it as the message body
            msg.setBody(new RemoteCall("clock", "setTime", params));
            msgBroker.routeMessageToService(msg, null);

            try {
                        // pause the loop for one second
               Thread.sleep(1000);
            } catch (InterruptedException e) {      }
         }
      }
   }
}
The CallCenter program creates
and starts a separate thread named CallCenterThread that every second creates a
new instance of the RemoteCall, puts
it into the message body of AsyncMessage, and using the MessageBroker publishes it to the destination
called ControlCenter.
The Flex client shown in the following example creates a consumer
object and subscribes it to the destination ControlCenter.
We borrowed the code for the alarm clock UI from Adobe’s manual on programming ActionScript 3. This example was used there for explaining events (see http://livedocs.adobe.com/flex/3/html/help.html?content=16_Event_handling_7.html). For your convenience, we’ve included this code in Flash Builder’s project NetworkingSamples, which contains all examples from this chapter.
In Example 6-28’s Flex application
you can find the consumer that is ready to consume messages from the
destination ControlCenter.
RemoteObject is used to start or stop the server-side
feed.
<?xml version="1.0" encoding="utf-8"?>
<mx:Application xmlns:mx="http://www.adobe.com/2006/mxml"
   xmlns:remoting="com.farata.remoting.*"
   xmlns:example="com.example.programmingas3.clock.*"
   creationComplete="co.subscribe()" layout="vertical" horizontalAlign="left">

  <mx:Consumer destination="ControlCenter"  id="co"
     message="handleMessage(event.message)"/>

  <mx:RemoteObject destination="ControlCenterRO" id="ro"/>
   <mx:Button label="Start" click="ro.start()"/>
   <mx:Button label="Stop" click="ro.stop()"/>
   <mx:Label text="Time"/>   <mx:Label width="259" id="serverClock"/>
   <example:SimpleClock id="clock" creationComplete="clock.initClock()"/>

 <mx:Script>
 <![CDATA[
   import com.farata.remoting.RemoteCall;
   import mx.messaging.messages.IMessage;

   private function handleMessage(msg:IMessage) : void {
      if (msg.body is RemoteCall) {
         var rc:RemoteCall = msg.body as RemoteCall;
         this[rc.methodName].apply(this, rc.parameters.source);
      }
   }

   public function setTime( d:Date) : void {
      serverClock.text = d.toTimeString();
      clock.setTime( d);
   }
]]>
</mx:Script>
</mx:Application>
When the consumer receives the message, the function handleMessage() extracts the instance of
RemoteCall from the message body and
calls the method whose name is located in the property RemoteCall.methodName:
var rc:RemoteCall = msg.body as RemoteCall;
this[rc.methodName].apply(this, rc.parameters.source);
In Example 6-28, this [rc.methodName] gets the reference to the
Function object based on the received
name, which is setTime() here. Then
the function apply() calls this
method, passing parameters contained in the RemoteCall object.
This technique is yet another way to implement the Command design
pattern, but here the server publishes a message that is a command to
the client to call a function specified in methodName.
Extending the Protocol
Although this technique of making RPC calls from the server is pretty cool, you can make it even better by hiding the processing of the received messages at the protocol level, so that the application developers will use this enhanced consumer without needing to know how it works under the hood.
First, extend the AMF endpoint and move the consumer portion into
the new class RemoteStreamingChannel,
which extends the standard StreamingAMFChannel, which will be responsible
for filtering and executing remote procedure calls.
Note the meta tag [Mixin] in
Example 6-29. In Flex, it’s used to
ensure that a static initializer’s code located in the method init() will be executed as soon as the SystemManager becomes
available.
package com.farata.messaging.channel{
   import com.farata.remoting.RemoteCall;

   import flash.utils.Dictionary;
   import mx.managers.ISystemManager;
   import mx.messaging.Consumer;
   import mx.messaging.channels.StreamingAMFChannel;
   import mx.messaging.events.MessageEvent;
   import mx.messaging.messages.IMessage;

   [Mixin]
   public class RemoteStreamingChannel extends StreamingAMFChannel{

      public static var destinations:Dictionary = new Dictionary();

      public function RemoteStreamingChannel(id:String=null, uri:String=null){
       super(id, uri);
       this.addEventListener(MessageEvent.MESSAGE, filterAndInvoke,false,1);
      }

         // if the receieved message is an instance of the RemoteCall,
         // get the destination and call the passed method on it
      protected function filterAndInvoke( evt:MessageEvent ) : void {
         var msg : IMessage = evt.message;
         if (msg.body is RemoteCall) {
            var rc:RemoteCall = msg.body as RemoteCall;
            var destination : Object = destinations[ rc.destinationName];
            if ( destination )
               var result:* =
            destination[rc.methodName].apply(destination, rc.parameters.source);
            else
                        //log the error
               trace( "missing destination " + rc.destinationName );
            evt.preventDefault();
         }
      }

      public static function init( systemManager:ISystemManager ) : void {
         //stub for static initializer
         var c:Consumer = new Consumer();
         c.destination = "ControlCenter";
         c.subscribe();
      }
   }
}
If the code in Example 6-28 was
calling the specified function on the this object, you can make it more generic by
specifying the destination object on the client and calling the function
on it:
destination[rc.methodName].apply(destination, rc.parameters.source);
To let BlazeDS know that you want to use this endpoint on the
client instead of the original StreamingAMFChannel, change the channel
configuration in services-config.xml (Example 6-30).
<channel-definitionid="my-streaming-amf"
      class="com.farata.messaging.channel.RemoteStreamingChannel">
<endpointurl="http://{server.name}:{server.port}/{context.root}/messagebroker/
              streamingamf"
class="com.farata.nioblaze.messaging.endpoints.NioAmfEndpoint"/>
</channel-definition>
The application in Example 6-31 uses the new channel.
<?xml version="1.0" encoding="utf-8"?>
<mx:Application xmlns:mx="http://www.adobe.com/2006/mxml"
   xmlns:remoting="com.farata.remoting.*"
   xmlns:example="com.example.programmingas3.clock.*"
   creationComplete="RemoteStreamingChannel.destinations['clock']=simpleClock;"
    layout="vertical" horizontalAlign="left">

    <mx:RemoteObject destination="ControlCenterRO" id="ro"/>
   <mx:Button label="Start" click="ro.start()"/>
   <mx:Button label="Stop" click="ro.stop()"/>

    <example:SimpleClock id="simpleClock" creationComplete="clock.initClock()"/>

 <mx:Script>
 <![CDATA[
   import com.farata.messaging.channel.RemoteStreamingChannel;
 ]]>
 </mx:Script>

</mx:Application>
Upon the creationComplete
event, this application assigns the SimpleClock object as the client destination
of all that goes under the name clock:
RemoteStreamingChannel.destinations['clock']=simpleClock;
The server-side sender from Example 6-27
is sending a command to call the function setTime() of the destination clock, which is
now mapped to the instance of the SimpleClock
component:
msg.setBody(new RemoteCall("clock", "setTime", params));The destination clock was not used in the MXML application shown
in Example 6-28, which was calling the
function setTime() on the this object no matter what. But the more
generic application shown in Example 6-31 explicitly routes the
server calls to the destination clock.
And the clock (Figure 6-9) is ticking, driven by the reverse RPC calls from the server.
Now you own a communication channel on both the server and client sides and you’re ready to program high-level protocols.
Custom Serialization and AMF
AMF is a very efficient protocol, and part of that efficiency is
thanks to the strict rules for supporting a limited set of data types in
an optimized way. One of the most frequent cases in which it needs to be
customized is when you have to work with non-UTC Date and Time. UTC stands for Coordinated Universal
Time.
First, you need to understand how Flex deals with transfer of the
Date objects. Dates are always
transferred to/from Flex clients as UTC Date, where no time zone information is
available on the object. Translation to the UTC/local time happens
automatically on the AMF protocol level, which adds the client time zone
offset to the incoming dates and subtracts it from outgoing
ones.
The server does not know about the client’s time zone; it always operates in UTC time. This means that if a user from New York City entered 1:00 p.m. as the time, a user in Denver, Colorado, will see it as 11:00 a.m. In some applications, such behavior may be desirable, but this is not the case in a global application in which the users can be located around the world.
The user wants to enter the time in the client’s local time; 1:00 p.m. will be 1:00 p.m. regardless of the time zone of the person who entered this time.
For example, requests for an appointment for the installation of the local TV cable service may be handled by a call center located on the other side of the globe. Ashish from the call center talks to you, and if you agreed to see the cable guy at 10:00 a.m., he enters 10:00 a.m. in the application. By the way, the server can be located in yet another time zone. This should be irrelevant for the distributed RIA.
Such an application has to operate without the use of time zones,
or, for that matter, in one time zone. This can be done either on the
server side by keeping the client time zone information in the session and
adjusting the dates on each transfer or by communicating the date as a
String. In either case, it requires
additional application code that should be added in multiple places that
deal with dates.
However, there is more elegant solution if, during data transfer,
you’ll be using the ActionScript metadata tag transient. Examine Example 6-32, which contains the code of an ActionScript DTO
called LineItemDTO.
package com.farata.datasource.dto{

import flash.events.EventDispatcher;

[RemoteClass(alias="com.farata.datasource.dto.LineItemDTO")]
[Bindable(event="propertyChange")]

 public class LineItemDTO extends EventDispatcher {
   private var _myDate : Date;

    // myDateUTC is not to be used on the client
   protected function get myDateUTC() : Date {
     return _myDate==null? null:
     new Date(_myDate.valueOf() - _myDate.getTimezoneOffset()*60000);
   }

    // myDateUTC is not to be used on the client
   protected function set myDateUTC( value : Date ):void {
   var oldValue:Object = _myDate;
   if (oldValue !== value) {
      this._myDate = value == null? null:
         new Date(value.valueOf() + value.getTimezoneOffset()*60000);
   }
 }

[Transient]
 public function get myDate() : Date {
   return _myDate;
 }

 public function set myDate( value : Date ):void {
   var oldValue:Object = this._myDate;
   if (oldValue !== value) {
      this._myDate = value;
    dispatchUpdateEvent("myDate", oldValue, value);
   }
 }
On the server, its Java twin may look like Example 6-33.
package com.farata.datasource.dto;

import java.io.Serializable;
import java.util.*;

 public class LineItemDTO implements Serializable{
  transient public java.util.Date myDate;

  // This getter is serialized as a property myDateUTC
  public java.util.Date getMyDateUTC() {
     return myDate;
  }

  public void setMyDateUTC(java.util.Date value){
     this.myDate = value;
  }
}
Please note the use of the keyword transient, which server-side JVM interprets like
this: “Don’t serialize the value of this member variable when you’ll be
sending the LineItemDTO instances over
the wire.”
On the other hand, when JavaBean LineItemDTO.java gets serialized, the word
get gets cut off from the getMyDateUTC and arrives as a myDateUTC property of the object LineItemDTO.as, where it’s
automatically converted into the UTC Date.
That’s all there is to it. You have normal public variables on both
sides, and AMF serialization works transparently, keeping the Date and Time
values in the UTC zone on both sides (you also need to set the JVM time
zone to UTC), and now you are always operating in the server’s time
zone.
This code will work in any implementation of the AMF protocol: BlazeDS, LCDS, OpenAMF, WebORB, GraniteDS, and so on.
Armed with this knowledge, reevaluate your needs for local versus global time to avoid the follow-up calls from the call center in India at 2:00 in the morning.
Even though this example uses custom AMF serialization for dates, you may use the same technique to provide custom serialization for any other application-specific objects.
Security Appliances
Once you’ve developed and tested your Flex application locally, and you’re ready to share it with the rest of the world, you need to move it to a secured hosting environment. Usually, for simplicity and performance, enterprises deploy Java EE servers behind standalone SSL accelerators and load balancers. Sometimes it’s just an Apache server or similar appliance.
This means that the client sends the data via an SSL channel to such an SSL appliance configured on the edge of a firewall. The appliance authenticates the user and maintains the session, and in turn calls the application server running on the intranet via unsecured HTTP to minimize the CPU load on the application server.
In this setup, you have to use a secured endpoint on the client side and an unsecured endpoint on application server. You can configure the channel to use such a pair of endpoints in the services-config.xml file of BlazeDS, but this would require separate builds and configuration files for external and internal deployments. As an alternative, you might want to switch the channels and endpoints dynamically during the runtime, based on which protocol is being used: HTTP or HTTPS.
During the preInitialize event of
the Flex application, you can apply a regular expression and find out
whether it was started via a secure or nonsecure protocol (Example 6-34).
import mx.messaging.config.ServerConfig;

private function preinitializeApplication() : void {

   const reUrl:RegExp= /(http|https)://(([^:]+)(:([^@]+))?@)?([^:/]+)(:([0-
   9]{2,5}))?(/([w#!:.?+=&%@!-/]+))?/;

   const appUrl:String = Application.application.url;

   const parts:Array = reUrl.exec(appUrl);

   if (parts!=null)
      if (parts[1] == "https" )
      {
         const channels:XMLList = ServerConfig.xml..channels.channel;
         for (var channel:String in channels) {
            if (channels[channel].@type=="mx.messaging.channels.AMFChannel")                {

               channels[channel].@type="mx.messaging.channels.SecureAMFChannel";
               var endpoint : XML = channels[channel].endpoint[0];
               var uri:String = endpoint.@uri
               uri = uri.replace( /^http:/, "https:" );
               uri = uri.replace( /{server.port}/, "443" );
               endpoint.@uri = uri;
            }
         }
      }
}
This code checks to see whether the application is executed over the
secure HTTPS protocol. If it is, the code goes through the ServerConfig singleton and updates the channel
specifications to use a secured endpoint, the HTTPS protocol, and port
number 443 on the web server. Because the client executes this code, you
can have a single configuration point for a variety of deployment
options.
Third-Party Networking Solutions
AMF is an open protocol, and various vendors offer their implementations. Your RIA may or may not use Java on the server side, and you may consider the following alternatives to BlazeDS, which are available as open source projects or offered by third-party vendors:
- WebORB
This family of products by the Midnight Coders includes implementations of AMF for Java, .NET, Ruby on Rails, and PHP. WebORB offers the best reliability and performance for these platforms, and it is free. Its .NET stack is the most impressive one, as it offers full-featured messaging, RTMP support, data push, and the best .NET integration. The Java stack of WebORB is similar to the BlazeDS offering; it also uses Red5 for RTMP/multimedia integration.
- RubyAMF
- AMFPHP
- PyAMF
- Granite Data Services
Granite Data Services (GDS) is a free open source package that offers functionality similar to LCDS. It caters to developers who use Flex and AMF to communicate with server-side POJOs and such Java technologies and frameworks as Enterprise JavaBeans 3 (EJB3), Seam, Spring, and Guice. It also features Comet-like data communications with AMF, as well as Tide, a framework that positions itself as an alternative to Cairngorm, combined with the Data Management Services offered by LCDS.
- Red5
An open source Flash server, Red5 supports RTMP and AMF remoting and streaming of audio and video. Red5 is written in Java and can be installed on any platform that supports Java. Even though typically Red5 is considered to be an alternative to Flash Media Server, you may also start using it as an alternative to BlazeDS. You can use either a standalone version of Red5, or deploy it in the Java servlet container as a web application archive (WAR) file. (At the time of this writing, Red5 has not been officially released and is at version 0.9 Final.)
Summary
This chapter covered a lot of ground. Not only did you learn how
data can travel between Flex and Java using the AMF protocol, but you also
learned how to automate the coding of the objects that are being
transported by AMF. You got familiar with the internals of the pretty
powerful DataCollection object, and
went through a set of code fragments that illustrate various techniques
applicable to creating a data synchronization solution based on Flex
remoting.
The authors of this book have created and made available a fully
functional version of such a DataCollection object, and we’ve provided the
reference to its complete code on SourceForge. You’ll revisit DataCollection in Chapter 9, where its subclass, OfflineDataCollection, will do a good
job synchronizing data between the local and remote databases in an AIR
application. Finally, you’ve learned yet another advanced technique for
pushing the data from the server to the client, via the AMF protocol
implemented in BlazeDS and making reverse RPC calls.
And the most exciting part is that in this chapter we’ve been using only open source solutions!