
7
Equipment Efficiency: Availability, Quality, and SMED
It has become increasingly important to manufacture products economically in smaller and smaller batches. On the one hand, new management philosophies demand that product lead times (both development and then manufacturing times) are kept as small as possible. On the other hand, product customization has increased, thereby increasing the number of parts in a product family. As a result, batch sizes have been reduced and continue to shrink.
In this context, companies should be as agile and flexible as possible. Part of the required agility is to reduce machine setup times to minutes instead of hours. Unless setup time can be reduced significantly, it will be difficult to produce small batches and reduce lead time economically.
The single-minute exchange of dies (SMED) methodology, as it is called, is a clear, easy-to-apply methodology that has produced good results in many cases very quickly and amazing results in some other cases. The SMED methodology was developed by Shigeo Shingo in Japan from 1950 to the 1980s. With this methodology, it is possible to achieve good results without costly investments, which makes implementation in many factories an easy decision to make.
SETUP PROCESS
A setup process corresponds to the time required to go from the end of the last good part from one batch to when the first good part of the following batch is produced. Using this definition, the trials needed to obtain the first good product are considered part of the setup process and therefore must be studied, analyzed, and improved.
The SMED methodology is designed so that the setup process can be done in fewer than 10 minutes. During the 1960s in most automotive body shops, press changeover was consuming a large part of the available production time. It was not unusual for the setup time for a large stamping press to take more than a full day. This was Shingo's first focus, and his hope was to bring the setup times down to a few minutes.
In most cases, it is not possible to reach this objective, although it is possible to achieve reductions of around 60 percent of the original setup time. In several cases, reductions of about 90 percent have been obtained, but as a general rule, project costs become significant in obtaining these gains.
It is also necessary to point out that it will not always be necessary to reduce the machine setup process, and even an 8-hour machine setup process can be acceptable under certain circumstances. For instance, when you are replacing the tires on your personal vehicle, what does it matter if it takes an hour to change all four tires? However, in car racing (Formula 1 or NASCAR), losing 15 seconds may have very catastrophic consequences for the driver's success.
Reduction of the setup process is addressed in the just-in-time (JIT) and the 20 keys methodologies (key number 5), as shown in Fig. 7.1.
SMED implementation improves the availability rate as well as the quality rate because SMED reduces all the setup process time. This setup time includes the trial phase for qualifying the first good piece to follow setup. Therefore, startup losses included in the quality rate are produced in this trial phase (Fig. 7.2).
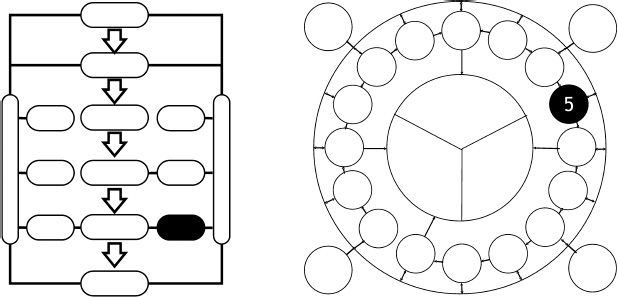
Figure 7.1. Location of setup process reduction in just-in-time and 20 keys diagrams.

Figure 7.2. SMED improves the availability and quality rates.
THEORETICAL BASIS
Basic Steps in a Setup Process
Before embarking on an in-depth discussion of the SMED methodology, it is necessary to describe the stages that make up a general setup process. Regardless the type of the machine or equipment that is going to be studied for setup evaluation and reduction, the following classification can be used to distinguish the four typical classes of setup operations:
- Prepare, adjust, and check (new materials and tools).
- Remove old tooling and install new tooling on the machine.
- Measure, set, and calibrate (fixtures, tools and tooling).
- Produce initial parts (production trials) and adjust the machine.
These activities occur for any setup, whether they are significant (from a time and labor viewpoint) or not, and the relative proportion of time required for each type of setup operation can vary significantly. The prepare, adjust, and check operation focuses on making sure that the tools and materials that will be used for setup are available when the setup is scheduled and that idle time will not occur while the new setup material is being accumulated. The produce initial parts and adjust the machine operation depends, in most cases, on the setup specialist's know-how and therefore can be difficult to predict with precision.
Traditional Strategies to Improve the Setup Process
For early manufacturing applications, the duration of the setup process was not particularly important. Manufactures could afford to have customers waiting for their products (e.g., the next model year of a car), and production was scheduled based on manufacturing needs, so these setups hardly affected the product's price. For instance, for early automotive production, it was not unusual for a production facility to shut down for 2 weeks while machines and tools were setup for new model year production.
Today, manufacturing lot sizes have decreased. This reduction in lot size does not mean that customer demand has shrunk but rather that individual needs and expectations have increased. This points directly to the fact that manufacturing flexibility needs to increase. That is to say, if several years ago a customer requested 50,000 of a specific part, today the same quantity of parts may be requested but in increased variety and with smaller delivery quantities, which forces manufacturers to produce in smaller lots.
Unfortunately, the possible production of defective parts at setup, coupled with the increased frequency of setup, has forced manufacturers to make more products than required and in many cases store them for future orders, i.e., build to stock. For example, let us suppose that an order for 500 parts is made; the setup process takes 3 hours to get the press ready, and the defects rate is 6 percent. The machine will be scheduled to produce 530 parts to cover the possible defective parts. If the 530 parts were acceptable, it would be necessary to store 30 parts, with the related inventory costs.
In order to reduce setup process effects, companies usually use two different strategies:
- They try to make the setup as fast as possible.
- They increase the production lot size.
Skill Based Strategies. Many companies have used setup specialists to reduce changeover and setup times. These special workers are skilled in the operation of specific machines, and they are familiar with the needed tools and methods to carry out the exchange (Fig. 7.3). In some cases, a company's dependence on these specialists is so strong that the exchange has lasted more than 8 hours because the specialist did not work on the shift in which the exchange was needed.

Figure 7.3. Skilled strategy tries to make the exchange faster.
The amount of skill that a setup specialist needs for placing and removing machine elements, as well as the complexity of the setup process, seems to make improvements in the exchange more difficult on some machines. However, not all the tasks that setup specialists carry out are critical, and the specialist can get help from the machine operator, making the setup process faster and easier.
Large-Batch-Based Strategies. This strategy is based on the idea that the larger the batch size, the smaller the impact of the setup time will be on the production cost of each part. Cost per part is based on the company cost-estimation system. The system shares all company costs (direct and indirect costs, raw material costs, etc) with each product.
Regardless the cost-estimation system, there is a section in the cost per part that depends on the time to manufacture a single part as well as on its respective setup time. This time is called TM:

If the lot size is large, the setup time effect is spread out more than if the lot size is small. As a result, TM decreases according to batch-size increase, as shown in Table 7.1.
TABLE 7.1. Effect of Setup Time on Production Time

TM is proportional to the setup time. The higher the setup time, the bigger the profit, as is shown in Table 7.2.
This reasoning supports the lot size increasing. Some companies only accept orders that exceed certain lot sizes to make production with setup profitable. In many cases, a company cannot choose not to supply a product, and it is necessary to manufacture smaller lots.
In the preceding case, if setup time and production time were about the same, setup expense would not dominate the times, as shown in the tables. In that case, the time saved would be minimal (Table 7.3), and therefore, it would not make sense to search for large lots size.
Economic Lot Size Strategy. From the previous discussion, one can infer that when setup times are large, manufacture batch size also should be large. However, this policy ignores the increase in inventory cost and potential loss from products becoming obsolete.
The economic lot size is not more than a direct relationship between the inventory cost and the setup cost. This traditional formulation can be found in any book that contains inventory management techniques. In all these methods, the effect of the setup cost decreases exponentially according to the increase in batch size. Therefore, in order to calculate the economic lot size, it is supposed that the setup cost is constant; i.e., the setup time is constant.
This traditional starting hypothesis is based on a constant setup time, i.e., it is not possible to reduce the setup time. More often than not, though, setup time can be reduced (Fig. 7.4).
As setup cost decreases, the economic lot size also would decrease until the unit product lot size is reached; i.e., it would be profitable to only accept orders made up of one article—a batch size of one!
SMED METHODOLOGY
In 1950, Shingo discovered, in the Toyo Kogyo factory, that the exchange of an 800-ton press was delayed because of a missing screw.
TABLE 7.2. Effect of Large Setup Time in Production Time

TABLE 7.3. Effect of Short Setup Time in Product Cost

He understood then that two types of operations should make up the process of change:
- Operations that can be carried out with the machine running and producing parts for the previous lot. Shingo called these types of activities external setup.
- Operations that required the machine to be idle while they were performed, Shingo denoted those operations as internal setup.
In 1957, Shingo improved the SMED methodology when he realized that placing an extra table on a Mitsubishi Company machine significantly reduced the setup time. Shingo discovered that it was possible to convert some of the internal setup tasks to external setup operations.
The SMED methodology consists of four conceptual stages (Fig. 7.5), with the first corresponding to documenting the setup activities or the current exchange study, as it is called. Thanks to the SMED application, Shingo reduced the setup time for a screw machine manufacturer from 8 hours to 58 seconds and at the Mitsubishi Company from 24 hours to 2 minutes and 40 seconds for press setup.
Preliminary Stage
This first stage the SMED methodology consists of studying the current setup process because, simply put, “what is unknown cannot be improved” (Fig. 7.6). It is necessary to know the process, its variability, and the cause(s) of this variability.

Figure 7.4. Decreasing lot size based on the reduction in setup cost.
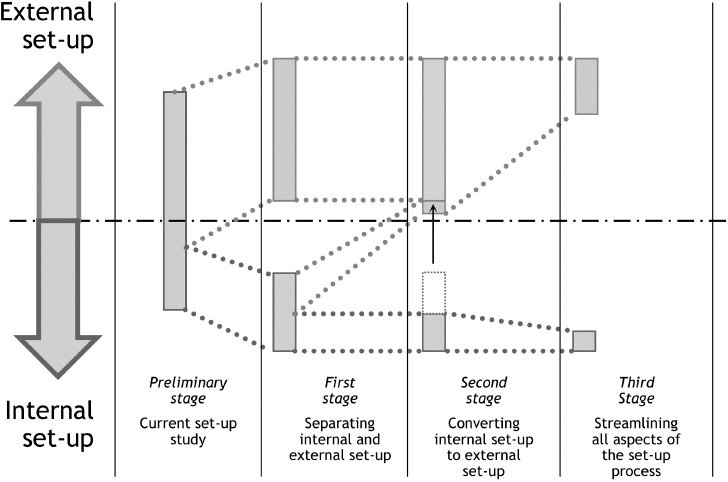
Figure 7.5. SMED methodology and its impact on the setup process. Reprinted with permission from A Revolution in Manufacturing: The SMED System. English translation copyright © 1985 by Productivity Press, a division of Kraus Productivity Ltd. www.productivitypress.com.
Therefore, in this stage, it is necessary to collect data on the setup times. In some companies, setups are frequent, and it is simple to carry out several measurements. In other companies, the setups can be sporadic, and therefore, it is necessary to get as much information as possible from limited data, with only one or two setup process studies. Setup data acquisition consists of process modeling, and then, by means of the time-study process, as explained in Chap. 3, each activity is measured. In fact, a setup process is no more than a group of operations.
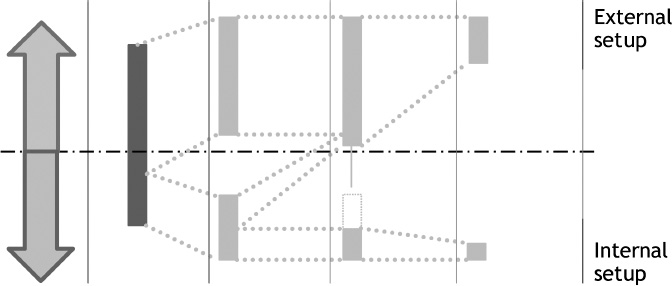
Figure 7.6. SMED preliminary stage.
It is important when beginning such a study to clarify, mainly to the setup specialists (if the company has this kind of worker), that the goal of the SMED methodology is not to eliminate their job. A specialist always will be necessary for certain tasks. Sometimes, the opposition of setup specialist can lead to project failure, so special care should be taken to make sure that these skilled technicians do not feel threatened.
Stage 1: Separating Internal and External Setup
The first stage consists on separating the operations that should be carried out when the machine is still processing the previous lot (external setup) and those where it is necessary to carry out setup with the machine stopped (internal setup). The goal of this stage is to classify setup operations according to the given definitions of external and internal setup (Fig. 7.7). This classification takes into account the same operations and duration included in the current method, i.e., without improving any particular operation.
In addition, in this stage it is necessary to ensure that the operations defined as external setup all can be carried out while the machine is running. At first, this seems obvious, but it is always worth explaining to the worker that the necessary tools for the changeover setup and the new die should be prepared beforehand so that production time can be gained.
In practice, it is not unusual for the external activities to begin until after a batch has been completed. The main reason for this is that time to get the tools and materials necessary is not allocated to operators while they are overseeing production operations.

In this stage, the largest SMED cost gains can be achieved. It is not unusual to reduce the exchange time by as much as 60 percent in some cases without any capital investment.
Stage 2: Converting Internal Setup to External Setup
The setup process time reduction from the first stage can be very significant, but this is not where SMED ends (Fig. 7.8). To reduce setup time as much as possible (or economical), it is necessary to study the possibility of converting some internal setup operations into external setup operations so that they can be carried out while the machine is running.
This stage examines two important aspects of the operation:
- Reevaluate the internal setup operations to check to see if some of them were considered internal erroneously.
- Look for alternatives that allow internal setup to be carried out in whole or in part as external operations, with the machine working. For example, is it possible to screw a die to a press before placing it inside the press chamber? The answer is yes.
Logically, most of the ideas that arise in stage 2 will require an economic investment, and it will be necessary to carry out a cost justification to determine the best strategy. It is necessary to distinguish the case in which the investment is necessary despite the economics, i.e., in the case where a company could lose an important customer if delivery time cannot be reduced.
In order to decide on an alternative's viability, it is necessary not only to analyze the economics but also to study the new process or system reliability, i.e., the possible appearance of new operations (both internal and external) that increase the setup time and, of course, the benefits and possible risks of the new process.

Figure 7.8. SMED second stage.
Development of this stage can achieve, in some cases, setup process times nearing single minutes (<10 minutes).
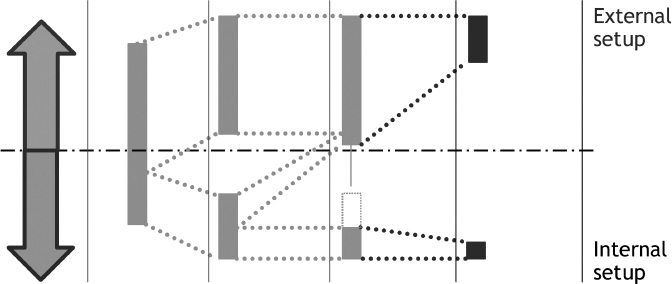
Stage 3: Streamlining All Aspects of the Setup Process
This stage attempts to improve all the setup operations, both internal and external, reducing their duration or even, if possible, trying to eliminate some operations (Fig. 7.9). Although the SMED methodology recommends that one follow these four stages systematically, common sense sometimes can dictate that in the second stage, time and money will not be invested in operations that have not been previously optimized.
For this reason, application of the third stage usually runs parallel to the second stage, leaving a final stage 3 for the improvement in the external setup operations and a revisit of the internal activities that have not been possible to convert into external.
SMED TOOLS
First-Stage Tools
It seems logical that one should know what operations should be conducted while the machine is still processing the previous lot. Unfortunately, much time wasting takes place in many setup processes. For instance:
- Materials are moved to the warehouse with the machine stopped.
- Tools and dies are supplied late or incorrectly.
- Tools and dies that are not needed are taken back to the supply room before starting the machine.
- Some needed screws and tools were not collected during the setup process.
- Some nuts are just too tight when one attempts to remove them.
It is necessary to eliminate all these wastes before starting the setup. Some good questions to ask include
- What has to be done before starting the change?
- How many screws are necessary to fix the die? Of what type?
- What tools are necessary? Are they prepared properly?
- Where should the tools be placed after using them?
In order to facilitate this checking process, a group of visual controls has been developed to ensure that the needed operations are carried out before starting the setup (Fig. 7.10).
Checklist. This tool consists of a questionnaire that should be checked before each setup process. The goal of the checklist is to verify in advance that all elements that should be prepared before the machine finishes the current lot are in fact ready and available. The checklist can be universal for all product changeovers or specific for each product. In the first case it will be placed near the machine, whereas in the second case it will be enclosed with the manufacturing order.

Figure 7.10. Visual control is the most important first-stage tool.
Check Panel. If the number of tools is small, or if the machine has its own tools, a check panel can be placed next to the machine (Fig. 7.11). Using this tool has many advantages. For example, the worker can visually check if all the necessary tools are located in the right place or if a needed tool is missing. In some check panels, the tools are silhouetted so that a missing tool is very obvious to the worker. Another strategy is to code the tools with two stickers. A sticker is placed on the machine and another is placed on the tool in order to pair the tool with the machine.
Function Checks. The checklist or the check panel do not show the die and tools status. Some plastic injection molds have material inlays that should be cleaned. If they are discovered in the trial step, cleaning of the mold can be carried out before the machine is stopped.
There are special devices for checking the molds before placing them in the machine. However, if the company does not own such a device, it might be necessary to invest in one. This possibility should be investigated and analyzed in the second SMED stage.
In other cases, it is better to inspect the mold after many pieces have been manufactured, even though the machine will be idled. Some defects will not be detected until the mold reaches the steady-state operating temperature. To check for this problem, it might be necessary to cool the mold again while inspecting the product, with a corresponding loss of production time.
Part and Tool Transportation Improvements. Part and tool transportation from the warehouse to the work area should be carried out before the exchange begins. In a traditional press exchange process, the worker removes the used mold, loads it in a crane, takes it to the warehouse, and loads the new mold. If the mold is heavy, the transportation movements will be slow, and time will be wasted while the machine sits idle. In order to implement this stage of the SMED methodology, it may require twice the labor, but the machine stop time decreases.

Figure 7.11. An example of a check panel.
For a new changeover process, the worker would go to the warehouse while the machine is working, load the new mold, and return and leave it next to the machine ready to install. The worker then would wait until the machine finishes its work. Once the machine is finished, the worker would take out the mold and leave it next to the machine. After the worker loads up the new mold, he or she would set the machine into operation. Finally, the worker would carry the used mold to the warehouse.
This new changeover appears to take longer than the traditional method. However, according to Shingo's definition of setup time, the time during which the machine is stopped is reduced drastically. As a result, the setup time is reduced.
Second-Stage Tools
It was mentioned earlier that the second stage usually runs parallel with the third stage when an operation is optimized before convertion. However, the SMED methodology offers some recommendations that facilitate complex cases studies. For example, in this second stage, movements around the machine should not be questioned, and they must be considered as internal setup. These movements will be analyzed in the third stage. It is not that some operations will be eliminated in the second stage. However, if waste is evident, they will be eliminated. There are several methods broadly intended to enhance the setup process. Some of these methods, policies, and tools are explained briefly next.
Endless-Material Method. In some processes, reels are used to supply material to a process. When a reel is empty, it should be removed and replaced with a full one, e.g., in a rolling mill or on packing machines. The changeover times for reels potentially could be eliminated if the end of one reel is welded or tied to the beginning of the following one. The machine would work continuously. As a result, setup time would be zero.
In this case, the product made with the welded or tied seam would be scrape. However, this is offset easily by gains made from the reduction in setup time, and in many cases, the last part of the previous reel is also discarded (Fig. 7.12). In some packing lines, the previous process cannot be stopped during reel changes, and some products are scraped, which adds to productions costs and reduces quality.
Temporary Containers. Unfortunately, it is not always possible to weld or tie the material on the reels to facilitate the changeover operation. In this case, there is no other alternative but to stop the machine. Temporary containers (Fig. 7.13) do not convert the whole reel changeover operation to external setup, but they can reduce an important part of it:
- These temporary containers save setup time considerably because they eliminate the movements involved in locating and bringing in the new reel.
- If the reels allow, it might be possible to tie the previous reel with the following reel and with a simple turn carry out the exchange. This operation increases time savings.
Press-Die Preheat. In most plastic injection-molding processes, the mold has to reach a specific temperature to begin the manufacturing process. There are devices that heat such molds up before they are placed in the machine. The main concern in this case is worker safety. Manipulating hot molds represents a very dangerous task. Nevertheless, it is possible to preheat the mold to a moderate temperature, reducing the time needed for the mold to reach the working temperature once the mold is placed into the machine and thus making the process safer for the worker.

Figure 7.12. Example of an endless material method.

Figure 7.13. Example of a temporary container.
Function Standardization. A good way to convert certain mold requirements, such as height and depth adjustments, of some presses and injection-molding machines into external operations is to standardize these measures, e.g., the injector distance for an injection-molding processes (Fig. 7.14). Only the most important components for the exchange will be standardized, taking into account two main conditions:
- The setup process should be as safe as before.
- The quality of the manufactured pieces should not be adversely affected.
Sometimes, when standardizing a particular measure, it will be necessary to develop a new device. This can be the right time to add new functionalities or features to the mold, e.g., a centered guide hole.
In many cases, it will not be possible to standardize all the machine tooling owing to the large number of different tools used. Nevertheless, developing constraints and restrictions to use for the specification of future tooling, coupled with standardization of the most used tooling, can be very beneficial.

Figure 7.14. Standardization and improvement of molds.
Tools Duplication. Sometimes it is possible to have two or more identical elements (cranes, tools, pallets, etc.) to reduce the setup time. For example, a single six pack is as easy to handle as a single can of soda. In this way, if the company has, for example, a double crane, it is possible to prepare the next mold and to extract the previous one without removing and placing the molds again. A good example is shown in the Fig. 7.15. The same scenario could be seen if a machining center had a tool changer, where the needed tools could be ready and available at all times.
Third-Stage Tools
The improvement or elimination of an operation requires reengineering of some aspect of the product or process. Reengineering can help in the analysis of several important factors. For example, is it possible to run the operation in a different way? Is this operation necessary? Is this procedure the most appropriate?
Up to this stage, external operations have not been analyzed. They simply have been distinguished, and some internal operations have been converted to external operations. However, at this point a question is in order: Will the setup specialist have enough time to organize the material and tooling and also carry out all the external operations? Although it is not considered a time-critical part of the setup (according to the definition that was given at the beginning of this section), performing external operations efficiently is always important because a setup specialist is a valuable resource.
It is necessary to study the workload of the setup specialists and to schedule the changeovers so that the specialists are not needed at the same time on two different machines; otherwise, the work carried out to improve the setup time will be pointless.

Figure 7.15. Crane duplication.
Internal operations can be improved in different ways. In this stage it is very important to analyze in detail the movements around the machine and to determine the optimal number of workers that should take part in the setup process. Different techniques can be used to improve and to eliminate operations. Some of these techniques are presented as examples.
Streamlining External Setup
Improving Tool Storage: Indicators' Strategy. This strategy is explained in Chap. 8, dedicated to the 5S's. However, it is not necessary to undertake the complexity of a 5S methodology. The strategy here is to organize the warehouse efficiently, keeping high-use items close for easy access and organizing the tooling so that it is located and identified easily, perhaps using a code. The 5S methodology offers a common orientation when choosing coding standards so that the different sections of the company can use the same nomenclature (Fig. 7.16).
Streamlining Internal Setup
Parallel Operations. With large machines, it is necessary to carry out operations at the front of the machine as well as at the back. The worker can waste important setup time walking around the machine.
As shown in Fig. 7.17, the setup time and complexity can be reduced with the help of a second worker. If a worker needs 2 hours to carry out the exchange, two workers could take less than 1 hour when movements around the machine are eliminated (although it is also possible that they could use more time based on task sharing and the operations sequence).

Figure 7.16. Sign strategy allows ease of use in tool storage.

Figure 7.17. Comparison between one or two workers in a setup process.
It is convenient to use a task map to indicate what operations will be carried out by each worker, starting with the initial situation shown in Table 7.4.
When two workers execute the exchange in a parallel fashion, the exchange procedure is presented in a table (Table 7.5). The table shows the task sharing and those tasks that can be carried out simultaneously, as well as the times where the workers should be waiting.
This representation allows the lean thinker to discover which are the most important tasks that should be improved or which are the tasks that the other worker can carry out in order to make the first worker's job easier (Table 7.6).
Worker safety once again is a priority in this type of synchronized work. There are special devices that decrease the probability of risks to workers, such as safety mats that stop the machine when they are activated. Safety mechanisms that halt the machine until some signal can be provided, e.g., confirmation buttons, etc., can save accidents and injury.
One-Motion Method. Some setup processes allow machines or people to perform more than one task simultaneously, e.g., performing electric and hydraulic connections on a refrigeration circuit while the mold is being slowly fit into position. In the case where these connections cannot be carried out simultaneously, similar connections can be grouped onto a device that allows an operator to connect all the connections even faster.
| No. | Procedure |
| 1 | Remove front bolts |
| 2 | Movement to machine back side |
| 3 | Remove back bolts |
| 4 | Remove back wiring |
| 5 | Movement to machine front side |
| 6 | Remove front wiring |
| 7 | Put used die up |
| 8 | Lift used die |
| 9 | Move used die next to machine |
| 10 | Remove used die |
| 11 | Move crane to new die |
| 12 | Put new die up |
| 13 | Lift new die |
| 14 | Move new die to machine |
| 15 | Get new die down |
| 16 | Fix front bolts |
| 17 | Movement to machine back side |
| 18 | Fix back bolts |
| 19 | Fix back wiring |
| 20 | Movement to machine front side |
| 21 | Fix front wiring |
| 22 | Fix new machine parameters |
TABLE 7.5. Task Sharing and Simultaneous Operations

TABLE 7.6. Improvement in Task Sharing

Functional Clamps. Functional clamps are devices that are used to passively hold an object in a fixed position with the minimum effort. Setup tasks such as turning nuts in and out or tying and untying a component can be eliminated.
The SMED methodology seeks to eliminate the use of screws and nuts as fixing elements. Shingo found that of the entire screw body (thread), the only thread that carries the press function is the last one. Therefore, all the screws should have only one thread. In this case, the screw would be considered as a functional clamp.
From a technical point of view, a one-thread screw or bolt is not viable, but in many cases the number of screw threads can be decreased. There are a large number of functional clamps that, although many of them are used with screws, facilitate installing, fixing, and removing dies.
- Pear-shaped holes. In many tops or surfaces with a great number of screws it is not necessary to unscrew all the bolts until the end. Using pear-shaped holes (Fig. 7.18), it is enough to unscrew them only until the top can be turned.
- U-shaped washers rings. These are similar to the clamp, but they are used in a large number of cases because they are helpful in any joint between a screw and a nut.

- C-shaped washers. These washers are used in difficult access situations when there is a risk of loosing a U-shaped washer into the machine.
- Guttered thread. This is an approach to the ideal screw with only one thread. The guttered thread allows a worker to fix an element with just one-third turn.
- Single-movement method. Axels that do not turn at high speeds can be held with simple elements that can be let free by turning a lever.
- Reduce tools variety. This can be done by using all the same screws so that the same tool can be used at all times or having simple earflap bolts.
Eliminating Testing Procedures (Trials) and Adjustments. Adjustments and trials with many changes easily can represent 50 percent of the total changeover time, i.e., until the first good piece is obtained. Trials and adjustments should be viewed carefully so that they are not only decreased but also eliminated. Whenever possible, a set point should be used instead of an adjustment (Fig. 7.19).
In many companies, the settings and positions for the next tooling can be used without applying the trial-and-error method. If adjustments are necessary, the adjusting procedures must be written, and the machine parameter values should be perfectly specified. In this way, if trials and adjustments must be performed, they will only be those that are extremely necessary. A new technique has been developed in which the adjustments sometimes are eliminated. It is called one-touch exchange of die (OTED).

Figure 7.19. Trials and adjustments should be eliminated.
Process Automation. A fully automated process is the last resource after successful implementation of the preceding methods. It will be effective if and only if the operation on which the automation will be applied is already optimal. Generally, process automation supposes high investment costs (Fig. 7.20). Regardless of the expense of implementation, in some cases it is the best alternative.
Zero Changeover
With SMED implementation, amazing time reductions can be achieved. However, it is the small improvements that can be achieved with SMED that are much more significant.
When Shingo died in 1990, Sekine and Arai continued his work, trying to go further than Shingo did in terms of time reduction. They atried to achieve setup times of less than 1 minute (seconds). In order to achieve this goal, they create a strategy called zero changeover.
Unfortunately, the only way to achieve setup times in the seconds is to automate the exchange process, which represents a large investment. Many of the improvements achieved, came from ideas developed by Shingo.

Figure 7.20. Automation is the last method to apply.
SMED EFFECTS AND BENEFITS
SMED provides several benefits. In the end, all these time reductions are translated into money savings, although there are other aspects, such as safety improvements, that are difficult to quantify economically.
Easier Setup Process
The reduction in the number and complexity of operations that the SMED methodology provides leads to the implementation of new changeover procedures. As a result, the setup process is simplified, and it becomes easier to carry out.
Thanks to the SMED, many of the operations can be carried out by most employees (fewer skills are required). Therefore, the setup specialist and the worker collaborate in the setup process.
Increased safety also results from the improved changeover simplicity. To reduce the setup time, all operations have to be analyzed in detail, which at the same time eliminates risky situations.
The new setup procedure can eliminate defective parts in the manufacturing process, making sure that when all the setup steps are performed properly, the machine is able to produce correct products from the first part.
On-Hand Stock Production
If the setup time decreases, manufacturing batch size can be decreased as well. Therefore, it will not be necessary to make large manufacturing orders, and as a consequence, work-in-process will decrease. If the work-in-process decreases, the mean time of material flow will decrease, as well as the lead time, because it is directly related to the time of material flow.
Workplace Task Simplification
Tool coding and a clean and upstanding machine environment, among many others, are strategies that help to simplified the workplace. After SMED implementation, it is easier to locate tools, dies, and parts in a short period of time.
Productivity and Flexibility
The benefits of SMED implementation are many and important, but the main benefits are centered on two key concepts: an increase in productivity and an increase in flexibility (Fig. 7.21).
Sometimes the SMED methodology is applied to decrease a machine's load in order to increase the productive period. Although the productivity increases, thanks to the SMED methodology, SMED's principal benefit is to increase flexibility, as will be shown next. If a company needs to improve a machine's flexibility and must decide between buying a new machine and spending the same amount of money on improving the setup time, by means of a SMED implementation, the decision is clear, as illustrated in Fig. 7.22.
It can be concluded that if a company looks only for a productivity increase, then SMED is one among a number of other methods, e.g., buying another machine or eliminating idle times. However, if the company is looking for an increase in flexibility, SMED is the only solution because buying a new machine does not provide an increase in flexibility.
Economic Benefits
The economic benefits derived from SMED implementation are not always the same and depend on the machine arrangement to which the SMED is applied.
- In some cases the machine on which the methodology is applied is saturated. If the objective of the SMED is to liberate the machine from its load time to increase machine availability, the benefit takes place because of the economic margin in the sales increment.

Figure 7.21. The main SMED benefits are improvements in productivity and flexibility.
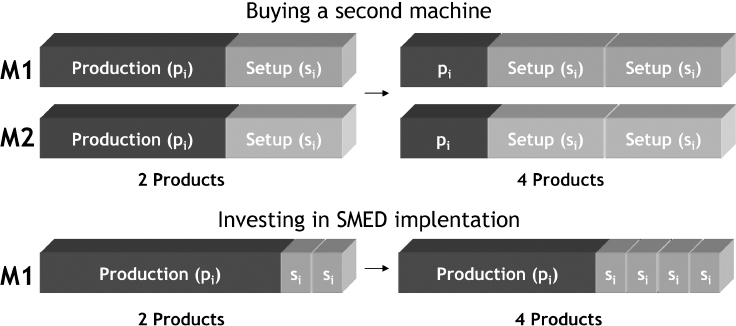
Figure 7.22. A second machine does not improve flexibility if the number of exchanges increases.
- If the machine is not saturated, and the number of changeovers is not important, the time needed to carry out a production order will decrease. If the machine's workers can be assigned to other sections, the economic benefit results from the saved labor costs.
These two examples demonstrate that in each case the economics of SMED can vary.
A flexibility increase is very difficult to measure economically, and it is necessary to relate it to the stock level (decrease in stock) or to other quantifiable benefits, e.g, the satisfaction of customers who receive their product orders in a shorter time. Nevertheless, the economic justification of a SMED study that looks for a flexibility improvement is always complicated. In this case it is also possible to present qualitative benefits derived from SMED.
SUMMARY
This chapter has presented a basic but helpful methodology to reduce the setup time in a machine: the SMED methodology. The SMED methodology proposes arranging the tools needed in the setup process before the machine finishes the preceding lot. The main benefit of setup time reduction is on increase in the flexibility of production. Flexibility is a key concept in the lean manufacturing strategy. Nevertheless, the economic justification of a SMED project that focuses on flexibility improvements is quite difficult.
RECOMMENDED READINGS
Kenichi Sekine and Keisuke Arai, Kaizen for Quick Changeover: Going beyond SMED. Portland, OR: Productivity Press, 1992.
Shigeo Shingo, A Revolution in Manufacturing: The SMED System. Cambridge, MA: Productivity Press, 1985.