
The iSeries Server versatility allows many different types of workstations to be attached to it. Microcomputers, however, are quickly becoming the most popular workstation devices because of their widespread use in today's computer industry. Before microcomputers, the 5250 dumb terminal was the device used to communicate to IBM midrange computers. The keyboard of the 5250 dumb terminal had a layout similar to today's microcomputer keyboard but it included some additional keys not found on the microcomputer keyboard. As microcomputers became popular workstations on midrange computers, there had to be a system in which the microcomputer could be used in the same manner as a 5250 terminal. To compensate for the differences in keys, 5250 software emulation was developed for microcomputers that would allow a user to communicate in the same manner as with the 5250 terminal.
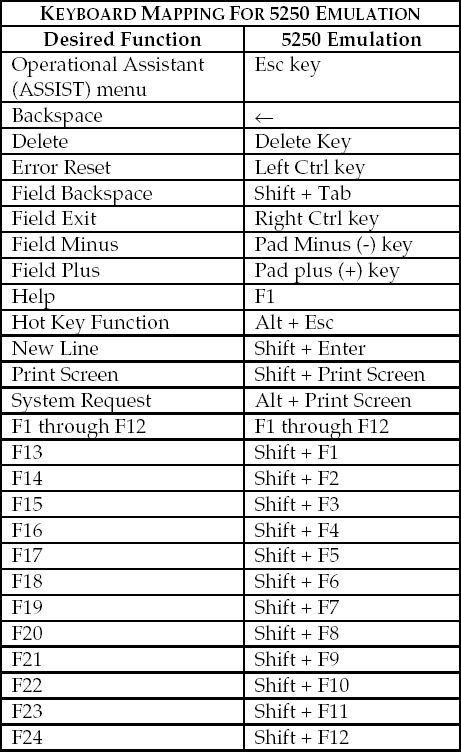
Figure A.1 contains the 5250 keyboard template used when connecting a microcomputer to an iSeries Server. The first column lists the most common functions used with a 5250 terminal. The second column identifies the microcomputer keystrokes necessary to emulate the original 5250 terminal.
Many of the engraved keys found on a microcomputer keyboard perform the same functions when the microcomputer is used in 5250 emulation mode. Generally, each of these keys performs a single function:
The Caps Lock key is used to place the entire keyboard, except for the number keys, in an uppercase mode. To get out of uppercase mode, you simply press the Caps Lock key again. A key that performs a function in this manner is called a toggle key, which allows you to turn a mode on and off.
The Delete key is used to delete the character in the cursor position.
The Insert key allows you to insert characters into a field on the screen. Each character that is inserted moves the characters following the inserted characters in the field one position to the right. Pressing the key a second time takes you out of the insert mode and back to overtype. The Insert key is a toggle key similar to the Caps Lock key.
The Page Up and Page Down keys are called the Roll keys and are used to move the display up or down to show additional information on the display screen. When More . . . is shown in the lower-right corner of the display, you can use the Page Down key (Roll Up key) to move toward the end of the information. When Bottom is shown, you have reached the end of the information. Similarly, you use the Page Up key (Roll Down key) to move toward the top of the information.
The Shift key is used to put the alphabetic keys into uppercase (capital letters). It has two other special functions that will be discussed in the next section.
The following keys have special meaning when used in the 5250 emulation mode:
The Field Advance key (Tab) moves the cursor to the start of the next field. If the cursor is located in the first position of a field when the Field Advance key (Tab) is pressed, the cursor will "jump" over the field and move to the first position of the next field. If the next field is not shown on the screen, the display rolls forward to the next field, and the cursor moves to the first position of that field.
The Field Backtab key (Shift + Tab keys) moves the cursor back one field to the previous field on the screen. If the previous field is not shown on the screen when the Field Backtab key is pressed, the display rolls backward to the previous field, and the cursor moves to the first position of that field.
The Field Exit key (Right Ctrl key) moves the cursor to the next field on the screen. This key is different from the Field Advance key (Tab key) in that any characters at and to the right of the cursor in the field where you were keying are deleted. When the Field Exit key is used after entering data into a numeric field the data is right-justified and zero-filled. When pressed after entering data into an alphanumeric field, the data is left-justified and padded with blanks.
The Enter key is used to transmit the data on the screen to the CPU. The Enter key is not used to move from one field to the next while entering data on the screen. Instead, either the Field Exit key or the Field Advance key (Tab key) is used for this function. It is important that you do not press the Enter key until you are sure all the values for fields on the screen have been entered. Pressing the Enter key instead of the Field Exit key may prematurely submit the data you are entering.
The Error Reset key (Left Ctrl key) is used to reset or correct a keyboard error. An example of a keyboard error is when you try to key into a protected area of the screen. When an error such as this occurs, a message will appear on the last line of the screen and the keyboard will lock. The Error Reset key must be pressed to unlock the keyboard before the error can be corrected.
The Help key (F1) will show you additional information about the display you are using, about messages you have received, or about other problems that might happen. For example, if you receive a message from the operating system that you do not understand, place the cursor on the message and press Help (F1) for help information about the message.
The Hot key (Alt + Esc keys) allows you to toggle between the iSeries Server screen and the DOS prompt.
The New Line key (Shift + Enter keys) allows you to move down the display screen one line at a time, rather than moving from field to field.
The End key moves the cursor to the end of the data on the line where the cursor is located.
The Print key (Shift + Print Screen) is used to print the information currently shown on the screen. Normally, when you press the Print key, the screen information is put on an output queue and printed at a later time. A message is shown and the Error Reset key must be pressed to unlock the keyboard.
The function keys are the top row of keys that are labeled F1 through F12 and are normally referred to as F keys. There are twenty-four function keys that can be used with the iSeries Server computer system. To use F1-F12, press the function key that corresponds to the number you want to use. To use F13-F24:
Press and hold the Shift key.
Press the function key that corresponds to the number you want to use. For example, to press F13, hold down the Shift key and press the F1 key. For F14, hold down the Shift key and press the F2 key. F24 is used by holding down the Shift key and pressing F12.
Normally, not all function keys are active at the same time. The function keys that are active are shown at the bottom of the display screen along with a brief description of their functions.
Function keys could have different meanings depending on the program running at the time. Although different function keys are shown on the different displays and menus, there are a few standard keys:
The F1 Help key provides on-line help information. The iSeries Server provides context-sensitive help information that is related to the field or area where the cursor is located on the screen. When displaying help, the F2 key allows you to display extended help.
The F3 Exit key is used to end the current function and return you to the screen from which the current function was started.
The F4 key is called the prompt key and provides assistance when entering data. When the cursor is on a field and F4 is pressed, a prompt screen appears from which the user can select a particular value for a field. It also is used to display a fill-in-the-blanks screen when entering a line containing several fields of data.
The F5 (Refresh) key removes any data you have keyed into the display screen since the last time the Enter key was pressed. It not only removes changes you made, but it also displays all of the original values that appeared on the display screen.
The F9 (Retrieve) key displays, on the command line, the last command that was entered on the command line. It also displays any parameters that were entered with the command. By repeatedly pressing F9, the system retrieves previously entered commands, going back one command with each press of F9.
The F12 (Cancel) key cancels the current screen and returns to the previous menu or display. It can be easily confused with the Exit key (F3), which is used to end the current function.
The F16 (System Main Menu) key returns to the system Main Menu.
The Home key displays the menu that was shown after you signed on the system.
The F24 (More keys) key is shown when a screen has more active function keys than can be shown in the space provided at the bottom of the screen. In such cases, you will see that one of the active function keys is F24 (More keys). A list of additional active function keys will replace the current list of active function keys when you press the F24 key (shift + F12). The F24 key may have to be pressed more than once to display all the active function keys available.