On the Rebel T2i/550D, a variety of easy-to-use options help ensure that your images will have excellent color regardless of the type of light. Getting great color begins during shooting by selecting a white balance and Picture Style. In addition, you can choose a color space that best matches your printing needs. In this chapter, you learn how each option is useful in different shooting scenarios as well as learning some techniques for ensuring accurate color. But before we talk about camera controls and options that ensure accurate color, it's important to understand the concepts of light and its colors.

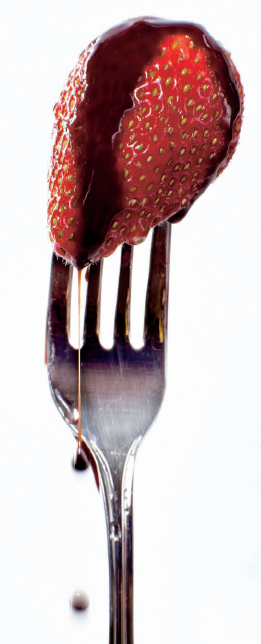
Delivering true-to-life vibrant color is one of the primary strengths of the T2i/550D. Exposure: ISO 100, f/19, 1/125 second.
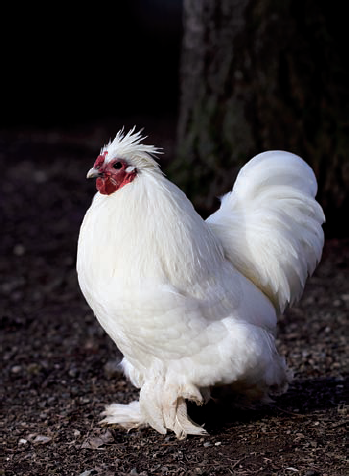
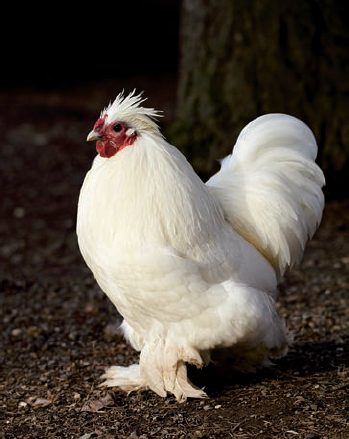
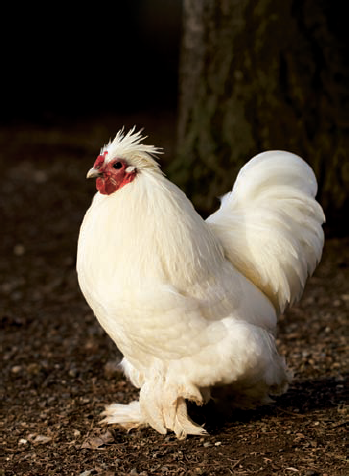
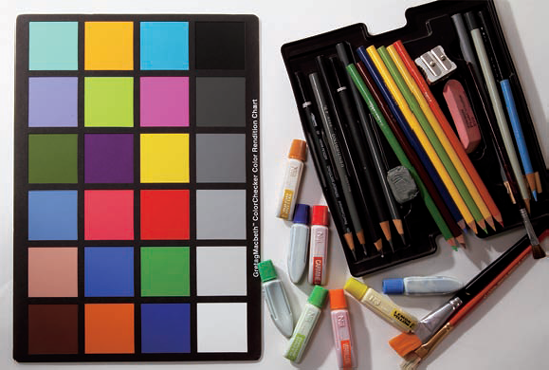
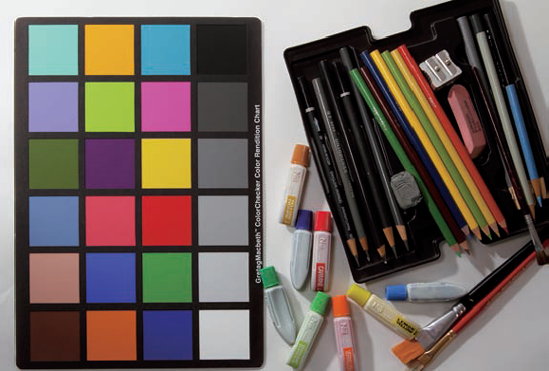
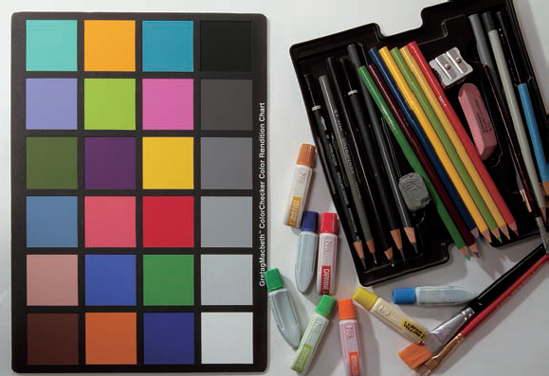
To get accurate image color, you have to tell the camera what type of light you're shooting in by selecting one of seven white balance options or by setting a custom white balance that measures the specific light in the scene. Using the correct white balance settings will help you spend less time color-correcting images on the computer and more time shooting. The following images show the color bias of the preset white balance settings using the same subject.
Tip
If you shoot RAW images, you can set and adjust the white balance in the RAW conversion program after the image is captured.


For most scenes where there is clearly defined light, the preset white balance options such as Daylight, Cloudy, and so on, provide accurate image color. In mixed lighting situations, you'll get the most accurate image color by setting a custom white balance. Setting a custom white balance takes a little more time than choosing a preset option, but it delivers very accurate and pleasing color. Whether you choose to use a preset or create a custom white balance setting may depend on how much time you have. If you don't have time to set a custom white balance, then use the Auto white balance that's designed to work well in any type of light.
Whatever your approach to white balance options, the time you spend using and understanding them and how they can enhance your images is time that you'll save color-correcting images on the computer.
To change to a preset white balance option such as Daylight, Tungsten, Shade, and so on, follow these steps:
Set the Mode dial to P, Av, Tv, M, or A-DEP, and then press the WB button on the back of the camera. The WB button is the up cross key. The White balance screen appears.
Press the left or right cross key to select a white balance setting, and then press the Set button. Because the white balance option you set remains in effect until you change it, remember to reset it when you begin shooting in different light.
Tip
In practice, the AWB white balance setting tends to have an overall cool, bluish, hue. While it is an acceptable choice in mixed light when there isn't time to set a custom white balance, be aware of the tendency for a cooler color rendering.
Mixed-light scenes, such as tungsten and daylight, can make getting accurate or visually pleasing image color a challenge. In mixed-lighting scenes, setting a custom white balance balances colors for the specific light or combination of light types in the scene. A custom white balance is relatively easy to set, and it's an excellent way to ensure accurate color.
Note
You can learn more about setting custom white balance at www.cambridgeincolour.com/tutorials/white-balance.htm.
Another advantage to creating a custom white balance setting is that it works whether you're shooting JPEG or RAW capture in P, Tv, Av, M, or A-DEP mode. Just remember that if light changes, you need to set a new custom white balance to get accurate color.
To set a custom white balance, follow these steps:
Set the camera to P, Av, Tv, M, or A-DEP shooting mode, and ensure that the Picture Style is not set to Monochrome. To check the Picture Style, press the Picture Style button (the down cross key) on the back of the camera. The Picture Style screen is displayed. To change from Monochrome, which is denoted on the Picture Style screen with an "M," press the left or right cross key to select another style, and then press the Set button. Also have the white balance set to any setting except Custom.
With the subject in the light you'll be shooting in, position a piece of unlined white paper so that it fills the center of the viewfinder, and take a picture. If the camera cannot focus, switch the lens to MF (manual focus) and focus on the paper. Not all lenses have a MF switch on the side of the lens. Also ensure that the exposure is neither underexposed nor overexposed such as by having Exposure Compensation (detailed in Chapter 2) set.
Press the Menu button, and then turn the Main dial to select the Shooting 2 menu.
Press the up or down cross key to highlight Custom WB, and then press the Set button. The camera displays the last image captured (the white piece of paper) with a Custom White Balance icon in the upper left of the display. If the image of the white paper is not displayed, press the left cross key until it is.
Press the Set button again. The T2i/550D displays a confirmation screen asking if you want to use the white balance data from this image for the Custom white balance setting.
Press the right cross key to highlight OK, and then press the Set button. A second confirmation screen appears.
Press the Set button to select OK, and then press the Shutter button to dismiss the menu. The camera imports the white balance data from the selected image.
Press the WB (White Balance) button on the back of the camera, and then press the right cross key to select Custom White Balance. The White balance screen appears. The Custom white balance setting is identified with text and is denoted by an icon with two triangles on their sides with a black dot between them.
Press the Set button. You can begin shooting now and get custom color in the images as long as the light doesn't change. The Custom white balance setting remains in effect until you change it by setting another white balance.

When you finish shooting in the light for which you set a custom white balance and move to a different area or subject, remember to reset the white balance option.
Given the wide range of indoor tungsten, fluorescent, and other types of lights that are available, the preset white balance options may or may not be spot-on accurate for the type of light in the scene. And even if they are, you may prefer a bit more of a green or blue bias to the overall image color. With the Rebel T2i/550D, you can use the White balance auto bracketing setting to get a set of three images, each a slightly different color bias up to plus/minus three levels in one-step increments.
White balance auto bracketing is handy when you don't know which color bias will give the most pleasing color or when you don't have time to set a manual white balance correction. The white balance bracketed sequence gives you three images from which you can choose the most visually pleasing color.
Note
White balance auto bracketing reduces the maximum burst rate of the Rebel T2i/550D by one-third because each press of the Shutter button records three images.
To set the White balance auto bracketing setting, follow these steps:
With the camera set to P, Tv, Av, M, or A-DEP shooting mode, press the Menu button, and then turn the Main dial until the Shooting 2 menu appears.
Press the down cross key to highlight WB SHIFT/BKT (White Balance Shift/Bracket), and then press the Set button. The WB Correction/WB Bracketing screen appears.
Turn the Main dial clockwise to set Blue/Amber bias, or counterclockwise to set a Magenta/Green bias. As you turn the Main dial, three squares appear and the distance between them increases as you continue to turn the dial. The distance between the squares sets the amount of bias. On the right side of the screen, the camera indicates the bracketing direction and level under BKT. You can set up to plus/minus three levels of bias. If you change your mind and want to start again, press the Display button on the back of the camera.
Press the Set button. The Shooting 2 (red) menu appears with the amount of bracketing displayed next to the menu item.
Lightly press the Shutter button to dismiss the menu.
If you're in One-shot drive mode, press the Shutter button three times to capture the three bracketed images, or if you're in Continuous drive mode, press and hold the Shutter button to capture the three bracketed images. With a blue/amber bias, the standard white balance is captured first, and then the bluer and more amber bias shots are captured. If magenta/green bias is set, then the image-capture sequence is the standard, then more magenta, then more green bias. White balance auto bracketing continues in effect until you remove it or the camera is turned off.
Note
You can combine White balance auto bracketing with Auto Exposure bracketing. If you do this, a total of nine images are taken for each shot. Bracketing also slows the process of writing images to the media card.
Similar to White balance auto bracketing, you can also manually bias the color of images by using White balance correction. This feature is much like using a color-correction filter on a film camera. The color can be biased toward blue (B), amber (A), magenta (M), or green (G) in plus/minus nine levels measured as mireds, or densities. Each level of color correction that you set is equivalent to five mireds of a color-temperature conversion filter. When you set a color correction or bias, it is used for all images until you change the setting.
Note
In film photography, densities of color-correction filters range from 0.025 to 0.5. On the Rebel T2i/550D, shifting one level of blue/amber correction is equivalent to five mireds of a color-temperature conversion filter.
To set White balance correction, follow these steps:
Press the Menu button, and then turn the Main dial to select the Shooting 2 menu.
Press the down cross key to highlight WB SHIFT/BKT, and then press the Set button. The WB Correction/WB Bracketing screen appears.
Press a cross key to set the color bias and amount that you want — toward blue, amber, magenta, or green. On the right of the screen, the SHIFT panel shows the bias and correction amount. For example, A2, G1 shows a two-level amber correction with a one-level green correction. If you change your mind and want to start again, press the Display button on the back of the camera.
Press the Set button. The Shooting 2 menu appears. The color shift you set remains in effect until you change it. To turn off White balance correction, repeat Steps 1 and 2, and in Step 3, press the Display button to return the setting to zero.
In addition to setting the appropriate white balance option, the choice of Picture Style also affects how color is rendered in images by setting the color tone and saturation used in images. A Picture Style provides the foundation for how images are rendered, and, whether you select a style or not, the T2i/550D applies a Picture Style to all of your images. Individual styles offer different looks. For example, the Landscape Picture Style has vivid color saturation, while the Portrait Picture Style renders portraits with warm, soft skin tones and subdued color saturation.
The Rebel T2i/550D offers six Picture Styles, which are detailed in Table 3.1. The camera uses the Standard Picture Style as the default style for P, Tv, Av, M, and A-DEP shooting modes, and for all Basic Zone modes except Portrait and Landscape shooting modes. Each Picture Style has settings for sharpness, contrast, color saturation, and color tone that you can use as is or you can modify them to suit your preferences. In addition, you can create up to three User Defined Styles that are based on one of Canon's Picture Styles.
Figures 3.9 through 3.14 show how Picture Styles change image renderings. The differences may not be as apparent in this book due to commercial printing, but they give you a starting point for evaluating differences in Picture Styles. The images were shot using a custom white balance.
In addition to forming the basis of image rendering, Picture Styles are designed to give you good prints with little or no post-processing so that you can print JPEG images directly from the media card. If you shoot RAW capture, you can't print directly from the media card, and the Picture Style is noted for the file, but it's not applied unless you use Canon's Digital Photo Professional program. You can also apply a Picture Style during RAW-image conversion using Canon's Digital Photo Professional conversion program.
Tip
Be sure to test Picture Styles first, and then choose the ones that provide the best prints for your JPEG images.
In addition, you can modify a Picture Style on the computer using Canon's Picture Style Editor as detailed later in this chapter.


You can also customize Picture Styles to help you get the kind of results out of the camera that you want. If you find that you want to adjust a Picture Style, here are the adjustments that you can modify when you're shooting in P, Tv, Av, M, and A-DEP shooting modes.
Sharpness: 0 to 7. Level zero applies no sharpening and renders a very soft look, whereas level 7 is the highest sharpening setting. If you print images directly from the media card, a moderate amount of sharpening, such as level 3, produces sharp images. But if your workflow includes sharpening images after editing and sizing them in an editing program, then you may want to set a lower sharpening level for the Picture Style in the camera to avoid oversharpening.
Contrast. This setting affects the image contrast as well as the vividness of the color. For images printed directly from the media card, a 0 (zero) to level 1 setting produces snappy contrast in prints. A negative adjustment produces a flatter look and a positive setting increases the contrast.
Saturation. This setting affects the strength or intensity of the color with a negative setting producing low saturation and vice versa. A zero or +1 setting is adequate for snappy JPEG images destined for direct printing.
Color Tone. This control primarily affects skin tone colors. Negative adjustments to color tone settings produce redder skin tones while positive settings produce yellower skin tones.
With the Monochrome Picture Style, only the sharpness and contrast parameters are adjustable, but you can add toning effects, as detailed in Table 3.1. Default settings in this table are listed in order of sharpness, contrast, color saturation, and color tone.
Table 3.1. EOS T2i/550D Picture Styles
Picture Style | Description | Sharpness | Color Saturation | Default Settings |
|---|---|---|---|---|
Standard | Vivid, sharp, crisp images with uniform color that are suitable for direct printing from the media card | Moderate | High | 3,0,0,0 |
Portrait | Provides a warmer rendition in skin tones, lower contrast and color saturation, and soft texture rendering | Low | Low | 2,0,0,0 |
Landscape | Deepens blues and brightens greens to create vivid reproduction, high color saturation, and high sharpness to emphasize landscape details | High | High saturation for greens and blues | 4,0,0,0 |
True color reproduction with low contrast and color saturation reducing the chance of overexposure and oversaturation. Helps retain highlight details. Allows latitude for image editing. | None | Low | 0,0,0,0 | |
Faithful | Provides true-to-life color rendition for subjects shot in light with a color temperature of 5200K, low color saturation and sharpness. | None | Low | 0,0,0,0 |
Monochrome | Black-and-white or toned images with slightly high sharpness | Slightly high | Yellow, orange, red, and green filter effects available | 3,0, N, N |
Many people have grown accustomed to seeing images with strong contrast, vivid color, and a higher sharpness level. If this is your preference, and if you routinely print images from the media card without first editing them on the computer, then you'll likely be pleased using the Standard Picture Style for everyday shooting, and the Landscape Picture Style for landscapes and cityscapes. The Standard style is the one set on the T2i/550D by default.
However, if you prefer a subtler rendering of color, saturation, and contrast that offers more fine details in the highlights and shadows, and if you enjoy editing images on the computer before printing them, then you'll likely appreciate the Neutral, Portrait, and Faithful styles. You can choose a Picture Style by following these steps:
Press the Picture Style button on the back of the camera. The Picture Style button is the down cross key. The Picture Style screen appears with the current Picture Style highlighted. The screen also shows the default setting for the style.
Press the left or right cross key to highlight the Picture Style you want, and then press the Set button.
After using, evaluating, and printing with different Picture Styles, you may want to change the default parameters to get the rendition that you want. Alternately, you may want to create a custom style. You can create up to three Picture Styles that are based on an existing style.
While the default Picture Styles are certainly good choices, I highly recommend modifying one or more Picture Styles to suit your visual tastes, and shooting and printing needs. After much experimentation, I settled on a modified Neutral Picture Style that provides pleasing results for any images that I shoot in JPEG format. Here is how I've modified the Neutral Picture Style settings.
Sharpness. +2
Contrast. +1
Saturation. +1
Color tone. 0

These settings provide excellent skin tones provided that the image isn't underexposed and the lighting isn't flat. You can try this variation and modify it to suit your work. I also often use the Portrait Picture Style that I modified by increasing the contrast setting to +1. This style is an excellent choice for photographing women and children. For men, I've found that the rendering is a bit too subtle, and I prefer to use the Standard Picture Style for men with a decreased Sharpness setting. I decrease the Sharpness setting because I always edit images on the computer before printing, and, as the final step in editing, I apply sharpening after I've sized a copy of the edited image for either Web display or for printing.
Tip
Adjusting the color tone of a Picture Style shifts the color subtly. For example, in the Portrait Picture style a +2 setting shifts skin tones to a more yellow rendering while a −2 shifts the color to a more reddish rendering.
To modify a Picture Style, follow these steps:
With the camera set to P, Tv, Av, M, or A-DEP shooting mode, press the Menu button, and then turn the Main dial to select the Shooting 2 menu.
Press the up or down cross key to highlight Picture Style, and then press the Set button. The Picture Style screen appears with a list of the preset Picture Styles.
Press the down cross key to highlight the Picture Style you want to modify, and then press the Display button. The Detail set. screen for the selected Picture Style appears.
To change the Sharpness parameter, which is selected by default, press the Set button. The Sharpness control is activated.
Press the left or right cross key to change the parameter, and then press the Set button. For all the parameter adjustments, negative settings decrease sharpness, contrast, and saturation, and positive settings provide higher sharpness, contrast, and saturation. Negative color tone settings provide reddish tones, and positive settings provide yellowish skin tones.
Press the down cross key to move to the Contrast parameter, and then press the Set button. The camera activates the control.
Press the left or right cross key to adjust the parameter, and then press the Set button.
Repeat Steps 5 through 7 to change additional parameters.
Press the Menu button. The Picture Style screen appears where you can modify other Picture Styles. The Picture Style changes are saved, changes are shown in blue, and the changes remain in effect until you change them. Press the Set button to return to the Shooting 2 menu, or lightly press the Shutter button to dismiss the menu.
You can also create a Picture Style to suit your personal preferences. You begin by choosing one of Canon's existing styles, and then you set the options for Sharpness, Contrast, Saturation, and Color Tone. Then you can save the style as a User Defined style on the camera.
Given that you can create up to three different User Defined styles, there is latitude to set up styles for different types of shooting situations. For example, you might want to create your own Picture Style for everyday photography that is less contrasty than the Standard Picture Style. Certainly you could alternately modify the existing Standard style, but you may want to leave it unmodified and use it for images you're going to print directly from the media card. Then you can set up a second User Defined style for portraits of women and children, and a third style for portraits of men. Because the styles are named and displayed as 1, 2, and 3, just remember which style you set up for each number.
To create and register a User Defined Picture Style, follow these steps:
With the camera set to P, Tv, Av, M, or A-DEP shooting mode, press the Menu button, and then turn the Main dial to select the Shooting 2 menu.
Press the down cross key to select Picture Style, and then press the Set button. The Picture Style screen appears.
Press the down cross key to highlight User Def. 1, and then press the Display button. The Detail set. User Def. 1 screen appears with the currently selected Picture Style listed.
Press the Set button. The Standard Picture Style control is activated so that you can choose a different base Picture Style if you want.
Press the up or down cross key to select a base Picture Style, and then press the Set button.
Press the down cross key to highlight the parameter you want to change, and then press the Set button. The camera activates the parameter's control.
Press the left or right cross key to set the parameter and then press the Set button.
Repeat Steps 6 and 7 to change the remaining settings. The remaining parameters are Contrast, Saturation, and Color tone.
Press the Menu button to register the style. The Picture Style changes are saved, the Picture Style name is displayed in blue, and the changes remain in effect until you change them. Press the Set button to return to the Shooting 2 menu, or lightly press the Shutter button to dismiss the menu.
You can repeat these steps to set up User Def. 2 and 3 styles.
One approach to getting Picture Styles that are to your liking is to set or modify one of the styles provided in the camera. But that approach is experimental: You set the style, capture the image, and then check the results on the camera and in prints. If the style needs adjustment, you go through the process again until you get the results you want.
There is a more precise way to modify Picture Styles using Canon's Picture Style Editor, a program that comes on the disc included in the camera box. With the Picture Style Editor, you can make precise custom changes to Picture Styles. The process is to open a RAW image that you've already captured in the Picture Style Editor program, apply a Picture Style, and then make changes to the style while watching the effect of the changes as you work. Then you save the changes as a Picture Style file (.PF2), and use the EOS Utility, a program that's also provided on the disc, to register the file in the camera and apply it to images.
The Picture Style Editor looks deceptively simple, but it offers powerful and exact control over the style. Because the goal of working with the Picture Style Editor is to create a Picture Style file that you can register in the camera, the adjustments that you make to the RAW image are not applied to the image. Rather, the adjustments are saved as a file with a .PF2 extension. After saving the settings as a PF2 file, you can apply them to images in Digital Photo Professional.
Tip
If you use the Picture Style Editor, it's best to use a Color Management System (CMS) that includes calibrating your monitor, using the correct monitor and printer profiles, and using a consistent color space among the camera, monitor, and printer. For monitor calibration, I recommend the Spyder 3 Pro or Elite from Datacolor, spyder.datacolor.com/product-mc-s3pro.php.
While the full details of using the Picture Style Editor are beyond the scope of this book, I encourage you to read the Picture Style Editor descriptions on the Canon Web site at http://web.canon.jp/imaging/picturestyle/editor/index.html.
Be sure you install the EOS Digital Solution Disk programs before you begin. To start the Picture Style Editor, follow these steps:
On your computer, start the Picture Style Editor. On a PC, the Picture Style Editor application is located in the Canon Utilities folder. On the Mac, look in the Applications folder for the Canon Utilities folder. The Picture Style Editor main window appears.
Click and drag a RAW CR2 image onto the main window. You can also choose File

To choose a style other than the current style, click the arrow next to Base Picture Style on the Tool Palette, and then choose the style you want. The Base Picture Style is at the top left of the Tool Palette.
Tip
To show the original image and the image with the changes you make side by side, click one of the split-screen icons at the bottom left of the main window. To switch back to a single image display, click the icon at the far-left bottom of the window.
Click Advanced button in the Tool palette to display the parameters for Sharpness, Contrast, Color saturation, and Color tone. These are the same settings that you can change on the camera. But with the Picture Style Editor, you can watch the effect of the changes as you apply them to the RAW image.
Make the changes you want, and then click OK.
Adjust the color, tonal range, and curve using the palette tools. If you are familiar with image-editing programs, or with Digital Photo Professional, most of the tools will be familiar. Additionally, you can go to the Canon Web site at
http://web.canon.jp/imaging/picturestyle/editor/functions.htmlfor a detailed description of the functions.
When you modify the style to your liking, you can save it and register it to use in the T2i/550D. However, when you save the PF2 file, I recommend saving two versions of it. During the process of saving the file, you can select the Disable subsequent editing option, which prevents disclosing the adjustments that have been made in the Picture Style Editor as well as captions and copyright information. This is the option to turn on when you save a style for use in the T2i/550D and in the Digital Photo Professional program. But by selecting that option, the style file no longer can be used in the Picture Style Editor.
For that reason, you'll likely want to save a second copy of the PF2 file without selecting the Disable subsequent editing option in the Save Picture Style File dialog box. That way, if you later decide to modify the style, you can use the Picture Style Editor to make adjustments to this copy of the PF2 file.
Before you begin, ensure that you've installed the EOS Digital Solution Disk programs on your computer. To save a custom Picture Style, follow these steps:
Click the Save Picture Style File icon at the top far right of the Picture Style Editor Tool palette or choose it from the menu. The Save Picture Style File dialog box appears.
Navigate to the folder where you want to save the file.
To save a file to use in the T2i/550D, select the Disable subsequent editing option at the bottom of the dialog box. To save a file that you can edit again in the Picture Style Editor, do not select this option.
Type a name for the file, and then click Save. The file is saved with a .PF2 file extension in the folder you specified.
To install the custom Picture Style on the Rebel T2i/550D, follow these steps. Before you begin, be sure that you have the USB cable that came with the camera available.
With the camera turned off, connect the camera to the computer using the USB cable supplied in the T2i/550D box.
On your computer, start the Canon EOS Utility program. The EOS Utility program is located in the Canon Utilities folder on your computer. The EOS Utility screen appears.
Turn on the T2i/550D.
Click Camera settings/Remote shooting under the Control Camera tab in the EOS Utility. The capture panel appears.
Click the red camera icon in the toolbar, and then click Picture Style. The Picture Style window appears.
Click User Defined 1, 2, or 3 from the list. The Shooting menu appears. If a Picture Style file was previously registered to this option, the new style overwrites the previous style. When you select User Defined, additional options appear.
Click Register User Defined style. The Register Picture Style File screen appears.
Click the browse icon. A window opens for you to navigate to the folder where you saved the Picture Style.
Navigate to the folder where you saved the Picture Style file that you modified in the Picture Style Editor, and click Open. The Picture Style settings dialog box appears with the User Defined Picture Style displaying the modified style you opened. If necessary, you can make further adjustments to the file before applying it.
Click OK. The modified style is registered in the T2i/550D. It's a good idea to verify that the style was copied by pressing the Picture Style button on the back of the T2i/550D, and then selecting the User Defined Style you registered to see if the settings are as you adjusted them.
Tip
In addition to creating your own styles, you can download additional Picture Styles from Canon's Web site at http://web.canon.jp/imaging/picturestyle/index.html.
A color space defines the range of colors that can be reproduced and the way that a device such as a digital camera, a monitor, or a printer reproduces color. Of the two color space options offered on the Rebel T2i/550D, the Adobe RGB (Red, Green, Blue) color space is richer because it supports a broader gamut, or range, of colors than the sRGB (standard RGB) color space option. And in digital photography, the more data captured, or, in this case, the more colors the camera captures, the richer and more robust the file. It follows that the richer the file, the richer the file you have to work with whether you're capturing RAW or JPEG images. And with the T2i/550D's 14-bit analog/digital conversion, you get a rich 16,384 colors per channel when you shoot in RAW capture.
The following histograms show the difference between a large and small color space in terms of image data. Spikes on the left and right of the histogram indicate colors that will be clipped, or discarded, from the image.
Note
For details on evaluating histograms, see Chapter 2.
Much more image data is retained by using the wider Adobe RGB color space. Richer files can withstand editing, which is by nature destructive, much better than files with less color data and resolution. So if you routinely edit images on the computer, rather than printing directly from the media card, then Adobe RGB is a good choice to provide richer files. But if you don't edit images on the computer, and if you want to print and display images straight from the camera on the Web or in e-mail, then sRGB is the color space to choose.
For printing images, Adobe RGB is the color space of choice for printing on inkjet printers and for printing by some commercial printers, although other commercial printing services use sRGB. If you print at a commercial lab, check with them to see which color space they use.
For images destined for online use in e-mail or Web display, sRGB provides the best image color display. While this may sound like a conflict in choosing color spaces, for most photographers it translates into using Adobe RGB for capture in the camera, and for editing and printing. Then when an image is needed for the Web or e-mail, you can make a copy of the image and convert it to sRGB in an image-editing program such as Photoshop.
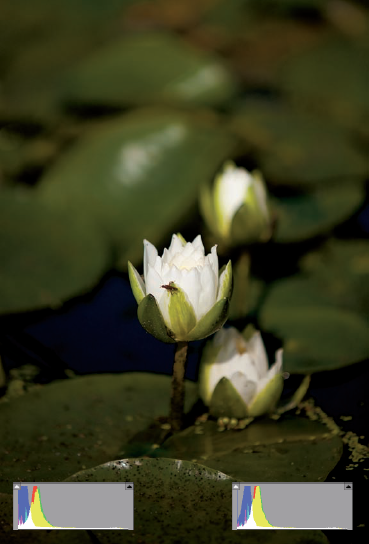
Figure 3.16. This RAW image was converted in Adobe Camera Raw and edited in Photoshop CS4. The inset histograms show the image in the sRGB color space on the left and in Adobe RGB color space on the right. Notice that the shadows block up much more in the sRGB color space than in Adobe RGB. Exposure: ISO 100, f/2.8, 1/6400 second with −1 1/3-stop Exposure Compensation.
On the T2i/550D, you can select one of two color spaces for shooting in the P, Tv, Av, M, and A-DEP shooting modes. The options are Adobe RGB or sRGB. The color space you choose applies to both JPEG and RAW files shot in Creative Zone modes. In all Basic Zone modes, the camera automatically selects sRGB.
If you choose Adobe RGB, image file names are appended with _MG_.
Note
The Rebel T2i/550D does not append an ICC (International Color Consortium) profile with the image so you will need to embed it when you're editing the file in an editing program. An ICC profile identifies the color space so that it is read by other devices, such as monitors and printers that support ICC profiles.
To set the color space on the T2i/550D for Creative Zone modes, follow these steps:
Set the Mode dial to a Creative Zone mode: P, Tv, Av, M, or A-DEP.
Press the Menu button, and then turn the Main dial to select the Shooting 2 menu.
Press the up or down cross key to highlight Color space, and then press the Set button. The camera displays two color space options.
Press the up or down cross key to highlight the color space you want, either sRGB or Adobe RGB, and then press the Set button. The color space remains in effect until you change it or switch to a Basic Zone mode.