You can make the Rebel T2i/550D even more enjoyable to use by customizing it for your personal shooting preferences and setting the camera up to suit your most common shooting situations. The T2i/550D offers excellent options for customizing the operation of controls and buttons and the shooting functionality, both for everyday shooting and for shooting specific scenes and subjects.

Customization options such as turning on Highlight Tone Priority help retain highlight details in this picture of a miniature Schnauzer puppy. Exposure: ISO 200, f/14, 1/125 second.
The T2i/550D offers three helpful features for customizing the use and operation of the camera: a group of 12 Custom Functions that enable you to control everything from whether digital noise reduction is applied for long-exposure and high-ISO images to the way the camera controls operate; a My Menu camera tab where you can include six of your most often used menu items in priority order for fast access; and, modifying the LCD screen color.
Custom Functions can save you time because they enable you to customize camera controls and operations to better suit your shooting style. The T2i/550D offers 12 Custom Functions ranging from customizing exposure changes to changing the functions of various buttons. There are a couple of specifics that you should keep in mind regarding Custom Functions:
They can be set only in Creative Zone modes such as P, Tv, Av, M, and A-DEP.
Once you change a Custom Function, the change remains in effect until you change it.
Note
Canon denotes Custom Functions using the abbreviation C.Fn [group Roman numeral]-[function number]; for example, C.Fn II-3.
Some Custom Functions are useful for specific shooting specialties or scenes while others are more broadly useful for everyday shooting. For example, the Mirror Lockup Custom Function is useful in specific scenarios such as when you're shooting macro and long exposures and when you're using a super-telephoto lens. On the other hand, the Custom Function that enables the Set button to be used during shooting is an example of a function that is broadly useful for everyday shooting.
Warning
Be sure to remember how you have set the Custom Functions because some options change the behavior of the camera controls.
Canon organized the 12 Custom Functions into four main groups denoted with Roman numerals, all of which you can access from the Setup 3 camera menu.
Table 4.1 delineates the groupings and the Custom Functions within each group. In addition, the function and options that are either enabled or disabled in Live View and Movie mode shooting are noted.
In this section, I explain each of the Custom Functions and the options that you can set. As you read about each Custom Function, consider how you could use it to make your use of the camera more useful for your common shooting scenarios. You don't have to set each option, and it is likely you may find only a few that are useful to you in the beginning. But as you continue shooting, you may recognize other functions that you want to use. Over time, you'll grow to appreciate the power that Custom Functions offer.

Keep in mind that the functions are easy to find, so that you can go back and reset them if you don't like the changes that you've made. In addition, you can reset all Custom Functions to the original settings if necessary. The steps to reset all Custom Functions are included at the end of this section.
Table 4.1. Custom Functions
C.Fn Number | Function Name |
|---|---|
Group I: Exposure | |
1 | Exposure level increments. (The option you choose works for Live View and Movie shooting). |
2 | ISO Expansion. |
3 | Flash synchronization speed in Av mode. |
Group II: Image | |
4 | Long exposure noise reduction. |
5 | High ISO speed noise reduction. |
6 | Highlight tone priority. |
Group III: Autofocus/Drive | |
7 | AF-assist beam firing. |
8 | Mirror Lockup. (This option does not work when you use Live View shooting). |
Group IV: Operation/Others | |
9 | Shutter /AE lock button. |
10 | Assign Set button. (The options do not work when you use Live View shooting). |
11 | LCD display when power on. |
12 | Add image verification data. |
In this group, the three Custom Functions enable you to determine the level of fine control you have over exposure and over flash exposure synchronization speeds when you're shooting in Aperture Priority (Av) mode.
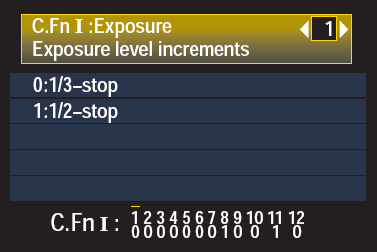
The options available for this function enable you to set the exposure increment to use for shutter speed, aperture, exposure compensation, and Auto Exposure Bracketing (AEB). The exposure increment you choose is displayed in the viewfinder and on the LCD as double marks at the bottom of the exposure-level indicator. Your choice depends on the level of control you want. If you're setting Exposure Compensation to get truly white snow in a snow scene, then I recommend using the 1/2-stop increment to get to a +1- or 2-stop compensation in fewer steps. But if you're perfecting the exposure on a portrait, you may find that the small 1/3-stop increment is more exact. Here are the C.Fn-1 options with a description of each one:
0: 1/3-stop. This is the Rebel T2i/550D's default option, and it offers the finest level of exposure control. Using this option, the camera displays shutter speeds in finer increments such as 1/60, 1/80, 1/100, 1/125 second, and so on. And it offers apertures as f/4, f/4.5, f/5, f/5.6, f/6.3, f/7.1, and so on.
1: 1/2-stop. This is a coarser exposure control setting. Using this option, the T2i/550D displays shutter speeds in increments such as 1/60, 1/90, 1/125, 1/180 second, and so on. And it offers apertures as f/4, f/4.5, f/5.6, f/6.7, f/8, f/9.5, and so on. You may want to set this option when you want to quickly make larger changes in exposure settings with a minimum of adjustments.
You can choose to increase the ISO range from the default 100 to 6400 to include ISO 12800 by choosing Option 1: On. Enabling the expansion has no effect on the Auto ISO range that is 100 to 6400 by default in P, Tv, Av, M, and A-DEP shooting modes unless you set a lower maximum ISO setting on the Shooting 3 menu. The expanded setting is available only when you shoot in P, Tv, Av, M, and A-DEP modes. The ISO range for the automatic shooting modes such as Close-up, Landscape, and so on is ISO 100 to 3200. If you enable ISO expansion, then additional ISO setting is denoted as "H" in the viewfinder and on the LCD. Be sure to test the high ISO setting for digital noise before you use it. However, in scenes where you would otherwise not be able to get the picture, the expanded ISO setting can be useful. Here are the options.
0: Off. With this option set, the ISO range is 100 to 6400 in P, Tv, Av, M, and A-DEP shooting modes. This is the default setting on the Rebel T2i/550D. For all but the lowest of light, this ISO range offers plenty of versatility for low-light shooting.
1: On. With this option set, you can choose "H" that is equivalent to ISO 12800. I recommend enabling and using this setting only in the most extreme of low-light scenes.
This function enables you to set the Flash Sync speed range, have the Rebel set it automatically, or set it to a fixed 1/200 second when you're using Av shooting mode. Here are the options and a description of each one:
0: Auto. When you're shooting in Av mode, choosing this option means that the T2i/550D will choose a shutter speed of 1/200 second to 30 seconds depending on the level of existing light. Slower Flash Sync speeds allow the scene to be illuminated by both the flash and the existing light in the scene. However, you must watch the shutter speed because at slow shutter speeds, any subject or camera movement appears as a blur. As long as the shutter speed is reasonably fast, this option is nice because the combination of ambient light and flash creates a natural-looking image.
1: 1/200-1/60 sec. auto. This option limits the Flash Sync speed from going slower than 1/60 second when you're using Av shooting mode. The advantage is that it helps prevents slow shutter speeds that can cause blur from handholding the camera or from subject movement. The downside is that the background will be dark because less existing light and more flash light factors into the exposure. With this setting, you cannot use high-speed Flash Sync with an accessory Speedlite.
2: 1/200 sec. (fixed). With this option, the Flash Sync speed is always set to 1/200 second and the flash typically provides the main illumination with less existing light being included in the exposure. This depends, of course, on the amount of existing light. While this option prevents blur from subject or camera movement that you may get using Option 1, the image may have flash shadows and a dark background that are characteristic of flash images with this option. With this setting, you cannot use high-speed Flash Sync with an accessory Speedlite.
The Image Custom Function group concentrates primarily on avoiding and reducing digital noise that can cause a grainy appearance with flecks of color particularly in the shadows, and in avoiding blown highlights, or highlights that are completely white with no detail.
With this function, you can turn noise reduction on, off, or set it to automatic for exposures of 1 second and longer. If you turn on noise reduction, the reduction process takes the same amount of time as the original exposure. In other words, if the original image exposure is 1 second, then noise reduction takes an additional 1 second. This means that you cannot take another picture until the noise reduction process finishes, and, of course, this greatly reduces the maximum shooting rate in Continuous drive mode. I keep the T2i/550D set to Option 1 to automatically perform noise reduction if it is detected in long exposures. Here are the options and a description of each one:
0: Off. This is the default setting where no noise reduction is performed on long exposures. This maximizes fine detail in the image, but it also increases the chances of noise in images of 1 second and longer. With this option, there is no reduction in the maximum burst rate when you're using Continuous drive mode.
1: Auto. The camera automatically applies noise reduction on 1 second and longer exposures if it finds noise present. If the Rebel T2i/550D detects noise that is typically found in long exposures, then it takes a second picture at the same exposure time as the original image, and it uses the second image, called a "dark frame," to subtract noise from the first image. Although technically two images are taken, only one image — the original exposure with noise subtracted — is stored on the media card.
2: On. The Rebel automatically performs noise reduction on all exposures of 1 second and longer. This option slows shooting down considerably because the Rebel T2i/550D always makes the dark frame to subtract noise from the original image, and the dark frame is exposed at the same amount of time as the first image. If you're shooting in Live View mode, then "Busy" is displayed during the noise reduction process. Weigh the option you choose based on the shooting situation. If you need to shoot without delay, then Option 0 or 1 is preferable. But if you want to save time at the computer applying noise reduction during image editing, then Option 2 is the ticket.
This option applies additional noise reduction when you shoot at high ISO speed settings. (The camera applies some noise reduction to all images.) Because Canon has a good noise-reduction algorithm, this setting maintains a good level of fine detail in images, and reducing shadow noise is advantageous. You may want to set this function for specific shooting situations, or you may want to set a level and leave it to be applied to all your images. Here are the options, and the level names are self-explanatory:
0: Standard
1: Low
2: Strong
3: Disable
Note
If you have C.Fn-5 set to Option 2, the burst rate in Continuous drive mode is decreased.
One of the most interesting and useful functions is Highlight tone priority, which helps ensure good image detail in bright areas of the image such as those on a bride's gown. With the function turned on, the high range of the camera's dynamic range (the range between deep shadows and highlights in a scene as measured in f-stops) is extended from 18 percent gray (middle gray) to the brightest highlights. Also, the gradation from middle gray tones to highlights is smoother with this option turned on. The downside of enabling this option is increased digital noise in shadow areas. But if you shoot weddings or any other scene where it's critical to retain highlight detail, then the trade-off is worthwhile. If noise in the shadow areas is objectionable, you can apply noise reduction in an image-editing program.
If you turn on Highlight tone priority, the lowest ISO setting is 200 rather than 100. The ISO display in the viewfinder, on the LCD, and in the Shooting information display uses a D+ to indicate that this Custom Function is in effect. Here are the options and a description of each one:
0: Disable. Highlight tone priority is not used and the full range of ISO settings is available.
1: Enable. The T2i/550D emphasizes preserving the highlight tonal values in the image and improving the gradation of tones from middle gray to the brightest highlight. Shadows go dark quicker and tend to show more digital noise. Also the ISO range is 200 to 6400. When you press the ISO button to change the ISO, the ISO speed screen notes Highlight tone priority at the bottom to remind you that this function is set. Choosing this option also automatically turns off Auto Lighting Optimizer regardless of the setting that you've chosen for it on the Shooting 2 menu.
This group of functions concentrates on autofocus speed and on enabling Mirror Lockup to prevent blur from the action of the reflex mirror in macro and long exposures.
This function enables you to control whether the Rebel T2i/550D's built-in flash or an accessory EX Speedlite's autofocus-assist light is used to help the camera's autofocus system establish focus. The AF-assist beam speeds up focusing and ensures sharp focus in low-light or low-contrast scenes. Here are the options and a description of each one:
0: Enable. This option allows the AF-assist beam from either the built-in flash or a Canon Speedlite mounted on the camera to help the camera focus. Enable is the default setting for the Rebel T2i/550D.
1: Disable. If you choose this option, neither the built-in flash nor the Speedlite AF-assist beam lights to help establish focus. While this option is useful in shooting situations where the AF-assist light may be annoying or intrusive, it can be difficult for the T2i/550D to establish accurate focus in low-light scenes.
2: Enable external flash only. If you choose this option, the AF-assist beam emits only when a Canon Speedlite is mounted on the camera's hot shoe. The Speedlite's AF-assist beam is more powerful than the beam of the built-in flash, and that makes this option good for low-light and low-contrast subjects that are farther away from the camera. However, be aware that if you have set the Custom Function on the Speedlite so that the AF-assist beam does not fire, then the Speedlite's Custom Function option overrides the camera's Custom Function option.
3: IR AF-assist beam only. If your accessory Speedlite has an infrared AF-assist beam, this option will enable using the IR AF-assist beam, and it prevents flash units that use a series of small flashes from firing the AF-assist beam.
Option 1 for this function prevents blur that can be caused in close-up and super-telephoto shots by the camera's reflex mirror flipping up at the beginning of an exposure. While the effect of motion from the mirror is negligible during normal shooting, it can make a difference in the extreme magnification levels for macro shooting and when using super-telephoto lenses. If you turn on Mirror Lockup, the first time that you press the Shutter button, it flips up the reflex mirror. You then have to press the Shutter button again to make the exposure. Also be sure to use a tripod in conjunction with Mirror Lockup. This option obviously doesn't apply during Live View shooting since the reflex mirror is already locked up to provide the live view of the scene. Here are the options and a description of each one:
0: Disable. This is the default setting where the reflex mirror does not lock up before making an exposure.
1: Enable. Choosing this option locks up the reflex mirror when you first press the Shutter button. With the second press of the Shutter button, the exposure is made and the reflex mirror drops back down.
Tip
If you often use Mirror Lockup, you can add this Custom Function to My Menu for easy access. Customizing My Menu is detailed later in this chapter. Also, if you use Mirror Lockup with bright subjects such as snow, bright sand, the sun, and so on, be sure to take the picture right away to prevent the camera curtains from being scorched by the bright light.
This group of Custom Functions enables you to change the functionality of camera buttons for ease of use to suit your shooting preferences, to control the LCD display, and to add data that verifies that the images are original and unchanged.
This function changes the function of the Shutter button and the AE Lock button (the button located at the top-right back of the camera with an asterisk above it) for focusing and exposure metering. To understand this function, it's important to know that the Rebel T2i/550D biases or weights the light metering in Evaluative metering mode toward the active AF point, which it assumes is the subject.
However, there are times when you want to meter somewhere other than where you want to focus. For example, if you're shooting a portrait, you may want to meter the light (on which the exposure will be calculated) and have it biased toward an area of the subject's skin. This area isn't where you want to set the focus; rather, you want to focus on the subject's eyes. To bias the metering on one area and focus on another area, you can use AE Lock.
The options of this function enable you to switch or change the functionality of the Shutter button and the AE Lock button, or to disable AE Lock entirely when you use continuous focusing via AI Servo AF mode. Note that only Option 1 can be used in Live View shooting, and none of the options works in Movie mode shooting.
Here are the options and a description of each one:
0: AF/AE lock. This is the default setting where you set the focus using the Shutter button, and you can set and lock the exposure by pressing the AE Lock button.
1: AE lock/AF. Choosing this option switches the function of the Shutter button and the AE Lock button. Pressing the AE Lock button focuses while pressing the Shutter button halfway sets and locks the exposure. Then you press the Shutter button completely to make the picture. You cannot use the Remote Switch RS-60E3 to focus by half-pressing the Shutter button.
2: AF/AF lock, no AE lock. If you're shooting in AI Servo AF mode where the camera automatically tracks focus on a moving subject, this function enables you to press the AE Lock button to stop focus tracking momentarily such as when an object moves in front of the subject. If you enable this option, you cannot use AE Lock.
3: AE/AF, no AE lock. With this option, you can start and stop AI Servo AF focus tracking by pressing the AE Lock button. For example, if you are photographing an athlete who starts and stops moving intermittently, you can press the AE Lock button to start and stop continuous autofocus tracking (AI Servo AF) depending on the motion of the subject. In AI Servo AF mode, the exposure and focusing are set when you press the Shutter button. You cannot use the Remote Switch RS-60E3 to focus by half-pressing the Shutter button.
This Custom Function enables you to take advantage of using the Set button while you're shooting rather than only when you're using camera menus. The Set button continues to function normally when you're accessing camera menus. Here are the options and a description of each one:
0: Normal (disabled). With this option selected, pressing the Set button during shooting has no effect.
1: Image quality. With this option, you can press the Set button as you shoot to display the Image-recording quality screen on the LCD so that you can make changes.
2: Flash exposure compensation. With this option, you can press the Set button to display and change Flash Exposure Compensation setting screen to set or change the amount of flash exposure compensation.
3: LCD monitor On/Off. With this option, pressing the Set button toggles the LCD monitor display on or off, replicating the functionality of the Display button.
4: Menu display. With this option, pressing the Set button displays the last camera menu that you accessed with the last menu item highlighted.
5: ISO speed. With this option, pressing the Set button displays the ISO speed screen where you can adjust the ISO sensitivity setting.
This function enables you to save a bit of battery power by choosing whether the shooting information is displayed on the LCD when you turn on the Rebel T2i/550D. Here are the options and a description of each one:
0: Display on. This is the default setting where the T2i/550D displays shooting information on the LCD when you turn on the camera. To turn off the display, you must press the Display button on the back of the camera.
1: Previous display status. With this option, the T2i/550 remembers the last state of the LCD display when you turn the camera off, and then it returns to that state when you turn on the camera again. So if you turned off the LCD display by pressing the Display button, and then turn off the camera, the LCD display is not turned on when you turn on the camera and vice versa. If you want to use this option to save battery power or simply to have the camera behave in one or the other way, you have to remember to press the Display button to either turn on or off the LCD before powering down the camera each time.
When this option is turned on, data is appended to verify that the image is original and hasn't been changed. This is useful when images are part of legal or court proceedings. The optional Original Data Security Kit OSK-E3 is required. Here are the options and a description of each one:
0: Disable. Image verification data is not appended to the image.
1: Enable. With this option and when used with the Original Data Security Kit OSK-E3, data is automatically appended to the image to verify that it is original. When you display shooting information for the image, a distinctive locked icon appears.
Depending on your shooting preferences and needs, you may immediately recognize functions and options that would make your shooting faster or more efficient. You may also find that combinations of functions are useful for specific shooting situations. Whether used separately or together, Custom Functions can significantly enhance your use of the T2i/550D.
To set a Custom Function, follow these steps:
Set the Mode dial to P, Tv, Av, M, or A-DEP.
Press the Menu button, and then turn the Main dial until the Setup 3 menu is displayed.
If necessary, press the up or down cross key to highlight Custom Functions (C.Fn), and then press the Set button. The most recently accessed Custom Function screen appears.
Press the right or left cross key to move through the Custom Function numbers displayed in the box at the top right of the screen, and when you get to the number you want, press the Set button. The Custom Function option control is activated and the option that is currently in effect is highlighted.
Press the up or down cross key to highlight the option you want, and then press the Set button. You can refer to the previous descriptions in this section of the chapter to select the function option that you want. Repeat Steps 4 and 5 to select other Custom Functions and options. Lightly press the Shutter button to return to shooting.
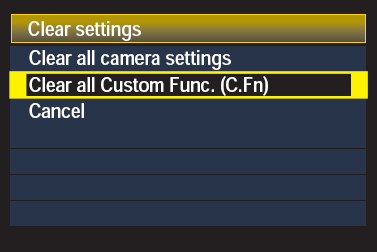
If you want to reset one of the Custom Functions, repeat these steps to change it. If you want to restore all Custom Function options to the camera's default settings, follow Steps 1 and 2 above. Then, press the down cross key to highlight Clear Settings, and press the Set button. On the Clear Settings screen, select Clear all Custom Func. (C.Fn), and then press the Set button. Press the right cross key to select OK, and then press the Set button.
Given the number of menus and menu options on the T2i/550D, and given that in an average day of shooting you may use only a few menus and options consistently, customizing the My Menu option makes it easy to select and register six of your most frequently used menu items and Custom Functions for easy access.
You can add and delete items to My Menu easily and quickly, and you can change the order of items by sorting the items you register. You can also set the T2i/550D to display My Menu first when you press the Menu button.
Before you begin registering items to My Menu, look through the camera menus and Custom Functions carefully and choose your six most frequently changed items.
To register camera Menu items and Custom Functions to My Menu, follow these steps:
Set the Mode dial to P, Av, Tv, M, or A-DEP.
Press the Menu button, and then turn the Main dial until My Menu is displayed.
Press the up or down cross key to highlight My Menu settings, if necessary, and then press the Set button. The My Menu settings screen appears.
Press the up or down cross key to highlight Register to My Menu, and then press the Set button. The Select item to register screen appears. This screen contains a scrolling list of all the camera's menu items, options, and Custom Functions.
Press the down cross key until you get to a menu item or Custom Function that you want to register, and then press the Set button. As you press the down cross key to scroll, a scroll bar on the right of the screen shows your relative progress through the list. When you select an item and press the Set button, a confirmation screen appears.
Press the right cross key to highlight OK, and then press the Set button. The Select item to register screen reappears.
Repeat Steps 5 and 6 until you've selected and registered as many items as you want up to six.
When you finish registering menu items, press the Menu button. The My Menu settings screen appears. If you want to sort your newly added items, from here go to Step 3 in the next set of steps.
To arrange your My Menu items in the order you want, follow these steps:
In P, Av, Tv, M, or A-DEP mode, press the Menu button, and then press the right cross key until My Menu is displayed.
Press the down cross key to highlight My Menu settings, and then press the Set button. The My Menu settings screen appears.
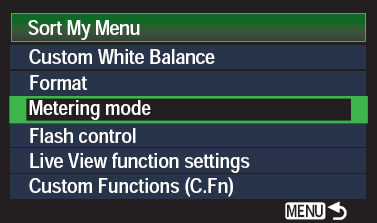
Press the down cross key to highlight Sort, and then press the Set button. The Sort My Menu screen appears.
Press the down or up cross key to select the item that you want to move, and then press the Set button. The sort control for the selected item is activated and is displayed with up and down arrow icons.
Press the up cross key to move the item up in the list, or press the down cross key to move it down in the list, and then press the Set button.
Repeat Steps 4 and 5 to move other menu items in the order that you want. Lightly press the Shutter button to return to shooting.
Note
The My Menu settings item always appears at the bottom of the My Menu list. Selecting it gives you access to the My Menu settings screen where you can Register, Sort, Delete, Delete all items, and disable or enable the display of My Menu as the first menu displayed.
You can delete either one or all items from My Menu. And you can choose to have My Menu displayed first every time you press the Menu button.
To delete one or more items from My Menu, follow these steps:
In P, Av, Tv, M, or A-DEP mode, press the Menu button, and then press the right cross key until My Menu is displayed.
Press the down cross key to highlight My Menu settings, and then press the Set button. The My Menu settings screen appears.
Press the down cross key to highlight Delete item/items, or highlight Delete all items to delete all registered items, and then press the Set button. The Delete item from My Menu or the Delete all My Menu items screen appears depending on the option you chose.
If you chose to delete individual menu items, press the down cross key to highlight the menu item you want to delete, and then press the Set button. The Delete My Menu confirmation screen appears. If you chose to Delete all items, the Delete all My Menu items screen appears.
Press the right cross key to select OK, and then press the Set button. Lightly press the Shutter button to return to shooting.
If you want the My Menu tab to be the first menu displayed when you press the Menu button, follow these steps:
On the My Menu menu, press the down cross key to highlight Display from My Menu, and then press the Set button. The My Menu settings screen appears.
Press the down cross key to highlight Display from My Menu, and then press the Set button. Two options appear.
Press the down cross key to select Enable, and then press the Set button. Lightly press the Shutter button to return to shooting.
In addition to setting Custom Functions and setting up My Menu, you can also display a handy Quick Control screen from which you can quickly change key camera and exposure settings in P, Tv, Av, M, and A-DEP shooting modes, and you can change the color of the LCD monitor.
The Quick Control screen is a very convenient way to not only see what settings the Rebel T2i/550D is currently set to, but also to quickly change settings on the fly with a minimum of changing among camera controls and menus.
Here is how to display and use the Quick Control screen:
In any camera mode, press the Display button. The shooting settings screen appears on the LCD showing the current exposure and camera settings.
Press the Q button. The Quick Control screen is activated. In Basic Zone modes such as Portrait, Landscape, and so on, the only option you can change is the image recording quality. In CA mode, you can change the shooting and exposure options displayed on the screen. And in P, Tv, Av, M, and A-DEP shooting modes, you can change the options displayed on the screen including ISO, shutter speed, or aperture, depending on the shooting mode, Exposure Compensation, Picture Style, white balance, Metering mode, and so on.
Press a cross key to select the option or setting that you want to change, and then turn the Main dial to change the setting. As you turn the Main dial, the camera cycles through the available options. To change another setting, repeat this step.
If you press a cross key and you get the screen for the function of that cross key, it means that you are not on the Quick Control screen. For example, if you press the WB cross key, and the White balance screen appears, it means that you are on the shooting settings screen instead of the Quick Control screen. You can tell the difference by looking in the lower left corner of the screen. If the LCD shows a Q in the lower left corner, it means that you are on the shooting setting screen. Just press the Q button to change to the Quick Control screen, and then you can press a cross key to make changes as described in Step 3. If the bottom of the screen displays descriptive text, then you're on the Quick Control screen.
Note
The Quick Control screen automatically changes to the shooting settings screen in about eight seconds if you are not making changes on the Quick Control screen. It also automatically reverts to the shooting settings screen when you half press the Shutter button.
Another customization option on the Rebel T2i/550D is choosing the screen color you want for the LCD shooting information display. You can choose from four options:
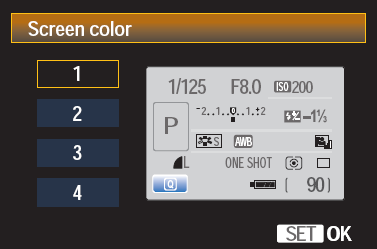
Black text on a light gray background, which is the default setting
White text on a black background
White text on a brown background
Green text on a black background
To set the screen color, follow these steps.
In any camera mode, press the Menu button, and then turn the Main dial to select the Setup 1 menu.
Press the down cross key to highlight Screen Color, and then press the Set button. The Screen color screen appears.
Press the up or down cross key to select the color scheme that you want, and then press the Set button. The option you choose remains in effect until you change it.
The T2i/550D offers you a high level of customization. While the full complement of choices may initially seem overwhelming, I recommend taking each one in turn and building on it to set more custom settings until you get the camera set up for your shooting style.