
Your iMac includes all the software you need to make professional-quality movies from your own video footage. You can import video from either a tape camcorder or a digital camcorder, edit the footage, add titles and credits, and give the movie a soundtrack. You can then share the movie with other applications, export the movie to a file, or post it on YouTube.
Open and Close iMovie 240
Import Video from a Tape Camcorder 242
Import Video from a Digital Camcorder 244
Import Video from a Digital Camera 246
Import Video Files from Your iMac 248
Create a Movie Project 250
Select the Video Footage You Want to Use 252
Build the Movie Project from Clips 254
Add Transitions between Video Clips 256
Add a Still Photo to the Movie Project 258
Create a Soundtrack for the Movie 260
Add Titles and Credits 262
Share the Movie on YouTube 264
iMovie is a powerful but easy-to-use application for importing video from camcorders, editing the video, and creating movies from it.
To work with iMovie, you must first open the application, either from the Dock or from the Applications folder. After you have finished using iMovie, close the application to free up your Mac's hardware resources again.

Open and Close iMovie
Open iMovie

Note
If iMovie does not appear on the Dock, click the desktop, and then choose Go and Applications. In the Finder window that opens, double-click iMovie.
The iMovie window opens.
If this is the first time you have run iMovie, the application creates a new movie project named My First Project.
If you have already run iMovie and created other projects, iMovie displays your most recent project.

The iMovie menu opens.

iMovie closes.

Tip
Where do I create my movies in iMovie?
To enable you to make movies as easily as possible, the iMovie window has the Project Library and the Project pane share the same space. From the Project Library, double-click a project to open it in the Project pane so that you can work in it. From the Project pane, click the Project Library button to close the project and display the Project Library again.

How do I save changes to a movie project in iMovie?
After you create a movie project, iMovie automatically saves changes to the project for you. This means that you do not need to save changes manually as you have to do in many applications.
If you have video footage on a camcorder that records on to video tape, you can connect the camcorder to your iMac with a FireWire cable and import the video. You can either import all of the footage at once or select the parts of it to import, using your iMac to control the camera's playback.

Import Video from a Tape Camco
Import All Footage


Tip
Which hard disk should I save the video footage on?
When you are starting to use iMovie, save the video to your iMac's hard disk, which is normally called Macintosh HD unless you have renamed it. But if you have connected a high-speed external hard disk that you can devote to iMovie files, choose that disk instead.
What is an Event, and how do I use Events?
An Event is a way of dividing up your video clips by the date and time you took them or by their theme. When you import video, you can choose between putting it in an existing Event or creating a new Event. You can create further Events later as needed and move video clips to them.
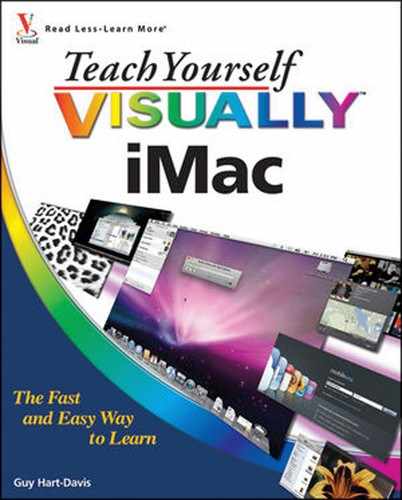
If you have video footage on a camcorder that records on to a memory card, a hard disk, or a DVD, you can connect the camcorder to your iMac with a USB cable and import the video. Because the video clips are stored as separate files, you can choose which clips to import, or simply import all of them at once.

Import Video from a Digital Camcorder
Note
Connect the USB cable to a USB port on the iMac, not to a port on the keyboard (if your iMac has a wired keyboard).
iMovie recognizes the camcorder and opens if it is not already running.
The Import From window opens.
Note
If you want to import all the clips, go to step 5.


Note
Click Uncheck All if you need to uncheck all the boxes quickly.

A dialog of import options opens.


iMovie imports the movie clips.


Tip
Should I check the Analyze for Stabilization after Import check box when importing video?
iMovie's video stabilization has two steps. First, you have iMovie analyze the video to decide which parts need stabilization; you can do this either when you import video, or later. Second, you apply the stabilization. Generally, it is better to analyze video for stabilization after importing it, for two reasons. First, the analysis makes the video importing take longer. Second, you may want to discard footage without analyzing it for stabilization, and analyze only the footage you want to use.

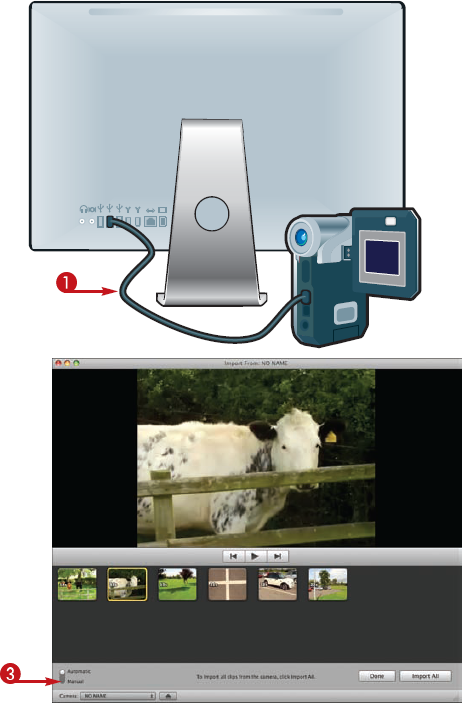
If your digital camera takes videos as well as still photos, you can bring the videos into iMovie and use them in your movies.
To import videos from a digital camera, you must normally use iPhoto rather than iMovie. You can then access the videos through iMovie's iPhoto Videos collection.

Import Video from a Digital Camera
iPhoto automatically launches and displays the contents of the camera.
Note
If the digital camera contains both photos and videos, iPhoto displays both. Each video has the

Note
To import just some videos, select those you want and then click Import Selected.
iPhoto imports the videos.

Note
The Delete Photos on Your Camera? dialog always mentions photos even if you have imported videos. It is best to keep the photos or videos on the camera until you have checked what you imported.
The dialog closes, and the videos appear in the Last Import list in iPhoto.

Tip
Can I play a video in iPhoto?
In iPhoto, double-click the video to open it in a QuickTime window. You can then control playback by using the on-screen control bar that appears (

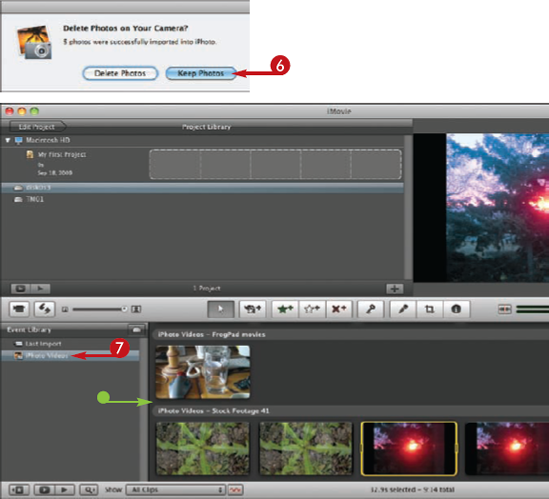
If you have video files stored on your iMac, you can import them into iMovie so that you can use them in your movies.
You can also use this technique to import video files from a digital camera whose memory card you can remove from the camera and connect to your iMac.

Import Video Files from Your iMac
The File menu opens.
The Import submenu opens.
Note
If you want to add the video files to an existing Event, click Add to existing Event, click


iMovie imports and optimizes the video or videos.
Tip
Why should I choose Full – Original Size when importing video?
iMovie can import high-definition video either at full quality or at reduced quality, which iMovie describes as Large. Use full quality unless your iMac is severely short of disk space. It is better to retain video quality so that your video footage is as good as possible. After making your movie, you can export it at a lower resolution if you want, while retaining a full-quality version on your iMac.

To make a movie, you first create a movie project, a file that contains the details of the movie. You then add video clips to the movie project, arrange and edit them, and add transitions and titles.
iMovie automatically creates a new movie project named My First Project when you first launch the application. You can rename this project or delete it.

Create a Movie Project
Note
If the Project Library shows you two or more hard disks, first click the disk on which you want to create the project – for example, Macintosh HD. Then click New Project.
The New Project dialog opens.

Note
A theme is a predefined set of screen transitions, titles, and other effects for a movie.
Note
If you are not using a theme, you can check Automatically add (


Tip
How do I rename a movie project?
To rename a movie project, double-click its name (

How do I delete a movie project?
To delete a movie project, you move it to the Trash.
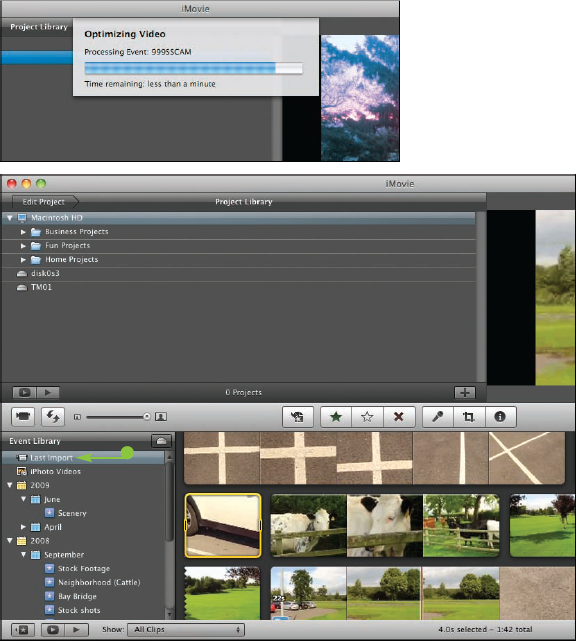
After importing video from your camcorder or your iMac, you have one or more Events in iMovie containing video clips — short sections of video.
Next, identify the video footage you want to use in your projects. To do so, you play back the clips and select the parts you want to use. You can mark a clip as a Favorite or as a reject for easy sorting.

Select the Video Footage You Want to Use
View a Clip
Select Part of a Clip
iMovie selects a four-second section from where you clicked.
Note
To move a selection without changing its length, click the yellow line at the top of the selection and then drag.
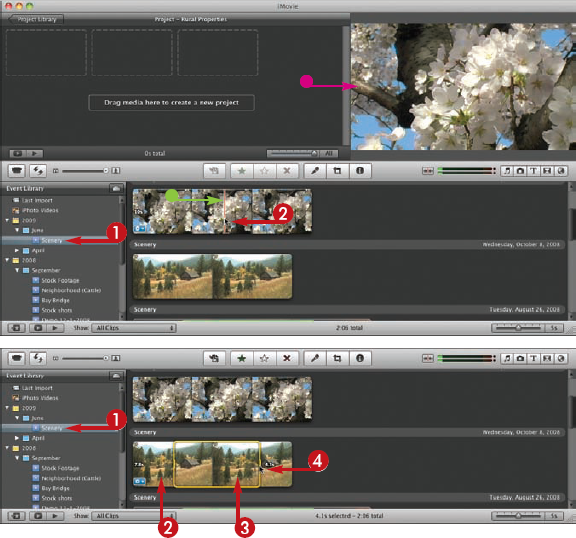
Mark a Selection as a Favorite or a Reject
View Only Your Favorites
iMovie displays only the footage you have marked as favorites.
Note
You can choose Favorites and Unmarked to view favorites and footage you have not marked as rejected.

Tip
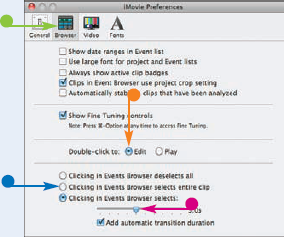
Can I change the amount of video iMovie selects when I click a clip?
Choose iMovie and Preferences to open the Preferences window, and then click the Browser tab (
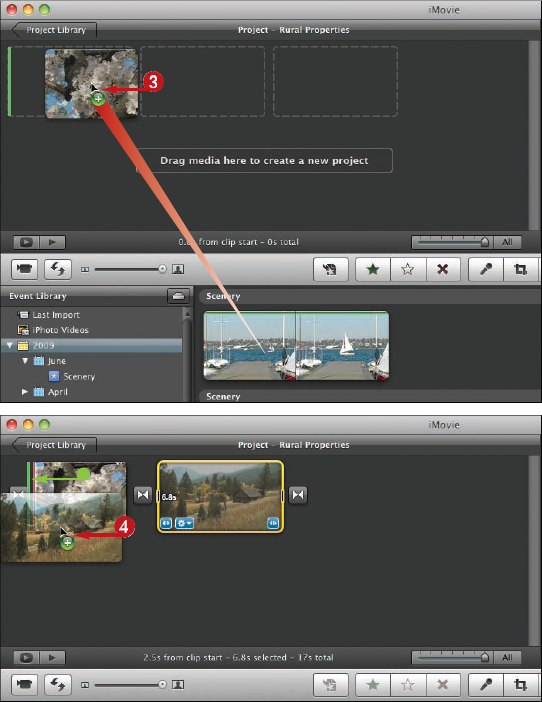
After grading your clips, you can quickly add your favorites to the movie project to build the movie.
You can then arrange the clips into the order in which you want them to play.

Build the Movie Project from Clips
iMovie opens the project in the Project pane.
Note
Use the selection methods explained on the previous two pages to select part of a clip.


iMovie adds the clip to the project.
Note
If you chose to have iMovie add transitions to your movie automatically, a transition icon such as

Note
To remove a clip from a project, click the clip in the Project pane and then press
Tip
Why does iMovie break up my video footage into separate clips?
When you import video footage from a tape camcorder, iMovie automatically creates clips from different sections of the tape by using the time code stamped on the frames: Where there is a gap in the time code, iMovie creates a new clip. A camcorder that stores digital files in memory, on a hard disk, or on DVD automatically creates its own clips as you record, and iMovie preserves these clips.

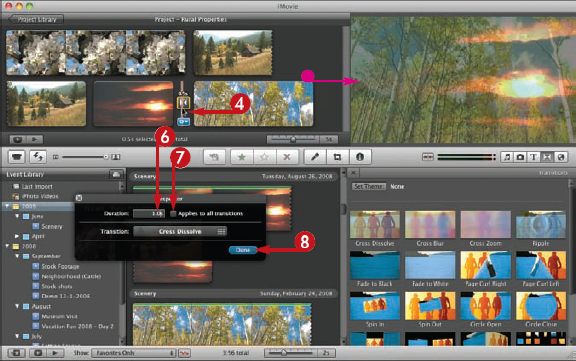
To make one clip flow better into the next, you can apply an effect called a transition between the clips. For example, the widely used Cross Dissolve transition gradually replaces the end of the first clip with the beginning of the second clip.
iMovie can apply transitions automatically, but you can retain greater control by applying them manually.

Add Transitions between Video Clips
Note
Position the mouse pointer over a transition to see a preview of its effect.

iMovie adds an icon representing the transition.
Note
Each transition has a different icon. With practice, you can identify transitions by their icons.

An Inspector dialog opens.
The Inspector dialog closes.
Tip
How can I change to a different transition?
After applying a transition between two video clips, you can switch to another transition by clicking and dragging it from the Transitions browser and dropping it on the existing transition. The replacement transition picks up the duration of the existing transition. You do not need to delete the existing transition first.

Should I add transitions to my movie automatically?
When using a theme to create a movie, set iMovie to add transitions automatically, because doing so gives you the best effect from the theme. When creating a movie without a theme, apply transitions manually, adding them only where the clips actually need them. For clips that flow easily from one to the next, leave a straight cut with no transition.

As well as video clips, you can use still photos in your movie projects. This capability lets you enrich your movies with your iPhoto library.
You can crop a photo to show exactly the right part, and you can bring life and movement to it by adding a Ken Burns effect, panning and zooming across the photo.

Add a Still Photo to the Movie Project


Tip
How do I crop or rotate a photo?
Click the photo in the Project pane, click Action (

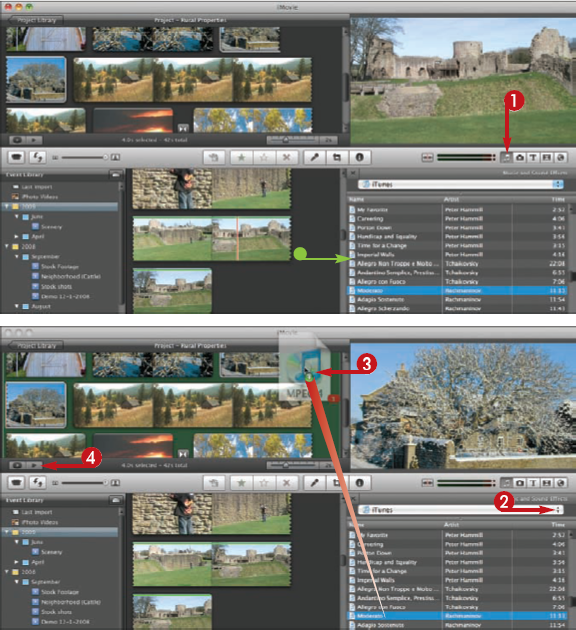
Your movie includes any audio you recorded along with your video clips, but you can also create a soundtrack for a movie by adding a song or playlist that plays in the background.
You can also add a sound effect at a particular point in a movie, or add narration to any footage that needs it.

Add a Background Track
Note
Make sure the Project pane shows a green background when you drop the song. This means the song becomes a background track for the first part of the movie.
iMovie plays the movie with the soundtrack.
Add a Sound Effect to a Video Clip
Set the Sound Level
An Inspector dialog opens.
The audio controls appear.
The Inspector dialog closes.


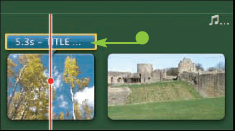
To give your movie an identity and a professional look, add a title, subtitle, and credits. iMovie provides a wide variety of title types suitable for different kinds of movies.
You can also add title screens to other parts of the movie that need them – for example, to make a change of scene explicit to the audience.

Add a Title
iMovie adds the title and displays the Choose Background dialog.
iMovie closes the Choose Background dialog and applies the background.
Note
If you do not need one of the placeholders, select it, and then press

iMovie applies the text to the title.

iMovie adds the title to the movie and displays the Choose Background dialog.
iMovie applies the background.
Note
If you do not need one of the placeholders, select it, and then press

iMovie applies the text to the title.
The Titles browser pane closes.

Tip
Can I superimpose a title or credits on a screen?
Yes. Click the title in the Titles browser and drag it to the Project pane. Position the mouse pointer over a clip until the playhead is at the frame where you want the title to start playing and then drop the title. You can then edit the title text in the viewer (
To share a movie with everybody on the Internet, you can post it to the YouTube video-sharing site. iMovie includes a built-in command for creating movies in the format that YouTube requires and for posting movies to the site.
Movies you post on YouTube must be less than 10 minutes long and less than 100 MB in size.

Share the Movie on YouTube


Tip
How do I get an account on YouTube?
Click Safari (
What are tags and why should I use them?
A tag is a text term that helps explain concisely what a movie is about. YouTube uses tag information in searches, so the tags help people find movies they are interested in. By adding suitable tags to your movie, you can make your movie easier to find and increase its audience.
