Each new iMac comes with iPhoto, a powerful but easy-to-use application for managing, improving, and enjoying your photos. You can import photos from your digital camera; crop them, straighten them, and perfect their colors; and turn them into albums, slideshows, and online galleries.
Open and Close iPhoto 210
Import Photos from Your Digital Camera 212
Browse through Your Photos 214
Crop a Photo to the Right Size 216
Rotate or Straighten a Photo 218
Remove Red-Eye from a Photo 220
Improve the Colors in a Photo 222
Add an Effect to a Photo 224
Sort Your Photos into Events 226
Create Albums of Your Photos 228
Create a Slideshow of Your Photos 230
Publish Photos to a MobileMe Gallery 232
Send a Photo via E-mail 234
Take Photos or Videos of Yourself 236
To get started with iPhoto, you must first open the application. When you finish using iPhoto, you can leave the application running if you plan to use it again soon, or you can quit the application to close it and make the memory it was using available for other use again.
Open and Close iPhoto
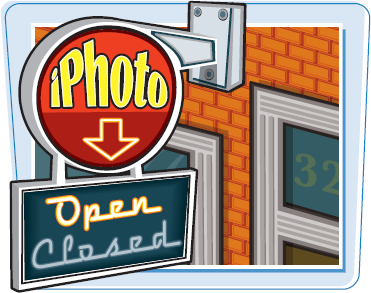
Open iPhoto

Note
If the iPhoto icon does not appear on the Dock, click Finder (

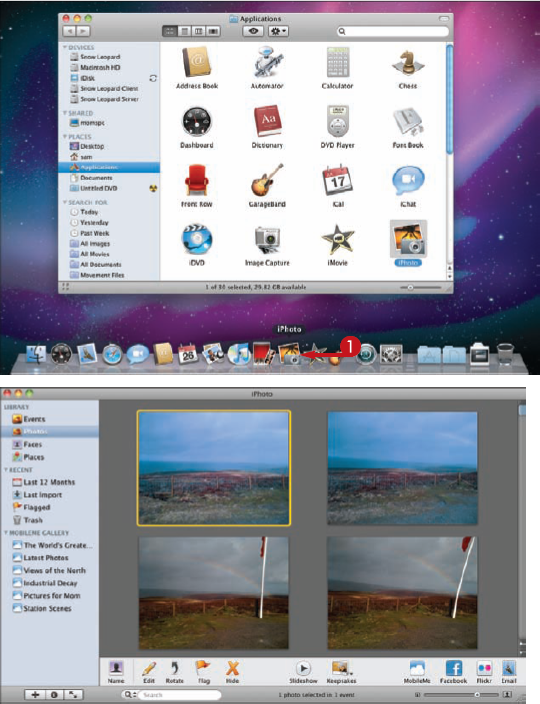
The iPhoto window opens.
The iPhoto menu opens.

The iPhoto window closes.

Tip
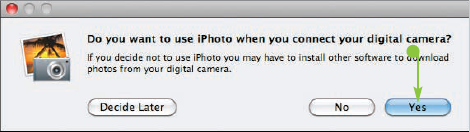
When I launch iPhoto, a dialog asks me if I want to use iPhoto when I connect my digital camera. Should I click Yes or No?
If iPhoto displays the Do You Want to Use iPhoto When You Connect Your Digital Camera? dialog, normally it is a good idea to click Yes (
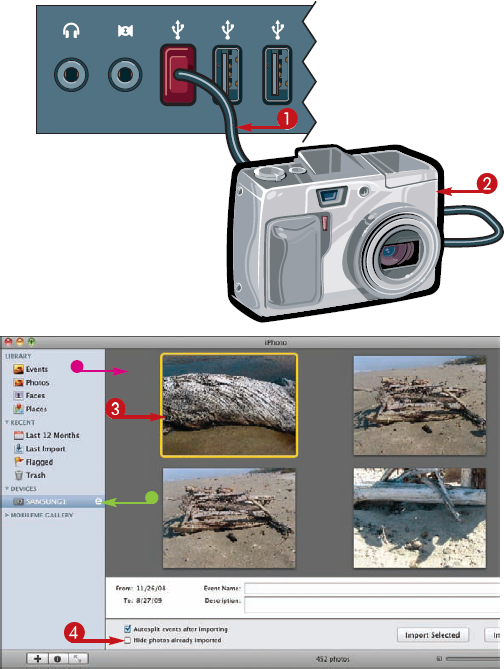
iPhoto enables you to import photos directly from your digital camera's memory or from a memory card. iPhoto can work with a wide variety of types of digital cameras, and normally recognizes a camera automatically when you connect it to your iMac and switch it on.

Import Photos from Your Digital Camera
Note
Some digital cameras turn on automatically when you connect them to a powered USB port, but most cameras need to be turned on manually.
Your iMac launches iPhoto if it is not running, or brings it to the front if it is running.


iPhoto hides the photos you have already imported.


Note
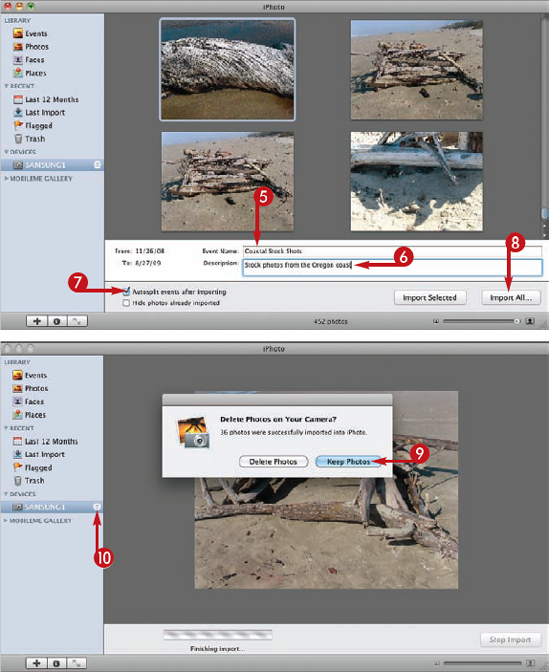
If you selected photos in step 2, click Import Selected instead of Import All.
iPhoto copies the photos from the digital camera to your iMac.
The Delete Photos on Your Camera dialog opens.


iPhoto ejects the camera, and you can safely disconnect it. You can now browse your photos as explained on the following pages.
Tip
How can I connect my digital camera to my iMac if I do not have the right kind of connector cable?
If you do not have the right cable to connect your digital camera directly to your iMac, remove the digital camera's memory card and insert it in a memory card reader connected to the iMac. The iMac then recognizes the memory card as a digital camera, and you can import the photos from it as described on these pages.

What is an Event, and what names should I give my Events?
An Event is a way of grouping photos in iPhoto. When you import photos, you assign them to an Event, and you can then browse and organize them through the Event. An Event can be a period of time from a few hours to a week or more, but you can also create Events that have ideas or themes as needed.

After adding your photos to iPhoto, you can browse through them in several ways. Usually the best way to start is by viewing the Last Import category, which contains the photos you most recently imported. You can view the photos either within the iPhoto window or full screen for greater effect.

Browse through Your Photos
The contents of the Recent category appear.
The last batch of photos you imported into iPhoto appear.
Note
Normally, the Last Import item shows photos from your digital camera. But if you last added photo files from a folder or from a scanner to iPhoto, those photos appear in Last Import.

The thumbnail bar appears.
iPhoto displays that photo.
Note
Move the mouse pointer down toward the middle of the screen to hide the thumbnail bar again.
iPhoto displays the full-screen control bar, which contains tools for editing photos.
iPhoto exits full screen and displays its window again.

To improve a photo's composition and emphasize its subject, you can crop off the parts you do not want to keep. iPhoto enables you to crop to any rectangular area within a photo, so you can choose exactly the part of the photo that you need.
Crop a Photo to the Right Size


Tip
I cropped off the wrong part of the photo. How can I get back the missing part?
You can undo an edit by choosing Edit and Undo or pressing

If you take a photo with the camera sideways or the wrong way up, you can easily rotate the photo by 90 or 180 degrees in iPhoto to fix the problem. iPhoto also enables you to straighten a photo by rotating it up to 10 degrees, automatically cropping off the parts that no longer fit.

Rotate or Straighten a Photo
Rotate a Photo
iPhoto rotates the photo 90 degrees counterclockwise.
Straighten a Photo


Note
Use the major and minor gridlines in the straightening grid to judge when lines in the picture have reached the horizontal or the vertical.
iPhoto hides the editing tools again.

Tip
How can I rotate a photo clockwise instead of counterclockwise?
To quickly rotate a photo clockwise,

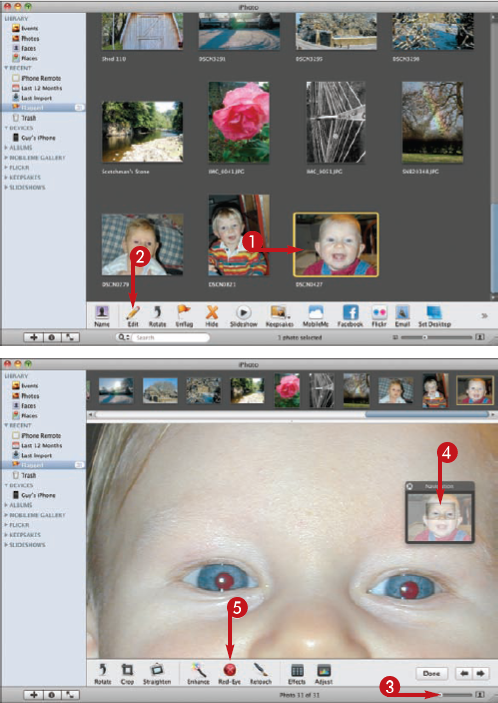
A camera's flash can make all the difference when taking photos in dark or dull conditions, but flash often gives people red-eye — glaring red spots in the eyes. iPhoto's Red-Eye tool enables you to remove red-eye from your photos, making your subjects look normal again.

Remove Red-Eye from a Photo

Tip
What is the Auto button in the Red-Eye tool for?
The Auto tool should be the quickest way to remove red-eye from a photo, but it generally gives less satisfactory results than removing red-eye manually. Normally, your photos look better if you click and drag the Size slider to the right size for the red-eye you need to remove. This takes only a moment longer than Auto, so it is usually worth doing.

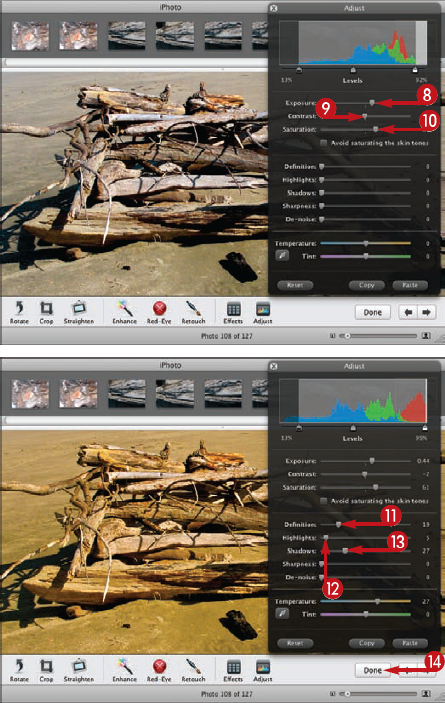
iPhoto includes powerful tools for improving the colors in your photos. If a photo is too light, too dark, or the colors look wrong, you can use these tools to make it look better. You can also use the Enhance tool to give the colors in a photo a fast and easy boost.

Improve the Colors in a Photo
Quickly Enhance the Colors in a Photo
iPhoto adjusts the exposure and enhances the colors.
Improve the Colors with the Adjust Window

Tip
What do the Sharpness and De-noise sliders in the Adjust dialog do?
Sharpness tries to make the photo look sharper by increasing the contrast between neighboring pixels that have different colors. Adjust the Sharpness slider gradually because big adjustments can give an unnatural look. De-noise attempts to remove incorrect colors and artifacts from the photo. Again, make changes gradually to achieve a better look.

How can I make the same change to several photos?
After making changes to one photo, click Copy in the Adjust dialog. Leave the Adjust dialog open while you click another photo and then click Paste to paste the adjustments to that photo. Repeat the paste operation as needed for other photos that need the same adjustments.

To add life and interest to a photo, you can apply one of iPhoto's effects to it. For example, you can turn a photo black and white or sepia, boost or fade the color, or turn the subject into a vignette in a blacked-out oval.

Add an Effect to a Photo


Tip
How can I remove the effects from a photo?
To remove the effects you have applied to a photo, click Original (

Can I apply multiple effects to a photo?
You can apply two or more effects to a photo at the same time. Some of the effects are mutually exclusive – for example, you cannot apply both B & W and Sepia to a photo at the same time. But you can apply other combinations of effects, such as applying both Sepia and Vignette to a photo.
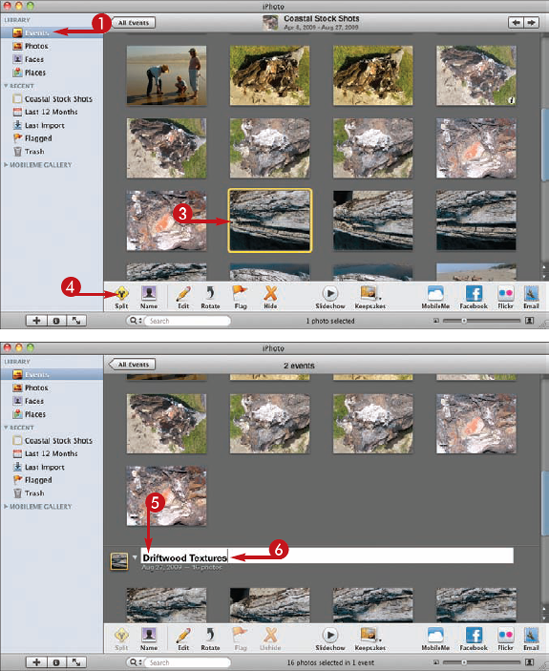
iPhoto automatically creates Events when you import photos, but you can move photos from one Event to another as needed to keep your photos organized. You can also split one Event into two Events, or merge two existing Events into a single Event.

Sort Your Photos into Events
Move Photos from One Event to Another
Note
Each Event appears as a stack of photos with a key photo on top. Move the mouse around over the key photo to see other photos in the Event.
iPhoto opens the Events.
Note
If you want to put all the photos from one Event in another Event, open the Events as described here, and then click Merge (


Split an Event into Two Events
Tip
Can I change how iPhoto creates Events?
You can set iPhoto to create an Event for every two hours, every eight hours, every day, or every week. iPhoto uses the times and dates in the photos you import, not your iMac's clock. Choose iPhoto and Preferences. The Preferences window opens. Click Events to open the Events preferences pane. Click Autosplit into Events and choose Two-hour gaps, Eight-hour gaps, One event per day, or One event per week, as needed. Click

When you want to assemble a custom collection of photos, create a new album. You can then add to it exactly the photos you want and arrange them into your preferred order.
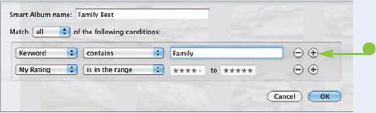
iPhoto can also create smart albums that automatically include all photos that meet the criteria you choose.

Create Albums of Your Photos
The New dialog opens.
Note
You can also create an album quickly by selecting photos, clicking New (

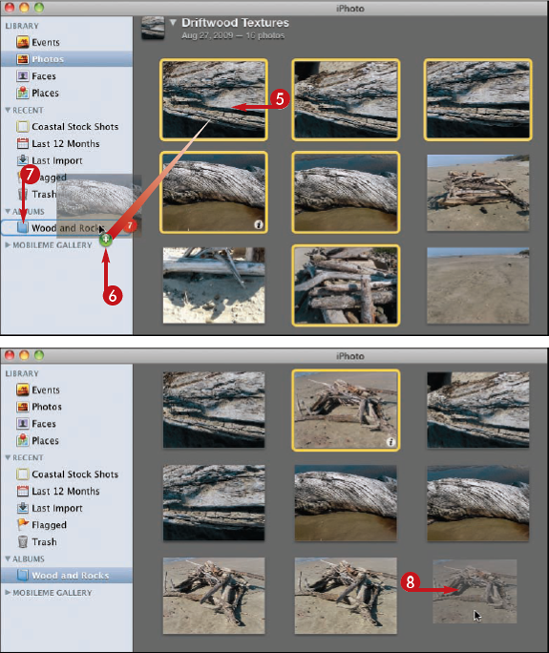
Note
You can also add photos to the album from Events, from Last Import, or from any of the other items in the sidebar.
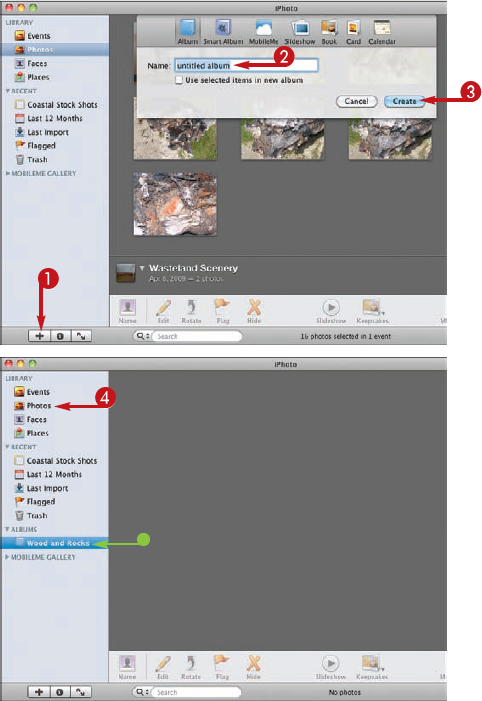
iPhoto adds the photos to the album.
The photos in the album appear.
iPhoto arranges the photos.
Tip
What is a smart album, and how do I create one?
A smart album is an album based on criteria you choose. For example, you can create a smart album of photos with the keyword "family" and a rating of four stars or better. iPhoto then automatically adds each photo that matches those criteria to the smart album. To create a new smart album, choose File and New Smart Album, and then set your criteria in the New dialog. Click
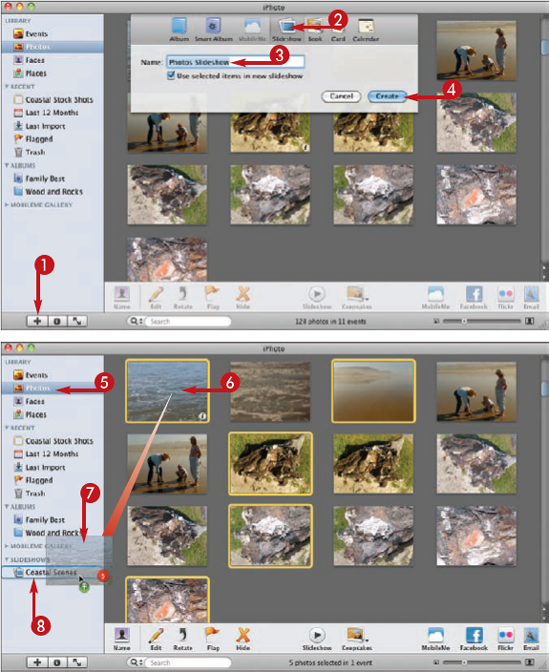
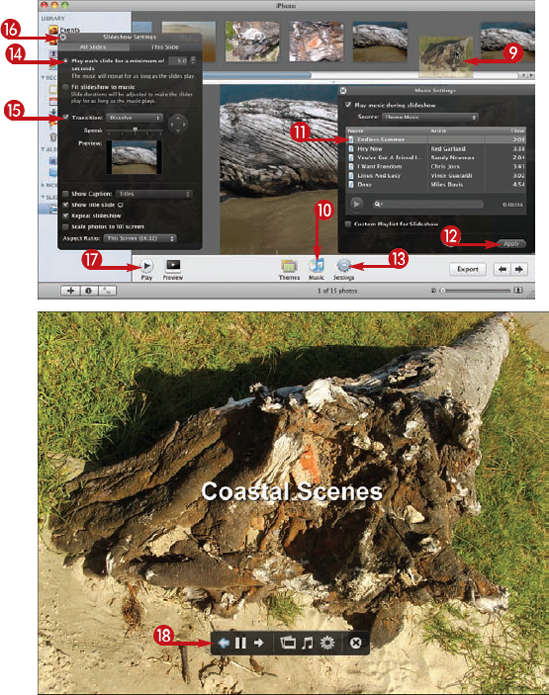
One of the best ways to enjoy your photos and share them with others is to create a slideshow. You can either create a simple, silent slideshow or one that includes effects and transitions and is accompanied by music.

Create a Slideshow of Your Photos
Create a Slideshow
The New dialog opens.
The new slideshow appears in the Slideshows list in the sidebar.
Note
You can also add photos to the slideshow from Events, from Last Import, or from any of the other items in the sidebar.
The list of photos appears.
iPhoto adds the photos to the slideshow.

Note
For a silent slideshow, click Play music during slideshow (


The slideshow starts playing.

Tip
What is the Themes button on the iPhoto toolbar for?
Click Themes (

What does the Slideshow button on the main iPhoto toolbar do?
The Slideshow button on the toolbar enables you to run an instant slideshow without saving a group of slides in the slideshow. In the Photos library, an Event, an album, or other item, select the photos you want to view. Click Slideshow (
If you subscribe to Apple's MobileMe service, you can publish photo albums from iPhoto to your MobileMe Gallery. You can choose who can view each album and decide whether to let others download photo files or upload their own photos.

Publish Photos to a MobileMe Gallery
Note
If you are not currently signed in to MobileMe, a MobileMe dialog opens. Click Sign In.
The Would You Like to Publish Album to Your MobileMe Gallery? dialog opens.

iPhoto adds the album to the MobileMe Gallery in the sidebar and publishes the album to your MobileMe Gallery.

Tip
Why would I hide an album on my Gallery page?
Hiding an album is useful when you want to share it only with some people. You can e-mail the album's Web address to the people who need to see the album. Other people do not see the album on your Gallery page and so cannot access it without guessing the address. Alternatively, you can password-protect the album but not hide it.

Should I choose Optimized or Actual Size for downloadable photos?
Choose Actual Size if you want visitors to download full-quality versions of the photos so that they can edit them. Choose Optimized to provide visitors with high-quality versions of photos for viewing on their computers. Full-size photos take longer for you to upload and for visitors to download than optimized photos.

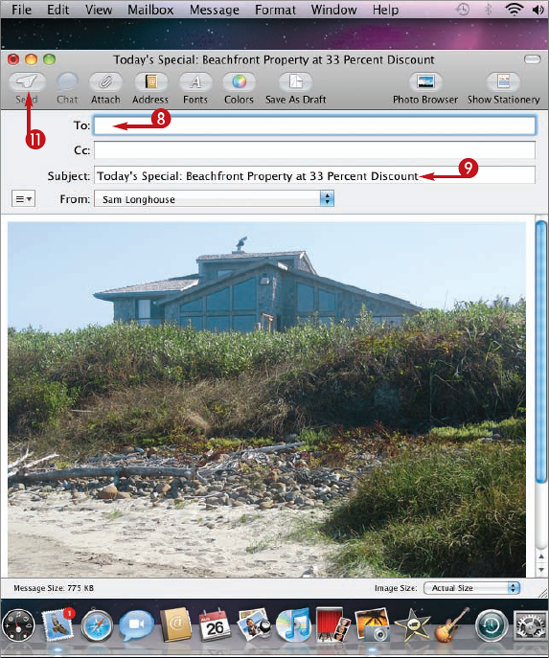
From iPhoto, you can quickly start an e-mail message containing one or more photos. You can then add text to the message in Mail and send it to any of your contacts.
You can either include the full version of the photo or create a smaller version of it that will transfer more quickly.

Send a Photo via E-mail

Tip
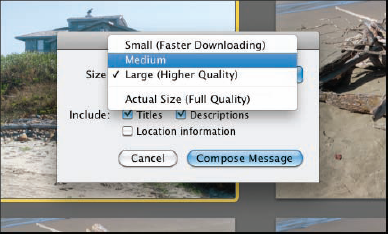
Which size should I use for sending a photo?
In the Mail Photo dialog, choose Small (Faster Downloading) if the recipient needs only to view the photos at a small size in the message. Choose Medium to let the recipient view more detail in the photos in the message. Choose Large (Higher Quality) to send versions of the photos that the recipient can save and use in albums or Web pages. Choose Actual Size (Full Quality) to send the photos unchanged, so that the recipient can enjoy, edit, and use them at full resolution.
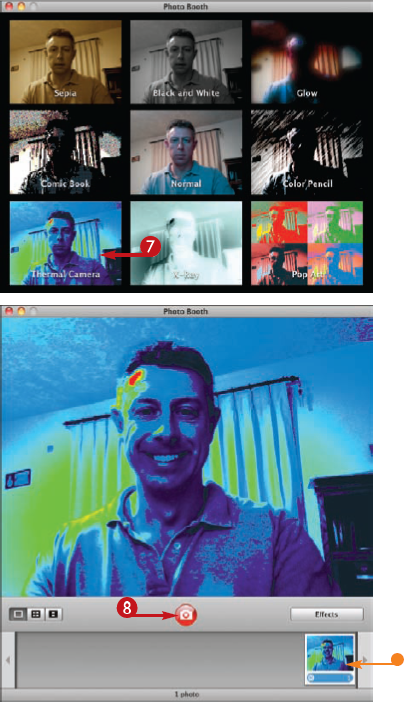
Your iMac includes a built-in iSight camera that is great not only for video chats with iChat but also for taking photos and videos of yourself using the Photo Booth application. You can use Photo Booth's special effects to enliven the photos or videos.
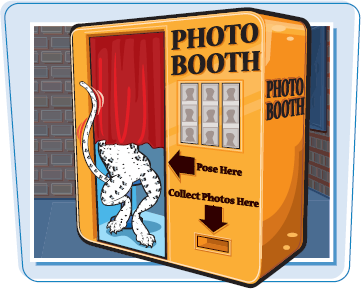
Take Photos or Videos of Yourself
A Finder window opens to your default folder.
The Applications folder opens.
The Finder window closes, and the Photo Booth window opens.

The Photo Booth window shows eight effects applied to the preview.
Note
To see more effects, click

Photo Booth counts down from three and then takes the photo or photos, or starts recording the movie.
If you are taking a movie, click


Tip
How can I use the photos and video I take in Photo Booth?
After taking a photo or video, click it in the photo well. Photo Booth displays buttons for using the photo or video. Click Email (
