
In This Chapter
Action and sports photography
Macro photography
Nature and landscape photography
Night and low-light photography
Portrait photography
In this chapter, you move into using the Rebel T1i/500D in the field for everyday photography. The selected photography specialty areas covered in this chapter provide examples that you can use for your shooting, or that you can use as a springboard for your work.
Each section explores using different features and options of the Rebel T1i/500D to not only enhance your images but also to make your shooting more enjoyable and convenient. For example, the action shooting section provides recommendations for lenses, setting up the autofocus and drive modes for action shots, ways to modify exposure in challenging lighting situations, and which custom functions to enable or disable for the best camera performance. While you may choose to use different features and options, the examples provide a starting point for getting the most from the Rebel in different shooting situations, and they show you how to apply various camera features and options to specific shooting scenarios. By the end of this chapter, I hope that you'll have a good appreciation of the versatility that the T1i/500D provides in shooting different scenes and subjects.
And as you move from photographing one type of scene or subject to another, make it a habit to check the camera settings and reset them for the new scene or subject. In fact, you might want to create a shooting checklist that you carry in your gear bag to remind you to double-check the ISO, white balance, autofocus mode, drive mode, and so on as you move between different shooting situations.
The more you shoot with the Rebel T1i/500D, the more you'll appreciate the creative options you have to make images that match your creative vision.
Anyone who shoots action and sports events knows that a fast camera is essential for capturing the energy of and the peak moments of the action. With a burst rate of approximately 170 JPEG or 9 RAW frames in Continuous drive mode, the T1i/500D is a solid performer for action shooting. The focal length multiplication factor of 1.6x brings the action in close with telephoto lenses. For example, using the Canon EF 70-300m f/4.5-5.6 IS USM lens effectively provides a 112-480mm equivalent focal length.
And with shutter speeds that range from 1/4000 to 30 seconds, depending on shooting mode, the camera offers ample opportunity to freeze action or to pan with the motion of the subject.
Note
Panning is a technique where you move the camera with the motion of the subject. In the final image, the subject is in sharp focus while the background is shown with blurred streaks. Panning requires relatively slow shutter speeds of 1/30 second or slower. You can occasionally use faster shutter speed such as 1/60 second in some situations.
You can choose any of the Rebel's three autofocus modes when you shoot in P, Tv, Av, M, or A-DEP shooting modes. Of the three autofocus modes, AI Servo AF mode is designed specifically for action shooting, and tracks focus on the subject motion. Depending on the scene or subject, you might alternately find that AI Focus AF is a good choice. In this autofocus mode, for example, you can focus on one of many runners at the start line using One-shot AF mode. Then when the runner begins moving, the camera detects motion and automatically switches to AI Servo AF to track focus on the subject until you press the Shutter button.
If you have a passion for sports and action shooting, one way to hone your skills is by shooting local events. As you shoot, try to capture the decisive moment when a runner crosses the finish line, a pole-vaulter reaches the height of a vault, or a race car gets the checkered flag. Other moments are equally compelling, such as when an athlete takes a spill, the look of disappointment when an athlete comes in second, third, or last in a race — in short, moments of high emotion that tell a rich and compelling story of the person and the event.

Figure 10.1. To capture Keith at the edge of the incline, I used Continuous drive mode and shot a series of images as he approached the top. I also used One-shot AF mode and selected the AF point manually. Exposure: ISO 200, f/5.6, 1/1250 second.
Action shooting is a great time to use the techniques of freezing and showing motion as a blur to capture the emotion and give the sense of being in the moment and of the entire event. Also create sequences of images that tell the story of a part or all of an event, or the story of a single athlete during the event.
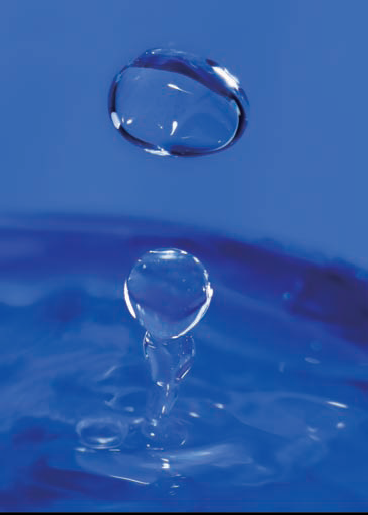
Figure 10.2. You can spend hours stopping the motion of water as it drips into a glass. I used the built-in flash and window light for this image. Exposure: ISO 100, f/5, 1/250 second.
Action photography techniques are by no means limited to sports. Any event that has energy and motion is an opportunity to apply sports and action shooting techniques, whether it's a baby taking his or her first steps or pets playing in the park, a top spinning, or water dripping from a faucet.
Tip
For ongoing inspiration in shooting action photos, I recommend MSNBC's The Week in Sports Pictures at www.msnbc.msn.com/id/3784577.
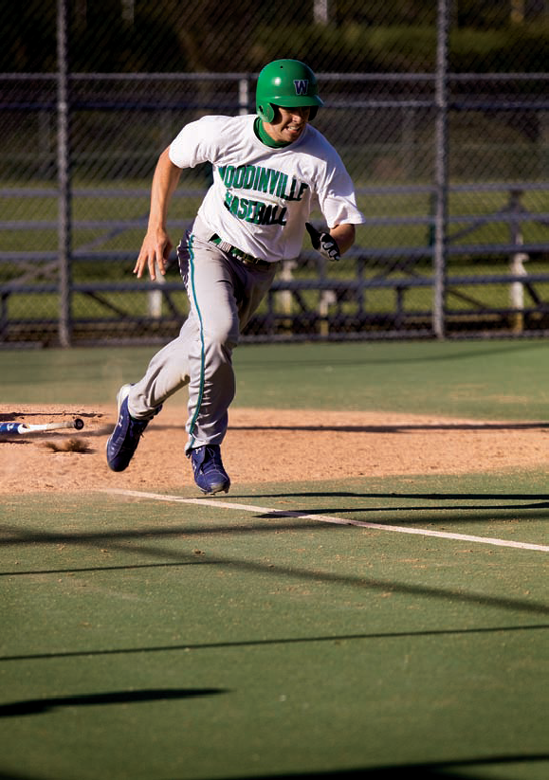
Figure 10.3. In this image, I wanted to capture the motion of the bat hitting the ground as well as the batter heading for first base.
Table 10.1. Action and Sports Photography
In the Field: The image in figure 10.3 is one of a series at a high school baseball park. The T1i/500D's fast autofocus helps to capture this type of action. Additional Considerations: At sports events, find a good shooting position with a colorful, non-distracting background. If you're shooting JPEG capture and the light is bright, setting a negative Exposure Compensation of up to −1 Exposure Value (EV) can help avoid blowing detail from highlight areas in the image. If you shoot in RAW capture mode, Exposure Compensation may not be necessary because you can recover some highlight detail during image conversion. Be sure to check the histogram to see if exposure modification is necessary regardless of whether you're shooting JPEG or RAW images. | |
Lighting | In the Field: Late afternoon light created deep shadows on the field, but provided nice warmth to the colors. I knew that the light hitting the player on the left side was bright, so I used negative Exposure Compensation to prevent highlights from being blown out on the uniform. Additional Considerations: Bright to moderate light is good for freezing subject motion. Moderate light is ideal for showing motion blur, although motion blur can be shown in brightly lit scenes as well. |
Lens | In the Field: Canon EF 70-200mm, f/2.8L IS USM lens zoomed to 153mm, or 245mm equivalent with the focal length conversion factor. Additional Considerations: The lens you choose depends on the subject you're shooting and your shooting distance from the action. A zoom lens is especially useful as subjects move across the playing field or arena because you can zoom the lens as the action advances toward and recedes from you. A telephoto lens also offers the advantage of blurring distracting backgrounds often found at sports events and increases the background blur if you're panning with subject motion. |
Camera Settings | In the Field: RAW capture, Shutter-priority AE (Tv) shooting mode with the white balance set to Daylight, Evaluative metering mode, Continuous drive mode, and Autofocus mode set to One-shot AF. Additional Considerations: In Tv mode, set the shutter speed to 1/250 second for action moving toward you to freeze motion. If action is moving side to side or the subject is jumping, then set 1/500 to 1/1000 second. Also, if you're shooting at a high ISO, and you want to use C.Fn-5, High ISO speed noise reduction, then set it to Low (Option: 1) so that the burst rate for continuous shooting is not significantly reduced as it will be if you use the Strong (Option: 2) setting. |
Exposure | In the Field: ISO 100, f/2.8, 1/4000 second, −1.33 Exposure Compensation, Shutter-priority AE mode (Tv) to ensure a fast shutter speed. The light was bright enough that I could keep the ISO at 100 to maintain the highest image quality. Additional Considerations: For indoor sports events, you'll need to increase ISO — a little or a lot — to get a fast enough shutter speed to freeze subject action. It's also important that the shutter speed is fast enough to prevent camera shake from handholding the camera and lens. A reliable guideline for handholding lenses is 1/[focal length]. So if you're shooting with a 200mm lens, the slowest shutter speed you can use and not get blur from handholding the camera is 1/200 second if you are using a non-image-stabilized (IS) lens. If you're shooting late afternoon events, as the light level decreases, you'll need to increase the ISO setting. Set the ISO only as high as necessary to get a fast enough shutter speed to freeze subject motion. |
Accessories | At slower shutter speeds and when using a telephoto lens or zoom setting, use a tripod or monopod to ensure sharp focus. With Canon L-series lenses, you can consider using a lens extender to extend the range of a telephoto lens. The lens extenders cost you 1 to 2 f-stops of light, so an extender is a good option in brightly lit scenes, but the light loss often proves too costly in the lower light of indoor stadiums.= |
Capture the thrill. Regardless of the technique you choose to shoot action photos, set a goal of showing the emotion, thrill, speed, or excitement of the scene in your pictures. For example, use a low shooting position for a child on a trampoline or a pole-vaulter to create a feeling of increased height.
Choose on a spot and let the action come to you. If lighting varies across the sports field with areas of very low light, find the best-lit spot on the playing field or court, set the exposure for that lighting, and then wait for the action to move into that area. This technique works well in a low-lit indoor stadium as well. You can also prefocus on this spot and wait for the athlete or action to move into the area.
Vary the shutter speed. To obtain a variety of action pictures, vary the shutter speed for different renderings of the action. At slower shutter speeds, part of the subject will show motion blur, such as a player's arm swinging, while the rest of the subject's motion will be stopped.
Practice timing and composition. If you're new to shooting action photos, practice as often as you can to hone your reflexes, and then concentrate on refining image composition. With practice, both timing and composition come together to give you fine action shots.
Many people think about shooting flowers when they think of macro photography. Certainly, few photographers can resist the temptation to photograph flowers and exotic plants. But macro photography includes more than the subjects offered in nature. With any of Canon's macro lenses, you have the opportunity to make stunning close-up images of everything from stamps and water drops to jewelry and the weathered hands of an elder. At its best, macro photography is a journey in discovering subjects that are overlooked or invisible in nonmacro photography. The enticements of macro subject composition include colors, the allure of symmetry and textures, intricate design variations, and descriptive details found in objects and the human form.
To explore these small worlds, a lineup of Canon macro lenses offers one-half to life-size magnifications. Each lens offers a different working distance from the subject, and with extension tubes, you can reduce the focusing distance of any lens to create dynamic close-up images. In addition, Canon's Macro Twin Lite MT-24EX and the Macro Ring Lite MR-14EX provide versatile lighting options for small subjects.
Note
Chapter 8 details Canon's macro lens lineup as well as extension tubes.
Regardless of the subject, focus is critical in macro work. And at 1:1 magnification, the depth of field is very narrow. For my work, I often maximize depth of field by using a narrow aperture of f/8 to f/16. Of course, the narrow aperture results in slow shutter speeds, so it's critical to use a tripod and have a stock-still subject. To ensure sharpness, I use the 2-second Self-timer mode to avoid camera shake from the motion of pressing the Shutter button with my finger. I also use Mirror Lockup, which flips up the reflex mirror and keeps it up so that the slap of the mirror doesn't cause blur. Mirror Lockup can be used in combination with a Self-timer mode.
Note
To learn how to enable Mirror Lockup, see Chapter 6.

Figure 10.4. Given the unique light on this flower bud, I chose to use a shallow depth of field that would give the bud an abstract quality to keep concentration on the light. With other macro subjects, I often choose the opposite approach and use a narrow aperture to maximize the depth of field. Exposure: ISO 200, f/2.8, 1/500 second.
The beauty of macro photography is showing details that most people commonly overlook. Use your macro lens as a microscope to find the most unique and compelling structures in the subject you're shooting. Reveal to the viewers what they haven't seen before. Combine depth of field with subject position for creative effect. For example, a picture of an insect coming straight at the lens at eye-level foreshortens the body and blurs the back of it creating a sense of power that is disproportionate to the creature's size.


Figure 10.6. Food is a subject with universal appeal to viewers, and that appeal together with the abundance of potential subjects, makes it a good subject for macro shooting.
Table 10.2. Macro Photography
In the Field: For figure 10.6, I wanted to show the appeal of the caramel-filled chocolate that is one of my favorite treats, especially when working on a tight book deadline. I cut the chocolate to reveal the caramel filling hoping that it would flow out gracefully. Additional Considerations: Look for light that compliments the subject and sets the mood for the image. Flowers, plants, insects, and other natural subjects in outdoor light usually offer ready-made setup. If you don't have a garden, local nurseries and greenhouses offer plentiful subjects. And always, always watch the background and find a shooting position that avoids distracting background elements and bright highlights. | |
Lighting | In the Field: The scene is backlit with indirect late-afternoon window light. I knew that the white plate would act as a white reflector, throwing light into the shadow areas to soften shadow edges. Additional Considerations: Outdoor light ranging from overcast conditions to bright sunshine is suitable for macro shooting. For outdoor flower shots, try taking a low shooting position, and then shoot upward to use the blue sky as a backdrop. For indoor shooting, window light to one side of the subject offers a beautiful light quality, and it is often bright enough for shooting on a tripod. Be sure to use silver or white reflectors to direct light toward the subject. Macro Speedlites are a good option as well. |
Lens | In the Field: Canon EF 100mm f/2.8 Macro USM lens. Additional Considerations: As detailed in Chapter 8, Canon offers excellent Macro lenses, including the EF 180mm f/3.5L Macro USM and the EF-S 60mm f/2.8 Macro USM lenses, as well as the venerable EF 100mm f/2.8 Macro USM lens. The 180mm offers a longer working distance for subjects you can't or don't want to approach from a close shooting distance. |
Camera Settings | In the Field: RAW capture, Aperture-priority AE (Av) shooting mode, using Custom White Balance, Evaluative metering, One-shot AF mode with manual AF-point selection, and the Self-timer drive mode. Additional Considerations: Before you begin shooting, decide on the depth of field that you want, and then select the aperture, camera-to-subject distance, and the lens to get the effect you envision. If there are bright highlights on the subject, you can ensure that the highlights retain detail, particularly with JPEG capture, by using AE Lock or negative Exposure Compensation, techniques described in Chapter 2. |
Exposure | In the Field: ISO 200, f/29, 1.6 second. For this image, I wanted as much acceptable sharpness as possible throughout the frame; in other words, an extensive depth of field. I also shot at f/11, f/16, and f/20, but the f/29 image delivered more extensive depth of field, and that was how I envisioned this shot. Additional Considerations: Unless you want to use selective focusing, where a very small part of the subject is in sharp focus, set a narrow aperture such as f/11 to f/29, depending on the lens, to maximize the depth of field, which is, by virtue of the close focusing distance, very shallow. Also use a tripod, beanbag, or mini-pod to stabilize the camera and use Self-timer mode to fire the shutter. This is also a good time to use Mirror Lockup (detailed earlier) to ensure tack-sharp focus. |
Accessories | Consider buying inexpensive plant holders to hold plants steady. I've found that fashioning a plant holder from florist wire works well, too. |
Ensure tack-sharp focus. The Rebel offers several self-timer modes that you can combine with Mirror Lockup, described previously, and a solid tripod for tack-sharp focus. Before you begin shooting, ensure that there is no "drift" of the camera as it is mounted on the tripod head, such as when the camera is pointed down or in vertical shooting position. If you detect any drift, tighten the fitting of the camera on the tripod head's quick-release plate or the fitting that attaches the camera to the tripod.
Make the most of lighting. If you want to emphasize depth in textured subjects, use strong sidelight that rakes across the subject. Or if you want controlled, focused light, you can fashion a modifier to reduce the breadth of light from a Speedlite. For example, one photographer fashioned a narrow "snoot" by using black electrical tape on a Speedlite. The snoot concentrates the flash light into a concentrated area for tiny subjects.
Maximize the area of acceptable focus. To get the maximum acceptable sharpness throughout the frame, especially for small objects, shoot on a plane that is level with the subject and use a narrow aperture such as f/11 or narrower. Any tilt of the lens will quickly create blur.
Take advantage of backlighting. Many flower petals and plant leaves are transparent, and with backlighting, the delicate veins are visible. You can use backlighting to create compelling and very graphic images of flowers and plants. Use Exposure Compensation or AE Lock to ensure that the highlights within the subject maintain good image detail.
With breathtaking vistas of forests, mountains, oceans, plants set against the canvas of the ever-changing sky, God's handiwork remains an awesome wealth of photographic material. From dawn to dusk and sometimes beyond, nature provides an endless source of inspiration for stunning images. Seasonal changes to flora and fauna, passing wildlife, rain, sunshine, fog, and snow all contribute to nature's ever-changing canvas. Photographing landscapes and nature requires both creative and technical skill to create images that capture the sense and details of the scene.
Tip
The image histogram is your best tool for evaluating whether the exposure captured detail in both light and dark areas. If the histogram shows pixels crowded against the left, right, or both sides of the histogram, the camera wasn't able to maintain detail in one or both areas. Filters, such as a graduated neutral density (Grad ND) filter, can help balance the exposure for bright sky areas and darker foreground areas allowing the sensor to hold detail in both areas.

Figure 10.7. This heavy, layered fog settled over Duvall, Washington, the town that's seen in the distance. The rusted red tin barn roof contrasts nicely with the overall green and gray color palette of the scene. Exposure: ISO 100, f/6.3, 1/40 second.
The quality of light plays a starring role in nature photography. Sunrise and sunset provide singularly rich color, and the low angles of the sun create long shadows, adding a sense of depth to landscapes. But also take advantage of the full range of atmospheric conditions, such as fog, which adds a sense of mystery; overcast light, which enriches colors; and rain and dew, which dapple foliage with fascinating patterns of water droplets.
Nature and landscape images are frequently good candidates for using exposure modification such as Auto Exposure Bracketing and Exposure Compensation to capture the range of highlights to shadows in the scene. If the range of highlights to shadows is greater than the Rebel can handle, it often sacrifices detail in the highlights. This is known as "blown" highlights where the brightest areas go completely white with no image detail. As you shoot, check the image histograms on the camera, or the blinking Highlight Alert that shows blown highlights during image playback. To see Highlight Alert, press the Display (DISP.) button one or more times during image playback until the image histogram is displayed with the image preview. Blinking areas of overexposure are a good signal for you to set negative Exposure Compensation that helps preserve detail in the key highlight areas of the image. Then take the image again and check the display and/or histogram to see if the compensation was enough.
Note
Be aware that the effects of bracketing and compensation may not be visible in your images because the T1i/500D has Auto Lighting Optimizer turned on by default for images that you capture in JPEG format. Auto Lighting Optimizer detects images that are too dark or that lack contrast and automatically adjusts them. If you prefer not to have the camera make automatic adjustments, turn off Auto Lighting Optimizer using C.Fn-7.
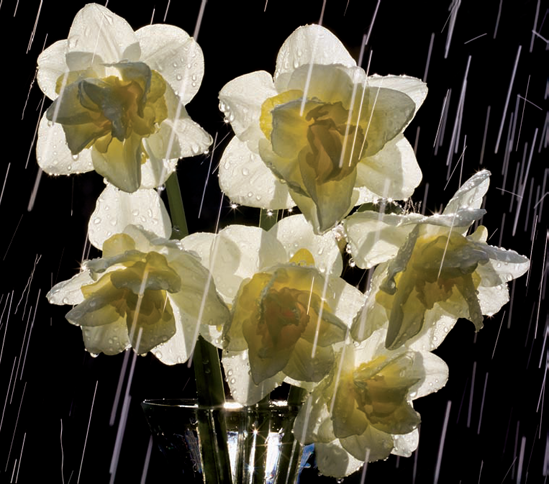
Figure 10.8. This backlit shot was made using flowers cut from the garden and a sprinkler. The trick is setting a shutter speed that renders the water streaks as long, but not too long. I've found that 1/60 second is the best choice. Exposure: ISO 200, f/29, 1/60 second.
Choose a place that gives you a unique visual or emotional sense. For example, if you find a scene that exudes tranquility, try different positions, focal lengths, and foreground elements to help convey the sense of peace. As you take pictures, look both at the overall scene and the components that make it compelling. Isolate subscenes that make independent compositions or can be used as a center of interest for the overall scene.
As you look around, ask yourself questions such as whether including more or less of the sky will enhance the image. Generally, a gray, cloudless sky adds no visual value to the image. Stormy skies, on the other hand, can add drama as well as beautiful color to outdoor images.

Figure 10.9. This scene depicts a small community located in the shadow of the Cascade Mountain range.
Table 10.3. Nature and Landscape Photography
In the Field: In figure 10.9, the peaceful valley lit by early sunset light and the snow-covered mountains characterize this rural area east of Seattle, Washington. Additional Considerations: Trust your eye to find compelling images, and always look for the light. It's challenging to find scenic expanses where utility wires, road signs, and other distractions do not factor into the scene. Sometimes you can scout shooting positions and locations that minimize the distractions. For sweeping scenes, include a foreground object such as a person, a rock, or a fence to provide a sense of scale. Also look for lines and shapes that you can use to direct the viewer's eye through the picture. | |
Lighting | In the Field: Sunset light casts a golden glow on the small town and on the trees. But because it was early sunset, the blue sky still retained a "clean" blue color, which I wanted for this shot. During RAW conversion, I opened up shadows to show more detail in the trees. Additional Considerations: A variety of lighting conditions is inherent in landscape and nature photography. The best light is during and just after or before sunrise and dawn when the low angle of the sun creates long shadows and enhances the colors of flora and fauna. |
Lens | In the Field: Canon EF 70-200mm f/2.8L IS USM lens set to 75mm. Additional Considerations: Both wide-angle and telephoto zoom lenses are good choices for landscape and nature photography. For distant scenes, a wide-angle lens may render some elements, such as distant mountains, too small in the frame. Use a telephoto lens to bring them closer. |
Camera Settings | In the Field: RAW capture, Aperture-priority AE (Av) shooting mode with white balance set to Daylight, and then adjusted during RAW conversion, Evaluative metering, One-shot AF mode with manual AF-point selection. Additional Considerations: Because some landscape images look better with deeper color, you can set Exposure Compensation to −1/2 or −1/3 stop if you're shooting JPEGs; this also helps to retain detail in bright highlights. Just hold down the Aperture/Exposure Compensation button at the top-right side of the LCD, and then turn the Main dial to the left to set the amount of negative compensation you want. Be sure to check the image histogram after capture to ensure proper exposure. Also consider using C.Fn-9, Mirror Lockup, to prevent vibration from the reflex mirror flipping up at the start of the exposure. You may also want to try the Landscape Picture Style. |
Exposure | In the Field: ISO 200, f/7.1, 1/200 second, using IS on the 70-200mm lens. Additional Considerations: Use the lowest ISO possible to avoid digital noise and to ensure the highest overall image quality. In most landscape and nature photos, extensive depth of field is the best choice, so choose a narrow aperture. |
Look for details that underscore the sense of the place. A dilapidated fence or a rusted watering trough in a peaceful shot of a prairie, or the furrows of a field helps convey how the land is used.
Look for unusual and compelling light. For example, when you shoot in a forest or shaded area, look to include streaming shafts of light coming through the trees or illuminating a single plant.
Maximize depth of field. While there are charts and formulas to calculate the hyperfocal distance — the point at which the depth of field extends from half the hyperfocal distance to infinity — a quick substitute is to focus one-third of the way into the scene to maximize the depth of field.
Use Exposure Compensation in scenes with large areas of light color. Large areas of light or white, such as snow scenes or white sandy beaches, can fool the camera meter into underexposing the image. To ensure that the snow or white sand appears white in the final image, set Exposure Compensation on the T1i/500D to +1 or +2. Likewise, to get true blacks, set −1 to −2 stops of Exposure Compensation.
There are few images more dramatic than low-light and night shots. And there are few scenes and subjects more challenging to shoot than night and low-light scenes. This area of photography opens a new world of creative challenge, enjoyment, and the potential for stunning images.
For outdoor images, sunset and twilight are magical photography times for shooting of subjects such as city skylines, harbors, and downtown buildings. During twilight, the artificial lights in the landscape, such as street and office lights, and the light from the sky reach approximately the same intensity. This crossover lighting time offers a unique opportunity to capture detail in a landscape or city skyline, as well as in the sky.

Figure 10.10. Different seasons and different levels of cloud cover offer excellent opportunities for moon shots. I was inspired to take out the tripod to capture the fast-moving colorful clouds as they passed across the moon. Exposure: ISO 1600, f/5.6, 1/5 second using an EF 100- 400mm f/4.5-5.6 IS USM lens. I also turned on C.Fn-5, High ISO speed noise reduction and set it to Option 2: Strong.
For indoor images such as indoor gymnasiums, music concerts, and other events, you have to depend on the T1i/500D's good performance at the higher ISO settings to give you good images. You may also want to consider shooting in RAW capture mode and performing additional noise reduction during image conversion.
Night and low-light scenes often necessitate using a high ISO setting, which increases the potential of getting digital noise. The Rebel T1i/500D offers two excellent Custom Function options to help offset digital noise: C.Fn-4 Long exposure noise reduction and C.Fn-5 High ISO speed noise reduction. Enabling one or both options decreases the maximum burst rate for continuous shooting, but it's great insurance for minimizing or eliminating distracting and annoying digital noise in images.

Figure 10.11. In my neighborhood, many neighbors have individual fireworks displays, so it's possible for me to capture multiple bursts in a single frame. Exposure: ISO 100, f/11, 1/6 second using a Canon EF 100-400mm f/4.5-5.6 IS USM lens.
Try shooting city skyline shots in stormy weather at dusk when enough light remains to capture compelling colors and the fearsome look of the sky. Busy downtown streets as people walk to restaurants, cafés, and diners; gasoline stations; widely spaced lights on a lonely stretch of a highway in the evening; the light of a ship coming into a harbor; and an outdoor fountain or waterfall that is lit by nearby streetlights are all potential subjects for dramatic pictures, as are indoor events such as concerts and recitals.

Figure 10.12. Low-light scenes such as concerts, events, and building interiors offer great photo opportunities, but they are challenging in terms of exposure, timing for capturing the action, and composition.
Table 10.4. Night and Low-Light Photography
In the Field: The primary setup for figure 10.12 was to find the shooting position that allowed me to avoid background distractions around the musician, and hopefully to have the background go to a dramatic black. Additional Considerations: If you are photographing outdoor night and low-light images, ensure that the composition has a clear subject. Be aware that passing cars and nearby lights can influence the camera's meter reading. You may need to wait for cars to pass or use Partial or Spot metering. | |
Lighting | In the Field: While the stage had an abundance of twinkle lights in the background, I tried to minimize the number of lights behind the guitarist. I then waited for him to step into a well-lit area of the stage before I began shooting. Additional Considerations: If you're shooting scenes with floodlit buildings, bridges, or other night scenes, begin shooting just after sunset so the buildings stand out from the surroundings. And whether you're shooting indoors or outdoors, check the histogram on the LCD to ensure that key highlights are not being blown out. Shadows naturally block up quickly in low light, but if you're shooting RAW capture, you can open the shadows some and apply noise reduction if necessary during image conversion. |
Lens | In the Field: Canon EF 85mm f/1.2L USM lens. Additional Considerations: For concerts and other indoor low-light events, there is no substitute for having a fast lens. The Canon EF 50mm f/1.4 USM lens is an excellent fast lens. A wide-angle zoom lens set to 18mm or 24mm allows you to get a broad expanse of night and evening scenes. Telephoto lenses, of course, are great for bringing distant scenes closer. Regardless of the lens you use, mount the camera or lens on a tripod to ensure tack-sharp focus. |
Camera Settings | In the Field: RAW capture, Aperture-priority AE (Av) shooting mode, using Auto (AWB) and adjusted during RAW conversion, Evaluative metering, One-shot AF mode with manual AF-point selection. Additional Considerations: Shutter-priority (Tv) mode gives you control over the shutter speed to control how motion is rendered, if that's important to the scene or subject you're shooting. If you have to handhold the camera, you can use Tv mode and set a shutter speed that's fast enough for handholding the lens that you're using, and then make adjustments to the ISO as necessary. Low-light scenes are also a good time to use the Self-timer mode to trip the shutter and to use Mirror Lockup, which you can enable using C.Fn-10. For outdoor low-light and night shooting, also consider using C.Fn-3, Long exposure noise reduction, and C.Fn-5, High ISO speed noise reduction. You also can enable C.Fn-9, Mirror Lockup, to avoid any vibration caused by the action of the reflex mirror as it flips up at the start of the exposure. |
Exposure | In the Field: ISO 400, f/2.8, 1/180 second. Additional Considerations: Light changes quickly in late-day outdoor scenes. This is a good time to consider using Auto ISO where the Rebel automatically sets the ISO between 100 and 1600 based on the available light. Just past sunset, you can usually rely on the meter to give a good exposure, but you may choose to bracket exposures at 1/3or 1/2-stop intervals. However, if bright lights surround the scene, the meter can be thrown off. Check the histogram often, and use a lens hood to avoid having stray light coming into the lens. If you want lights in the scene to have a star-burst effect, use a narrow aperture such as f/11 or smaller. |
Accessories | Using a tripod or setting the camera on a solid surface is essential in low-light scenes. |
Be safe and use common sense. Night shooting presents its own set of photography challenges, including maintaining your personal safety. Always follow safety precautions when shooting during nighttime. Be sure to wear reflective tape or clothing, carry a flashlight, and carry a charged cell phone with you.
Use a level when using a tripod. A small bubble level designed to fit on the hot-shoe mount helps avoid tilted horizon shots. Some tripod heads also have built-in levels.
Try the Self-timer mode. You can, of course, negate the advantage of using a tripod by pressing the Shutter button with your finger, causing camera shake and a noticeable loss of sharpness. A better solution is to use one of the Self-timer modes with or without Mirror Lockup.
Portraiture is likely the most popular of photographic specialties and provides a continuing challenge and opportunity for photographers. Making portraits is a process of discovering the spirit and spark of people and conveying it in images — certainly a compelling and challenging endeavor. Despite the challenges, portrait photography is ultimately very satisfying and rewarding.
The following sections detail some of the considerations involved in portraiture.

Figure 10.13. For this portrait, I placed this 3-month-old baby in open shade to prevent him from squinting in brighter light. Exposure: ISO 200, f/4, 1/500 second.
For head and head-and-shoulders portraits, lenses ranging from 35mm to 200mm are excellent. A telephoto lens has the advantage of enhancing the background blur of a wide aperture to bring the subject visually forward in the image. For full-length and environmental portraits, a moderate wide-angle lens is a good choice. Having a fast f/2.8 lens or faster is a great advantage particularly if you move among areas where the light varies from moderate to low light.
In all portraits, the subject is the center of attention, and that's why it's important to choose a nondistracting background. Even if you have trouble finding a good background, you can de-emphasize the background by using a wide aperture such as f/4 or f/2.8 and by moving the subject well away from the background. Conversely, some portraits benefit by having more background context. For example, when taking high school senior portraits, backgrounds and props that help show the student's areas of interest are popular. More extensive depth of field by using a narrow f/8 or f/11 aperture is the ticket for showing a star football player in the context of a football field.
Lighting differs for portraits of men and women. For men and boys, strong, directional daylight can be used to emphasize strong masculine facial features. For women and girls, soft, diffuse light from a nearby window or the light on an overcast day is flattering. To control light, you can use a variety of accessories, including reflectors to bounce light into shadow areas and diffusion panels to reduce the intensity of bright sunlight. These accessories are equally handy when using the built-in or an accessory flash for portraits. To determine exposure, take a meter reading from the subject's face, use Auto Exposure Lock, and then recompose, focus, and take the picture.
Tip
The Rebel T1i/500D doesn't have a PC terminal to connect a studio strobe system directly to the camera, but several companies make affordable hot-shoe adapters for this purpose. Ensure that the voltage of the strobe system is safe to use with the T1i/500D — the recommended voltage is usually 6 volts. Consider Safe-Sync adapters that regulate and reduce Flash Sync voltage to 6 volts to protect camera circuitry.
Entire books are written on posing techniques for portraits. But you won't go wrong with one essential guideline — the best pose is the one that makes the subject look comfortable, relaxed, and natural. In practice, this doesn't mean that the subject slouches on a chair; it means letting the subject find a comfortable position, and then tweaking it to ensure that the subject lines and appearance are crisp and attractive. Key lines are the structural lines that form the portrait. You can also use diagonal and triangular lines formed by the legs, arms, and shoulders to create more dynamic portraits. And placing the subject's body at an angle to the camera is more flattering and dynamic than a static pose with the subject's head and shoulders squared off to the camera.
Even if you light and pose the subject perfectly, a portrait will fail if you haven't connected with the subject. Your connection with the subject is mirrored in the subject's eyes. Every minute that you spend building a good relationship with the subject pays big dividends in the final images. Keep in mind that even the most sparking personalities can freeze when the lens is pointed in their direction. To ease their anxiety, you have to be a consummate director, calming the subject, gently guiding him or her into the spirit of the session, and providing encouraging feedback.
Before you begin, talk to the subject about his or her interests. Then see if you can create setups or poses that play off of what you learn. Consider having a prop that the subject can use for inspiration and improvisation. Alternately, play off the subject's characteristics. For example, with a very masculine subject, use angular props or a rocky natural setting that reflects masculinity.

Figure 10.15. For this very casual father-son portrait, the key was to have the mother standing next to me to elicit a smile from the baby.
Table 10.5. Portrait Photography
In the Field: For figure 10.15, the background of dense foliage provided a nondistracting backdrop. I also ensured that the father and son were positioned several feet in front of the foliage, and I shot with a wide aperture and short telephoto zoom setting. Additional Considerations: Uncluttered and simple backgrounds make the subject stand out from the background. If you don't have white paper, use a plain, neutral-color wall, and move the subject 4 to 6 feet or farther from the background. If you're using an accessory Speedlite, moving the subject away from the background also helps reduce or eliminate background shadows. Keep poses simple and straightforward; allow the subject to assume a natural position, and then adjust the pose for the best effect. | |
Lighting | In the Field: I placed the father and son in open shade just at the edge of bright sunlight on the left side of the subjects. Additional Considerations: For outdoor portraits, a silver or white reflector is an indispensable tool to bounce light into the faces of the subjects. You can also use fill flash to brighten faces particularly in outdoor settings. If you use the built-in or an accessory flash, I recommend setting C.Fn-3 to Option 0: Auto so that the existing light factors into the exposure. Window light supplemented by silver or white reflectors is the most beautiful portrait lighting. Use a silver reflector on the opposite side of the window to fill shadows, and another reflector at the subject's waist level to fill shadows under the chin. |
Lens | In the Field: Canon EF 24-105mm f/4L IS USM lens zoomed to 96mm. Additional Considerations: Most photographers prefer a focal length of 85mm, 105mm and up to 200mm for portraits. Canon offers a variety of zoom lenses that offer a short telephoto focal length, such as the EF 24-105mm f/4L IS USM and the EF 70-200mm f/2.8L IS USM lenses. Another lens to consider for excellent contrast in portraits is the venerable Canon EF 50mm f/1.4 USM lens (equivalent to 80mm on the Rebel T1i/500D). |
Camera Settings | In the Field: RAW capture, Av shooting mode, Shade white balance adjusted during RAW conversion, Evaluative metering, One-shot AF drive mode with manual AF-point selection. Additional Considerations: For portraits, you want to control depth of field, and Aperture-priority AE (Av) shooting mode gives you that control. Always manually select the AF point that is over the subject's eye that is closest to the lens and focus on the eye. From my experience, tack-sharp focus isn't maintained if you lock focus and then move the camera to recompose the image. So select the AF point that is over the subject's eye, press the Shutter button halfway, and then don't move the camera to recompose the shot. Portrait Picture Style is an excellent choice. And for the best color, set a custom white balance. |
Exposure | In the Field: ISO 200, f/4, 1/1000 second with −0.67 Exposure Compensation. Additional Considerations: To avoid digital noise in shadow areas, set the lowest ISO possible; I don't recommend using Auto ISO because it can set a very high ISO that can introduce unsightly digital noise. To ensure that features are reasonably sharp throughout the faces of a group of people, set the aperture to f/8 or f/11, and then move the group several feet from the background. |
Accessories | A tripod ensures sharp focus, but it limits your ability to move around the subject quickly to get different angles. If the light permits, shooting off the tripod frees you to try more creative angles and shooting positions. |
Use the Portrait Picture Style. I find that Portrait provides the classic skin tone rendition with subdued contrast that makes lovely prints. You can also change the settings of the Portrait Picture Style if you want a bit more contrast or a different rendition of skin tones. See Chapter 3 for details on modifying Picture Styles.
Prepare a list of setups and poses ahead of time. People often feel uncomfortable posing for the camera. Having a list of poses or setups enables you to move through the session with good speed.
Flatter older subjects. For older adults, ask the subject to lift his or her head and move it forward slightly to reduce the appearance of lines and wrinkles.
Framing the subject. As a general rule, keep the subject's head in the upper one-third of the frame.
Always be ready to take a shot. When a good rapport is established between you and the subject, be ready to shoot spontaneously even if the setup isn't perfect. A natural, spontaneous expression from the subject is much more important than futzing to get a perfect setup.
Shoot and keep shooting. It's possible and probable that something will be amiss with "the perfect" pictures that you think you've captured — even after you examine them on the LCD. So keep shooting.