Looking for a way to allow your Web site visitors to communicate with you? This chapter shows you how to build forms that gather information from users and send it to Web servers for processing. You can build forms that allow users to send feedback about a site or buy products by submitting credit card information. To create a form, you can use a variety of input fields, including text fields, check boxes, drop-down menus, and radio buttons. The sections in this chapter describe how to add these fields and when to use them.

Understanding Forms 122
Types of Form Elements 124
Create a Form 126
Send Form Data to an E-mail Address 127
Add a Text Box 128
Add a Large Text Area 130
Add Check Boxes 132
Add Radio Buttons 134
Add a Menu 136
Add a Submit Button 138
Add a Reset Button 139
You can use forms to collect information from the people who visit your Web site. For example, you might enable visitors to send you feedback, post comments on articles, or purchase goods or services from your business. You collect information by creating an HTML form on your page. When the user submits the form information, the information is sent back to the Web server where it is processed. Forms are an important way to make a site interactive instead of just a collection of static pages with text and images.
Forms and Scripts
In an HTML form, input elements such as text fields, menus, and check boxes collect data from a Web site user. After a user fills in the data, he or she clicks a button to submit the form, and the browser sends the data back to the Web server. The Web server typically handles the data by processing it with a program known as a CGI script. For example, you can write CGI scripts to parse the data and send back a custom Web page in response or store the data in a database. You can examine the database to see what information users have submitted.

Implementing CGI Scripts
You can write your own CGI scripts if you know a programming language such as Perl, PHP, or Java, or you can adapt one of the many free CGI scripts available on the Web. Sites like the CGI Resource Index (http://cgi.resourceindex.com), Matt's Script Archive (www.scriptarchive.com), and HotScripts.com (www.hotscripts.com) are good places to start. Many Web hosts also make CGI scripts accessible to their customers. The place where CGI scripts are stored on a Web server is usually called a CGI-bin directory (the directory may be called something else, depending on the server).

Web page forms have three important parts: a <FORM> tag, form input elements, and a Submit button. When designing and building a form, you write HTML to define the different objects that allow users to type or select information. These objects can include text fields, radio buttons, check boxes, and more. All forms should include a Submit button for sending the data to a Web server for processing. The <FORM> tag usually specifies the script that processes the form information on the Web server.

Types of Forms
You can create different types of forms to enable different types of interaction. For example, you can create a search form that allows users to search your Web site for information by submitting keywords. You can add data-collection forms to gather information from users, such as names, postal addresses, and e-mail addresses. Your form can allow users to comment on and rate the articles posted on your Web site. You can also use forms to help customers add items to an online shopping cart and make a purchase on your site.
Confirmation
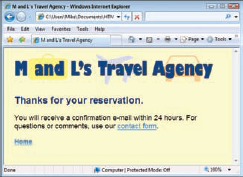
After the form data is processed, a script typically sends a confirmation HTML page back to the browser window noting whether or not the form data was sent successfully. You might also code your script so that it sends a confirmation message by e-mail. It is always good practice when collecting form data to provide visitors with a confirmation or assurance that some sort of action will be taken based on their submission.
Sending Data to Databases
Another use for CGI scripts is to send form data to a database. Database systems are designed to store and manage large amounts of information. CGI scripts can translate form data from the Web server into a format readable by a database. If you plan to use your form data in conjunction with a database, you need to learn more about how databases work with the Web. Popular database systems include Microsoft SQL Server, Oracle, and MySQL.

Sending Data to an E-mail Address
If you do not want to use a CGI script, you can use a command directly in your <FORM> tag that tells a browser to send form data to an e-mail address. When a user submits the form, the browser inserts a list of field names and values in an e-mail message, which the user can then send. This option is useful only if the form is simple; more complex forms require scripts or databases to process and make sense of the information. To learn more about sending form data via e-mail, see the section "Send Form Data to an E-mail Address."

Forms are made up of a variety of input elements. Some elements, such as text boxes, give users a way to add information in a free-form manner. Others, such as radio buttons, constrain what the user can submit. You can mix different types of input elements in a single form. At the end of a form is usually a Submit button that allows the user to send the entered information back to the Web server. A script then processes the information on the Web server.
Text Boxes
Text boxes are input fields designed specifically for users to type data into, such as typing a name or comment. A text box can be a single line to collect a limited amount of characters, such as a phone number or postal code. Text boxes can also be large, multiline fields that allow for submitting paragraphs of input. In single-line text boxes, you can control the maximum number of characters a user can type.
Radio Buttons
Radio buttons are the small, circular buttons found on forms. Like check boxes, radio buttons are used to present several choices to the user. Unlike with check boxes, however, users may select only one radio button in a set, similar to how the buttons on old automobile radios work. For example, if you include a feedback form on your page that rates your Web site, you might include radio buttons for the values Excellent, Good, Average, and Poor. The user can select only one of the four options.
Check Boxes
Check boxes enable a user to select one or more options from a list. For example, if you want to collect information about a user's familiarity with computers, you can place a set of check boxes next to a list of computer applications. When designing a form, you have the option of presenting check boxes as already checked.
Menu
A menu enables you to present a large set of choices in a form. In a drop-down menu, a user clicks a box to open a list of options from which he or she can select only one. For example, users often choose from a drop-down menu when selecting their state or country in an address form.
List
Lists are another way to present a set of choices to the user. Unlike menus, lists take up multiple lines of space on your page. They also can allow users to select more than one option by ctrl-clicking. You move through the list of items using scroll buttons located on the side of the list.
Submit Button
Users need a way to send their data to the Web server. They can do this using a Submit button, which usually appears at the end of the form input elements. Data is collected only after the user clicks this button.
Reset Button
You can add a Reset button to your HTML form that allows the user to reset all the input fields and start over. This button usually appears at the end of the form, next to the Submit button.

You can use a form to gather information from the people who visit your Web site. To create a form, you use the <FORM> tag to point to the CGI script that will process the form, define the form elements, and display a Submit button to send the data to the script.
Most forms use a CGI script to instruct the Web server to process the collected information. Consult your Web host to find out the location of a directory where you can store your script on the server. You can also forgo a CGI script and send the form data to an e-mail address. See the section "Send Form Data to an E-mail Address" to learn more.

The type of method to use can depend on the information you are collecting or the script that processes the form data.
If you are including a file upload element in your form, use the
postmethod.
Note
You may need to contact your Web host to determine the name and path of the CGI script

You can now add input elements to your form between the
<FORM>and</FORM>tags.Note
See the remaining sections in this chapter to learn more about adding input elements

You can instruct the browser to send form data to an e-mail address. When the user clicks the Submit button for the form, a new e-mail message opens in the default e-mail client. Data from the form is inserted into the e-mail message as name/value pairs, for example month=May. You might use this type of form if your Web server does not support CGI scripts. Note that e-mail-based forms may not work for all users because the forms require that the browser is correctly configured to use an e-mail client and that the e-mail client supports this feature.

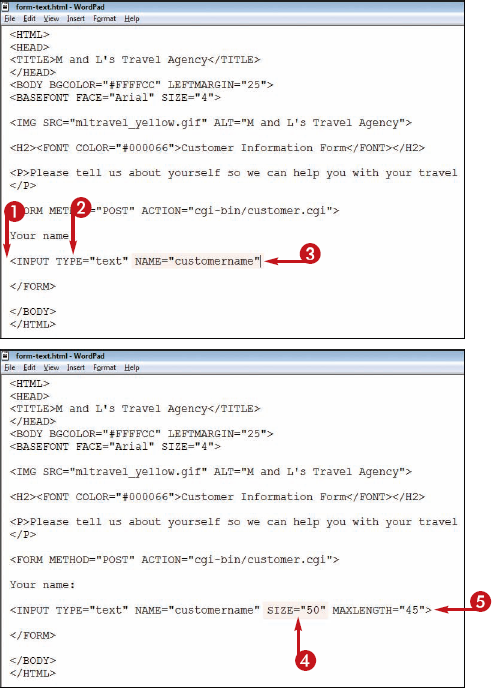
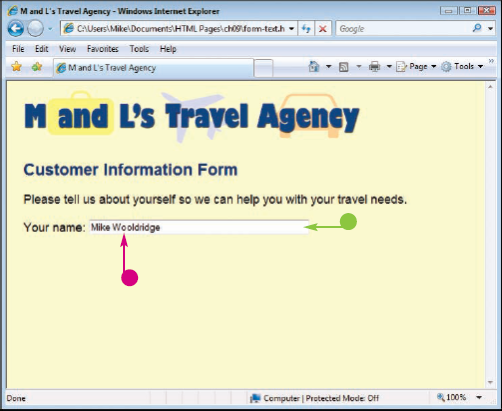
You can add a text box to your form to allow users to type a single-line reply or response. When creating a text box, you must identify the input field with a unique name. You can also control the text box size and the maximum number of characters a user can type in the field.
By default, browsers display the text box field at a width of 20 characters. You can make the text box wider using the SIZE attribute. You can control the number of characters allowed in a text box by specifying a value with the MAXLENGTH attribute.
Note
Can I add a default value to a text box?
Yes. A default value is text that appears in the text box when the user views the form. You can use default values to display instructions about the type of data required, give users an example of the data you are looking for, or show a popular choice or response. To specify a default, you can add the VALUE attribute to the <INPUT> tag. For example:
<FORM METHOD="post" ACTION="/
cgi-bin/feedback.pl">

<INPUT TYPE="text" NAME=
"e-mail" VALUE="Enter your
e-mail address">

</FORM>
How do I create a password text box?
Password text boxes are similar to regular text boxes with one difference. Instead of displaying the characters that are typed, the input field displays the data as asterisks (*) or bullets (•). This prevents others from seeing the password text. To create a text box for password entry, you specify the password type in the <INPUT> tag. Your code might look like this:
<FORM METHOD="post" ACTION="/
cgi-bin/feedback.pl">

<INPUT TYPE="password"
NAME="secret" SIZE="45">

</FORM>
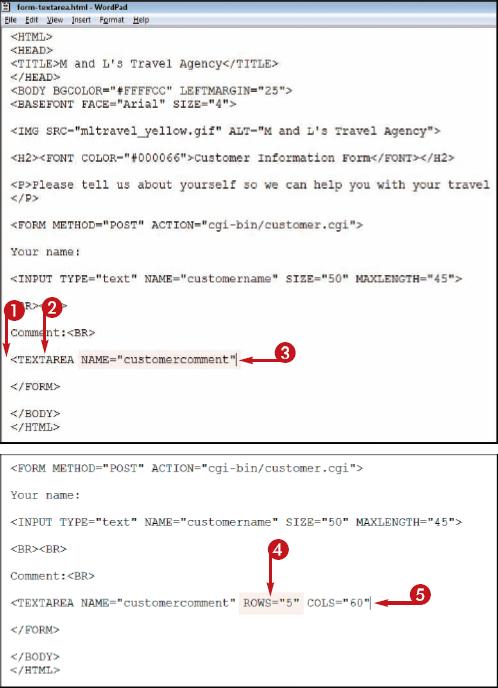
If your form requires a large text-entry box, you can create a large text area that holds multiple lines of text. For example, if you create a feedback form, you can use a large text area to allow users to type paragraphs of text.
When defining a text area, you can control the size of the text box and how text wraps within the field. Text area size is measured in rows and columns, with the measurement based on the number of characters that can be displayed.
Note
You can use the
<BR>or<P>tag to separate input elements onto different lines in your form.


softwraps text within the text area but does not wrap text in the form results.hardwraps text within both the text area and the form results.offturns off text wrapping, forcing users to create new lines of text as they type.


Note
What happens if the user types more than can be viewed in the text area?
If the user types more text than is visible in the text area, scroll bars become active at the side of the text box. Scroll bars allow the user to scroll and view the text. The text area automatically holds as much text as the user needs to type, up to 32,700 characters.
Is there a way to keep users from typing text into a large text area?
Yes. You can use the READONLY attribute if you want to display default text in a text area and do not want users to move or edit the text. For example, you might use a large text area to explain something about your form or offer detailed instructions. You can place the READONLY attribute within the <TEXTAREA> tag.
You can add check boxes to your form to allow users to select from one or more options. You might use check boxes to find out what types of services a user is interested in. When a user selects a check box and submits the form, the browser sends information associated with the check box to the Web server as a name/value pair, for example flight=yes. Check box values are often set to "yes" or "true" to denote that boxes were selected, but they can have other values as well.
Note
You can optionally use
<BR>or<P>tags to separate input elements onto different lines in your form.

Note
How do I automatically show the check box as selected?
You can use the CHECKED attribute to show a check box as selected by default when the user views that page. You add the CHECKED attribute to the <INPUT> tag:
<FORM METHOD="post" ACTION="/
cgi-bin/questionnaire.pl">

<INPUT TYPE="checkbox"
NAME="newsletter" VALUE="yes"
CHECKED>

</FORM>
How do I get the check boxes onto separate lines?
You can use the <P> or <BR> tag. Your code might look like this:
<FORM METHOD="post" ACTION="/
cgi-bin/questionnaire.pl">

<P>What type of movie do you
like the best?</P>

<INPUT TYPE="checkbox"
NAME="drama" VALUE="true">

<BR><INPUT TYPE="checkbox"
NAME="comedy" VALUE="true">

<BR><INPUT TYPE="checkbox"
NAME="action" VALUE="true">

</FORM>
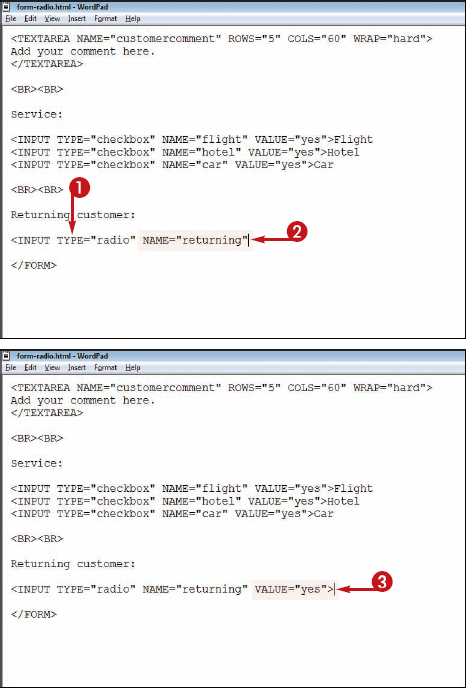
You can use radio buttons if you want to allow users to choose only one item from a group. The user clicks a button to activate the selection. You might use radio buttons to enable users to answer yes-or-no questions in a form. When a user selects a radio button and submits the form, the browser sends information associated with the selected radio button to the Web server as a name/value pair, for example returning=yes.
Note
The radio button value does not appear on the form.
Note
You can optionally use
<BR>or<P>tags to separate input elements onto different lines in your form.

Note
What happens if I give radio buttons in a set different names?
When radio buttons have different NAME attributes, the browser treats them as parts of different radio button sets. This means the user is able to turn more than one of them on at a time by clicking. Make sure all the radio buttons in a set have the same NAME attribute to avoid this.
Can I show a particular radio button as selected by default?
Yes. You can use the CHECKED attribute to show one radio button in the group as selected by default. The CHECKED attribute is inserted after the VALUE attribute in your HTML code. Your code might look like this:
<FORM METHOD="post" ACTION="/
cgi-bin/questionnaire.pl">

<INPUT TYPE="radio"
NAME="agerange" VALUE="40-50"
CHECKED>

</FORM>
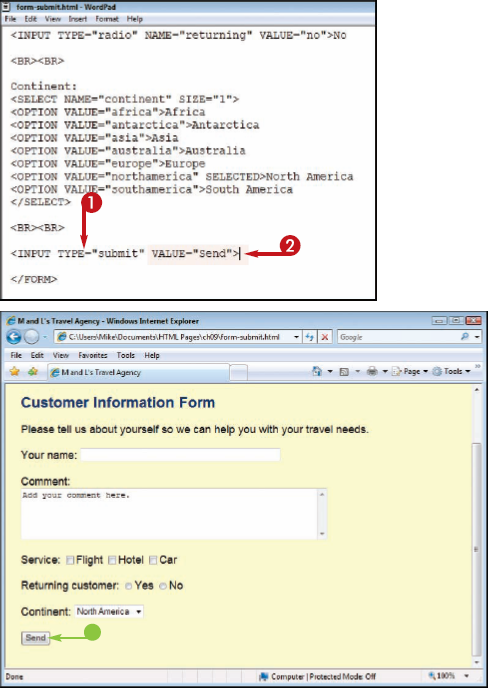
You can add a menu to a form to give users a list of choices. Menus allow you to display choices as a drop-down list that appears when the user clicks the list. By storing a long list of choices as a drop-down list, you can free up space for other input items in the form. When a user selects a menu item and submits the form, the browser sends information associated with the menu and the selected item to the Web server as a name/value pair, for example continent=africa.
If you want to display a drop-down menu, set the height to 1.

The Web browser displays the menu on the form.

Note
How do I display a menu of items on my form as a scrollable list?
Type the number of menu entries to display at a time as the SIZE attribute value. This makes the menu appear as a rectangular box that displays the items as a list. If the number of menu items is more than the display size, users can scroll to view the entire list. If the menu size is 1, a drop-down menu is displayed.
How can I create a submenu?
Use the <OPTGROUP> tag and the LABEL attribute (note that not all browsers support the <OPTGROUP> tag):
<P>What is your favorite flower?</P>
<SELECT NAME="favoriteflower">
<OPTGROUP LABEL="Perennial">
<OPTION VALUE="Daisy">Daisy
<OPTION VALUE="Rose">Rose
</OPTGROUP>
<OPTGROUP LABEL="Annual">
<OPTION VALUE="Petunia">Petunia
<OPTION VALUE="Pansy">Pansy
</OPTGROUP>
</SELECT>
You can add a Submit button to your form so users can send you the data they enter into the form. It is common practice to add the Submit button to the bottom of the form, below the text boxes, check boxes, radio buttons, and other elements. You can choose any label you want for the button. It is a good idea to choose a label that conveys to users that they need to click the button to submit their data. If you do not include a label, most browsers display "Submit Query" on the button.
You can add a Reset button to your form to allow users to clear the data they have entered. For example, the user may want to type different information, or change his or her mind about submitting the information. A Reset button lets users erase all the information they typed into the various input fields. It is standard practice to put the Reset button at the bottom of the form, next to the Submit button.
